Author Topic: tile thread/ making and glazing tile photos  (Read 7547 times)

0 Members and 1 Guest are viewing this topic.

Offline faux fiddy

  • Just becaus I'm the second post on the pissed off thread doesn't mean I'm an
  • Old Timer
  • ******
  • Posts: 4,810
  • bike in a box
tile thread/ making and glazing tile photos
« on: January 13, 2012, 02:51:23 AM »
Hey, did I ever post tile project pics?

Anyway there's this girl that saw the product and started sayin' "Hey, look what you've done, lemme finish this bathroom."


I think I might have out done myself on the tile and thought it might be a bit busy as far as patterns, but she wanted to bring leftover paint over and paint the walls.


WhaDDYA SAY?

Anyway I didn't have her checked out on the hammer, and she drops it. Small spot on a tile like a cracked window, no big deal, but then it bounced and hit the terlet. (brand new installed) and cracks the base loose.

Oh yeah, she went and bought the replacement terlet herself, picked it out at Home dePOT, delivered it next day?

No leaks after the second try at installing the first terlet, but the second base/throne just didn't want to quit leaking, and it was the spud gasket. Googled it up and found a hint: push down on the whole  tank while snugging the bolts instead of trying to pull it in with the bolts.

Indebted to that poster on that website, after a whole afternoon  and alternating tanks and drying them out [eight times] it was the magic bullet of no leaks.

Just thought y'all'd   find that handy sometime with a drippy terlet and a complaining miss's.

« Last Edit: February 09, 2012, 01:18:46 AM by fiddy of industry »
^^^^^^^/l^^^^^^^^^^^^^^/l^^^
. . ______/ l_________________/  l
<'  '  '   '  o .  . . . . . . .................(
 ' VVVVV'   ')))))____>-''''''''''''''''''\  l
' . vvvv_   -              -                 \/

Offline Xnavylfr

  • Expert
  • ****
  • Posts: 1,102
  • Beers, Babes and bikes since 1965
Re: turlet tank mounting and whatnot /tile thread?
« Reply #1 on: January 13, 2012, 07:21:16 AM »
Another trick for ya!!
Have someone sit on the toilet and wiggle back an forth while you tighten the base bolts.. Porcelain breaks real easy.. ask me how I know!!!


Xnavylfr(CHUCK)

Offline BeSeeingYou

  • Old Timer
  • ******
  • Posts: 3,913
Re: turlet tank mounting and whatnot /tile thread?
« Reply #2 on: January 13, 2012, 07:54:26 PM »
I always do a dry fit so I can position any plastic wedges to keep it from rocking if the floor is not flat or to get it level.  Then I will put it down with the wax ring and sit on it and just lightly rock back and forth a bit to seat it down.  Get off and snug up the bolts.   Done dozens and never had a leaker.

Offline 754

  • Really Old Timer ...
  • *******
  • Posts: 29,050
Re: turlet tank mounting and whatnot /tile thread?
« Reply #3 on: January 13, 2012, 08:19:49 PM »
 I wish that F^&*&^er that put the one in my shop, knew 1/2 of that... made him redo a lot of the pipes going up to the ceiling.. looked like crap....
Maker of the WELDLESS 750 Frame Kit
dodogas99@gmail.com
Kelowna B.C.       Canada

My next bike will be a ..ANFOB.....

It's All part of the ADVENTURE...

73 836cc.. Green, had it for 3 decades!!
Lost quite a few CB 750's along the way

Offline BeSeeingYou

  • Old Timer
  • ******
  • Posts: 3,913
Re: turlet tank mounting and whatnot /tile thread?
« Reply #4 on: January 13, 2012, 09:41:48 PM »
Another tip.  Toilet flanges have slots to hold the bolts but they often do not hold them from spinning so get an extra pair of stainless nuts/washers and use them to attach the bolts to the flange and use the other set of nuts/washers to hold down the toilet.  It always pisses me off they only give you two nuts with the hold down bolts. 

Just finished putting in the DWV (drain waste vent) for a basement bathroom.  Cemented over it a few days ago and now am redoing the water supply lines for the whole house.  Using PEX for the first time.  About two days after I tied into the main sewer line it all backs up and comes up the floor drain.  Telling the owner it's nothing I did to cause it I call Roter Rooter out.  Their guy spends 2 hours auguring out massive root systems out of the line.  Even sent a camera down the line.  It was like a giant colonoscopy. ;D
« Last Edit: January 13, 2012, 10:01:01 PM by srust58 »

Offline faux fiddy

  • Just becaus I'm the second post on the pissed off thread doesn't mean I'm an
  • Old Timer
  • ******
  • Posts: 4,810
  • bike in a box
Re: turlet tank mounting and whatnot /tile thread?
« Reply #5 on: January 14, 2012, 08:09:58 PM »
Another tip.  Toilet flanges have slots to hold the bolts but they often do not hold them from spinning so get an extra pair of stainless nuts/washers and use them to attach the bolts to the flange and use the other set of nuts/washers to hold down the toilet.  It always pisses me off they only give you two nuts with the hold down bolts. 

It was like a giant colonoscopy. ;D


One of the toilets didn't have slots, or a flange for that matter, and with the other problems it was like a giant colonoscopy.

And the flange that suffered a chronic exposure existence failure  was a 5" ID pipe that went around the outside of the 4" pipe, which was six inches down in the concrete.   I called around and no one had ever heard of that. I might have a few pictures on the other computer, and a bit more to add to...

The pipe was only available in 20' sticks from the local plumbing yard, so I shopped around and still don't have an invoice for that, the hour of forklift and a welder running a saw.  Yikes! :o
« Last Edit: January 18, 2012, 01:49:38 AM by fiddy of industry »
^^^^^^^/l^^^^^^^^^^^^^^/l^^^
. . ______/ l_________________/  l
<'  '  '   '  o .  . . . . . . .................(
 ' VVVVV'   ')))))____>-''''''''''''''''''\  l
' . vvvv_   -              -                 \/

Offline faux fiddy

  • Just becaus I'm the second post on the pissed off thread doesn't mean I'm an
  • Old Timer
  • ******
  • Posts: 4,810
  • bike in a box
Re: turlet tank mounting and whatnot /tile thread?
« Reply #6 on: January 15, 2012, 12:06:58 AM »
Now that tile  done, I found this and two pairs of knee pads that I bought years ago, wish I'd have found them sooner.

Finding the best  place to hang it.  It's  a fancy piece of plywood.  Maybe try to get an autograph  or two on it.

Wow, a girl that takes you dumpster diving in a camaro...what's the catch?

« Last Edit: January 15, 2012, 12:11:18 AM by fiddy of industry »
^^^^^^^/l^^^^^^^^^^^^^^/l^^^
. . ______/ l_________________/  l
<'  '  '   '  o .  . . . . . . .................(
 ' VVVVV'   ')))))____>-''''''''''''''''''\  l
' . vvvv_   -              -                 \/

Offline Raul CB750K1

  • Old Timer
  • ******
  • Posts: 3,881
Re: whatnot /tile thread?
« Reply #7 on: January 15, 2012, 09:24:55 PM »
Didn't know Toby Keith had a restaurant. Still listen to the "unleashed" CD I got me when I was in Nashville almost 10 years ago....

Offline faux fiddy

  • Just becaus I'm the second post on the pissed off thread doesn't mean I'm an
  • Old Timer
  • ******
  • Posts: 4,810
  • bike in a box
Re: whatnot /tile thread?
« Reply #8 on: January 16, 2012, 02:46:26 PM »
Didn't know Toby Keith had a restaurant. Still listen to the "unleashed" CD I got me when I was in Nashville almost 10 years ago....

I have no idea how that sign got in a construction dumpster, but  it must be part of a chain of different restraunts with the same corporate head. I found it going after a few perfect sized green sheetrock scraps.  If worst comes to worst it's always a sheet of grade A plywood.

Here's the tile project pics I finally got posted. Got the whole post wiped out twice in the process of posting, so this one went into an e-mail first.

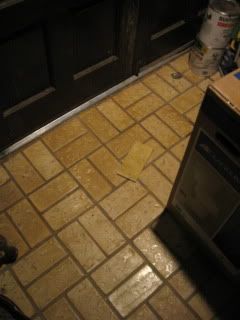
The house had ceramic tile in the foyer that was a yellowish gold unobtanium that was half inch thick. It could have created a real eyesore to just start laying something completely different , and there was no door to shut between the two areas, so it was either tear the old tile out (not!) or find or make a close match. I started with something similar in a 13x13 that I found and  when it seemed not quite right I looked into re-glazing and firing a new batch. I did several sample chips and then came up with a formula for a whole kiln full of pieces cut to the brick size. I floated the floor to compensate the difference in tile thickness.

Here is the foyer pattern with an immitation unobtanium tile I came up with.


I bought glaze a a couple places including www.thehouseofclay.com     which is where I took all the samples and glazed tiles to be fired. (photos of this process are on my sick laptop)


I used the tiles to form a perimeter around the new pattern in the first hallway,
this is looking back towards the foyer in the first hallway.


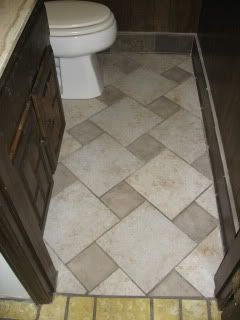
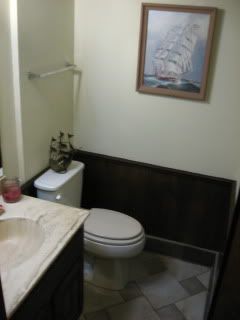
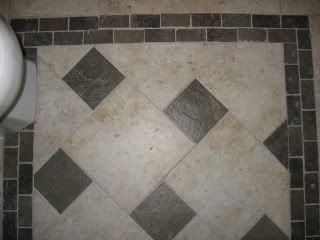
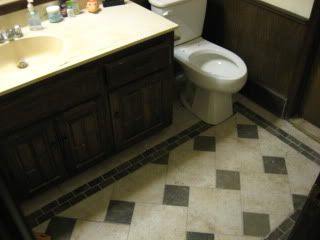
I found a few greyish tiles to throw into the front bathroom pattern.


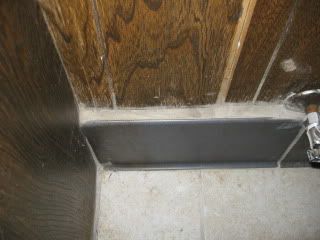
The builders/ blueprinters had goofed up and mixed plumbing walls with 2x4 studs which made for some kooky trim work.


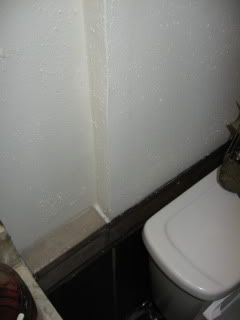
This was in a corner that had received 35 years of splash from the sink and missed shots and dribbles and sprinkles from the toilet so I cut out the rot and filled it out flush to the plumbing wall with durarock, and reinstalled the paneling without the funny little trim pieces.  I plan on cutting a small piece of granite for this space, the tile is for temporary placeholder.

Demo'd trim piece


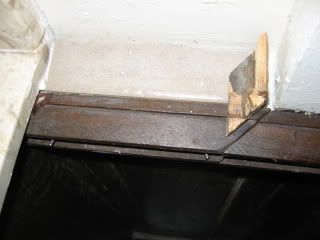
The goal being no zig-zag  mark of zorro cuts on the ceramic baseboards, I furred it all out. I used a rock backer product  behind these baseboard tiles which made for thick grout lines. I cleaned up and bleached the piece of paneling and reused all but the bottom 6".


After swapping around the found items, the front  half bath head took on a seafarin' theme.


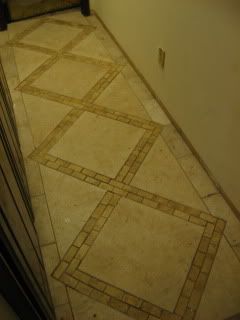
The second hallway had a different pattern, scraps  of the unglazed tile  leftovers   from cutting the reproduction unobtanium tiles made the mini  brick patterns, and matched close enough to the re-glazed stuff that it looked okay together.  Lots of cuts and messing around with placing the things individually and finding ways to tape them together into fours, not quite as easy as the store bought pre-made stuff like it.


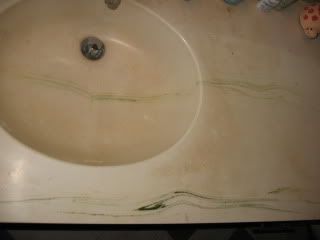
The back bathroom had a green streak or two in the countertops, which I wa$n't going to replace. I found some green to throw onto the mix at home dePOT.


Had a discussion about how to size the pattern as it applies to the pythagorean theorum with a friend who loaned me his tile saw.  He said he liked to just keep things simple, but I figure with a little extra saw work you get something significantly better looking.
« Last Edit: January 16, 2012, 03:09:21 PM by fiddy of industry »
^^^^^^^/l^^^^^^^^^^^^^^/l^^^
. . ______/ l_________________/  l
<'  '  '   '  o .  . . . . . . .................(
 ' VVVVV'   ')))))____>-''''''''''''''''''\  l
' . vvvv_   -              -                 \/

Offline Raul CB750K1

  • Old Timer
  • ******
  • Posts: 3,881
Re: tile thread w/pics added
« Reply #9 on: January 16, 2012, 10:17:15 PM »
From a distance it seems such a great work! I consider myself skilled at things mechanical, and have an ability to learn new things quickly, but in spite of having seen constructing, bricklaying, tiling, tens of times, I'm a total incompetent at anything regarding with masonry. Everytime I try I'm unable to do anything not even close to good looking, and if I do, it takes me ages! It took me three full days to lay the wallpaper in my kid's bedroom, and I wasn't satisfied with the result...

For those reasons I enjoy a good work being done, and as I said, at least from a distance yours seems to be a good work!

Offline faux fiddy

  • Just becaus I'm the second post on the pissed off thread doesn't mean I'm an
  • Old Timer
  • ******
  • Posts: 4,810
  • bike in a box
Re: tile thread w/pics added
« Reply #10 on: January 17, 2012, 02:07:28 AM »
From a distance it seems such a great work! I consider myself skilled at things mechanical, and have an ability to learn new things quickly, but in spite of having seen constructing, bricklaying, tiling, tens of times, I'm a total incompetent at anything regarding with masonry. Everytime I try I'm unable to do anything not even close to good looking, and if I do, it takes me ages! It took me three full days to lay the wallpaper in my kid's bedroom, and I wasn't satisfied with the result...

For those reasons I enjoy a good work being done, and as I said, at least from a distance yours seems to be a good work!

Thanks, Raul, and I figure I'm an official jackass of all trades. I did wallpaper on several new houses as an apprentice. Cut it at the corners,  as they always shrink and pull away, then caulk the cut in the  corner. You see that mistake everywhere by 'professionals.'

One time I was sheetrocking a wall in a big project on a building in Juneau, we were cutting down 2x12's to use in another wall and I made sure to save the 1/8" wafer thin scraps, and before the sheetrock went on I made 4 point string lines on the old wall. I used those trash scraps as furring before the rock went on. The building maint. guy was impressed with my "tricks of the trade." I explained I was just on the fly trying to make a smooth wall, no warps of the 100 YO building on this wall. I would use less mud to match the stuff to what was existing on the place .  As they say on new construction, , leave it to the taper, but in this case  that would be me, too. I  Saved a lot of mud by not throwing those wafer thin scraps in the trash.
« Last Edit: January 18, 2012, 01:48:02 AM by fiddy of industry »
^^^^^^^/l^^^^^^^^^^^^^^/l^^^
. . ______/ l_________________/  l
<'  '  '   '  o .  . . . . . . .................(
 ' VVVVV'   ')))))____>-''''''''''''''''''\  l
' . vvvv_   -              -                 \/

Offline faux fiddy

  • Just becaus I'm the second post on the pissed off thread doesn't mean I'm an
  • Old Timer
  • ******
  • Posts: 4,810
  • bike in a box
Re: tile thread w/pics added
« Reply #11 on: January 18, 2012, 01:06:23 AM »
Okay, the sick computer may still be sick, and slow. But here are the photos of dealing with pipes.

The 5" id rotted  flange was brought to the surface by setting  a piece of pipe, caulking it with a bit of roof tar, and bringing it up to surface with a piece of pipe cut off the 20' stick from the oil field aplications. No compression flanges in that size, and so, extend the pipe up to floor level and cement it it in. Or weld it which is prohibhibitively expensive and idiotic, ain't gonna happen. The expert welder said grout it in.

See if I can find the pics,,,,
Crappy Pics, but the piece of pipe fit in fine, welder of oil field pressure vessels said do it (grout the pipe segment  in ), the turlet works fine, turds go away in a fine swirl and looks good installed. Invoice goes to the vultures?
  Edit: the flanges I used were plastic. I caulked it with polyplastic, poured in some gorila glue and pre-drilled and screwed it down int the concrete.  I figure if I am lucky enough to live another 35 years I will be lucky and have already bought an extra plastic flange ($5 usd 2011) to break it out and do the same repair.

« Last Edit: January 18, 2012, 01:52:12 PM by fiddy of industry »
^^^^^^^/l^^^^^^^^^^^^^^/l^^^
. . ______/ l_________________/  l
<'  '  '   '  o .  . . . . . . .................(
 ' VVVVV'   ')))))____>-''''''''''''''''''\  l
' . vvvv_   -              -                 \/

Offline Duke McDukiedook

  • Space Force 6 Star General
  • Really Old Timer ...
  • *******
  • Posts: 12,688
  • Wish? Did somebody say wish?
Re: tile thread w/crappy closet flange pics added
« Reply #12 on: January 18, 2012, 07:28:01 AM »
I may be looking at this thread for crapper install info, the Missus is bugging me about cost estimates for the bathroom I plan on putting in the basement.
"Well, Mr. Carpetbagger. We got somethin' in this territory called the Missouri boat ride."   Josey Wales

"It's Baltimore, gentlemen. The gods will not save you." Ervin Burrell

CB750 K3 crat | (2) 1986 VFR750F

Offline fmctm1sw

  • Old Timer
  • ******
  • Posts: 3,042
Re: tile thread w/crappy closet flange pics added
« Reply #13 on: January 18, 2012, 10:31:19 AM »
A year or so ago, I finally popped off the toilet in the kids' bathroom and found a pencil wedged way down in it.  They weren't kidding about "stuff a rag into the pipe." 
Quote from: 754
Dude is that a tire ? or an O-ring..??

Quote from: inkscars
This is not a pod thread
This is not a #$%* on my vacuum gauges thread
This is a help or GTFO thread.

1973 CB350F
1973 CB350G
1975 CB550K
1983 GL650I
1973 CB750K3 (http://forums.sohc4.net/index.php?topic=92888.0)
1984 Kawasaki KLT-250 (AKA 3 wheeler of death)
1994 Honda TRX300
1999 Honda TRX250

Offline bikerbart

  • Master
  • *****
  • Posts: 1,578
Re: tile thread w/crappy closet flange pics added
« Reply #14 on: January 18, 2012, 01:29:38 PM »
I started with cutting away all the old plumbing and starting fresh when I built my master bath,subway tile,small hex tile,even tiled around the sink,Not too shabby for a first timer,I also just finished my dining room/kitchen,and the fireplace.Sorry I dont have any suggestions.This is my first House I ever owned and I love it.20's bungalow with a mid century modern addition in the 50's.
its better to regret something you have done,than something you havent.Except playing with explosives.

Offline faux fiddy

  • Just becaus I'm the second post on the pissed off thread doesn't mean I'm an
  • Old Timer
  • ******
  • Posts: 4,810
  • bike in a box
Re: tile thread w/crappy closet flange pics added
« Reply #15 on: January 18, 2012, 02:08:44 PM »
They make toilet flanges that expand in the lower part. You may be able to get one to fit inside that pipe. Anchor it to the floor and you are set.  Johnni bolts brand have a trapped washer and small grippers that keep the bolt from turning when you tighten the nut up. Just a bit more cost, worth it.

No  luck  in finding a compression flange that big around  or that goes that deep in the pipe. I had a choice of 4" or 3" diameter  from the major nationwide suppliers.  No one had heard of 5" ID which is what the flange had. It was sweated  around the 4" pipe which was almost six inches below the surface of the concrete.

I figured all three toilets would have a similar configuration so I had three pieces of pipe cut to bring 4" pipe up to floor level.   I can't seem to find those two extra now, but the flanges on the other toilets were serviceable, and done with 4" pipe all the way to the surface.

For a flange, I used plastic because it was inexpensive. I caulked it and glued it into the pipe and screwed and glued it to the floor. It's not going anywhere and it's not going to leak.


I may be looking at this thread for crapper install info, the Missus is bugging me about cost estimates for the bathroom I plan on putting in the basement.


It might be interesting to install if there's no existing  plumbing at all in a basement. The ADA crappers cost just over $100 at home depot.  4" ID pipe is usually only available in 20' sticks. Not sure about PVC, but it is easy to work with as far a gluing things together, prolly alot less expensive than iron.

A year or so ago, I finally popped off the toilet in the kids' bathroom and found a pencil wedged way down in it.  They weren't kidding about "stuff a rag into the pipe." 

There's some serious stank!


« Last Edit: January 18, 2012, 03:40:00 PM by fiddy of industry »
^^^^^^^/l^^^^^^^^^^^^^^/l^^^
. . ______/ l_________________/  l
<'  '  '   '  o .  . . . . . . .................(
 ' VVVVV'   ')))))____>-''''''''''''''''''\  l
' . vvvv_   -              -                 \/

Offline Don R

  • My Sandcast is a
  • Really Old Timer ...
  • *******
  • Posts: 20,563
  • Saver of unloved motorcycles.
Re: tile thread w/crappy closet flange pics added
« Reply #16 on: January 20, 2012, 10:20:33 AM »
It appears some fool left a cast iron hub directly where there should be a piece of pipe for the flange to caulk (lead and oakum joint) to. In this case you do what you have to. Seal it up good to keep the sewer cooties out.
No matter how many times you paint over a shadow, it's still there.
 CEO at the no kill motorcycle shop.
 You don't need a weatherman to know which way the wind blows.

Offline faux fiddy

  • Just becaus I'm the second post on the pissed off thread doesn't mean I'm an
  • Old Timer
  • ******
  • Posts: 4,810
  • bike in a box
Re: tile thread w/crappy closet flange pics added
« Reply #17 on: January 20, 2012, 02:13:56 PM »
It appears some fool left a cast iron hub directly where there should be a piece of pipe for the flange to caulk (lead and oakum joint) to. In this case you do what you have to. Seal it up good to keep the sewer cooties out.

It looked like a flange that was fit around the 4" pipe and leaded in. There wasn't much left of the mounting flange, not enough to bolt anything to, much less a toilet.

After a month of cogitation I figured cut a piece of pipe to bring it (4" id) to the surface and grout it in.  Probably better to  have used a compression flange, but I already had the plastic so I used it.
^^^^^^^/l^^^^^^^^^^^^^^/l^^^
. . ______/ l_________________/  l
<'  '  '   '  o .  . . . . . . .................(
 ' VVVVV'   ')))))____>-''''''''''''''''''\  l
' . vvvv_   -              -                 \/

Offline faux fiddy

  • Just becaus I'm the second post on the pissed off thread doesn't mean I'm an
  • Old Timer
  • ******
  • Posts: 4,810
  • bike in a box
Re: tile thread w/crappy closet flange pics added
« Reply #18 on: January 20, 2012, 05:33:33 PM »
Looks great.
^^^^^^^/l^^^^^^^^^^^^^^/l^^^
. . ______/ l_________________/  l
<'  '  '   '  o .  . . . . . . .................(
 ' VVVVV'   ')))))____>-''''''''''''''''''\  l
' . vvvv_   -              -                 \/

Offline Don R

  • My Sandcast is a
  • Really Old Timer ...
  • *******
  • Posts: 20,563
  • Saver of unloved motorcycles.
Re: tile thread w/crappy closet flange pics added
« Reply #19 on: January 21, 2012, 07:34:36 AM »
A 4" over the pipe C.I. flange would be 5" ID, that would explain it. It's common for the flange to break. It was apparently entirely removed leaving the barrel around the pipe. The shop I worked at sold all their CI stuff for scrap recently. The new owner never did any plumbing service work. Or asked the guys that do. He is big on putting some quick cash in his pocket, not thinking about the future.
No matter how many times you paint over a shadow, it's still there.
 CEO at the no kill motorcycle shop.
 You don't need a weatherman to know which way the wind blows.

Offline faux fiddy

  • Just becaus I'm the second post on the pissed off thread doesn't mean I'm an
  • Old Timer
  • ******
  • Posts: 4,810
  • bike in a box
Re: tile thread w/crappy closet flange pics added
« Reply #20 on: January 21, 2012, 11:53:29 PM »
Uhhh, what's C.I?

I think it's good until the next time, might even be m turn again, but I figured since the neigbor had some guy fail to screw a closet flange down and then had teams of people say her pipes were cracked and they'd have to break concrete, and fish cameras through  her whole $ystem, and, yes sewer cooties (she called them sewer flies) and all that. I just thought I'd make sure to screw it down and seal it up, so it seems like I did better than the neighbor's plumber.
^^^^^^^/l^^^^^^^^^^^^^^/l^^^
. . ______/ l_________________/  l
<'  '  '   '  o .  . . . . . . .................(
 ' VVVVV'   ')))))____>-''''''''''''''''''\  l
' . vvvv_   -              -                 \/

Offline faux fiddy

  • Just becaus I'm the second post on the pissed off thread doesn't mean I'm an
  • Old Timer
  • ******
  • Posts: 4,810
  • bike in a box
Re: tile thread won't let me quit
« Reply #21 on: January 27, 2012, 12:53:11 PM »
ARRRGHH  I just can't seem to get this thing done. A terlet backed up, couldn't plunge it clear, downstream shower backed up and my toy snake just ain't cutting it.

A friend came to the rescue. I never used one like this- an electric eel brand. Supposedly it's piano wire.

I know the rigid I used before would be tearing stuff up like paneling, woodwork, sheetrock. This thing is much less cantankerous.


Now I'm ready to set this toilet for the final time.... I HOPE.
« Last Edit: January 27, 2012, 01:00:34 PM by fiddy of industry »
^^^^^^^/l^^^^^^^^^^^^^^/l^^^
. . ______/ l_________________/  l
<'  '  '   '  o .  . . . . . . .................(
 ' VVVVV'   ')))))____>-''''''''''''''''''\  l
' . vvvv_   -              -                 \/

Offline faux fiddy

  • Just becaus I'm the second post on the pissed off thread doesn't mean I'm an
  • Old Timer
  • ******
  • Posts: 4,810
  • bike in a box
Re: tile thread/ making and glazing tile photos
« Reply #22 on: February 09, 2012, 01:31:49 AM »
Okay, the sick computer is working enough to post the photos.

Here is inside www.thehouseofclay.com/ who I have to reccomend as very friendly, knowledgeable people with good materials and workspace and , well, the honesty of saying you might not get a perfect match, so no disappointments from them.

The stuff turned out as good as I expected and not the same, not perfect, and if I wasn't bragging about about the pains  I went to make things flow from one space  to another  prolly no one would notice any difference.

Anyway, glazing tile was all about  finding something similar, cutting it to the brick size, and then laying it out, putting a wash over it, firing it, and then adding the other glaze features of the unobtanuim tile. With another glazing and firing, or so it was looking close enough to laysoide by side. etc. Several trips to the House of Clay, 60 miles. Often it was just a couple chips of tile to be fired and test fire again for color match.  I have to thank my arsehole brother for stealing the toyota to increase my expenses on this project, as he needed three economy cars in his driveway and me left to use a gasshog van for these trips.
« Last Edit: February 09, 2012, 02:47:55 AM by fiddy of industry »
^^^^^^^/l^^^^^^^^^^^^^^/l^^^
. . ______/ l_________________/  l
<'  '  '   '  o .  . . . . . . .................(
 ' VVVVV'   ')))))____>-''''''''''''''''''\  l
' . vvvv_   -              -                 \/

Offline faux fiddy

  • Just becaus I'm the second post on the pissed off thread doesn't mean I'm an
  • Old Timer
  • ******
  • Posts: 4,810
  • bike in a box
Re: tile thread/ making and glazing tile photos
« Reply #23 on: February 09, 2012, 02:05:58 AM »
Heres a bit more of junk information I got over the internet that seems to work. (I swear making/ glasing my own tile was my OWN idea).

But an actual tile guy laid the green border and there were some flaws in concrete and around the toilet especially , so here is what I gleaned off the  interwebs.  Use Toilet shims, (duh!) but this was the broken toilet and just shimming it all the way forward with the other issues was an issue. I stacked shims to compensate for the brick pattern having a bit less thinset under it (1/4" almost) and then , well, what I read was shim it and caulk or set grout under it. Well you dont want grout on your tiles so I also read more.., put plastic under it and then shove the grout in as if I know the toilet, wax, closet flange, and all of that crap is going to fail soon. No mess to clean up when the inevitable happens. Plastic wrap under the spaceholder grout. Sounded good to me, I had the grout, and  $60 worth of caulk tube stuff from HD or Lowes  was out of the question.

Fill it in, Flake away the dried grout, fill it in some more,  and I trimmed back the plastic  like it said. Stacked shims are pretty much hidden now.  I like the way it came out and the terlet is solid as bricks.

Maybe I will use up the last bit of grout in a tube caulk to do a bit of a seal  around it , but for now, maybe I can find a better place to squeeze it into.
« Last Edit: February 09, 2012, 02:43:57 AM by fiddy of industry »
^^^^^^^/l^^^^^^^^^^^^^^/l^^^
. . ______/ l_________________/  l
<'  '  '   '  o .  . . . . . . .................(
 ' VVVVV'   ')))))____>-''''''''''''''''''\  l
' . vvvv_   -              -                 \/

Offline Duke McDukiedook

  • Space Force 6 Star General
  • Really Old Timer ...
  • *******
  • Posts: 12,688
  • Wish? Did somebody say wish?
Re: tile thread/ making and glazing tile photos
« Reply #24 on: February 09, 2012, 08:04:40 AM »
CI = Cast Iron.
"Well, Mr. Carpetbagger. We got somethin' in this territory called the Missouri boat ride."   Josey Wales

"It's Baltimore, gentlemen. The gods will not save you." Ervin Burrell

CB750 K3 crat | (2) 1986 VFR750F

Offline BeSeeingYou

  • Old Timer
  • ******
  • Posts: 3,913
Re: tile thread/ making and glazing tile photos
« Reply #25 on: February 10, 2012, 05:28:00 PM »
Sometimes you gotta get creative Fiddy.   Is the floor that un-level at the toilet?  I just put the shower base in last week and the floor in that spot sloped 1/2 inch in the 48 inch length of the base.  I had to float the whole thing on a bed of mortar and then level it out. :)

Offline faux fiddy

  • Just becaus I'm the second post on the pissed off thread doesn't mean I'm an
  • Old Timer
  • ******
  • Posts: 4,810
  • bike in a box
Re: tile thread/ making and glazing tile photos
« Reply #26 on: February 11, 2012, 03:02:12 AM »
Sometimes you gotta get creative Fiddy.   Is the floor that un-level at the toilet?  I just put the shower base in last week and the floor in that spot sloped 1/2 inch in the 48 inch length of the base.  I had to float the whole thing on a bed of mortar and then level it out. :)

Uhhh, well at least make it look like someone with an art degree did it, that piece of paper . But anyway..

I remember the closet flange that had the 5" [junction"]  was kind of weird concrete behind the terlet, maybe sloped off a bit in all directions, including towards the sunken living room, and then the guy that got me started did the perimeter first  in that BR.  The place where it flowed away behind the toilet ate up a fair bit in thinset to somewhat level it and perhaps I had other cheaper things to level a floor with.  I hid a bunch of  tile 1/3's  there, the larger full pieces might have rocked back and forth a bit.

The Other larger tiles  in front ended up a bit proud of the the green brick tiles , hence setting the terlet with grout. It had it, pre mixed and even messing with plastic celophane  easiest and most purchased thing to use, and the cleanup was simple.   

In the Front hallway  I leveled the transition from the 1/2" thick unobtaniumtiles with plaster type floor leveler for the difference of thickness and it worked pretty well and set up quick.

Now if you want to do something like I've got here, and don't mind burning up saw blades and ear drums, I could tell you how I'd do it on that bathroom you are doing.  I say a guy who measures and scores and snaps tiles well diagonaly might do just as well without the saw and  tinitus, but I never had one of the things.

But in my honest  internet opinion is that either the big tiles corners are square to something and the little tiles are square to something different. Neither has to be square to the wall. I think that 4-6 or maybe 8" tiles are best for the small tiles, 12" or so for big and beyond that  the center of the room is'n't as important anymore because they DONT HAVE to have anything centered or squared other than the cuts  themselves.  When you realize that the common sense is to use a large full tile and use as much of it to cut around the door jamb, the first place your eyeball sees, and lay the rest of the pattern out on that.  The next piece should be at least a half of the smaller tile,

I used a lazer on laying out much of it, rarely used spacers, and it's not at all perfect, but I like it.

Some people say center of the room is an absolute point, and everything goes around it.  In some cases  it is  perfect, but I can see how the diagonal patterns with 60' x 30' ish ratios open things up changing the square walls of a dwelling.  Neither the large nor the small tiles have to be square to the walls, just slant it to where it might look better  since the shape of the room makes no perfect center.


« Last Edit: February 11, 2012, 04:20:36 AM by fiddy of industry »
^^^^^^^/l^^^^^^^^^^^^^^/l^^^
. . ______/ l_________________/  l
<'  '  '   '  o .  . . . . . . .................(
 ' VVVVV'   ')))))____>-''''''''''''''''''\  l
' . vvvv_   -              -                 \/

Offline 333

  • Time for change
  • Really Old Timer ...
  • *******
  • Posts: 7,558
  • Mail List Member #162 - Call me Stan
Re: tile thread/ making and glazing tile photos
« Reply #27 on: February 11, 2012, 07:23:00 AM »
I would think a 45 degree angle would be the thing to strive for when setting a diagonal pattern.  And I'd start at the most visible wall to start on, considering the shape of that room.  But it looks good.  We did ours about 6 years ago.  I had a contractor friend come in, cause I didn't know how to do it. He let me help, and now I have a clue.  I ended up doing the repair when the fiberglass shower floor cracked last year.  Replaced it with cement and tile, so it won't crack again.  Being somewhat of a tool junkie, I used the repair as an excuse to buy a cheap tile wet saw.

You keep mentioning a slow computer.  Have you run "disc cleanup"?  This can go a long way to return some speed to a slowed down machine.  Follow this; hit the "start" button, then "accessories", then "system tools".  "Disc cleanup" should be there.  It may take some time to run it if it hasn't been done before.  Another way to do this is to download a free program called "CCleaner" from "Piroform", and run it regularly.
Go metric, every inch of the way!

CB350F0  "Scrouching Tiger"
CT70K0    "Sneezing Poodle"

www.alexandriaseaport.org

Offline faux fiddy

  • Just becaus I'm the second post on the pissed off thread doesn't mean I'm an
  • Old Timer
  • ******
  • Posts: 4,810
  • bike in a box
Re: tile thread/ making and glazing tile photos
« Reply #28 on: February 11, 2012, 12:57:05 PM »


You keep mentioning a slow computer.  Have you run "disc cleanup"?  This can go a long way to return some speed to a slowed down machine.  Follow this; hit the "start" button, then "accessories", then "system tools".  "Disc cleanup" should be there.  It may take some time to run it if it hasn't been done before.  Another way to do this is to download a free program called "CCleaner" from "Piroform", and run it regularly.

Actully I figured out google talk was repeatedly opening in some instances.  When I pulled up task manager the thing was running as many as 290 processes, mostly google talk instead of the usual 69-74.

I do the disc cleanups pretty regular.
^^^^^^^/l^^^^^^^^^^^^^^/l^^^
. . ______/ l_________________/  l
<'  '  '   '  o .  . . . . . . .................(
 ' VVVVV'   ')))))____>-''''''''''''''''''\  l
' . vvvv_   -              -                 \/

Offline faux fiddy

  • Just becaus I'm the second post on the pissed off thread doesn't mean I'm an
  • Old Timer
  • ******
  • Posts: 4,810
  • bike in a box
Re: tile thread/ making and glazing tile photos
« Reply #29 on: February 11, 2012, 03:23:21 PM »
I would think a 45 degree angle would be the thing to strive for when setting a diagonal pattern. 

 Being somewhat of a tool junkie, I used the repair as an excuse to buy a cheap tile wet saw.


I found the ryobi at a pawn shop for pretty cheap. Works pretty good, but I think the pump is getting clogged up so I'll have to try to clean the lines.


45 degrees is generally what comes out with mixing 6" and 12" tiles, just the way it is, sort of.

Diagonal with same  size tiles all lines up straight, Just diagonal, and this is where the cheapie lazer line came in really handy. 

I guess I didn't take/post  any pice of the twin bath mostly same sized tiles. The tub surround had old yellow stuff, toilet seat matched so the whole terlet was re-used. It still gets paint and a bit more cleanup.  I  took the ADA ($129)  toilet back and used the old one. I Can't do this ALL for nothing AND out of my pocket!
« Last Edit: February 11, 2012, 03:25:26 PM by fiddy of industry »
^^^^^^^/l^^^^^^^^^^^^^^/l^^^
. . ______/ l_________________/  l
<'  '  '   '  o .  . . . . . . .................(
 ' VVVVV'   ')))))____>-''''''''''''''''''\  l
' . vvvv_   -              -                 \/

Offline faux fiddy

  • Just becaus I'm the second post on the pissed off thread doesn't mean I'm an
  • Old Timer
  • ******
  • Posts: 4,810
  • bike in a box
Re: tile thread/ making and glazing tile photos
« Reply #30 on: February 15, 2012, 01:13:40 AM »
Looks nice, rust.
^^^^^^^/l^^^^^^^^^^^^^^/l^^^
. . ______/ l_________________/  l
<'  '  '   '  o .  . . . . . . .................(
 ' VVVVV'   ')))))____>-''''''''''''''''''\  l
' . vvvv_   -              -                 \/