Author Topic: 73' CB500 Restoration  (Read 9147 times)

0 Members and 1 Guest are viewing this topic.

Offline PurduePete

  • Full Member
  • *
  • Posts: 60
73' CB500 Restoration
« on: March 07, 2012, 08:05:55 PM »
Hey everyone,

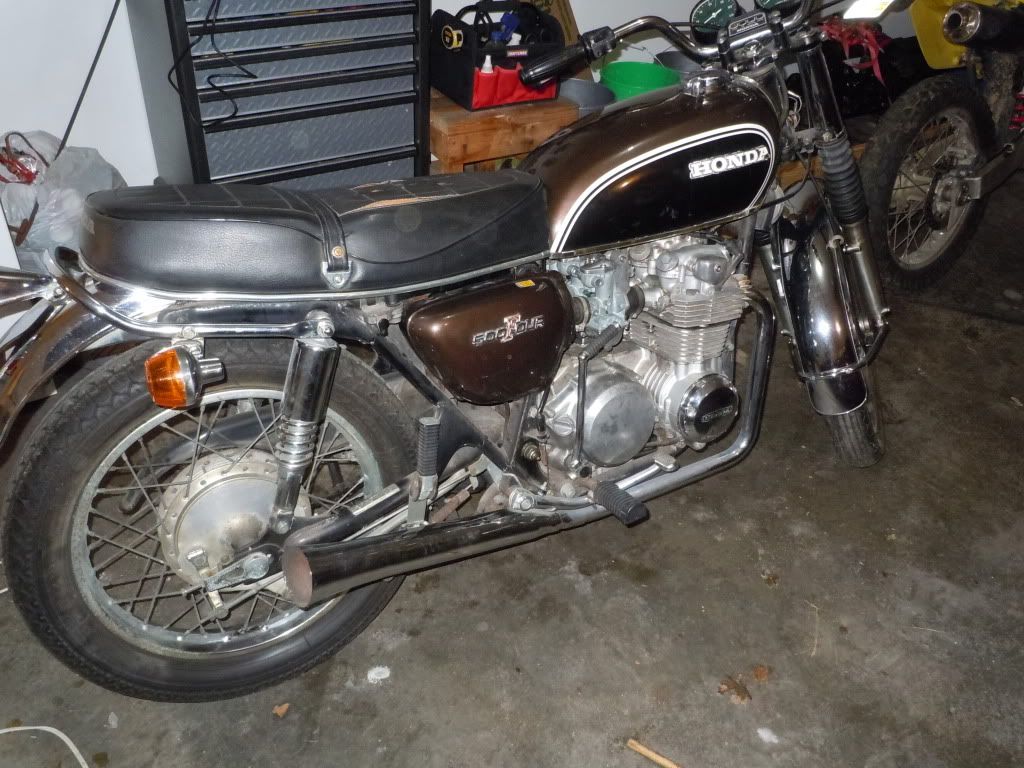
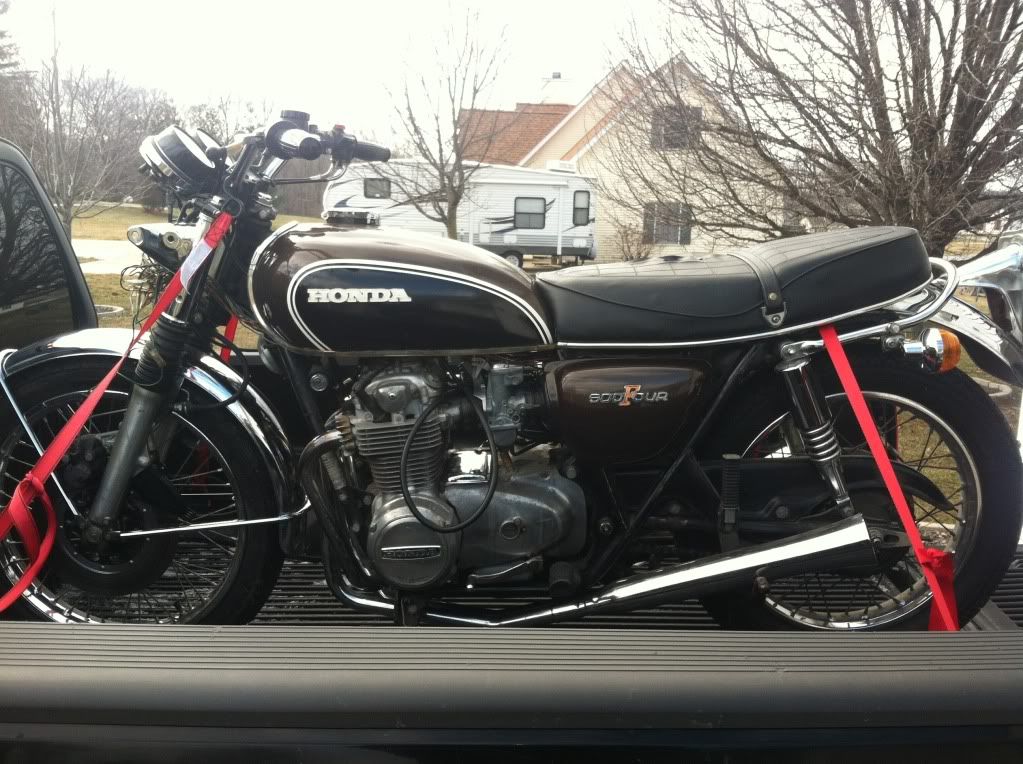
I'm pretty new here, been lurking a while now but I have posted one thread. Got a 73' CB500 for free from one of my Dad's friends. He worked on it a bit and the carbs are cleaned and hadn't been hooked back up to the rusty tank. However the rest of it is in need of some work. Mostly cleaning and checking over. So I figured that I'd start a thread to document my progress. This will not be a cafe racer, they are cool but I love the look of this bike as it is.... or was before I started pulling it apart. They are my favorite looking bikes. The plan is to see if it runs and how well and then start the restoration from there. Tips would be appreciated.

Here is the bike when I got it.


The problems that I know of are that the oil is obviously bad, rusty tank, rusty electrical system, wiring needs a bit of going over as some of the wires melted a bit (didn't hurt over integrity but they need to be replaced so the insulation is alright), also there was an oil leak around the shift shaft. That is where I started after checking the wires to make sure they ran to the right place. Here are some pictures of what I found.
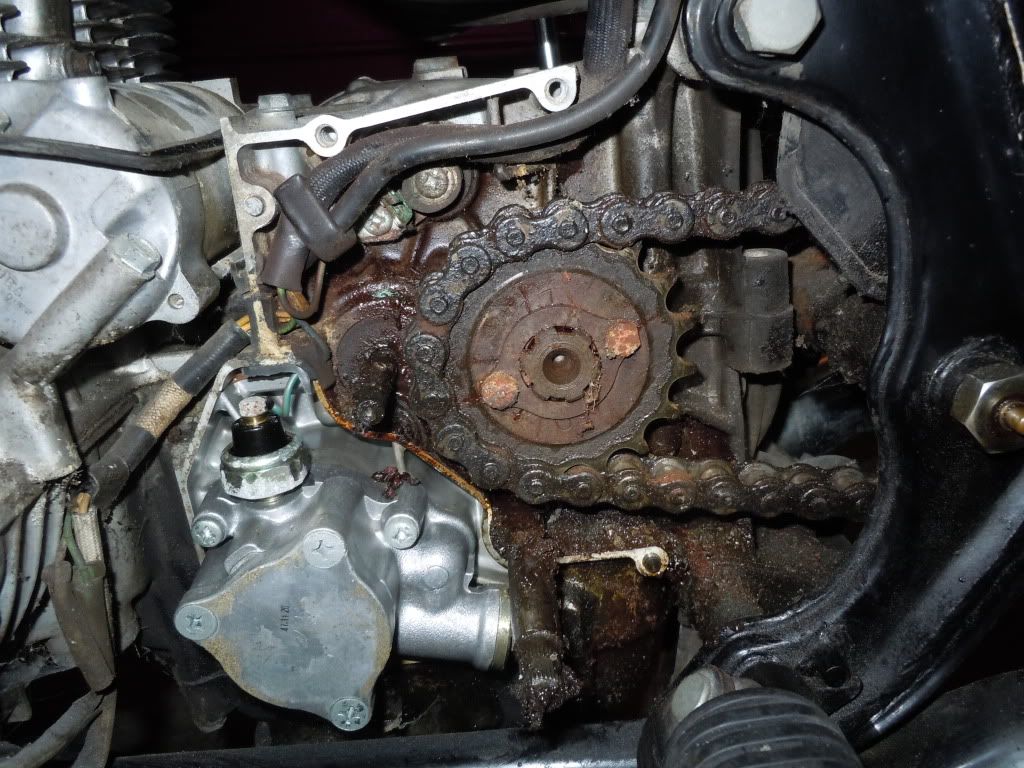
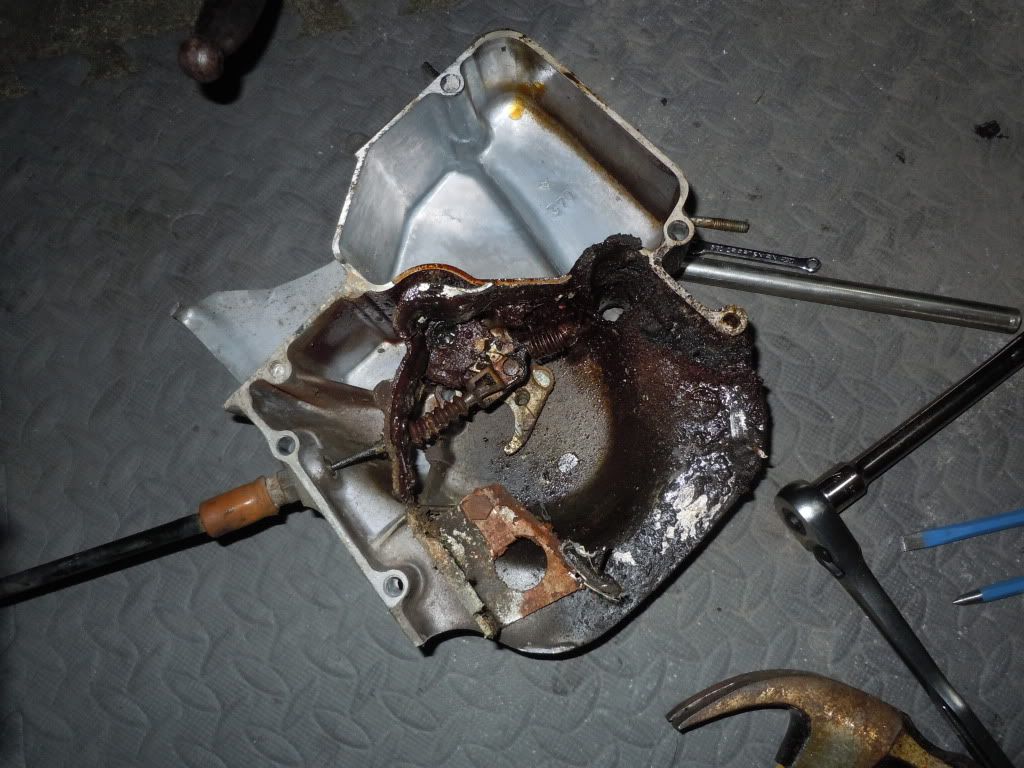


I tell you what those screws were crazy hard to get out. One stripped so that needed an extractor and I had to get an impact screw driver to pop the others loose loose. I can't tell if that is grease from the chain or oil from the shifter shaft. Any one got recommendations as to a degreaser to use on this crap? Been at it with a screw driver after taking apart the cover.
1973 Honda CB500 Four - Restoring
2001 Suzuki DRZ400 Kicker - Street Legal

Offline theofam

  • I'm cold, give me a
  • Hot Shot
  • ***
  • Posts: 598
  • Suffering from MDD - Mechanical Deficit Disorder
Re: 73' CB500 Restoration
« Reply #1 on: March 07, 2012, 08:24:32 PM »
Nice looking scoot as it sits!  Some elbow grease and it'll look awesome.

As for degreasing, you can use Simple Green.  You might notice some discoloration of the aluminum if you soak it in Simple Green.  That might not matter to you if you're going to polish the piece.

If I find something is really on there, I use wax and grease remover.  This stuff is for painters to clean a piece immediately before tack clothing and spraying, but I find it works wonders (about three times as fast) as Simple Green or an equivalent.

http://www.autobodytoolmart.com/klean-strip-prep-all-wax-grease-remover-gsw362-p-14855.aspx

Keep us posted with your progress.

Offline PurduePete

  • Full Member
  • *
  • Posts: 60
Re: 73' CB500 Restoration
« Reply #2 on: March 14, 2012, 09:38:10 PM »
Well the electrical system has got some things wrong with it. I wanted to know if it would turn over so I put a battery in it and got no lights, no clicking, not nothing. So I'm going to completely pull it apart and go over the whole electrical system. So far I am pretty sure that at minimum the magnetic starter switch is not good. It was very corroded and the boots are cracked and falling apart. Here is a picture of the corrosion.


I checked the points to see if they were corroded and they are not. I also checked the stator, so far only the points cover screws weren't stuck. The impact screw driver is great but not perfect for all situations, long as you can slot the screws it is amazing though. Some of these screws are really bad, no idea how I'd get them other wise.
1973 Honda CB500 Four - Restoring
2001 Suzuki DRZ400 Kicker - Street Legal

Offline EDU

  • Full Member
  • *
  • Posts: 64
Re: 73' CB500 Restoration
« Reply #3 on: March 15, 2012, 03:41:10 AM »
I pulled the cover on mine yesterday (same bike but a 71) and it looked EXACTLY like that!

Except that I also had a liquid sort of like a flat white (as in the coffee) leaking... part of it was gasoline, the rest I wouldn't have clue!
« Last Edit: March 15, 2012, 03:49:40 AM by EDU »

Offline wedoo2

  • Hot Shot
  • ***
  • Posts: 441
Re: 73' CB500 Restoration
« Reply #4 on: March 15, 2012, 05:02:18 AM »
All of that crap inside the drive sprocket cover will clean up nicely.  I used the gunk degreaser and a lot of rags, then finally a dremel.  Definitely replace the seals unless you like the look, or like to push the bike.

There are replacement wiring harnesses out there and it may be an easier, and in the long run more reliable,  option to solve your electrical issues.  Some stuff you can clean, others just need to be replaced.  Keep sending in the pictures.
Some days the sun is too loud.

Offline RAFster122s

  • I feel like a really really
  • Really Old Timer ...
  • *******
  • Posts: 12,457
  • SOHC4 member # 2605
Re: 73' CB500 Restoration
« Reply #5 on: March 15, 2012, 06:06:21 PM »
The green oxidation on the copper wires is almost as bad as the black wire rot. You really should replace those wires as they won't conduct electricity like that. Buy a new harness or start replacing entire runs of old wire with new good quality wire.  Only good way to cast out the electric gremlins/demons.
David- back in the desert SW!

Offline SohRon

  • She laughs 'til she cries when they call me an
  • Expert
  • ****
  • Posts: 946
Re: 73' CB500 Restoration
« Reply #6 on: March 15, 2012, 06:16:34 PM »
I am pretty sure that at minimum the magnetic starter switch is not good. It was very corroded and the boots are cracked and falling apart. Here is a picture of the corrosion.


Don't give up on parts just because they look funky. Unplug the yellow/red and black wires from the back of the electrical panel and touch them to a 12v power source (black to +, yellow/red to -). If you get a click, it's likely the solenoid is good and a simple application of the mechanic's basic lubricant (elbow grease) can get it looking like new


Refurbishing this stuff is both relaxing and money-saving, and you'll learn all about your bike as you bash caress each piece back to shape!

« Last Edit: March 15, 2012, 06:18:42 PM by SohRon »
"He slipped back down the alley with some roly-poly little bat-faced girl..."

Assembling my '74 CB550: http://forums.sohc4.net/index.php?topic=86697.0
Assembly of the Right-hand Switch (a rebuilder's guide):  http://forums.sohc4.net/index.php?topic=80532.0
Installing stock 4X4 exhaust: CB500-CB550 K: http://forums.sohc4.net/index.php?topic=82323.0
CB550 Assembly Manual: http://forums.sohc4.net/index.php/topic,151576.0.html

Offline PurduePete

  • Full Member
  • *
  • Posts: 60
Re: 73' CB500 Restoration
« Reply #7 on: March 15, 2012, 08:49:52 PM »
Well I guess that I will pull it apart if possible. Moved to my dirt bike and painted the exhaust today so didn't get to work.

I think that while I'm waiting for a game to download that I'll try and tear that magnetic starter switch apart. Didn't have any idea that it was possible to fix it by taking it apart. Going to give that a go. Thanks SohRon, where in the world did you get that picture? A tutorial would be great.
1973 Honda CB500 Four - Restoring
2001 Suzuki DRZ400 Kicker - Street Legal

Offline ekpent

  • Really Old Timer ...
  • *******
  • Posts: 13,512
  • To many bikes-but lookin' for more
Re: 73' CB500 Restoration
« Reply #8 on: March 16, 2012, 06:12:42 AM »
If you have no power anywhere like lights etc then it could be as simple as a fuse or something in that area or ignition switch. Start in those areas first.

Offline PurduePete

  • Full Member
  • *
  • Posts: 60
73' CB500 Restoration
« Reply #9 on: March 23, 2012, 07:26:53 AM »
I've checked fuses, grounds, and run through all the wires coming from the regulator and rectifier to the headlight. Is it possible to get spark without a battery? I've got a battery off course (brand new so not the problem, literally two weeks old) but I want to pull that compartment and start pulling everything off to run through all wires. I'm just having trouble knowing where to start. I am quite sure the starter switch is no good. Don't know how to fix it either, so can I replace with any 12 V honda switch that looks similar from another year or from a quad even?

I'm new to working on an electrical system that has a starter and so many accessories...and this doesn't even have much. My dirt has a speedo, tail light, headlight and horn. Basically it. So if someone has advice to learn more about each component or how to restore components that would be great.


PurduePete

Sent from my iPhone
1973 Honda CB500 Four - Restoring
2001 Suzuki DRZ400 Kicker - Street Legal

Offline Killer Canary

  • Master
  • *****
  • Posts: 1,805
  • Typical Bran Muffin
Re: 73' CB500 Restoration
« Reply #10 on: March 23, 2012, 07:56:18 AM »
The solenoid is lightly crimped together and can be disassembled, though I don't think it's meant to be. Inside is a coil and a pair of heavy contacts;they can be emeried if necessary.It would be a good idea to check the resistance of the internal coil first. If it shows a high resistance, it's no point taking the solenoid apart. Just about any 12v solenoid will work as long as the current rating on the contacts is sufficient and it's the two wire type.
Good luck!
If it's worth doing at all it's worth over-doing.
Honda MT250, CB400F, CB450K, CB550, GL500, CBR929
Kawi GPz900, H1

Offline PurduePete

  • Full Member
  • *
  • Posts: 60
73' CB500 Restoration
« Reply #11 on: March 26, 2012, 06:07:58 AM »
So I've narrowed the issue down to... Just about every single connector. I took everything out and started cleaning. I tested resistance of pins within the same connector. On the opposite side of the same pin I got an infinite resistance. Double checked meter settings too.

I double checked my starter switch and resistance is very low so it might be alright. I'm going to do the after market rectifier and regulator trick that others have suggested. I'm going to post and see if anyone is interested in giving me their regulator or rectifier in the want ads though. Going to buy the vintage connector kit and redo all connectors.


PurduePete

Sent from my iPhone
1973 Honda CB500 Four - Restoring
2001 Suzuki DRZ400 Kicker - Street Legal

Offline lucky

  • Really Old Timer ...
  • *******
  • Posts: 6,717
Re: 73' CB500 Restoration
« Reply #12 on: March 26, 2012, 06:24:44 AM »
When you use your impact driver remember that first you must use the correct size bit.

Phillips come in sizes like #1.#2 and #3. #2 is most common but a #3 is needed
also.

If the bit does not fit you will ruin the screw.
Also you are supposed to put some pushing and twisting motion on the screw BEFORE hitting the impact driver with the hammer.

You do not just place the bit on the screw and hit the impact driver with the hammer!
Many people do not know that.
« Last Edit: March 26, 2012, 06:27:31 AM by lucky »

Offline lucky

  • Really Old Timer ...
  • *******
  • Posts: 6,717
Re: 73' CB500 Restoration
« Reply #13 on: March 26, 2012, 06:30:20 AM »
Well I guess that I will pull it apart if possible. Moved to my dirt bike and painted the exhaust today so didn't get to work.

I think that while I'm waiting for a game to download that I'll try and tear that magnetic starter switch apart. Didn't have any idea that it was possible to fix it by taking it apart. Going to give that a go. Thanks SohRon, where in the world did you get that picture? A tutorial would be great.

The solenoid in the photo is CRACKED from overheating. Someone just kept grinding away on that starter until the solenoid fried.
Go back and look again.

When trying to start a bike you are supposed to let the system rest between attempts.
Many people do not know that.

Offline PurduePete

  • Full Member
  • *
  • Posts: 60
73' CB500 Restoration
« Reply #14 on: March 26, 2012, 08:43:22 AM »
I am not sure if you mean mine or not but is not cracked. At least I don't believe that it is. If you mean the wire at the top being so dirty it looks like part of it so it looks cracked thats true. I have since cleaned it up a touch. Be happy to post a picture tonight when I get home.

I will look after class and work and let you know tonight.


PurduePete

Sent from my iPhone


I also did some serious scrubbing on the rectifier and it is still good. Only allows current one direction. Almost 500 ohms resistance on each path though. Seemed high. The connectors aren't very conductive.
« Last Edit: March 26, 2012, 07:33:04 PM by PurduePete »
1973 Honda CB500 Four - Restoring
2001 Suzuki DRZ400 Kicker - Street Legal

Offline PurduePete

  • Full Member
  • *
  • Posts: 60
Re: 73' CB500 Restoration
« Reply #15 on: April 10, 2012, 03:59:59 PM »
I have discovered the most likely culprit and a solution. That is one reason that I have not been on here in quite some time. The other reason is that school has really picked up and girlfriends brother goes to Afghanistan so been visiting with him. This weekend I will have some time to work on the bike. All of the connectors are certainly corroded, to the point that they make no contact. Here is what I mean.

This is a picture of the corroded connector, there is only one pin I was able to get a reading on using the method I'll show later.


So to solve this solution I dunked the connectors into a solution of Vinegar and as much Salt as would dissolve. This creates a very light HCl acid solution and eats the stuff away pretty quick but doesn't seem to cause harm if left in for a while. I used a baggy and rubber banded it to the connectors on the bike.


Here is how I measured resistance to make sure that was the issue. I placed a lead on either side of said connector and measured resistance. The 1 means infinity so that mean I have a real problem. This is a picture of the bad connections on the regulator. I've already scrubbed on one of them using a brass wire brush and some vinegar and you can see a difference. The rest just soak and then I brush them with a nylon brush to remove any residual mess, then wipe off and spray with WD-40 to try and keep them from corroding too quickly. I don't think it will be issue of them flash rusting like the gas tank did. Should be fine but wanted to be sure.
1973 Honda CB500 Four - Restoring
2001 Suzuki DRZ400 Kicker - Street Legal

Offline lucky

  • Really Old Timer ...
  • *******
  • Posts: 6,717
Re: 73' CB500 Restoration
« Reply #16 on: April 11, 2012, 07:30:19 AM »
I have discovered the most likely culprit and a solution. That is one reason that I have not been on here in quite some time. The other reason is that school has really picked up and girlfriends brother goes to Afghanistan so been visiting with him. This weekend I will have some time to work on the bike. All of the connectors are certainly corroded, to the point that they make no contact. Here is what I mean.

This is a picture of the corroded connector, there is only one pin I was able to get a reading on using the method I'll show later.


So to solve this solution I dunked the connectors into a solution of Vinegar and as much Salt as would dissolve. This creates a very light HCl acid solution and eats the stuff away pretty quick but doesn't seem to cause harm if left in for a while. I used a baggy and rubber banded it to the connectors on the bike.


Here is how I measured resistance to make sure that was the issue. I placed a lead on either side of said connector and measured resistance. The 1 means infinity so that mean I have a real problem. This is a picture of the bad connections on the regulator. I've already scrubbed on one of them using a brass wire brush and some vinegar and you can see a difference. The rest just soak and then I brush them with a nylon brush to remove any residual mess, then wipe off and spray with WD-40 to try and keep them from corroding too quickly. I don't think it will be issue of them flash rusting like the gas tank did. Should be fine but wanted to be sure.


Mix the vinegar with 50% water it works much faster.
But part of the problem is the plastic plug being deteriated.

Offline lucky

  • Really Old Timer ...
  • *******
  • Posts: 6,717
Re: 73' CB500 Restoration
« Reply #17 on: April 11, 2012, 07:33:19 AM »
Those case screws would have come right out with a impact driver with the correct size phillips bit.

Also when using the impact drover you apply force in the direction of loosening while pushing inwards - THEN tap it with the hammer.

Many people do not know that and just hit the driver with the hammer and it strips the screw.
Many impact drivers are not sold with instructions anymore.

Offline crysis

  • Full Member
  • *
  • Posts: 22
    • Cassian
Re: 73' CB500 Restoration
« Reply #18 on: April 11, 2012, 08:16:06 AM »
Looking at you're front sprocket, I have a cb750 and had the same. My problem was the auto chain oiler which I sealed up permanently. I don't know if the 500 has the same ingenious device but maybe an expert here can add a comment on that.
What doesn't kill you makes you wish you were dead.

Offline PurduePete

  • Full Member
  • *
  • Posts: 60
Re: 73' CB500 Restoration
« Reply #19 on: April 11, 2012, 11:43:26 AM »
The case was in the way which is why I stripped the screw... least that is going to be my excuse  8) Also you are correct.... pretty crappy instructions. Something else that did not help was that it was my first time using it, I'd finally figured it out though. I've got the impact driver down now and really am glad that I got it. Going to replace the screws with stainless steel socket head cap screws. They should look good and work better, and while not period correct I still think that it will be better.

So far the vinegar and salt is working really well, that connector is looking pretty good. I'll take some pictures when I go out there in a few minutes. I'm really happy with how it is turning out, the connectors are looking good. I'm going to make a paste using salt and vinegar to scrub the regulator. This weekend I'll try and get some power from everything.
1973 Honda CB500 Four - Restoring
2001 Suzuki DRZ400 Kicker - Street Legal

Offline RAFster122s

  • I feel like a really really
  • Really Old Timer ...
  • *******
  • Posts: 12,457
  • SOHC4 member # 2605
Re: 73' CB500 Restoration
« Reply #20 on: April 13, 2012, 12:22:53 AM »
Be certain to use the silver colored antisieze paste with the stainless fasteners or you run the risk of dissimilar metals electrolysis working to eat and corrode your aluminum alloy and aluminum parts.
David- back in the desert SW!

Offline PurduePete

  • Full Member
  • *
  • Posts: 60
Re: 73' CB500 Restoration
« Reply #21 on: April 13, 2012, 06:39:24 PM »
Well strangely the bike runs. I made a little gas tank or gas delivery system since it was basically just a piece of PVC pipe with some tubing. But it runs so I'm pleased. Needs so much more work though. No biggy. Here are two videos.

73' Honda CB500 First Run

It smokes pretty good on the left side which is the 2nd and 3rd cylinder I believe. I took a video of it. It does not look blue so it doesn't seem to be burning oil. I am not sure what would be making it smoke on those cylinders. If anyone has suggestions let me know.

73' CB500 Smoking on Startup

Ignore the garage mess, girlfriends mom just brought a bunch of stuff up today and I haven't put it up yet.
« Last Edit: April 13, 2012, 06:55:57 PM by PurduePete »
1973 Honda CB500 Four - Restoring
2001 Suzuki DRZ400 Kicker - Street Legal

Offline PurduePete

  • Full Member
  • *
  • Posts: 60
73' CB500 Restoration
« Reply #22 on: June 27, 2012, 12:51:58 PM »
Well it has been a while but I've made progress. I had finals and the. Couldn't get a good paying internship that was close so thought money was going to be tight. Things turned out ok, still on a tight budget but can work on it a little each month.

The bike runs but now has a gas tank installed instead of a little trial feller. I lined the gas tank using the Caswell system and it worked awesome! One thing I wish I had done was use toilet bowl cleaner one last time but that's alright. I started to polish the side covers as well. I am using 1000 grit wet or dry, using it wet. Works great but my covers were bad. I replaced the gasket on the alternator side because it basically wasn't there. Took a razor blade to get it off. I also replaced the alternator cover bolts and the chain cover with SHCS from fastenal in a grade 12.9 zinc plated. Looks great and won't rust. I had to get the 35mm and cut them to 32mm but that's alright. I also replaced the regulator with a ford solid state and it works awesome. It made the tail light work too. Now I need to fix the master cylinder which is no longer frozen but still won't come out. I need to replace the rear brakes but I took it for a ride anyway and it felt awesome. Came to life. It was fangerous but i didnt even leave my tiny neighborhood. I also pulled the starter and cleaned it really well and it works now too.

Parts on the way:
- Install new rear wheel bearings
- Install new air filter
- Install new chain

Next on the list:
- New front wheel bearings
- New front brake parts

Future Plans In Order:
- New seat cover
- New grips with bar end mirrors maybe
- New paint (thinking black and gold for pursue but only subtitle gold)
- New SHCS all the way around
- Suspension work when I get the courage
....the list will continue as I think and look at everyone's pictures.


PurduePete

Sent from my iPhone
« Last Edit: June 27, 2012, 12:57:44 PM by PurduePete »
1973 Honda CB500 Four - Restoring
2001 Suzuki DRZ400 Kicker - Street Legal