Author Topic: Re: K Two *** [FINISHED] ***  (Read 29520 times)

0 Members and 1 Guest are viewing this topic.

Offline jerry h

  • Hot Shot
  • ***
  • Posts: 392
Re: K Two
« Reply #50 on: October 21, 2012, 02:55:49 PM »
Hi Gary -
Quote
.I have been following your thread with great interest as I am in the middle of a K1 rebuild
  I've been following and enjoying your K1 project as well.  ;D

Wish I had taken better notes of what I ordered and actually used... but digging through the receipt pile,  here is what I found:
The big tubing from the harness that goes through the headlamp shell was bought from  www.vintageconnections.com
"High-Gloss Black Nominal 14mm I.D. Sleeving # B14  (1 foot)

I redid the tubing through the handlebars - got that from McMaster-carr - PVC Sleeving, .375 ID,  part #1508T31
http://www.mcmaster.com/#catalog/118/818/=jtl5h9.
I bought 10 feet, of course I have left over.

For the tach and speedo wires, rear brake switch, etc, came from Vintageconnections again, Part # BO7 (I bought 7 feet, with some left over)  "High-Gloss Black Nominal 7mm ID Sleeving"

To get the sleeving on, I had to cut off the connectors, replacements from Vintage connections again: I have extras, I'd rather buy too many, than be 1 connector short.
3.5mm Bullet Terminals/Insulators - (bought 50) part # SB2-25
3.5mm Socket Terminals/Insulators (50 again)  part #SS2-25
3.5mm Triple-Socket Terminals (bought 5)  part # TS2-5

Lastly - re-wrapped the main harness using Scotch Supper 88 Electrical Tape.

Hope this helps......
"It is not the critic who counts, the credit belongs to the man who is actually in the arena, whose hands are covered with grease and oil."

K2 http://forums.sohc4.net/index.php/topic,105097.0.html

Offline Garystratos201

  • I have never been a
  • Hot Shot
  • ***
  • Posts: 419
Re: K Two
« Reply #51 on: October 21, 2012, 08:14:56 PM »
Perfect ....and thanks again for sharing......................Gary
Visit my build project;
http://forums.sohc4.net/index.php?topic=111620.0

Current ride; Bass boat.... 2005 Ranger 521VX,250 hp Mercury Verado, super charged and direct fuel injected. Not a bass on the lake can out run me !!!

Offline jerry h

  • Hot Shot
  • ***
  • Posts: 392
Re: K Two
« Reply #52 on: December 02, 2012, 12:57:33 AM »
Greetings all-

Work continues....  seems the closer I get to the finish, the longer everything takes.  A great deal of time is spent pouring over the parts diagrams trying to find out what washer, spacer, nut etc. belongs where.  The bike had the fairing, luggage rack, sissy bar and what not on, so putting it back to OE is a bit of a challenge locating the correct little finish bits.

One of the first things I did after tear down was clean the crud and dirt off the chrome parts, buff with a little chrome polish, and to my eye at the time, they appeared "useable" until re chroming  was possible at some future date.   Recently, I was going to start putting the fenders back on, but here's what I found:


Basically there was no chrome left on the pieces, and in the several months they were sitting, they were covered in rust pits!  So the "future" re chroming was moved up a little.....  I'm quite lucky to have an excellent shop about 20 minutes away  customplatingspecialist.com ,   so off they went.


I feel a little ashamed to admit this, but usually people doing restorations aren't happy with re chromed parts because they look "better" than what the original Honda chrome was..... Actually I was hoping for the money spent, that they look ALOT better than the original crappy chrome that these bikes had when new.  Oh well,  no judging contests for me, I'll take the really shiny stuff and be happy. ;D   


Focus next was on the front brakes.  The caliper was froze when I bought the bike.  After removing the wheel, I used the master cylinder to "pump" the piston out.  Honest truth---- here's what i found behind the piston:


There was at least a medicine cup full of water!  No wonder the piston was rusted :o
Several days of cleaning involved to get the caliper spotless inside and out, then I sanded the paint and sprayed it with VHT high temp caliper paint.   The manufacture recommends after drying to bake it at 200F for an hour to get maximum benefits from the paint.  Turned out very nice.


Thanks to TwoTired, there are many good posts in the archive on how to rebuild the caliper.  Here's the proper supplies needed for the job.  Dow Corning high vacuum grease (for behind the pucks and surrounding area "outside" the piston), 

 http://www.ebay.com/itm/DOW-CORNING-Laboratory-High-Vacuum-Grease-976V-Stopcock-/280617417916?pt=LH_DefaultDomain_0&hash=item415619fcbc


and Raybestos BAF-12  brake assembly lube (for the piston, and seal parts "inside" the caliper)  bought on Amazon, paid like 8.00 (special deal with free shipping) 


 As you can see I now have about 9 lifetimes supply,  (hey Johnnie, hoodellyhoo, or any other SOHC'ers in the area, if you need any, I can hook you up!  ;D)

The master cylinder was another joy....    although you may think I took the next picture from the HMS Titanic artifact web site,  I can assure you, it came out of my M/C.     


 ???


Of course Honda rebuild kit to the rescue.


The M/C annodizing was pretty much gone, so I really wanted to have it re done.  I contacted several professional places that I found online, and non of them would touch it.   Something about the alloys Honda probably used, and they couldn't predict how the finish would turn out......    I know there is a Caswell kit, a bit pricy, and I really don't want a whole chemical kit sitting around on the shelf for one piece, so I committed another "restoration" sin,  and painted it with the VHT paint as well.  Removed the little remaining annodizing with some Oven Off, then painted/baked.  After a few days, I lightly sanded with some OOOO steel wool, then a light rub down with some automotive scratch remover, followed by a coat of wax.  Has a nice flat sheen to it, of course I'll have to be super careful with the brake fluid. Some day if I can find a really nice OE M/C with good annodizing, I'll replace it. 


Have to do a little "plug" here for fellow SOHC'er who sells some really nice brake hoses - Thanks Shaun!
http://slingshot-cycles.com/


I've been putting off installing the new gas cap and old latch on the tank for months now.....  to be honest I was just plain scared to touch the tank.  The candy gold finish is perfect - a slip up would be inexcusable.   Used Johnnie's tip of using a BB and a small clamp to peen the pins.  The pins are a lot harder than I was expecting, after a little sweating, ok, ALOT of sweating,  another job done. 


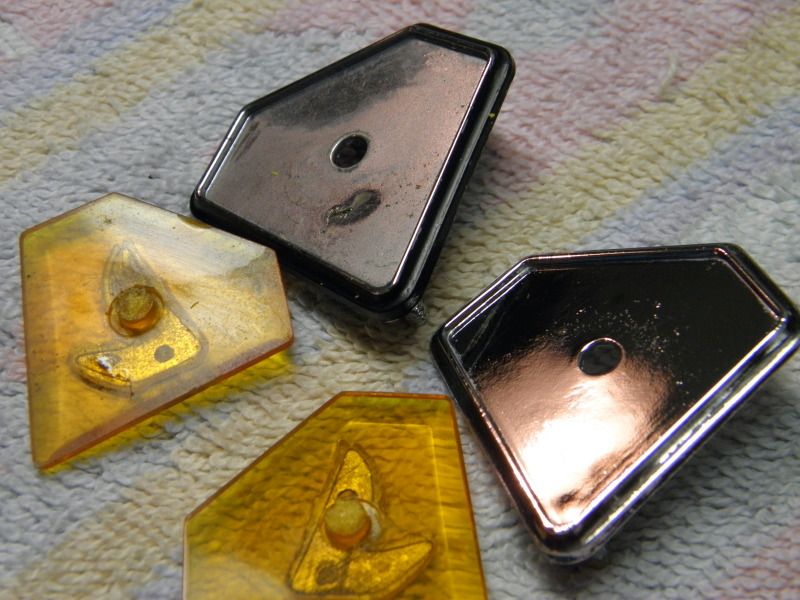
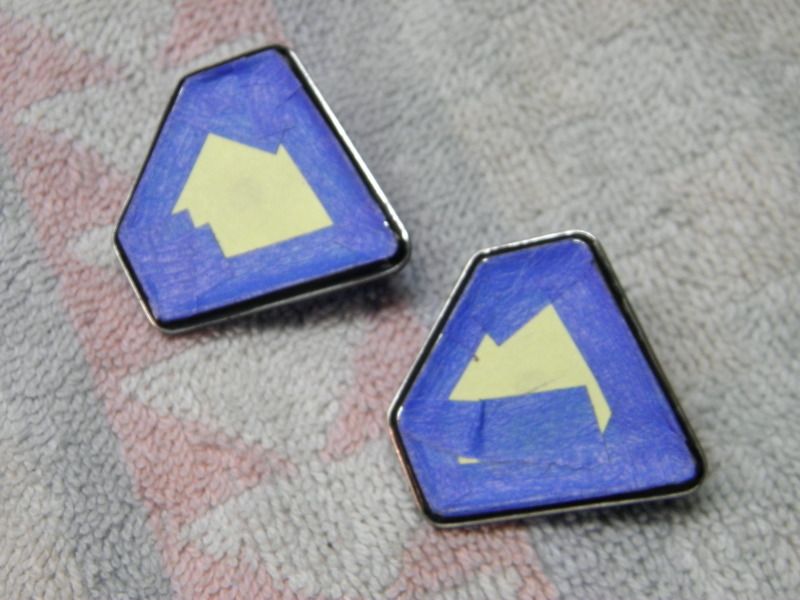
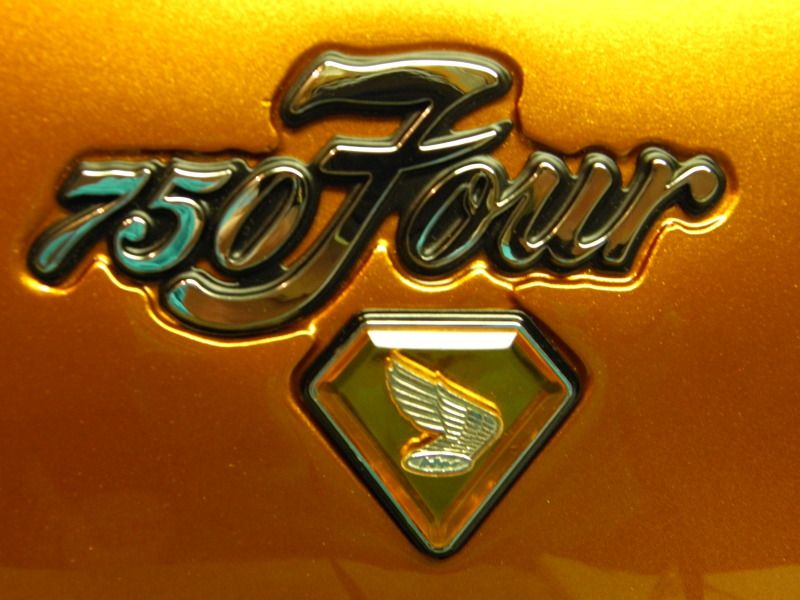
Time for an "easy"  job -  a little tank repo trim "bling": ;D


Let's play another quick round of "before and after"   -----------------


    ;D ;D ;D


Sorry to scare you with that King and Queen seat picture!  haha!


With caliper drying, time to work on the mounting bracket.  There was a little play between the arm and mount.  This little play can cause a "clunking" sound when braking.... here's the service bulletin:


http://data.sohc4.net/SB750/750_34.pdf


I ordered both washers, and ended up using the .1mm -  the arm is now snug and smooth as can be.  When I took it apart the pin was seized in the arm, cleaned it up well, lubed and reassembled.


THANKS for stoppin by!   ;)


"It is not the critic who counts, the credit belongs to the man who is actually in the arena, whose hands are covered with grease and oil."

K2 http://forums.sohc4.net/index.php/topic,105097.0.html

Offline Viktor.J

  • Breaking in the forum
  • Hot Shot
  • ***
  • Posts: 530
Re: K Two
« Reply #53 on: December 02, 2012, 01:23:29 AM »
Really nice work to follow !

Im going to get a new seat this winter, where did you get yours ? looks really good !
And you sanded down the calipers ? with emery cloth or blasting ?


// Viktor
Please ! Take a look and give me feedback in my project thread, its much needed :)
http://forums.sohc4.net/index.php?topic=112745.0

Honda CB750 K2

Offline Stev-o

  • Ain't no
  • Really Old Timer ...
  • *******
  • Posts: 34,437
  • Central Texas
Re: K Two
« Reply #54 on: December 02, 2012, 07:07:38 AM »
Great job and nice write up.   I took a fender to my local chrome shop and they wanted $225, I said no thanks and bought a good used one.  Was your guy more reasonable?
'74 "Big Bang" Honda 750K [836].....'76 Honda 550F.....K3 Park Racer!......and a Bomber!............plus plus plus.........

Offline hoodellyhoo

  • CB350F
  • Master
  • *****
  • Posts: 1,726
Re: K Two
« Reply #55 on: December 02, 2012, 07:34:44 AM »
WOW! Fantastic work as usual!
1972 CB350F (Back from the Dead!)- http://forums.sohc4.net/index.php?topic=20822.0
1965? S65 - Coming Eventually!
1972 CB750K2 (father-son project)
1976 CB750K6- (sold) http://forums.sohc4.net/index.php?topic=96859.0
1976 CB750K6 (sold)- http://forums.sohc4.net/index.php?topic=62569.0

Offline Johnie

  • Really Old Timer ...
  • *******
  • Posts: 8,615
Re: K Two
« Reply #56 on: December 02, 2012, 07:56:29 AM »
Coming along nicely Jerry!!! Great pics...
1970 CB750K0 - Candy Ruby Red
1973 CB750K3 - Candy Bacchus Olive or Sunflake Orange
1970 Chevy Chevelle SS396 - Cortez Silver
1976 GL1000 Sulphur Yellow

Oshkosh, WI  USA

Offline Garystratos201

  • I have never been a
  • Hot Shot
  • ***
  • Posts: 419
Re: K Two
« Reply #57 on: December 02, 2012, 08:00:40 AM »
Great work as always. I enjoy your posts.........Gary
Visit my build project;
http://forums.sohc4.net/index.php?topic=111620.0

Current ride; Bass boat.... 2005 Ranger 521VX,250 hp Mercury Verado, super charged and direct fuel injected. Not a bass on the lake can out run me !!!

Offline jerry h

  • Hot Shot
  • ***
  • Posts: 392
Re: K Two
« Reply #58 on: December 02, 2012, 08:48:48 AM »
Thanks guys!


Quote
Really nice work to follow !

Im going to get a new seat this winter, where did you get yours ? looks really good !
And you sanded down the calipers ? with emery cloth or blasting ?


I bought the seat at www.servicehonda.com

Before painting the calipers, I lightly sanded them with 400/ then 600 wet or dry sandpaper with water,  I used the old paint as my primer.


Quote
Great job and nice write up.   I took a fender to my local chrome shop and they wanted $225, I said no thanks and bought a good used one.  Was your guy more reasonable?

I was going to space it out over a few years to defray the cost, but with everything in sad shape I decided to do it all at once.  Both fenders, and the tail light mount were 395.00 out the door.  The problem I'm running into now, is stuff that I thought looked pretty good on the bike as I bought it, when I go to put it on the "finished" bike, they look horrible and stick out like a sore thumb.  The latest example is the "750 FOUR" badges on the side covers.... I was so careful taking them off, but now they look very out of place on the freshly painted covers,   so those will have to be replaced as well - the list never seems to be getting smaller.
"It is not the critic who counts, the credit belongs to the man who is actually in the arena, whose hands are covered with grease and oil."

K2 http://forums.sohc4.net/index.php/topic,105097.0.html

Offline fishslayeryo

  • Enthusiast
  • **
  • Posts: 191
Re: K Two
« Reply #59 on: December 05, 2012, 12:22:12 PM »
Very nice work Jerry! Impressive build and progress! Love the paint on the tins, cameout great!
'71 CB750 K1...work in progress:)
Budget Build: http://forums.sohc4.net/index.php?topic=100525.0

Fishing is much more than fish. It is the great occasion when we may return to the fine simplicity of our forefathers.  ~Herbert Hoover

Offline Johnie

  • Really Old Timer ...
  • *******
  • Posts: 8,615
Re: K Two
« Reply #60 on: December 06, 2012, 10:35:52 AM »
You can still get those badges Jerry. You are correct...next to the new candy they probably do not look so good. Tell Santa what you need and he shall deliver.
1970 CB750K0 - Candy Ruby Red
1973 CB750K3 - Candy Bacchus Olive or Sunflake Orange
1970 Chevy Chevelle SS396 - Cortez Silver
1976 GL1000 Sulphur Yellow

Oshkosh, WI  USA

Offline greenjeans

  • Industrial strengthed dreamer.
  • Old Timer
  • ******
  • Posts: 2,962
  • 1972 CB750K2
Re: K Two
« Reply #61 on: December 06, 2012, 03:22:10 PM »
Beautiful work Jerry.  Really Beutiful.     Great color choice - my favorite of the era.
Yep, I'm the kid that figured out how to put things back together...eventually.

Offline wheeliepop

  • Full Member
  • *
  • Posts: 23
Re: K Two
« Reply #62 on: December 07, 2012, 07:42:22 AM »
You are going to feel incredible on "that day". Don't worry, the thaw always comes...

Great build and fun to watch! I went though some of the same dilemmas on my old girl; once it gets to being so close to perfect, the work multiplies. Hang in there, it's absolutely worth it. You're going to be smiling at this bike for a long, long time.  8)
'05 PS250
'82 CBX1000-C
'78 CB750K
'78 CB550K
'77 GL1000 (naked)
'77 GL1000 (also naked)
'68 C90 (white one)
'68 C90 (black one)
'78 CB750K
'74 CB360

Offline MoMo

  • Really Old Timer ...
  • *******
  • Posts: 8,275
  • Ride like you're invisible
Re: K Two
« Reply #63 on: December 07, 2012, 08:55:31 AM »
Very nice work, enjoy the long winter of restoration...Larry

Offline lucky

  • Really Old Timer ...
  • *******
  • Posts: 6,717
Re: K Two
« Reply #64 on: December 14, 2012, 01:46:17 PM »
You are doing a beautiful job!!!
Good workmanship.

Offline jerry h

  • Hot Shot
  • ***
  • Posts: 392
Re: K Two
« Reply #65 on: January 28, 2013, 11:01:27 PM »
Wish I had some exciting news to post, but the winter's work has been trying to get through the remaining several boxes of CB750  miscellanea.   

The carb rack was first up......  pretty much the standard tear down and clean routine.  Focus was on trying to do this job the best I could the first time, to avoid having to mess with them later.  Replaced the jets, needle valve/seats and gaskets (all OEM Honda). 


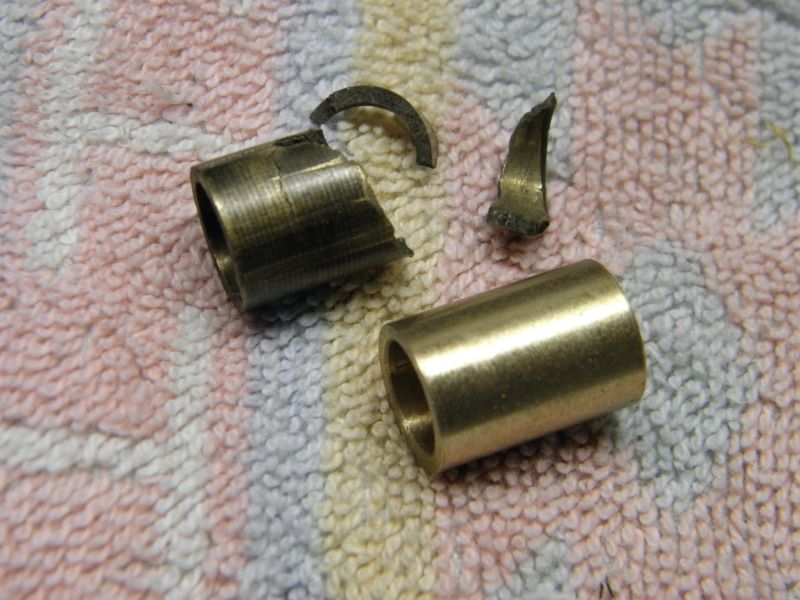
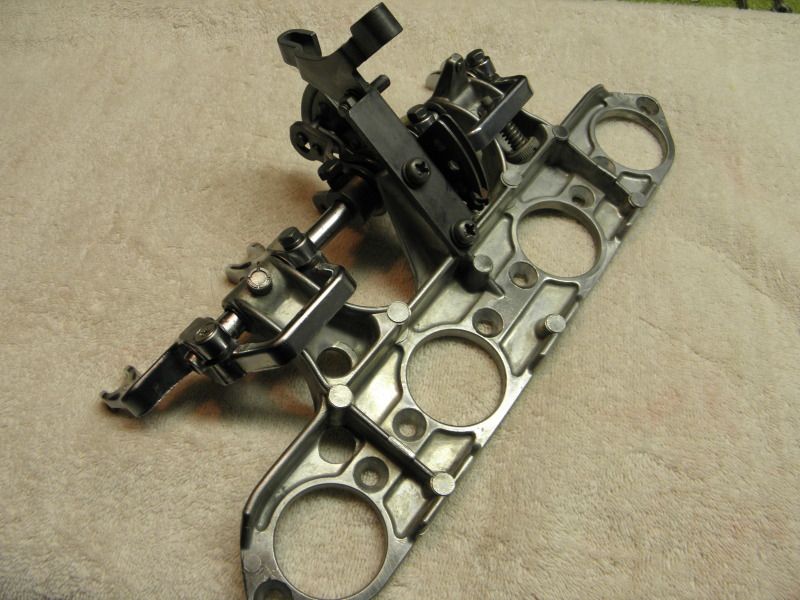
With the carbs sorted, I had the bright idea to spiff up the rack...  thought I'd simply take it apart, clean, lube, and polish it a little and be done, but I found out the shaft and arms were corroded/fused together. Should have just quit at that point, but I was stubborn and eventually got it apart.  Note the circle in the next pic.... when I finally got the shaft out, the bushing also came out in three pieces.  Not sure if it was broke all ready, or if I did it while taking apart?  but now that had to be fixed.


Found some bronze oilite in the junk box and whipped up a new bushing.
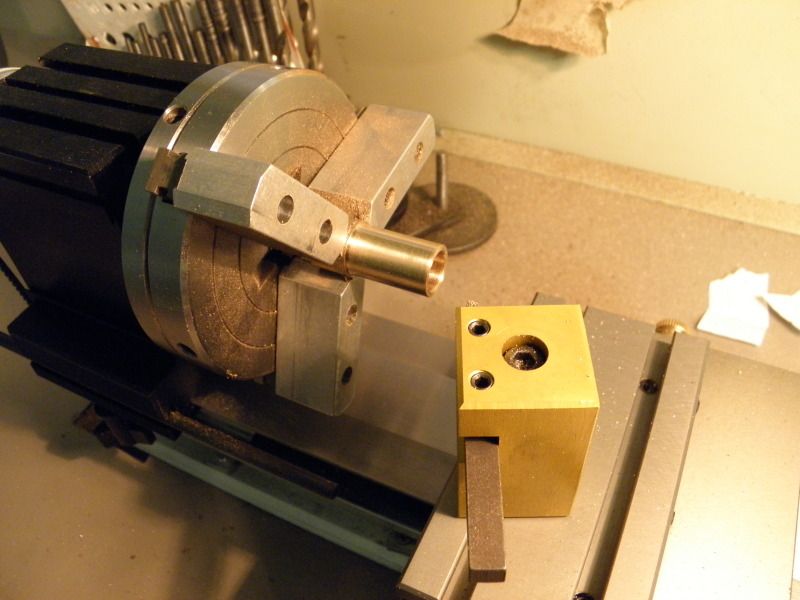


Back together.... enough goofing around with the rack!


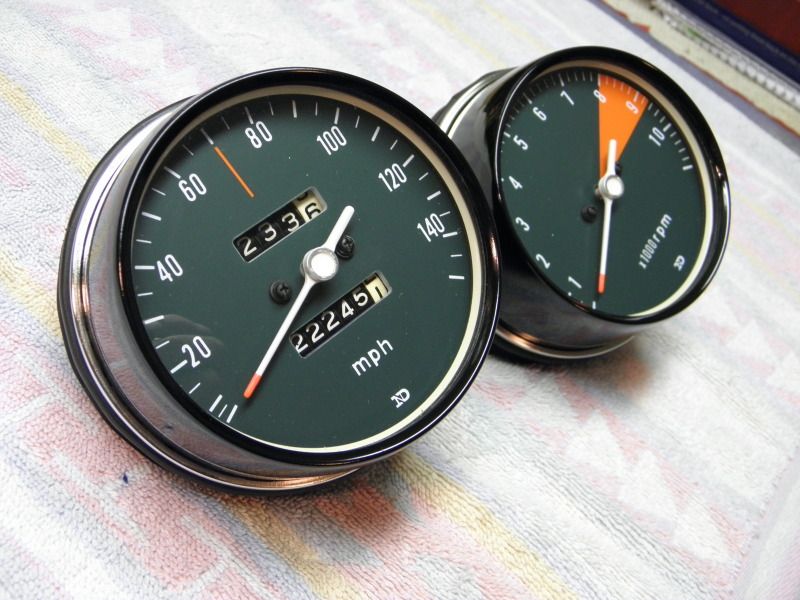
Replacing the clock faces seemed to be a fun change of pace after the routine carb cleaning....   so that was up next.
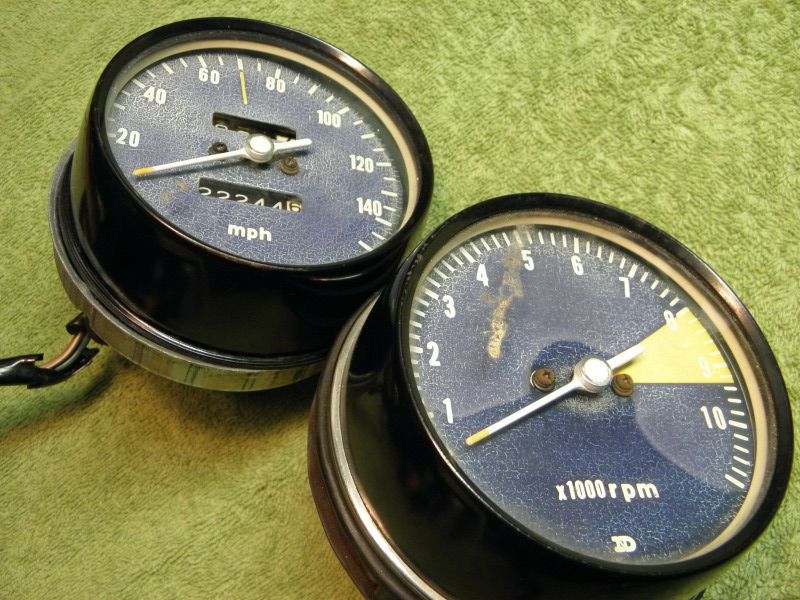


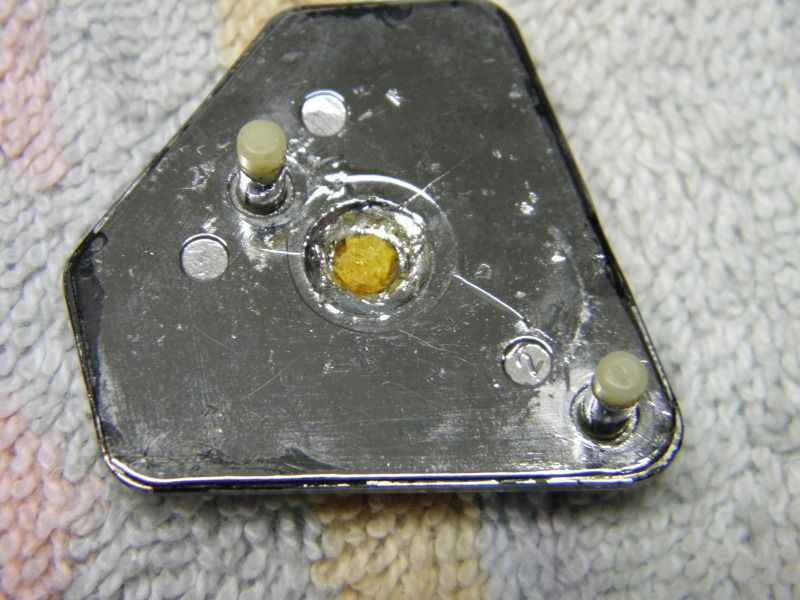
Bought new faces from www.cb750faces.com ,  they look fantastic!   Getting the gauges open was more work than originally expected. While open, I fought back any urges to mess with the internals (oil and grease  -   too much and its worse than doing nothing) ... so it was replacing the faces and get out.   When I removed the speedometer face, I was surprised to find this on the back side :
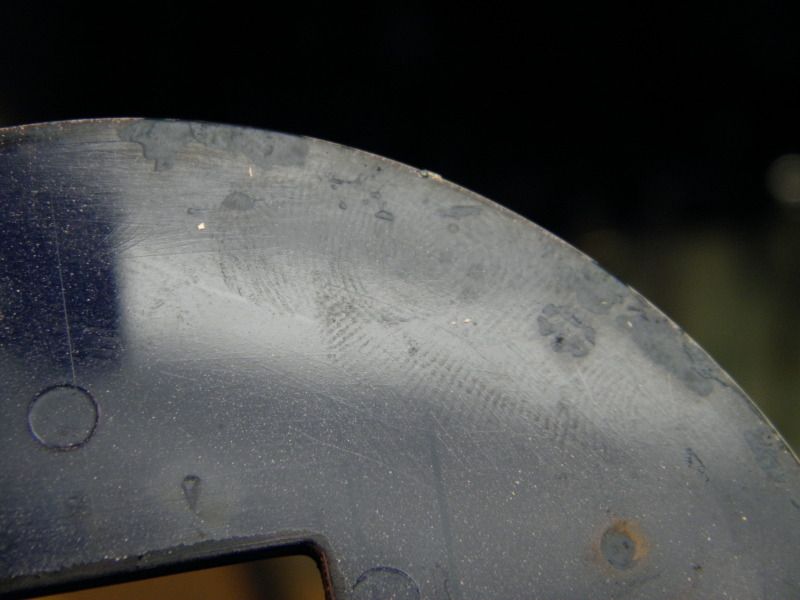


Cool !  its the finger print of the person who put my speedometer together back in February of 72,  must have been done after a break, or maybe lunch?  Kinda of puts a "human" connection to the machine.

While apart I decided to repaint the outer cases with my new favorite paint, the VHT caliper paint.  I like the fact that you need to bake it in the oven to cure it.  The original paint used was some tough stuff!  Airplane stripper did nothing to it, I had to bust out the old fashioned Zip-Strip, even that had a time of it.  I figure the cured VHT paint will hopefully be as tough.

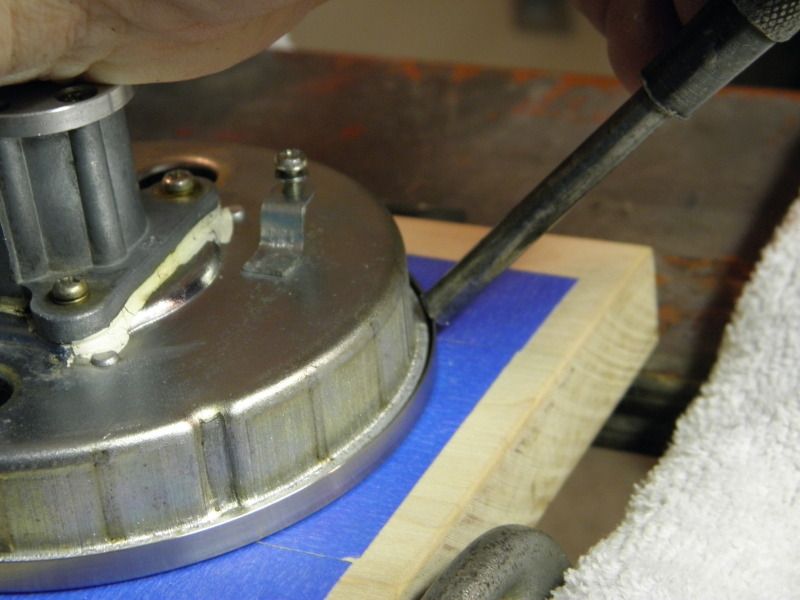
The plan was to use the pliers with tape on the jaws method of re-assembly -  I found out that I lack the talent needed to pull that off,  maybe I don't have the correct pliers???   After struggling a while, I thought I'd use a screwdriver .... ended up slipping and putting a giant scratch in the case. Crap!    When done, I had put marks all over the ring with the pliers - so embarrassing looking, that I'm not going to show you the result here :-[   ;D

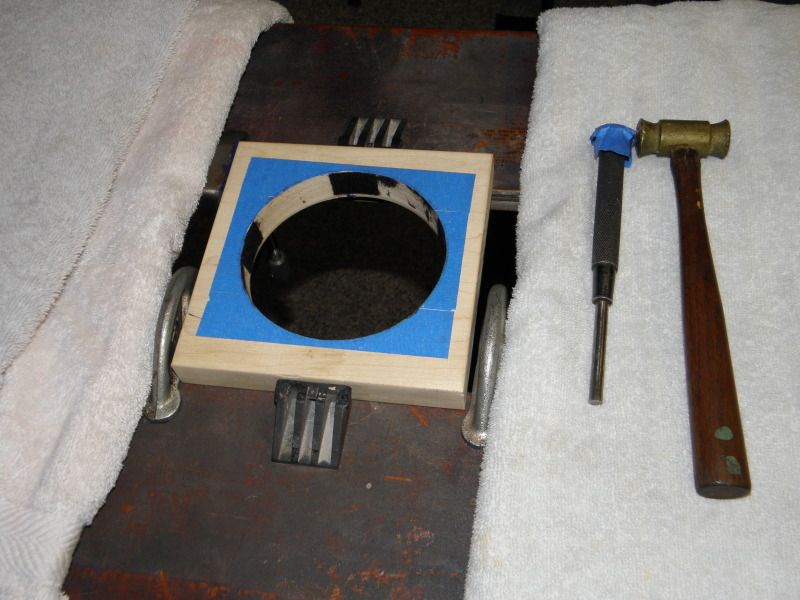
Plan B - grab a beer (or two)  and search the archives for a solution.   Found a post where someone (sorry I don't remember who now, or I'd credit you with the concept) suggested making a wood jig to hold the gauge solid, while using a hammer and punch to crimp the ring.....  no pliers involved, so I should be ok.   Made a little jig on the wood lathe out of some scrap maple - basically the hole needs to be very snug fitting on the outer case. I lined the hole with some stick on felt to prevent scratching.   You work your way around multiple passes just like the pliers method, the beauty being, the front face and side of the ring are never touched, so a perfect job from the front.

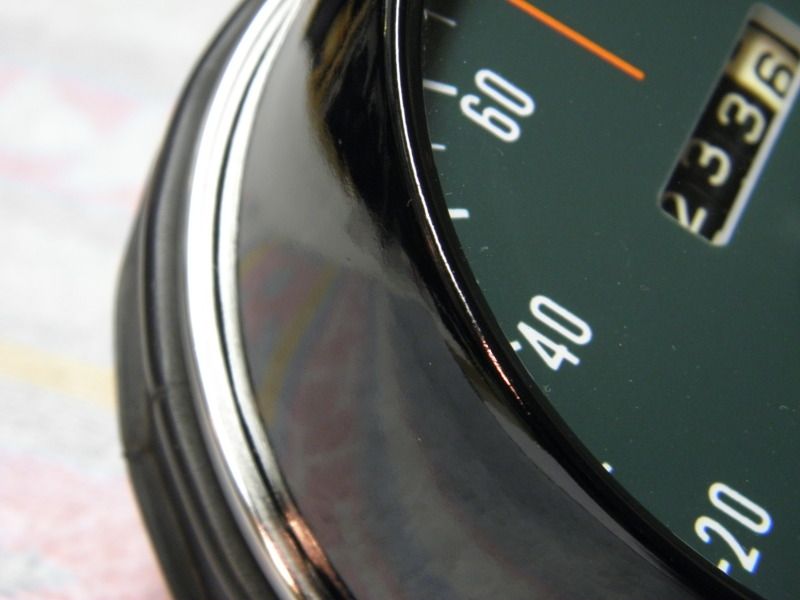
Stripped and repainted the scratched case, and ordered two new crimp rings from  www.cb750faces.com (should have done that right off when I ordered the new faces).  After crimping, I used a little Meguiar's swirl and scratch remover, on the black cases to remove what little micro scratches there was from the jig.


At least this time, I can show you the results.....


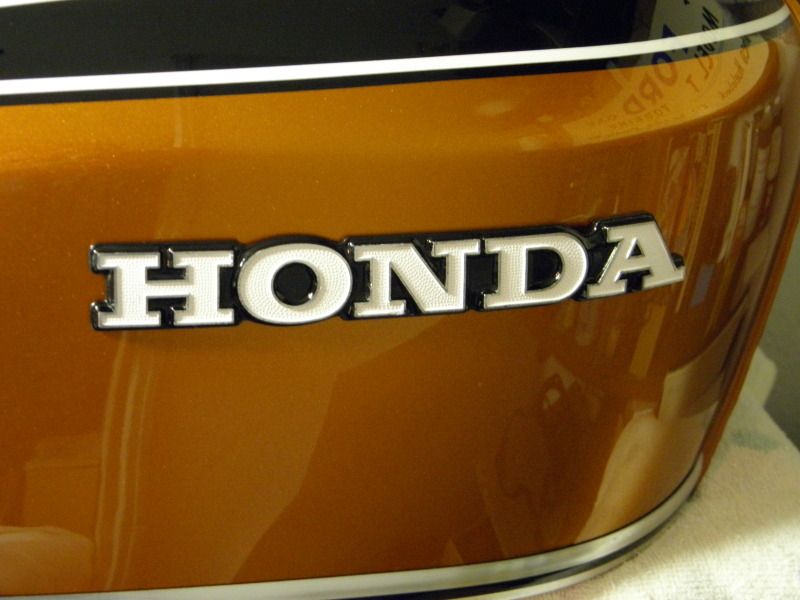
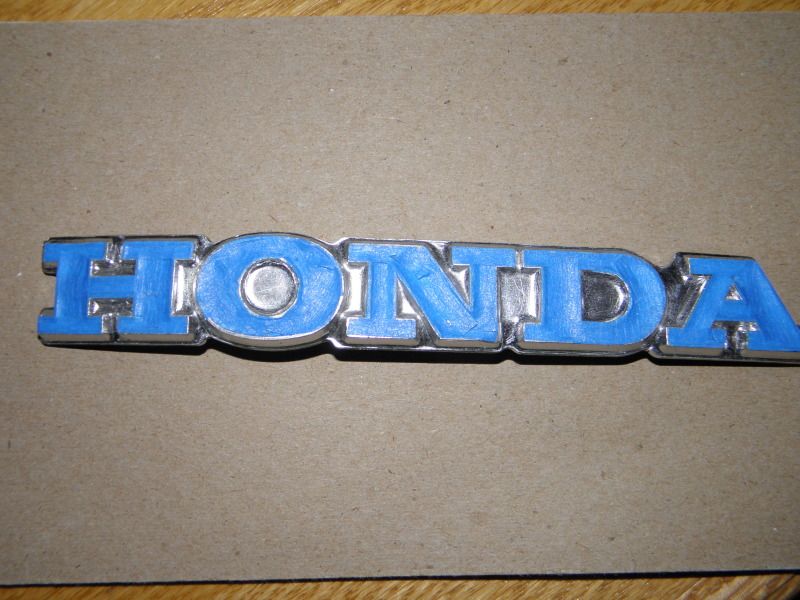
While on a roll, the HONDA tank emblem was next....   I'm not a good "brush" person either, so I went with the mask and spray plan.


Zip - Strip again...


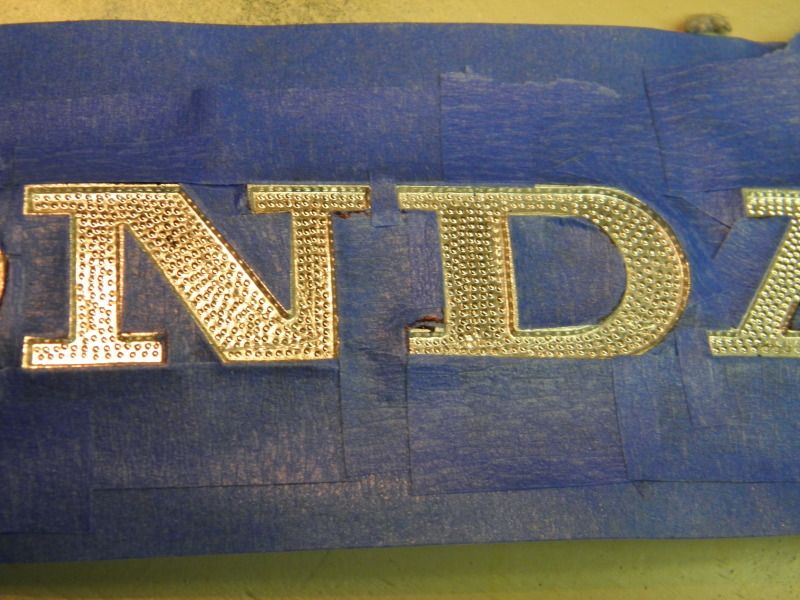
Mask off the white, and spray with Rustoleum Semi Gloss Black...


Mask off the black and spray with Rustoleum Gloss White...


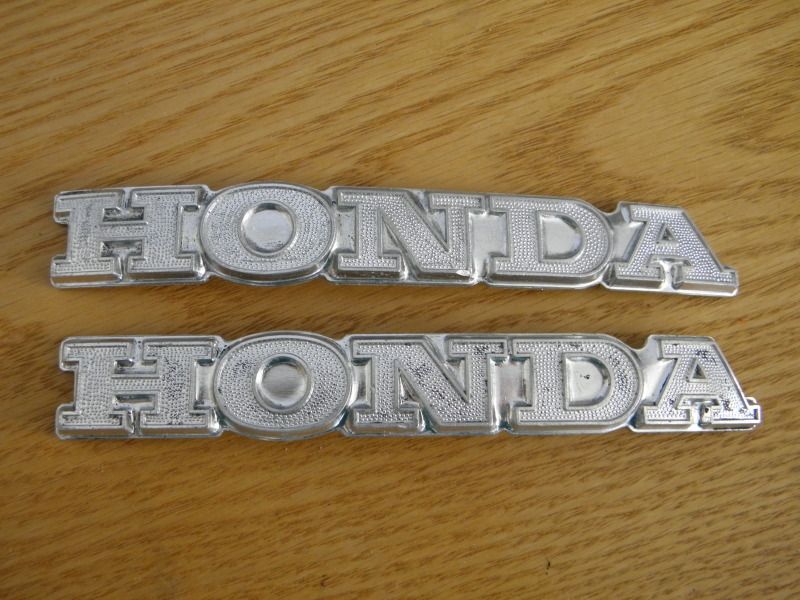
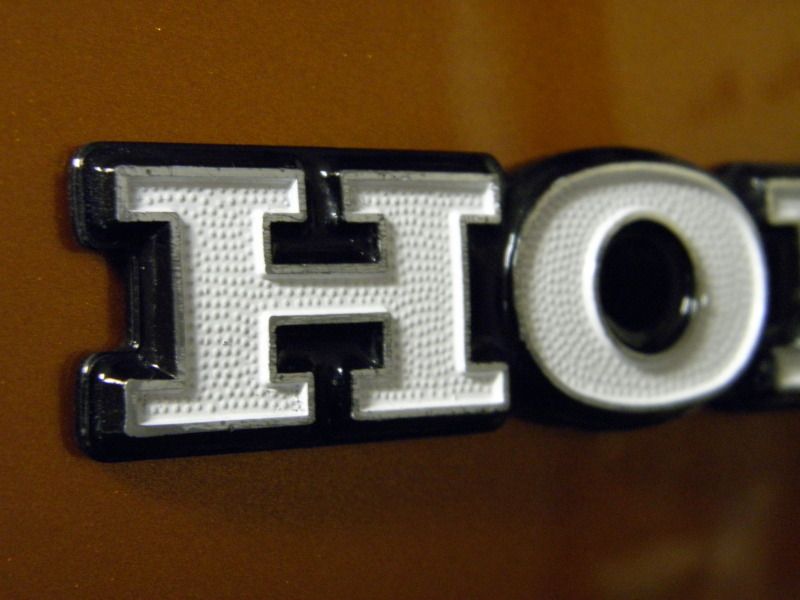
When dry, hit the highlights with some 1500 sandpaper, and presto!


My "flying wing jewel" was looking kind of blah and dull ... so I carefully chipped away the "retaining mushroom" on the back with an exacto knife, and dental pick, and you can then pop out the jewel.


Water and dust get behind the jewel and make it look dull.  Check out the difference.... the bottom one has been cleaned,  quite a difference.


While apart I spiffed up the black paint on the body...


A small drop of epoxy to replace the part I chipped out originally on the back to secure the jewel, and that's done.


A few projects out of the way.... several more to go.  The goal is to have everything ready for the final assembly in spring.  The "parts needed" list is finally countable on one hand   ;D

- #2 muffler
- battery
- chain
- grab bar

As usual, Thanks for stopping by ;D

"It is not the critic who counts, the credit belongs to the man who is actually in the arena, whose hands are covered with grease and oil."

K2 http://forums.sohc4.net/index.php/topic,105097.0.html

Offline Viktor.J

  • Breaking in the forum
  • Hot Shot
  • ***
  • Posts: 530
Re: K Two
« Reply #66 on: January 28, 2013, 11:19:11 PM »

While apart I decided to repaint the outer cases with my new favorite paint, the VHT caliper paint.  I like the fact that you need to bake it in the oven to cure it.  The original paint used was some tough stuff!  Airplane stripper did nothing to it, I had to bust out the old fashioned Zip-Strip, even that had a time of it.  I figure the cured VHT paint will hopefully be as tough.

The plan was to use the pliers with tape on the jaws method of re-assembly -  I found out that I lack the talent needed to pull that off,  maybe I don't have the correct pliers???   After struggling a while, I thought I'd use a screwdriver .... ended up slipping and putting a giant scratch in the case. Crap!    When done, I had put marks all over the ring with the pliers - so embarrassing looking, that I'm not going to show you the result here :-[   ;D

Plan B - grab a beer (or two)  and search the archives for a solution.   Found a post where someone (sorry I don't remember who now, or I'd credit you with the concept) suggested making a wood jig to hold the gauge solid, while using a hammer and punch to crimp the ring.....  no pliers involved, so I should be ok.   Made a little jig on the wood lathe out of some scrap maple - basically the hole needs to be very snug fitting on the outer case. I lined the hole with some stick on felt to prevent scratching.   You work your way around multiple passes just like the pliers method, the beauty being, the front face and side of the ring are never touched, so a perfect job from the front.

Stripped and repainted the scratched case, and ordered two new crimp rings from  www.cb750faces.com (should have done that right off when I ordered the new faces).  After crimping, I used a little Meguiar's swirl and scratch remover, on the black cases to remove what little micro scratches there was from the jig.


At least this time, I can show you the results.....


While on a roll, the HONDA tank emblem was next....   I'm not a good "brush" person either, so I went with the mask and spray plan.
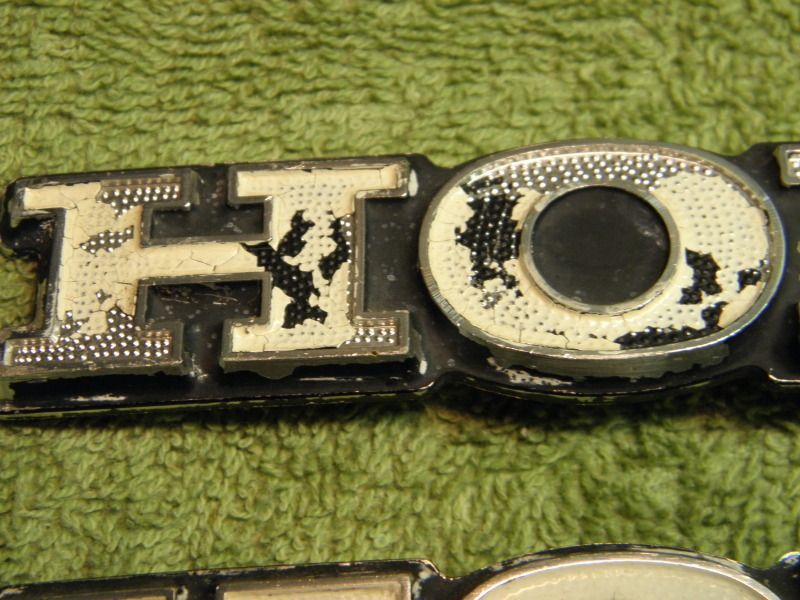


Zip - Strip again...


Mask off the white, and spray with Rustoleum Semi Gloss Black...


Mask off the black and spray with Rustoleum Gloss White...


When dry, hit the highlights with some 1500 sandpaper, and presto!


Nice work Jerry !
You seem to do all the work that I plan to do :)

Gauges:
Do you recommend to do the wooden jigg first hand ? I don't feel that secure with this "fine"-mechanical work. spoons, pliers and whats not :) ?
Any more heads up or recommendations ?

Tank emblem:
My white is also poor and falling of on some places. Where did you find the color ? or is it just some regular paint ? (dont live in the US)  I don-t want do the work and then in 6 months it turned out I chose a bad paint :)

Thanks for great work !
« Last Edit: January 28, 2013, 11:22:38 PM by Viktor.J »
Please ! Take a look and give me feedback in my project thread, its much needed :)
http://forums.sohc4.net/index.php?topic=112745.0

Honda CB750 K2

Offline disco

  • Hot Shot
  • ***
  • Posts: 571
Re: K Two
« Reply #67 on: January 29, 2013, 03:12:01 AM »
Hi Jerry,

I just discovered your re-build thread & I have got to say your attention to detail & ingenuinity at problem solving  is most impressive. I've picked up quite a few good techniques from your thread which I'll hopefully remember whilst I'm doing my next restoration (CB750K2). The speed of the build is quite amazing. When I look at how far you've come in such a relatively short time...absolutely mind boggling.

Keep up the great work! I can't wait for the next build instalment.
1976 CB750 K6 Sapphire Blue
1972 CB750 K2 836 Orange Sunrise
1972 CB750 K2 Candy Red
1972 CB750 K2 Candy Gold'

Offline Johnie

  • Really Old Timer ...
  • *******
  • Posts: 8,615
Re: K Two
« Reply #68 on: January 29, 2013, 05:39:27 AM »
Coming along great Jerry. Nice thread with lots of info for those in the same boat with you. Looking forward to us getting these candy golds out this summer.
1970 CB750K0 - Candy Ruby Red
1973 CB750K3 - Candy Bacchus Olive or Sunflake Orange
1970 Chevy Chevelle SS396 - Cortez Silver
1976 GL1000 Sulphur Yellow

Oshkosh, WI  USA

Offline Stev-o

  • Ain't no
  • Really Old Timer ...
  • *******
  • Posts: 34,437
  • Central Texas
Re: K Two
« Reply #69 on: January 29, 2013, 06:36:00 AM »
Great job and write up. I also need to restore some tank badges.
'74 "Big Bang" Honda 750K [836].....'76 Honda 550F.....K3 Park Racer!......and a Bomber!............plus plus plus.........

Offline Garystratos201

  • I have never been a
  • Hot Shot
  • ***
  • Posts: 419
Re: K Two
« Reply #70 on: January 29, 2013, 01:33:45 PM »
Jerry what can U say that hasnt been said already. Simply fandamtastic !!! Love the attention to detail and the ever so time consuming attention to detail...........Gary
Visit my build project;
http://forums.sohc4.net/index.php?topic=111620.0

Current ride; Bass boat.... 2005 Ranger 521VX,250 hp Mercury Verado, super charged and direct fuel injected. Not a bass on the lake can out run me !!!

Offline ferrodo

  • Full Member
  • *
  • Posts: 16
Re: K Two
« Reply #71 on: January 29, 2013, 01:55:03 PM »
Great attention to detail Jerry .. I love the way your clocks and emblems turned out..

Offline ZanVooden

  • I don't need no stinkin' title
  • Hot Shot
  • ***
  • Posts: 300
  • This was suppose to be a quick one month job...
Re: K Two
« Reply #72 on: March 15, 2013, 09:44:39 AM »
Jerry, I must have missed the start of the rebuild while I was working on some of other bikes away from this forum.

But I have to say this is incredible! Your attention to detail is fanatic and amazing. Come Spring (if it ever shows up here in Wisconsin) this is going to be an amazing bike to see around!

Good luck, and think spring!

Offline jerry h

  • Hot Shot
  • ***
  • Posts: 392
Re: K Two
« Reply #73 on: March 24, 2013, 11:09:10 PM »
Well, its officially Spring (calendar says so, but it sure doesn't feel like it outside yet),  so its time for a little update.

I really want to learn to do all of the maintenance items myself.  One thing I never liked doing was dropping my wheels off at the local dealer and having them install tires/balance etc.,  so with time this winter, I decided to put some effort in and learn a little about wheels.  Bought a spoke wrench,  some spoke weights  http://forums.sohc4.net/index.php?topic=115569.0 ,
made a tire stand out of some spare angle iron, added a  $2.00 Fowler dial indicator (yard sale find), and some adjustable feet from my last dish washer, and I'm ready to go.


 Many articles online, here's one I found really helpful....
http://www.ktm950.info/how/Tire%20Shop/spoked_wheels/Building_a_wheel/Building%20Wheels.pdf


I practiced trueing a junk rim up for a few weeks.   I'd get it good, then loosen it up and start over again, till I finally felt comfortable.  Months ago when the tires arrived, I was excited and mounted them right up, guessing the rims would be fine.... well the front had enough radial and lateral run out,  I decided to take the tire off and correct it properly, while the rear only needed a little tweaking.   With wheels balanced, and back on the chassis,  focus next was on getting everything ready for the "final" assembly, assuming the  temps ever get above 30F in my garage. 


Tail light and fender ready to be bolted on:


(I love the big tail light mount) 


Ordered an EK X Ring chain, and new sprockets, and finally got the engine connected to the rear wheel.  I replaced the cool  ::) 70's era chain guard (and a few other items as you can see from the before picture below) with an original issue .....


Another piece I was missing was the grab bar.   Simple item, but hard to tell what one is correct for your year when looking through the pages of grab bars on E bay.  Usually the sellers don't know exactly what they have.   I was super excited to get a correct one from the classifieds here.  THANKS KCN.   Really appreciate it. ;D


Carbs next.    Installation went fine, but true to form, I spent a few hours trying to decide if the angle of the carbs to the engine is correct   ???......  (I was thinking they should be more level,  possibly if I rotated the carb boots, I could alter the angle slightly)  but when I bolted the airbox up, and it fit perfectly, I figured all was well.


 Maybe a waste of time, but I spent a full week polishing my airbox. It had a brownish oxidation that was impervious to everything but Novus plastic polish (#1 and #3)  Eventually I was able to get a black finish back, followed by a coat of car wax for protection.   


For all of the hours spent working on this (not including the vast amount of  time thinking about the bike ;D)  I feel like I would have more to report,   but that' it!     Next installment I hope to have the front and rear fenders installed and get the front brake system back on and operational,   oh ..... and get the engine running ;D


Thanks for stopping by,
Take care->


« Last Edit: March 24, 2013, 11:18:23 PM by jerry h »
"It is not the critic who counts, the credit belongs to the man who is actually in the arena, whose hands are covered with grease and oil."

K2 http://forums.sohc4.net/index.php/topic,105097.0.html

Offline stewonepot

  • Enthusiast
  • **
  • Posts: 123
Re: K Two
« Reply #74 on: March 25, 2013, 12:59:12 AM »
Hi Jerry,
Great progress and looking very clean.The carb rubbers will be in the correct position when a straight edge is flush across all four. Is that chainguard a little long?
kind regards Stew