Author Topic: 1975 cb550 Project SENCHA - bike has found new home  (Read 81072 times)

0 Members and 2 Guests are viewing this topic.

Offline goldarrow

  • one day, i'll be an
  • Old Timer
  • ******
  • Posts: 3,361
Re: 1975 cb550 Project SENCHA - ENGINE - TOP END - THE RUBBER BAND TRICK!
« Reply #100 on: August 18, 2012, 03:54:56 PM »
So what's next since you have another project now?

More likely than not I'm going to save the bike. When it's gonna happen? No idea yet. Not sure if it's a good idea to start working on it while the 550 is still in progress.

Today put the o-rings that came with the gaskets kit


The new o-rings are a bit smaller than the old ones would this cause problems?
« Last Edit: August 20, 2012, 08:32:08 PM by goldarrow »
Life Is Full Of Challenges - And My Backyard Is Full Of SOHC4's

CB550 K0
CB750 K0, K2, K23 JDM, K45, K5
And the little ones z50r, xr50r, st90


750k5 http://forums.sohc4.net/index.php?topic=114817.0

Offline CBGhia

  • Expert
  • ****
  • Posts: 1,347
Were there 8 of those in the kit?  They look like the o-rings for the tappet covers.
CB550 Cafe, GL1000, Buell Ulysses
if you dont trial spin the camshaft in the head and cover you are a novice,with no natural mechanical appitude,destined for destruction.
"The cleaner the dipstick, the closer to God." -Rev. Horton Heat
“Faster, Faster, until the thrill of speed overcomes the fear of death.”  - Hunter S. Thompson

Offline goldarrow

  • one day, i'll be an
  • Old Timer
  • ******
  • Posts: 3,361
1975 cb550 Project SENCHA - ENGINE - TOP END - HEAD, VALVES - CAMSHAFT next
« Reply #102 on: August 18, 2012, 07:22:14 PM »
Were there 8 of those in the kit?  They look like the o-rings for the tappet covers.

The kit came with 12 total.  I'm thinking 8 for rapport and 4 for intake...but that's how they look on intake ports
Life Is Full Of Challenges - And My Backyard Is Full Of SOHC4's

CB550 K0
CB750 K0, K2, K23 JDM, K45, K5
And the little ones z50r, xr50r, st90


750k5 http://forums.sohc4.net/index.php?topic=114817.0

Offline dave500

  • Really Old Timer ...
  • *******
  • Posts: 17,033
  • WHAT?no gravy?
the old ones wouldve been flattened into the groove fully,its the same o ring for the tappet covers and the inlet manifolds.

Offline goldarrow

  • one day, i'll be an
  • Old Timer
  • ******
  • Posts: 3,361
1975 cb550 Project SENCHA - ENGINE - TOP END - HEAD, VALVES - CAMSHAFT next
« Reply #104 on: August 18, 2012, 09:20:24 PM »
Head is tightened down.  Used pick tool and laced the washer then bolt, helped guided them into the holes.

Tightened down the nuts in steps. First few rounds by hand. Then more rounds using torque wrench. I only have lbs/in type.

1st round 100 lbs/in = 8.3 lbs/ft.
2nd round 120 lbs/in = 10 lbs/ft
3rd round 140 lbs/in = 11.7 lbs/ft
4th round  160 lbs/in = 13.3 lbs/ft
Then last round 170 lbs/in = 14.2 lbs/ft. just shy of 14.46 minimum spec per manual. Realizing that these bolts are old and may be a bit rusty, so I stop there

Also did a couple of kick by hand at the kick start to feel how pistons move. I could hear some compressions noise from the holes. So I think that is a good sign, right?
« Last Edit: August 18, 2012, 09:24:04 PM by goldarrow »
Life Is Full Of Challenges - And My Backyard Is Full Of SOHC4's

CB550 K0
CB750 K0, K2, K23 JDM, K45, K5
And the little ones z50r, xr50r, st90


750k5 http://forums.sohc4.net/index.php?topic=114817.0

Offline dave500

  • Really Old Timer ...
  • *******
  • Posts: 17,033
  • WHAT?no gravy?
go a little higher final torque,like 16-18,you wont need to retorque,yeah turn the engine over a few times to make sure theres no binding or valve to piston smash,plenty of oil down the bores.

double check your cam timing marks,and make sure the ignition is set up correctly,it must fire up first time and dont let it idle,blip the throttle untill its warm enough to ride,youll have to vacuum sync the carbs once its run for a little while,change the oil after the first tank of fuel.
« Last Edit: August 18, 2012, 11:54:55 PM by dave500 »

Offline dave500

  • Really Old Timer ...
  • *******
  • Posts: 17,033
  • WHAT?no gravy?
« Last Edit: August 19, 2012, 12:26:04 AM by dave500 »

Offline goldarrow

  • one day, i'll be an
  • Old Timer
  • ******
  • Posts: 3,361
1975 cb550 Project SENCHA - ENGINE - TOP END - HEAD, VALVES - CAMSHAFT next
« Reply #107 on: August 19, 2012, 12:14:43 PM »
Thanks Dave. I'll make sure I do those.  The bike is far from running still.

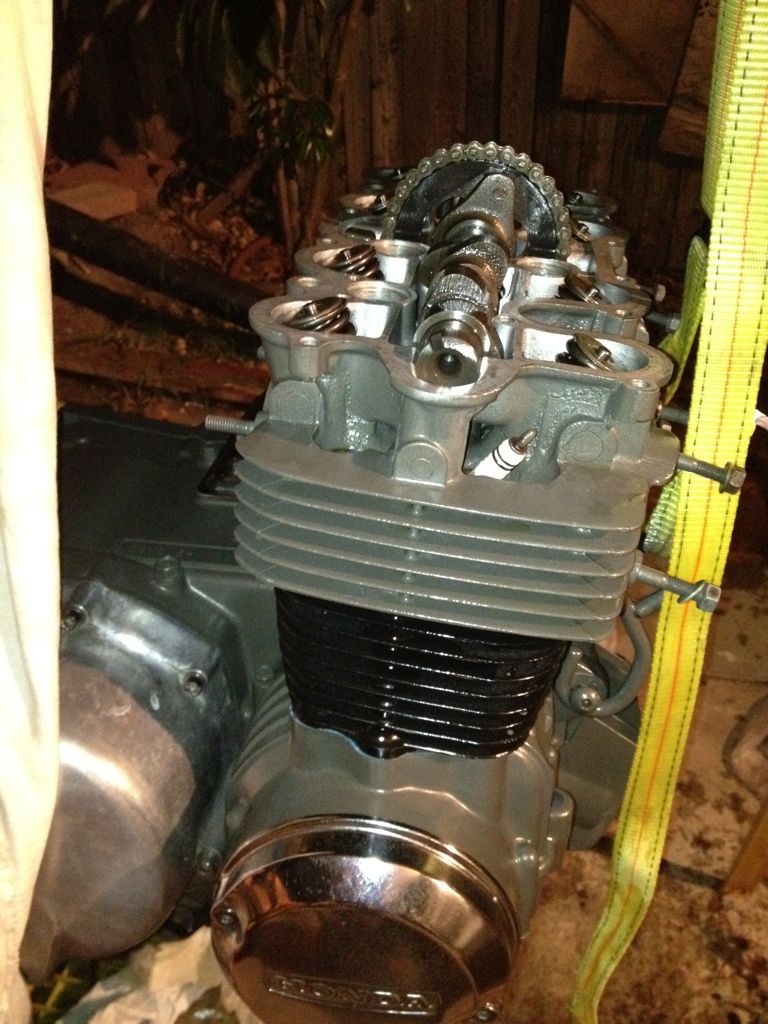
Here's how motor look like at the moment.


« Last Edit: August 19, 2012, 12:21:20 PM by goldarrow »
Life Is Full Of Challenges - And My Backyard Is Full Of SOHC4's

CB550 K0
CB750 K0, K2, K23 JDM, K45, K5
And the little ones z50r, xr50r, st90


750k5 http://forums.sohc4.net/index.php?topic=114817.0

Offline Stev-o

  • Ain't no
  • Really Old Timer ...
  • *******
  • Posts: 34,419
  • Central Texas
Motor looks great
'74 "Big Bang" Honda 750K [836].....'76 Honda 550F.....K3 Park Racer!......and a Bomber!............plus plus plus.........

Offline goldarrow

  • one day, i'll be an
  • Old Timer
  • ******
  • Posts: 3,361
1975 cb550 Project SENCHA - ENGINE - TOP END - HEAD, VALVES - CAMSHAFT next
« Reply #109 on: August 19, 2012, 09:40:52 PM »
Thanks Steve, I'm trying.
Life Is Full Of Challenges - And My Backyard Is Full Of SOHC4's

CB550 K0
CB750 K0, K2, K23 JDM, K45, K5
And the little ones z50r, xr50r, st90


750k5 http://forums.sohc4.net/index.php?topic=114817.0

Offline goldarrow

  • one day, i'll be an
  • Old Timer
  • ******
  • Posts: 3,361
Re: 1975 cb550 Project SENCHA - ENGINE - TOP END - 650 CAM drop in!
« Reply #110 on: August 19, 2012, 10:37:27 PM »
Spent my late afternoon finish up torquing the head.

Increments of 10 Lbs/in, went up all the way to 200 lbs/in = 16.67 lbs/ft which is right at the upper end of manual spec.

Dropping in the 650 cam without any mod to the casting.

My stock cam was pitted badly on several lobes so I had no choice but change it out. Since I'm changing it, might as well go with the performance upgrade. Thank you Onepieceatatime for letting me have your 650 cam.  Also remembered from reading Twotired post about later 77 or 78 550 cam cover will keep the 650 cam at longevity. Something I might do down the road.

Here are some pics

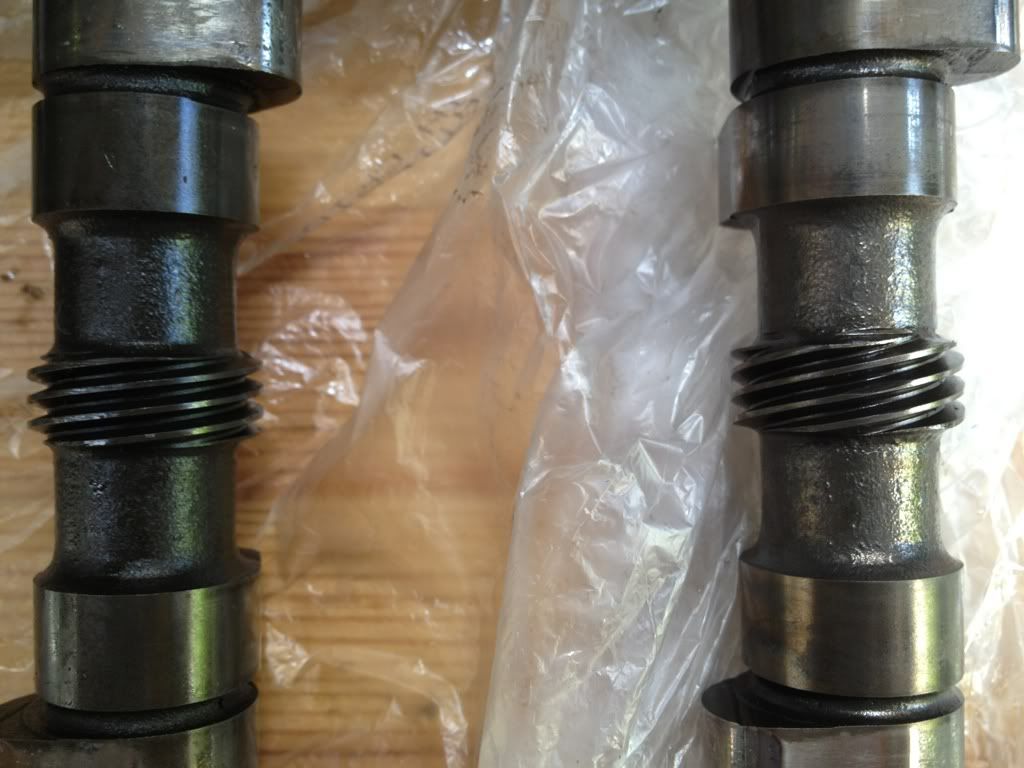
On the left is my set of cam, the right is the 650
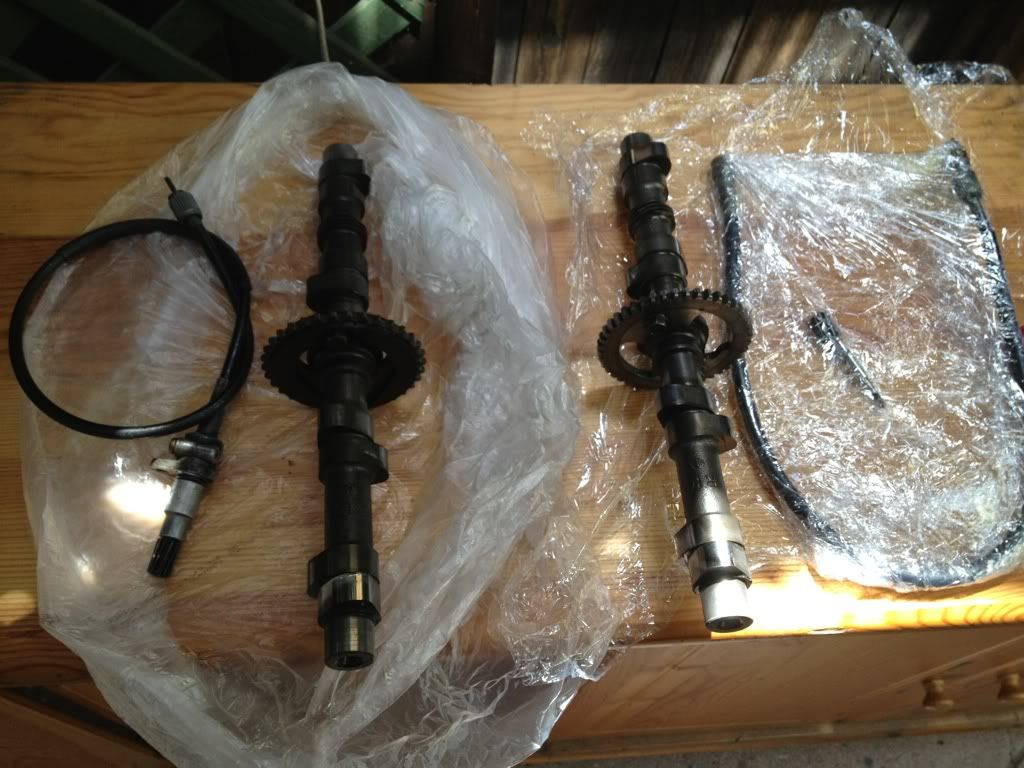

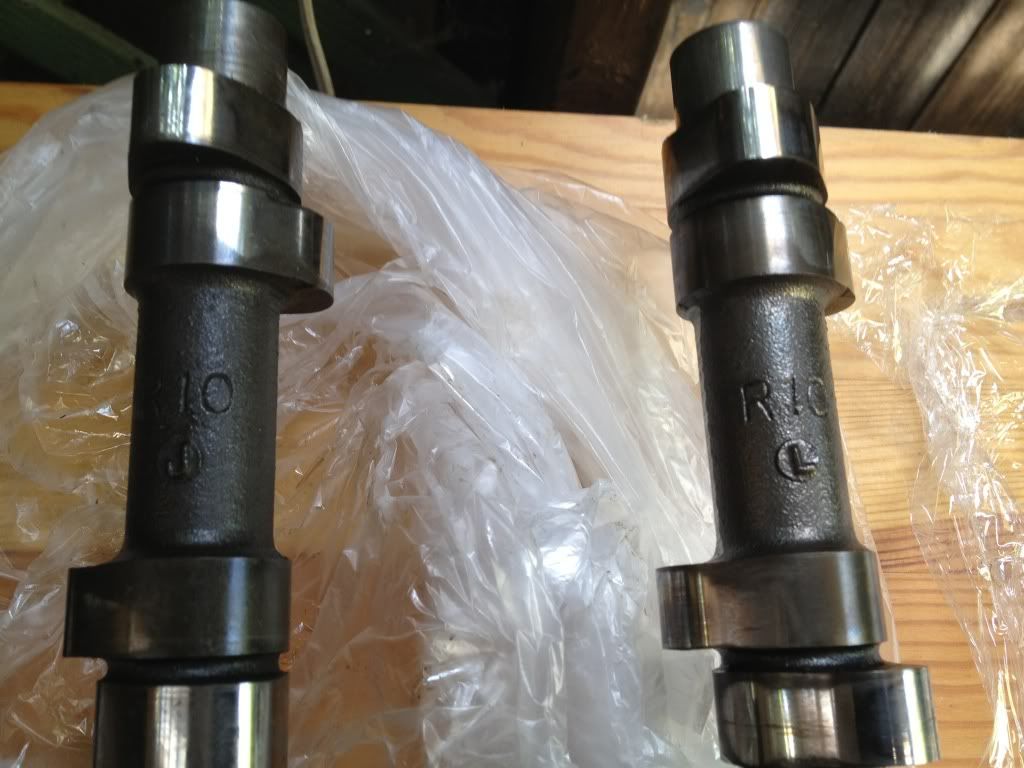
This pic 650 cam is on the right.  The cam marked R10 L. The 550 cam marked R10 J. No clue what these means.

Sprocket in comparison, again 650 is on the right
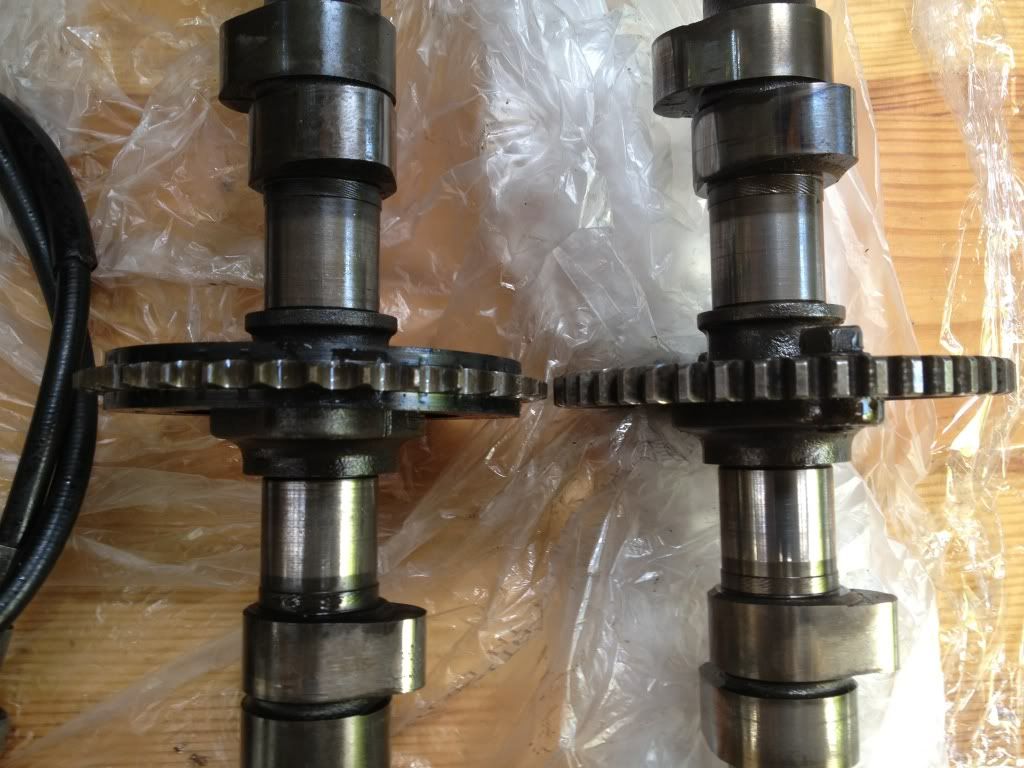

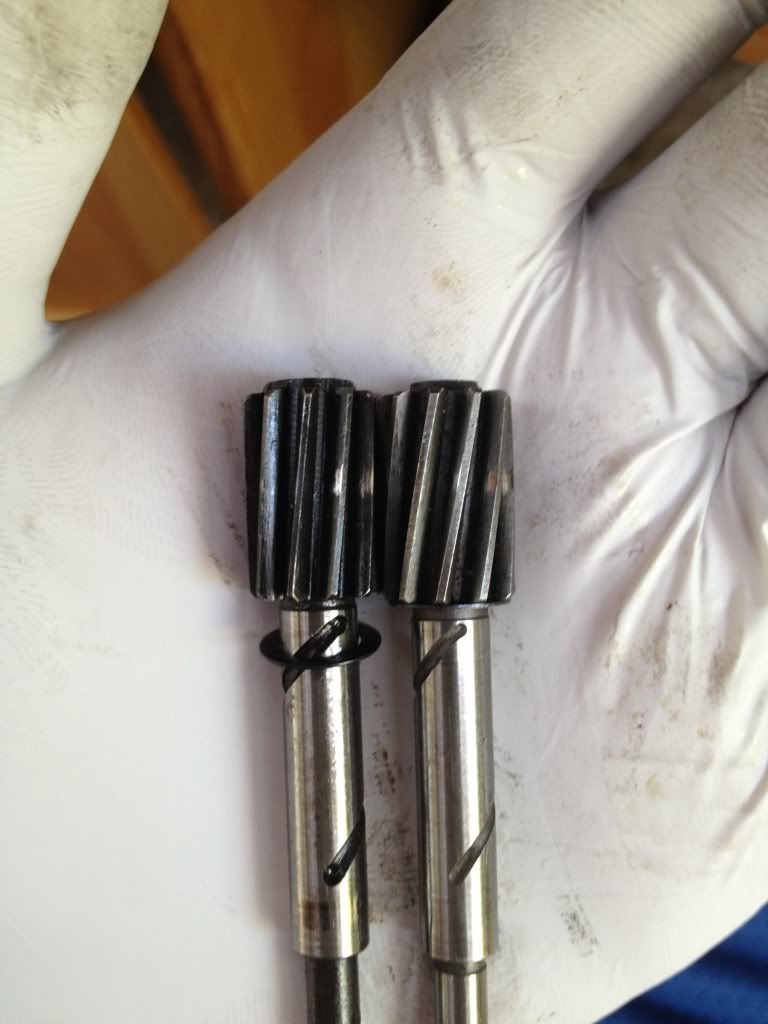
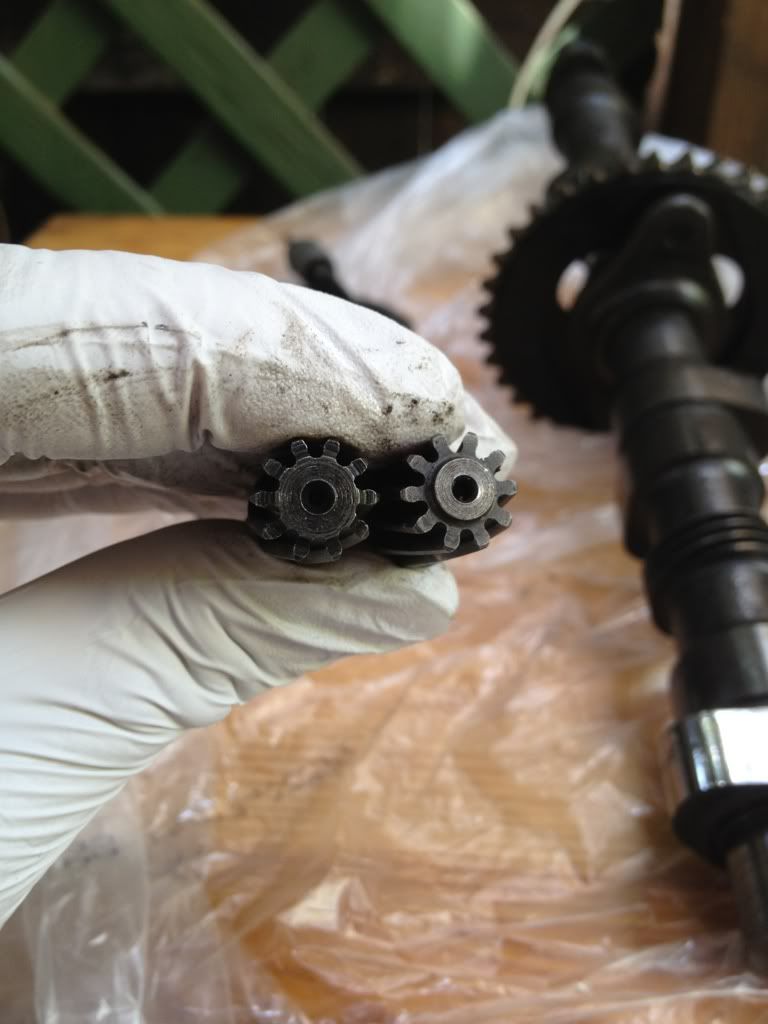
Tach drive gear. Notice that the gears are just slightly more slanted than the 550. This is why you will need the 650 tach drive

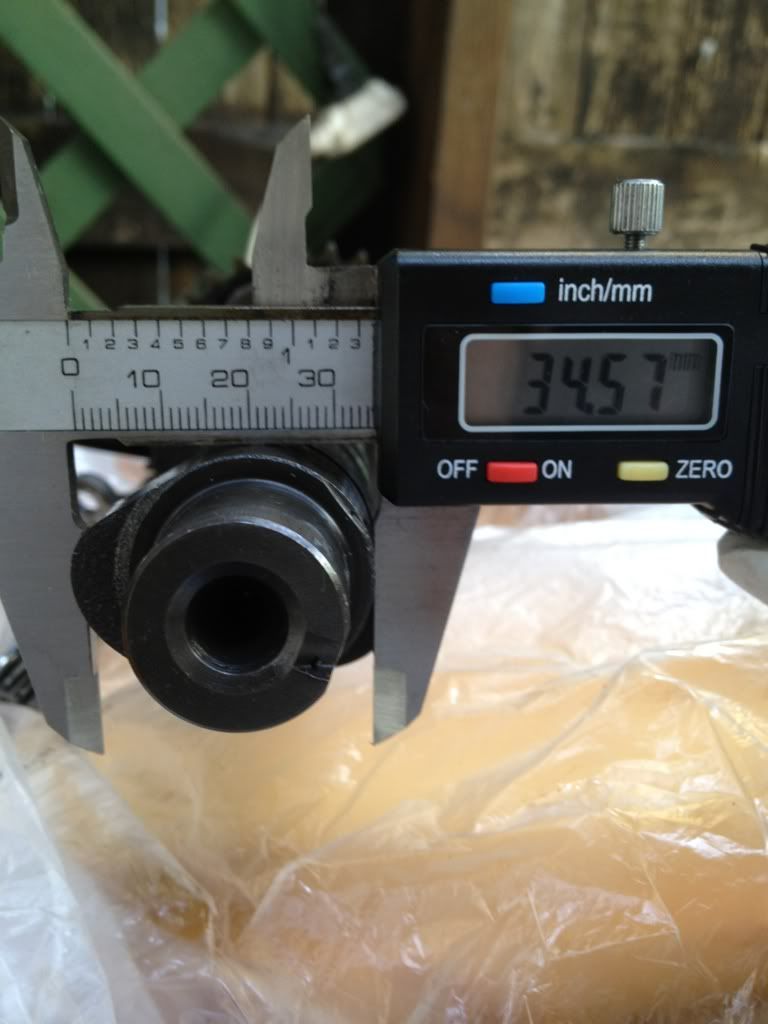
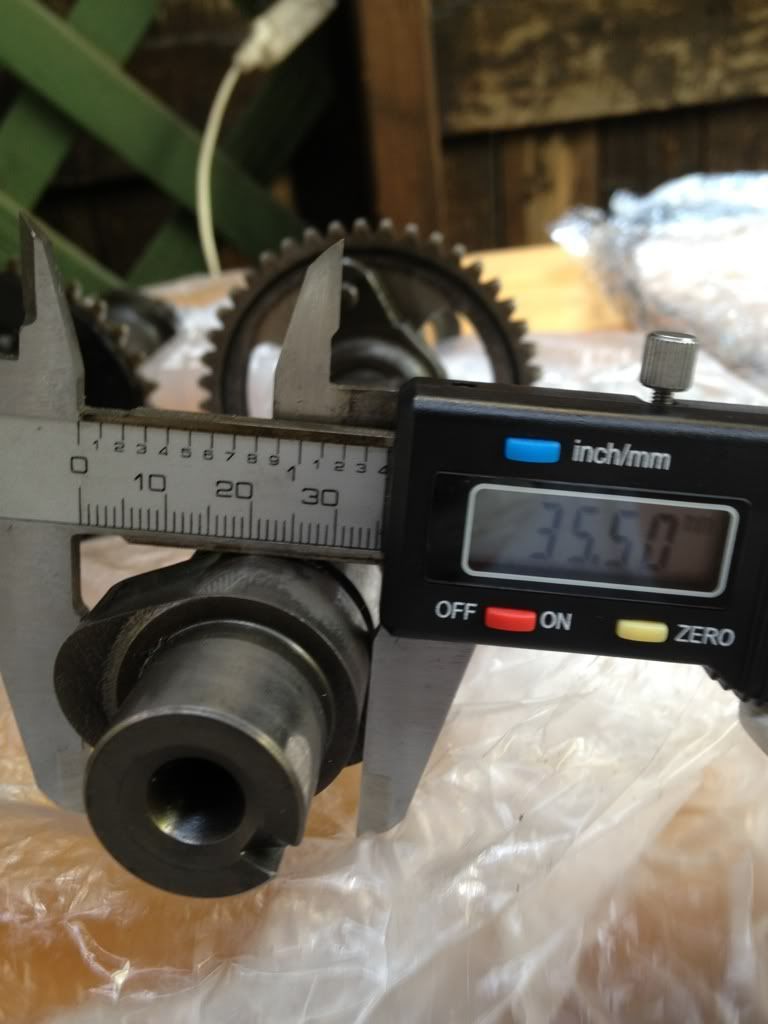
Lobe measurement in comparison. 650 cam obviously has longer lobes.


Tach drive side by side

A different view

Installing the cam is fairly straight forward, make sure to follow the manual. Ch.4 no.12, figure no.84. Make sure position chain, sprocket, and cam as pictured

Set valve timing as shown in no.13 and figure 85


Now that you followed the manual, chain and sprocket still won't go on the cam right? Well here's the trick. Not sure if this has ever been covered already but I don't recall seeing from reading.

What you want to do is tighten up the tensioner so that no tensions apply to the chain. Loosen the nut, turn adjusting bolt to the right (don't do too hard or you'll break it) then tighten up the nut.

Now there should be just enough slack in the chain to slide the sprocket onto the cam and bolt on. Make sure valve timing is still spot on. Chain will go on to the sprocket with ease

Once done tighen up the bolt, spin the motor few time and done!

Cover up the rest tomorrow

Edit: forgot to mention to keep using 550 cam sprocket.
« Last Edit: August 19, 2012, 11:07:33 PM by goldarrow »
Life Is Full Of Challenges - And My Backyard Is Full Of SOHC4's

CB550 K0
CB750 K0, K2, K23 JDM, K45, K5
And the little ones z50r, xr50r, st90


750k5 http://forums.sohc4.net/index.php?topic=114817.0

Offline onepieceatatime

  • Hot Shot
  • ***
  • Posts: 624
Re: 1975 cb550 Project SENCHA - ENGINE - TOP END - 650 CAM drop in!
« Reply #111 on: August 19, 2012, 11:30:01 PM »
That engine is looking really nice. Glad to see it all coming back together, and looking forward to seeing that you have it on the road.
1965 CA77
1972 CB750K Ol' Sarge
1974 CB450K7
1977 CB750K7
1977 CB750K7
1980 CB650C
1982 CM450A
1997 GL1500SE

Offline goldarrow

  • one day, i'll be an
  • Old Timer
  • ******
  • Posts: 3,361
Re: 1975 cb550 Project SENCHA - ENGINE - TOP END - 650 CAM drop in!
« Reply #112 on: August 20, 2012, 07:54:25 PM »
thanks onepiece for your contribution, still have a few things to sort out but sure is coming along.
Life Is Full Of Challenges - And My Backyard Is Full Of SOHC4's

CB550 K0
CB750 K0, K2, K23 JDM, K45, K5
And the little ones z50r, xr50r, st90


750k5 http://forums.sohc4.net/index.php?topic=114817.0

Offline goldarrow

  • one day, i'll be an
  • Old Timer
  • ******
  • Posts: 3,361
Re: 1975 cb550 Project SENCHA - ENGINE - TOP END - 650 CAM drop in!
« Reply #113 on: August 20, 2012, 08:20:01 PM »
today, buttoning up the top of the engine.

securing the rocker arms using the famous, very well sought after trick for installing the cam cover! THE RUBBER BAND TRICK!  i went extra mile using the colorful rubber bands...lol

here's pic of top of cover


bottom side of cover, all ready to go


applying yamabond semi drying #4 to the rubber seals pucks, it was a bit messy, so later i applied the sealant to the head instead.


and here's the engine buttoned up.  just need to get hex bits so that i can torque the cover down per manual


finishing up the rest of the engine paint, the swing arms next
« Last Edit: August 20, 2012, 08:25:46 PM by goldarrow »
Life Is Full Of Challenges - And My Backyard Is Full Of SOHC4's

CB550 K0
CB750 K0, K2, K23 JDM, K45, K5
And the little ones z50r, xr50r, st90


750k5 http://forums.sohc4.net/index.php?topic=114817.0

Offline dave500

  • Really Old Timer ...
  • *******
  • Posts: 17,033
  • WHAT?no gravy?
Re: 1975 cb550 Project SENCHA - ENGINE - TOP END - THE RUBBER BAND TRICK!
« Reply #114 on: August 21, 2012, 12:05:38 AM »
once the cover is on and tappets set remove the plugs and turn the engine over a few times,make sure the valves dont hit the pistons.

Offline goldarrow

  • one day, i'll be an
  • Old Timer
  • ******
  • Posts: 3,361
1975 cb550 Project SENCHA - ENGINE - TOP END - THE RUBBER BAND TRICK!
« Reply #115 on: August 21, 2012, 09:43:37 AM »
One question Dave, how do I make sure oil pump is active and doing its job supplying the oil to the top end?

When does the oil pump actually pumping up the oil? I just want to make sure that oil is feeding it's way up so that I don't have to go back to square 1 and spend money on rebuilding it again because of no oil.

I will probably remove the oil pump for inspection also.

Thanks
Life Is Full Of Challenges - And My Backyard Is Full Of SOHC4's

CB550 K0
CB750 K0, K2, K23 JDM, K45, K5
And the little ones z50r, xr50r, st90


750k5 http://forums.sohc4.net/index.php?topic=114817.0

Offline dave500

  • Really Old Timer ...
  • *******
  • Posts: 17,033
  • WHAT?no gravy?
Re: 1975 cb550 Project SENCHA - ENGINE - TOP END - THE RUBBER BAND TRICK!
« Reply #116 on: August 21, 2012, 01:41:07 PM »
good precautions goldy,with the left cover off youll see the oil pump pressure switch,this turns the dash light on and off,remove it and with the ignition off and the spark plugs out spin the engine on the starter and up to about 3 or 4 seconds or instantly oil should spurt out of that hole,refit the sender,then again with plugs out and ignition off spin it again and the oil light should go out.normaly the oil light goes out pretty much straight away when starting,if youve done an oil and filter change it takes a few seconds to fill the filter housing and build pressure.
« Last Edit: August 21, 2012, 01:43:05 PM by dave500 »

Offline goldarrow

  • one day, i'll be an
  • Old Timer
  • ******
  • Posts: 3,361
1975 cb550 Project SENCHA - ENGINE - TOP END - THE RUBBER BAND TRICK!
« Reply #117 on: August 21, 2012, 05:08:09 PM »
once the cover is on and tappets set remove the plugs and turn the engine over a few times,make sure the valves dont hit the pistons.

I think I have a serious problems!?!?!?! But I hope not. Set timing T mark spot in at the point BUT I have no play at the rockers to adjust!  Intake #3, Exhaust #1,2

Looking at the manual


Reading it over and over like 10 times, I think I'm doing it in reverse than the manual. Basically, i was trying to do the "x" instead of "o" and that's why no play in the rockers? If so, could I simply turn the crank another 360* to free up the rockers?

Here's my 0.05mm feeler now


I hope I'm right, will give another go tomorrow
Life Is Full Of Challenges - And My Backyard Is Full Of SOHC4's

CB550 K0
CB750 K0, K2, K23 JDM, K45, K5
And the little ones z50r, xr50r, st90


750k5 http://forums.sohc4.net/index.php?topic=114817.0

Offline dave500

  • Really Old Timer ...
  • *******
  • Posts: 17,033
  • WHAT?no gravy?
Re: 1975 cb550 Project SENCHA - ENGINE - TOP END - THE RUBBER BAND TRICK!
« Reply #118 on: August 21, 2012, 08:05:03 PM »
turn it 360 back to the same mark and try again,or do it the way i always do,ignore the notion of setting a few tappets at a time and do one cylinder at a time in sequence,rotate the engine in its running direction and watch as the valves for #1 move,keep turning and watch as the inlet valve goes down then starts to come up,when its almost closed look at your 1/4 mark and stop it at "T",set both valves on cylinder 1 now,do all the valves like this remembering to stop the mark on 2/3 for those cylinders,,this way you cannot be wrong,no valve will be set with the cam of its base circle.

i have a feeler set where you can remove each blade from the holder,it makes it a little easier to do then,i cut them off blunt and sharpen the blunt end down a little,itll insert a bit easier then.
« Last Edit: August 21, 2012, 08:10:42 PM by dave500 »

Offline goldarrow

  • one day, i'll be an
  • Old Timer
  • ******
  • Posts: 3,361
Re: 1975 cb550 Project SENCHA - ENGINE - ALL ABOUT TIMINGS
« Reply #119 on: August 22, 2012, 09:34:34 PM »
finally, i was able seal up the engine top-end today. 

- valves tappets checked
        well, previously i was having small trouble adjusting the tappets.  trying to do several "o" and "x" at a time was not successful for me as i found out that one of the tappet screws won't go all the way through the rocker arm screw hole like it normally should, it kinda stuck half way.  may be this is something to check before doing installing the cover on the head.  i went ahead adjusting the tappets 1 cylinder at a time both inlet and exhaust. 

starting with
-No.1, turn crank until T mark 1-4 lined up with the case mark, check to see if rocker arms moves up and down a lot or very loose, this is TDC (top dead center) at cylinder 1, then it is ok to adjust the INLET 0.05mm and EXHAUST .08mm.   
-if you check the rocker arms and they are tight, or move up/down very little, then TDC (top dead center is at cylinder 4).  turn crank 360 degrees and make sure T mark 1-4 lined up with the case mark again, this should be TDC of cylinder 1.  then adjust tappets for cylinder 1.
-turn crank case once more 360 degrees, with the T mark 1-4 lined up, this should be TDC of cylinder 4, adjust the tappets
- turn crank case again but this time make sure T mark 2-3 lined up with the case mark.  feel the play on the rocker arms, if the rocker arms on cylinder 2 feels way loose, then TDC is at this cylinder, adjust the tappets.  if rocker arms are tight, TDC is at cylinder 3.  turn crank case 360 degrees and adjust tappets on cylinder 2.
- turn crank case again 360 degrees and this should be TDC of cylinder 3, adjust tappets and you're done.

this is probably not the best write ups, but i was only trying to be a little more precise that what i have read here on the forum and the manual.  hope this helps someone in the future.

- cam chains checked
                 once done with the tappets, adjust cam chain with to its sweet spot.  very straight forward from the manual.  loosen the cam adjuster nut, turn the crank to just past the T 1-4 mark, spring peg just to the right of the case mark.  this is 15 degrees ATDC (AFTER Top Dead Center) sweet spot.  tighened up the cam adjuster nut and you're done.

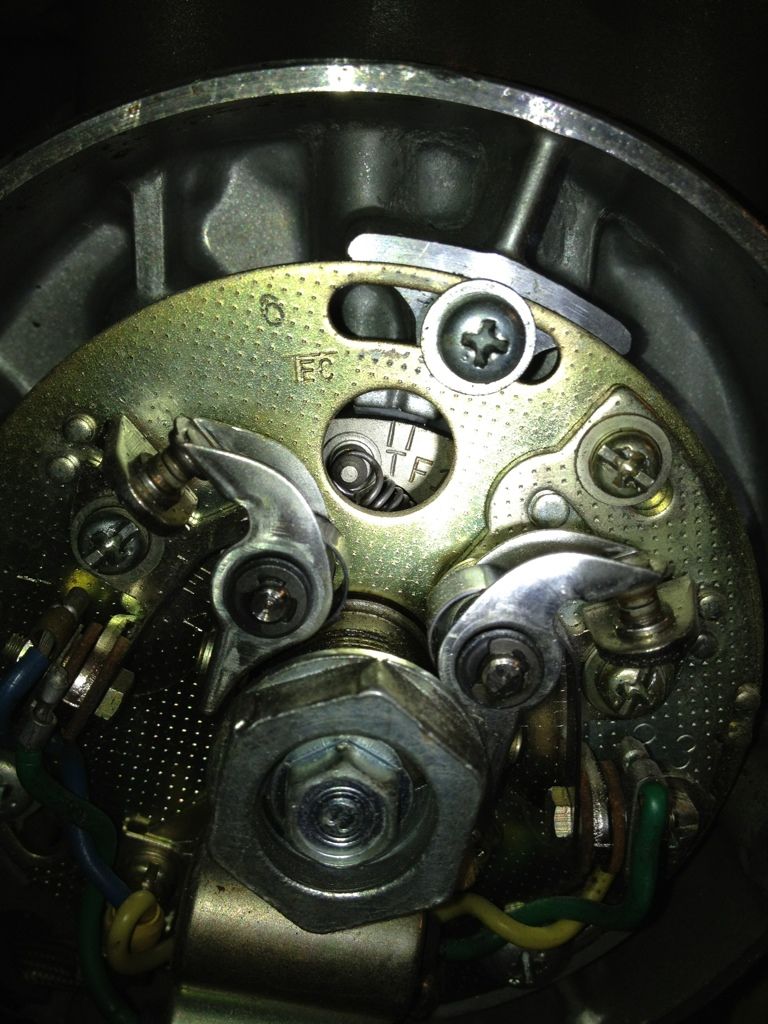
- points checked
               here following the manual is simple, but trying to see when the crank turns until the point contact opens widest could be tricky to the eyes.  after several turns, i notice that when the points open up the most, the crank is at 15 degrees ATDC.  so i used that as a reference to adjusting the point. someone please correct me if i'm wrong. manual spec is 0.3mm - 0.4mm.  do the same procedure for point 2-3. 
Life Is Full Of Challenges - And My Backyard Is Full Of SOHC4's

CB550 K0
CB750 K0, K2, K23 JDM, K45, K5
And the little ones z50r, xr50r, st90


750k5 http://forums.sohc4.net/index.php?topic=114817.0

Offline goldarrow

  • one day, i'll be an
  • Old Timer
  • ******
  • Posts: 3,361
Re: 1975 cb550 Project SENCHA - ENGINE - FINISHING IT UP
« Reply #120 on: August 27, 2012, 07:03:02 PM »
droped oil filter, oil pan and clutch cover. 

-changed 3 o-rings on the oil pumps.  of course the screws holding oil pump to the engine won't come off without a fight.  had to use screw extractors on 2 of the 3 screws, and replaced with slightly shorter screws, hope this will be okay.

-removed starter and replaced one o-ring there, no difficulty here

oil filter cover - same paint as the engine
-little of fighting to get it off, but it came off with not much buggered head.  i call that lucky.  removed the oil filter, and the famous washer that like to go missing is still intact, i call that lucky #2!

oil pan cover - autozone changed out their paint inventory!  i have been using rustoleum brand and just happen to short a can of engine primer and cast coat iron!  had to get VHT brand instead and paint came out different, oh well, minor differences in color but i don't think it's much noticable as it will be on bottom of engine
- removed the bolt without much difficulties either.  pan dropped right down.  plenty of crud in the pan, but did not notice any metal specks, i call that lucky #3!


clutch cover - painted black.  i didn't want to use the VHT paint of slightly different tone than the engine, so i went with black, hopefully this will match with the cylinder and tappet covers

will put in oil and seal the engine tomorrow.  i already have new mobil 1 racing 4t 10w-40 on hand that i bought a while back, so i will use this instead of go out and buy different oil.    the engine is still far from getting fired up, and i just wanna make sure i have some oil in it while it sits.
Life Is Full Of Challenges - And My Backyard Is Full Of SOHC4's

CB550 K0
CB750 K0, K2, K23 JDM, K45, K5
And the little ones z50r, xr50r, st90


750k5 http://forums.sohc4.net/index.php?topic=114817.0

Offline goldarrow

  • one day, i'll be an
  • Old Timer
  • ******
  • Posts: 3,361
1975 cb550 Project SENCHA - ENGINE - FINISHING IT UP
« Reply #121 on: August 28, 2012, 11:49:47 PM »
Well, I'm buttoning up the rest of my engine covers  and everything was going along very well until I peep into the oil filter hole. Looks like something was eating the metal of bottom case right at the tip of oil filter bolt? 

Anyone ever seen this? Experience it? Please chime in.


And wait, is that a crack? Will my engine be ok to running like this?


Life Is Full Of Challenges - And My Backyard Is Full Of SOHC4's

CB550 K0
CB750 K0, K2, K23 JDM, K45, K5
And the little ones z50r, xr50r, st90


750k5 http://forums.sohc4.net/index.php?topic=114817.0

Offline rb550four

  • Master
  • *****
  • Posts: 2,473
  • I'm nobody's slave and nobody's master
Re: 1975 cb550 Project SENCHA - ENGINE - FINISHING IT UP
« Reply #122 on: August 29, 2012, 01:29:35 PM »
Looks like PO cranked the crap out of the oil filter bolt , stress crack... If I saw that at this stage... I would complete the engine and run it . Measure the size of the crack now, remeasure each oil change to see if it remained the same or not. Could run forever or break next week , fortunately it isn't a moving part and would not be subject to the pressures of most moving parts. I'd run it. Just remind yourself of it's condition while tightening the filter bolt. 
    Anyone else?
A few Honda 500's, a few Honda 550's, a few Honda 650's, '72 cb 450, a couple 500/550/650 hybrids, and 2001 750. 
  550 Snowbike -Somebody had to do it.
  http://forums.sohc4.net/index.php/topic,101678.0.html             
http://forums.sohc4.net/index.php/topic,137317.msg1550907.html#msg1550907

Offline Mcwilliams570

  • Hot Shot
  • ***
  • Posts: 646
Re: 1975 cb550 Project SENCHA - ENGINE - FINISHING IT UP
« Reply #123 on: August 29, 2012, 01:48:01 PM »
Like rb500four said I would run it like it is (I am a cheap bastard) and keep a close eye on it.

Matt
My CB550 project http://forums.sohc4.net/index.php?topic=101182.0

Project UFB Cb550 http://forums.sohc4.net/index.php?topic=112143.0

Like a 10 dollar hooker on Friday night its going to be ridden.

1974 cb550
1975 cb550
2005 vmax
2009 vmax-sold
1981 gl500i

Offline Stev-o

  • Ain't no
  • Really Old Timer ...
  • *******
  • Posts: 34,419
  • Central Texas
Re: 1975 cb550 Project SENCHA - ENGINE - FINISHING IT UP
« Reply #124 on: August 29, 2012, 08:29:17 PM »
Run it!
'74 "Big Bang" Honda 750K [836].....'76 Honda 550F.....K3 Park Racer!......and a Bomber!............plus plus plus.........