Author Topic: 1975 cb550 Project SENCHA - bike has found new home  (Read 78600 times)

0 Members and 1 Guest are viewing this topic.

Offline goldarrow

  • one day, i'll be an
  • Old Timer
  • ******
  • Posts: 3,361
continuing from where i left off yesterday, honing my cylinder away. 
got lots of scratches out, can you see it?


after about an hour of honing, stopping, honing stopping, just like you're in a stop and go traffic.  can you see it now?


well, it's there, but most of it is gone.  trying to feel it with my finger nail but can't feel it, so i think i'm gonna call it done.  what do you think?  what i'm gonna do for cleaning up is dunk the whole cylinder into a bucket of water/simple green mix.  gonna let it soak over night so that tomorrow i can clean and scrape old gaskets off.

this is how the cylinder measured

the number was running up to 58.54, i guess this is how liable harbor freight measuring caliper is. 
the manual said serviceable limits on the bore is 58.6
my number looks pretty decent

what do you think?
Life Is Full Of Challenges - And My Backyard Is Full Of SOHC4's

CB550 K0
CB750 K0, K2, K23 JDM, K45, K5
And the little ones z50r, xr50r, st90


750k5 http://forums.sohc4.net/index.php?topic=114817.0

Offline wannabridin

  • Patience made me a
  • Master
  • *****
  • Posts: 2,236
  • -Garrett
    • 1976 CB750K, under construction:
you should run to harbor freight and get a set of their ID mic's.  This way you can get a more precise measurment of the bores.  http://www.harborfreight.com/hand-tools/specialty-measuring/6-piece-telescoping-gauge-set-5649.html

they are certainly worth it!!
1976 CB750K, currently under construction:
http://forums.sohc4.net/index.php?topic=64468.0

-And if you don't do it this year, you'll be one year older when you do...

Offline fastbroshi

  • Puppet
  • Old Timer
  • ******
  • Posts: 2,645
I've got a set of those and they suck ballz.  The locking mechanisms have an inconsistent feel to them in my opinion, but I'm no machinist.
Just call me Timmaaaaay!!!

Offline wannabridin

  • Patience made me a
  • Master
  • *****
  • Posts: 2,236
  • -Garrett
    • 1976 CB750K, under construction:
really?  mine took a little getting used to, but they produced quite accurate results after i played with them a little.  harbor freight is hit or miss, but luckily they have a great return policy!! 
1976 CB750K, currently under construction:
http://forums.sohc4.net/index.php?topic=64468.0

-And if you don't do it this year, you'll be one year older when you do...

Offline fastbroshi

  • Puppet
  • Old Timer
  • ******
  • Posts: 2,645
Let me rephrase.  The telescoping portions felt like they weren't made very well and had a lot of side to side slop in them.  They almost feel like the springs inside are catching on something.  Goooooooo China!
Just call me Timmaaaaay!!!

Offline rb550four

  • Master
  • *****
  • Posts: 2,472
  • I'm nobody's slave and nobody's master
I have been not so happy with any of harbor freight tools so far,  the price is so enticing , unfortunately the tool is never close to the quality one would hope for.
A few Honda 500's, a few Honda 550's, a few Honda 650's, '72 cb 450, a couple 500/550/650 hybrids, and 2001 750. 
  550 Snowbike -Somebody had to do it.
  http://forums.sohc4.net/index.php/topic,101678.0.html             
http://forums.sohc4.net/index.php/topic,137317.msg1550907.html#msg1550907

Offline wannabridin

  • Patience made me a
  • Master
  • *****
  • Posts: 2,236
  • -Garrett
    • 1976 CB750K, under construction:
man i must be lucky!  there's very little that hasn't exceeded my expectations.  i also do quite a bit of researching on them past their website to see how they perform, so that helps too.  either way, for $15, my bore mic's worked well!  sorry to hear that about the others.

ok, my apologies for distracting from the thread!
1976 CB750K, currently under construction:
http://forums.sohc4.net/index.php?topic=64468.0

-And if you don't do it this year, you'll be one year older when you do...

Offline goldarrow

  • one day, i'll be an
  • Old Timer
  • ******
  • Posts: 3,361
1975 cb550 Project SENCHA - cleaning up time - FRAME DONE - ENGINE NEXT!
« Reply #57 on: July 29, 2012, 10:09:45 pm »
Wow what a weekend. Friday afternoon elbow grease and razor blade scraping old gaskets off the cylinder. It was soaked in simple green/water mix for a good 3 days. Only some came off, gasket was tough!

saturday morning, drove around an about an hour at yard sales and picked up a fairly new bench top blaster cabinet for $50. I saw it 3 weeks ago but didn't get, it was still there and I just had to get it. Matches nicely on my tool cart!


Spent 3 hours doing side job at my neighbors house, afternoon went to my boss's baby shower, then friend's wedding in evening.

Sunday morning didn't find any deal at swap meet but oh well. Came home and started cleaning sand out of the blasting cabinet. Put in almost a whole bag of 50 lbs washing soda that I got 3 months ago. Cylinder jug here I come!

We all know how ugly dirty these are after so many years but here it is after some times of soda blasting.

Top view


Bottom view


Piston #3 after only few minutes of soda blasting. Top view.


Side view by the ring lands


Inside piston.


Hopefully tomorrow I get some time to clean the cylinder some more to get final measurement.

fixed the images hosting issues with tapatalk
« Last Edit: July 30, 2012, 05:28:46 pm by goldarrow »
Life Is Full Of Challenges - And My Backyard Is Full Of SOHC4's

CB550 K0
CB750 K0, K2, K23 JDM, K45, K5
And the little ones z50r, xr50r, st90


750k5 http://forums.sohc4.net/index.php?topic=114817.0

Offline dave500

  • Really Old Timer ...
  • *******
  • Posts: 16,945
  • WHAT?no gravy?
coming along well,run a 1 mil drill bit through those piston oil holes,just sort of spin it between your thumb and index finger,youll get some crud out of them,if the pistons and bore are in spec youll get away with just rings ok.

Offline goldarrow

  • one day, i'll be an
  • Old Timer
  • ******
  • Posts: 3,361
1975 cb550 Project SENCHA - cleaning up time - FRAME DONE - ENGINE NEXT!
« Reply #59 on: July 30, 2012, 11:39:36 am »
Thanks Dave. I did as you suggest but I used small air brush first then small drill bit and sure enough some crud came out.

Here's my problem with Honda specs
Piston diameter from Honda manual
Standard value between 54.47~58.49 ?thats a 4 mill gap!  Please see pic in the red circle. Can someone please explain?
Life Is Full Of Challenges - And My Backyard Is Full Of SOHC4's

CB550 K0
CB750 K0, K2, K23 JDM, K45, K5
And the little ones z50r, xr50r, st90


750k5 http://forums.sohc4.net/index.php?topic=114817.0

Offline fastbroshi

  • Puppet
  • Old Timer
  • ******
  • Posts: 2,645
I wouldn't pay attention to it.  I would look at it as saying 58.49(new) - 58.35mm(serviceable limit).
Just call me Timmaaaaay!!!

Offline dave500

  • Really Old Timer ...
  • *******
  • Posts: 16,945
  • WHAT?no gravy?
ive picked up a few missprints and typos in that chart.

Offline goldarrow

  • one day, i'll be an
  • Old Timer
  • ******
  • Posts: 3,361
1975 cb550 Project SENCHA - ENGINE - TOP END - piston/cylinder
« Reply #62 on: July 30, 2012, 01:30:19 pm »
I figured it was a typo also after reading numbers in inches

I think my problem is in the piston now. How likely that pistons get worn so much? And I get different reading measuring different places on it. Here are measurements:

Top piston pic1


Top piston pic2


Middle piston


Piston skirt pic1


Piston skirt pic2


Went back to measure the bore and still get same reading. At least there is some consistency in the caliper.

Put piston against ruler and see gap, is this normal?
« Last Edit: July 30, 2012, 05:42:28 pm by goldarrow »
Life Is Full Of Challenges - And My Backyard Is Full Of SOHC4's

CB550 K0
CB750 K0, K2, K23 JDM, K45, K5
And the little ones z50r, xr50r, st90


750k5 http://forums.sohc4.net/index.php?topic=114817.0

Offline fastbroshi

  • Puppet
  • Old Timer
  • ******
  • Posts: 2,645
Re: 1975 cb550 Project SENCHA - ENGINE - TOP END - piston/cylinder
« Reply #63 on: July 30, 2012, 02:08:24 pm »
Maybe so, I can't confirm.  From what I remember, the circumfrence around the piston at the ring lands isn't one of the areas you measure the piston.  Go about 1/2" up from the bottom of the skirt.
Just call me Timmaaaaay!!!

Offline goldarrow

  • one day, i'll be an
  • Old Timer
  • ******
  • Posts: 3,361
1975 cb550 Project SENCHA - ENGINE - TOP END - piston/cylinder
« Reply #64 on: July 30, 2012, 02:26:01 pm »
Yeah the manual says to measure skirt 90 degrees of the pin hole and all numbers still seem to be within limits.

I think I'm just paranoid by the numbers and seeing the piston moving side to side in the bore when I mock up


mock up piston in cylinder with feeler gauge in it
« Last Edit: July 30, 2012, 05:45:58 pm by goldarrow »
Life Is Full Of Challenges - And My Backyard Is Full Of SOHC4's

CB550 K0
CB750 K0, K2, K23 JDM, K45, K5
And the little ones z50r, xr50r, st90


750k5 http://forums.sohc4.net/index.php?topic=114817.0

Offline dave500

  • Really Old Timer ...
  • *******
  • Posts: 16,945
  • WHAT?no gravy?
Re: 1975 cb550 Project SENCHA - ENGINE - TOP END - piston/cylinder
« Reply #65 on: July 30, 2012, 11:07:49 pm »
the top of the piston around the rings is smaller than the skirt,dont measure it here,,also you must measure the bore further down about halfway not the top area as it dosent wear much at all there,that will be a false reading.

Offline goldarrow

  • one day, i'll be an
  • Old Timer
  • ******
  • Posts: 3,361
1975 cb550 Project SENCHA - ENGINE - TOP END - piston/cylinder
« Reply #66 on: August 01, 2012, 11:38:33 pm »
Got a chance to clean up the cylinder today and also painted it with high temp flat aluminum....niceeee

When i removed piston rings from piston #3, the top ring was stuck hard and it broke off, surely there were some rust on the ring. So piston rings are on order as well as engine gaskets kit...should be here in about a week or two, feebay seller cruzinimage

On a side note, I messed up my frame paint really badly. I should have left it alone. I used etching primer, 2 coats of gloss black, then clear coat. I went to autozone to get engine paint and also saw stop rust gloss black. I should have used that in the first place. Came home and paint stop rust gloss black over finished frame, went along just fine until I put the clear coat over it. Stupid me. Then realizing that the paint wasn't dried enough! Paint run all over the frame and  with hairline cracks looking all over :( what do I do now? Can I just sand it down smooth? Or do I have to strip the paint to bare metal again? :~(  will post pic tomorrow

well, took pictures of it this morning before running off to work.  i guess it doesn't seem so bad, some textured instead of smoothness. 
main top of frame

rear footpeg


and here's my cylinder after painting

« Last Edit: August 02, 2012, 09:51:09 am by goldarrow »
Life Is Full Of Challenges - And My Backyard Is Full Of SOHC4's

CB550 K0
CB750 K0, K2, K23 JDM, K45, K5
And the little ones z50r, xr50r, st90


750k5 http://forums.sohc4.net/index.php?topic=114817.0

Offline goldarrow

  • one day, i'll be an
  • Old Timer
  • ******
  • Posts: 3,361
Re: 1975 cb550 Project SENCHA - ENGINE - TOP END - piston/cylinder
« Reply #67 on: August 06, 2012, 06:39:12 pm »
while waiting for gaskets kit and piston rings to come in, i cleaned up the rest of the pistons, frankly my piston #4 looked like it burns and worn way more than other pistons.  i let it soak over night with pine sol, then soda blasting but it didn't clean up.

on the left my piston #4, on the right piston from donor motor parts that i got a while back for $90 with other stuffs, engine is exposed to weather due to missing cylinder and i might resurrect that too if it didn't take much. 


above replacement piston didn't clean up very well either because of pitting, on to the next replacement piston.  this one cleaned up like new!


and here after cleaned up


all measurements are good and within honda specs
Life Is Full Of Challenges - And My Backyard Is Full Of SOHC4's

CB550 K0
CB750 K0, K2, K23 JDM, K45, K5
And the little ones z50r, xr50r, st90


750k5 http://forums.sohc4.net/index.php?topic=114817.0

Offline goldarrow

  • one day, i'll be an
  • Old Timer
  • ******
  • Posts: 3,361
Re: 1975 cb550 Project SENCHA - ENGINE - TOP END - piston/cylinder
« Reply #68 on: August 07, 2012, 07:37:10 pm »
some more cleaning and painting to the engine.  for what's available from autozone, i kind of like the way the color came out and along with stainless steel bolts.  waiting to seal the engine, so that i can drop the oil filter, clutch cover, oil pan, then paint the rest.   have to say that the cases are not possible to clean up everything unless split the cases and clean each part individually. 

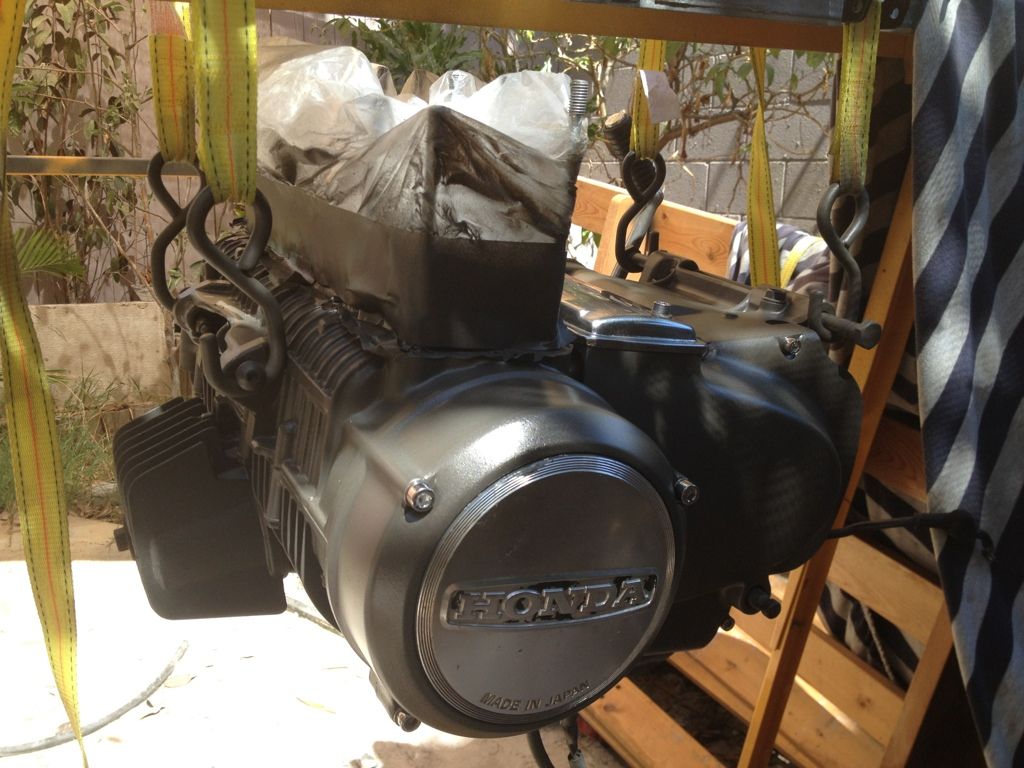
so, here's mock up of the engine bottom half with new stainless steel bolts.  left side.
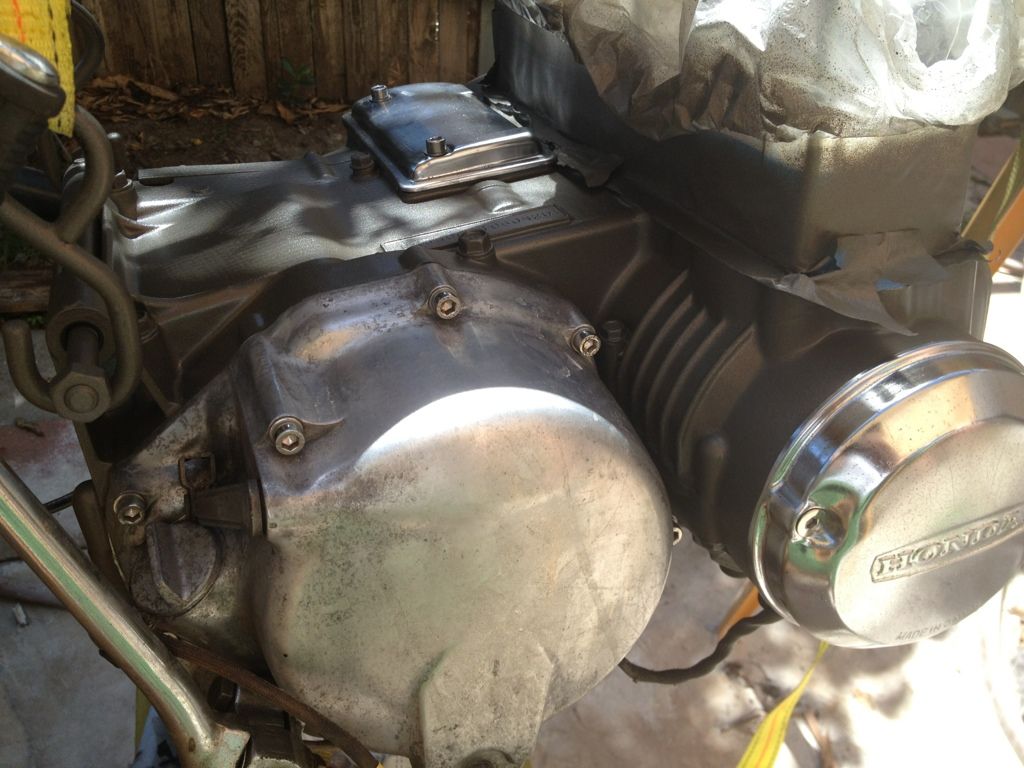

and the right side


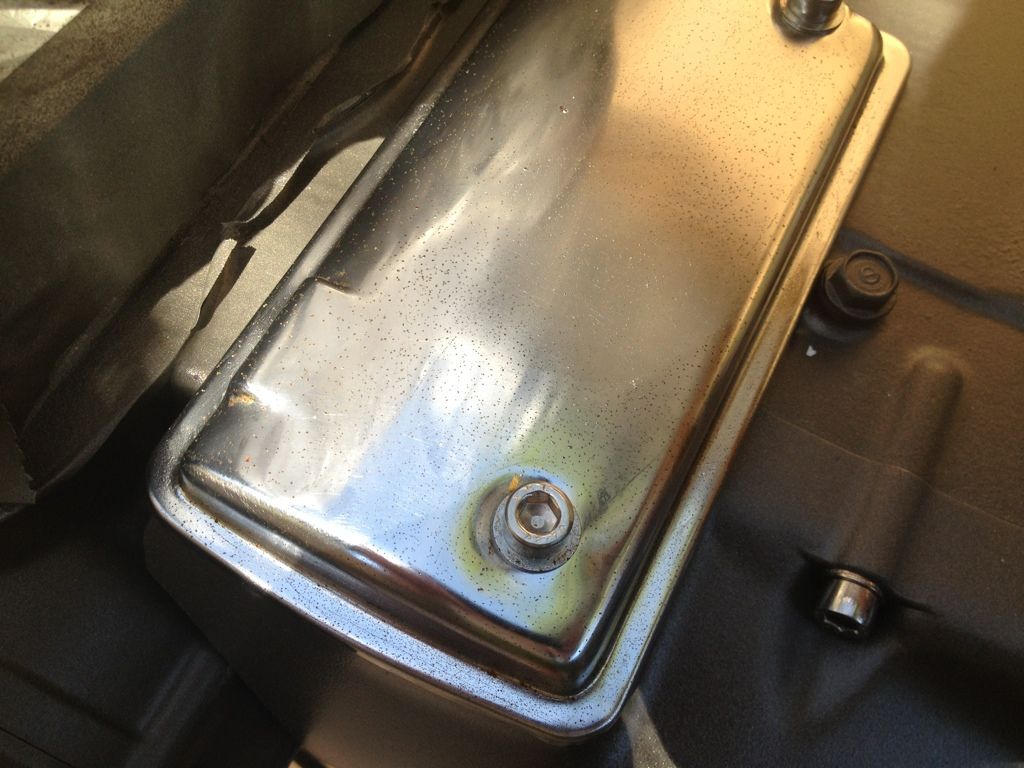
the chrome pieces are pitted, used steel wool, but don't come off.  it looks fine 15 feet away, so i think it's going to stay that way for now until i can justify the cost of re-chrome - anyone any idea how much these two small pieces would cost roughly?


that's it for now until my gaskets kit come in.  i think i probably lost all my subscribers by now...lol


...Baby come back, any kind of fool could see
There was something in everything about you
Baby come back, you can blame it all on me
I was wrong, and I just can't live without you

Now that I put it all together
Give me the chance to make you see....my bike
Life Is Full Of Challenges - And My Backyard Is Full Of SOHC4's

CB550 K0
CB750 K0, K2, K23 JDM, K45, K5
And the little ones z50r, xr50r, st90


750k5 http://forums.sohc4.net/index.php?topic=114817.0

Offline rb550four

  • Master
  • *****
  • Posts: 2,472
  • I'm nobody's slave and nobody's master
Re: 1975 cb550 Project SENCHA - ENGINE - TOP END - piston/cylinder
« Reply #69 on: August 07, 2012, 08:19:06 pm »
No worries, we all know that this stuff takes time.
  I  really like that bottom end color , is that VHT cast Iron? I use that allot, the cast aluminum color is what I use on the top end usually and sometimes the semi gloss black just to mix things up alittle,the flat black doesn't seem to stick as well.
  What colors will you be doing on the upper end?
I thought that you were going for a totally stock look for some reason, I could be wrong, but I like what you're doing.
Looking good.
A few Honda 500's, a few Honda 550's, a few Honda 650's, '72 cb 450, a couple 500/550/650 hybrids, and 2001 750. 
  550 Snowbike -Somebody had to do it.
  http://forums.sohc4.net/index.php/topic,101678.0.html             
http://forums.sohc4.net/index.php/topic,137317.msg1550907.html#msg1550907

Offline goldarrow

  • one day, i'll be an
  • Old Timer
  • ******
  • Posts: 3,361
Re: 1975 cb550 Project SENCHA - ENGINE - TOP END - piston/cylinder
« Reply #70 on: August 07, 2012, 08:43:59 pm »
No worries, we all know that this stuff takes time.
  I  really like that bottom end color , is that VHT cast Iron? I use that allot, the cast aluminum color is what I use on the top end usually and sometimes the semi gloss black just to mix things up alittle,the flat black doesn't seem to stick as well.
  What colors will you be doing on the upper end?
I thought that you were going for a totally stock look for some reason, I could be wrong, but I like what you're doing.
Looking good.

quite a few things happened in between.  the color is rustoleum cast coat iron. 

- i tried out the flat aluminum color, it came out ok, but color didn't seem to stick very well.  may be i just didn't do it right, not sure.  this cast iron seems to stick better...better prep? 
- i wanted the $25 stainless steel bolts that i bought months back to stand out of the paint.  waited so long for this, lol.
-after i soda blasted the engine, there were just so much aluminum scars all over, just like you see on the clutch cover.  i didn't feel like polishing the case the way it is now be cause i know i won't do a good job on it.  let alone i can't even clean, reach to tiny spots to clean off grease and dirt crud stuffs.  so painting it is until the next time i have to split the case

the cylinder will be black, this one also very bad after soda blasted and soak over night in simple green.  tried the cast aluminum but paint is easily scratched up.

other small pieces will be black to mix with main engine color.  that way, my SS bolts will look like they actually worth $25 :)

so, in sum, stock i wanted to do but.....
Life Is Full Of Challenges - And My Backyard Is Full Of SOHC4's

CB550 K0
CB750 K0, K2, K23 JDM, K45, K5
And the little ones z50r, xr50r, st90


750k5 http://forums.sohc4.net/index.php?topic=114817.0

Offline dave500

  • Really Old Timer ...
  • *******
  • Posts: 16,945
  • WHAT?no gravy?
Re: 1975 cb550 Project SENCHA - ENGINE - TOP END - piston/cylinder
« Reply #71 on: August 07, 2012, 08:47:49 pm »
coming along well,that clutch cover will come up good with some more elbow grease,plenty of threads and internet of how to polish alloy,start with fine paper then steel wool then polish etc,rechroming is expensive,try tin foil rubbing of the rusty chrome it might get it good enough then polish,have you dropped the sump on that engine?,its a good time to de sludge it now its easy,dont over do those new socket head bolts! they only need to be nipped up plus a little more,its easy to over do them compared to those old phillips(jis).

Offline Mcwilliams570

  • Hot Shot
  • ***
  • Posts: 646
Re: 1975 cb550 Project SENCHA - ENGINE - TOP END - piston/cylinder
« Reply #72 on: August 08, 2012, 10:20:17 am »
Hello Goldarrow I just did a 550 cover yesterday and getting ready to do the other one in the next few days. I just use some wet/dry sandpaper if its really bad start with 600 then I just go up 800,1000,1200 and either buff it or use 1800,2000 for a really nice mirror finish. It takes a bit of time but worth it when done.

Matt
My CB550 project http://forums.sohc4.net/index.php?topic=101182.0

Project UFB Cb550 http://forums.sohc4.net/index.php?topic=112143.0

Like a 10 dollar hooker on Friday night its going to be ridden.

1974 cb550
1975 cb550
2005 vmax
2009 vmax-sold
1981 gl500i

Offline goldarrow

  • one day, i'll be an
  • Old Timer
  • ******
  • Posts: 3,361
Re: 1975 cb550 Project SENCHA - ENGINE - TOP END - piston/cylinder
« Reply #73 on: August 08, 2012, 06:03:48 pm »
thank matt, that cover looks really good.  i have plenty of patience in my sleeves, but this kind of patience....i don't know...especially no beers by my side........hmm....
Life Is Full Of Challenges - And My Backyard Is Full Of SOHC4's

CB550 K0
CB750 K0, K2, K23 JDM, K45, K5
And the little ones z50r, xr50r, st90


750k5 http://forums.sohc4.net/index.php?topic=114817.0

Offline goldarrow

  • one day, i'll be an
  • Old Timer
  • ******
  • Posts: 3,361
Re: 1975 cb550 Project SENCHA - ENGINE - TOP END - piston/cylinder
« Reply #74 on: August 08, 2012, 06:24:59 pm »
on to more cleaning the head related pieces...soak them over night in pine sol/water mix.  intake ports pieces came out clean


breather cover and end cap covers also came out clean but i didn't take pics of them

removing exhaust gaskets, originally i thought they weren't there to begin with or that they fused to the port but after a while they came off.

 i used the angle pick tool and carefully tap it


enough so i can use the hook end pick and pull it up.


would this worth even a dollar if i recycle the copper?....or on their way to the trash....


and here's the cylinder head cover after some time of soda blasting


my first real issue in a long while.........the combustion chamber on #4...the surface of the chamber looks just like the surface of my piston #4, burn and pitted.   i guess the question is, is this still usable?


 i can keep soda blasting it to look like this


and more soda blasting, to look like this, but this sure takes forever.  but the surface is pitted, not smooth like the other 3 chambers


i need expert advise on this please
Life Is Full Of Challenges - And My Backyard Is Full Of SOHC4's

CB550 K0
CB750 K0, K2, K23 JDM, K45, K5
And the little ones z50r, xr50r, st90


750k5 http://forums.sohc4.net/index.php?topic=114817.0