Author Topic: CB550K0 Build - 450T Tank mods  (Read 76853 times)

0 Members and 1 Guest are viewing this topic.

Offline streak09

  • Enthusiast
  • **
  • Posts: 203
  • I don't know what im doing, but I'll do it anyway
Re: CB550K0 Build - Im still Alive!
« Reply #150 on: November 11, 2014, 08:38:07 AM »
Just a quick update/reminder that this build is not dead! I taking some time to set up the garage so I can have a decent area to work in. I dont have any bike updates, but I did build a workbench and I do have the bike at our new place now. Planning on diving back into the bike after 1 or 2 more projects in the garage.


Offline MickB

  • Expert
  • ****
  • Posts: 942
Re: CB550K0 Build - Im still Alive!
« Reply #151 on: November 11, 2014, 10:02:55 AM »
Streak09 I just found your project, it's looking good. Now the honeymoon's over you can concentrate on building the 550 and not worry about the little woman, I'm sure she'll understand. You're very close to the end.
Get some oil on that floor!

Offline minimo

  • Expert
  • ****
  • Posts: 1,203
  • 1977 CB550F 1975 CB400F 1959 Ducati 200 Americano
Re: CB550K0 Build - Im still Alive!
« Reply #152 on: November 11, 2014, 10:36:54 PM »
I'm loving that custom battery box/mount utilizing the existing center stand brackets. Great build so far. Looking forward to catching more progress.

Offline streak09

  • Enthusiast
  • **
  • Posts: 203
  • I don't know what im doing, but I'll do it anyway
Re: CB550K0 Build - Im still Alive!
« Reply #153 on: November 17, 2014, 10:10:09 AM »
I'm loving that custom battery box/mount utilizing the existing center stand brackets.

Thanks! I can't take all the credit though, I got the idea from Bru-Tom.

I put a neat little fold down bench next to where I will be working on the bike. Should come in handy. Work on the bike is comming soon.... promise!


« Last Edit: November 17, 2014, 10:19:02 AM by streak09 »

Offline riverfever

  • Master
  • *****
  • Posts: 1,769
Re: CB550K0 Build - Im still Alive!
« Reply #154 on: November 17, 2014, 05:23:48 PM »
Congrats on the house Streak. I did the same floor in my garage and its held up great.
http://forums.sohc4.net/index.php?topic=127186.0

"You wouldn't think that out here...a man could simply run clear...out of country but oh my...oh my...nothing but the light." -Ben Nichols

Offline streak09

  • Enthusiast
  • **
  • Posts: 203
  • I don't know what im doing, but I'll do it anyway
Re: CB550K0 Build - Im still Alive!
« Reply #155 on: November 18, 2014, 09:54:31 AM »
Congrats on the house Streak. I did the same floor in my garage and its held up great.

Thanks! I am very happy with the floor so far. Did a lot of research and gave it my all when prepping it. I hope it holds!

Offline streak09

  • Enthusiast
  • **
  • Posts: 203
  • I don't know what im doing, but I'll do it anyway
Re: CB550K0 Build - Im still Alive!
« Reply #156 on: November 22, 2014, 04:47:47 PM »
Ok, time for some bike talk! Took a little time to re-familiarize myself with the wiring that I started. I do need some input here though. Where would you guys recomend putting fuses? I dont really want to go the fuse block route (yet). I would rather put in-line fuses where I need them. Im going pretty bare bones here for a while but will be added some circuits in later (lights, blinkers, etc). So, here is my wiring diagram.


Is the fuse show in the diagram the only one I need for now? I really dont even know if thats the right spot, and what apmerage should I use? I really am kinda lost on this one, and want to make sure I protect all my components. Let me know what you guys think! Also, please tell me if you see something fishy in my diagram  :D

Offline streak09

  • Enthusiast
  • **
  • Posts: 203
  • I don't know what im doing, but I'll do it anyway
Re: CB550K0 Build - Wiring fun!
« Reply #157 on: December 04, 2014, 03:40:11 PM »
I think I got an answer over on the tech forum. Seems like my one fuse at the battery power will do for my initiall setup, 15 Amp. 

I've decided to tear my carbs all the way, as opposed to just cleaning with the bank assembled. This is against reccomendations of multiple people on various forums  :P. A few reasons I chose to go this route. I would like to learn more about carbs and the intricacies of the set-up. I also would like to clean them ultrasonically. To do this with the size ultrasonic cleaner I plan on getting requires dissasembly. Lastly, I would like to paint the bodies  so I need access to the inner portions of the rack.

Planning on setting up in the basement so I can do it in warmth and in front of a TV.  ;D


Also put this whiteboard up in the garage. Got everything at lowes, under $20 total!

Offline CBR954AD

  • Enthusiast
  • **
  • Posts: 186
Re: CB550K0 Build
« Reply #158 on: December 04, 2014, 07:19:02 PM »
I have a questions, what kind of swing arm bushing are you using. I cannot find any gold color ones. all i see ios black rubber ones, or aluminum kind . thank you

Offline streak09

  • Enthusiast
  • **
  • Posts: 203
  • I don't know what im doing, but I'll do it anyway
Re: CB550K0 Build - Wiring fun!
« Reply #159 on: December 04, 2014, 08:17:07 PM »
I have a questions, what kind of swing arm bushing are you using. I cannot find any gold color ones. all i see ios black rubber ones, or aluminum kind . thank you

I think I got them off ebay, and i believe they were made by a member on this forum. They are bronze. http://www.ebay.com/itm/Honda-CB-250-360-400-500-550-750-Four-swingarm-bronze-bushing-set-bearing-new-/281371815863?pt=Motorcycles_Parts_Accessories&hash=item4183112fb7&vxp=mtr

I think the above link is the same seller that I purchased from.

Offline streak09

  • Enthusiast
  • **
  • Posts: 203
  • I don't know what im doing, but I'll do it anyway
Re: CB550K0 Build - Back to Carbs
« Reply #160 on: December 08, 2014, 09:37:53 PM »
Yesterday I tore the carbs allllll the way down. Only thing I didnt take apart was the pivot and steel rod that the throttle cables connect to. Maybe get to that later if I determine its worth while.

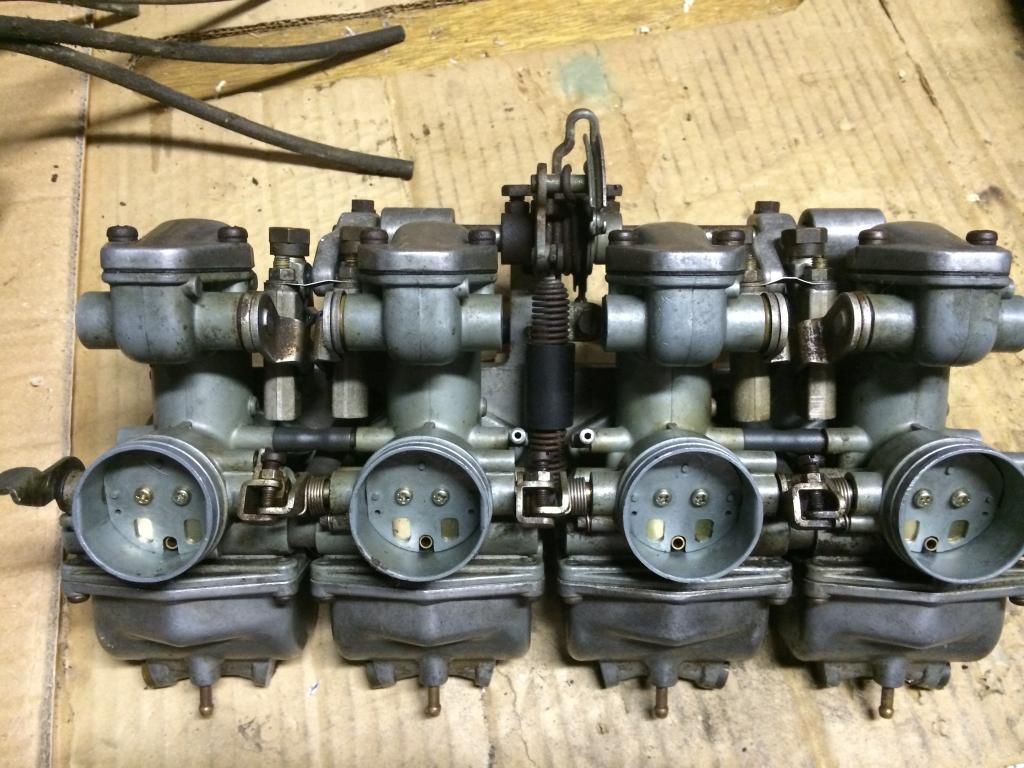
Here is how they started...


Here is the end result...


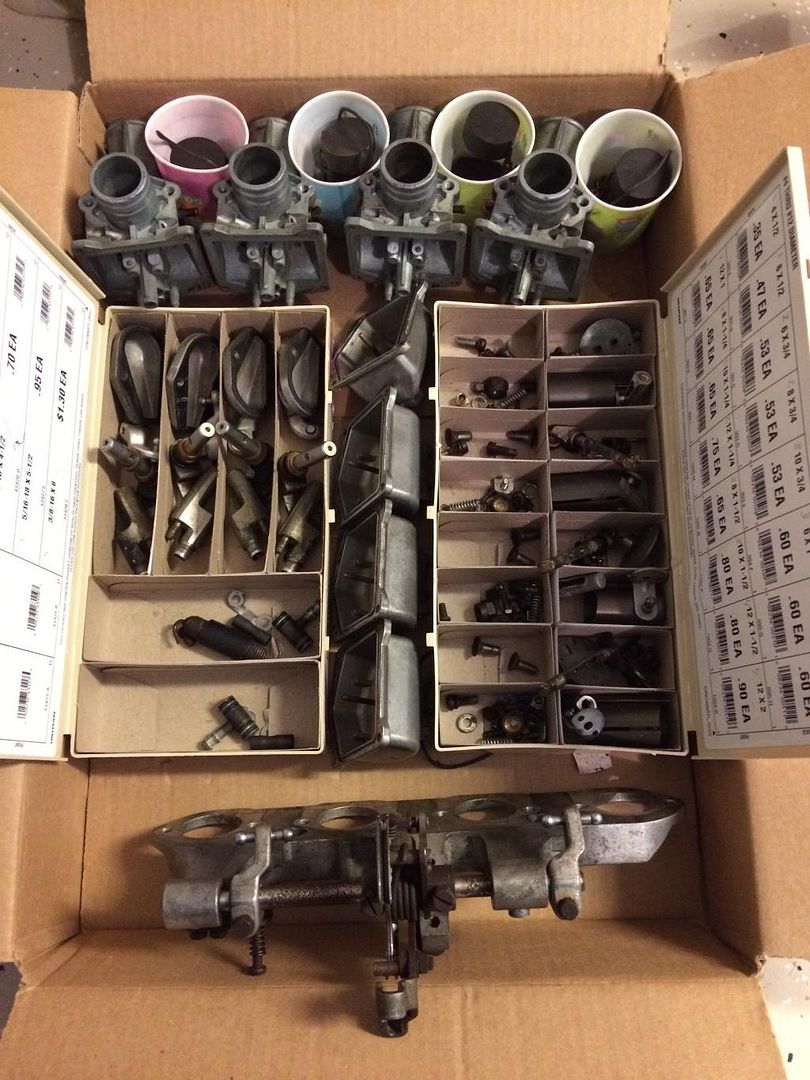
I picked up some of those plastic bins that hardware stores keep their screws in for a buck a peice. Very handy to keep all the the parts seperated and organized.

When I ordered o-rings a while ago I didnt get the ones that go on the incoming fuel "T"s, so I ordered those along with intake and tappet cover o-rings from the oring store so I have everything need to reassemble when the time comes.

Couple questions for the peanut gallery:

I found the felt washers on the throttle slide pivot arm (except for 1 carb  ???), but Ive read that there are also ones on the choke pivot arm? I found no sign of felt on the choke pivots. Anyone know if there should be?

Felt washer


Question 2, what are these tubes for?  ???


Next up I will get the carb bits soda blasted and wait for my ultrasonic cleaner to arrive by raindeer  ;D

While I wait on that I will try to get my exhausr mocked up. Need to make a call to my painter/fab guy to see if we can set up a time to get it done. I wish I had a welder... :'(

Traveling this week for work, so probably no updates until this weekend

Offline Riceman

  • Full Member
  • *
  • Posts: 79
Re: CB550K0 Build - Back to Carbs
« Reply #161 on: December 08, 2014, 10:13:58 PM »
Those tubes are the float bowl vents,two short tubes attach and
run down through the the front of the swing arm I believe.
« Last Edit: December 08, 2014, 10:20:37 PM by Riceman »

Offline PGF550F

  • Enthusiast
  • **
  • Posts: 148
Re: CB550K0 Build - Back to Carbs
« Reply #162 on: December 09, 2014, 06:47:58 AM »
Yes, vent tubes. Mine has ~12" long lines on those tubes running back over the rear part of the transmission. Float bowl vents to atmosphere from what I understand.

Offline streak09

  • Enthusiast
  • **
  • Posts: 203
  • I don't know what im doing, but I'll do it anyway
Re: CB550K0 Build - Back to Carbs
« Reply #163 on: December 09, 2014, 04:46:16 PM »
Perfect, thanks. Im assuming the tubes are there to prevent gas from draining allover the engine in case of a serious overflow where the gas would start coming out of the vents. Good to know.

Offline streak09

  • Enthusiast
  • **
  • Posts: 203
  • I don't know what im doing, but I'll do it anyway
Re: CB550K0 Build - Back to Carbs
« Reply #164 on: December 14, 2014, 04:52:52 PM »
So, I havent been able to get ahold of my welder guy. Is anyone here from the Dayton Ohio area and could do some welding as well as some tube bending? I will post in the services as well.

Offline streak09

  • Enthusiast
  • **
  • Posts: 203
  • I don't know what im doing, but I'll do it anyway
Re: CB550K0 Build - Back to Carbs
« Reply #165 on: January 12, 2015, 09:32:35 AM »
I decided to do a first round of cleaning on 2 carbs with just unltra-sonic cleaning, no soda blasting beforehand. Some before pictures...


I did no cleaning what-so-ever before hand. Plunked them in the cleaner (about 50% simple green, 50% water) and started the cycle. After about 8 cycles of 8 minutes each (flipping carbs every 2 cycles), they came out looking like this...


I think it did a pretty good job! There is a bit of grime left in some places, but overall im happy. The next 2 carbs I will soda blast before hand, and utilize the US cleaner to clean the soda off and ensure the passages are clear. If I weren't painting the carbs, I would probably use the US by itself and just do 1 carb at a time. I think they are perfectly fine for operating condition, I just want to make sure I get ALL the gunk off prior to painting.

Offline DustyRags

  • I'm not skilled, I'm just a
  • Hot Shot
  • ***
  • Posts: 720
  • Just try it and see what happens
Re: CB550K0 Build - Back to Carbs
« Reply #166 on: January 12, 2015, 04:56:53 PM »
Lookin' good! I think I scrubbed my carbs with a toothbrush and WD40- made a massive difference as well, but a hell of a lot messier!  :P
1976 CB550K- sold
2005 Kawasaki Vulcan 500- sold
2000 CB750 Nighthawk - sold
1975 XL350 - crashed
2004 Suzuki Vstrom 650 - sold

Offline streak09

  • Enthusiast
  • **
  • Posts: 203
  • I don't know what im doing, but I'll do it anyway
Re: CB550K0 Build - Back to Carbs
« Reply #167 on: February 03, 2015, 10:00:38 AM »
I finally got to soda blast the carb bodies, and cycle them through the ultrasonic cleaner, but not without battling the lovely weather here in Ohio.  It was a bit chilly, but dry, so I though I would take the opportunity to make some ground on the bike. I move all the stuff outside, and of course, it starts sleeting, so the ice just kinda bounced off the box. Not to be discouraged, I thought at least its not rain. Well 20 minutes later and its rain  >:(. I kept going and eventually finished, covered in baking soda paste...

Ran them through the ultrasonic to get all the soda off/out and make sure the passages were clear and they are spick and span.


Dirty carb vs. clean


They are as clean as they have ever been, or every will be again. I'm trying to decide what paint to use on the bodies. I would like to use POR-15s chassis coat black in a spray can (same thing I used for the frame). It applies nice and is tough, but I don't know how it will hold up to gas. I think I will try it out on some scraps before coating these guys. I would hate to find out that it just dissolves the paint :(. Anyone have any recommendations? Ideally I would like to use the VHT paint I used on engine so they match, but I just haven't had much luck with the durability. I have babied the motor and I already have a few chips... I may give it a shot, but it makes me a bit nervous.

Plan is to paint the bodies, and leave the bowls and top caps brushed aluminum.
« Last Edit: February 03, 2015, 10:02:29 AM by streak09 »

Offline streak09

  • Enthusiast
  • **
  • Posts: 203
  • I don't know what im doing, but I'll do it anyway
Re: CB550K0 Build
« Reply #168 on: March 18, 2015, 09:47:53 AM »
Believe it or not, this build is actually still moving. Barely, probably not even visible to the naked eye, but it is moving. With the warm weather I was able to get into the garage and collect some thoughts and try to think some things out. I found a guy right down the road that a co-worker recommended for welding. Apparently he does a lot of custom fab turbos, so I hope he can easily hook me up with a good modification to fit my cone muffler to by F headers.

While test fitting some things I found a pretty bad crash between by right foot peg and my kicker. When in the folded position it barely clears the foot peg. I can barely unfold it without scraping the peg to bad. There is little to no room for rotation when trying to kick it over. Now, I do have an F model kicker, but what I did not realize is that the F models had a different foot peg as well  :(. It looks like the F model have a pivot point closer to the engine to allow it to fold in close to the frame to allow clearance for the kicker.


I'm going to see if I can do some grinding on the kicker to give clearance, but I'm not too optimistic that it will work out.

Does anyone have a space F model foot peg that they have replaced with rearsets that they wouldn't mind letting go?

Any other suggestions?

P.S. My photobucket links are acting very strange, so sorry if pictures are getting mixed up.
« Last Edit: March 18, 2015, 10:30:26 AM by streak09 »

Offline rb550four

  • Master
  • *****
  • Posts: 2,475
  • I'm nobody's slave and nobody's master
Re: CB550K0 Build - Back to Carbs
« Reply #169 on: March 18, 2015, 02:15:50 PM »
F pegs are like hen's teeth around my house , but I did find this on ebay
http://www.ebay.com/itm/DRIVER-FOOT-PEGS-75-HONDA-CB550-1975-76-CB-550-F-/380224971802?pt=Motorcycles_Parts_Accessories&hash=item58872ca41a&vxp=mtr

or even better
http://www.ebay.com/itm/1975-HONDA-CB550F-CB550-KICK-STARTER-STAND-FRONT-FOOT-PEGS-REAR-TURN-SIGNALS-/231509532472?pt=Motorcycles_Parts_Accessories&hash=item35e70b1f38&vxp=mtr

As for the POR-15 , My local garage mechanic uses it inside  tanks to seal them, says it doesn't break down, I heard the same thing from other antique car restorers. I decided to try it last fall, so I did a tank, then it turned into winter, so I haven't had fuel in it yet, can't give you first hand opinion on it yet.
 Perhaps someone here has done it and would like to share their observations.
« Last Edit: March 19, 2015, 10:07:10 AM by rb550four »
A few Honda 500's, a few Honda 550's, a few Honda 650's, '72 cb 450, a couple 500/550/650 hybrids, and 2001 750. 
  550 Snowbike -Somebody had to do it.
  http://forums.sohc4.net/index.php/topic,101678.0.html             
http://forums.sohc4.net/index.php/topic,137317.msg1550907.html#msg1550907

Offline streak09

  • Enthusiast
  • **
  • Posts: 203
  • I don't know what im doing, but I'll do it anyway
Re: CB550K0 Build - Back to Carbs
« Reply #170 on: March 23, 2015, 07:55:02 AM »
Those are some good finds there rb550four. However, after picking some brains over on the tech forum, I've decided to hold off on this particular assignment until I actually get this thing running. It looks like it will be more involved than what I thought, so I would rather put my time and money into getting the bike running at this point.

As for the POR-15, I have no doubt that the tank sealer would hold up great, but I was wondering about their Chassis Black Coat and its resistance to fuel. It is a one part spray --> http://www.por15.com/Single-Part-Topcoats_c_14.html , same stuff I used on the frame.

I have since decided to use VHT high temp to match the engine and hope for the best (I will bake it in a toaster oven).

Over the weekend I was able to fab an adapter for the cone muffler to the F header. I think it turned out great, and will look good with some header wrap until I can get the header ceramic coated.


Next work to be done will be to order some throttle and clutch cables, and keep going on the carbs.

Offline jtran000

  • Full Member
  • *
  • Posts: 93
Re: CB550K0 Build - Back to Carbs
« Reply #171 on: March 25, 2015, 11:59:44 PM »
keep it coming man!  exhaust set up looks great.

Offline streak09

  • Enthusiast
  • **
  • Posts: 203
  • I don't know what im doing, but I'll do it anyway
Re: CB550K0 Build - Back to Carbs
« Reply #172 on: March 27, 2015, 08:35:36 AM »
keep it coming man!  exhaust set up looks great.

Thanks! I'm a bit frustrated with the foot peg, kicker, brake situation. Need to take some time away from that area for a bit.  Hopefully we get some warm/dry weather soon so I can finish up soda blasting the carbs and lay some paint down on some carb/manifold parts.

Offline streak09

  • Enthusiast
  • **
  • Posts: 203
  • I don't know what im doing, but I'll do it anyway
Re: CB550K0 Build - Back to Carbs
« Reply #173 on: April 02, 2015, 02:16:52 PM »
Okay guys, I need some help here.

I'm about to place (a decent size order) from 4into1.com, and debating over whether to get replacement jets or not before I order. I've researched, but I think it has confused me and muddled it more. --> http://forums.sohc4.net/index.php?topic=75890.0 .

So here is where I stand:
'74 CB550k - 022A Carbs. Right now I have 100 mains, and 40 pilots.
   #1 - Is this stock, and if not what is?
   #2 - I'm switching to a F 4-1 header with 12" shorty muffler. Stock air-manifold-thing with single direct mount K&N filter.

I have never done any jetting, but have tuned in carbs (roughly) before. Would you recommend stepping up a size (2,3,4...) on the jets, or might I be ok with what I have? I realize I will not know until I start her up, get it synched, and do some plug chops, but is this a feasible starting point? Or will I definitely need to step up at least a size, so might as well start tuning from there?

Okay, now topic 2. Opinion on Keyster. Am I safe buying Keyster jets (main and pilot only) instead of genuine Keihin? I've heard a mix of stories, some say they are perfect replacements, others saying they suck. Opinions?

Appreciate the help/insight as always!  ;D


Offline streak09

  • Enthusiast
  • **
  • Posts: 203
  • I don't know what im doing, but I'll do it anyway
Re: CB550K0 Build - Back to Carbs
« Reply #174 on: April 12, 2015, 04:36:39 PM »
NEVER BUY KEYSTER kits. They are CRAPOLA!!!

Thanks Calj, ive heard the kIts were crap, but hadnt heard anything about just the jets (except the needle, which jve heard many bad experiences). I will keep what I have for now, and replace if neccesary on down the road.

I received all my items from 4into.com. I got a cable set, hand grips, fuel line, oil filter, and some carb clamps. Very impressed with 4into1. Along withmy order came a half sheet size of a summary of all 4 cylinder honda bikes with various tech specifications (spark plug, battery, ect). They also sent a buisness card size spec sheet with detailed info (compression, intak/exhaust clearances,  and lots of other things). Everything was as described and woukd definitely recommend.


I got the carbs painted. I think they look great, but I hope they hold up.


Grilling up some carbs! Baked at ~215 F for abot 30 minutes.


Keeping fingers crossed!

Ill be plugging away at rebuilding the carbs over the next couple weeks. I have most everything sonic cleaned and soda blasted that needed it. Im going for a brushed look on the bowls and caps along with the intake manifolds. That will take a bit of time. I also purchased a stainless carb fastener kit off ebay to match the engine fasteners.

Till next time!