Author Topic: CB550K0 Build - 450T Tank mods  (Read 55788 times)

0 Members and 2 Guests are viewing this topic.

Offline rb550four

  • Master
  • *****
  • Posts: 2,473
  • I'm nobody's slave and nobody's master
Re: CB550K0 Build - Back to Carbs
« Reply #175 on: March 18, 2015, 02:15:50 PM »
F pegs are like hen's teeth around my house , but I did find this on ebay
http://www.ebay.com/itm/DRIVER-FOOT-PEGS-75-HONDA-CB550-1975-76-CB-550-F-/380224971802?pt=Motorcycles_Parts_Accessories&hash=item58872ca41a&vxp=mtr

or even better
http://www.ebay.com/itm/1975-HONDA-CB550F-CB550-KICK-STARTER-STAND-FRONT-FOOT-PEGS-REAR-TURN-SIGNALS-/231509532472?pt=Motorcycles_Parts_Accessories&hash=item35e70b1f38&vxp=mtr

As for the POR-15 , My local garage mechanic uses it inside  tanks to seal them, says it doesn't break down, I heard the same thing from other antique car restorers. I decided to try it last fall, so I did a tank, then it turned into winter, so I haven't had fuel in it yet, can't give you first hand opinion on it yet.
 Perhaps someone here has done it and would like to share their observations.
« Last Edit: March 19, 2015, 10:07:10 AM by rb550four »
A few Honda 500's, a few Honda 550's, a few Honda 650's, '72 cb 450, a couple 500/550/650 hybrids, and 2001 750. 
  550 Snowbike -Somebody had to do it.
  http://forums.sohc4.net/index.php/topic,101678.0.html             
http://forums.sohc4.net/index.php/topic,137317.msg1550907.html#msg1550907

Offline streak09

  • Enthusiast
  • **
  • Posts: 203
  • I don't know what im doing, but I'll do it anyway
Re: CB550K0 Build - Back to Carbs
« Reply #176 on: March 23, 2015, 07:55:02 AM »
Those are some good finds there rb550four. However, after picking some brains over on the tech forum, I've decided to hold off on this particular assignment until I actually get this thing running. It looks like it will be more involved than what I thought, so I would rather put my time and money into getting the bike running at this point.

As for the POR-15, I have no doubt that the tank sealer would hold up great, but I was wondering about their Chassis Black Coat and its resistance to fuel. It is a one part spray --> http://www.por15.com/Single-Part-Topcoats_c_14.html , same stuff I used on the frame.

I have since decided to use VHT high temp to match the engine and hope for the best (I will bake it in a toaster oven).

Over the weekend I was able to fab an adapter for the cone muffler to the F header. I think it turned out great, and will look good with some header wrap until I can get the header ceramic coated.


Next work to be done will be to order some throttle and clutch cables, and keep going on the carbs.

Offline jtran000

  • Full Member
  • *
  • Posts: 93
Re: CB550K0 Build - Back to Carbs
« Reply #177 on: March 25, 2015, 11:59:44 PM »
keep it coming man!  exhaust set up looks great.

Offline streak09

  • Enthusiast
  • **
  • Posts: 203
  • I don't know what im doing, but I'll do it anyway
Re: CB550K0 Build - Back to Carbs
« Reply #178 on: March 27, 2015, 08:35:36 AM »
keep it coming man!  exhaust set up looks great.

Thanks! I'm a bit frustrated with the foot peg, kicker, brake situation. Need to take some time away from that area for a bit.  Hopefully we get some warm/dry weather soon so I can finish up soda blasting the carbs and lay some paint down on some carb/manifold parts.

Offline streak09

  • Enthusiast
  • **
  • Posts: 203
  • I don't know what im doing, but I'll do it anyway
Re: CB550K0 Build - Back to Carbs
« Reply #179 on: April 02, 2015, 02:16:52 PM »
Okay guys, I need some help here.

I'm about to place (a decent size order) from 4into1.com, and debating over whether to get replacement jets or not before I order. I've researched, but I think it has confused me and muddled it more. --> http://forums.sohc4.net/index.php?topic=75890.0 .

So here is where I stand:
'74 CB550k - 022A Carbs. Right now I have 100 mains, and 40 pilots.
   #1 - Is this stock, and if not what is?
   #2 - I'm switching to a F 4-1 header with 12" shorty muffler. Stock air-manifold-thing with single direct mount K&N filter.

I have never done any jetting, but have tuned in carbs (roughly) before. Would you recommend stepping up a size (2,3,4...) on the jets, or might I be ok with what I have? I realize I will not know until I start her up, get it synched, and do some plug chops, but is this a feasible starting point? Or will I definitely need to step up at least a size, so might as well start tuning from there?

Okay, now topic 2. Opinion on Keyster. Am I safe buying Keyster jets (main and pilot only) instead of genuine Keihin? I've heard a mix of stories, some say they are perfect replacements, others saying they suck. Opinions?

Appreciate the help/insight as always!  ;D


Offline calj737

  • Really Old Timer ...
  • *******
  • Posts: 21,100
  • I refuse...
Re: CB550K0 Build - Back to Carbs
« Reply #180 on: April 02, 2015, 03:31:00 PM »
Okay guys, I need some help here.

I'm about to place (a decent size order) from 4into1.com, and debating over whether to get replacement jets or not before I order. I've researched, but I think it has confused me and muddled it more. --> http://forums.sohc4.net/index.php?topic=75890.0 .

So here is where I stand:
'74 CB550k - 022A Carbs. Right now I have 100 mains, and 40 pilots.
   #1 - Is this stock, and if not what is?
   #2 - I'm switching to a F 4-1 header with 12" shorty muffler. Stock air-manifold-thing with single direct mount K&N filter.

I have never done any jetting, but have tuned in carbs (roughly) before. Would you recommend stepping up a size (2,3,4...) on the jets, or might I be ok with what I have? I realize I will not know until I start her up, get it synched, and do some plug chops, but is this a feasible starting point? Or will I definitely need to step up at least a size, so might as well start tuning from there?

Okay, now topic 2. Opinion on Keyster. Am I safe buying Keyster jets (main and pilot only) instead of genuine Keihin? I've heard a mix of stories, some say they are perfect replacements, others saying they suck. Opinions?

Appreciate the help/insight as always!  ;D
You'll be close with your stock brass.
NEVER BUY KEYSTER kits. They are CRAPOLA!!!
'74 550 Build http://forums.sohc4.net/index.php?topic=126401.0
'73 500 Build http://forums.sohc4.net/index.php?topic=132935.0

"Of all tyrannies, a tyranny sincerely exercised for the good of it's victim may be the most oppressive. It may be better to live under robber barons than under omnipotent moral busybodies. The robber baron's cruelty may sometimes sleep, his cupidity may at some point be satiated, but those who torment us for our own good will torment us without end for they do so with the approval of their own conscience." - C.S. Lewis

Offline streak09

  • Enthusiast
  • **
  • Posts: 203
  • I don't know what im doing, but I'll do it anyway
Re: CB550K0 Build - Back to Carbs
« Reply #181 on: April 12, 2015, 04:36:39 PM »
NEVER BUY KEYSTER kits. They are CRAPOLA!!!

Thanks Calj, ive heard the kIts were crap, but hadnt heard anything about just the jets (except the needle, which jve heard many bad experiences). I will keep what I have for now, and replace if neccesary on down the road.

I received all my items from 4into.com. I got a cable set, hand grips, fuel line, oil filter, and some carb clamps. Very impressed with 4into1. Along withmy order came a half sheet size of a summary of all 4 cylinder honda bikes with various tech specifications (spark plug, battery, ect). They also sent a buisness card size spec sheet with detailed info (compression, intak/exhaust clearances,  and lots of other things). Everything was as described and woukd definitely recommend.


I got the carbs painted. I think they look great, but I hope they hold up.


Grilling up some carbs! Baked at ~215 F for abot 30 minutes.


Keeping fingers crossed!

Ill be plugging away at rebuilding the carbs over the next couple weeks. I have most everything sonic cleaned and soda blasted that needed it. Im going for a brushed look on the bowls and caps along with the intake manifolds. That will take a bit of time. I also purchased a stainless carb fastener kit off ebay to match the engine fasteners.

Till next time!

Offline streak09

  • Enthusiast
  • **
  • Posts: 203
  • I don't know what im doing, but I'll do it anyway
Re: CB550K0 Build - Back to Carbs
« Reply #182 on: April 21, 2015, 01:19:46 PM »
So I'm all set up to start re-assembly of carbs. Only thing missing is to make a couple felt washer/seals that I noticed were missing during tear down. Last night I replaced all O-rings on: T fittings, main jets, float seat, and drain screw. I sourced all O-rings through The O-Ring Store and everything fit fine.

Nice clean area to assemble


Going for the brushed look on the floats and caps


I picked up what I think to be a CB750 tank at a place called Rice Paddy in Columbus over the weekend. We made a trip to Columbus to eat at Schmidt's, an authentic German restaurant (by far my favorite place to eat). If ever in Columbus Ohio, it is a must. Another must is Rice Paddy. Parts galore! Very friendly as well, props to the people running it. http://www.ricepaddy.com/

Anyways, I think it is a 750 tank and I'm digging the bulkier look. Looks like I will need to modify the mounting points, the tank has a narrower "ditch" that the 550 where it sets over the frame. Ill snap some pics when I'm home.

Offline streak09

  • Enthusiast
  • **
  • Posts: 203
  • I don't know what im doing, but I'll do it anyway
Re: CB550K0 Build - Back to Carbs
« Reply #183 on: April 21, 2015, 06:20:56 PM »
Here is the tank. Rusty outside, but only 1 very minor dent on the side. A layer of rust on the inside, but it hasnt been coated previously and is very solid. Can anyone confirm that this is a CB750 tank? It has two little tubes at the back that I'm assuming keep the tank halves at equal fuel level.

The tank is sitting high in the front because the little pegs that the rubber attach to stick out too far and interfere with getting the on the "C" shaped mounts. Should be easy to modify.


Offline streak09

  • Enthusiast
  • **
  • Posts: 203
  • I don't know what im doing, but I'll do it anyway
Re: CB550K0 Build - Back to Carbs
« Reply #184 on: April 23, 2015, 06:32:50 PM »
Starting to look like carbs again!


Offline seanbarney41

  • not really that much younger than an
  • Really Old Timer ...
  • *******
  • Posts: 10,879
Re: CB550K0 Build - Back to Carbs
« Reply #185 on: April 23, 2015, 06:57:09 PM »
Streak, that is a CB450 tank if it has crossover tube...looks very similar to 76 and earlier 750 tanks...you may have problems getting the petcock to clear your carbs, idk...and those crossover tubes are a total pain in the ass.
If it works good, it looks good...

Offline streak09

  • Enthusiast
  • **
  • Posts: 203
  • I don't know what im doing, but I'll do it anyway
Re: CB550K0 Build - Back to Carbs
« Reply #186 on: April 24, 2015, 06:32:19 AM »
Streak, that is a CB450 tank if it has crossover tube...looks very similar to 76 and earlier 750 tanks...you may have problems getting the petcock to clear your carbs, idk...and those crossover tubes are a total pain in the ass.

Well that's good news, and bad... While browsing bikes a while I recall really liking the look of the 450 tanks. I did some searching and confirmed your suspicion about the petcock --> http://forums.sohc4.net/index.php?topic=19029.0. For the price I got the tank, I may consider moving the petcock? I wouldn't do the welding, but I know someone who should be able to do it easily. The crossover tubes seam to clear the frame from what I can tell. I would put a valve in the middle of them so if I pulled the tank I would only have to drain one side.

I really like the look of the 450 tank. Any other issues I should expect when using it? Like fuel flow rate or anything?

Thanks for the info seanbarney!

Offline calj737

  • Really Old Timer ...
  • *******
  • Posts: 21,100
  • I refuse...
Re: CB550K0 Build - Back to Carbs
« Reply #187 on: April 24, 2015, 06:34:23 AM »
You could also run 2 petcocks and eliminate the crossover tube. Since you're considering moving the one side already...
'74 550 Build http://forums.sohc4.net/index.php?topic=126401.0
'73 500 Build http://forums.sohc4.net/index.php?topic=132935.0

"Of all tyrannies, a tyranny sincerely exercised for the good of it's victim may be the most oppressive. It may be better to live under robber barons than under omnipotent moral busybodies. The robber baron's cruelty may sometimes sleep, his cupidity may at some point be satiated, but those who torment us for our own good will torment us without end for they do so with the approval of their own conscience." - C.S. Lewis

Offline streak09

  • Enthusiast
  • **
  • Posts: 203
  • I don't know what im doing, but I'll do it anyway
Re: CB550K0 Build - Back to Carbs
« Reply #188 on: April 24, 2015, 06:48:57 AM »
You could also run 2 petcocks and eliminate the crossover tube. Since you're considering moving the one side already...

Ooooo.... I like. One petcock for every 2 carbs. I will need to find another bung or whatever it's called (what the petcock screws to). Okay be I can find a threaded tube and not have to re-use the one I will cutoff?

I would have to worry about keeping the tank halfs somewhat even, but it's either that or dealing with the crossover tubes...
« Last Edit: April 24, 2015, 06:50:46 AM by streak09 »

Offline calj737

  • Really Old Timer ...
  • *******
  • Posts: 21,100
  • I refuse...
Re: CB550K0 Build - Back to Carbs
« Reply #189 on: April 24, 2015, 06:55:01 AM »
BMW air heads use this setup as stock. I wouldn't get too preoccupied about the fuel level fining balance between the halves. Riding and sloshing does a pretty good job of finding its own level.

Then you could choose an aftermarket petcocks like a Pingel or Takasago and fit a bung where you need it to avoid carb conflict.
'74 550 Build http://forums.sohc4.net/index.php?topic=126401.0
'73 500 Build http://forums.sohc4.net/index.php?topic=132935.0

"Of all tyrannies, a tyranny sincerely exercised for the good of it's victim may be the most oppressive. It may be better to live under robber barons than under omnipotent moral busybodies. The robber baron's cruelty may sometimes sleep, his cupidity may at some point be satiated, but those who torment us for our own good will torment us without end for they do so with the approval of their own conscience." - C.S. Lewis

Offline streak09

  • Enthusiast
  • **
  • Posts: 203
  • I don't know what im doing, but I'll do it anyway
Re: CB550K0 Build - Back to Carbs
« Reply #190 on: April 24, 2015, 09:41:54 AM »
Excellent. That will be my direction then. I've got a little while before I get there, but now I've got a plan. Thanks!

Offline streak09

  • Enthusiast
  • **
  • Posts: 203
  • I don't know what im doing, but I'll do it anyway
Re: CB550K0 Build - Back to Carbs
« Reply #191 on: April 24, 2015, 04:26:41 PM »
Almost there!


Offline streak09

  • Enthusiast
  • **
  • Posts: 203
  • I don't know what im doing, but I'll do it anyway
Re: CB550K0 Build - Back to Carbs
« Reply #192 on: April 26, 2015, 07:50:01 AM »
I was able to button up the carb yesterday, and no left over parts! Good sign! I used stainless fasteners, made sure to not over tighten and used anti-seize. I think they look pretty darn good if do I say so myself!  ;D 


I also did a bench sync to a 1/8" drill bit, and made sure I still had enough travel in the idle screw to fully close the carbs. Adjusted the choke plates so they were all level at open position. I'm assuming its more important to have them the same at open rather than choke? 

After getting them back together I did a leak/overflow tests. The only one that overflowed was number 3, but it quickly stopped. I think the float just hesitated for a moment. I did several cycles of filling, draining, filling again, and didn't have any problems, so I think they are good.


Onto the next item! I've got a list of things to check/complete before I attempt a start up. One of those is checking oil flow. I've done some searching and can't find a clear answer (at least one that I can understand) if I can check my oil flow, particularly to the head without a start up. Ive kicked the motor over probably 20 times in a row to see if I get any oil to the head, but it looks pretty dry. Is it even possible to kick it over fast enough to get oil pressure and flow? I don't have my starter hooked up, so that is not an option. Am I going to have to just wait to find out if I have pressure? Can I prime it some how so I don't start it up dry up top? I'll have to make sure I research how to check/clean the oil pick-up as well.

Other items on the list:
Install clutch lever
Route throttle and clutch cables
Install carbs
Get at least 1 brake functional
Re-check valve clearances
Install plug caps
Install battery
Check spark/wiring again
Attach air filter to air box

Im sure there are a few more, thats depressing... :(

Onward!

Offline streak09

  • Enthusiast
  • **
  • Posts: 203
  • I don't know what im doing, but I'll do it anyway
Re: CB550K0 Build - Back to Carbs
« Reply #193 on: April 28, 2015, 06:47:22 AM »
Took a little time yesterday evening to work on the airbox modification. Basically took a PVC coupling and ground down the flange side to make it thin, and bolted it to the airbox. I will paint the coupling black so it doesn't stick out like a sore thumb.


K&N filter to match the PVC diameter.


I think it should work out well, I need to make a new top attachment for the airbox to help support the carbs, the original tab has been cut off.

Anyone have any thoughts on checking oil flow to the head?

Offline mystic_1

  • Really Old Timer ...
  • *******
  • Posts: 6,071
  • 1970 CB750K
Re: CB550K0 Build - Airbox Mod
« Reply #194 on: April 28, 2015, 08:29:23 AM »
Not too shabby!

You'll want to use some sort of sealant between that flange and the airbox, I think.  RTV should be more than sufficient.

mystic_1
"A ship in harbor is safe, but that is not what ships are built for."
- John Augustus Shedd

My build thread:  http://forums.sohc4.net/index.php?topic=68952.0

Offline streak09

  • Enthusiast
  • **
  • Posts: 203
  • I don't know what im doing, but I'll do it anyway
Re: CB550K0 Build - Airbox Mod
« Reply #195 on: April 28, 2015, 11:13:58 AM »
Thanks mystic! I will definitely need to seal it up. The airbox is actually curved inward.  I can see some daylight between the adapter and the airbox, so definitely will need to seal it up. I was thinking if I could cut a groove in the adapter I could get a large o-ring in there. The only reason I bring up the o ring option is I am a little hesitant on adding a seal after my filter point, a peice may break off and get sucked in the engine? Am I being paranoid?

Offline mystic_1

  • Really Old Timer ...
  • *******
  • Posts: 6,071
  • 1970 CB750K
Re: CB550K0 Build - Airbox Mod
« Reply #196 on: April 28, 2015, 12:41:34 PM »
Nah I wouldn't worry too much about that, just don't glob it on too thick, and after you've bolted things down you can wipe away any squeeze-out from the inside.

Cutting in an o-ring groove seems like too much work for too little benefit here.  Plus your flange is already pretty thin.

If it were me, I'd also trim those little bits where the flange extends out past where the airbox plastic curves away, thereby eliminating any places for crud to get stuck.

A little bit of paint, and use black RTV, and your mod will look seemless.  For extra cool, use button-head allen fasteners.  8)


Again, nicely done!

mystic_1
"A ship in harbor is safe, but that is not what ships are built for."
- John Augustus Shedd

My build thread:  http://forums.sohc4.net/index.php?topic=68952.0

Offline streak09

  • Enthusiast
  • **
  • Posts: 203
  • I don't know what im doing, but I'll do it anyway
Re: CB550K0 Build - Airbox Mod
« Reply #197 on: May 11, 2015, 09:55:14 AM »
True about the grooving, too thin and too much work! I will stick with a sealant.

I posted a question over on the tech forums about some strange clutch wear I found. Any help appreciated! Strange Clutch Wear .

Also, any thoughts on priming the head with oil? I pulled the filter and oil pan the other day (that's what lead to the clutch wear question) and would like to try to get oil to the head ASAP so I know I am safe to start her up.

Offline streak09

  • Enthusiast
  • **
  • Posts: 203
  • I don't know what im doing, but I'll do it anyway
Re: CB550K0 Build
« Reply #198 on: May 15, 2015, 07:16:00 PM »
Got the front brake on today. New line, caliper seal, and pads. I rebuilt the master cylinder a few years back so it should be good to go, it used to be on a CB360. Just need to swap out some bolts for some new/correct length. Its bled, and is working good. With the stainless line it feels nice and firm. Its a bit long, but I think it will do.


Puppy photo bomb!

Offline streak09

  • Enthusiast
  • **
  • Posts: 203
  • I don't know what im doing, but I'll do it anyway
Re: CB550K0 Build
« Reply #199 on: May 17, 2015, 02:11:02 PM »
Got a few things done while tinkering last night:

     - Valve clearances set, took waaaaay longer than it should have. I just never have the feeling that I got them right on and tend to re-re-re-re-do them until I feel comfortable (or just fed up).

     - Set cam chain tension. Pretty easy. Tensioned it at ~15 degrees past TDC cylinder 1.

     - Pulled off the oil pump to check it out. Everything seemed good, O-rings were still very good. The relief valve seemed kinda sticky, so I cleaned off a bit of tarnish and now it slides pretty good. Ill be replacing the oil pressure sensor just for piece of mind and I've heard they seem to go out often. Re-installed oil pump.
     
I got some stuff done this morning as well:

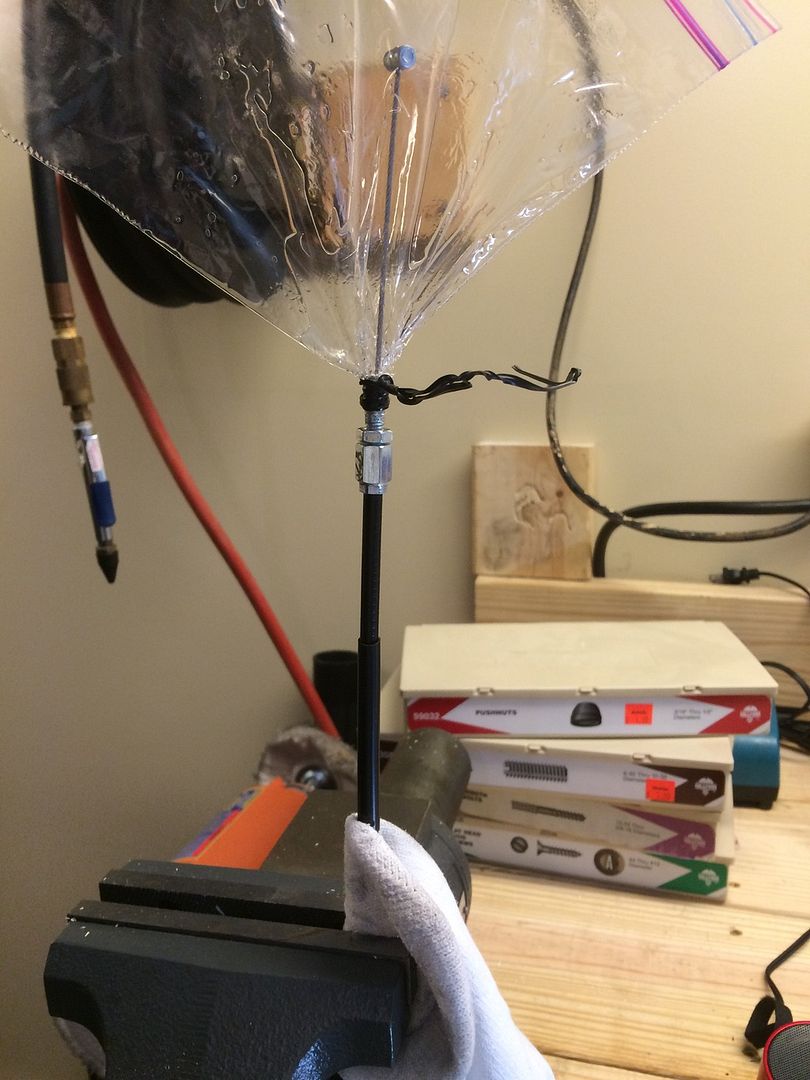
     - Lubed new clutch and push/pull throttle cables.

Very high tech lube system...

     - Installed battery and tested wiring out again. Everything seems good. One odd thing I noticed though. I don't have my plug boots on yet, so I'm just laying the spark cables grounded on the engine and checking that the spark jumps from the wire to the case. When I hit the kill switch, one set of wires discharges and sparks. Is this normal? Is it just the coils discharging? I have the Pamco system.

FYI, wiring diagram of my set-up:
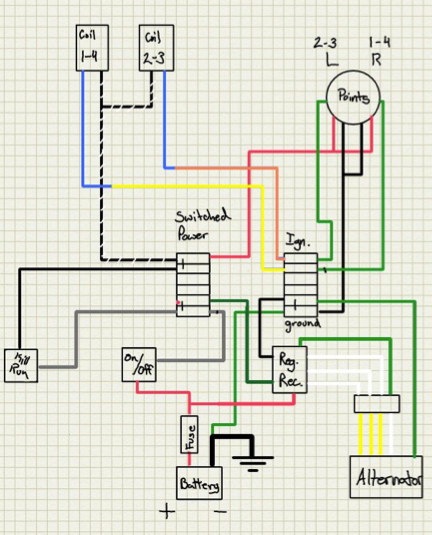


Waiting on new clutch cover gasket to put button the cover up, then I will fill with oil and try to prime it (I still haven't found out if I can or need to prime the head with oil!!!  :-[)


If anyone has any suggestions or comments on how I'm going about things please let me know! This is my first time around with this large and complicated of a bike. Everything that I have learned has been from scouring the forum and have found some great info, but there is no substitute for experience.