Alright so I recently found this ad for a cb550 seat cover on Ebay after much searching for one that matched the original style as close as possible:
http://www.ebay.com/itm/170826987891?ssPageName=STRK:MEWNX:IT&_trksid=p3984.m1497.l2649#ht_1679wt_1184
IT'S AN AMAZING QUALITY SEAT COVER FOR CHEAP! The seller is called tight-fit-seats in the UK. (Disclaimer: I am not an advertiser for tight-fit-seats, just a very satisfied customer)
I installed a "Gumtwo" Ebay seat cover on my brother's CB650 and, even though it looks pretty good now, the vinyl was VERY thin, with very little excess vinyl around the edges to pull on. I tore it twice trying to install it and had to sew double stitches around the edges. The added foam that gumtwo also stitches into the top of the seat cover makes it a total bear to install and, instead of "adding extra padding", it makes the seat hard as a rock. It also didn't have the factory style heat pressings, just a single line of stitching. Not to mention it was $90!
The "tight-fit-seats" seat cover I bought for my CB550 was only about $60 shipped, had all the factory heat pressings (almost identical to the original) and the vinyl was of very high quality, nice and thick, and plenty of material to tug on around the edges.
They also carry seats for CB750F1, CB750F2, CB400F, CB350F, CBX1000, CB550K3, CB500K0, CB500K1, CB750K1, CB750K2-K5, CB750K6, CX500, GL1000, and a lot of vintage Kawi and Yamaha seats. All of them are in the range of $50 and are HEAT PRESSED as original. The heat pressings are a near perfect match on all of them, including the faux-stitching. So, if you are in the market for a seat cover, buy from them, you will not be disappointed! I just hope their prices stay low... maybe they'll realize how awesome their product is and jack up the price.
To fasten the seat cover to the seat pan, I ordered this trim that I found from
http://www.siriusconinc.com/ .
http://www.siriusconinc.com/pro_detail-chrome_seat_trim_band-36-2726.htm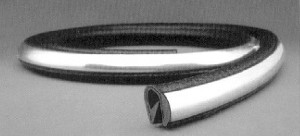
It looks very similar to the original seat trim, which as we all know, is pretty much impossible to replace as original because it is molded directly into the seat cover.
Since I was there, and it was only $10 more, I also replaced my chrome passenger strap buckles.
http://www.siriusconinc.com/pro_detail-honda_cb77_cl77_cb450_cb350_cb750_gl1000_seat_buckles-36-81.htm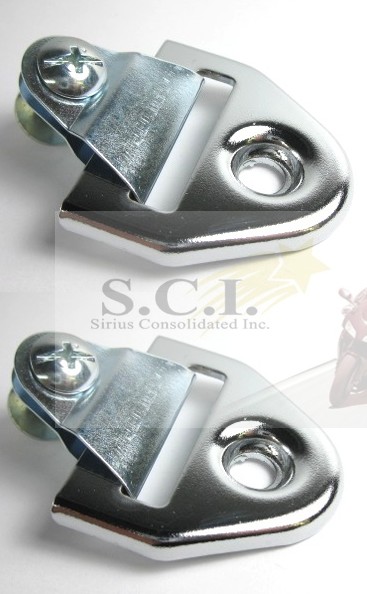
So, total cost for everything including shipping to my door was about $103. Not bad, considering gumtwo's seat cover is $90, and I wasn't impressed with gumtwo the first time around.
Anyways, here's what I started with:


An original seat that was starting to show its age. I had to duct-tape the saddle area on both sides from tearing along the heat pressings. The buckles were pitting and only remnants remained of the original chrome strip.
And here are the new parts:

Beautiful embossing:

And look how close the heat pressing matches the original! The grain of the vinyl is a little different, but who cares it looks killer!:

The only real noticeable deviation from the original that I could find was the stencil on the back of the seat. It's white, not silver as original. I don't care, though. I like the white. It stands out more and looks cleaner. (Out come the opinions

)

A passenger strap was included, as well. It was thinner than the original, but it's reinforced with material comparable to a seat belt, so I trust it:


The chrome trim was very nice and thick. It's got some weight to it, as well and it is of a u-channel design. Be careful, though. You need to tug on it a bit because they don't give you any excess. Only enough to do one seat, so you gotta stretch on it a bit.


The chrome buckles were very nice as well. They are nice and thick, but the chrome doesn't quite have the sheen of the original. But that's fine by me, because I don't have the money to dish out for NOS Honda.


The bolts are also too long and don't look like the original, so i didn't use them.
So, moving right along, It's time to disassemble the seat. I started by flipping over the seat, unscrewing the seat hinge, and unscrewing the seat latch. Remove them both. Then remove the little pins on the screws that hold the passenger strap on. Flip over the seat and remove the screws that hold on the passenger strap. Then remove the passenger strap. Remember to keep track of where all of the little washers, clips, rubber snubbers, screws and bolts go.


Flip the seat back right side up and take a screw driver and start prying all of the little retainer tabs away from the seat trim. There are four hooks at the front of the seat that are a little bit different and may require pliers.

Once all of the tabs and hooks are pried away, start pulling the cover off.


Now, take a look at how well the new cover matches the original on the inside! Pretty cool stuff.

Now inspect the seat foam for damage and cracks. My seat had started to crack around the saddle area where I had duct-taped previously. Take a little bit of 80 grit sand paper and sand off any foam that may leave bumps in the cover. I also took some 3M Super 77 and glued that hole shut to hopefully keep that tear at bay.

After the foam has been repaired if needed, place the new seat cover around the foam and seat pan. Try to center it as best you can, its a trial and error thing.

Now, Take some HEAVY DUTY tape. (I used HD packing tape.) Pull all of the excess seat cover towards the center of the seat pan and tape it there. Go all around the seat and tape the cover on. Flip over the seat and see how well the cover is centered.

I got it pretty well centered, so I installed the trim. The trim will be the only fastening device to hold the cover on, so it needs to be on pretty tight. The cover, however; doesn't need to be pulled super super tight. Just a little tighter than is needed to remove the wrinkles. The stock seat cover doesn't stretch over the foam, it just slips on like a glove... and this new cover fits like one, too. So don't worry about pulling hard. You'll wear out your knuckles.
Put the trim on one side of the seat and stop. Look at the other side and see how well the tape is holding. Flip over the seat and take a look at the pattern on top to make sure the cover is still centered. If it is still centered, proceed with the rest of the trim. You'll need to put some tension on the trim when going around the curved areas under the HONDA logo, so an extra set of hands helps. I had my little brother pull on it to make sure we had enough trim to go around the seat. I did, but just.


This a trial and error thing, so if it didn't line up as you like, just pull the trim off ONLY where the cover doesn't line up right. Then tug on the cover a little and push on the trim while keeping tension on the cover.
I got it on just how I wanted it.

Now, to get rid of most of the waviness in the trim, I put the seat on the floor, sat on it, and rocked back and forth to set it onto the pan nice and snug. Then, I flipped over the seat and hammered the tabs into the trim strip. Then cut off the excess vinyl.

Next, I did the passenger strap. I disassembled the original strap and inspected how it went together. I also took the little chrome button/bolt and polished and reused it.

I then measured the original strap length and cut the new one to match. I then took the excess strap and cut it into short lengths to fit behind the buckle to make it nice and thick. This will keep the chrome bolt from stabbing into the seat cover and tearing it.

Nice and shiny with the refurbished chrome button.

Install it on the seat and you're done!
Now I couldn't resist putting it on my bike and taking some final pictures!


The fit is damn near perfect and any fitment issues were my own fault, not the cover. I might make some adjustments later on.
I only have $1100 into this bike (including the purchase price) and this cover makes it look a million bucks!
Hope you enjoyed this write-up!
-Austin


