Author Topic: Wiring up a Danmoto gauge  (Read 9804 times)

0 Members and 1 Guest are viewing this topic.

Offline Scott S

  • Global Moderator
  • Really Old Timer ...
  • *****
  • Posts: 8,232
Wiring up a Danmoto gauge
« on: April 02, 2013, 05:46:51 AM »
 This looks like it will be pretty simple to wire up, but I could use some positive reinforcment, to ease my mind.
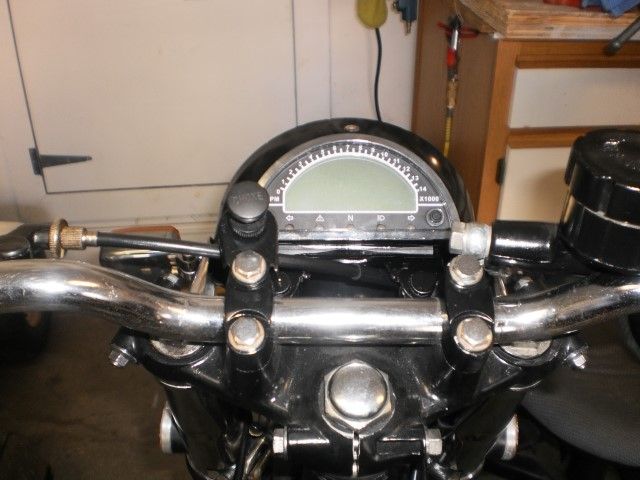


 In fact, whoever designed this thing might have had a Honda! Many of the wires match color for color to the Honda wiring diagram.
 I have a few questions, but I'll take them one or two at a time so as not to get everyone confused.

 Here's all the instructions that came with the Danmoto, if you can really call them that. Notice my handwriting on the second pic. That's the easy, idiot-proof stuff!
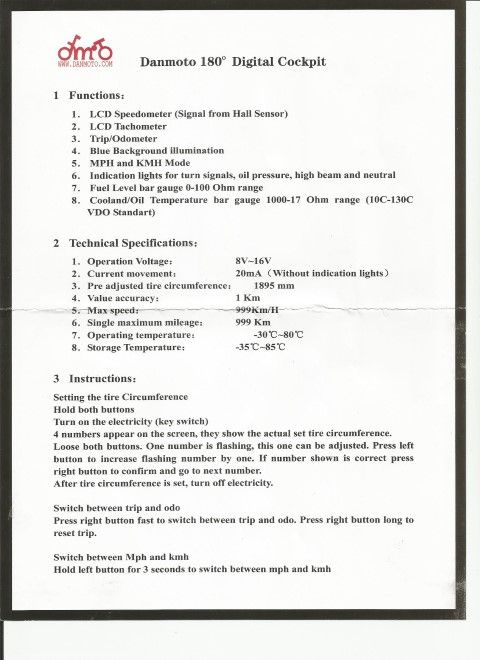
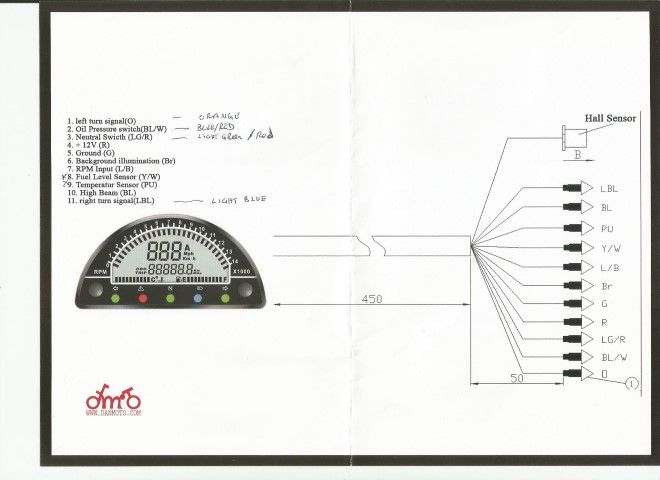


 I'll be using the wires that once went to the "idiot lights" on the dash of my CB500. Those should match up to the turn indicators, oil pressure, neutral, and high beam on the Danmoto.

  The turn signal bulb on the stock dash has two wires...orange and light blue. LB comes from the RH turn signal, O comes from the left. Pretty straight forward to match those up, right?

 Next, the oil pressure switch has a blue/red wire on the stock harness. The dash light has the blue/red and a black wire. The black just runs power to the bulb, right?  If the Danmoto has a 12V source, all I need is to run the B/R wire from the oil pressure switch to the BL/W wire on the Danmoto, correct?

 Same idea with neutral lamp. It has a light green/red wire from the neutral switch and a black wire to power  the lamp. I can take the LG/R wire that once went to the dash lamp and plug it into the LG/R on the Danmoto.

« Last Edit: April 02, 2013, 06:15:01 AM by Scott S »
'71 CB500 K0
'17 Triumph Street Scrambler
'81 Yamaha XS650

Offline Scott S

  • Global Moderator
  • Really Old Timer ...
  • *****
  • Posts: 8,232
Re: Wiring up a Danmoto gauge
« Reply #1 on: April 02, 2013, 05:50:15 AM »
 First REAL question, if my other stuff passes inspection...

 Let's start with #4 and #5 on the Danmoto; +12V and Ground. In a CB500/550 dash (this bike is a '71 CB500 and I'm using the correct diagram. I'm pretty sure that the 500/550 was the same up to about '76), I can use any of the green wires in the headlight bucket for ground. Should I use a black wire for power? Or should I look for a keyed power wire...a black/white wire, I believe.
« Last Edit: April 02, 2013, 06:16:18 AM by Scott S »
'71 CB500 K0
'17 Triumph Street Scrambler
'81 Yamaha XS650

Offline Greggo

  • Somebody's
  • Old Timer
  • ******
  • Posts: 4,164
  • Helmets Save Lives. Period.
Re: Wiring up a Danmoto gauge
« Reply #2 on: April 02, 2013, 06:11:40 AM »
Correct me if I'm wrong, but I thought the greens were all grounds..no power..

Offline Scott S

  • Global Moderator
  • Really Old Timer ...
  • *****
  • Posts: 8,232
Re: Wiring up a Danmoto gauge
« Reply #3 on: April 02, 2013, 06:17:13 AM »
Correct me if I'm wrong, but I thought the greens were all grounds..no power..

 Corrected that....I was confused for a minute. Electricity is black magic to me.

 Now....best way to get 12V and ground to the Danmoto?
'71 CB500 K0
'17 Triumph Street Scrambler
'81 Yamaha XS650

Offline Greggo

  • Somebody's
  • Old Timer
  • ******
  • Posts: 4,164
  • Helmets Save Lives. Period.
Re: Wiring up a Danmoto gauge
« Reply #4 on: April 02, 2013, 06:30:03 AM »
Correct me if I'm wrong, but I thought the greens were all grounds..no power..

 Corrected that....I was confused for a minute. Electricity is black magic to me.

 Now....best way to get 12V and ground to the Danmoto?

I think you would want power linked to the ignition switch, yeah?

Offline Scott S

  • Global Moderator
  • Really Old Timer ...
  • *****
  • Posts: 8,232
Re: Wiring up a Danmoto gauge
« Reply #5 on: April 02, 2013, 06:44:39 AM »
 I know that there's a keyed power wire on the main harness that feeds the coils; a black/white wire. Is there a corresponding wire inside the headlight bucket?
 The Bk/W wire on my diagram goes to the tachometer light, along with a green wire. Could I use that?

 Which brings me to #6: Background illumination.
 I was figuring on using one of the wires that sent power to the tach or speedo lighting. Suggestions?
'71 CB500 K0
'17 Triumph Street Scrambler
'81 Yamaha XS650

Offline Stev-o

  • Ain't no
  • Really Old Timer ...
  • *******
  • Posts: 34,413
  • Central Texas
Re: Wiring up a Danmoto gauge
« Reply #6 on: April 02, 2013, 06:45:43 AM »
Yes, greens are ground and you would want it wired through the ig switch (or it would be constant hot)
'74 "Big Bang" Honda 750K [836].....'76 Honda 550F.....K3 Park Racer!......and a Bomber!............plus plus plus.........

Offline Scott S

  • Global Moderator
  • Really Old Timer ...
  • *****
  • Posts: 8,232
Re: Wiring up a Danmoto gauge
« Reply #7 on: April 02, 2013, 06:50:35 AM »
Yes, greens are ground and you would want it wired through the ig switch (or it would be constant hot)

 Is the black/white wire that goes to the tach light the same keyed wire that feeds the coils? Could I use that?
'71 CB500 K0
'17 Triumph Street Scrambler
'81 Yamaha XS650

Offline lucky

  • Really Old Timer ...
  • *******
  • Posts: 6,717
Re: Wiring up a Danmoto gauge
« Reply #8 on: April 02, 2013, 07:12:25 AM »
First REAL question, if my other stuff passes inspection...

 Let's start with #4 and #5 on the Danmoto; +12V and Ground. In a CB500/550 dash (this bike is a '71 CB500 and I'm using the correct diagram. I'm pretty sure that the 500/550 was the same up to about '76), I can use any of the green wires in the headlight bucket for ground. Should I use a black wire for power? Or should I look for a keyed power wire...a black/white wire, I believe.

On the Honda some wires with colored stripes are wires that only have power that is switched on. On and off.
For instance the start button yellow with red stripe.
Turn signal wires etc.,.
Horn button and so on.

Offline Scott S

  • Global Moderator
  • Really Old Timer ...
  • *****
  • Posts: 8,232
Re: Wiring up a Danmoto gauge
« Reply #9 on: April 03, 2013, 04:42:14 AM »
 Any other input? Am I correct on the signals/oil/neutral lights?
 Best source for 12V and ground?
'71 CB500 K0
'17 Triumph Street Scrambler
'81 Yamaha XS650

Offline andrewk

  • doin' it.
  • Hot Shot
  • ***
  • Posts: 626
Re: Wiring up a Danmoto gauge
« Reply #10 on: April 03, 2013, 05:46:07 AM »
I just wired up one of these on a CB450SC.  You have the signals and such correct in your previous posts.

Best source for 12V is a black wire.  That's switched 12V.  If you put it on the Blk/W wire, it would go on and off with the kill switch, and I don't think you want that.  Any ground plug in the bucket with an open spot will be good for ground.

Pretty painless, but there's a lot of wires there.

Offline Scott S

  • Global Moderator
  • Really Old Timer ...
  • *****
  • Posts: 8,232
Re: Wiring up a Danmoto gauge
« Reply #11 on: April 03, 2013, 06:06:56 AM »
 Cool. Good info.

 Do you like the gauge?
'71 CB500 K0
'17 Triumph Street Scrambler
'81 Yamaha XS650

Offline andrewk

  • doin' it.
  • Hot Shot
  • ***
  • Posts: 626
Re: Wiring up a Danmoto gauge
« Reply #12 on: April 04, 2013, 02:33:49 AM »
It's not the worst.  I'm still playing around with the tire circumference setting, I'm within 4 mph now, which is probably more accurate than stock. :)

I'm not sure if I like the look of the 180 gauge as much as the 360, but no matter how it looks, it's BRIGHT, which is a very nice upgrade, especially at night.  Either unit is a good upgrade for someone wanting modern gauges.

My only concern is all weather performance.  The wiring has a weather seal, but I would imagine that water can find its way in somehow, it always does.  The Nighthawk I put this on sees daily use, but not much rain use, the owner uses it as a fair weather commuter.

« Last Edit: April 04, 2013, 02:40:41 AM by andrewk »

Offline Scott S

  • Global Moderator
  • Really Old Timer ...
  • *****
  • Posts: 8,232
Re: Wiring up a Danmoto gauge
« Reply #13 on: April 05, 2013, 08:18:01 AM »
 Does anyone have pics or ideas for mounting the Hall Effect magnet and sensor? FWIW, I have Lester mag wheels and not spokes.
'71 CB500 K0
'17 Triumph Street Scrambler
'81 Yamaha XS650

Offline Scott S

  • Global Moderator
  • Really Old Timer ...
  • *****
  • Posts: 8,232
Re: Wiring up a Danmoto gauge
« Reply #14 on: April 05, 2013, 01:10:31 PM »
 Got everything figured out and tested except the tach and speedo. Tach is wired, but I can't test it until the bike is running. We have a plan for the Hall Sensor....stay tuned.

 Pic is blurry because I had to turn off the flash.
'71 CB500 K0
'17 Triumph Street Scrambler
'81 Yamaha XS650

Online scottly

  • Global Moderator
  • Really Old Timer ...
  • *****
  • Posts: 16,334
  • Humboldt, AZ
Re: Wiring up a Danmoto gauge
« Reply #15 on: April 05, 2013, 06:09:52 PM »
I made a bracket to mount the pick-up for my bicycle speedo, and used a couple of tiny magnets from Radio Shack in the head of one of the socket head cap screws on my Morris wheels. 
Don't fix it if it ain't broke!
Helmets save brains. Always wear one and ride like everyone is trying to kill you....

Offline Scott S

  • Global Moderator
  • Really Old Timer ...
  • *****
  • Posts: 8,232
Re: Wiring up a Danmoto gauge
« Reply #16 on: April 05, 2013, 06:15:36 PM »
 We have something very similar in mind. Picked up some parts today. Hope to have it installed this weekend.
'71 CB500 K0
'17 Triumph Street Scrambler
'81 Yamaha XS650

Offline andrewk

  • doin' it.
  • Hot Shot
  • ***
  • Posts: 626
Re: Wiring up a Danmoto gauge
« Reply #17 on: April 07, 2013, 08:41:41 AM »
Heres how I did the nighthawk.  I re-bent the speedo cable guide and used fender washers. Glued the magnet to a rotor bolt head, after cutting off the back plastic part where the circlip fits. Easy peasey.


Offline Scott S

  • Global Moderator
  • Really Old Timer ...
  • *****
  • Posts: 8,232
Re: Wiring up a Danmoto gauge
« Reply #18 on: April 15, 2013, 08:35:39 AM »
 I have everything working but the tach. It works, but reads high.

 I found this on a Ducati site:

"The Tach need a 10K ohm 1/2 watt resistor inline for it to work and connect to the negative tab of the coil.  Very easy.  Resistor can be had at Radio Shack 5 or $3."

 Does this sound right? I'm using it on a CB650 with dual output coils/wasted spark ignition.
 There isn't really a negative side of the coils, right? One prong gets the signal from the points (electronic ignition in my case) and the other is fed power from the keyed switch.
 Which would you use?

 Do I just cut the wire coming from the gauge for the tach signal and solder in the resistor?
'71 CB500 K0
'17 Triumph Street Scrambler
'81 Yamaha XS650

Offline andrewk

  • doin' it.
  • Hot Shot
  • ***
  • Posts: 626
Re: Wiring up a Danmoto gauge
« Reply #19 on: April 15, 2013, 09:00:15 AM »
For the resistor wiring, yes, that would be the easiest way.

The points side of the coil is considered negative.  You'll want the tach on one side of your electronic ign (blue or yellow equivalent).

I'm having my own tach problems, but I'm working with CDI.  If I hook up at the coil it reads fine to 4k, then stops.  If I hook it up to the ign pickup wiring, it reads double.  I think my solution is going to involve a zener diode.  Strange how little information is out there.

Offline Scott S

  • Global Moderator
  • Really Old Timer ...
  • *****
  • Posts: 8,232
Re: Wiring up a Danmoto gauge
« Reply #20 on: April 15, 2013, 03:51:15 PM »
 I forgot to post these over here.
 Here's the bracket we made and longer bolts...


 Mounted the magnet on the bracket...


 And made up another bracket for the Hall Sensor.


 The magnet is mounted using the (longer) rotor bolts. It works, but I have to enter the tire ratio and change it to MPH.

'71 CB500 K0
'17 Triumph Street Scrambler
'81 Yamaha XS650

Offline Scott S

  • Global Moderator
  • Really Old Timer ...
  • *****
  • Posts: 8,232
Re: Wiring up a Danmoto gauge
« Reply #21 on: April 15, 2013, 03:59:03 PM »

 The speedo works, but I still need to enter the proper tire diameter and change it to MPH.

 I also installed a 10K ohm resistor inline on the tach wire to get the signal down.


 That got the tach reading correctly, but it has a little noise in it. The bars would jump up one or two bars over the actual idle speed. We twisted up about 10 feet of wire in my drill to make a homemade capacitor and prove a theory. That took ALL the noise out of the tach signal as made it steady.
 I tried wiring in a capacitor from Radio shack, but the smallest one I could fid didn't remove all the noise. I have half a mind to re-attach the coiled wire and just hide it under the tank somewhere.


'71 CB500 K0
'17 Triumph Street Scrambler
'81 Yamaha XS650

Offline andrewk

  • doin' it.
  • Hot Shot
  • ***
  • Posts: 626
Re: Wiring up a Danmoto gauge
« Reply #22 on: April 15, 2013, 05:32:17 PM »
that's a slick mount.  I like how you were able to hide it in the fender stay.  I routed mine along the brake hose.


Offline K3Owner

  • Enthusiast
  • **
  • Posts: 149
Re: Wiring up a Danmoto gauge
« Reply #23 on: April 16, 2013, 07:07:05 AM »
We always employed electrolytics when filtering supplies because of the needed capacity. .001u may not be enough but we're not talking supplies here either. You said you coiled wire and that worked so you created a homemade inductive choke and placed it in line in the circuit? Nice job. Buy an inductor at RS that does the same. Now, that said, I haven't been on the repair bench in 20 years so you might say that it shows...
1978 CB550K4 - yeah, I'm not a K3 Owner - my bad

Offline Scott S

  • Global Moderator
  • Really Old Timer ...
  • *****
  • Posts: 8,232
Re: Wiring up a Danmoto gauge
« Reply #24 on: April 16, 2013, 08:34:44 AM »
 Yes, I need a bigger capacitor. Is there a way to measure the resistance of the coiled wire we made? That thing made it rock steady. Maybe I'll just coil it up and hide it under the tank.

 Someone said to try an electrolytic radial cap in the range of 1000-10,000uf. Or, since the ones I have came in a two pack, wire another up in series? Do I have to tap into the tach wire again and make another ground, or could I tap into the wire that comes off the existing capacitor that's going to ground?
'71 CB500 K0
'17 Triumph Street Scrambler
'81 Yamaha XS650

Offline Duke McDukiedook

  • Space Force 6 Star General
  • Really Old Timer ...
  • *******
  • Posts: 12,690
  • Wish? Did somebody say wish?
Re: Wiring up a Danmoto gauge
« Reply #25 on: April 16, 2013, 10:15:57 AM »
On the cap value I would think you would just need a filter value to shelve the RF noise at the desired frequency. What that Farad value would be I could not tell you. Yeah, coiling wire would not make a capacitor but it would make a free air inductor.
"Well, Mr. Carpetbagger. We got somethin' in this territory called the Missouri boat ride."   Josey Wales

"It's Baltimore, gentlemen. The gods will not save you." Ervin Burrell

CB750 K3 crat | (2) 1986 VFR750F

Offline Scott S

  • Global Moderator
  • Really Old Timer ...
  • *****
  • Posts: 8,232
Re: Wiring up a Danmoto gauge
« Reply #26 on: April 16, 2013, 03:57:20 PM »
 After fiddling with the bike today, tuning the carbs and getting some heat into the engine, the tach really calmed down. Most, if not all, of the noise went away. It was idling in the driveway and two bars were showing....a nice, steady idle.

 It's certainly not bad enough to bother me at this point. It seems to be working fine now.
 All that's left is to program the speedo.
'71 CB500 K0
'17 Triumph Street Scrambler
'81 Yamaha XS650

Online scottly

  • Global Moderator
  • Really Old Timer ...
  • *****
  • Posts: 16,334
  • Humboldt, AZ
Re: Wiring up a Danmoto gauge
« Reply #27 on: April 16, 2013, 06:45:47 PM »
Yes, I need a bigger capacitor.
 Someone said to try an electrolytic radial cap in the range of 1000-10,000uf. Or, since the ones I have came in a two pack, wire another up in series?
A 10,000 uf cap is HUGE. Try wiring the second cap in parallel with the first one. Caps add in parallel, the opposite of resistors that add in series. 
Don't fix it if it ain't broke!
Helmets save brains. Always wear one and ride like everyone is trying to kill you....

Offline Duke McDukiedook

  • Space Force 6 Star General
  • Really Old Timer ...
  • *******
  • Posts: 12,690
  • Wish? Did somebody say wish?
Re: Wiring up a Danmoto gauge
« Reply #28 on: April 17, 2013, 01:22:56 PM »
Yeah, you would want to talk to an elcectronics guru on RF noise supression but I would think a cap around the size of .01uF would be a better place to start for a noise filter.
"Well, Mr. Carpetbagger. We got somethin' in this territory called the Missouri boat ride."   Josey Wales

"It's Baltimore, gentlemen. The gods will not save you." Ervin Burrell

CB750 K3 crat | (2) 1986 VFR750F

Offline Scott S

  • Global Moderator
  • Really Old Timer ...
  • *****
  • Posts: 8,232
Re: Wiring up a Danmoto gauge
« Reply #29 on: April 17, 2013, 05:46:04 PM »
 Now that the bike is running and the battery is fully charged, I'm not getting any noise. The tach works well and is very steady.

 I also programmed the speedo today and set it to MPH. Haven't verified it yet against a known speedometer, but it seems to be OK.

 Good gauge, good price and not that hard to wire up and program. I can see using this again on a different project.
'71 CB500 K0
'17 Triumph Street Scrambler
'81 Yamaha XS650

Offline K3Owner

  • Enthusiast
  • **
  • Posts: 149
Re: Wiring up a Danmoto gauge
« Reply #30 on: April 20, 2013, 05:24:34 AM »
Wire is measured in impedance by gauge and length. If you know both, you can look it up easily enough. It's not the impedance that is playing the role. It's an RF choke, absorbing the noise. A cap in that range should work well, is very cheap, small, and easy to hide in the wiring. Doubling those little ceramics won't give you enough effect. 500 of them will, though. As I said, advice from someone not on the bench for 20 years. Cheap advice but at least it's a cheap part to try!
1978 CB550K4 - yeah, I'm not a K3 Owner - my bad

Offline Scott S

  • Global Moderator
  • Really Old Timer ...
  • *****
  • Posts: 8,232
Re: Wiring up a Danmoto gauge
« Reply #31 on: April 20, 2013, 05:34:31 AM »
 It's working great now. Only about 50-60 miles on the bike, but so far - so good.
'71 CB500 K0
'17 Triumph Street Scrambler
'81 Yamaha XS650