Author Topic: CB750 K1 project  (Read 51403 times)

0 Members and 1 Guest are viewing this topic.

Offline Dunk

  • Expert
  • ****
  • Posts: 932
Re: CB750 K1 project
« Reply #25 on: September 06, 2013, 06:55:17 AM »
Thanks, I reassembled the wheel bearings as they came out, leaving that seal out. I assume the spacer is supposed to be tight between the bearings and spin with them? I first installed the retainer side bearing, fully seated and tightened the retainer ring. Then installed the spacer after blasting the rust off and painting it so it won't rust again, and finally installed the bearing on the speedometer side. I drove that one in until the center part contacted the spacer. It was a little tight to turn so lightly tapped the center of the retainer side bearing and now both bearings spin freely together along with the spacer. I assume this is correct and the bearings and spacer should turn together. Now I just need to clean and paint the rotor and reassemble that.. Debating if I should put new spokes on this, I'll see how they clean up.


Fork tube caps arrived so I installed the springs and caps along with 10 wt fork oil.


Not sure what's next. I'll probably pull the rear wheel off my other K1 and disassemble that this weekend. Maybe start putting more small parts on the frame such as wiring and electrical and misc bracketry. Need to clean, blast, and paint the pegs. More parts should arrive early next week which will allow me to reassemble more. It feels good and is a great motivator as more parts go back on the frame.

Offline SOHC4 Cafe Racer Fan

  • Speak up, Whipper-Snapper! I'm a
  • Really Old Timer ...
  • *******
  • Posts: 15,733
  • SOHC/4 Member #1235
Re: CB750 K1 project
« Reply #26 on: September 06, 2013, 11:53:55 AM »
I went back into the thread to figure out why you painted the upper fork tubes -- rust/pitting.  This is obviously common with moisture getting trapped under the fork ears.  I like the look of the stock fork ears, but this design flaw/feature is unfortunate.
1975 CB550K1 "Blue" Stockish Restomod (http://forums.sohc4.net/index.php?topic=135005.0)
1975 CB550F1 frame/CB650 engine hybrid "The Hot Mess" (http://forums.sohc4.net/index.php/topic,150220.0.html)
2008 Triumph Thruxton (http://forums.sohc4.net/index.php/topic,190956.0.html)
2014 MV Agusta Brutale Dragster 800
2015 Yamaha FZ-09 (http://forums.sohc4.net/index.php/topic,186861.0.html)

"There are some things nobody needs in this world, and a bright-red, hunch-back, warp-speed 900cc cafe racer is one of them — but I want one anyway, and on some days I actually believe I need one.... Being shot out of a cannon will always be better than being squeezed out of a tube. That is why God made fast motorcycles, Bubba." Hunter S. Thompson, Song of the Sausage Creature, Cycle World, March 1995.  (http://www.latexnet.org/~csmith/sausage.html and https://magazine.cycleworld.com/article/1995/3/1/song-of-the-sausage-creature)

Sold/Emeritus
1973 CB750K2 "Bionic Mongrel" (http://forums.sohc4.net/index.php?topic=132734.0) - Sold
1977 CB750K7 "Nine Lives" Restomod (http://forums.sohc4.net/index.php?topic=50490.0) - Sold
2005 RVT1000RR RC51-SP2 "El Diablo" - Sold
2016+ Triumph Thruxton 1200 R (http://forums.sohc4.net/index.php/topic,170198.0.html) - Sold

Offline Terry in Australia

  • Really Old Timer ...
  • *******
  • Posts: 33,363
  • So, what do ya wanna talk about today?
Re: CB750 K1 project
« Reply #27 on: September 06, 2013, 06:12:08 PM »
Yeah, the reason they rusted so badly was that Honda cheaped out and left the last 10 inches of fork tube hard-chrome free, so not only was water being trapped in the headlight ears a problem, but leaving bare unpainted steel fork tubes under those headlight ears was just dumb penny pinching.


I've seen some fork tubes so badly rusted that they were dangerous, but it's an easy fix nowadays, new fork tubes are available, and cheap.

Cadunkle, did you replace the fork seals? I imagine that you have, it'd be silly to replace the springs and oil and leave 42 year old seals in those forks.

No the axle spacer doesn't spin with the bearings, what happens is when you tighten the axle it pulls the bearings into the spacer (don't forget the axle seal on the non speedo side) and so the spacer is locked in place with the inner bearing shell, which doesn't turn, the outer shell rotates around it.

You can't do much about your spokes, if you try to clean them up with any abrasives you'll just remove the old zinc plating and they'll rust. Either live with them, or replace them. Cheers, Terry. ;D
I was feeling sorry for myself because I couldn't afford new bike boots, until I met a man with no legs.

So I said, "Hey mate, you haven't got any bike boots you don't need, do you?"

"Crazy is a very misunderstood term, it's a fine line that some of us can lean over and still keep our balance" (thanks RB550Four)

Offline Dunk

  • Expert
  • ****
  • Posts: 932
Re: CB750 K1 project
« Reply #28 on: September 06, 2013, 06:28:50 PM »
I believe at some point (K2?) Honda chromed the full length of the fork tubes. Mine were fairly pitted in some spots but still seemed like plenty of material left. Hopefully the paint, and avoiding rain when possible will prevent them from rusting again

Yes, new fork seals and snap rings. Old snap rings were so rusted they were falling apart when I tried to clean them. Had to order online since no local stores had 50mm/2" internal snap rings in stock.

Offline Dunk

  • Expert
  • ****
  • Posts: 932
Re: CB750 K1 project
« Reply #29 on: September 08, 2013, 04:24:27 AM »
Other rear wheel pulled and disassembled. This one has no cracks on the bearing retainer. Need to polish, install bearings, and lace newer/good condition 18" rim and spokes to it.


Offline Terry in Australia

  • Really Old Timer ...
  • *******
  • Posts: 33,363
  • So, what do ya wanna talk about today?
Re: CB750 K1 project
« Reply #30 on: September 08, 2013, 02:21:00 PM »
That's excellent mate, how are you going to clean up tht hub before you lace it to your rim? I've gotta put a drum brake hub in my Borrani rear rim, I think I'll get it bead blasted and paint it a gloss silver, that's what the PO did on my K2 and it looked really good. Cheers, Terry. ;D
I was feeling sorry for myself because I couldn't afford new bike boots, until I met a man with no legs.

So I said, "Hey mate, you haven't got any bike boots you don't need, do you?"

"Crazy is a very misunderstood term, it's a fine line that some of us can lean over and still keep our balance" (thanks RB550Four)

Offline Dunk

  • Expert
  • ****
  • Posts: 932
Re: CB750 K1 project
« Reply #31 on: September 09, 2013, 05:17:28 AM »
I'm not entirely sure, though I was planning on compounding and polishing as I did with the fork lowers. First step was to scrub in the parts washer which got the easier junk off and brightened it a fair bit. Compounding and polishing the outer parts on each side should be easy enough. Getting the inside ribbed area will be more difficult. I may put it in the blast cabinet to clean the ribbed area and just get it as best I can  with compound and polish. Maybe someone here can add a better way to get these hubs presentable. I prefer not to paint as I worry about paint coming off or being damaged around the spoke areas, and of course they were only lightly polished and cleared from the factory so if it's not too difficult to recreate that look I'll try for that.

Offline Dunk

  • Expert
  • ****
  • Posts: 932
Re: CB750 K1 project
« Reply #32 on: September 09, 2013, 05:14:35 PM »
Blasting didn't rough up the surface much so I just did the whole thing. I'll compound and polish the visible parts from the sides and leave the ribs as they are since they seem to be left rough as cast from Honda. Here it is after blasting all the crud and rust off.


Still waiting on parts, I think something is on back order so I'll have to see what exactly it is and how that'll hold me up. For now I'll just keep trucking along with this stuff. Polish the rear hub, clean up the drive flange and brake plate and polish them. Then I'll probably end up taking the front rim off, cleaning and polishing that hub properly, and reassembling with new spokes. It would drive me nuts to have the rear nice and the front dirty. So the list gets longer... Should be ready to ride in time for snow.  ;D

Offline Dunk

  • Expert
  • ****
  • Posts: 932
Re: CB750 K1 project
« Reply #33 on: September 09, 2013, 07:47:20 PM »
I think I'm done for the night. Rear hub parts are cleaned, blaster, and compounded. Just need to polish and should be good. I know I could be anal about it and get all the nooks and such but I think this will be good enough for me and it looked like originally they were just given a quick polish on the more accessible areas and the hard areas left as cast.

After cleaning


Sand blasted


Hub compounded


All parts compounded


Next I'll polish these parts. Honda cleared these from the factory. I'm thinking I probably should as well, since it'll be hard to clean and polish with spokes on the wheel or on the bike. Should I clear coat these? If so what rattle can clear coat is best for this?

Offline Dunk

  • Expert
  • ****
  • Posts: 932
Re: CB750 K1 project
« Reply #34 on: September 09, 2013, 08:15:27 PM »
Also, 664 views on this thread. Please don't be shy about commenting, pointing out anything I'm doing wrong, recommendations, idea, etc. I started this thread to share what I'm doing and also for motivation. I could have been riding by now if I just slapped it all together but I want to be thorough and make this bike nice. This all started because I needed a new front tire...

I suppose it's time I make a list...

To do:
Rear wheel
   -Finish polishing
   -Install bearings
   -Clear coat
   -Lace/true rim
   -Mount/balance tire
Front wheel
   -Clean/paint rotor
   -Order spokes
   -De-lace rim
   -Clean/polish hub
   -Lace/true rim
   -Mount/balance tire
Brakes
   -Rebuild caliper
   -Rebuild master cylinder
   -New brake lines
   -Clean/polish rear brake pedal
   -Clean/install rear brake light switch
Frame
   -Install inner fender
   -Install fender
   -Install wiring harness and electrical parts
Body
   -Drill for emblems in new side covers
   -Remove cap and petcock from tank, strip paint and prep
   -Acquire solid fork ears/prep/clean
   -Strip/prep headlight bucket
   -Paint
   -Clean/polish fenders and misc shiny parts
Engine
   -Clean
   -Paint?
   -Polish covers and shiny bits
   -Paint black background on alternator cover
   -Replace valve cover gasket
   -Inspect/replace clutch
   -Replace neutral switch
   -Inspect/replace cam chain tensioner
Gauges
   -Restore

Offline Tews19

  • I am no
  • Really Old Timer ...
  • *******
  • Posts: 6,465
Re: CB750 K1 project
« Reply #35 on: September 09, 2013, 08:17:56 PM »
Take a look at Godffreys garage... He sells a lightened rotor for your bike.. I have it on my K1.. Love it.

Great job on the blasting. I need to do that to my 550 hub.. I went with an aluminum rim for my rear..

Keep up the good work
1969 Honda CB750... Basket case
1970 Honda CB750 survivor.

Offline jerry h

  • Hot Shot
  • ***
  • Posts: 392
Re: CB750 K1 project
« Reply #36 on: September 09, 2013, 08:50:06 PM »
Quote
Should I clear coat these? If so what rattle can clear coat is best for this?

My 2cents... I wouldn't.  Its much easier to polish a little now and then, than it is to some day take it all apart and strip the failing clear coat and do it all over again.  Its a roll of the dice as to how long your rattle can clear will hold out..... 

Enjoying watching your progress. ;)
"It is not the critic who counts, the credit belongs to the man who is actually in the arena, whose hands are covered with grease and oil."

K2 http://forums.sohc4.net/index.php/topic,105097.0.html

Offline Terry in Australia

  • Really Old Timer ...
  • *******
  • Posts: 33,363
  • So, what do ya wanna talk about today?
Re: CB750 K1 project
« Reply #37 on: September 10, 2013, 12:52:48 AM »
I clear coated the fork lowers on my K2 after I polished them and they're still looking good 8 years on, (well I've since sold the bike, but I've not heard anything negative from the buyer, and he's a very picky) but I used 2 pack clear which is superior to acrylic laquer.

You can also get things clear powder coated, which I think would be a really good treatment. I'm a rider though, not a polisher, and I hate the thought of continually polishing parts after riding it, or washing it etc.

As Jerry said, it's a roll of the dice and you need to do whatever suits you. Honda clear coated the parts to keep them shiny for the first few years of the bike's lives, but aluminum is hard to keep looking good without a lot of effort, so your choices are fairly limited. Cheers, Terry. ;D
I was feeling sorry for myself because I couldn't afford new bike boots, until I met a man with no legs.

So I said, "Hey mate, you haven't got any bike boots you don't need, do you?"

"Crazy is a very misunderstood term, it's a fine line that some of us can lean over and still keep our balance" (thanks RB550Four)

Offline Dunk

  • Expert
  • ****
  • Posts: 932
Re: CB750 K1 project
« Reply #38 on: September 10, 2013, 06:38:51 AM »
Take a look at Godffreys garage... He sells a lightened rotor for your bike.. I have it on my K1.. Love it.

I see it here.

Looks good, should stop better and save a couple pounds. I may go for it. This got me thinking, are there any other areas I can save some weight while keeping a mostly stock look or not detracting too much from the original appearance?

Offline edhaeuser

  • Hot Shot
  • ***
  • Posts: 321
Re: CB750 K1 project
« Reply #39 on: September 10, 2013, 09:38:06 AM »
I bead blasted my hubs as well.  Then I hit the flanges with 400 and 800 grit sandpaper followed by a fairly course buffing compound and a buffing wheel.  They turned out looking good.  I left the bead finish in the middle like you did.  I ended up clearing the hubs with duplicolor.  Hopefully it holds up well, we will see I guess.

Offline Tews19

  • I am no
  • Really Old Timer ...
  • *******
  • Posts: 6,465
Re: CB750 K1 project
« Reply #40 on: September 10, 2013, 10:47:52 AM »
I got one of the knock off aluminum rims off ebay in the mail yesterday..... They are super light.
1969 Honda CB750... Basket case
1970 Honda CB750 survivor.

Offline Terry in Australia

  • Really Old Timer ...
  • *******
  • Posts: 33,363
  • So, what do ya wanna talk about today?
Re: CB750 K1 project
« Reply #41 on: September 12, 2013, 12:42:20 AM »
I got one of the knock off aluminum rims off ebay in the mail yesterday..... They are super light.

Have you got a link mate? Be careful of "Super Light" rims, if they're too thin, they might not take much abuse. I haven't seen the ones you're talking about, so yours may well be fine, but a lot of cheap Chinese alloy rims are meant for 300 pound commuters, not 500 pound Dinosaurs. Cheers, Terry. ;D
I was feeling sorry for myself because I couldn't afford new bike boots, until I met a man with no legs.

So I said, "Hey mate, you haven't got any bike boots you don't need, do you?"

"Crazy is a very misunderstood term, it's a fine line that some of us can lean over and still keep our balance" (thanks RB550Four)

Offline Dunk

  • Expert
  • ****
  • Posts: 932
Re: CB750 K1 project
« Reply #42 on: September 15, 2013, 11:50:23 AM »
I was excited when these showed up!


Though my excitement quickly turned to irritation. I had two issues. Firstly I'll say QC at Ikon has some issues. The first thing I noticed is the threads were full of crud. Slightly disappointing for a $500 part but not the end of the world. I grabbed a pick and cleaned the junk out of the threads only to find a weld booger in there. Didn't think it was that bad until I couldn't knock it off the threads. I ended up filing the booger down by hand  until flush with the threads and then running a tap through it. Shock lower mount bolt threads in fine now.


The other was a minor issue with the chrome around the lower shock mount bolt hole on one of the shocks. The finish is imperfect, it looks like maybe some cutting oil residue remained after cutting the threads. It still has some finish on it so I doubt it will rust, and it is hidden on the inside of the swing arm towards the wheel.


Needless to say I am not happy. I expected much greater QC on a high end somewhat specialty part. These issues weren't enough for me to send them back for refund or replacement, but perhaps enough that I will avoid Ikon for the next bike. Hagon is cheaper and highly regarded here so perhaps their QC is better. I will say that I had no problem ordering, and Dave did call to let me know when they were shipped out and when to expect them. For these issues though it's not worth eating shipping costs and waiting to do anything about warranty or defect. One of the reasons I got these is they are rebuildable and can be disassembled. I was (still am) considering removing the top shroud and spring and painting the inner shock body and upper mount black so they will look even closer to original K1 shocks. This is easy to do any time if I got bored though. Not sure if this is indicative of overall Ikon QC, as I have the worst luck so far as DOA and defects. If one in a million is defective that's the one I get, without a doubt.

Here they are installed. Also note the repop inner fender ordered from Z1parts. If appears the same as original though it's a bit tight to the battery box almost as if the relieved area as not properly positioned. It does appear to be in the same spot though, so maybe it normally fits like this or there is something different somewhere. My original had one of the mounting flanges cracked off. Though I have one of the other bike I figured I'd try this repop since I was ordering a few other things from Z1parts.net.


I also got a set of repop rear turn signal brackets. I did not realize these require two rubber pieces and a sleeve on each side. So I checked my wrecked K1 and found the two larger rubber pieces intact and usable along with the bolts. The brackets I could have used but one got a little jacked up and they're rusty. The outer rubber piece that slips inside the hole in the bracket was present on one side but unusable. No sleeves on either side. Looks like I can get these parts new still so I'll have to order those.


Note that this bike had a later model grab bar that wraps around the seat along with a sissy bar when I got it. The grab bar did not fit properly to the seat and had gaps in the mounting. I ordered the correct K1 small grab handle which should arrive this week. Hopefully I can get the rubber parts for the turn signals quickly so I can mount the rear fender (which still needs to be cleaned.

As for little stuff I've been painting some of the crustier bolts that I had to blast. Don't feel like dealing with plating everything and losing track of where all the fasteners go. Hopefully this is sufficient to look decent and not rust.


Guess I should consult the list and see what's next.

Offline Dunk

  • Expert
  • ****
  • Posts: 932
Re: CB750 K1 project
« Reply #43 on: September 15, 2013, 02:41:06 PM »
I'm putting the new wiring harness in and am discovering a few things I had not noticed previously. First, my battery positive cable is pretty rough. Ordered a new one of those. Next my rectifier plug is melted together to the old harness and deformed. The bike never gave any symptoms of a charging problem, but I will need a new rectifier or at least a new plug for this one. I was considering either pulling off the wrecked K1 or ordering NOS originals.

This got me thinking I remember seeing new digital regulator/rectifier in one units. Is this the way to go?  Are there several manufacturers or are they all the same wherever you order? If several which is preferable? Where do they mount? Looks like two bolts but nothing I've seen mentions bolt spacing. I would assume they mount where the original regulator went? Are these digital units reliable?

Offline cheftuskey121

  • Super Newbie
  • Expert
  • ****
  • Posts: 1,305
Re: CB750 K1 project
« Reply #44 on: September 15, 2013, 05:51:25 PM »
love watching along. takes me back a few months when I was doing my K1. I cannot speak for the combo units but I have a separate  rectifier unit and regulator unit that I ordered new from http://oregonmotorcycleparts.com/ and it has not failed. I have put 4000 miles on the bike so far. the biggest benefit to separate units is is one fails you only have to fix/replace one. if you are keeping it stock I would do that. I think the combo units are really for saving space, at least thats how it seems to me. keep up the good work and keep the pictures coming!

Offline seanbarney41

  • not really that much younger than an
  • Really Old Timer ...
  • *******
  • Posts: 10,895
Re: CB750 K1 project
« Reply #45 on: September 15, 2013, 07:09:21 PM »
This is a cool thread.  I really like how you are not going crazy over-restoring things but you really seem to be doing a great job over building a solid, reliable, good riding bike.
If it works good, it looks good...

Offline Terry in Australia

  • Really Old Timer ...
  • *******
  • Posts: 33,363
  • So, what do ya wanna talk about today?
Re: CB750 K1 project
« Reply #46 on: September 16, 2013, 02:17:10 AM »
Sorry to see that you've had QC problems with your new Ikons mate, I only live around 3 hours from the factory, so if you send them to me I'll be happy to drive up there and throw them thru the window?

But seriously, Ikon QC is usually very good. I just put a new Ikon shock on the rear of my BMW K100RS SE, and had none of the issues that you've described. Where were they shipped from? I imagine you didn't order them from Oz, they're usually actually cheaper to buy in the US than here in their country of manufacture! Cheers, Terry. ;D
I was feeling sorry for myself because I couldn't afford new bike boots, until I met a man with no legs.

So I said, "Hey mate, you haven't got any bike boots you don't need, do you?"

"Crazy is a very misunderstood term, it's a fine line that some of us can lean over and still keep our balance" (thanks RB550Four)

Offline Dunk

  • Expert
  • ****
  • Posts: 932
Re: CB750 K1 project
« Reply #47 on: September 16, 2013, 07:51:13 AM »
love watching along. takes me back a few months when I was doing my K1. I cannot speak for the combo units but I have a separate  rectifier unit and regulator unit that I ordered new from http://oregonmotorcycleparts.com/ and it has not failed. I have put 4000 miles on the bike so far. the biggest benefit to separate units is is one fails you only have to fix/replace one. if you are keeping it stock I would do that. I think the combo units are really for saving space, at least thats how it seems to me. keep up the good work and keep the pictures coming!

Thanks, this seems like a reasonably priced option. I'll keep my voltage regulator and just order the rectifier from here unless anyone else suggest another option.

Offline Dunk

  • Expert
  • ****
  • Posts: 932
Re: CB750 K1 project
« Reply #48 on: September 17, 2013, 07:11:47 AM »
Sorry to see that you've had QC problems with your new Ikons mate, I only live around 3 hours from the factory, so if you send them to me I'll be happy to drive up there and throw them thru the window?

But seriously, Ikon QC is usually very good. I just put a new Ikon shock on the rear of my BMW K100RS SE, and had none of the issues that you've described. Where were they shipped from? I imagine you didn't order them from Oz, they're usually actually cheaper to buy in the US than here in their country of manufacture! Cheers, Terry. ;D

Yeah that would be fitting to return them that way. Just disappointed that it seems that most companies don't care about quality or customer satisfaction anymore. Like and learn, I'll try a different brand of shocks on the next bike or just spend the same or less for NOS shocks.

I ordered through http://www.ikonsuspensionusa.com/ located in California. I expected a delay since they're made in Australia and it took a couple weeks but Dave was good enough to call and give me a heads up when he had them and shipped them to me.

Offline Dunk

  • Expert
  • ****
  • Posts: 932
Re: CB750 K1 project
« Reply #49 on: September 18, 2013, 04:02:44 PM »
Order from David Silver Spares came in today. Biggest thing was the repop headlight ears. Since I'll be giving the parts to someone else to paint and that may take a bit of time I should probably focus on stripping the tank and figuring out where I'm taking them for paint. I can plug along with other things while this is in progress.
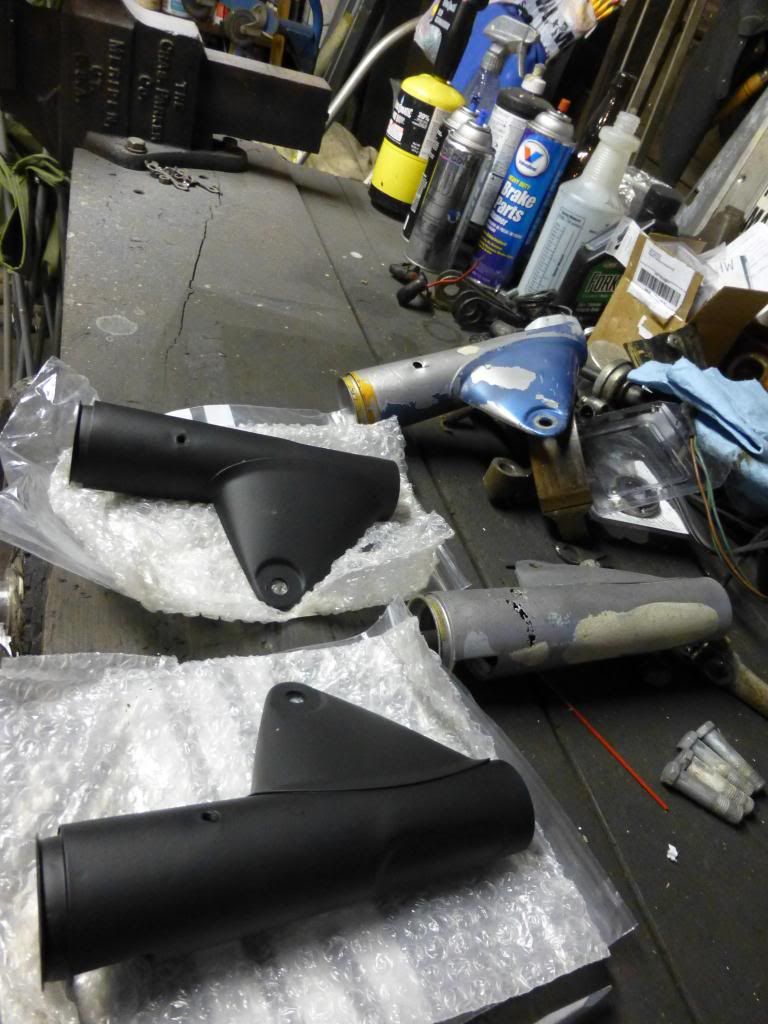
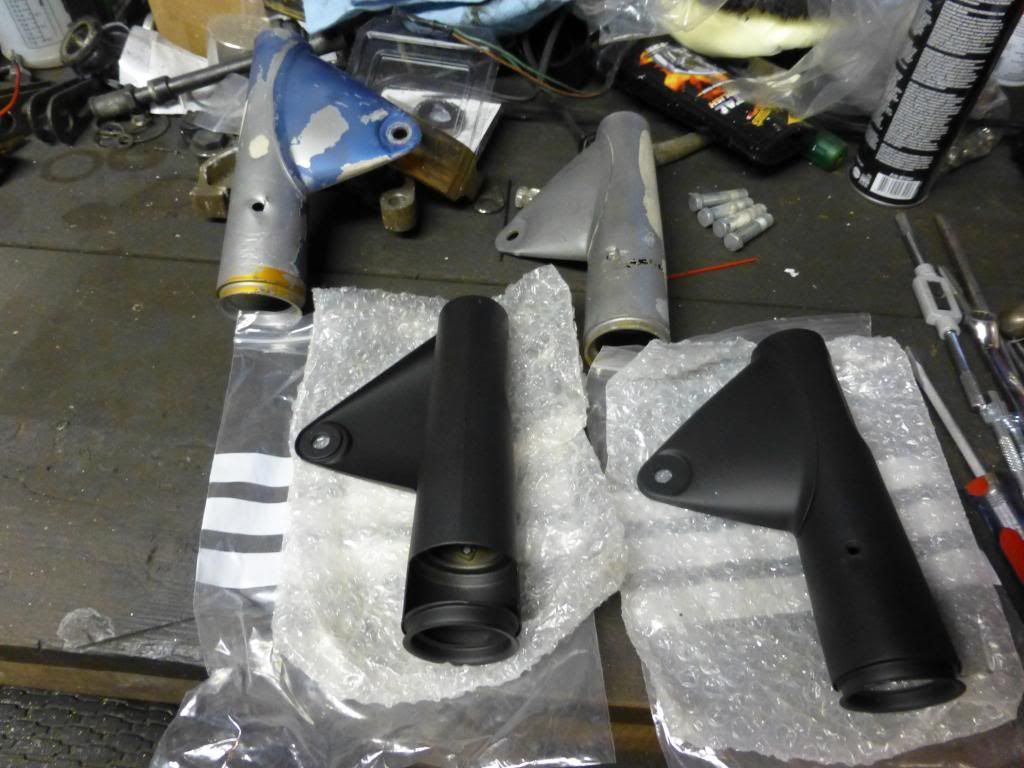


Bike as it currently sits...
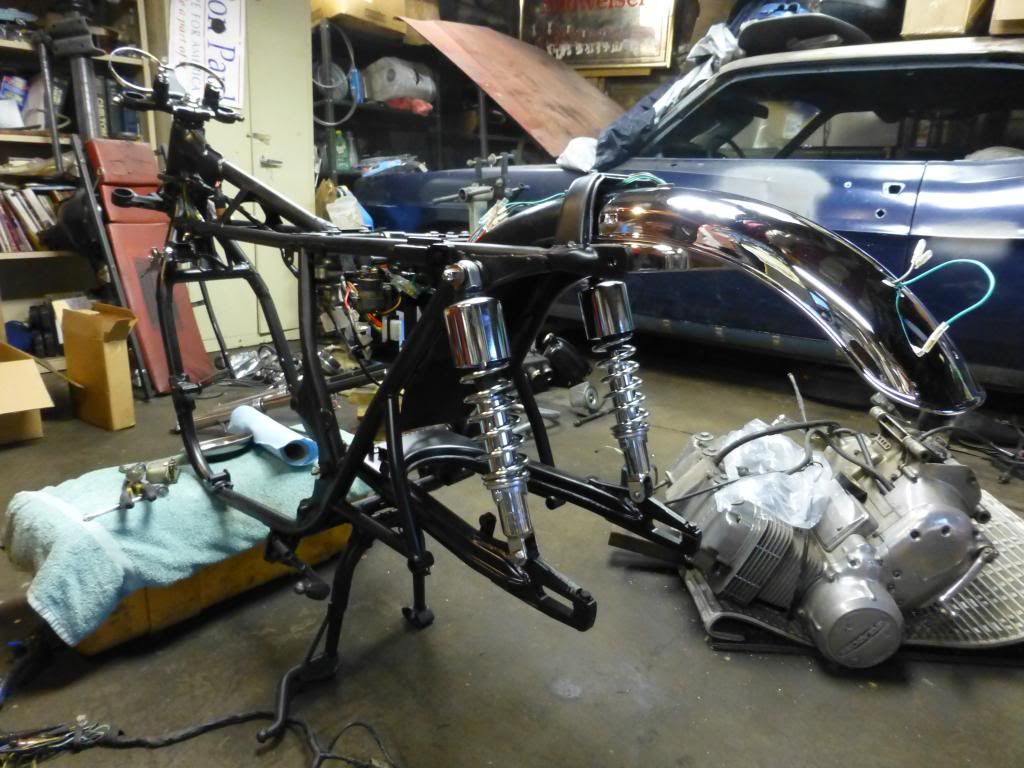


I have a couple boxes of new parts ready to go, starting to feel like I'm slacking as things pile up but life can be busy.

Parts to restore gauges from Lecram came in the other day, I know that'll be a good sized project in and of itself. Does anyone know what paint I should use on the needles to match original? Is this the same color used on the controls/switches in the recessed parts (headlight, turn signals, etc.)?

Bushings and such to mount rear turn signals are on order, and I received the grab handle today. One those parts come in I'll be able to install those.

I have the Frankenbike repop side covers, NOS side cover emblems and badges, NOS tank badges, repop lower tank trim, stripes, gas cap and latch.

A bunch of other new, NOS, user, and repop stuff I've ordered along with a couple boxes of misc CB750 parts from previous bikes. So many parts and I'm forgetting what a few of the smaller ones are. It'll be good to get everything painted so I can put the headlight ears on and get the front end together. I'll try to get at least a solid night of work in on this soon.

I'm also debating what I want to do with my taillight/license plate bracket. It has some minor pitting on the sides and is slightly rusty inside. I could just sandblast and chrome paint the inside to keep from rusting and chrome polish the outside that's alright aside from small pitting, or rechrome this one, or find a better used or NOS bracket. Not sure, but I feel it's kind of a shame to put an imperfect bracket on a very nice condition fender. Fender only has some light scratches in the chrome you have to get close to see, and is virtually rust free underneath. Oh well, bigger fish to fry for now and that's easy to change any time.