Author Topic: CB750 K1 project  (Read 49515 times)

0 Members and 1 Guest are viewing this topic.

Offline Terry in Australia

  • Really Old Timer ...
  • *******
  • Posts: 33,221
  • So, what do ya wanna talk about today?
Re: CB750 K1 project
« Reply #100 on: November 24, 2013, 11:57:10 pm »
Looks good mate, the master was anodised, and of course they faded very quickly. You could get it re-anodised, paint it and be really careful, or get it powder coated. I couldn't find a place that would re-anodise mine so I painted it with engine enamel, and baked it on, and it still looked good a couple of years later when I sold it. Your fuel tap looks great. Cheers, Terry. ;D 
I was feeling sorry for myself because I couldn't afford new bike boots, until I met a man with no legs.

So I said, "Hey mate, you haven't got any bike boots you don't need, do you?"

"Crazy is a very misunderstood term, it's a fine line that some of us can lean over and still keep our balance" (thanks RB550Four)

Offline Dunk

  • Expert
  • ****
  • Posts: 932
Re: CB750 K1 project
« Reply #101 on: November 29, 2013, 01:21:29 pm »
Got the front brake distribution block and lower lines on. Replacement hard line from Z1parts.net is not bent properly. I had to tweak it a bunch to get it to line up as well as it did... Which still leaves a lot to be desired. I may tweak the line or replace it entirely for a better fit into the rubber lower hose.


Is there a trick to installing the gas cap and latch pins? I'm irritated I chipped the paint. Not sure what to do about it. Probably find a touchup paint that's close and put a little dab to hide my oops. Most people would probably never notice it, but I'll know it's there and it drives me nuts. Anyone know the closest off the shelf touchup to hide this with? It does not seem like I can flare these ends by myself and it would be difficult even with a helper on the other side holding the pin flush. I was tapping a roll pin driver to try to flare the end slightly. Kind of worked but not all that tight, best I can do without a better method or helper, and the paint was chipped inserting the pin for the latch.


Also got lower trim on the tank and a few other minor things.


« Last Edit: November 29, 2013, 01:27:40 pm by cadunkle »

Offline JDS

  • Full Member
  • *
  • Posts: 44
Re: CB750 K1 project
« Reply #102 on: November 29, 2013, 10:15:09 pm »
That blue is a really nice color.  I've been stuck on the idea of ruby red for my K0 but looking at your bike is giving me second thoughts.  What size and make are your tires?  They're on my Christmas list this year and I was going to order a set.  Also if you don't mind what did the rebuild kit for your gauges cost and were they difficult to do?

Offline cheftuskey121

  • Super Newbie
  • Expert
  • ****
  • Posts: 1,305
Re: CB750 K1 project
« Reply #103 on: November 29, 2013, 10:29:59 pm »
Looks like continental rb2 and k112. I had them on my K1. Solid tire with vintage look.

Offline Dunk

  • Expert
  • ****
  • Posts: 932
Re: CB750 K1 project
« Reply #104 on: November 30, 2013, 08:38:35 am »
Yes they are Continentals. They had good reviews here from those wanting a period correct vintage looking tire.

I got the gauge rebuild kits from http://www.cb750faces.com. Quality looks good and again several here have used them with good results. The owners is a member here. I haven't done the gauges yet but I will be doing those soon.

Offline Terry in Australia

  • Really Old Timer ...
  • *******
  • Posts: 33,221
  • So, what do ya wanna talk about today?
Re: CB750 K1 project
« Reply #105 on: November 30, 2013, 01:53:52 pm »
Looking good mate, I just (very carefully) used a hammer and punch to flare the end of the pins, you don't need much and the spring pressure when the cap is closed keeps the pins in place anyway. Cheers, Terry. ;D
I was feeling sorry for myself because I couldn't afford new bike boots, until I met a man with no legs.

So I said, "Hey mate, you haven't got any bike boots you don't need, do you?"

"Crazy is a very misunderstood term, it's a fine line that some of us can lean over and still keep our balance" (thanks RB550Four)

Offline jerry h

  • Hot Shot
  • ***
  • Posts: 392
Re: CB750 K1 project
« Reply #106 on: November 30, 2013, 11:51:20 pm »
Quote
Is there a trick to installing the gas cap and latch pins?

Darn, sorry to see your scratches ....   guess it's too late now, but a c-clamp and a small ball bearing/BB  work well.

Looking good though!


"It is not the critic who counts, the credit belongs to the man who is actually in the arena, whose hands are covered with grease and oil."

K2 http://forums.sohc4.net/index.php/topic,105097.0.html

Offline Terry in Australia

  • Really Old Timer ...
  • *******
  • Posts: 33,221
  • So, what do ya wanna talk about today?
Re: CB750 K1 project
« Reply #107 on: December 01, 2013, 02:08:04 am »
Yep that's the way to do it. The problem with candy paint, is that it's virtually impossible to just touch it up. Do it properly, do it once. Cheers, Terry. ;D
I was feeling sorry for myself because I couldn't afford new bike boots, until I met a man with no legs.

So I said, "Hey mate, you haven't got any bike boots you don't need, do you?"

"Crazy is a very misunderstood term, it's a fine line that some of us can lean over and still keep our balance" (thanks RB550Four)

Offline stewonepot

  • Enthusiast
  • **
  • Posts: 123
Re: CB750 K1 project
« Reply #108 on: December 01, 2013, 09:18:40 am »
no punch! that's the way to do it     that's the way to do it! regards stew.

Offline micol

  • Full Member
  • *
  • Posts: 57
Re: CB750 K1 project
« Reply #109 on: December 01, 2013, 07:01:33 pm »
Really enjoying the build.  The bike is looking very nice.  How do you like the VHT paint on the frame?  I'm working on a K3 and am interested in how you like it and if it will hold up. 

Offline mwvachon

  • Hot Shot
  • ***
  • Posts: 358
  • The Family Heirloom
Re: CB750 K1 project
« Reply #110 on: December 02, 2013, 07:35:11 pm »
Guess I cheated on this part... ordered the gas cap & latch with the machined pins and 'E' clips...

M.W.Vachon
2014 CB1100 Deluxe
1999 Valkyrie I/S
1971 CB750-K1 (Candy Gold)
1971 CB750-K1 (Candy Red)
Project link: http://forums.sohc4.net/index.php?topic=108498.0]
1965 Honda S90
1976 GL1000
1975 CB400F

Offline Terry in Australia

  • Really Old Timer ...
  • *******
  • Posts: 33,221
  • So, what do ya wanna talk about today?
Re: CB750 K1 project
« Reply #111 on: December 12, 2013, 10:09:32 pm »
Guess I cheated on this part... ordered the gas cap & latch with the machined pins and 'E' clips...


Where'd you get them mate? Yamiya? I need to change tanks on my bike in the next couple of weeks, and re-installing the cap with that setup looks a lot safer! Cheers, Terry. ;D
I was feeling sorry for myself because I couldn't afford new bike boots, until I met a man with no legs.

So I said, "Hey mate, you haven't got any bike boots you don't need, do you?"

"Crazy is a very misunderstood term, it's a fine line that some of us can lean over and still keep our balance" (thanks RB550Four)

Offline mwvachon

  • Hot Shot
  • ***
  • Posts: 358
  • The Family Heirloom
Re: CB750 K1 project
« Reply #112 on: December 13, 2013, 03:01:22 pm »
Terry, these came from eBay:
http://stores.ebay.com/worldwidemotorcyclepartsnmore/
A bit pricey, but I had some extra $ in my PayPal account that I decided I wouldn't miss...
M.W.Vachon
2014 CB1100 Deluxe
1999 Valkyrie I/S
1971 CB750-K1 (Candy Gold)
1971 CB750-K1 (Candy Red)
Project link: http://forums.sohc4.net/index.php?topic=108498.0]
1965 Honda S90
1976 GL1000
1975 CB400F

Offline Terry in Australia

  • Really Old Timer ...
  • *******
  • Posts: 33,221
  • So, what do ya wanna talk about today?
Re: CB750 K1 project
« Reply #113 on: December 13, 2013, 04:40:25 pm »
Thanks mate! ;D
I was feeling sorry for myself because I couldn't afford new bike boots, until I met a man with no legs.

So I said, "Hey mate, you haven't got any bike boots you don't need, do you?"

"Crazy is a very misunderstood term, it's a fine line that some of us can lean over and still keep our balance" (thanks RB550Four)

Offline SOHC4 Cafe Racer Fan

  • Speak up, Whipper-Snapper! I'm a
  • Really Old Timer ...
  • *******
  • Posts: 15,719
  • SOHC/4 Member #1235
Re: CB750 K1 project
« Reply #114 on: December 13, 2013, 05:56:36 pm »
Terry, these came from eBay:
http://stores.ebay.com/worldwidemotorcyclepartsnmore/
A bit pricey, but I had some extra $ in my PayPal account that I decided I wouldn't miss...
Holy crap that seller is pricey!!
1975 CB550K1 "Blue" Stockish Restomod (http://forums.sohc4.net/index.php?topic=135005.0)
1975 CB550F1 frame/CB650 engine hybrid "The Hot Mess" (http://forums.sohc4.net/index.php/topic,150220.0.html)
2008 Triumph Thruxton (http://forums.sohc4.net/index.php/topic,190956.0.html)
2014 MV Agusta Brutale Dragster 800
2015 Yamaha FZ-09 (http://forums.sohc4.net/index.php/topic,186861.0.html)

"There are some things nobody needs in this world, and a bright-red, hunch-back, warp-speed 900cc cafe racer is one of them — but I want one anyway, and on some days I actually believe I need one.... Being shot out of a cannon will always be better than being squeezed out of a tube. That is why God made fast motorcycles, Bubba." Hunter S. Thompson, Song of the Sausage Creature, Cycle World, March 1995.  (http://www.latexnet.org/~csmith/sausage.html and https://magazine.cycleworld.com/article/1995/3/1/song-of-the-sausage-creature)

Sold/Emeritus
1973 CB750K2 "Bionic Mongrel" (http://forums.sohc4.net/index.php?topic=132734.0) - Sold
1977 CB750K7 "Nine Lives" Restomod (http://forums.sohc4.net/index.php?topic=50490.0) - Sold
2005 RVT1000RR RC51-SP2 "El Diablo" - Sold
2016+ Triumph Thruxton 1200 R (http://forums.sohc4.net/index.php/topic,170198.0.html) - Sold

Offline Dunk

  • Expert
  • ****
  • Posts: 932
Re: CB750 K1 project
« Reply #115 on: December 26, 2013, 06:36:11 pm »
Finally some more progress...

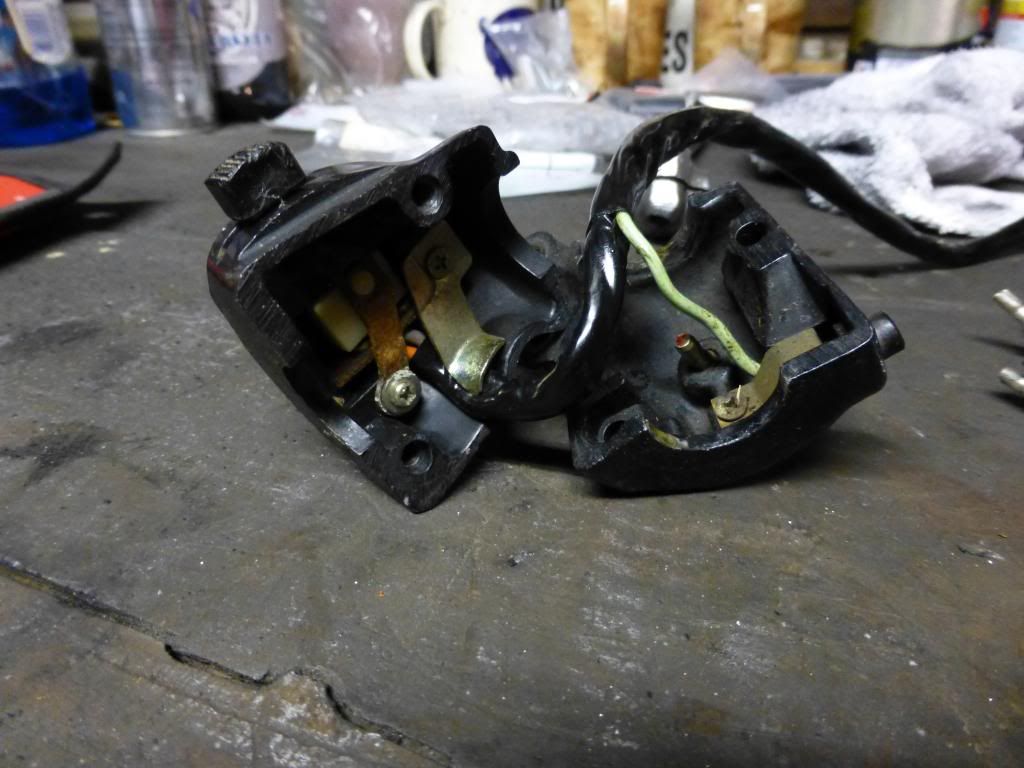
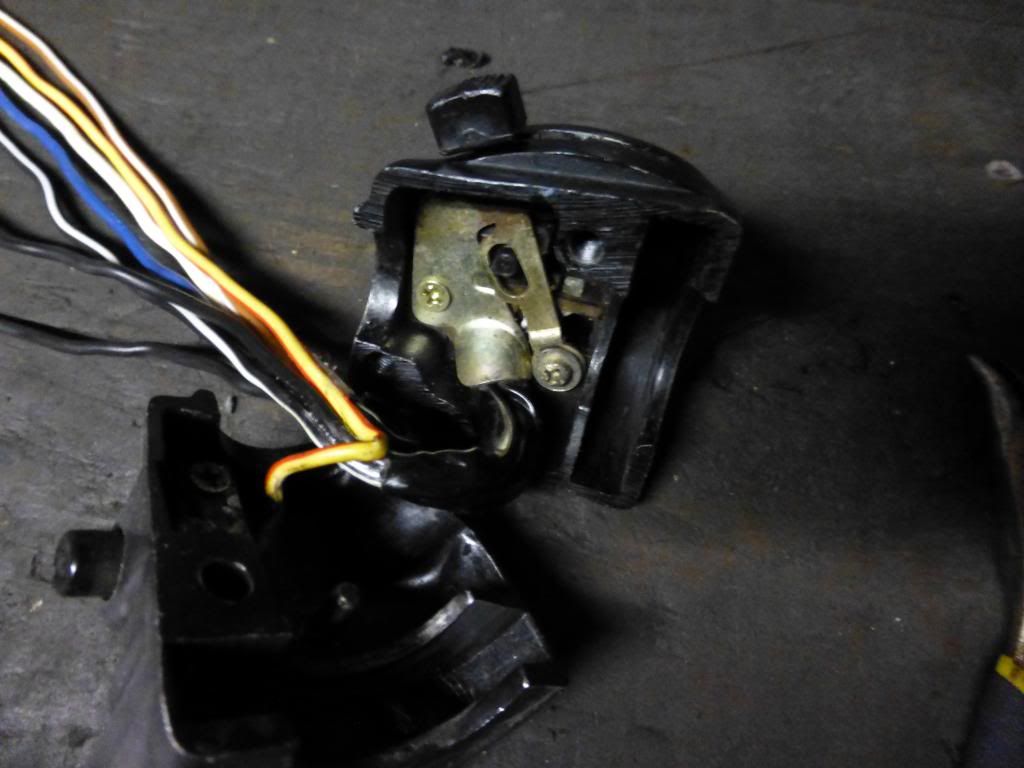
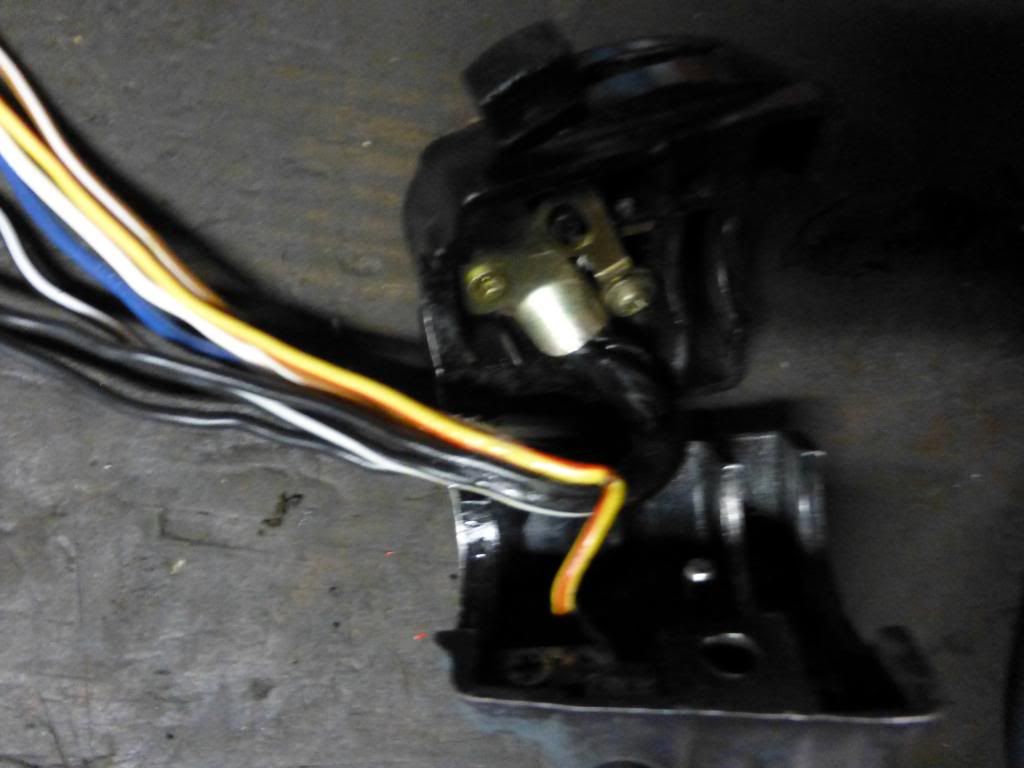
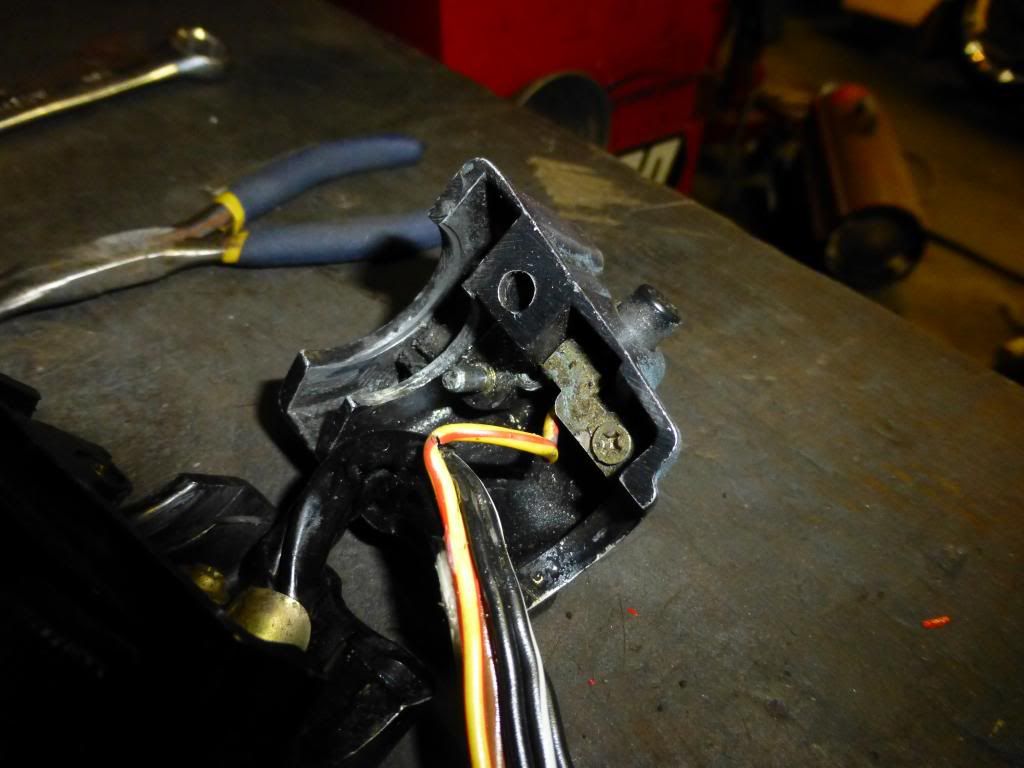
Pulled the switches/controls off the bars. Got the paint to repaint the lettering and such... Model Masters International Orange. Haven't finished cleaning these up and painting yet, but they're off and apart. I got new bars as the bars on the bike were somewhat rusty inside and had a few nicks and scratches in the finish. Since NOS is available that's what'll be going back on the bike.


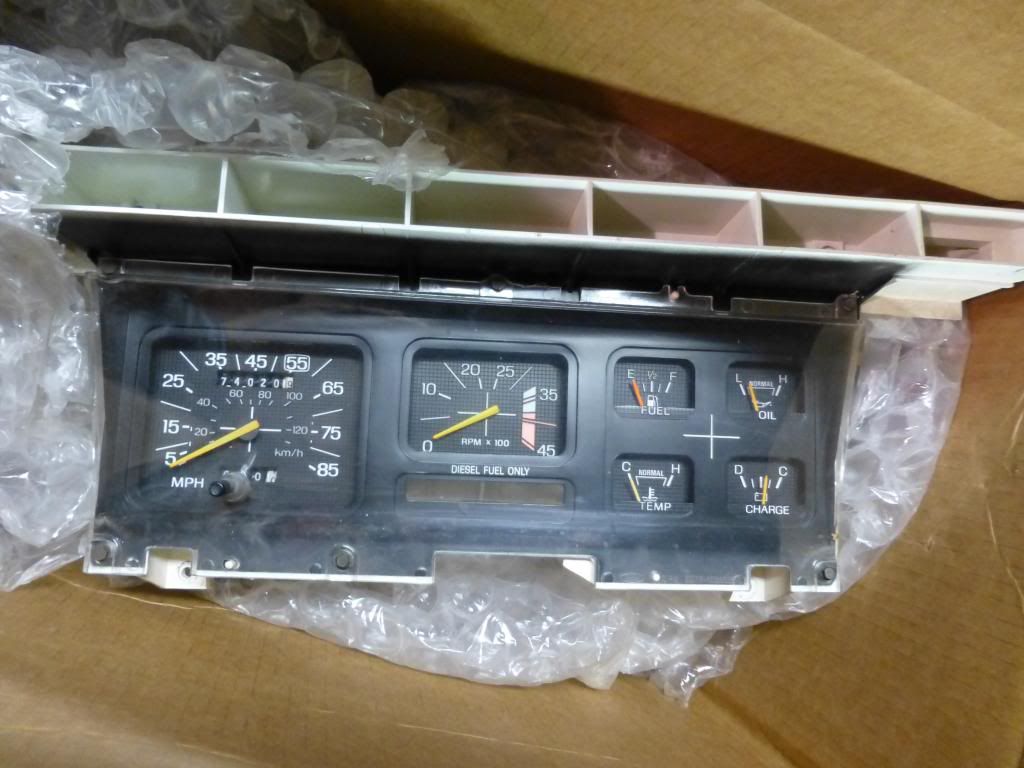
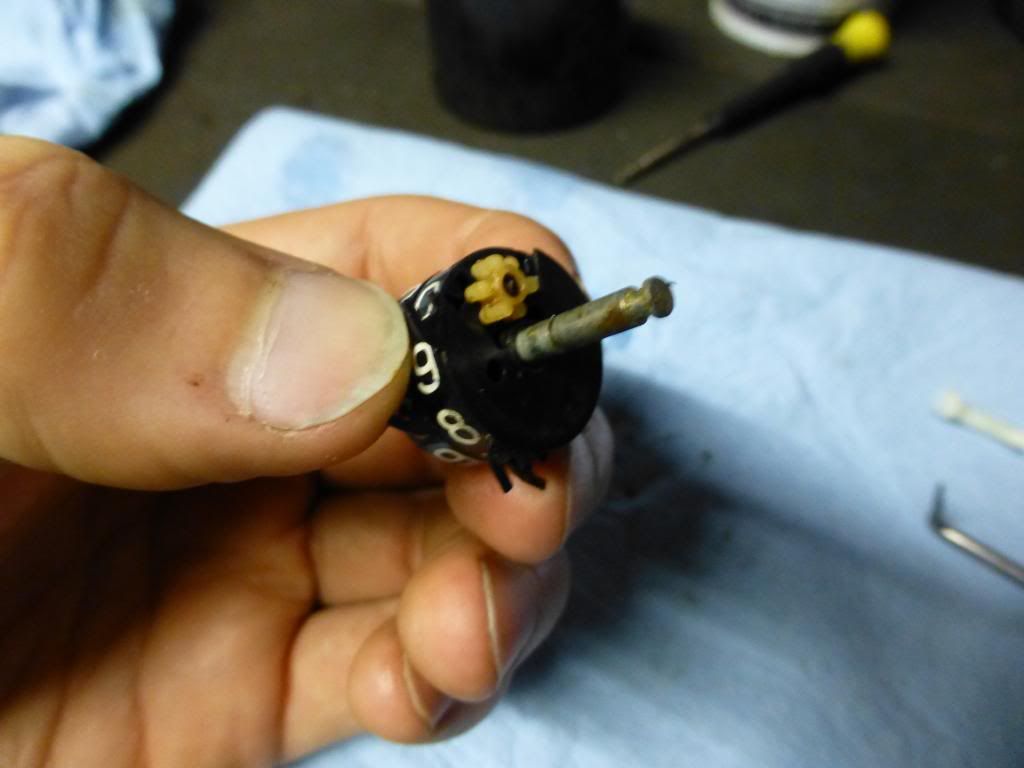
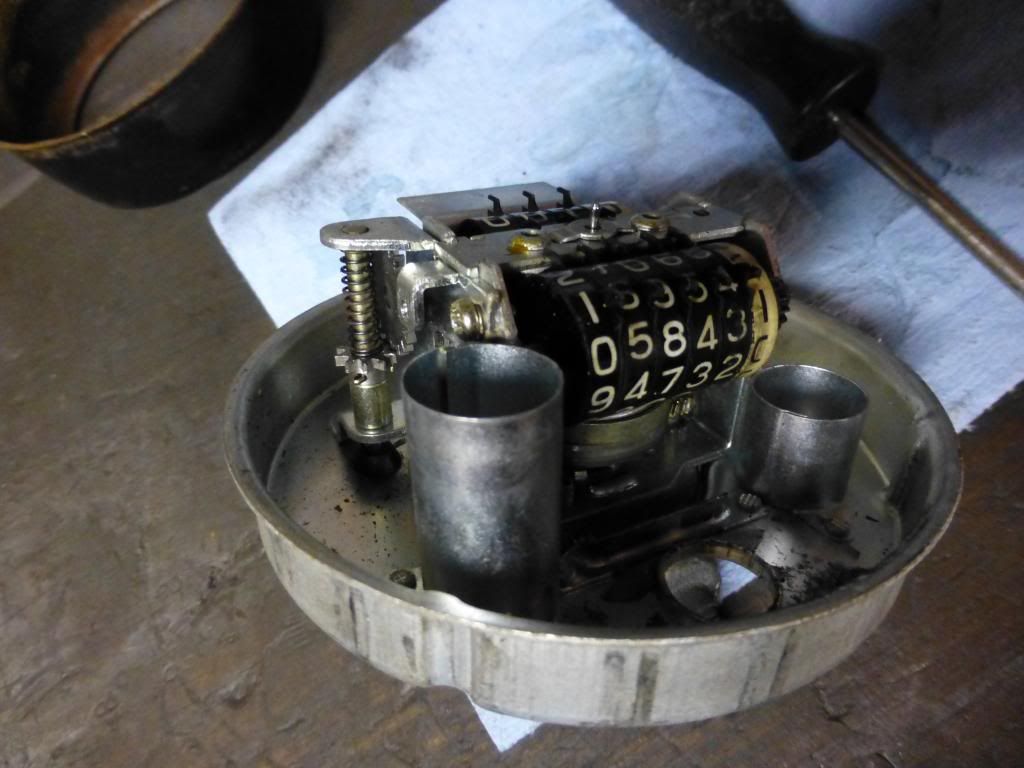
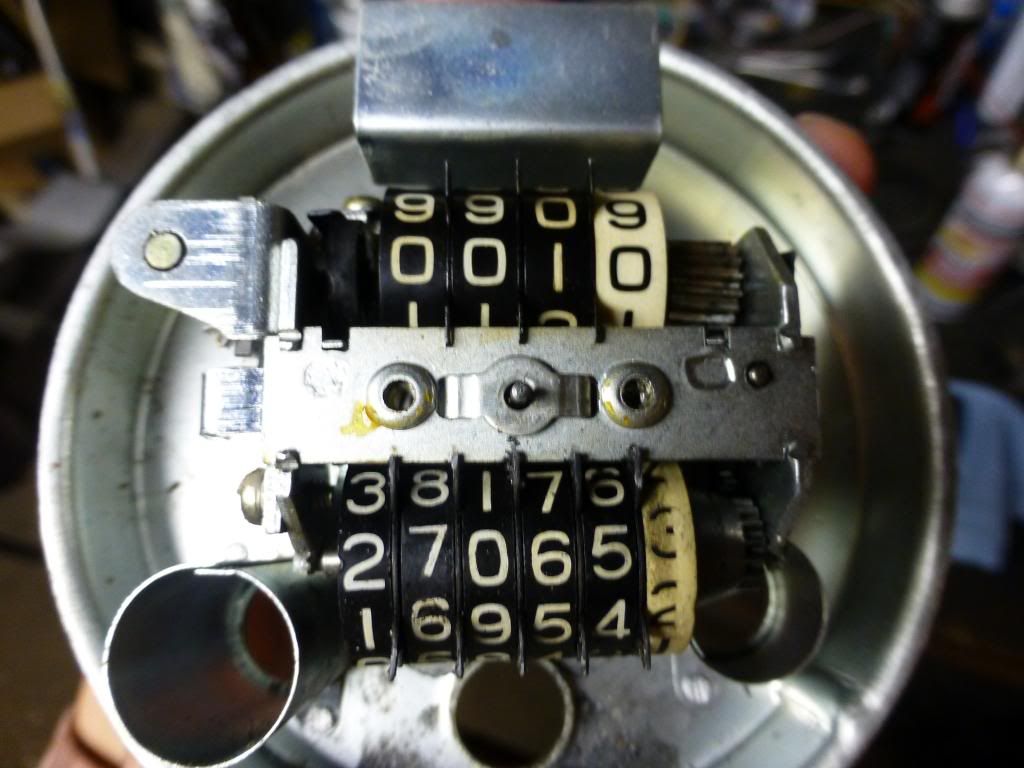
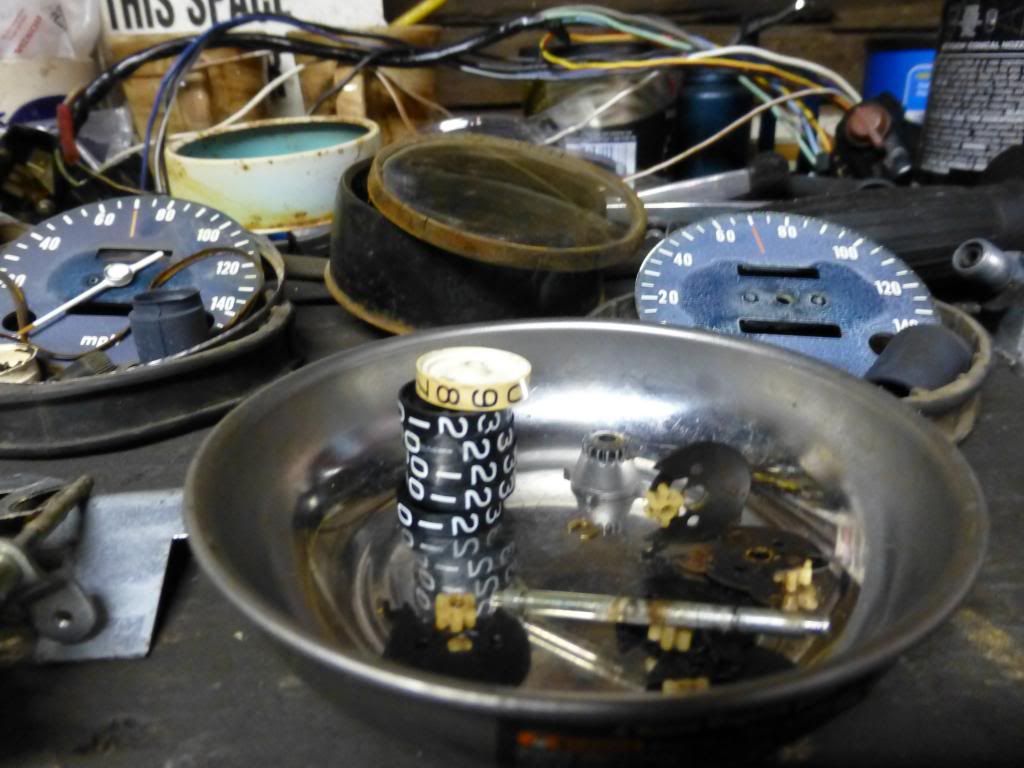
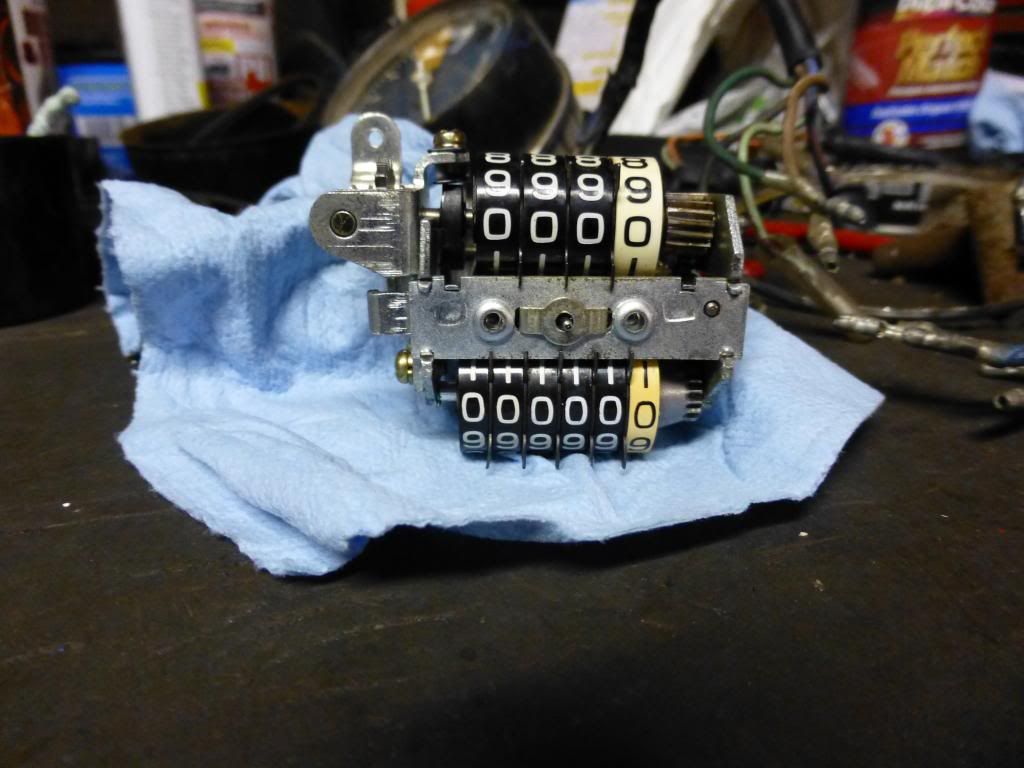
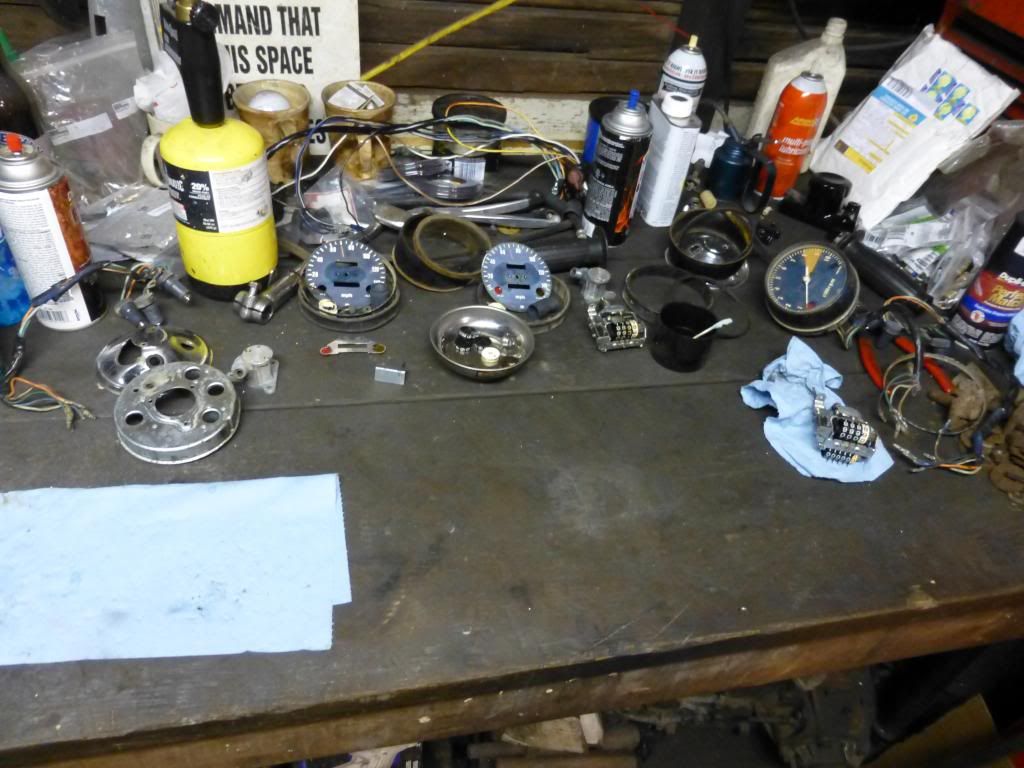
I started on the gauges. What a tedious mess that is. I have two speedometers to pull whatever is best from and that is what I've done. Cleaned all the number wheels and such as best I could and working on reassembly now.


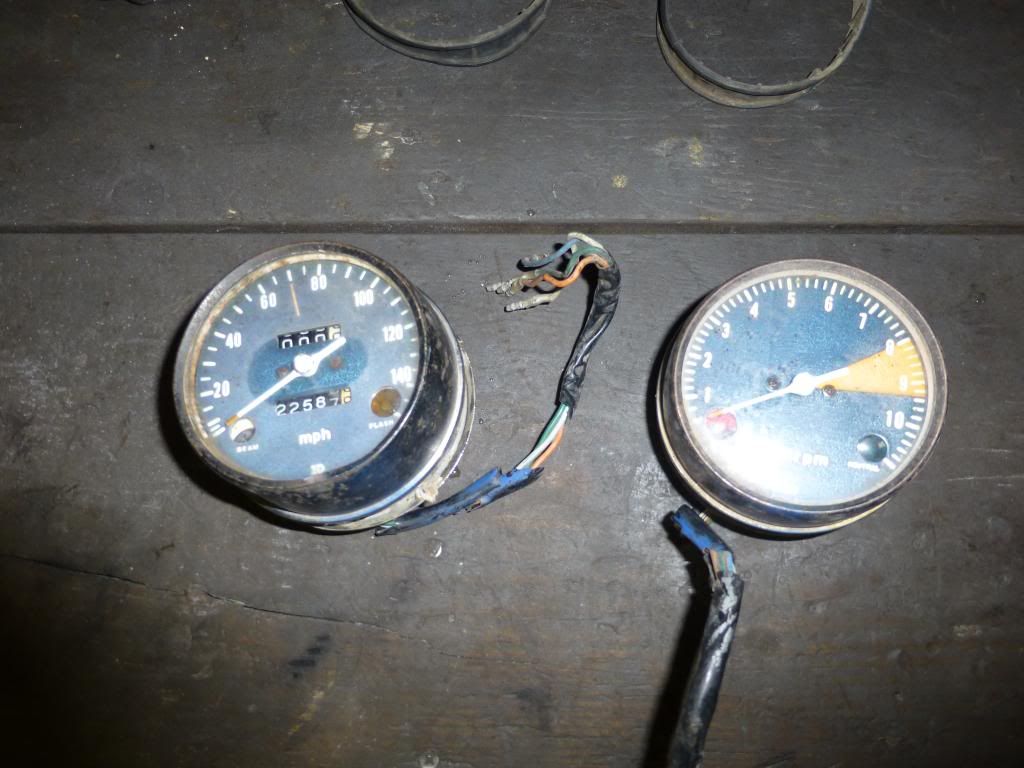
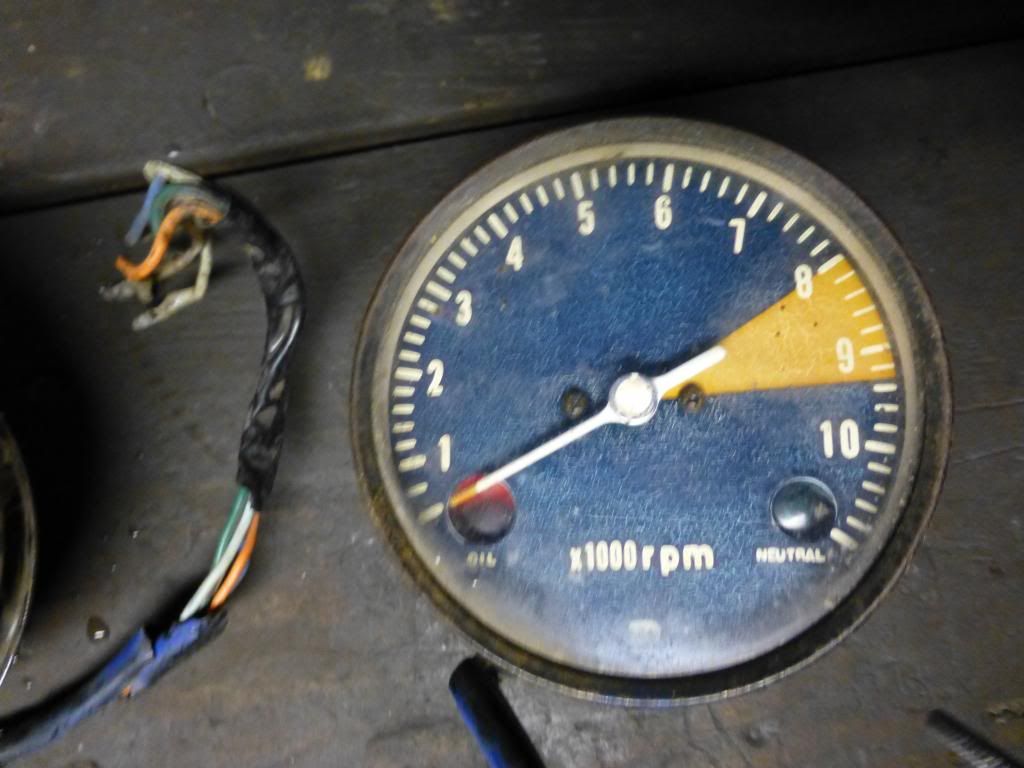
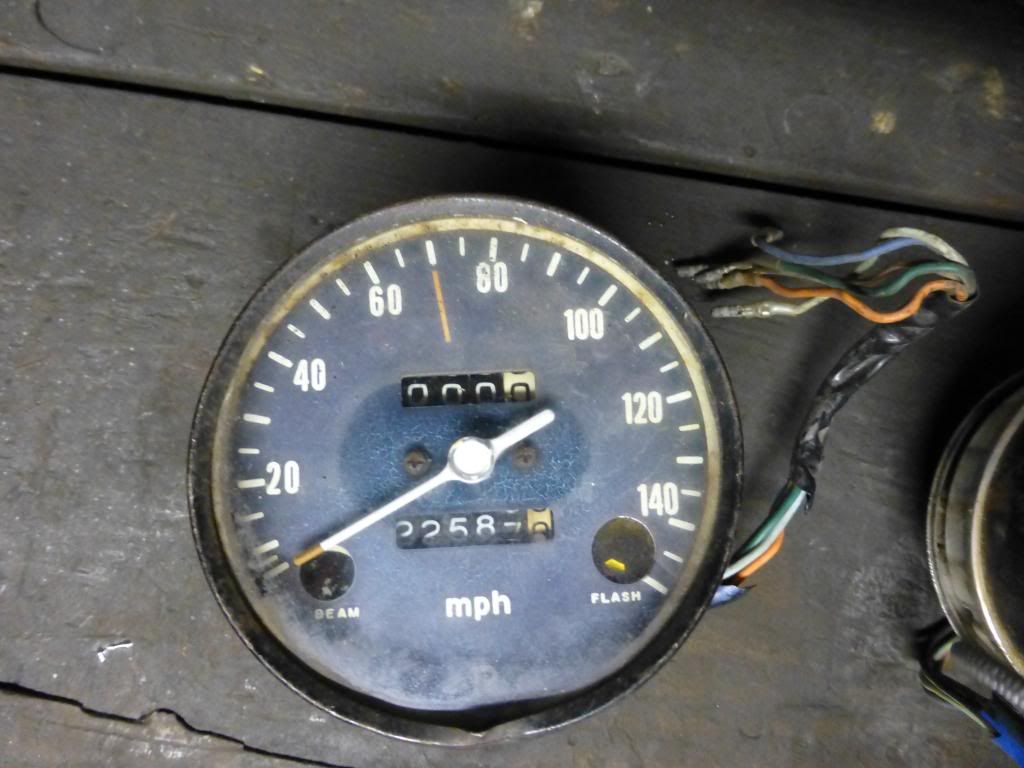
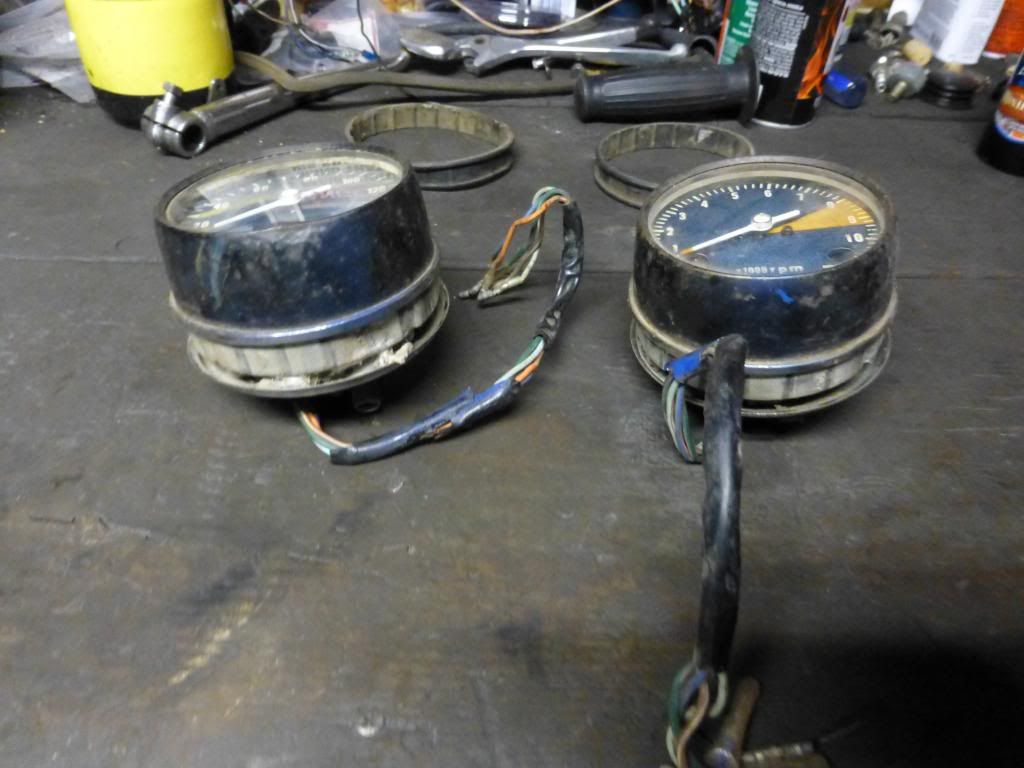
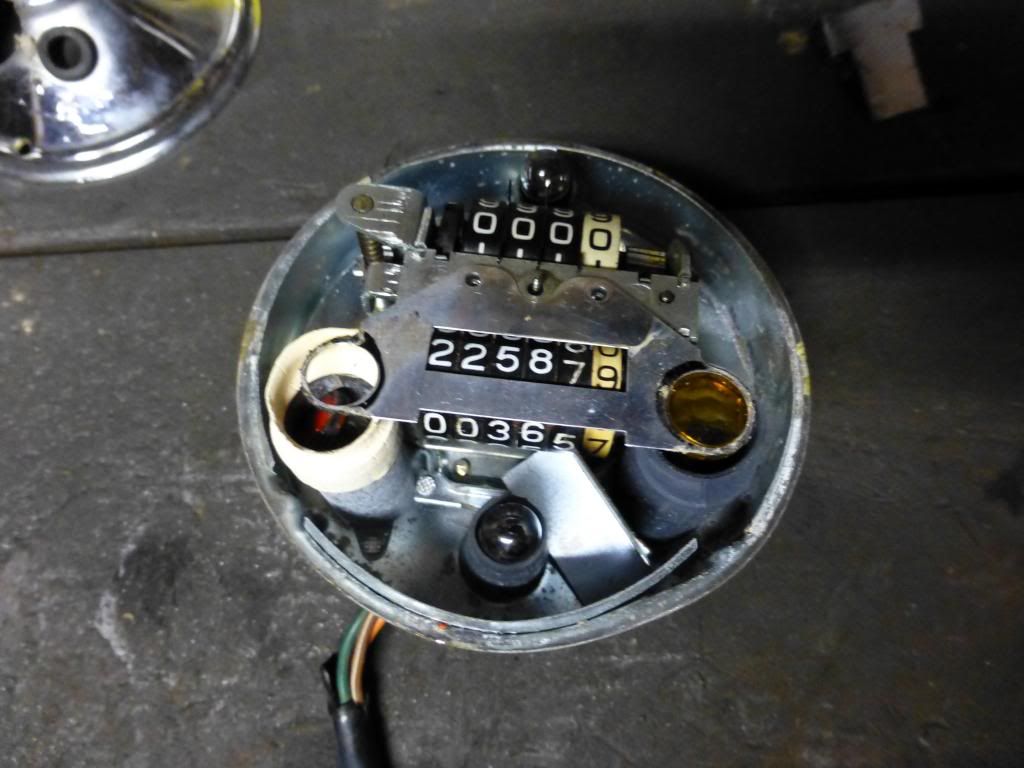
Number wheels in both gauges had some boogered wheels, with either scratches, excessive fading, etc. I cherry picked the ebst of what I had and soaked/scrubbed with dish soap and q-tips. Not sure if there's any better way, but I didn't wants to mess them up. Cleaned up a lot and I'm satisfied except the tenth of a mile is quite yellowed in spots. Unfortunately the brighter of the two was marred somehow. Believe it or not the worse one did actually brighten up a lot with the dish soap scrubbing, but still very noticeably yellowed. Afraid to use anything strong on these so it'll be what it'll be unless anyone knows a better way before I get these together.


This is what's going back in.


Backing plates cleaned up but missing reflectors.


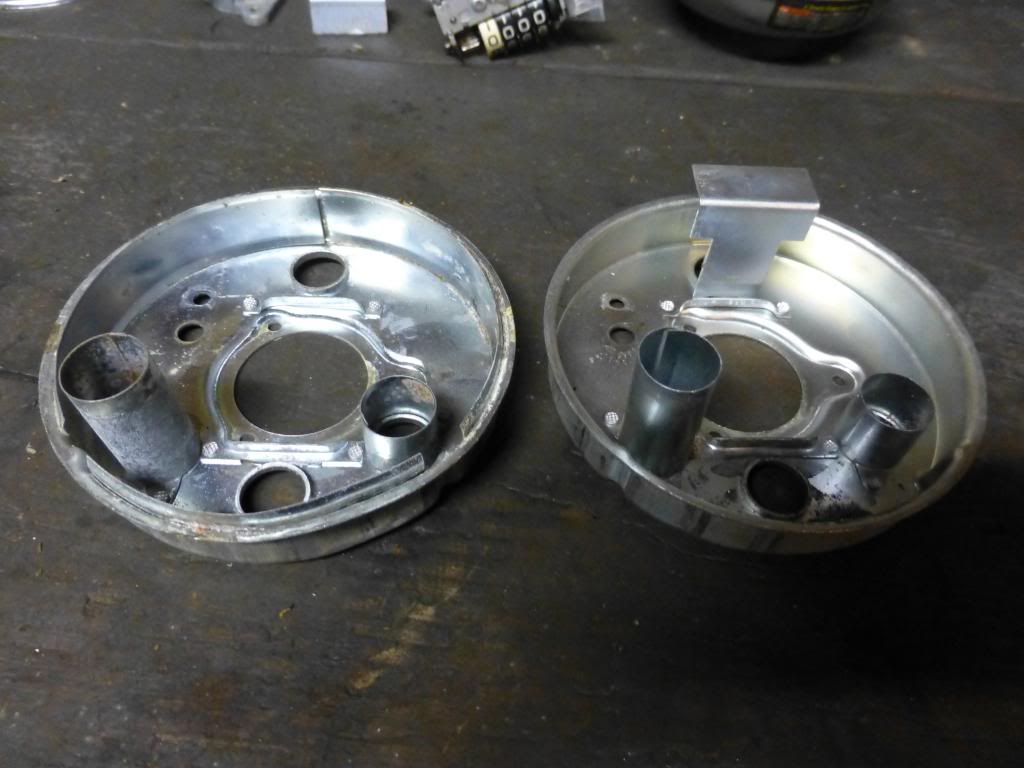
Epoxied one back in, waiting for it to cure.


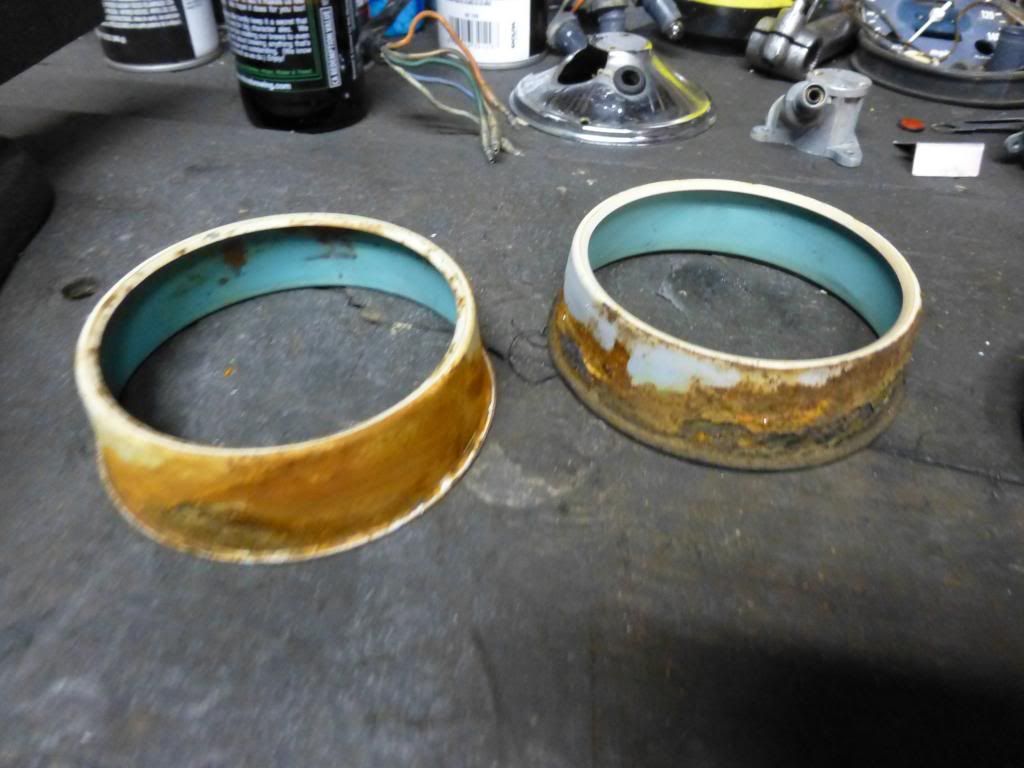
These were nasty, water has got past the seals. More so one one which has been open previously.
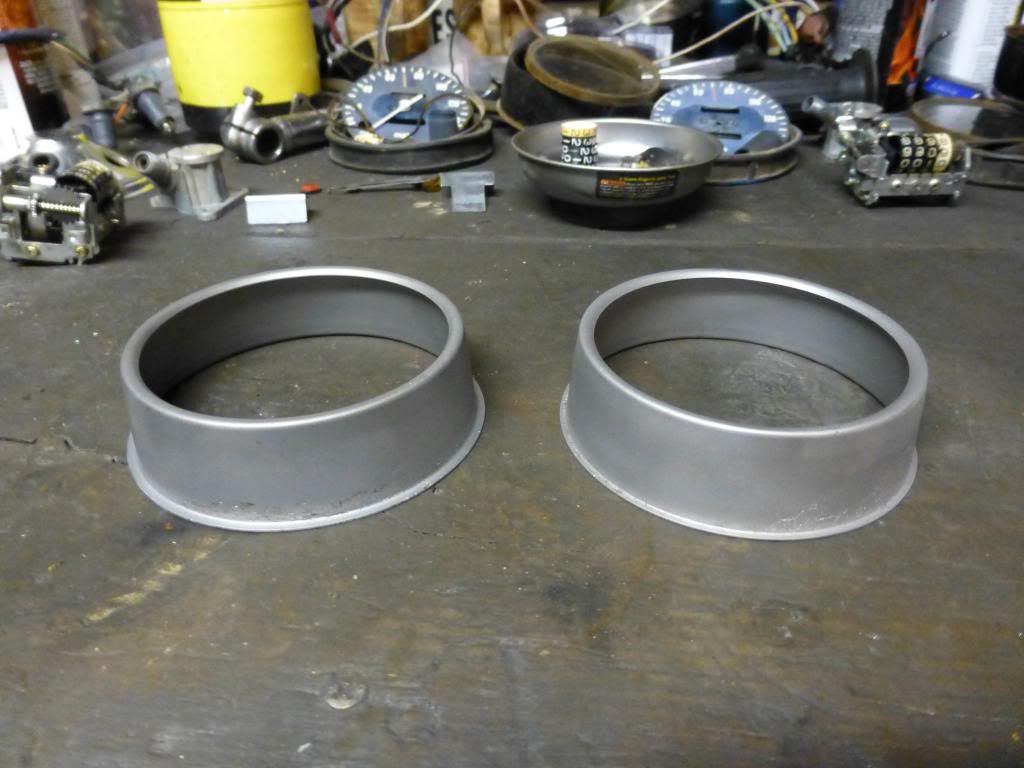


Clean.


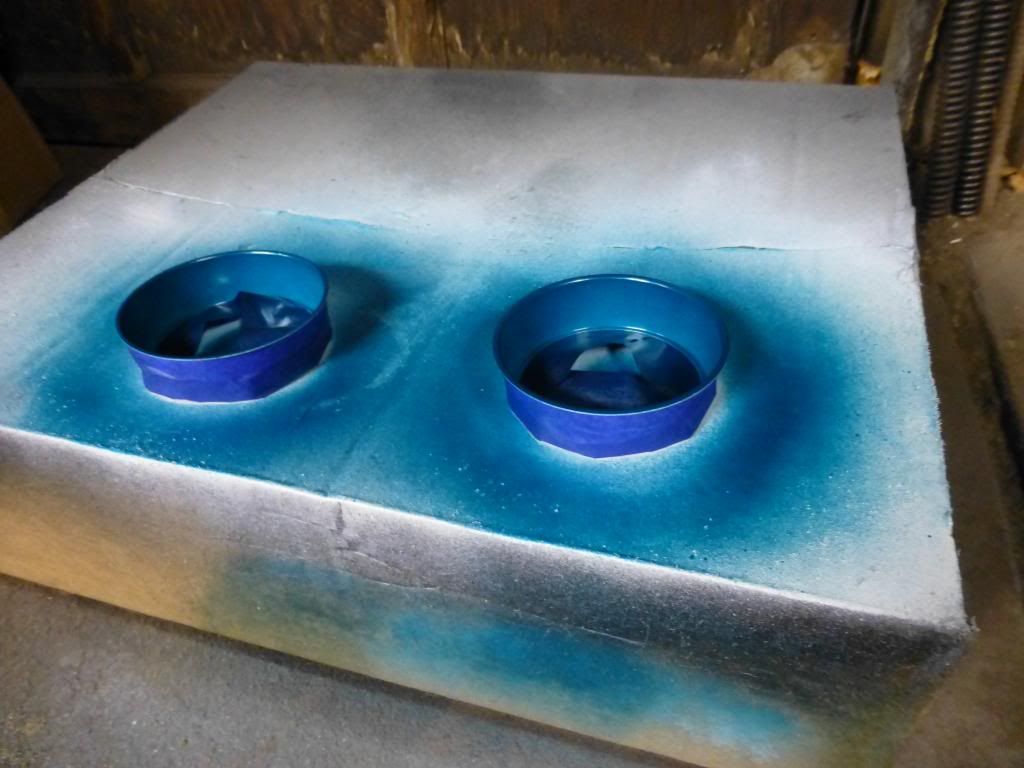
Couldn't find a very close match for the puke green color, hopefully this works. Did them all in white then this over the insides. I may lightly spray white again over that to lighten them up a tad closer to original. I have SMD LED lights coming in to use in the gauges, both soft white and green colors so I can try both and see which looks closer to original.


Can't wait to get the gauges done and have my bench back!


Coincidentally, I just got a cluster with the made of unobtainium factory tach for my truck, so at minimum I'll be cleaning, painting needles and tach redline, and matching odometer soon as well. Feels like gauges never end!


Offline mwvachon

  • Hot Shot
  • ***
  • Posts: 358
  • The Family Heirloom
Re: CB750 K1 project
« Reply #116 on: December 27, 2013, 06:21:24 am »
Impressive. Some motivation for when I get to that part on my project!
M.W.Vachon
2014 CB1100 Deluxe
1999 Valkyrie I/S
1971 CB750-K1 (Candy Gold)
1971 CB750-K1 (Candy Red)
Project link: http://forums.sohc4.net/index.php?topic=108498.0]
1965 Honda S90
1976 GL1000
1975 CB400F

Offline Terry in Australia

  • Really Old Timer ...
  • *******
  • Posts: 33,221
  • So, what do ya wanna talk about today?
Re: CB750 K1 project
« Reply #117 on: December 31, 2013, 04:48:50 pm »
Looking good mate, I sent a set of crappy K1 gauges off to Marcel (CB750Faces.com) who converted them into K0 gauges, for less than $200 per gauge.

His restoration service is fantastic, I've got another set of K1 gauges that I'm going to send him to restore for me, he doesn't just clean them up, he re-oils the pots (to stop the needles from jumping) and totally restores them to look like new. I'm never gonna touch another gauge from now on, I'm just going to send mine to Marcel.

Also, Yamiya is selling their excellent repro handlebar switches for $138.99 per pair, in case you're interested? Cheers, Terry. ;D

http://www.ebay.com.au/itm/HONDA-CB750-K0-K1-STARTER-KILL-WINKER-HORN-SWITCH-SET-NEW-F130F154-/141149822783?pt=Motorcycles_Parts_Accessories&hash=item20dd2f5f3f
I was feeling sorry for myself because I couldn't afford new bike boots, until I met a man with no legs.

So I said, "Hey mate, you haven't got any bike boots you don't need, do you?"

"Crazy is a very misunderstood term, it's a fine line that some of us can lean over and still keep our balance" (thanks RB550Four)

Offline Dunk

  • Expert
  • ****
  • Posts: 932
Re: CB750 K1 project
« Reply #118 on: January 04, 2014, 04:00:31 pm »
Haven't had much time lately to work on this but in the time I can spend on this the gauges are taking forever due to my OCD about them.

I got the truck gauges done and installed, wanted to bang that out since it was less involved. Also gave me a little practice at painting needles, which is what I wanted.


Getting ready to wrap up the speedometer but I'm noticing the new jewels I have are different than original. The shape is slightly different, the roundness of the dome on top is more pronounced, more of a dome on the reproductions. Not too worried about that as nobody will ever notice. My concern is the color of all 4 is different. The most pronounced is the yellow. Is the flasher/turn signal indicator supposed to be yellow or orange? The reproduction is clearly orange while both originals I have are clearly yellow. The other jewels differ in color from the old originals but are much closer which I could attribute to fading or whatnot.

What jewels do I use? Do I use the originals or the reproductions?

Originals on top.


Original on right.


Original on left.

Offline Dunk

  • Expert
  • ****
  • Posts: 932
Re: CB750 K1 project
« Reply #119 on: January 05, 2014, 04:34:56 pm »
More frustration. Tried to do a bit tonight, figure out which jewels to use, tinker with a few things, etc... I figure while I'm deciding which jewels to use I can paint the tips on the needles. Painted white with Rustoleum yesterday afternoon so more than 24 hours. Was leery of using Rustoleum but figured people use it for all sorts of metal projects and it was convenient at a store i was at. Can says dry to touch in 2-4 hours, can handle in 5-9 hours and fully dry in 24 hours. Needles looked great and I was happy with the color and smooth nice finish.

So I measure and tape off for the red tip. Thought I noticed when I smoothed the tape the white paint was compressing and making a small ridge at the edge of the tape. Whatever, my eyes aren't the best and it's a small part hard to see on white. Paint the first coat on the tip and notice a smudge on other end of the needle from handling it. I can hold my thumb on it and rub and make marks, can make indents easily with my fingernail. Of course I was very careful handling this making sure my hands were spotless and I was gentle, so 30 hours later you can't even lightly handle it. Very disappointed as I've never had this happen with the brands I commonly use, DupliColor or VHT. More wasted time... Story of my life.

This week I'll pick up either some DupliColor to spray or Model Masters to brush. Haven't decided which way to go yet.

Offline calj737

  • Really Old Timer ...
  • *******
  • Posts: 20,960
  • I refuse...
Re: CB750 K1 project
« Reply #120 on: January 05, 2014, 05:46:12 pm »
I would not be surprised to have extended drying times at this point in the season. Even if you are painting indoors, the paint and the part both need to be fully over 70 degrees to get good dry times.

There is also the possibility of undercoat contamination or incompatible layers for proper adhesion.. Just saying in case you may have overlooked some of these ideas.
'74 550 Build http://forums.sohc4.net/index.php?topic=126401.0
'73 500 Build http://forums.sohc4.net/index.php?topic=132935.0

"Of all tyrannies, a tyranny sincerely exercised for the good of it's victim may be the most oppressive. It may be better to live under robber barons than under omnipotent moral busybodies. The robber baron's cruelty may sometimes sleep, his cupidity may at some point be satiated, but those who torment us for our own good will torment us without end for they do so with the approval of their own conscience." - C.S. Lewis

Offline Dunk

  • Expert
  • ****
  • Posts: 932
Re: CB750 K1 project
« Reply #121 on: January 19, 2014, 04:21:09 pm »
I redid the needles with Duplicolor white primer and gloss white for top coat, hipoparts flourescent red for the tips. Came out great and no issues with quality or dry time. Maybe the Rustolium would have been fine given more time to dry, but I've never had issues with Duplicolor so that's what I used this time and should have used the first time.

I'm having difficulty crimping the new crimp rings on the gauges. Damaged two rings so far so I'm holding off on that. If anyone has tips for crimping the rings on, particularly new rings from Lecram/CB750faces, that would be greatly helpful.


Put new heat shrink of the control wiring, cleaned them up, painted lettering, fished through NOS bars, and bolted them on.


Offline mwvachon

  • Hot Shot
  • ***
  • Posts: 358
  • The Family Heirloom
Re: CB750 K1 project
« Reply #122 on: January 19, 2014, 09:30:51 pm »
Hey cadunkle -

When I did my family heirloom, I made a jig to hold the gauge face down. I used a small piece of laminate and cut a hole that was just slightly larger than the gauge housing. I reinforced the sheet with some 1" stock on the underside that also let me rest the gauge in the holder while working with it on the bench.


I put a soft cloth over the jig and placed the gauge inside it with the ring in place. From that point, using a 3/8" extension, I was able to gently tap the edge of the ring and begin working my way around the gauge, bending it over in small increments.


To be sure, this is slow and tedious work, but without special crimpers or such, I don't know how else you could do this...

Looks like you're ahead of me and my project, but your posts are helping to keep me motivated. Keep up the great work.
« Last Edit: January 19, 2014, 09:36:16 pm by mwvachon »
M.W.Vachon
2014 CB1100 Deluxe
1999 Valkyrie I/S
1971 CB750-K1 (Candy Gold)
1971 CB750-K1 (Candy Red)
Project link: http://forums.sohc4.net/index.php?topic=108498.0]
1965 Honda S90
1976 GL1000
1975 CB400F

Offline Dunk

  • Expert
  • ****
  • Posts: 932
Re: CB750 K1 project
« Reply #123 on: January 20, 2014, 05:13:03 am »
Thanks, I think that may be the hot ticket.

Offline Dunk

  • Expert
  • ****
  • Posts: 932
Re: CB750 K1 project
« Reply #124 on: January 27, 2014, 06:35:01 pm »
Put the tach face plate on and was a little disappointed in the quality. The speedo looked great, but the tach seems to have a bunch of small blemishes scattered on it. Looks like maybe some dust when it was made. Unfortunate, but it is what it is.


That worked great on the ring. 4" hole saw in a 2x, then a 1/8" punch and hammer. Started real slow around the ring and had  difficulty with it wanting to pop out on the opposite side. So I went around and did 4 spots in quarters that I hit firmly to fully bend, then rotated 45* and did quarters so 8 solid punches firmyl crimped then gradually went around another 2 or 3 times to fully crimp. Unfortunately there was some dust or loose paint/whatever somewhere and I have some junk on the inside of the glass. Hopefully I can get this to settle somewhere out of sight using some air and tapping it. Don't have any more rings so for now it's good enough. Wiped down the inner white ring for the tach and had to touch up the paint so waiting for another day to crimp the tach together. Slow and steady.


Also started looking at wiring in the headlight bucket. Reproduction harness I think might be a little different. Gonna be a pain to figure it out. Ordered a kit with some of the original style bullet connectors to repair the few that have been hacked on what's left of the original wiring.