Author Topic: 1975 CB550 Winter 2013 Build  (Read 25252 times)

0 Members and 1 Guest are viewing this topic.

Offline Chaser60

  • Enthusiast
  • **
  • Posts: 172
  • 75 CB550
Re: 1975 CB550 Winter 2013 Build
« Reply #50 on: April 26, 2014, 06:06:13 AM »
next up.  Swing arm reassembly.   I changed out the pesky old zerks and threaded in new ones.   Didnt get any pics of this, but again, basically used SohRon's build thread to get this done.   Greased it all liberally and then torqued the bolts until the arm just slowly falls from top of range to ground on its own weight. 

Moved on to the front end next.   There is a youtube video out there on replacing the cb550 fork seals that I used as a guide.  Installed new Progressive front springs.   Only thing that was not clear on that video (and not so clear in the manuals) was how deep to set the seals into the lower forks.   I think Honda made a tool that would basically set them just below the retainer ring.   Some members said they drove them all the way in to the seat area in the lower fork.   I did this so hopefully not an issue.  Next time, i would set them just below the ring for the retainer.

Here are all the parts.  I am re-using the head lamp brackets since they polished up nicely.   New fork boots from dime city.  These are much softer than the originals and do not have the little drain holes in the corrugated sections.  Hope that is not an issue, but they look nice.

Once again, SohRon thread was a great guide on how to set this up.  I use his thread and the shop manual.  These answer 95% of my questions.  Then when I get stuck, the members here always know a solution.   Thanks all.


anyone know a trick to eliminate or get smaller side reflectors on the stock head lamp mounts.   These are kind of overwhelming the smaller turn signals I have planned.   This is only a day rider for me, so not too worried about the loss of reflection at night.


I did not have any gaps between the upper and lower due to the all balls steering stem spacers and install of those new bearings in the stem.   I had simply ground the underside of the stem nut flat and all is good.   
« Last Edit: April 28, 2014, 05:36:08 AM by Chaser60 »

Offline Chaser60

  • Enthusiast
  • **
  • Posts: 172
  • 75 CB550
Re: 1975 CB550 Winter 2013 Build
« Reply #51 on: April 26, 2014, 06:25:55 AM »
Next up Lace those wheels.  I have never done this.  Read up on it here and in some links that were in member's threads.   Basically sounded like not hard, but need patience...Hmm that is not what I am known for.   Bought a harbor freight static wheel balancer to use as truing stand...that was a mistake but more on that later.

Lacing was actually easy.   Best advice i got from a member's thread.  Take pictures BEFORE you unlace them in the first place.  Very glad I did that.  Also, be sure you put something up through the valve stem hole.  this will give you a reference to use when re-assembly begins.


Maybe took an hour per wheel.   I re-used the original spokes as they were in great shape and polished up well with a little "neverdull" and 0000 steel wool in a few spots.   a little oil on the spoke threads made them turn easy.  I counted the # of turns to get relatively in the ball park.  Not sure this is necessary, but i did not have any big issues when truing.

Repeated process with the rear.  No pics of that.  One thing to note.  Spokes are different shape for inner vs outer.   Dont mix them up and label them when you unlace if you are going to reuse.

Offline Chaser60

  • Enthusiast
  • **
  • Posts: 172
  • 75 CB550
Re: 1975 CB550 Winter 2013 Build
« Reply #52 on: April 26, 2014, 06:48:33 AM »
Truing.  Not as bad as I thought.   Basically walked away from the lacing for a day or two.  And started this when I could concentrate and was fresh.

Some key threads are inserted here.  Thanks KONG.  Your explanation worked best for my brain...and is repeated below so others dont need to search for it.
_____________________________

After you lace your wheels up - and don't worry about how the previous owner did it, you just do yours correctly - put your wheel in your truing stand and do the following.   Starting at the air valve hole unscrew each nipple, lubricate it, and then tighten each nipple 10 turns, go all the way around.  Take the wheel off the stand and shake it while holding by the rim, then set it into the stand and do the same thing again and go around and tighten each one 2 or 3 turns.  Do that until each of them is still free to be easily turned but ever so slightly snug.  Now its time to true the wheel.

Set up your indicator and begin by checking the wheel for roundness, don't worry about side wobble, just spin it and check the runout as the distance from axle center to edge of rim varies.  You bring the wheel true this way first and you do it by pulling on the tall side.  Spin the wheel and find the high spot, mark it with masking tape on the side of the wheel - then go exactly opposite of it and tighten the two spokes across from it by 1 turn each, the next two to each side of them by 1/2 turn, and the next two after them by 1/4 turn.  Then spin and measure again.  Do the same thing again if necessary but if you have to do it more than once you have to loosen the high side the same way as you tighten the low side.  Never turn any spoke more than 1 turn at a time.  Oh, somewhere on the rim there may be a hump where the ends were butt-welded together, ignore it.  Keep adjusting the wheel until your readout is +/- 0.10 inch or better - and you should be able to do better.

Once you've got the wheel round you take the wiggle out of it.  Set up your indicator to measure runout side to side and spin the wheel slowly and find the center of the section that is most distant from your side.  Here you also should work about 4 or 6 spokes at a time, but do not make the adjustments so large (usually 1/2 turn at a time) and here as you tighten the spoke that feeds to the side of the hub nearest you you have to loosen the nipple for the spoke next to it on each side by the same amount.  This part will go quickly, its a lot easier to do than it sounds.  Make your adjustments until you have reduced the runout as noted above.

Finally once you have it right take the wheel out of the stand and find a soft surface and bounce it a few times, I just use a carpeted floor.  Bounce it like hitting a small pothole.  Then remount the rim in your truing stand and measure your runout again.  Make corrections as necessary but this time only tighten the nipples, don't loosen any - the adjustments needed, if any, will be very small.

Now, finally, spin the rim and lightly tap each spoke with your spoke wrench as it passes by.  Listen to the sound.  Most will go clink, but a couple will go clunk.  Tighten the clunkers about 1/2 turn at a time until they sing out like their sisters.  Check runout one more time and if all is well check each nipple to see if any spoke-end is sticking out.  If any are take a grinder and remove the protruding parts.  Then put a new rimstrip on it and you're done.
__________________________________________

Another very helpful bit was from http://www.webbikeworld.com/motorcycle-wheels/spoke-wheels/
vertical Alignment

Some nice diagrams on this website that help with which way things move as you tighten or loosen.


Here is harbor freight stand


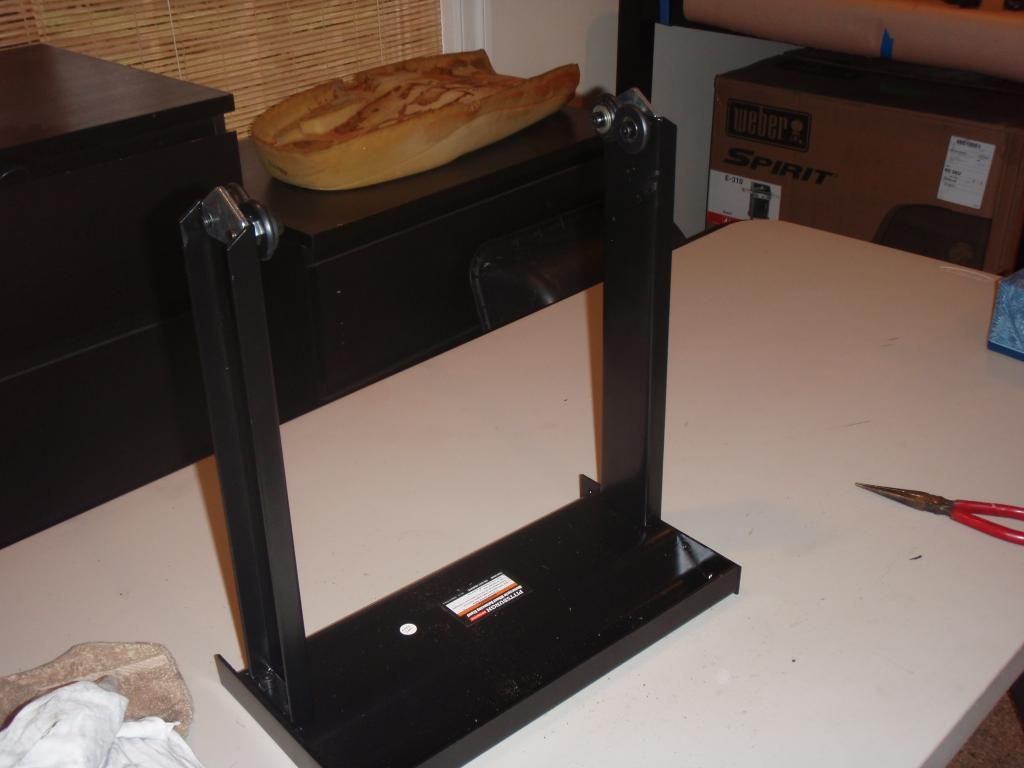
What I found out after finishing the front was that these little bearing surfaces were not round so the shaft actually wobbled.


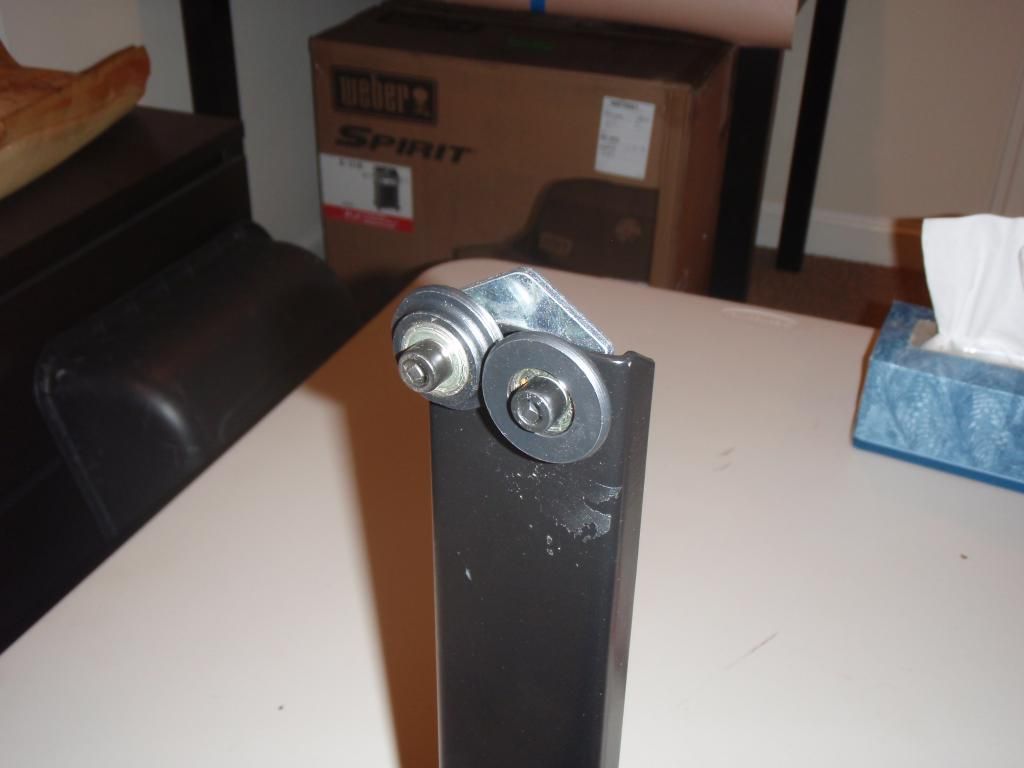
Works fine as a static balancer, but dont buy this as a truing stand.  Yes, I know they don't advertise it as a truing stand and yes I was trying to cheap out.... You can true the wheel, but since the shaft wobbles on the stand, you are actually not true once on a straight bar such as your AXLES...DOH !

So I then used the bar (which was true the issue is the bearings on the HF stand).  This is the setup between my bench and my drill press.


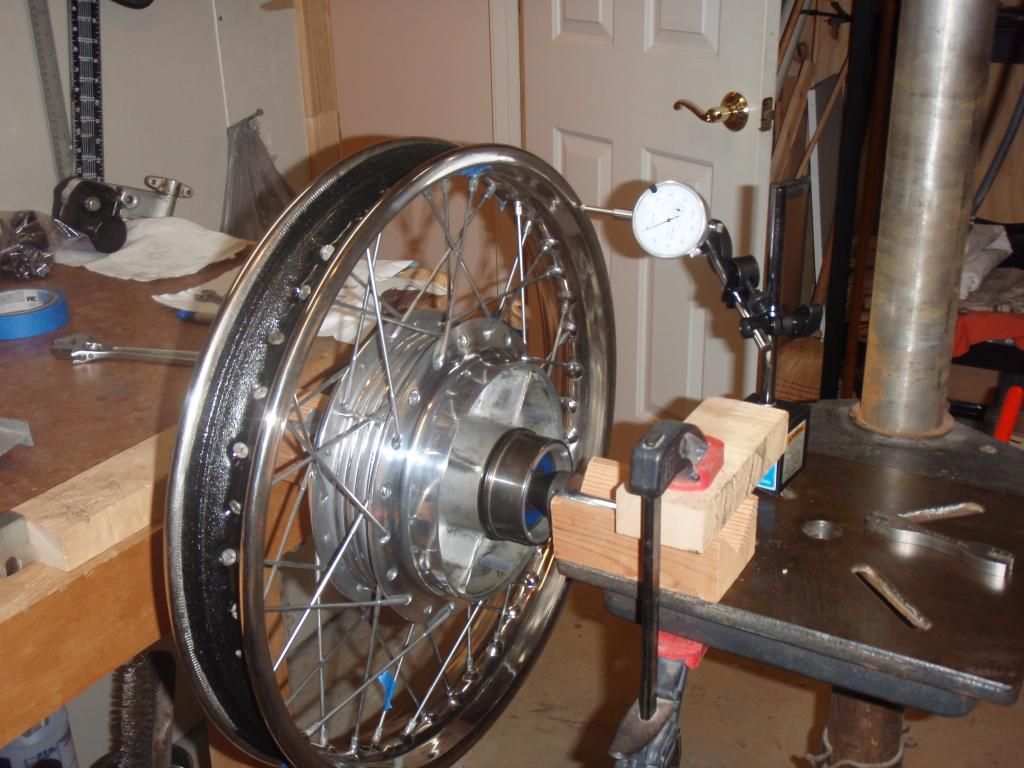
This worked perfectly.   Follow the advice KONG and the link provided above.   And soon you are true.  It felt great to get it right.   Took about 90 minutes per wheel once i got off the harbor freight stand. The last thing I did was hit each spoke with the spoke wrench and listen to the tone (sound).   Any that were a dull low sound were loose.   Snug those up and recheck to be sure it didnt drive out of position.

Also, mind the weld in the rim.  This will never be a true spot and so don't chase that around and around.   I taped it so I didn't panic each time the dial indicator jumped.
« Last Edit: April 28, 2014, 05:38:47 AM by Chaser60 »

Offline Chaser60

  • Enthusiast
  • **
  • Posts: 172
  • 75 CB550
Re: 1975 CB550 Winter 2013 Build
« Reply #53 on: April 26, 2014, 07:00:37 AM »
Now that we are all trued...Time to mount thoses brand new Avon tires, tubes and strips.   I couldnt take pics of this wrestling match as i did this solo.   Here are the tips i found most helpful

http://www.motorcycle-usa.com/704/5399/Motorcycle-Article/Tire-Changing---The-Dunlop-Method.aspx


this website has a video that is really useful.  It is an off road change, but I followed this guys method and it was actually easy.  Pay attention to tube inflation, placement and how much he "bites" off with each move.   

I have two bikemaster tire spoons, soapy water and that's about it. 

Touched up the black paint on the rotor with a little rustoleum and reassembled rest of front tire.  I love the look of these AVONS.  I bought the non - metric sizes 3.25 19 and 4.00 18  Cant wait to get on them.  Sadly still a long ways to go.   


Here is the front back on the harbor freight balancing stand.  It works perfect for this task...


And I am loving the drilled rotor too.

Offline Chaser60

  • Enthusiast
  • **
  • Posts: 172
  • 75 CB550
Re: 1975 CB550 Winter 2013 Build
« Reply #54 on: April 26, 2014, 07:12:42 AM »
Next up.  Get the front wheel, fender, brake mount, new turn signals and headlamp can back on this thing.   Again, Followed SohRon's thread and the shop manual, so I wont repeat their directions here.   I will say once again that the photo's in SohRon's thread make such a difference in being able to "see" how this should go.   Things like the front fender and disck brake bracket, how to insert the forks in the triple tree etc .... WAY WAY helpful.   


Last bit for the night yesterday was the headlamp can.   I had to fab one of the sleeves and also since I just couldnt stand the idea of the metal ear of the mount against my brand new paint, I installed this little rubber washer.  Bought these at a farm hardware store, but have seen them in LOWES also


Offline Chaser60

  • Enthusiast
  • **
  • Posts: 172
  • 75 CB550
Re: 1975 CB550 Winter 2013 Build
« Reply #55 on: April 26, 2014, 08:05:52 AM »
I am looking for suggestions on the side reflector.    I don't ride this bike at night, so not really worried about safety element of this decision.   I think that with the small turn signals, this is simply too large.  I can eliminate it but that leaves a nasty theaded hole and a bolt / screw head isnt most attractive option.   Any ideas to fill hole (not weld) or places to find a smaller reflector?


Offline SOHC4 Cafe Racer Fan

  • Speak up, Whipper-Snapper! I'm a
  • Really Old Timer ...
  • *******
  • Posts: 15,556
  • SOHC/4 Member #1235
Re: 1975 CB550 Winter 2013 Build
« Reply #56 on: April 26, 2014, 05:22:35 PM »
Who cares about the damn reflector or its threaded whole.  Twist the throttle and GO!!
1975 CB550K1 "Blue" Stockish Restomod (http://forums.sohc4.net/index.php?topic=135005.0)
1975 CB550F1 frame/CB650 engine hybrid "The Hot Mess" (http://forums.sohc4.net/index.php/topic,150220.0.html)
2008 Triumph Thruxton (http://forums.sohc4.net/index.php/topic,190956.0.html)
2014 MV Agusta Brutale Dragster 800
2015 Yamaha FZ-09 (http://forums.sohc4.net/index.php/topic,186861.0.html)

"There are some things nobody needs in this world, and a bright-red, hunch-back, warp-speed 900cc cafe racer is one of them — but I want one anyway, and on some days I actually believe I need one.... Being shot out of a cannon will always be better than being squeezed out of a tube. That is why God made fast motorcycles, Bubba." Hunter S. Thompson, Song of the Sausage Creature, Cycle World, March 1995.  (http://www.latexnet.org/~csmith/sausage.html and https://magazine.cycleworld.com/article/1995/3/1/song-of-the-sausage-creature)

Sold/Emeritus
1973 CB750K2 "Bionic Mongrel" (http://forums.sohc4.net/index.php?topic=132734.0) - Sold
1977 CB750K7 "Nine Lives" Restomod (http://forums.sohc4.net/index.php?topic=50490.0) - Sold
2005 RVT1000RR RC51-SP2 "El Diablo" - Sold
2016+ Triumph Thruxton 1200 R (http://forums.sohc4.net/index.php/topic,170198.0.html) - Sold

Offline Chaser60

  • Enthusiast
  • **
  • Posts: 172
  • 75 CB550
Re: 1975 CB550 Winter 2013 Build
« Reply #57 on: April 28, 2014, 04:20:27 AM »
Ha yes...I am a bit obsessive compulsive.  Plan is to wrap it up before Month of May is over.   Running out of time and money for sure.    Hopefully dont land in a mess with the carbs when they go back on after sitting all winter, but that is a couple weeks away. 

Didn't have much time to work yesterday.   Did get the new chain drive sprocket installed along with inner fender, rear shocks, turn signals, the modified HD softail fender and tail light.   

Shocks are the original OEM Hondas.  They work fine and are an easy change out later when I have some $$ back in wallet again.  Will replace later.  At this time, just disassembled, painted inner, cut about an inch off the top protection  cup and painted it too.   


This is the cut down rear fender.   Bought it off a damaged HD for next to nothing, trimmed it up.   Thin black rubber washers between the contact points and in it goes


Installed with 2 bolts and the mini cat eye turn signals from JP cycles.  Tail light has integrated license plate bracket, May have to bend that upward a bit after I see about rear wheel clearance.


Have to tackle the valve adjustments and then on to the wiring harnesses next.   I was planning to disassemble, clean and repaint the switches but that will set me back another two days, so those may just have to remain in their beautiful antiqued patina...

Offline SOHC4 Cafe Racer Fan

  • Speak up, Whipper-Snapper! I'm a
  • Really Old Timer ...
  • *******
  • Posts: 15,556
  • SOHC/4 Member #1235
Re: 1975 CB550 Winter 2013 Build
« Reply #58 on: April 28, 2014, 07:51:14 AM »
The Harley fender looks interesting. I'm intrigued in a good way as to how the lines will flow with the seat.
1975 CB550K1 "Blue" Stockish Restomod (http://forums.sohc4.net/index.php?topic=135005.0)
1975 CB550F1 frame/CB650 engine hybrid "The Hot Mess" (http://forums.sohc4.net/index.php/topic,150220.0.html)
2008 Triumph Thruxton (http://forums.sohc4.net/index.php/topic,190956.0.html)
2014 MV Agusta Brutale Dragster 800
2015 Yamaha FZ-09 (http://forums.sohc4.net/index.php/topic,186861.0.html)

"There are some things nobody needs in this world, and a bright-red, hunch-back, warp-speed 900cc cafe racer is one of them — but I want one anyway, and on some days I actually believe I need one.... Being shot out of a cannon will always be better than being squeezed out of a tube. That is why God made fast motorcycles, Bubba." Hunter S. Thompson, Song of the Sausage Creature, Cycle World, March 1995.  (http://www.latexnet.org/~csmith/sausage.html and https://magazine.cycleworld.com/article/1995/3/1/song-of-the-sausage-creature)

Sold/Emeritus
1973 CB750K2 "Bionic Mongrel" (http://forums.sohc4.net/index.php?topic=132734.0) - Sold
1977 CB750K7 "Nine Lives" Restomod (http://forums.sohc4.net/index.php?topic=50490.0) - Sold
2005 RVT1000RR RC51-SP2 "El Diablo" - Sold
2016+ Triumph Thruxton 1200 R (http://forums.sohc4.net/index.php/topic,170198.0.html) - Sold

Offline Chaser60

  • Enthusiast
  • **
  • Posts: 172
  • 75 CB550
Re: 1975 CB550 Winter 2013 Build
« Reply #59 on: April 28, 2014, 11:13:18 AM »
CB750 Cafe Racer Fan... Here you go.   I modified the original seat pan.  I think I posted some of that process early in this build thread, but essentially shortened metal pan a few inches and then cut and reshaped the rear section of pan.  I mocked up a cushion with florists foam and sent the pan and mock up off to have a new foam cushion and cover made.   I think I could have done the foam cushion, but no way I could sew the cover.   This seat design retains all attachment hardware, lock and rubber supports.    Here is how it looks.   


Offline SOHC4 Cafe Racer Fan

  • Speak up, Whipper-Snapper! I'm a
  • Really Old Timer ...
  • *******
  • Posts: 15,556
  • SOHC/4 Member #1235
Re: 1975 CB550 Winter 2013 Build
« Reply #60 on: April 28, 2014, 03:12:32 PM »
CB750 Cafe Racer Fan... Here you go.   I modified the original seat pan.  I think I posted some of that process early in this build thread, but essentially shortened metal pan a few inches and then cut and reshaped the rear section of pan.  I mocked up a cushion with florists foam and sent the pan and mock up off to have a new foam cushion and cover made.   I think I could have done the foam cushion, but no way I could sew the cover.   This seat design retains all attachment hardware, lock and rubber supports.    Here is how it looks.   


That is OUTSTANDING.  The lines flow really well together, and it modernizes the fender to a CBF shape.  VERY NICE!!  What kind of HD fender did you modify?
1975 CB550K1 "Blue" Stockish Restomod (http://forums.sohc4.net/index.php?topic=135005.0)
1975 CB550F1 frame/CB650 engine hybrid "The Hot Mess" (http://forums.sohc4.net/index.php/topic,150220.0.html)
2008 Triumph Thruxton (http://forums.sohc4.net/index.php/topic,190956.0.html)
2014 MV Agusta Brutale Dragster 800
2015 Yamaha FZ-09 (http://forums.sohc4.net/index.php/topic,186861.0.html)

"There are some things nobody needs in this world, and a bright-red, hunch-back, warp-speed 900cc cafe racer is one of them — but I want one anyway, and on some days I actually believe I need one.... Being shot out of a cannon will always be better than being squeezed out of a tube. That is why God made fast motorcycles, Bubba." Hunter S. Thompson, Song of the Sausage Creature, Cycle World, March 1995.  (http://www.latexnet.org/~csmith/sausage.html and https://magazine.cycleworld.com/article/1995/3/1/song-of-the-sausage-creature)

Sold/Emeritus
1973 CB750K2 "Bionic Mongrel" (http://forums.sohc4.net/index.php?topic=132734.0) - Sold
1977 CB750K7 "Nine Lives" Restomod (http://forums.sohc4.net/index.php?topic=50490.0) - Sold
2005 RVT1000RR RC51-SP2 "El Diablo" - Sold
2016+ Triumph Thruxton 1200 R (http://forums.sohc4.net/index.php/topic,170198.0.html) - Sold

Offline Chaser60

  • Enthusiast
  • **
  • Posts: 172
  • 75 CB550
Re: 1975 CB550 Winter 2013 Build
« Reply #61 on: April 28, 2014, 06:37:17 PM »
Thanks for saying so !    To answer your question, that fender is off of a HD Softail.    I am sorry that I don't recall the year.  I do remember that you have to be careful with the year and model.   As the HD bikes get newer, HD started to fit ever wider rear tires and the fender gets too wide to fit inside an unmodified CB550 frame.   So you have to look for an older Softail.   I think the space between the frame on the CB550 is a little less than 7 inches.    Also note if you go too old, the fender does not have that little raised style line at the edge.   This is painted gloss black on mine.   I wanted this style edge for the paint that I had in mind.   I hunted around and finally found one that would fit inside the frame.  This was important because I do not have any welding skills so I could not easily narrow the width of the fender by slicing out the middle and re-welding.   All my metal work was then cutting, trimming and edging.

I only used the last 7 to 8 inches for mine.  This was matter of trial and error for how I wanted it to look.  You could go longer or shorter to suit your seat.   If shorter, might need different tail light and bracket.

Thanks again.


Offline seanbarney41

  • not really that much younger than an
  • Really Old Timer ...
  • *******
  • Posts: 11,190
Re: 1975 CB550 Winter 2013 Build
« Reply #62 on: April 28, 2014, 08:40:27 PM »
very cool seat and rear fender
If it works good, it looks good...

Offline Chaser60

  • Enthusiast
  • **
  • Posts: 172
  • 75 CB550
Re: 1975 CB550 Winter 2013 Build
« Reply #63 on: May 05, 2014, 05:45:48 AM »
Good progress this weekend.   Valve clearances adjusted and engine buttoned up.  New sprocket, chain,  Rear tire and brakes on.   Other stuff like pegs, shifter, etc all done.   Began to re-install the wire harness.  Getting there.


Thanks for feed back on seat and fender.  Unfortunately, I just found an issue.  I swear I had this right when I did the fender design, but somehow when I bought the taillight bracket and license plate bracket I made a error.   Manual says the rear suspension travel is 3.1 inches.    I only have 2.5 inches of clearance between the new Avon rear tire and the bottom of the plate and light bracket.     I have never bottomed out this rear end when riding, but this makes me very nervous from a safety point of view.


I have no way to mod the fender to extend it further rearwards without a total make over.    I am hunting alternative tail lights and brackets also.   Has anyone ever limited the travel of the rear suspension and would this even be safe?   Inside the shock is a rubber stopper that I assume is the item that gates the "bottoming" out of the suspension.  It would be easy enough to add a second one or change to one that is about 3/4 inch longer.   Any advice?   I may also post this over in the other section.  Thanks.

Offline SOHC4 Cafe Racer Fan

  • Speak up, Whipper-Snapper! I'm a
  • Really Old Timer ...
  • *******
  • Posts: 15,556
  • SOHC/4 Member #1235
Re: 1975 CB550 Winter 2013 Build
« Reply #64 on: May 05, 2014, 09:25:39 AM »
The taillight doesn't seem to be the issue, so much as the license plate holder.  I think you might get a away without modifying it.  A little touch between the plate holder and tire should not endanger you or the tire, but if you do have rubbing, you may want to remotely mount your license plate (perhaps to one of the shock mounting bolts).
1975 CB550K1 "Blue" Stockish Restomod (http://forums.sohc4.net/index.php?topic=135005.0)
1975 CB550F1 frame/CB650 engine hybrid "The Hot Mess" (http://forums.sohc4.net/index.php/topic,150220.0.html)
2008 Triumph Thruxton (http://forums.sohc4.net/index.php/topic,190956.0.html)
2014 MV Agusta Brutale Dragster 800
2015 Yamaha FZ-09 (http://forums.sohc4.net/index.php/topic,186861.0.html)

"There are some things nobody needs in this world, and a bright-red, hunch-back, warp-speed 900cc cafe racer is one of them — but I want one anyway, and on some days I actually believe I need one.... Being shot out of a cannon will always be better than being squeezed out of a tube. That is why God made fast motorcycles, Bubba." Hunter S. Thompson, Song of the Sausage Creature, Cycle World, March 1995.  (http://www.latexnet.org/~csmith/sausage.html and https://magazine.cycleworld.com/article/1995/3/1/song-of-the-sausage-creature)

Sold/Emeritus
1973 CB750K2 "Bionic Mongrel" (http://forums.sohc4.net/index.php?topic=132734.0) - Sold
1977 CB750K7 "Nine Lives" Restomod (http://forums.sohc4.net/index.php?topic=50490.0) - Sold
2005 RVT1000RR RC51-SP2 "El Diablo" - Sold
2016+ Triumph Thruxton 1200 R (http://forums.sohc4.net/index.php/topic,170198.0.html) - Sold

Offline Chaser60

  • Enthusiast
  • **
  • Posts: 172
  • 75 CB550
Re: 1975 CB550 Winter 2013 Build
« Reply #65 on: May 05, 2014, 09:50:05 AM »
Thanks Gents !   Guess I will focus on getting this all back together and give it a few bounces once its off the stand.   

Cafe Racer Fan, the tail light mount and license mount are all one piece of chrome.   You can kind of see that in an earlier post picture from the rear.   

Cal, what are those shocks you are running on your 550.   PS, are you riding that thing or did you build a trailer queen?

Offline Chaser60

  • Enthusiast
  • **
  • Posts: 172
  • 75 CB550
Re: 1975 CB550 Winter 2013 Build
« Reply #66 on: May 05, 2014, 10:07:23 AM »
well that wiring issue sucks...and just jabbing you back for that documaster zing you sent my way earlier.  Cheers

Offline Chaser60

  • Enthusiast
  • **
  • Posts: 172
  • 75 CB550
Re: 1975 CB550 Winter 2013 Build
« Reply #67 on: May 05, 2014, 10:17:28 AM »
Up?  Definitely.   As you can see from my pics.  Currently only way my bike would dial in a blue ridge run would be on your trailer.    But that will change in a few weeks...stay tuned

Offline dgilling

  • Hot Shot
  • ***
  • Posts: 343
Re: 1975 CB550 Winter 2013 Build
« Reply #68 on: May 08, 2014, 09:20:19 AM »
This restore thread is great! I'm just starting mine.  http://forums.sohc4.net/index.php?topic=137018.0.  I love how you put in the threads and links that you found most helpful.  This will save me a ton of time.  Subscribed and looking forward to seeing the finished product. 


Offline Chaser60

  • Enthusiast
  • **
  • Posts: 172
  • 75 CB550
Re: 1975 CB550 Winter 2013 Build
« Reply #69 on: May 09, 2014, 05:45:59 AM »
dgilling - thanks.  This forum has made this project much easier for me.  I have been away from bikes and restorations/mods for a very long time.    The collective knowledge and willingness to help is fantastic.   I felt like I spent hours searching here and wider net too.   The searches are painful.  If you get too specific, you find little.  If you go too general, you get tons of unrelated stuff.   

So I took to including them in my posts for 2 reasons.   First to pay recognition to the member that posted it.  And second, if I found it helpful, I am sure others might too. 

One other search that has become my friend is to use google search but point it at this site.   You do that by including the following     site:forums.sohc4.net after your key words.   This has helped me get in the ball park of my specific questions several times faster.

Every once in a while you get just plain lucky... like for example the fact that I picked a 550 to build and a member like SohRon has done the most impressive build thread that I have found to date on that bike.   He quite completely could take his work and publish a bolt by bolt how to restore book and make some money.   Another example is member calj737.   He happens to be out east here quite nearby and has helped me find a great powdercoater and has offered tons of help (and a little smack talk as well).   At first I thought it was because we were neighbors in VA.  Then I learned that he is active all over this forum and just has a massive passion for 2 wheel things that he is willing to share.  Makes this all the more fun for sure.

Will subscribe to your thread too.  Good luck
« Last Edit: May 20, 2014, 10:44:17 AM by Chaser60 »

Offline Chaser60

  • Enthusiast
  • **
  • Posts: 172
  • 75 CB550
Re: 1975 CB550 Winter 2013 Build
« Reply #70 on: May 22, 2014, 07:55:33 AM »
I should be working, but having a bit of procrastination so will post a build update instead. 

Cleaned, touched up and installed caliper, pads, new steel line and speed bleeder.  The last two came from slingshot in Richmond.   Great product.  Great delivery.  Post office mangled the box and the speed bleeder had gotten lost.   Slingshot shipped me out another.  Great customer service too.  They have a discount for forum members and it looks great installed.    Easy install and set inside pad gap per the manual.   

Still loving the drilled rotor.   Not sure I love the look of the dust shield to rear of fork, but going to leave it for now.  I am sure Honda engineers had a reason for it.

Searched on bleeding techniques.   Forgot to write down the thread, but think I found it via SohRon's epic build and believe maybe original poster was TwoTired.   Anyways, straight forward bleeding technique made even easier with the speed bleeder.  Buy one of these for your caliper the next time you are doing brake work.   I now have a rock solid front brake lever.  One thing I didn't do and now totally regret, but more about that when we get to the wiring...


Offline Chaser60

  • Enthusiast
  • **
  • Posts: 172
  • 75 CB550
Re: 1975 CB550 Winter 2013 Build
« Reply #71 on: May 22, 2014, 08:21:41 AM »
Next up wire harness and reconnecting everything.   Cleaned female bullet connectors with little 17 caliber ( I think) bore brush used for small caliber gun barrel cleaning.  Bought 2 at gander mountain for like $3 bucks.   Hit the males with a bit fine wet dry and set about to matching everything up.   I had labeled all and had a page of notes about what went where.   Long slow process, but everything re-installed and mated. 

Except for 2 wires.   A pesky solo solid brown in the head light can and this solo green blade at the inside of the panel.


Couldn't find them on the wiring diagram so I posted 2 quick questions and got several helpful and rapid replies.   These are not connected on US versions so I was done with the physical reconnections!!  Thanks to the members that answered those questions.     Hooked up the battery and tested, horn, directionals, tail light, brake light.  All good.   New front directionals are not running lights, so this left those two running light connections un-mated in the head lamp can.  For those that need it.   The cat eyes are from JP cycles.  They are 2 wire.   Black is hot, striped is ground.   In the can you hook up to the solid orange and solid light blue for the signals.  Those same colors with the white stripes are for the running lights an are unused with these cat eyes.

Headlamp Can is still a bowl of spaghetti and has all my labels  will leave this until I can test rest of electrical system once I am done with other work.

Back to the front brakes.  I wish I had changed the brake signal sensor when I did the brake hoses.   It works but takes a massive pull on the lever to get it to come on.   It worked fine when I took the bike apart so didnt even think about it.   


Offline Chaser60

  • Enthusiast
  • **
  • Posts: 172
  • 75 CB550
Re: 1975 CB550 Winter 2013 Build
« Reply #72 on: May 22, 2014, 08:30:46 AM »
Backing up a step.  I also installed new bars (CB400f style) from 4 into 1 out in CA.   Pic shows difference in rise and such.  These are OE replica's and predrilled so after painting the switches and curing them, snaked the wires through without issue.


Reinstalled gages and master cylinder.  The short rise bars did now allow the brake banjo bolt to clear the right side gage housing.  So pulled the gages and set about to a fine adjustment with mallet and wood block on the gage cluster mounting plate.   Re-installed and have adequate clearance now.   I did not want drag bars.  Not yet sure I like the riding configuration of the 400f bars with my seat, but need to get this thing on the road and put a few hours in the saddle before worrying about that much.  Dont have a picture of that installed at the moment


Offline Chaser60

  • Enthusiast
  • **
  • Posts: 172
  • 75 CB550
Re: 1975 CB550 Winter 2013 Build
« Reply #73 on: May 22, 2014, 08:53:01 AM »
Next up reinstall carbs.   This is probably my biggest risk to getting back to riding.   This bike was running well when I put it in the shop in November.   I chose not to dissassemble and clean the carbs.  I fully drained them and they have been hiding in a box all winter.  Will see soon enough if it runs, how well and then decide next steps.   Likely a rebuild or at least rejet due to direction I am headed with the exhaust, but that is getting ahead of myself.

New hoses all around and a little external clean up.   Back on with no issues.  Once again SohRon's build was like a how to manual for the carbs and the stock air box.   


I learned I was missing some parts from the airbox and have located most of them from members here.  Thanks goldarrow.

Offline goldarrow

  • one day, i'll be an
  • Old Timer
  • ******
  • Posts: 3,360
Re: 1975 CB550 Winter 2013 Build
« Reply #74 on: May 22, 2014, 09:04:37 AM »
Looking great and very clean! I'm jealous.  :)
Life Is Full Of Challenges - And My Backyard Is Full Of SOHC4's

CB550 K0
CB750 K0, K2, K23 JDM, K45, K5
And the little ones z50r, xr50r, st90


750k5 http://forums.sohc4.net/index.php?topic=114817.0