Author Topic: High altitude 73 CB500 daily driver ( 5/20/17 update )  (Read 32805 times)

0 Members and 1 Guest are viewing this topic.

Offline Desert Dan

  • Some might call me an
  • Enthusiast
  • **
  • Posts: 137
High altitude 73 CB500 daily driver ( 5/20/17 update )
« on: February 15, 2015, 10:59:49 PM »
Hi all, Ive been trolling the SOHC/4 site for months and I figured it was about time I posted my bike here with all the work I have been doing to it. A bit of backstory on me, this is my first motorcycle, Im 22, in college working on a pilots license, and Ive been working on air cooled volkswagens since I was 15. Anyways what happened is I bought the bike off of craigslist last September, and I got way more of a project than I bargained for. At the time the story I was given was that the guy had restored the bike a few years ago in Michigan and allowed it to fall into disrepair after he moved to Colorado. I thought I was getting a good deal at the time because when I bought it the paint and chrome looked great but the engine leaked oil and fuel in copious quantities and it smoked a bit of oil, I believed all the heavy lifting had been done and all I had to do was give it a quick tune up. I don't expect this to be a very fast paced thread as I have a tendency to forget to take pictures when I get on a roll working on the bike, but Ill try and get a few good shots and anecdotes in when I can. My goal for this bike is to get it close to stock and just drive the piss out of it, no top dollar restoration, no insane speed machine. So here are a few shots of the bike the first one is just after I purchased it, unfortunately its my only before shot because I stripped it down before it crossed my mind to take more photos. There is also a photo of it with my 67 vw bus that I restored in highschool.
« Last Edit: May 20, 2017, 01:42:20 PM by Desert Dan »

Offline Desert Dan

  • Some might call me an
  • Enthusiast
  • **
  • Posts: 137
Re: High altitude 73 CB500 K2 daily driver restoration
« Reply #1 on: February 15, 2015, 11:38:40 PM »
So like I said when I bought the bike it leaked fuel out of the #3 float bowl, it leaked oil out of many indistinguishable orifices, and it had a bit of a tricky clutch. When I first brought it home the battery had magically died overnight despite being "brand new" and all the kicking in the world wouldn't bring it to life so I pushed it to the top of my driveway and roll started it, after that it took about 3 or 4 kicks to start. I drove it around my neighborhood a bit then immediately put it in my shop and started tearing parts off of it. The first order of business was a good 3000 mile tune up with new spark plugs and points, then I dove in to the carbs with nothing more than the downloaded workshop manual and my experience from rebuilding volkswagen carbs. Once I had the carbs complete things came to a standstill because the fuel petcock on the tank was clogged with a mixture of rust and redcoat. After a bit of reading on the forums I started the tank on a round of electrolyses to remove the rust. Unfortunately the only thing holding the fuel in the tank was the nice new paint job that had been a key selling point. Over the next month I brazed a myriad of pinholes in the tank, though my brazing abilities must be subpar as I could never quite get the tank to be 100% leak free.

Offline Desert Dan

  • Some might call me an
  • Enthusiast
  • **
  • Posts: 137
Re: High altitude 73 CB500 K2 daily driver restoration
« Reply #2 on: February 16, 2015, 12:04:15 AM »
With work on the tank put on hold I turned my sites to the oil that was finding its way out of the engine and on to the concrete floor of my shop. I started out by ordering an older bottom end gasket kit, and with nothing more than an exploded view diagram started replacing every seal I could get my grimy hands on. It was during the time when I was replacing the seal on the sump cover that I found in the grunge half of a ring(this will be an important note later on in the story), I wasn't sure if it was a transmission set ring, a piston ring, or the one ring of power, all I new was there were some suspicious goings on inside this engine. Simultaneously while I was sealing the engine, I started on the turn signals. There was nothing wrong with them besides their total absence, I there fore made one of many trips to the local salvage yard to recover a set of turn signals, a new grab bar, and new used tappets because the PO (previous owner) had stripped the hex head of every single tappet. With the new turn signals installed and wired up there was a great resounding lack of signaling, mostly because the PO had cut the switch wires flush inside of the turn signal switch to avoid having to cut a hole in the aftermarket handlebar he had installed. Long story short a good bit of flux and solder later I  rewired the switch and had turn signals. The last bit is mostly undocumented but I have a bag of gutted switch parts as proof of it occurring.

Offline Desert Dan

  • Some might call me an
  • Enthusiast
  • **
  • Posts: 137
Re: High altitude 73 CB500 K2 daily driver restoration
« Reply #3 on: February 16, 2015, 12:37:43 AM »
At this point things were absolutely chugging along, I had the engine running like a top, most of the electrics were in order, I had completely gone through the clutch actuation mechanism, and had installed new brake shoes. I was driving it around my neighborhood with a little 2liter gas tank I commandeered off of a two stroke bicycle that I had built a few years back, and I was fine-tuning the carbs with a 4 dial vacuum gauge I bought off of ebay. Pertaining to the gas tank issue, I completely stripped the gas tank of paint, I had burned out all of the tank liner, and I had so many pinholes I finally broke out the big guns and bought a new tank and matching side covers off of fleebay  :o. Im not sure if the new tank is sporting original paint or if its a quality respray but I got a great deal on it and it is rust free and looks great. Now the story gets a little more complex. I finally get around to titling, registering, and insuring the bike and taking it's first inaugural highway run only to discover it is totally gutless over 55mph. If you remember from the first part of the thread the bike did burn some oil and smoke a bit, more specifically it would smoke a sh*t ton on start up and after five minutes it would cease smoking and behave itself, but this prevented me from reading my plugs and realizing the carbs were extremely rich. A week of taking the carbs on and off the bike later, I had found the sweet spot on the needle clip and had the bike running extremely well, so I bought myself the lyle valve spring tool and decided to go after the valve stem seals. It is at this point where everything takes a turn for the worse and leads up to present day.

Offline Desert Dan

  • Some might call me an
  • Enthusiast
  • **
  • Posts: 137
Re: High altitude 73 CB500 K2 daily driver restoration
« Reply #4 on: February 16, 2015, 10:06:57 AM »
If you live in Colorado you know we had some pretty warm days this January, there was a week where it hit 70*F for a few days in a row! During these warm days I could do little to resist the urge to take the newly running and tuned motorcycle for a ride around town, I put about 150 miles on it riding all over. The only problems with the bike at the time were that there wasn't allot of top end power, I would have to shift down to maintain 60mph up mild hills, and the aforementioned start up smoke. Seeing as the bike only smoked during start up or after idling I made the assumption that it was a case of old leaky valve seals. I set off one weekend with the lyle vale spring tool which allowed me to remove the valve springs and retainers with out pulling the head. To my horror when I got the valve spring out of the way,  I found every single valve guide in the head was cracked or broken at the top where the valve guide seal goes. I wracked my brain and I was 99% sure I hadn't caused the damage, I was very careful removing the seals and the valve spring tool never came close to hitting the guides. So the process of tearing down the engine began, the head came off relatively easy and when I removed the valves I found that every single valve was bent and required a punch to remove from the guide. The runout of the best valve was twice the allowable limit in the Clymers. I have no clue how the bike ran so well for so long with bent valves and I had the engine up to 8k rpms a number of times  :o, I was very lucky that the whole thing didn't decide to catastrophically crap out on me. With the engine all apart I started measuring things to decide what to keep and replace, when I got to the pistons I was pleasantly surprised to find #1 was missing half of a secondary compression ring which explains the ring I found in the sump some four months ago. The pistons and cylinders are all within spec, and once I get all the parts and materials I have ordered Ill be comencing with the top end rebuild. Im aiming to have the bike back together and the new rings broken in by the end of March.So as the bike sits right now Ive got a new 550 top end coming from a SOHC/4 member in Iowa, a whole mess of parts coming from all over, and I have the pistons down at the powder coater having a special thermal barrier applied to the tops.

Offline kap384@telus.net

  • Hot Shot
  • ***
  • Posts: 555
Re: High altitude 73 CB500 K2 daily driver restoration
« Reply #5 on: February 16, 2015, 01:01:34 PM »
Good read.  Keep it up. You've obviously got the skill set and the drive to get this thing back on the road and running like it is supposed to. 
1965 Honda CB450K0
1972 Honda CT70K1
1975 Honda MR50
1975 Honda CB400F Supersport
1977 Honda CB750F2 Supersport
1978 Honda XL100
1979 Honda CBX Supersport
1982 Honda VF750S Sabre - Adventure Bike modified
1983 Honda CX650T
1995 Honda VFR750
2016 Honda CRF1000L Africa Twin
2015 KTM 200 XC-W
1963 Suzuki T10
My 1977 CB750F restoration - http://forums.sohc4.net/index.php?topic=66779.0
My 1975 CB400F restoration -
http://forums.sohc4.net/index.php?topic=145196.msg1651779#msg1651779
'More Stock Than Not' thread - http://forums.sohc4.net/index.php?topic=90807.500
My CT70 Resurrection - http://forums.sohc4.net/index.php?topic=145221.0
Best Motorcycle Tool Ever - https://www.engduro.com

Offline Desert Dan

  • Some might call me an
  • Enthusiast
  • **
  • Posts: 137
Re: High altitude 73 CB500 K2 daily driver restoration
« Reply #6 on: February 17, 2015, 09:17:17 AM »
Thanks, I tried to sum up everything without getting too long winded. Right now there isn't any work being done to the bike as Im waiting for parts to arrive and snow to melt. In the mean time Ive been studying brandEn's thread on building a leak free top end, its really well organized with good pictures http://forums.sohc4.net/index.php?topic=107040.0

Offline Desert Dan

  • Some might call me an
  • Enthusiast
  • **
  • Posts: 137
Re: High altitude 73 CB500 K2 daily driver restoration
« Reply #7 on: February 17, 2015, 08:33:06 PM »
Ok so I got the first batch of parts in today, and I received word that the 550 top end is in the mail. All Im waiting on now are the rings from Japan to show up and for the pistons to get back from the powder coater. I was wonder what everyones preference is on installing the pistons into the cylinders. There's the standard method of having the pistons connected to the rods the rods and then dropping the cylinders on top, or there's the technique of putting the pistons in the cylinders first then staggering the rods so 2&3 are connected first then 1&4.

Offline Desert Dan

  • Some might call me an
  • Enthusiast
  • **
  • Posts: 137
Re: High altitude 73 CB500 K2 daily driver restoration
« Reply #8 on: February 23, 2015, 08:16:14 PM »
Quick Progress update, I got the new head, valve cover, and cam in on Thursday. I then spent the following weekend cleaning everything up to take to Hondaman for some port work.

I polished up the combustion chambers of the new head to go with the porting it will receive.

I went a little overboard after polishing the combustion chambers, I then polished the breather cover, the intake manifolds , carbs, and tappets after being forced indoors by the recent cold weather. I mocked up the top end prior to taking it down to Hondaman today.

 After dropping off the top end with Mark, I swung by Precision Powder coating where I had a special thermal barrier applied to the tops of my pistons to help prevent carbon building up on their tops and to reflect the heat of combustion up and out of the engine.
The pistons came out great and at reasonable 60 bucks for all four. The plan for the top end is to have the cylinder block and head decked flat, a regrind for the valves, cut new valve seats, and a port and polish to improve the mid range of the engine.

Offline calj737

  • Really Old Timer ...
  • *******
  • Posts: 21,100
  • I refuse...
Re: High altitude 73 CB500 K2 daily driver restoration
« Reply #9 on: February 24, 2015, 06:00:50 AM »
I like the coating on the domes too, but I'd urge you to add Dry Film Lubricant to the skirts. This provides a significant benefit to cold starts and reduces wear a great deal.

Best to keep a valve installed in the guide when polishing the chamber to avoid knicking the seats (next time). The damage to the guides and valves could have occurred when removing the rocker cover without releasing the tension on the tappets. The 500/550 motors need the rocker released to remove the pressure on the valve and spring before removing the cover. Maybe a PO didn't follow this, who knows...
'74 550 Build http://forums.sohc4.net/index.php?topic=126401.0
'73 500 Build http://forums.sohc4.net/index.php?topic=132935.0

"Of all tyrannies, a tyranny sincerely exercised for the good of it's victim may be the most oppressive. It may be better to live under robber barons than under omnipotent moral busybodies. The robber baron's cruelty may sometimes sleep, his cupidity may at some point be satiated, but those who torment us for our own good will torment us without end for they do so with the approval of their own conscience." - C.S. Lewis

Offline Desert Dan

  • Some might call me an
  • Enthusiast
  • **
  • Posts: 137
Re: High altitude 73 CB500 K2 daily driver restoration
« Reply #10 on: February 24, 2015, 09:12:34 AM »
I like the coating on the domes too, but I'd urge you to add Dry Film Lubricant to the skirts. This provides a significant benefit to cold starts and reduces wear a great deal.

Best to keep a valve installed in the guide when polishing the chamber to avoid knicking the seats (next time). The damage to the guides and valves could have occurred when removing the rocker cover without releasing the tension on the tappets. The 500/550 motors need the rocker released to remove the pressure on the valve and spring before removing the cover. Maybe a PO didn't follow this, who knows...
The dry film coating is really an amazing product, it was actually your build thread that inspired my to try out the coatings, I would have liked to have used the DFL and the oil shedding coatings on the pistons but unfortunately this build is limited by time and budget. The coatings aren't too expensive but when doing a rebuild 60 dollars here and 60 dollars there really start to add up. I allocated more budget to the head work rather than coatings. I wasn't too worried about nicking the valve seats when I was polishing the combustion chambers because they are going to be recut in a couple of days but I also did the polishing by hand which should have minimized any damage done to them. Im still perplexed on how the engine could run with 8 bent valves, Mark said it could have been caused by the tappets slipping off the tops of the valves at high rpm, though thats usually a problem caused by a high lift cam.

Offline HondaMan

  • Someone took this pic of me before I became a
  • Really Old Timer ...
  • *******
  • Posts: 14,022
  • ...not my choice, I was nicknamed...
    • Getting 'em Back on the Road
Re: High altitude 73 CB500 K2 daily driver restoration
« Reply #11 on: February 25, 2015, 01:46:37 PM »
Im still perplexed on how the engine could run with 8 bent valves, Mark said it could have been caused by the tappets slipping off the tops of the valves at high rpm, though thats usually a problem caused by a high lift cam.

It occurs to me that another 'thing' that could cause this is an overly-tight (by a lot) valve adjustment AND greatly worn guides (which is rare in the CB500, though). I've seen this accidentally done on the old Twins like the CB160, where the valve stems are so small that having them as little as .006" too tight and the guides worn more than .006" (that's twice Honda's limit) can make them "trip" over the inner edge of the stem at full lift and high RPM. This then bends the valve stem tip outward (the early engines did not rotate the valves at all). These early engines had long, tapered tips on the valve guides to protect against this, but many a CB160 saw 2000-mile oil changes (it was supposed to be 800-1000) and the cheapest oil the college kid could buy(!). Once worn enough, the seal would crack from the wobble and the plugs would foul with oil, but this often stopped only the faint-hearted, as there was a plug wrench in the toolkit. Eventually, the poor 160 would quit with bent or broken valve(s), or one stuck in a piston, if this happened on the freeway.
See SOHC4shop@gmail.com for info about the gadgets I make for these bikes.

The demons are repulsed when a man does good. Use that.
Blood is thicker than water, but motor oil is thicker yet...so, don't mess with my SOHC4, or I might have to hurt you.
Hondaman's creed: "Bikers are family. Treat them accordingly."

Link to Hondaman Ignition: http://forums.sohc4.net/index.php?topic=67543.0

Link to My CB750 Book: https://www.lulu.com/search?adult_audience_rating=00&page=1&pageSize=10&q=my+cb750+book

Link to website: www.SOHC4shop.com

Offline Desert Dan

  • Some might call me an
  • Enthusiast
  • **
  • Posts: 137
Re: High altitude 73 CB500 K2 daily driver restoration
« Reply #12 on: February 25, 2015, 08:44:19 PM »
It occurs to me that another 'thing' that could cause this is an overly-tight (by a lot) valve adjustment AND greatly worn guides (which is rare in the CB500, though). I've seen this accidentally done on the old Twins like the CB160, where the valve stems are so small that having them as little as .006" too tight and the guides worn more than .006" (that's twice Honda's limit) can make them "trip" over the inner edge of the stem at full lift and high RPM. This then bends the valve stem tip outward (the early engines did not rotate the valves at all). These early engines had long, tapered tips on the valve guides to protect against this, but many a CB160 saw 2000-mile oil changes (it was supposed to be 800-1000) and the cheapest oil the college kid could buy(!). Once worn enough, the seal would crack from the wobble and the plugs would foul with oil, but this often stopped only the faint-hearted, as there was a plug wrench in the toolkit. Eventually, the poor 160 would quit with bent or broken valve(s), or one stuck in a piston, if this happened on the freeway.

That theory makes the most sense to me, all the evidence seems to indicate the previous owner was mechanically handicapped and cut a good number of corners when he owned the bike. Thats really interesting how the 160 suffered from bent valves, I have to admit there was a split second where I considered just riding with the bent valves and living with the smoke  ::).  I did notice the old head had chips out of the casting edge around the valve springs as if the springs or tappets had some how come in contact with it, it could be a contributing factory to the valve damage. On a different note I looked high and low for the Nippon Denso spark plugs you told me about on monday but I was unsuccessful, I came close at a toyota dealership as the did stock Densos just not the right model. Ill try a few more places this coming week once I dig myself out of all the snow we just got.

Offline Desert Dan

  • Some might call me an
  • Enthusiast
  • **
  • Posts: 137
Re: High altitude 73 CB500 K2 daily driver restoration
« Reply #13 on: March 01, 2015, 07:54:30 PM »
Not much progress to report lately, between all the cold weather and the head being out to be ported there hasn't been much todo on the bike. I cleaned up the engine to make it "sanitary" for when the rebuilding part of the rebuild happens, there was only a little road dirt and grime which wasn't too bad to remove.I had cleaned the engine before the teardown and after I had eliminated all the oil leaks which made the whole process of cleaning the engine much easier.


This afternoon I decided to drain the oil and drop the pan in preparation for the rebuild. I only put 300-400 miles on the bike since I first changed the oil and it didn't look too bad considering the missing and broken secondary compression rings. The first time I dropped the pan there was a good 1/8th inch of sludge in the bottom, this time there was no sludge but I did manage to find some ferrous debris in the pan.
\

Im not excessively worried about the magnetic particles I found as it's minimal and may have been the last bits of crud being flushed out, but I will be keeping my eye on it in the future.
  I took a few photos of the internals since the pan is off, everything seems in place and in good order to my untrained eye but Im no expert, so it wouldn't hurt to have some of the experts chime in on the pictures. Sorry about their quality the engine is still in the frame and its a bit of a challenge to take pictures in a confined area.


Of all the different parts of the bike Id have to say the transmission is in the best shape, with the little bit of riding I did get to accomplish it always shifted smoothly and I only ever found one false neutral and that was probably due to operator error.

Offline HondaMan

  • Someone took this pic of me before I became a
  • Really Old Timer ...
  • *******
  • Posts: 14,022
  • ...not my choice, I was nicknamed...
    • Getting 'em Back on the Road
Re: High altitude 73 CB500 K2 daily driver restoration
« Reply #14 on: March 01, 2015, 09:43:11 PM »
Because of the Hy-Vo style drive chain and the tiny bits of ferrous 'stuff' you're picking up, maybe consider a magnetic drain plug? I saw some at the O'Reilly's Auto near here last summer that fit these bikes. The grit is hard on those many thin plates in the slinky Hy-Vo chains.

The porting part is done: should I post some pix of it here?
See SOHC4shop@gmail.com for info about the gadgets I make for these bikes.

The demons are repulsed when a man does good. Use that.
Blood is thicker than water, but motor oil is thicker yet...so, don't mess with my SOHC4, or I might have to hurt you.
Hondaman's creed: "Bikers are family. Treat them accordingly."

Link to Hondaman Ignition: http://forums.sohc4.net/index.php?topic=67543.0

Link to My CB750 Book: https://www.lulu.com/search?adult_audience_rating=00&page=1&pageSize=10&q=my+cb750+book

Link to website: www.SOHC4shop.com

Offline SOHC4 Cafe Racer Fan

  • Speak up, Whipper-Snapper! I'm a
  • Really Old Timer ...
  • *******
  • Posts: 15,733
  • SOHC/4 Member #1235
Re: High altitude 73 CB500 K2 daily driver restoration
« Reply #15 on: March 01, 2015, 11:52:49 PM »
The porting part is done: should I post some pix of it here?

Heck yes!
1975 CB550K1 "Blue" Stockish Restomod (http://forums.sohc4.net/index.php?topic=135005.0)
1975 CB550F1 frame/CB650 engine hybrid "The Hot Mess" (http://forums.sohc4.net/index.php/topic,150220.0.html)
2008 Triumph Thruxton (http://forums.sohc4.net/index.php/topic,190956.0.html)
2014 MV Agusta Brutale Dragster 800
2015 Yamaha FZ-09 (http://forums.sohc4.net/index.php/topic,186861.0.html)

"There are some things nobody needs in this world, and a bright-red, hunch-back, warp-speed 900cc cafe racer is one of them — but I want one anyway, and on some days I actually believe I need one.... Being shot out of a cannon will always be better than being squeezed out of a tube. That is why God made fast motorcycles, Bubba." Hunter S. Thompson, Song of the Sausage Creature, Cycle World, March 1995.  (http://www.latexnet.org/~csmith/sausage.html and https://magazine.cycleworld.com/article/1995/3/1/song-of-the-sausage-creature)

Sold/Emeritus
1973 CB750K2 "Bionic Mongrel" (http://forums.sohc4.net/index.php?topic=132734.0) - Sold
1977 CB750K7 "Nine Lives" Restomod (http://forums.sohc4.net/index.php?topic=50490.0) - Sold
2005 RVT1000RR RC51-SP2 "El Diablo" - Sold
2016+ Triumph Thruxton 1200 R (http://forums.sohc4.net/index.php/topic,170198.0.html) - Sold

Offline Desert Dan

  • Some might call me an
  • Enthusiast
  • **
  • Posts: 137
Re: High altitude 73 CB500 K2 daily driver restoration
« Reply #16 on: March 02, 2015, 07:31:38 AM »
Because of the Hy-Vo style drive chain and the tiny bits of ferrous 'stuff' you're picking up, maybe consider a magnetic drain plug? I saw some at the O'Reilly's Auto near here last summer that fit these bikes. The grit is hard on those many thin plates in the slinky Hy-Vo chains.

The porting part is done: should I post some pix of it here?

Will do, Ill pick up a magnetic drain plug asap, I was going to put hard drive magnets on the oil filter for the initial ring break in so maybe Ill just keep using those as well until the ferrous material dissipates. And as Cafe Racer Fan said, " Heck Yes" to posting the pictures of the port job. Thanks again for porting the head and all the advice you've provided.

Offline Desert Dan

  • Some might call me an
  • Enthusiast
  • **
  • Posts: 137
Re: High altitude 73 CB500 K2 daily driver restoration
« Reply #17 on: March 23, 2015, 11:47:14 PM »
Quick update on the top end rebuild, according to Mark the machine shop is a few weeks behind on work so the head and cylinders are still in limbo. In the mean time Ive been Ive been re-organizing my shop and ordering the last few pieces I require for the build. I bought a new cam chain slipper and guide, the slipper was easy to find new from David Silver spares but I had to dig deep and order an NOS cam chain guide from ebay.
 
 I hung up some peg board to clean up one of my benches


Some accouterments to degree in the stock cam


Offline Stev-o

  • Ain't no
  • Really Old Timer ...
  • *******
  • Posts: 34,461
  • Central Texas
Re: High altitude 73 CB500 K2 daily driver restoration
« Reply #18 on: March 24, 2015, 04:25:40 AM »
Subscribed....
'74 "Big Bang" Honda 750K [836].....'76 Honda 550F.....K3 Park Racer!......and a Bomber!............plus plus plus.........

Offline HondaMan

  • Someone took this pic of me before I became a
  • Really Old Timer ...
  • *******
  • Posts: 14,022
  • ...not my choice, I was nicknamed...
    • Getting 'em Back on the Road
Re: High altitude 73 CB500 K2 daily driver restoration
« Reply #19 on: March 24, 2015, 10:53:33 AM »
I'm waiting for the head to return from the mill-flat job so I can post those porting pix...
See SOHC4shop@gmail.com for info about the gadgets I make for these bikes.

The demons are repulsed when a man does good. Use that.
Blood is thicker than water, but motor oil is thicker yet...so, don't mess with my SOHC4, or I might have to hurt you.
Hondaman's creed: "Bikers are family. Treat them accordingly."

Link to Hondaman Ignition: http://forums.sohc4.net/index.php?topic=67543.0

Link to My CB750 Book: https://www.lulu.com/search?adult_audience_rating=00&page=1&pageSize=10&q=my+cb750+book

Link to website: www.SOHC4shop.com

Offline SOHC4 Cafe Racer Fan

  • Speak up, Whipper-Snapper! I'm a
  • Really Old Timer ...
  • *******
  • Posts: 15,733
  • SOHC/4 Member #1235
Re: High altitude 73 CB500 K2 daily driver restoration
« Reply #20 on: March 24, 2015, 12:38:57 PM »
I'm waiting for the head to return from the mill-flat job so I can post those porting pix...

 ;D ;D ;D
1975 CB550K1 "Blue" Stockish Restomod (http://forums.sohc4.net/index.php?topic=135005.0)
1975 CB550F1 frame/CB650 engine hybrid "The Hot Mess" (http://forums.sohc4.net/index.php/topic,150220.0.html)
2008 Triumph Thruxton (http://forums.sohc4.net/index.php/topic,190956.0.html)
2014 MV Agusta Brutale Dragster 800
2015 Yamaha FZ-09 (http://forums.sohc4.net/index.php/topic,186861.0.html)

"There are some things nobody needs in this world, and a bright-red, hunch-back, warp-speed 900cc cafe racer is one of them — but I want one anyway, and on some days I actually believe I need one.... Being shot out of a cannon will always be better than being squeezed out of a tube. That is why God made fast motorcycles, Bubba." Hunter S. Thompson, Song of the Sausage Creature, Cycle World, March 1995.  (http://www.latexnet.org/~csmith/sausage.html and https://magazine.cycleworld.com/article/1995/3/1/song-of-the-sausage-creature)

Sold/Emeritus
1973 CB750K2 "Bionic Mongrel" (http://forums.sohc4.net/index.php?topic=132734.0) - Sold
1977 CB750K7 "Nine Lives" Restomod (http://forums.sohc4.net/index.php?topic=50490.0) - Sold
2005 RVT1000RR RC51-SP2 "El Diablo" - Sold
2016+ Triumph Thruxton 1200 R (http://forums.sohc4.net/index.php/topic,170198.0.html) - Sold

Offline Desert Dan

  • Some might call me an
  • Enthusiast
  • **
  • Posts: 137
Re: High altitude 73 CB500 K2 daily driver restoration
« Reply #21 on: March 25, 2015, 03:06:06 PM »
I'm waiting for the head to return from the mill-flat job so I can post those porting pix...
Im sure Im not the only one who's chomping at the bit to see pictures of your handiwork, this bike has turned in to quite the fixation for me. You were uncannily correct when you told me you cold make the weather change by uncovering your motorcycle, Im currently looking at a fresh inch of snow on the ground. When the time comes to reassemble the engine Im going to see if I can borrow some of my brother's camera gear so I can thoroughly document the process and maybe put together a time lapse video.

Offline Desert Dan

  • Some might call me an
  • Enthusiast
  • **
  • Posts: 137
Re: High altitude 73 CB500 K2 daily driver restoration
« Reply #22 on: March 26, 2015, 04:25:26 PM »
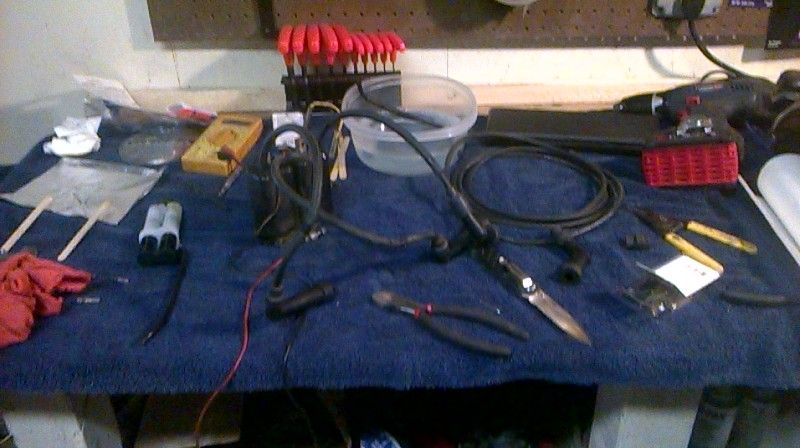
So I was puttering around my shop today and decided to tackle the job of replacing the spark plug wires on my coils. The wires on my coils worked well enough but they were stiff, brittle, and a tad on the short side. I used a method I had read about on the forums some months ago and documented the procedure.
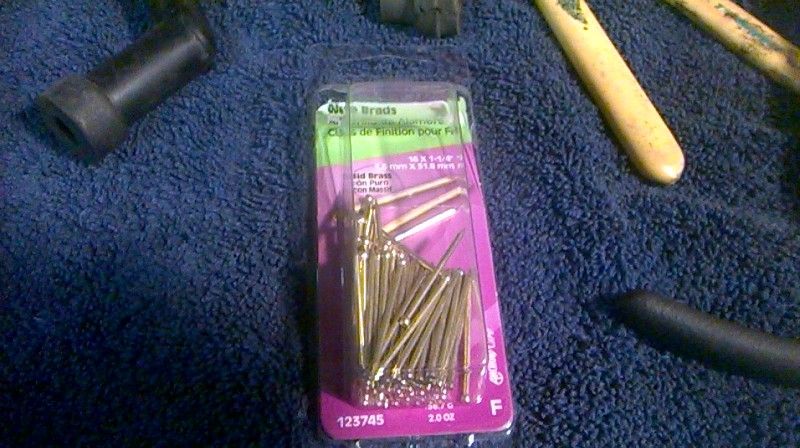
The materials I used were 2 part epoxy, brass brad nails, and 6 feet of 7mm spark plug wire purchased at my local Orielly's.
I first cut off the old wire at the base as close to the coil as I could get
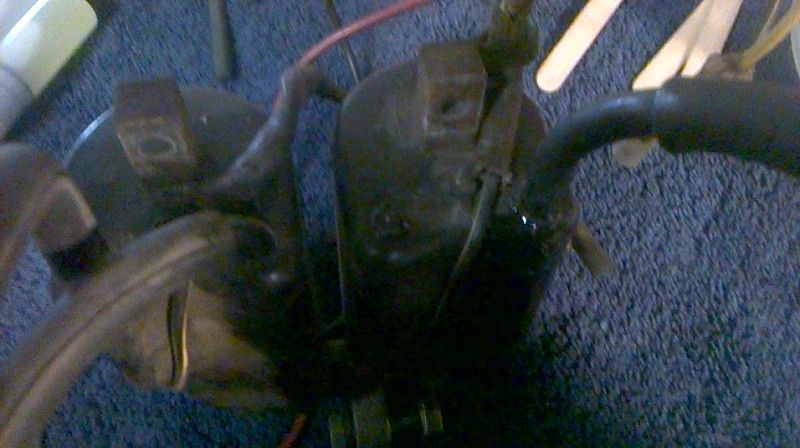
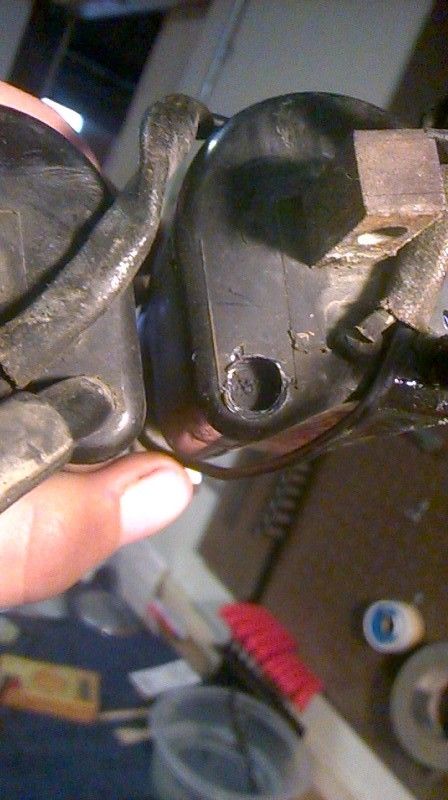
Then using a 3/16 drill bit I drilled in to the old wire roughly a quarter inch
I used brass brad nails to fasten the new wire to the internal old wire, I ground them down to roughly 1/2in in length sharpening both ends. I took the modified nail and stuck it in to the old coil wire and filled around it with 2 part epoxy.
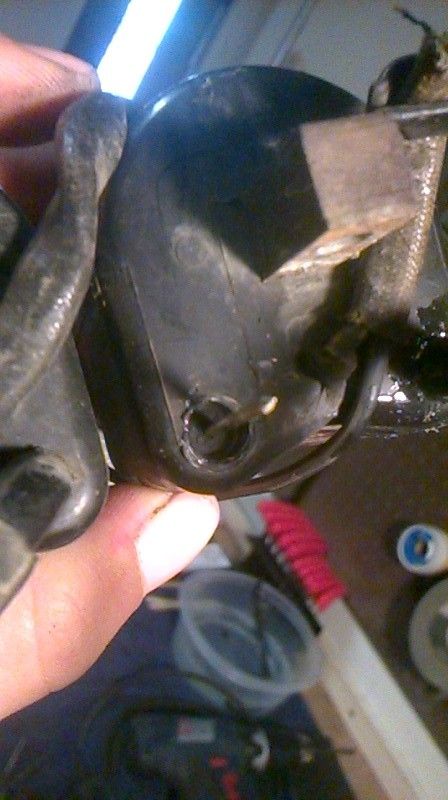

I used warm water and soap to remove the covering of the old wire and apply it to the new one.
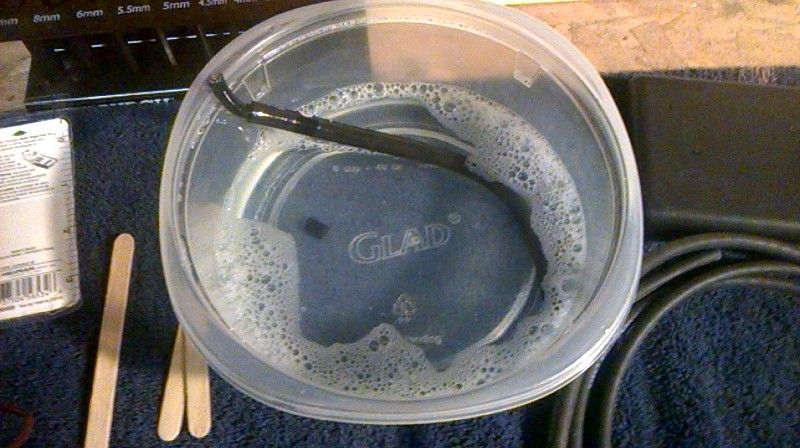
I then pushed the new wire on to the brad nail pushing it all the way in to the drilled out area of the coil so that the epoxy oozed out. After that it was rinse and repeat for the following four wires.
Here are the completed coils next to the old wires, I gave myself a generous amount of extra wire as I can always shorten them in the future.
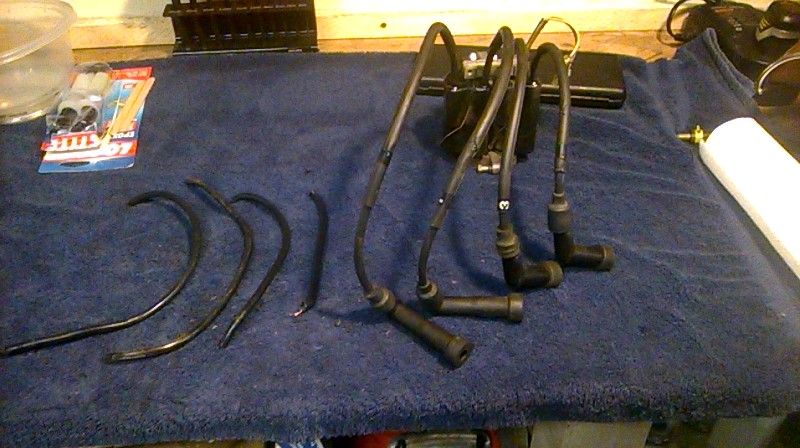
It is crucial when pushing the new wire on to the coil that you don't push it on at an angle allowing the brad nail to poke through the wire, if that happens and you don't catch it you're going to have a bad time. Over all I spent about 15 bucks in materials and it took a little less than two hours of tinkering in my shop.

Offline brett_bike

  • Hot Shot
  • ***
  • Posts: 448
  • '73 CB500 Four K2
Re: High altitude 73 CB500 K2 daily driver restoration
« Reply #23 on: April 02, 2015, 09:22:23 AM »
Subscribed

Offline Desert Dan

  • Some might call me an
  • Enthusiast
  • **
  • Posts: 137
Re: High altitude 73 CB500 K2 daily driver restoration
« Reply #24 on: April 02, 2015, 04:20:57 PM »
Allot of progress to report and a major setback, I got the heads and cylinders back from Mark (aka) Hondaman and the porting looks most excellent and the decking and valve grind went all according to plan. I picked up the head and cylinders this last sunday, I painted them and a few other parts monday and began assembly tuesday. They say pictures are worth a thousand words so Ill let them do the talking.


I used Dupli-Color DE1615 engine enamel, I left the original honda paint underneath the breather cover to compare to the new color on the rest of the valve cover


Home made ring compressor made with 3in pvc pipe


Finding true TDC


The more observant among you may have noticed that the cam chain tensioner was not installed until the head was on, and to my horror and despair I learned how crucial it is that it be installed simultaneously with the cylinder block. I was working out of the Clymers manual which is woefully inadequate for this procedure, it mentions during disassembly that the cylinders may need to be raised 20mm to facilitate removal of the tensioner but nothing is mentioned about how the only way to get the tensioner to seat properly in the case is to install it while the cylinders are 20mm above the case. So with all that hard work I have stripped it back down and am currently awaiting new head and base gaskets. If any one has any tips on how to properly install the tensioner that would be greatly appreciated. It seems to me that the tensioner would break as the distance from the slot it rests in in the case to adjustment hole in the cylinder block is to small and would snap the adjustment bolt off of the tensioner.