Author Topic: 1972 CB350 For the Daughter  (Read 68058 times)

0 Members and 1 Guest are viewing this topic.

Offline grcamna2

  • Not a
  • Really Old Timer ...
  • *******
  • Posts: 15,659
  • I love to restore & travel. Keep'em Going Strong !
Re: 1972 CB350 For the Daughter
« Reply #75 on: September 30, 2016, 04:29:23 PM »
I hope you are able to keep the fuel tank as close to the original mounting height in the back as possible..
75' CB400F/'bunch o' parts'
  I love the small ones too !
Do your BEST...nobody can take that away from you.

Offline Harsh

  • Expert
  • ****
  • Posts: 1,103
  • 74 CB750 and two 72 CB350's
Re: 1972 CB350 For the Daughter
« Reply #76 on: September 30, 2016, 05:13:13 PM »
I need to make sure the backbone of the tank won't hit the frame Bill, but other than that I don't see a real issue being slightly lower in the rear.  You may not even notice it visually.

I thought about that Cal, but does that provide the proper/enough of rigidity?

Offline grcamna2

  • Not a
  • Really Old Timer ...
  • *******
  • Posts: 15,659
  • I love to restore & travel. Keep'em Going Strong !
Re: 1972 CB350 For the Daughter
« Reply #77 on: September 30, 2016, 05:17:52 PM »
I need to make sure the backbone of the tank won't hit the frame Bill, but other than that I don't see a real issue being slightly lower in the rear.  You may not even notice it visually.

I thought about that Cal, but does that provide the proper/enough of rigidity?

I was thinking of the visual lines of the bike when you're finished.
75' CB400F/'bunch o' parts'
  I love the small ones too !
Do your BEST...nobody can take that away from you.

Offline Harsh

  • Expert
  • ****
  • Posts: 1,103
  • 74 CB750 and two 72 CB350's
Re: 1972 CB350 For the Daughter
« Reply #78 on: September 30, 2016, 05:24:03 PM »
Ahh yah.  Didn't think of that.

Offline Harsh

  • Expert
  • ****
  • Posts: 1,103
  • 74 CB750 and two 72 CB350's
Re: 1972 CB350 For the Daughter
« Reply #79 on: October 01, 2016, 11:50:23 AM »
All right, I got the rear brace made.  It was a bit of a pain to get the bend in since I don't really have the tools for metal working, but it is done.


The front is another story.  I am terrified of cutting off the rear tank mounting bracket.  However, I don't see another way.  I am going to post this and bounce my thoughts off others before I go to cutting.  Maybe someone will have another idea or confirm my thoughts.


OK...There is 1/2" between the underside of the tank and the peak in the frame.
15/16" from the frame where the bracket is welded to to the top of the bracket.
The flat stock I would weld on is 3/16".
Subtract the flat stock from the total distance of the bracket and I am left with 3/4".
The peak is 3/16".
If I were to grind it down I would be down to 9/16".
The rubber cushion for the rear of the tank is 5/16".
That would give me 1/4" of clearance under the tank.

If I were to leave the peak I would have 1/16" of clearance under the tank.

Offline Harsh

  • Expert
  • ****
  • Posts: 1,103
  • 74 CB750 and two 72 CB350's
Re: 1972 CB350 For the Daughter
« Reply #80 on: October 01, 2016, 01:17:01 PM »
I may have figured out another way.  The first pic is how the seat sits with the rubber piece in place and the second one is without the rubber piece.  I noticed that without the rubber piece the seat actually contacts the frame.  The difference is 5/8".  The legs on the bracket are 1/2.  So if I were to cut the bracket legs off and weld the bracket directly to the frame I would be in a much better position.  I like this idea better because it allows me to keep the stock mounting bracket and rubber cushion.  And since I just thought of it, if I were to weld the bracket to the underside of the frame I would eat up that extra 1/8".  I think I would have to slide the bracket back a hair to clear the down tube, but there is plenty of room to still secure the tank in the rubber cushion.


Offline RAFster122s

  • I feel like a really really
  • Really Old Timer ...
  • *******
  • Posts: 12,581
  • SOHC4 member # 2605
Re: 1972 CB350 For the Daughter
« Reply #81 on: October 01, 2016, 10:13:56 PM »
How hard would it be to pull the cover and reshape the nose of the seat to blend in better?  Granted it is probably some skills you don't have experience with but, that would be my approach.  Also, you only develop new skills by trying or doing.  Why are you or your daughter so married to using this seat? It sounds like a wider version with a new cover could work better.  Split the metal pan in two and weld in a new strip to widen. Then the seat cover is remade to that added width and any trims or tucks.  Way easier in words of course.

Block up under the seat b pan with wood to support the pan.  Make a clamp like a bench hold down or a drill press hold down clamp.  A clamp that can hold the seat can be made with a two layers of plywood with a center layer of a hard wood or another layer of plywood with a slot to fit the end of a clamp's  screw assembly.  Drill the clamp arm for a pair of bolts to go through the clamp's arm.  Epoxy or Gorilla glue (brown) version the wood layup.  A couple heavy steel angle stock with plate to sandwich the load over a broader area of the vertical arm. It screws down into your bench or if you want to have it repeatable use T nuts on underside of bench or install threaded inserts into your bench.  The clamp is a big  L shaped assembly to give you the ability to clamp down vertically reaching deeper across the object you are securing to the table top.  This gives you the abilty to bend or reshape the metal a bit easier.  A few smacks of a broad cold chisel, not enough to cut but enough to form a break linen the underside of the pan where you need it to start bending in a line
 Helps get the metal moving along that line. Ideally going slow to start the bend.  If it is curved you are going to have to cut it out and reweld or take several tabs to get it to bend where you need it.  A big air compressor and air cutoff wheel is the best soliution for cutting if the disc isn't too large. Air die grinders can also be used with polishing wheels/buffs and ones with a long neck and low profile are more expensive but worth the investment if you plan to do much polishing work.  Watch the CFM rating on the airtool as die grinders require lots of air and lots of pressure to operate effectively.  Adjusting the pressure outpu to turn slower or faster, but the cubic feet per minute rating determines how big a tank and size compressor needed.

Dremel tools can work but the cutoff wheels are very costly and you will go through many of them. Their advantage is the slots are very narrow.  Drilling a hole at the spot you want the slot at the end of the slot can prevent the sheet metal from cracking at that point is it is an area that has much stress.
Good luck on the project it is good seeing your threads again.  Was shocked to read of the injuries, glad you are doing better.  Thanks for your years of service in your Navy career and congrats on your retirement.  Hope the new job is going well.

David

David- back in the desert SW!

Offline Harsh

  • Expert
  • ****
  • Posts: 1,103
  • 74 CB750 and two 72 CB350's
Re: 1972 CB350 For the Daughter
« Reply #82 on: October 02, 2016, 10:39:01 AM »
We are married to the seat because we paid a significant amount of money for it.  The pan is fiberglass and the cover is riveted to it.  I thought about heating the pan and pulling it outward for a bit of clearance, but I would certainly melt the naugahyde before the fiberglass got warm enough to manipulate.  I have to look at it some more, but I might be able to make some relief cuts on the underside at the front where the seat makes contact with the rubber tank mount.  I think there is some foam on the underside than be removed to provide clearance.

I was thinking about using some starboard as a base for the seat.  I used it on my 750 and it worked out well.

Offline Harsh

  • Expert
  • ****
  • Posts: 1,103
  • 74 CB750 and two 72 CB350's
Re: 1972 CB350 For the Daughter
« Reply #83 on: October 02, 2016, 11:09:32 AM »
So a guy on the twins forum took some pics of what he did to make his seat fit.  Which got me thinking.


The marks are where the rubber piece make contact with the seat.  If I were to drill out the rivets I could pull back the cover enough the make a relief cut in the fiberglass pan and foam.  I could then spray some adhesive and press the cover to the newly cut foam and to the fiberglass relief.  After that rivet or staple the remaining cover into place.

Offline RAFster122s

  • I feel like a really really
  • Really Old Timer ...
  • *******
  • Posts: 12,581
  • SOHC4 member # 2605
Re: 1972 CB350 For the Daughter
« Reply #84 on: October 03, 2016, 02:58:25 AM »
I figured it was expensive as it looks very nice. Yeah, the rivets can be drilled out and replaced with a few nips and tucks as you mentioned.  You don't want it to rub against the tank or vibrations will cause it to wear a hole through the tank's paint, just stating the obvious.  BikeExif did a piece on how to build your own cafe racer...it talks about lines and stuff like that.
I figure whatever you do you and the daughter will decide.  What is your daughter's specialty in the Navy?  Is she in electronics as well.  Recall Physics and Electronics classes where they taught current  flow in opposite directions...really confused lots of guys I went through both classes with eons ago in college (I have degree in Electronics Engineering Technology).

I am sure your daughter will be pleased with the end results... Maybe a road trip up to Cals with the frame and cutting the tubes up behind the tank and replacing it with tubing would be better?  You could eliminate some of the compromises you are experiencing.  Having the loop bent by a local pipe/metal working shop for the loop or buy one from Harrisluv would speed things along with having the tubing Cal would recommend.  Need a countersink bit that could clean up the end of the pipes to eliminate any internal burrs.

Best of luck however you decide to address the issues. Your previous builds have shown you have a great eye for what works and you have built some nice bikes...

David
David- back in the desert SW!

Offline Harsh

  • Expert
  • ****
  • Posts: 1,103
  • 74 CB750 and two 72 CB350's
Re: 1972 CB350 For the Daughter
« Reply #85 on: October 03, 2016, 08:32:59 AM »
Thanks for the info David.  My daughter is a Jet Engine Mechanic  (AD).  She repairs the engines that are in the F/A-18 Hornet.  Or at least she was an AD.  The Navy just made a huge (and ginormously dumb) move and has done away with all rates.  It was a PC thing that started with removing the word "man" from ratings.  Rates were a huge source of pride and tradition and are now a thing of the past.  I was an Aviation Electronics Technician or AT.  In the new system I would be an A210.

Offline RAFster122s

  • I feel like a really really
  • Really Old Timer ...
  • *******
  • Posts: 12,581
  • SOHC4 member # 2605
Re: 1972 CB350 For the Daughter
« Reply #86 on: October 03, 2016, 10:54:34 AM »
I was very interested in becoming a naval electronic and was interested in becoming an avionic specialist and because I was 17 graduating high school my parents were against it. They pushed me to go to college for a year instead doing the electronic program they had there... I didn't change that course.  I was also considering nuclear power program as my test scores had easily placed me in the pool of eligible candidates. The recruiter was blowing sunshine and he made the mistake of telling me immediately after taking the nuclear power test that he had reviewed my test and I had scored a high 90sand I knew that was setting off the BS meter.  He went to sea duty and the new recruiter provided the real scores, or a different number. Low 90s so, it confirmed the suspicions.  I didn't trust that I would be able to do what I wanted to do as a result and if I washed out of nuclear power I would likely get stuck into doing whatever the navy chose to put me in...6 years of that or 4 could be very unpleasant.  Understand your pride as I knew several Naval seamen and a few officers and the pride was evident.  Cross training was very appealing to me as well.  The USAF didn't offer that flexibility or the choices that appealed to me.  I regret I didn't pursue that path.   I did move into government contracting working in part of my career but not for the Navy...  My dad had been in the Army during Korean conflict and contracted double pneumonia and reclassed as a cook and ended up stateside as a result.  He served at Ft Knox and Ft Belvior; I worked some on Ft Belvior and it was interesting the changes from what he had described, it was very different from when he had been there but, I didn't go exploring as I didn't have the need to know what it was like nor what they had there... The problems that could come with that would be a foolhardy endeavor.

Best of luck to your daughter.  Bean counters and pc stuff that negatively affects the operation, policy and culture tends to really mess with getting the job done and being able to do tbe best job you can do, be it commericial or govt world... seen impacts in both. 
The jet engine mechanic would be cool too, not quite as bad  these days where dropping a wrench when working on top of an engine could spell pulling an engine and a world of hurt as a result.  But with the composite modern aircraft it might be true again.
I would imagine technology has improved greatly for retrieval methods to prevent that need as well.

David


David- back in the desert SW!

Offline Harsh

  • Expert
  • ****
  • Posts: 1,103
  • 74 CB750 and two 72 CB350's
Re: 1972 CB350 For the Daughter
« Reply #87 on: November 02, 2016, 01:54:18 PM »
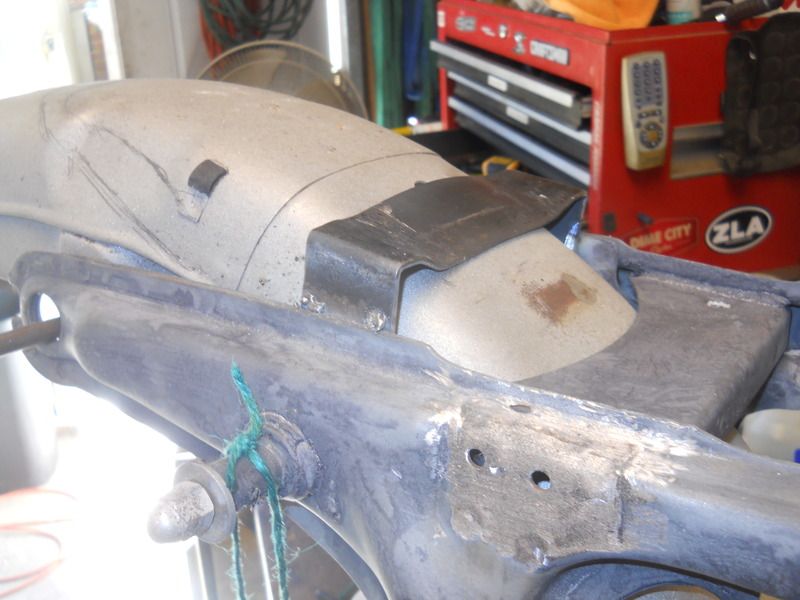
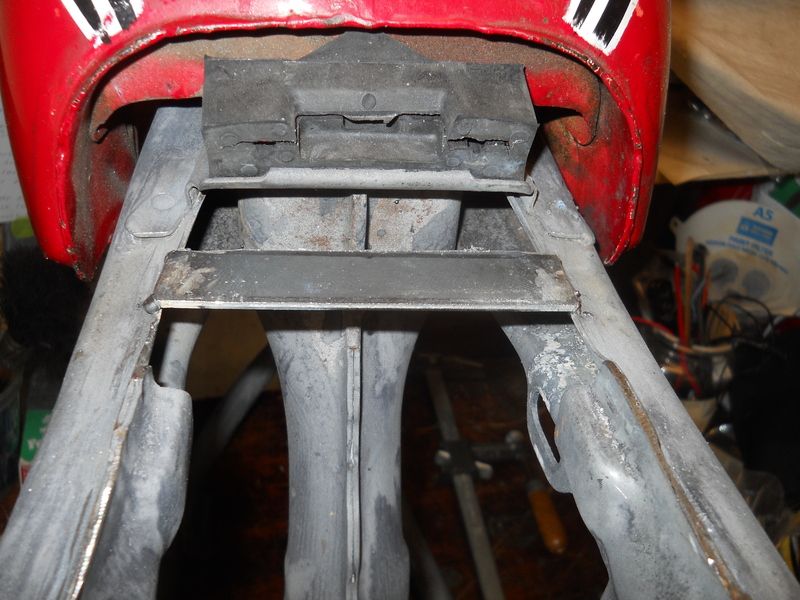
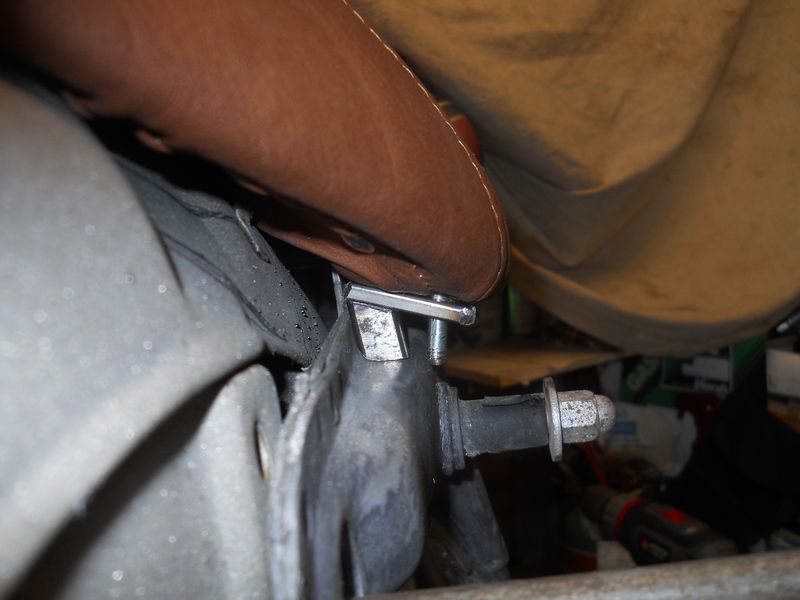
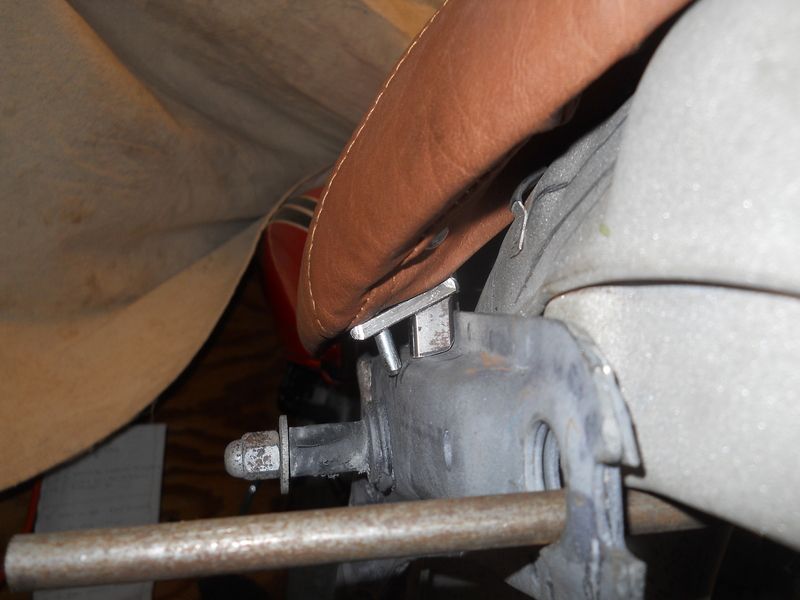
Wow...over a month since my last update.  Things have been pretty slow on the build lately.  I have trimmed the seat so that it fits around the tank a lot better.  I also tacked in a few brackets to secure the seat and rear fender.  I have been practicing my welding, but I am not going to be able to get good enough fast enough to do a quality job so I am going to have a buddy do the finish welding for me.  The rear of the seat is secured with a threaded pin that once I get everything together I will drill a cross hole in and secure it with a hairpin clip and some Loctite.  That will allow the seat to be easily removed if need be.

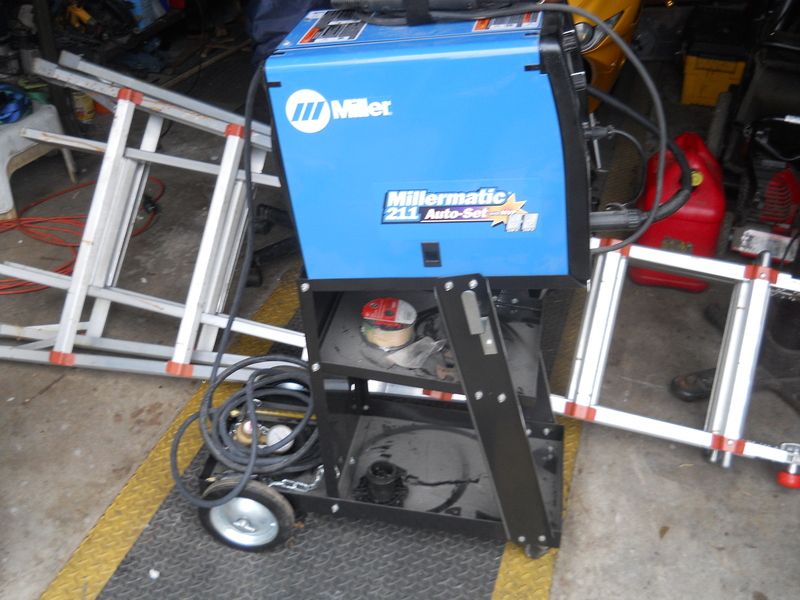
Picked up this little bad boy.


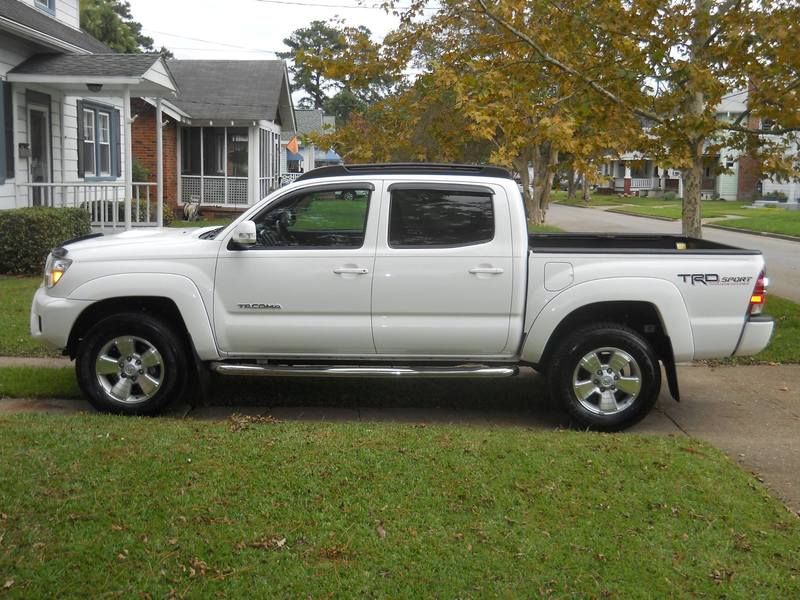
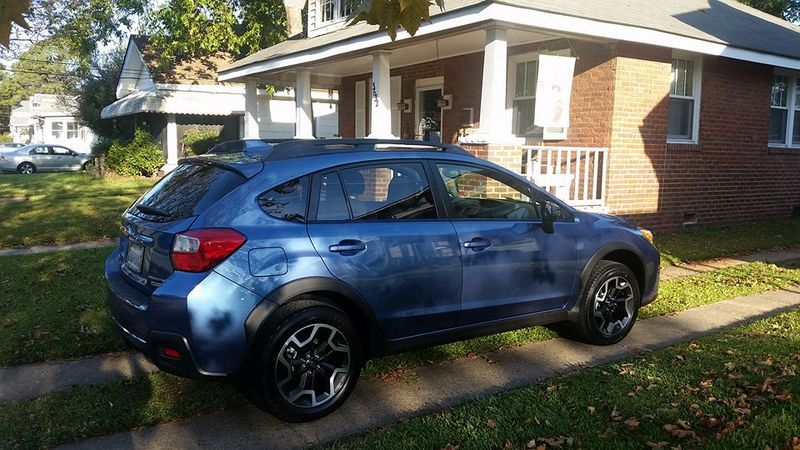
I got tired of trying to balance my time between working on my truck, working on the wife's car, going to the race track, and working the bike so I broke down and bought new vehicles.  Two less headaches and a lot more free time.

I picked up a 2014 Toyota Tacoma with 19K on the clock in immaculate condition and the wife got a 2016 Subaru Crosstrek.


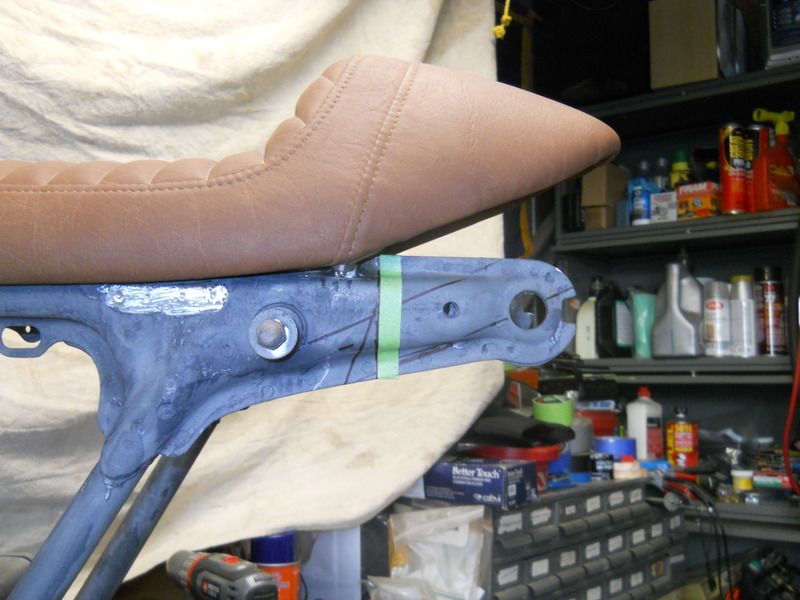
Finished the mounting brackets today when I got home.  Now onto cutting off what I don't need.

We have three (maybe four) options before us.

Straight up and down.


This one follows the seam on the seat.  I could probably move it a bit to the left.


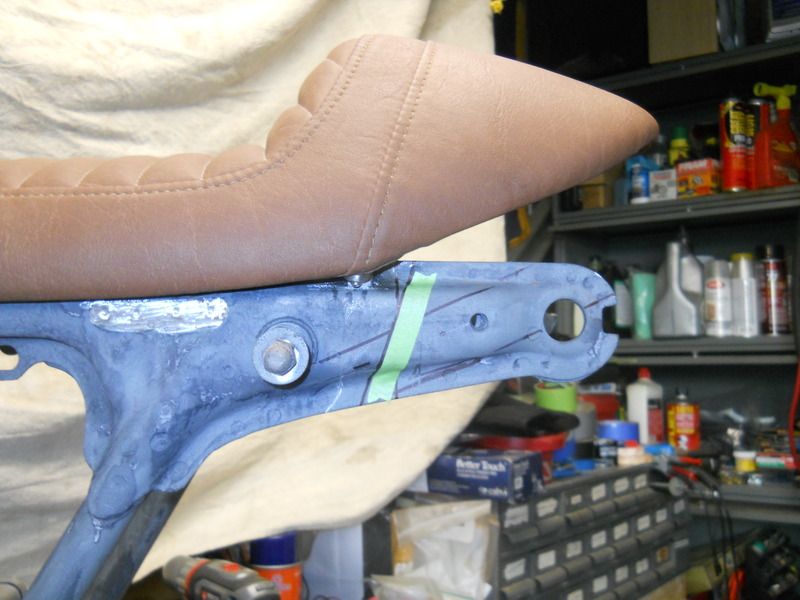
This one follows the angle of the bottom of the seat.


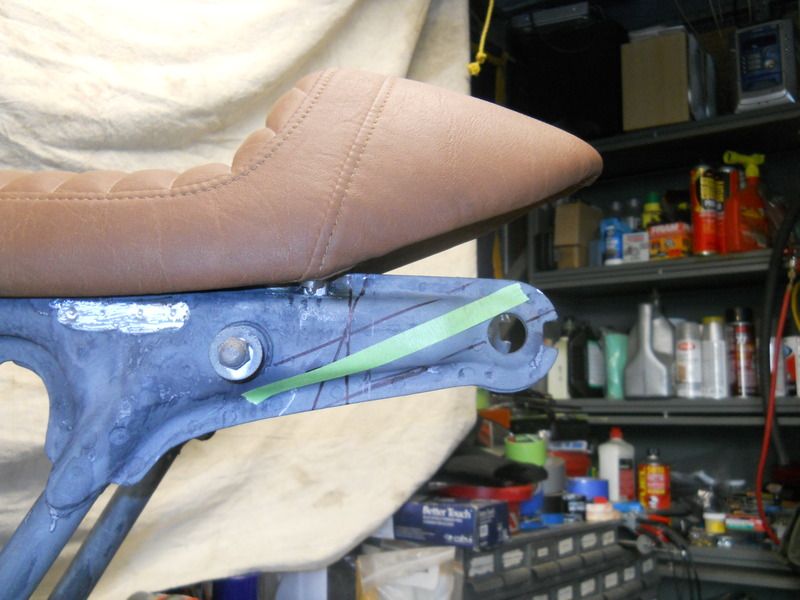
Or I could do a combo of them.

I know which one I like the best, but I want to hear what you all think.

Offline grcamna2

  • Not a
  • Really Old Timer ...
  • *******
  • Posts: 15,659
  • I love to restore & travel. Keep'em Going Strong !
Re: 1972 CB350 For the Daughter
« Reply #88 on: November 02, 2016, 02:19:36 PM »
Nice automobiles Harsh  :)
I think the supports underneath the center/middle portion of the seat needs to be solid so the seat pan will stay centered w/ the weight of the rider to keep it in a neutral position,fully supported underneath in a few places w/ rubber bumpers attached in at least 4 places against your frame/braces.Then the seat latch assm. won't have any stress on it to cause problems later. imo
Nice Miller mig welder also !  I will need to learn how to weld soon myself;did you take any courses ?
75' CB400F/'bunch o' parts'
  I love the small ones too !
Do your BEST...nobody can take that away from you.

Offline Harsh

  • Expert
  • ****
  • Posts: 1,103
  • 74 CB750 and two 72 CB350's
Re: 1972 CB350 For the Daughter
« Reply #89 on: November 02, 2016, 02:31:46 PM »
And a fourth option.  This one follows the angle of the frame tube.


Nice automobiles Harsh  :)
I think the supports underneath the center/middle portion of the seat needs to be solid so the seat pan will stay centered w/ the weight of the rider to keep it in a neutral position,fully supported underneath in a few places w/ rubber bumpers attached in at least 4 places against your frame/braces.Then the seat latch assm. won't have any stress on it to cause problems later. imo
Nice Miller mig welder also !  I will need to learn how to weld soon myself;did you take any courses ?

The center part of the seat will be supported.  I just haven't got to that point yet.  No courses yet, but I have looked into some.  The last time I welded was 30 years ago and that was stick welding.
« Last Edit: November 02, 2016, 02:43:02 PM by Harsh »

Offline Restoration Fan

  • My wife will never call me
  • Master
  • *****
  • Posts: 1,956
Re: 1972 CB350 For the Daughter
« Reply #90 on: November 02, 2016, 02:49:04 PM »
Wow, nice Miller welder.  You don't play around when you buy a welder!

(Also, nice choice on vehicles.  Both of those tend to be cars that have good longevity.)
Ron

Stella - Logan's Senior Project    78 750K http://forums.sohc4.net/index.php?topic=141761.0

Logan's Reward - CB500 and CB550 Cafes    http://forums.sohc4.net/index.php/topic,147787.0.html

Offline RAFster122s

  • I feel like a really really
  • Really Old Timer ...
  • *******
  • Posts: 12,581
  • SOHC4 member # 2605
Re: 1972 CB350 For the Daughter
« Reply #91 on: November 02, 2016, 03:25:09 PM »
Good looking progress and nice cars too. 
It looks like it is coming together.  Just have to tote some stuff up to Calj's to bribe him to come down, he can really handle welding a pretty bead and teach you some stuff too as well.  He has a few welding porn pics of his stuff around the forum.
David- back in the desert SW!

Offline grcamna2

  • Not a
  • Really Old Timer ...
  • *******
  • Posts: 15,659
  • I love to restore & travel. Keep'em Going Strong !
Re: 1972 CB350 For the Daughter
« Reply #92 on: November 02, 2016, 04:46:25 PM »
Steven,
I would install the rubber support bumpers before you weld-in the latch mech.
75' CB400F/'bunch o' parts'
  I love the small ones too !
Do your BEST...nobody can take that away from you.

Offline Harsh

  • Expert
  • ****
  • Posts: 1,103
  • 74 CB750 and two 72 CB350's
Re: 1972 CB350 For the Daughter
« Reply #93 on: November 02, 2016, 04:59:18 PM »
Why?  Once I get the brackets fully welded in I can/will adjust the supports bumpers to the height necessary.  I want the seat to sit flush against the welded in bracket that the pins slide into.  As the seat goes towards the tank the distance from the frame rails to the seat gets thinner/shorter.  I was planning on making a solid plate that goes across the battery area across the frame rails to support the seat.  The rear will have bumpers that are bolted into the stock curved frame support that goes across the frame just forward of the piece I tacked in.

Offline grcamna2

  • Not a
  • Really Old Timer ...
  • *******
  • Posts: 15,659
  • I love to restore & travel. Keep'em Going Strong !
Re: 1972 CB350 For the Daughter
« Reply #94 on: November 02, 2016, 05:33:21 PM »
Why?  Once I get the brackets fully welded in I can/will adjust the supports bumpers to the height necessary.  I want the seat to sit flush against the welded in bracket that the pins slide into.  As the seat goes towards the tank the distance from the frame rails to the seat gets thinner/shorter.  I was planning on making a solid plate that goes across the battery area across the frame rails to support the seat.  The rear will have bumpers that are bolted into the stock curved frame support that goes across the frame just forward of the piece I tacked in.

oh,ok.
75' CB400F/'bunch o' parts'
  I love the small ones too !
Do your BEST...nobody can take that away from you.

Offline Harsh

  • Expert
  • ****
  • Posts: 1,103
  • 74 CB750 and two 72 CB350's
Re: 1972 CB350 For the Daughter
« Reply #95 on: November 03, 2016, 04:57:49 AM »
I did some crappy photchopping and I am down to these.  I wish I had taken the pics from the same distance as it would make it a tiny bit easier to compare the two.


Offline Harsh

  • Expert
  • ****
  • Posts: 1,103
  • 74 CB750 and two 72 CB350's
Re: 1972 CB350 For the Daughter
« Reply #96 on: November 03, 2016, 08:13:35 AM »
I was going to block off the open end after I cut it.  Which way are you suggesting I run a hoop?  Either way would cause some issues.  The red version would interfere with the tail light at the rear of the seat.  I was planning on insetting a cat eye tail light.  The black version might interfere with the remaining part of the fender and maybe wheel clearance.


Offline SOHC4 Cafe Racer Fan

  • Speak up, Whipper-Snapper! I'm a
  • Really Old Timer ...
  • *******
  • Posts: 15,556
  • SOHC/4 Member #1235
Re: 1972 CB350 For the Daughter
« Reply #97 on: November 03, 2016, 09:15:06 AM »
The hoop could kick upwards into the recess of the seat -- perhaps follow the rearward seam line of the seat. 

How are you attaching the taillight? 
1975 CB550K1 "Blue" Stockish Restomod (http://forums.sohc4.net/index.php?topic=135005.0)
1975 CB550F1 frame/CB650 engine hybrid "The Hot Mess" (http://forums.sohc4.net/index.php/topic,150220.0.html)
2008 Triumph Thruxton (http://forums.sohc4.net/index.php/topic,190956.0.html)
2014 MV Agusta Brutale Dragster 800
2015 Yamaha FZ-09 (http://forums.sohc4.net/index.php/topic,186861.0.html)

"There are some things nobody needs in this world, and a bright-red, hunch-back, warp-speed 900cc cafe racer is one of them — but I want one anyway, and on some days I actually believe I need one.... Being shot out of a cannon will always be better than being squeezed out of a tube. That is why God made fast motorcycles, Bubba." Hunter S. Thompson, Song of the Sausage Creature, Cycle World, March 1995.  (http://www.latexnet.org/~csmith/sausage.html and https://magazine.cycleworld.com/article/1995/3/1/song-of-the-sausage-creature)

Sold/Emeritus
1973 CB750K2 "Bionic Mongrel" (http://forums.sohc4.net/index.php?topic=132734.0) - Sold
1977 CB750K7 "Nine Lives" Restomod (http://forums.sohc4.net/index.php?topic=50490.0) - Sold
2005 RVT1000RR RC51-SP2 "El Diablo" - Sold
2016+ Triumph Thruxton 1200 R (http://forums.sohc4.net/index.php/topic,170198.0.html) - Sold

Offline grcamna2

  • Not a
  • Really Old Timer ...
  • *******
  • Posts: 15,659
  • I love to restore & travel. Keep'em Going Strong !
Re: 1972 CB350 For the Daughter
« Reply #98 on: November 03, 2016, 10:33:11 AM »
The hoop could kick upwards into the recess of the seat -- perhaps follow the rearward seam line of the seat. 

How are you attaching the taillight?

That hoop would add lot's of strength to that area too.
75' CB400F/'bunch o' parts'
  I love the small ones too !
Do your BEST...nobody can take that away from you.

Offline Harsh

  • Expert
  • ****
  • Posts: 1,103
  • 74 CB750 and two 72 CB350's
Re: 1972 CB350 For the Daughter
« Reply #99 on: November 03, 2016, 11:06:39 AM »
The hoop could kick upwards into the recess of the seat -- perhaps follow the rearward seam line of the seat. 

How are you attaching the taillight? 

That is what I had initially thought, but then I started to over think it.

I will be making a small bracket that will secure the tail light to the fender.  I am trimming the fender so that it isn't really visible when you look at the bike, but it will still provide protection.  You can see a couple of pencil lines where I traced around the bottom of the seat in one of the earlier pictures.


That hoop would add lot's of strength to that area too.

I was thinking the same exact thing.  I think it will especially help keeping the frame from twisting behind he shock mounts.


Thanks for the suggestions fellas.  Ahh, I just love more work.