Author Topic: 1972 CB350 For the Daughter  (Read 65173 times)

0 Members and 1 Guest are viewing this topic.

Offline Harsh

  • Expert
  • ****
  • Posts: 1,103
  • 74 CB750 and two 72 CB350's
Re: 1972 CB350 For the Daughter
« Reply #50 on: August 30, 2016, 01:33:26 PM »
So I have a bit of weirdness going on.  The other day when I put the front end together the caliper bolts I had bagged and tagged did not fit in their respective holes.  They were M6x33 vice M8x33.  I scratched my head for a while as I remember taking them off and putting them in the ziploc bag.  I hunted through all of the bagged parts and did not find the correct bolts.  When I secured the rotor for assembly I used a bolt from my parts bin.

That is missing bolts part one.  While I was searching for the above bolts I came across the bag that has the triple pinch bolts in it.  There was only one in the bag.  No holes in the bag and it was sealed.  Of course I had the bolt, D washer, and nut all together so one side is now missing.

I have scoured the garage and absolutely can not find these bolts.  I am completely befuddled as to where the bolts went.  The rotor bolts especially.  Did the ones I have shrink in diameter?

Offline Harsh

  • Expert
  • ****
  • Posts: 1,103
  • 74 CB750 and two 72 CB350's
Re: 1972 CB350 For the Daughter
« Reply #51 on: August 30, 2016, 03:22:46 PM »
OK...I went through my parts bin AGAIN.  Low and behold sitting at the bottom of it was the triple bolt and associated hardware.

Now the rotor bolts.  I absolutely know as I removed them I put them in the bag.  So I got to thinking.  When I was soaking them in the Prep&Etech I remember the liquid turning into a sludge.  It was the first time anything like that had ever happened.  I cleaned the sludge off the bolts and soaked them in some new solution.  When I went back to check on them later that evening the solution had started to congeal again.  I remember saying to hell with it, removed them from the P&E, and went straight to the parkerizing.  While in that solution I remember they fizzed A LOT longer than any of the other hardware had.  I honestly think the threads were eaten down from the solutions.  So I guess I need to source some new bolts.

Offline Harsh

  • Expert
  • ****
  • Posts: 1,103
  • 74 CB750 and two 72 CB350's
Re: 1972 CB350 For the Daughter
« Reply #52 on: September 04, 2016, 05:12:03 PM »
Picked up the clipons from the local guy today.  I did a bit of mock up to give you all a bit of visual reference.  There is a plan in place to make them fit.  Once assembled I noticed a couple of issues in regards to the gauges.  The fork tubes will hit the gauges when they are extended through the triple and with the clipons installed they interfere with the gauges.  The first solution that jumps in my head would be to make a small bracket out of some flat stock to extend them out a bit.

With the gauges mounted. 


Offline Harsh

  • Expert
  • ****
  • Posts: 1,103
  • 74 CB750 and two 72 CB350's
Re: 1972 CB350 For the Daughter
« Reply #53 on: September 09, 2016, 05:30:37 AM »
Been trying to figure out the wiring. I don't know why, but it kicks my butt every time. Which is sad since I am an electronics guy. I am not going to use the stock controls on this bike. I am going to use a set from a 2008 Suzuki SV650.

Offline Harsh

  • Expert
  • ****
  • Posts: 1,103
  • 74 CB750 and two 72 CB350's
Re: 1972 CB350 For the Daughter
« Reply #54 on: September 09, 2016, 07:02:46 AM »
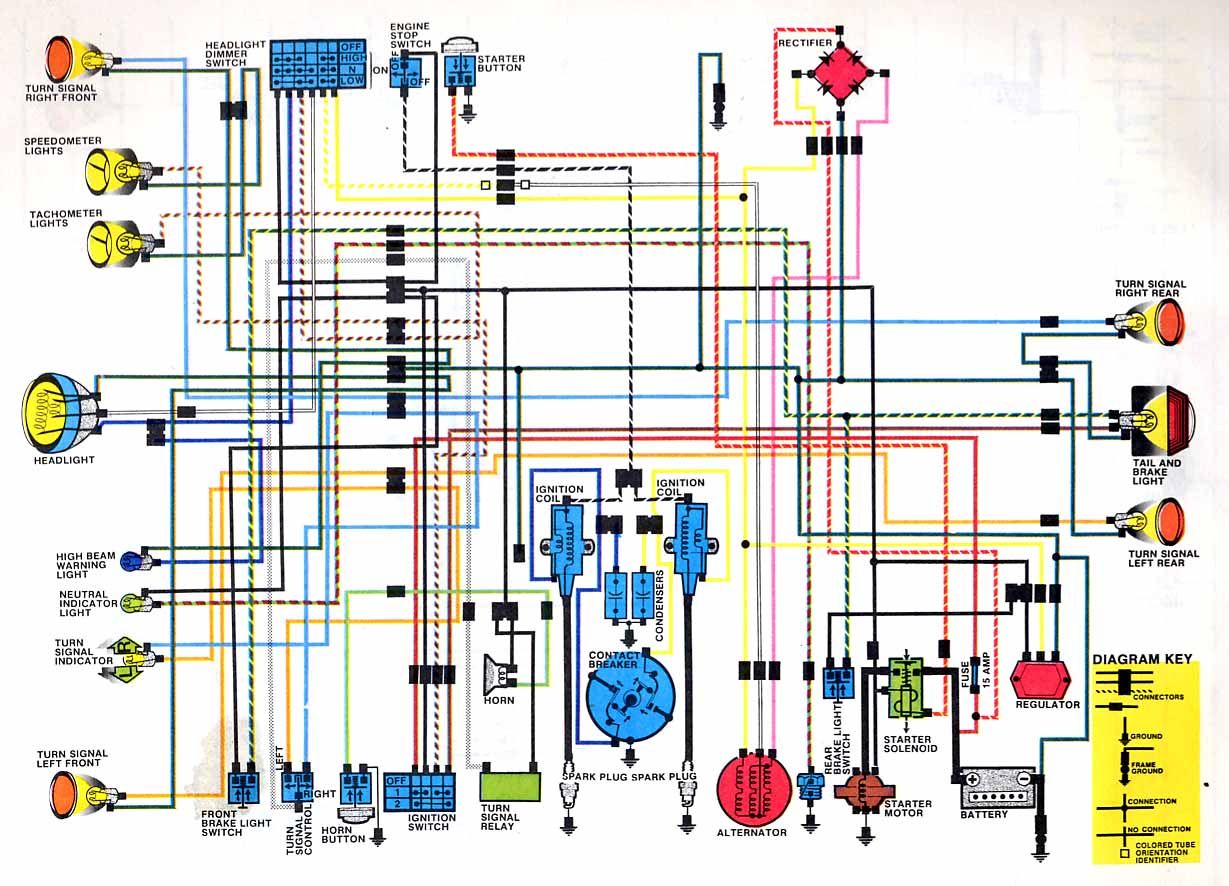
Well I am not sure if this is correct or not.  I am not sure what to do with the Y and Y/w wires and I would like to add a switch to turn the headlight on/off.

Right Switch.........Bike

Black /r...............Black
Black /bl..............Green /y
Yellow /g.............Red /y
Orange /w...........Black /w
Orange /b............Black
Light Green..........Light Blue
Light Blue............Gray
Black..................Orange


Left Switch...........Bike

Black /y..............not used - clutch switch
Black /w.............Light Green
Orange /g...........Black
Light Green.........Light Blue
Light Blue...........Gray
Black.................Orange
Orange..............Black
Yellow...............Blue
White................White
........................Yellow - to Alternator and RR
........................Yellow /w - to Alternator
........................Brown /w - power from ignition switch to speedo/tach lights.  Doesn't have to run through control switch, but could run through a separate switch to kill those lights along with the headlight.


Offline Harsh

  • Expert
  • ****
  • Posts: 1,103
  • 74 CB750 and two 72 CB350's
Re: 1972 CB350 For the Daughter
« Reply #55 on: September 09, 2016, 07:48:44 AM »
That is basically the plan.  It almost looks like I need to connect the Yellow and Yellow /w wires because it looks like they are only connected when the headlight is on.  But something just isn't sitting right in my head about that.

Offline Harsh

  • Expert
  • ****
  • Posts: 1,103
  • 74 CB750 and two 72 CB350's
Re: 1972 CB350 For the Daughter
« Reply #56 on: September 10, 2016, 07:02:36 AM »
Dreams...my dreams last night annoyed me.  I am sure you are sitting on the edge of your seat wondering what they were about.  Well let me tell you.


Wiring diagrams...damned wiring diagrams.

If I don't figure that crap out soon I fear I may go insane.

Offline grcamna2

  • Not a
  • Really Old Timer ...
  • *******
  • Posts: 15,282
  • I love to restore & travel. Keep'em Going Strong !
Re: 1972 CB350 For the Daughter
« Reply #57 on: September 10, 2016, 07:36:03 AM »
Dreams...my dreams last night annoyed me.  I am sure you are sitting on the edge of your seat wondering what they were about.  Well let me tell you.


Wiring diagrams...damned wiring diagrams.

If I don't figure that crap out soon I fear I may go insane.

LOl  You'll get it,trying to interface the Suzuki controls to your Honda sounds like a challenge.
75' CB400F/'bunch o' parts' & 81' CB125S modded to a 'CB200S'
  I love the small ones too !
Do your BEST...nobody can take that away from you.

Offline Harsh

  • Expert
  • ****
  • Posts: 1,103
  • 74 CB750 and two 72 CB350's
Re: 1972 CB350 For the Daughter
« Reply #58 on: September 10, 2016, 07:39:15 AM »
I put triumph controls on my CB750.

I think I figured out the yellow and yellow /w wires.  Since they are connected when the headlight is on I see no reason why I can't just connect them directly together.  I remembered reading something about people connecting those two wires in the headlight bucket to keep the charging system running all of the time or something like that.

Now I think I just need to make sure I have the rest of the wires are hooked up to the correct polarity or signal in/out and I should be good.

Offline grcamna2

  • Not a
  • Really Old Timer ...
  • *******
  • Posts: 15,282
  • I love to restore & travel. Keep'em Going Strong !
Re: 1972 CB350 For the Daughter
« Reply #59 on: September 10, 2016, 07:54:00 AM »
I put triumph controls on my CB750.

I think I figured out the yellow and yellow /w wires.  Since they are connected when the headlight is on I see no reason why I can't just connect them directly together.  I remembered reading something about people connecting those two wires in the headlight bucket to keep the charging system running all of the time or something like that.

Now I think I just need to make sure I have the rest of the wires are hooked up to the correct polarity or signal in/out and I should be good.

I have heard some other folks that are wiring these say that those wires(yellow/wht stripe)are coming directly from the stator to power the headlight.
75' CB400F/'bunch o' parts' & 81' CB125S modded to a 'CB200S'
  I love the small ones too !
Do your BEST...nobody can take that away from you.

Offline Harsh

  • Expert
  • ****
  • Posts: 1,103
  • 74 CB750 and two 72 CB350's
Re: 1972 CB350 For the Daughter
« Reply #60 on: September 14, 2016, 05:15:11 PM »
Looking at most of the solutions to modify a stock reflector to accept an H4 bulb only one was acceptable to me.  While nicely done, that one still didn’t look as simple as what I had in my head.  So here we are.  My idea will allow you to easily swap bulbs without having to undo copious amounts of safety wire and will leave you with a nice looking application.

I had a couple of spare headlights from previous builds that used H4 bulbs.  I got to thinking how were the mounts connected to the glass.  Well, there are just a few pressed in tabs that keep the parts together.  Before you remove the mount make sure you notate which direction is up on it.  You can easily press the tabs out and remove the mount.  Once done you now have a solid foundation for an H4 bulb.  If you don’t have any spare lights I suggest going to a junk yard or your local auto parts store and pick up the cheapest light you can find that uses an H4 bulb.

My donor light.  I think it came from my CB750.  In the second pic you can see where the tabs were pushed out to remove the mount.


You don’t need to worry about getting super close to the base because you are going to drill a bigger hole in it later.  The only reason I even removed the oem bulb was so that the hole saw wouldn’t bottom out on it.  I have noticed a difference in diameter between the two mounts I have so whatever you have might be different as well.  Don’t worry, it isn’t a big deal as it is only important because it will dictate how big a hole you drill.  I suggest a drill press with a hole saw designed for cutting glass or ceramics.  It will bounce around less on the metal.  If you don’t have a drill press recruit someone to help hold the headlight in place.  Use the rubber dust shield for the H4 bulb under the glass to help protect it and provide a somewhat stable base.  Get the hole saw centered over the hole that is left from the removal of the bulb.  Go slowly and keep the metal of the reflector cool.  If it gets hot it WILL cause the reflection material on the inside to bubble up.  Not a total loss if it does, but not perfect either.  Now due to hole saws not coming in every size imaginable size you may have to do a bit of trimming to the hole you just cut.  Go slowly as you only want the hole to be a tiny bit bigger than the mount.

Tab, this one had three of them.


Mount removed.


Bulb cut out.


Once you have the hole drilled, using emery cloth, a file, or whatever rough up couple an inch or so of the metal housing around the outside new hole.  You want to do this so whatever you choose to adhere the mount with will have some tooth to grab onto.  You will also want to remove any sharp edges from the newly cut hole.  More on that later.  After roughing up the area make sure to clean it thoroughly.  Now would be a great time to clean out the inside of the headlight as well.  Shake out any loose stuff that may have fallen inside.  I then take a rag with some denatured alcohol to wipe out the inside thoroughly.  Do not scrub too much against the reflector part you can remove it if you do.  If you didn’t heed my advice about removing the sharp edges your fingers are probable cut up right about now.

Hole drilled and sanded.


I will say upfront that having to stop and take pictures during this stage greatly impacted my final product.  The two part putty starts to get hard quickly.  Because of that I wasn’t able to get it as smooth as I would have liked.

I chose to use some two-part putty because it is more controllable than mixing some JB Weld or other epoxy.  You can get it in the plumbing section of just about any hardware store.  Make a nice ring around your hole.  Ensure you have the mount oriented correctly then press it into place.  Once pressed in, keeping pressure on it, stick your finger on the inside and smooth out whatever putty has oozed through.  You may and hopefully will have some putty come through the holes from the tabs that originally attached the mount to the reflector housing.  That is good as long as it doesn’t impede bulb installation it will actually work to your advantage in helping to hold the mount onto the reflector housing.  Trim away any excess putty on the outside leaving a little bit to blend/feather it to the mount.  I keep pressure on it for a few minutes until I am satisfied it isn’t going to move anymore.


Putty in place.  I did push it a little bit over the edge before pushing in the mount.


Smooth out the putty.


Putty trimmed.  You can see it oozing through the original mount hole where the tab was.


You should now have a good looking and solid H4 bulb mount.

« Last Edit: September 14, 2016, 05:20:31 PM by Harsh »

Offline NobleHops

  • Don ya be callin' me no
  • Expert
  • ****
  • Posts: 1,340
  • Misfit - Tucson, Arizona
Re: 1972 CB350 For the Daughter
« Reply #61 on: September 14, 2016, 05:21:12 PM »
Or you could source a 7 inch headlight from one of the DOHC bikes. In 1981 or so they converted over to a lens with a removable H4 bulb. I think the form factor is identical, and would fit in an SOHC headlight rim, but I haven't tried.

Super crafty work man!

N.
Nils Menten * Tucson, Arizona, USA

I have a motorcycle problem.

My build thread: NobleHops makes a 400F pretty for his wife: http://forums.sohc4.net/index.php?topic=131210.0

Offline Harsh

  • Expert
  • ****
  • Posts: 1,103
  • 74 CB750 and two 72 CB350's
Re: 1972 CB350 For the Daughter
« Reply #62 on: September 14, 2016, 05:40:42 PM »
A 7" bulb won't work.  It is too big to fit between the fork ears of a 350.  The two spare bulbs I have are 7" bulbs a 350 has a 6 1/4" bulb.

Offline NobleHops

  • Don ya be callin' me no
  • Expert
  • ****
  • Posts: 1,340
  • Misfit - Tucson, Arizona
Re: 1972 CB350 For the Daughter
« Reply #63 on: September 14, 2016, 06:19:27 PM »
Ahhhhh.
Nils Menten * Tucson, Arizona, USA

I have a motorcycle problem.

My build thread: NobleHops makes a 400F pretty for his wife: http://forums.sohc4.net/index.php?topic=131210.0

Offline Harsh

  • Expert
  • ****
  • Posts: 1,103
  • 74 CB750 and two 72 CB350's
Re: 1972 CB350 For the Daughter
« Reply #64 on: September 15, 2016, 03:34:56 PM »
Did a little mocking up and frame de-tabbing.  The seat isn't as wide at the front as I had hoped so the rear seam of the tank is going to show and a bit more of the frame than I wanted.

The rear frame hump has to go.  I was hoping I would be able to keep it, but it just won't work with it there.


After cutting off the hoop, seat hinge points, and helmet hook.  I still need to cut off the seat latch, but it wasn't in my way for what I was doing today.


The rear of the seat hits the frame.


Thinking about adding a brace across the shock mount points.  It will also give me a place to attach some brackets to mount the rear of the seat and a place to attach the part of the fender.  Every thing in green tape I am thinking about cutting off.


Offline SOHC4 Cafe Racer Fan

  • Speak up, Whipper-Snapper! I'm a
  • Really Old Timer ...
  • *******
  • Posts: 15,556
  • SOHC/4 Member #1235
Re: 1972 CB350 For the Daughter
« Reply #65 on: September 15, 2016, 03:58:35 PM »
Nice, clean removal of the cross-member/fender mount. I agree that you should replace it with a new cross-member and the location looks good and practical for mounting signals/taillight/fender.
1975 CB550K1 "Blue" Stockish Restomod (http://forums.sohc4.net/index.php?topic=135005.0)
1975 CB550F1 frame/CB650 engine hybrid "The Hot Mess" (http://forums.sohc4.net/index.php/topic,150220.0.html)
2008 Triumph Thruxton (http://forums.sohc4.net/index.php/topic,190956.0.html)
2014 MV Agusta Brutale Dragster 800
2015 Yamaha FZ-09 (http://forums.sohc4.net/index.php/topic,186861.0.html)

"There are some things nobody needs in this world, and a bright-red, hunch-back, warp-speed 900cc cafe racer is one of them — but I want one anyway, and on some days I actually believe I need one.... Being shot out of a cannon will always be better than being squeezed out of a tube. That is why God made fast motorcycles, Bubba." Hunter S. Thompson, Song of the Sausage Creature, Cycle World, March 1995.  (http://www.latexnet.org/~csmith/sausage.html and https://magazine.cycleworld.com/article/1995/3/1/song-of-the-sausage-creature)

Sold/Emeritus
1973 CB750K2 "Bionic Mongrel" (http://forums.sohc4.net/index.php?topic=132734.0) - Sold
1977 CB750K7 "Nine Lives" Restomod (http://forums.sohc4.net/index.php?topic=50490.0) - Sold
2005 RVT1000RR RC51-SP2 "El Diablo" - Sold
2016+ Triumph Thruxton 1200 R (http://forums.sohc4.net/index.php/topic,170198.0.html) - Sold

Offline Harsh

  • Expert
  • ****
  • Posts: 1,103
  • 74 CB750 and two 72 CB350's
Re: 1972 CB350 For the Daughter
« Reply #66 on: September 15, 2016, 04:38:28 PM »
I was looking at the pic with the seat and thought that instead of cutting the frame straight down that if I were to cut it at an angle to match the seat it would look good.

Offline kslrr

  • There is always a Blaster when there is a
  • Master
  • *****
  • Posts: 1,542
  • Raising her up right!
Re: 1972 CB350 For the Daughter
« Reply #67 on: September 15, 2016, 07:48:25 PM »
Following this build.
Now  1972 CB350FX (experimental v2.0)
        1981 CB650c Custom with '79 engine (wifes)
        1981 CB650 engine
        2004 HD XL883C Custom
        1977 Yamaha XS750D (in progress)
Then 1972 CL175
        1964 Yamaha YGS-1T
No ride is a Bad ride

Offline Harsh

  • Expert
  • ****
  • Posts: 1,103
  • 74 CB750 and two 72 CB350's
Re: 1972 CB350 For the Daughter
« Reply #68 on: September 16, 2016, 09:37:23 AM »
That is way beyond my skillset.

My quick measurements should allow me to still use part of the fender to help protect everything under the seat.  Before I cut the frame I will have the brace welded in to make sure everything will fit correctly.

Offline Harsh

  • Expert
  • ****
  • Posts: 1,103
  • 74 CB750 and two 72 CB350's
Re: 1972 CB350 For the Daughter
« Reply #69 on: September 17, 2016, 01:44:03 PM »
Alright I have to send out a huge thank you to Cal.  He bead blasted a bunch of parts for me.  His kindness simply amazes me.  After some thorough cleaning I should be able to start on getting the engine painted and put back together.

So now that I have the bead blasted parts back I was able to attach the rear fender in its correct location to get a good look at how things will sit.  I think (fingers crossed) things are going to work out.  The cross brace as I originally had it wouldn't work because the fender made contact with it.  However, if I put it at an angle complimentary to the fender it will not only act as a brace, but a place to attach the fender to.  I put the seat on and traced along it where the seat would be.  It looks like I will be able to provide a lot more protection under the seat that I previously thought.  I was originally going to cut it at the seam.  Another added benefit of extending the fender under the seat is that it will provide me a place to attach a bracket for the tail light and license plate.  Cutting/grinding off the upper lip on the frame will allow me a place to weld on some tabs to attach the rear of the seat to.


Offline Harsh

  • Expert
  • ****
  • Posts: 1,103
  • 74 CB750 and two 72 CB350's
Re: 1972 CB350 For the Daughter
« Reply #70 on: September 26, 2016, 02:47:50 PM »
I got my rotor back today from being surfaced and having holes drilled in it.  Tom at TrueDisk did an amazing job.


And of course a quick mock up of the front end.  I have a buddy that woks in the R&D machine shop at Chrysler.  He milled out the pockets in the stock triple to accept the clipon brackets.  He also made me a bracket for the gauges and added a bit of flare to it.  I can't begin to tell you how happy I am at how awesome this is.


« Last Edit: September 27, 2016, 10:19:56 AM by Harsh »

Offline SOHC4 Cafe Racer Fan

  • Speak up, Whipper-Snapper! I'm a
  • Really Old Timer ...
  • *******
  • Posts: 15,556
  • SOHC/4 Member #1235
Re: 1972 CB350 For the Daughter
« Reply #71 on: September 26, 2016, 03:03:50 PM »
Nice parts!!
1975 CB550K1 "Blue" Stockish Restomod (http://forums.sohc4.net/index.php?topic=135005.0)
1975 CB550F1 frame/CB650 engine hybrid "The Hot Mess" (http://forums.sohc4.net/index.php/topic,150220.0.html)
2008 Triumph Thruxton (http://forums.sohc4.net/index.php/topic,190956.0.html)
2014 MV Agusta Brutale Dragster 800
2015 Yamaha FZ-09 (http://forums.sohc4.net/index.php/topic,186861.0.html)

"There are some things nobody needs in this world, and a bright-red, hunch-back, warp-speed 900cc cafe racer is one of them — but I want one anyway, and on some days I actually believe I need one.... Being shot out of a cannon will always be better than being squeezed out of a tube. That is why God made fast motorcycles, Bubba." Hunter S. Thompson, Song of the Sausage Creature, Cycle World, March 1995.  (http://www.latexnet.org/~csmith/sausage.html and https://magazine.cycleworld.com/article/1995/3/1/song-of-the-sausage-creature)

Sold/Emeritus
1973 CB750K2 "Bionic Mongrel" (http://forums.sohc4.net/index.php?topic=132734.0) - Sold
1977 CB750K7 "Nine Lives" Restomod (http://forums.sohc4.net/index.php?topic=50490.0) - Sold
2005 RVT1000RR RC51-SP2 "El Diablo" - Sold
2016+ Triumph Thruxton 1200 R (http://forums.sohc4.net/index.php/topic,170198.0.html) - Sold

Offline Harsh

  • Expert
  • ****
  • Posts: 1,103
  • 74 CB750 and two 72 CB350's
Re: 1972 CB350 For the Daughter
« Reply #72 on: September 30, 2016, 03:25:46 PM »
So I have run into a bit of an issue.  I picked up some steel to weld in to brace the rear of the frame and secure the front of the seat.  Lets start with the front.  In previous mock ups I didn't have the rubber piece on that holds down the rear of the tank in place.  Even without it in place the front of the seat was sat a little high.  Noticed it was sitting on the hooks that the strap that holds the battery down attach to, so those had to go.  Then it was sitting on a rolled edge at the front.  The opposite side of the frame didn't have it so off it went.  That is when I noticed it sitting on the rubber piece.

So this is my thought.  I can cut off the bracket that secures the rear of the tank and weld in a flat piece of stock.  That will drop the tank almost an inch.  In order to secure it I could weld in a bolt or a flanged pin with a hole in the shank to insert a cotter pin.  Of course the flat piece of stock would have some rubber on it for some soak up some of the vibration.  I understand this would impact the fuel getting into the petcock, but I think it would only change or be an issue at low levels.  I don't think it will impact anything else though.  The crossover tube and fuel lines as they come out of the petcock would be close the the carbs, but looking at the wife's bike they should clear.


A little blurry, but you get it


Cut that off and weld in a flat piece in its place across the frame.


Now the rear brace isn't going where I had hoped.  It needs to be closer to the hole.  Where it is at I don't see it adding any cross support strength.  All it would do is be a place to attach the rear fender.  Not really sure what to do other than cutting the fender way back or denting in the fender in to accept the brace further back sort of like the fender is dented in towards the rear of the last pic.  there is pleeeenty of clearance in the wheel well.


« Last Edit: September 30, 2016, 04:08:52 PM by Harsh »

Offline grcamna2

  • Not a
  • Really Old Timer ...
  • *******
  • Posts: 15,282
  • I love to restore & travel. Keep'em Going Strong !
Re: 1972 CB350 For the Daughter
« Reply #73 on: September 30, 2016, 04:03:18 PM »
Harsh,
You have to make lot's of 'mods' to get that new seat to fit,wow.
75' CB400F/'bunch o' parts' & 81' CB125S modded to a 'CB200S'
  I love the small ones too !
Do your BEST...nobody can take that away from you.

Offline Harsh

  • Expert
  • ****
  • Posts: 1,103
  • 74 CB750 and two 72 CB350's
Re: 1972 CB350 For the Daughter
« Reply #74 on: September 30, 2016, 04:11:56 PM »
Yah, not what I wanted or needed.  So much for others saying just a tiny bit of fiddling at it will fit.  I guess their version of fit and mine are two different.  My version of fitting isn't perfect by any means, but it definitely has to be better than someonelses.