Author Topic: CB350F Carbs - assembly tips?  (Read 5170 times)

0 Members and 3 Guests are viewing this topic.

Offline dbbrian350F

  • Enthusiast
  • **
  • Posts: 114
  • dbbrian350F
CB350F Carbs - assembly tips?
« on: September 08, 2015, 11:11:32 AM »
I have done some searching but haven't quite found the answers to move forward.

The bike has been sitting, so I have removed the rack of carbs, having read quite a bit about clean, clean, clean.  But I am hesitant to disassemble more than necessary to mess up settings.  Especially taking individual carbs off the stay plate.

I have simple green purple to start with, and will order gaskets, seat needles, etc depending on what I find.  Springs look good.  One carb is white-ish cruddy inside the bowl.  Hoping I can clean it up.

When I rotate the throttle mechanism, there is some resistance, and then a click before the slides will move up, then they move freely to fully open. Anyone have this issue?  Does it mean I need to remove the slides from the top or is this required anyway for proper cleaning?

When I look at the top of the carbs with the caps off, there are nuts with bent washers - do I leave those alone?

Any help appreciated.

Brian
« Last Edit: November 30, 2015, 01:50:41 PM by dbbrian350F »
Bound and determined to restore my...
1974 CB350F1

Lucky new custodian of...
1978 XS1100E

Offline flybox1

  • My wife thinks I'm a
  • Really Old Timer ...
  • *******
  • Posts: 14,289
Re: CB350F Carb slides clicking
« Reply #1 on: September 08, 2015, 11:19:39 AM »
the clicking is most likely not coming from the slides.  look elsewhere for the point of resistance.
No need to remove the carbs from the stay plate, just clean the internals of each carb, and then bench sync them.
spray carb cleaner in the carb throats onto the slides to clear away any varnish.  yes, you can easily remove the slides through the top caps.
'78 750K (F3 engine) PD42b's, Modified airbox w/K&N  filter, 40/110 jets, 1 needle shim, IMS@ 1 turn out. Kerker + Cone 18" QuietCore

Past Bikes
1974 550K0 (stock), 1973 CB350F (stock), 1983 Yamaha XS400K (POS)
77/78 cool 2 member #3
"Knowledge without mileage equals bullsh!t" - Henry Rollins

"This is my CB. There are many like it, but this one is mine…"

Offline dbbrian350F

  • Enthusiast
  • **
  • Posts: 114
  • dbbrian350F
Re: CB350F Carb slides clicking
« Reply #2 on: September 08, 2015, 08:15:43 PM »
Thanks Flybox.  I looked again and think its the needle set sticking.  Will get the carb cleaner to see if that helps.
Bound and determined to restore my...
1974 CB350F1

Lucky new custodian of...
1978 XS1100E

Offline flybox1

  • My wife thinks I'm a
  • Really Old Timer ...
  • *******
  • Posts: 14,289
Re: CB350F Carb slides clicking
« Reply #3 on: September 08, 2015, 09:13:43 PM »
Theres nothing for the needle to catch on when the slides are lifting.  Check everything between the throttle sleeve and right control... down to the bell where the cables attach.....

For example, if the cable is frayed at its ends at the control, there is plenty to catch on in tbe control.
Can, or have you pulled the carbs off and manually lifted the slides at the throttle bell...to see its not the cables?
« Last Edit: September 08, 2015, 09:16:02 PM by flybox1 »
'78 750K (F3 engine) PD42b's, Modified airbox w/K&N  filter, 40/110 jets, 1 needle shim, IMS@ 1 turn out. Kerker + Cone 18" QuietCore

Past Bikes
1974 550K0 (stock), 1973 CB350F (stock), 1983 Yamaha XS400K (POS)
77/78 cool 2 member #3
"Knowledge without mileage equals bullsh!t" - Henry Rollins

"This is my CB. There are many like it, but this one is mine…"

Offline dbbrian350F

  • Enthusiast
  • **
  • Posts: 114
  • dbbrian350F
Re: CB350F Carb slides clicking
« Reply #4 on: September 09, 2015, 06:26:13 PM »
Definitely not the cables, I took the rack of carbs off the bike.  I think it may be build up on the needle.  I'll TRY and get a video off my phone and post. 

I am so nervous about doing damage to something.  I used to do all my own work on this bike 35 years ago, although never opened up the carbs, but now I feel like such a noob.  Last night I decided to gently take a slow jet out, and the tip snapped off - feck-feck-feck!  I read some threads, seems i'm not the only one done that, so there may be hope to get the piece out.  Thought all the months of lurking and reading I would be good to go, but took one step backwards.  It would seem carb cleaner is the 1st order of business. 

I was going to give the carbs a wash and toothbrush scrub in simple green-purple.  From the advice above I bought some carb cleaner. 

 Is the simple green a good idea 1st?

 Do I need to neutralize or rinse or anything after I use carb cleaner? (don't want to ruin anything else  :-\ )

Brian
« Last Edit: September 09, 2015, 08:41:12 PM by dbbrian350F »
Bound and determined to restore my...
1974 CB350F1

Lucky new custodian of...
1978 XS1100E

Offline harisuluv

  • Master
  • *****
  • Posts: 2,009
Re: CB350F Carb slides clicking
« Reply #5 on: September 09, 2015, 09:12:46 PM »
Theres nothing for the needle to catch on when the slides are lifting.  Check everything between the throttle sleeve and right control... down to the bell where the cables attach.....

For example, if the cable is frayed at its ends at the control, there is plenty to catch on in tbe control.
Can, or have you pulled the carbs off and manually lifted the slides at the throttle bell...to see its not the cables?

Not saying it's the case, but with carbs that get sent to me, I have had instances where they were apparently sitting a long time and there was bad gas/lacquer everywhere.  The lacquer in the needle jet/emulsion tube would "catch" and stick to the needle and actually make kind of a "click" noise when it separates each time. 

Offline dscri001

  • Full Member
  • *
  • Posts: 24
Re: CB350F Carb slides clicking
« Reply #6 on: September 09, 2015, 10:17:30 PM »
Theres nothing for the needle to catch on when the slides are lifting.  Check everything between the throttle sleeve and right control... down to the bell where the cables attach.....

For example, if the cable is frayed at its ends at the control, there is plenty to catch on in tbe control.
Can, or have you pulled the carbs off and manually lifted the slides at the throttle bell...to see its not the cables?

Not saying it's the case, but with carbs that get sent to me, I have had instances where they were apparently sitting a long time and there was bad gas/lacquer everywhere.  The lacquer in the needle jet/emulsion tube would "catch" and stick to the needle and actually make kind of a "click" noise when it separates each time.

I had the exact same issue last week taking apart mine. Mine happen to be lacquer on the slides sticking to the wall. Used a heat gun and they slid right out. If I removed the heat too soon I could literally feel it start to stick up again.

Offline dbbrian350F

  • Enthusiast
  • **
  • Posts: 114
  • dbbrian350F
Re: CB350F Carb slides clicking
« Reply #7 on: September 13, 2015, 10:58:18 PM »
Thanks for the replies.  Put the carb cleaner spray to them, and even though I was out in the backyard - the wifey came out and said the smell was going all through the house!  Wicked stuff.

But it did reduce get rid of the clicking.  Although the slides still seem to have some friction.  I watched a video on "the motorcycle project" site  http://www.cb750carbs.com/  .  The how to video on slide removal has helped me understand what I need to do to get them out. 

https://youtu.be/1cV_3OGKI50

Even though they are cleaner, I think I've only just begun to clean them, and I may end up doing more dis-assembly, and take off the stay plate and find someone with an ultrasonic cleaner.
Bound and determined to restore my...
1974 CB350F1

Lucky new custodian of...
1978 XS1100E

Offline harisuluv

  • Master
  • *****
  • Posts: 2,009
Re: CB350F Carb slides clicking
« Reply #8 on: September 13, 2015, 11:05:51 PM »
Ultrasonic is good for some contaminants, however, varnish/sticky old gas isn't one of them.  With the right cleaner it can eat it up, but that's also going to be harsh on your carb bodies. 

Offline dbbrian350F

  • Enthusiast
  • **
  • Posts: 114
  • dbbrian350F
CB350F Carb dis-assembly progress
« Reply #9 on: September 22, 2015, 08:34:09 PM »
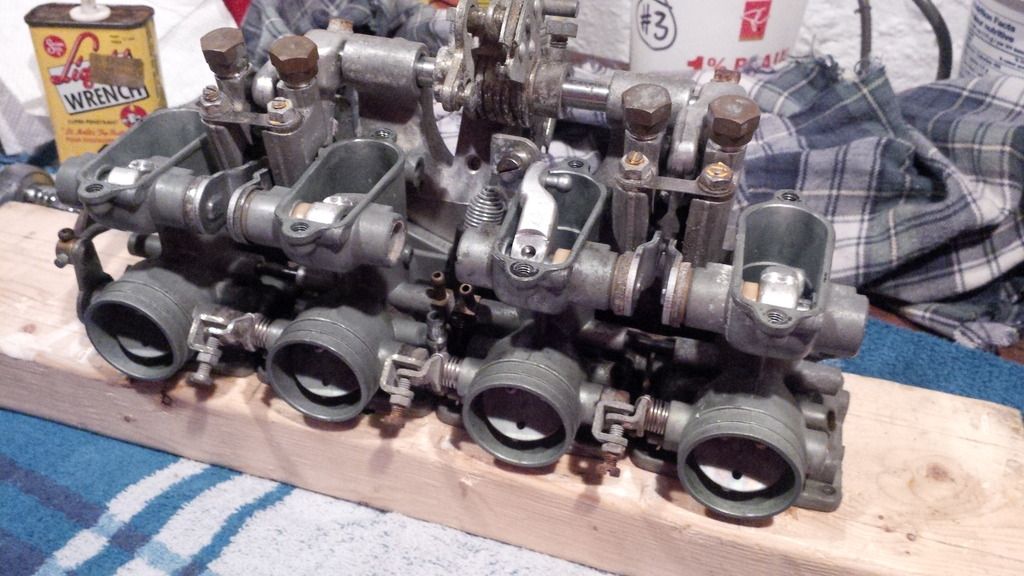
A little update on my Carbs

After breaking off the tip of a slow jet needle in carb 1, I am going much slower and things are looking brighter.  Slow is fast right?. However, I'm taking weeks to do what some people do in minutes!  But I love it, couldn't be happier working on this bike, a claim I haven't made in years.  I think I have a carb body deal worked out with a member too.  Also hope to score some new fasteners to replace rusty ones.

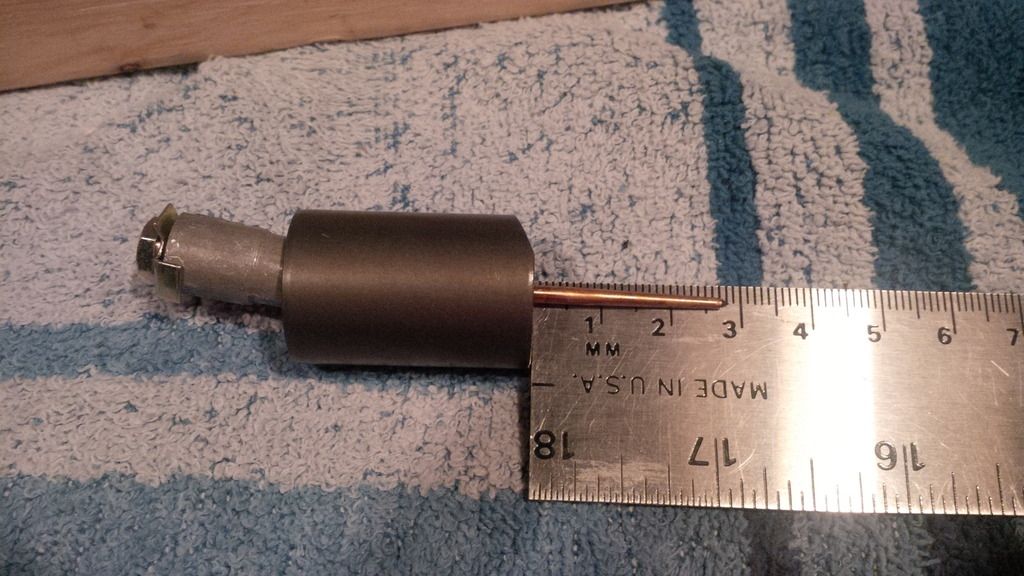
Removed the slides, and they look nice and clean.  I don't think I'll take them apart any further.  The needle is bout 28mm beyond the bottom edge.  I question how much these carbs have been apart before with signs of pliers marks on tabs.  Is that a stock position? 

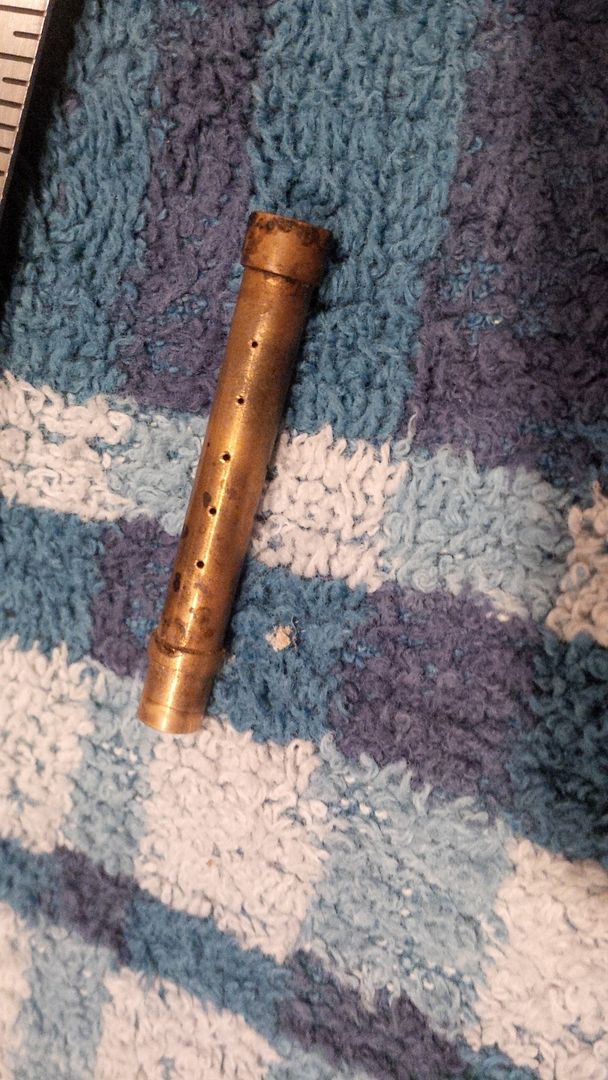
Emulsion tubes are out!!!!  Being very patient, waiting, and carefully proceeding payed off.  Trusty can of vintage Liquid Wrench helped after a few days of re-applying, and using the skinny wooden dowels finally got them to budge.  Came out unharmed, a bit gunky, but not too bad looking.  Also removed air needles and springs.


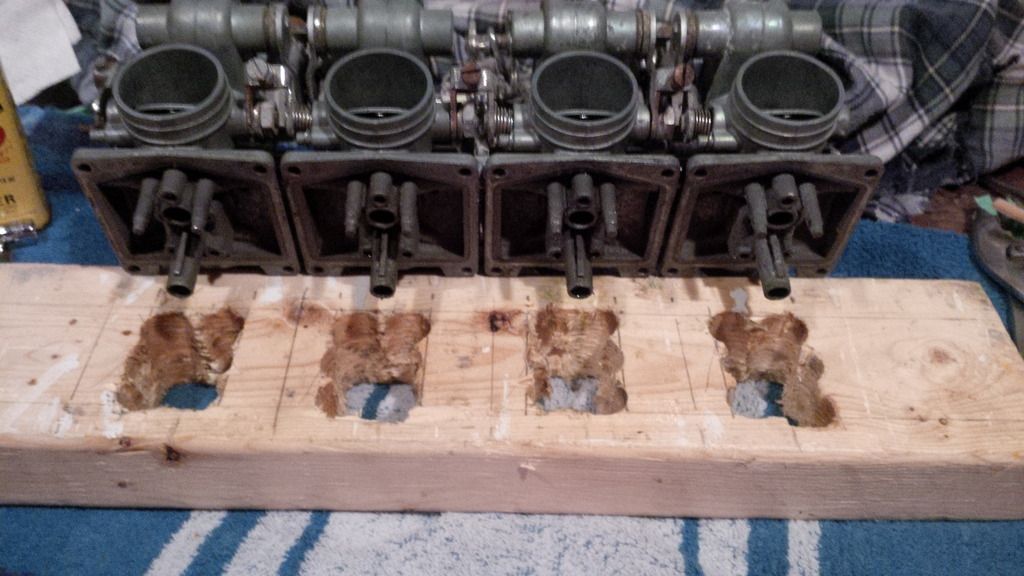
Here's something that works for me - I drilled out a 2x4 to accept the posts for the carbs and it makes working on the carbs easier, and without fear of damaging the posts. Especially when pushing on the wood dowel to get an emulsion tube out.


Still lots of cleaning, and some corrosion to try and remove.  Any tricks other than complete dis-assembly and sodas blast?

« Last Edit: September 22, 2015, 08:36:00 PM by dbbrian350F »
Bound and determined to restore my...
1974 CB350F1

Lucky new custodian of...
1978 XS1100E

Offline dbbrian350F

  • Enthusiast
  • **
  • Posts: 114
  • dbbrian350F
Re: CB350F Carb Dis-assembly progress
« Reply #10 on: September 30, 2015, 07:08:40 PM »
So with the #1 carb body on the way, I'm looking at the rack trying to figure out how much of that linkage can remain intact to do the swap.  Initially I wanted to avoid changing settings for everything so I could get that rack back on, and start up the bike just to know it runs, before doing other work during the winter, but I'm starting to think I'll end up learning how to set it all up from scratch.
Bound and determined to restore my...
1974 CB350F1

Lucky new custodian of...
1978 XS1100E

Offline dbbrian350F

  • Enthusiast
  • **
  • Posts: 114
  • dbbrian350F
Re: CB350F Carb - Birthday presents!
« Reply #11 on: October 01, 2015, 06:40:37 PM »
Look what came in the mail!   


All packaged so nicely...


Everything I need to get back on track

Special thanks to Harisuluv!  He provided some great guidance, and sent me these goodies!  Just look at that hardware - yum!

Now I just need to get my other carb bodies and jets as clean as the ones he sent and start the assembly.

Oh, the birthday reference...my kids and wife gave me cards with money to spend on what I wanted.  Couldn't think of anything better than this.  ;)

Brian
Bound and determined to restore my...
1974 CB350F1

Lucky new custodian of...
1978 XS1100E

Offline dbbrian350F

  • Enthusiast
  • **
  • Posts: 114
  • dbbrian350F
Re: CB350F Carb Dis-assembly progress
« Reply #12 on: October 01, 2015, 06:46:33 PM »
Bye the way, anyone know if the needle shown in reply #9 is the stock clip position?
Bound and determined to restore my...
1974 CB350F1

Lucky new custodian of...
1978 XS1100E

Offline dscri001

  • Full Member
  • *
  • Posts: 24
Re: CB350F Carb Dis-assembly progress
« Reply #13 on: October 01, 2015, 07:19:54 PM »
Looking good. Downhill from there. Was for me at least haha.

Bye the way, anyone know if the needle shown in reply #9 is the stock clip position?

Mine was right at 30mm but someone else may want to verify. Mine has ~3300 miles on it so I am assuming its been untouched and going to leave it at that height.


Offline dbbrian350F

  • Enthusiast
  • **
  • Posts: 114
  • dbbrian350F
Re: CB350F Carbs - Birthday present parts arrived!
« Reply #14 on: October 02, 2015, 04:59:14 AM »
Thanks dscri

I recall this bike had a nice idle, but I was the second owner, and my sister had the bike for a. Few years, and there is evidence someone has been into the carbs, so you are more likely to be right. 
Bound and determined to restore my...
1974 CB350F1

Lucky new custodian of...
1978 XS1100E

Offline dscri001

  • Full Member
  • *
  • Posts: 24
Re: CB350F Carbs - Birthday present parts arrived!
« Reply #15 on: October 02, 2015, 11:35:16 PM »
Thanks dscri

I recall this bike had a nice idle, but I was the second owner, and my sister had the bike for a. Few years, and there is evidence someone has been into the carbs, so you are more likely to be right.

I've also read that it will vary from OEM to aftermarket stuff. I'm pretty new to this stuff so I am leaving the needle alone and cleaning up the jets the best I can just like you are. Also replacing all o-rings. My float valves were heavily seized so those were the only things replaced. 

Offline dbbrian350F

  • Enthusiast
  • **
  • Posts: 114
  • dbbrian350F
Re: CB350F Carbs - assembly tips?
« Reply #16 on: November 30, 2015, 01:53:36 PM »
I finally have my carb parts clean, and some time to assemble.

With the new o-rings on the fuel connectors, I am wondering if some type of lube to get them to slide into place would be appropriate.  Seems kinds dry and don't want to ruin the o-rings or get them twisted.
Bound and determined to restore my...
1974 CB350F1

Lucky new custodian of...
1978 XS1100E

Offline flybox1

  • My wife thinks I'm a
  • Really Old Timer ...
  • *******
  • Posts: 14,289
Re: CB350F Carbs - assembly tips?
« Reply #17 on: November 30, 2015, 01:57:17 PM »
a little lube never hurt anything.  use sparingly.
'78 750K (F3 engine) PD42b's, Modified airbox w/K&N  filter, 40/110 jets, 1 needle shim, IMS@ 1 turn out. Kerker + Cone 18" QuietCore

Past Bikes
1974 550K0 (stock), 1973 CB350F (stock), 1983 Yamaha XS400K (POS)
77/78 cool 2 member #3
"Knowledge without mileage equals bullsh!t" - Henry Rollins

"This is my CB. There are many like it, but this one is mine…"

Offline dbbrian350F

  • Enthusiast
  • **
  • Posts: 114
  • dbbrian350F
Re: CB350F Carbs - assembly tips?
« Reply #18 on: November 30, 2015, 02:23:35 PM »
OK thanks. I should have asked what type is safe for O-rings?
Bound and determined to restore my...
1974 CB350F1

Lucky new custodian of...
1978 XS1100E

Offline flybox1

  • My wife thinks I'm a
  • Really Old Timer ...
  • *******
  • Posts: 14,289
Re: CB350F Carbs - assembly tips?
« Reply #19 on: November 30, 2015, 02:29:23 PM »
I just used a little belray blue grease. 
If they are viton or buna, they'll hold up just fine.
'78 750K (F3 engine) PD42b's, Modified airbox w/K&N  filter, 40/110 jets, 1 needle shim, IMS@ 1 turn out. Kerker + Cone 18" QuietCore

Past Bikes
1974 550K0 (stock), 1973 CB350F (stock), 1983 Yamaha XS400K (POS)
77/78 cool 2 member #3
"Knowledge without mileage equals bullsh!t" - Henry Rollins

"This is my CB. There are many like it, but this one is mine…"

Offline dbbrian350F

  • Enthusiast
  • **
  • Posts: 114
  • dbbrian350F
Re: CB350F Carbs - assembly tips?
« Reply #20 on: November 30, 2015, 02:58:29 PM »
They are buna-n.  Don 't have belray blue grease, so thought I would search and found this chemical resistance chart. Think I have some mineral oil.

http://www.quickcutgasket.com/pdf/Chemical-Resistance-Chart.pdf

Thanks Flybox.
« Last Edit: November 30, 2015, 03:02:13 PM by dbbrian350F »
Bound and determined to restore my...
1974 CB350F1

Lucky new custodian of...
1978 XS1100E

Offline gtmdriver

  • Enthusiast
  • **
  • Posts: 164
Re: CB350F Carbs - assembly tips?
« Reply #21 on: December 01, 2015, 02:06:24 AM »
I bench synched my set before refitting them.

I used a 3mm (or 1/8") drill and screwed in the idle screw until the drill was a light sliding fit between one of the carb chokes and its slide on the engine side of the carbs. I then adjusted the other carbs using the screws and locknuts on top of the carbs until all the other slides were at the same height. Remember to back off the idle screw again before starting the bike.

When I fired it up and attached the vacuum gauges the carbs were so close I could have left them alone but, being a bit OCD, I adjusted the one carb which was out slightly and the job was done.

Offline dbbrian350F

  • Enthusiast
  • **
  • Posts: 114
  • dbbrian350F
Re: CB350F Carbs - assembly tips?
« Reply #22 on: December 01, 2015, 03:24:58 AM »
Thank you GTMDRIVER.    That is clear explanation enough that I might even have the same good results.
Bound and determined to restore my...
1974 CB350F1

Lucky new custodian of...
1978 XS1100E

Offline flybox1

  • My wife thinks I'm a
  • Really Old Timer ...
  • *******
  • Posts: 14,289
Re: CB350F Carbs - assembly tips?
« Reply #23 on: December 01, 2015, 07:02:02 AM »
Aftermarket float needles  - Stock float height for the 350F is 21mm, but after many conversations with Hondaman, one rich plug test after another, and spotty leaky carbs, I performed a clear tube test.  fuel was up over the bowl gasket seam.
24mm float height was needed to bring the fuel to a correct level.
If you've rebuilt these with aftermarket float needles, please perform the clear tube test on the bench. 
Might save you some headaches.
'78 750K (F3 engine) PD42b's, Modified airbox w/K&N  filter, 40/110 jets, 1 needle shim, IMS@ 1 turn out. Kerker + Cone 18" QuietCore

Past Bikes
1974 550K0 (stock), 1973 CB350F (stock), 1983 Yamaha XS400K (POS)
77/78 cool 2 member #3
"Knowledge without mileage equals bullsh!t" - Henry Rollins

"This is my CB. There are many like it, but this one is mine…"

Offline dscri001

  • Full Member
  • *
  • Posts: 24
Re: CB350F Carbs - assembly tips?
« Reply #24 on: December 01, 2015, 09:02:27 PM »
I made 4 separate fittings for the clear tube test and made life a lot easier. Turn on fuel and let them all fill and drop each bowl (after draining gas) and adjust individually. I was able to get them all to the correct height but seems they keep overflowing until I tap on the bowls. Don't mean to hijack but have you run into this issue? Floats pivot easily and after a few taps they stop leaking and settle to the correct height. can these floats lose buoyancy?