Author Topic: unknown (for me) electric part  (Read 3133 times)

0 Members and 1 Guest are viewing this topic.

Offline madmtnmotors

  • When did I get to be a
  • Really Old Timer ...
  • *******
  • Posts: 6,117
  • Sunny Central Florida
Re: unknown (for me) electric part
« Reply #25 on: December 09, 2015, 04:06:51 AM »
OMG...

I hope you are not the one using all those "dime store" electrical connectors. Quite the mish mash of el-cheapo crimped end connectors, butt splices, and even those hideous "pinch" type splice taps. These are all rarely dependable, often loose, and corrode quickly. You can do it right once, or be chasing gremlins for a long time.

I see a package of double crimp connectors there on the floor, I highly recommend the proper crimp tool. They also have male and female spade connectors too, if you are replacing the marginal connections, I would replace all of the cheap connectors.


Here is a copy of my post from another thread, ironically titled "Electrical Connectors":


Strip it. I usually strip about a 1/4" to 5/16". Three-eights is a bit much and not necessary:


Don't forget the insulator! (ask me how I know):


I finally figured out (after about three tries) that it's easier to load the connector in the crimp tool first. Note the stepped jaw. The trailing end has a higher relief so as not to over crimp the insulation:


Ratchet down on it just enough to hold it:


You only need about a 1/4" of insulation extended into the connector. Too much and you get into the part of the crimp that should be catching wire only. The jaws are pretty wide and hard to see inside, so I use my thumbnail as a guide when inserting the wire:


Crimp it!:


Voila' (as opposed to "Viola" which everyone knows is a musical instrument):


And finally, the insulator:


Procedure is the same for other types of connectors, just be sure to use the right insulator. Here we have the insulator for the female bullet:


Load the tool:
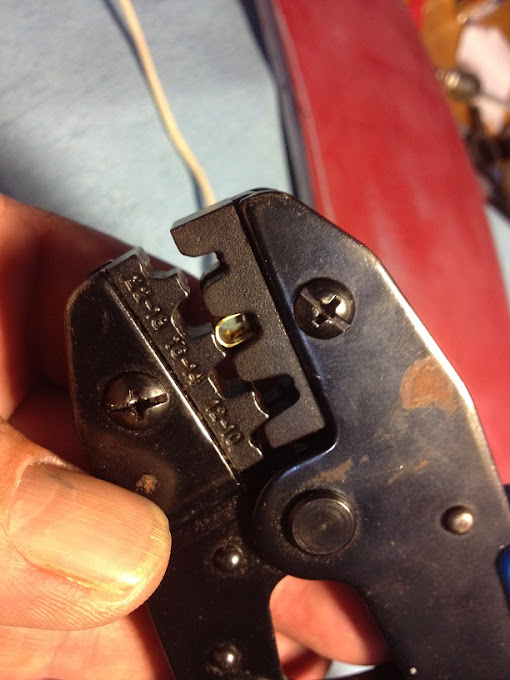


Crimp it... crimp it real good... and voila'! (as opposed to "viola" which everyone knows is a musical instrument):


Slide the insulator into place:


Dang! This is how they must of looked when the bike was new!:


Give the wire a tug when you're done. Occasionally I will get a loose crimp, but most of the time it is a result of smaller gauge wire. In those cases I will strip 1/2" of insulation and double the wire back on itself to mimic a heavier gauge wire. These are my go-to connectors for all things automotive.  8)


When done properly, these crimps are "gas tight" and are highly resistant to corrosion at the crimp. Provided you don't submerse them in saltwater (or acid!) regularly, should last another forty years.
« Last Edit: December 09, 2015, 04:14:50 AM by madmtnmotors »
TAMTF...


Wilbur


Projects:
"Evolution": http://forums.sohc4.net/index.php?topic=100352.0
"P.O. Debacle": http://forums.sohc4.net/index.php/topic,126692.msg1441661.html#msg1441661
F2/F3 O-rings: http://forums.sohc4.net/index.php?topic=113672.msg1300721#msg1300721
Cam Tower Studs: https://www.mcmaster.com/#93210a017/=t19sgp
Clean up that nasty harness: http://forums.sohc4.net/index.php?topic=137351.msg1549191#msg1549191
http://forums.sohc4.net/index.php/topic,148188.msg1688494.html#msg1688494
http://forums.sohc4.net/index.php/topic,139544.msg1579364.html#msg1579364
                                          
Charging system diagnosis: http://forums.sohc4.net/index.php?topic=1012.msg8345#msg8345
Get the manuals: http://manuals.sohc4.net/cb750k/
The Dragon: http://forums.sohc4.net/index.php?topic=45183.msg1571675#msg1571675
Headlight Switch: http://forums.sohc4.net/index.php?topic=113986.msg1283236#msg1283236
Branden's leak free top end thread: http://forums.sohc4.net/index.php?topic=107040.0
Engine Lifting Made Easy: http://forums.sohc4.net/index.php/topic,58210.msg1684742.html#msg1684742
                                      http://forums.sohc4.net/index.php/topic,100352.msg1675840.html#msg1675840
Static and Dynamic Timing: http://www.hondachopper.com/garage/carb_info/timing/timing1.html
Airbox Gasket Replacement: http://forums.sohc4.net/index.php/topic,114485.msg1290000.html#msg1290000
"Café" : http://forums.sohc4.net/index.php/topic,84697.msg953814.html#msg953814
PD Carb Choke Linkage: http://forums.sohc4.net/index.php/topic,100352.msg1669248.html#msg1669248
                                    http://forums.sohc4.net/index.php/topic,110931.msg1248354.html#msg1248354
                                    http://forums.sohc4.net/index.php/topic,48858.msg515204.html#msg515204
Follow up on your damn posts: http://forums.sohc4.net/index.php/topic,144305.msg1791605.html#msg1791605
Taiwanese Cam Chain Tensioners:  http://forums.sohc4.net/index.php/topic,155043.msg1774841.html#msg1774841
Gumtwo Seat Cover: http://forums.sohc4.net/index.php/topic,164440.msg1897366.html#msg1897366
Primary Drive: http://forums.sohc4.net/index.php/topic,166063.msg1919278.html#msg1919278
Tank Latch: http://forums.sohc4.net/index.php/topic,165975.msg1919495.html#msg1919495
Shorten your forks: http://vintage-and-classic-honda-s.456789.n3.nabble.com/How-to-shorten-forks-td4042465.html DO NOT CUT THE SPRINGS!
Clutch How To: http://vintage-and-classic-honda-s.456789.n3.nabble.com/How-to-change-and-adjust-a-clutch-SOHC-td4040391.html
Late model K7/K8/F2/F3 front sprocket cover removal: http://forums.sohc4.net/index.php/topic,178428.msg2072279.html#msg2072279
630 to 530 conversion: http://forums.sohc4.net/index.php/topic,180710.msg2094423.html#msg2094423

Sent from my Tandy TRS-80!