Author Topic: 72' CB750K2 Resto-Mod  (Read 14554 times)

0 Members and 7 Guests are viewing this topic.

Offline markreimer

  • Expert
  • ****
  • Posts: 1,192
Re: 72' CB750K2 Resto-Mod
« Reply #50 on: December 09, 2016, 01:43:05 pm »
You can see it here, line runs straight in.


Sent from my iPhone using Tapatalk

Offline timbo750

  • Expert
  • ****
  • Posts: 759
Re: 72' CB750K2 Resto-Mod
« Reply #51 on: December 09, 2016, 02:21:29 pm »
I manipulated the line by hand. Just took my time , it wont be an exact mirror as the guard mounting bracket is different on each side. I will get a photo for you.

Offline RAFster122s

  • I feel like a really really
  • Really Old Timer ...
  • *******
  • Posts: 12,198
  • SOHC4 member # 2605
Re: 72' CB750K2 Resto-Mod
« Reply #52 on: December 09, 2016, 05:29:30 pm »
A bare line can be bought at the auto parts store, go to a Napa or similar to get a better quality line than the run of the mill auto parts stores have as their plating won't be nearly as good. Then a good tubing bender...just need a properly sized set of bubble flare tools or have the NAPA store that does machine shop work do it for you after you bend it to proper shape.
It may take you a few tries and the hardest bend is the one closest to the fitting near the caliper because if the line isn't straight it is very hard to get it to thread properly and it may not seal well.  So, you may need to leave a bit more room than the stock line has to ensure it is bent correctly if you do not have a vice mounted tube bender where you can put the bend more precisely.  Heating the line some helps it bend easier.  File smooth any cuts you make to the line and be sure to dress the opening as well so it doesn't have bits left over or a rough end or it is likely to split.
Best of luck!
David- back in the desert SW!

Offline FridgeRaider

  • Enthusiast
  • **
  • Posts: 133
Re: 72' CB750K2 Resto-Mod
« Reply #53 on: December 10, 2016, 09:33:55 am »
You can see it here, line runs straight in.


Sent from my iPhone using Tapatalk

Cool pic! Thank you for showing me an alternative option.

A bare line can be bought at the auto parts store, go to a Napa or similar to get a better quality line than the run of the mill auto parts stores have as their plating won't be nearly as good. Then a good tubing bender...just need a properly sized set of bubble flare tools or have the NAPA store that does machine shop work do it for you after you bend it to proper shape.
It may take you a few tries and the hardest bend is the one closest to the fitting near the caliper because if the line isn't straight it is very hard to get it to thread properly and it may not seal well.  So, you may need to leave a bit more room than the stock line has to ensure it is bent correctly if you do not have a vice mounted tube bender where you can put the bend more precisely.  Heating the line some helps it bend easier.  File smooth any cuts you make to the line and be sure to dress the opening as well so it doesn't have bits left over or a rough end or it is likely to split.
Best of luck!

I love having new tools to play with but unfortunately I don't do enough tube bending to justify buying one. I work mainly in a one car garage so space is a precious commodity for me. It's the reason I haven't bought a benchtop lathe .........or a CNC milling machine. Those things are sweet too.     

I manipulated the line by hand. Just took my time , it wont be an exact mirror as the guard mounting bracket is different on each side. I will get a photo for you.

That's what I'm going to do for my build, post a photo for me if you can.

In the mean time, here's some more pics of the progress. The front fender and fork ears were an early xmas present from my father. It's a considerably better look than dents and rusted out holes found in the original ones.


The seat I'm using has a cool story. About a year ago, My Dad and I took his '74 CB750 up to a small bike show in Tallahassee and outside was the usual assortment of odds and ends vendors. One of them was a guy who owned a (now closed) motorcycle shop and was trying to sell the last of his left over pieces. He had two identical CB750 seats in almost immaculate condition for $40 apiece. He said when the bikes were popular back in the day, people would buy custom seats for him to install and leave him with the practically new originals. He said he left them to sit on shelves in his workshop for 30 years before closing up his doors..........so naturally we talked him down to $25 apiece. For him to store those that long, he ended up making ~$0.83/year.  ;D


I powdercoated the stator cover in the chrome and then went back with some semi-gloss Black Testor paint bought at Hobby-Lobby to fill in the background.


1972 CB750K2 Resto-mod (836cc Upgrade) - http://forums.sohc4.net/index.php/topic,161782.0.html

Offline FridgeRaider

  • Enthusiast
  • **
  • Posts: 133
Re: 72' CB750K2 Resto-Mod
« Reply #54 on: December 12, 2016, 09:19:38 pm »
Good thing I was looking for a challenge when I bought this bike.....because as as I delve deeper into the engine, I keep making unfortunate discoveries. When I had first dropped the oil pan I noticed a bad sign of sizeable chunks of metal and can now confidently say I found where the majority of it has come from. It looks like the PO either used to long of a screw or tried to torque screws down while something (fluid, dirt, etc) was at the bottom of the threads because he blew out the backing of three different M6 threads. One holds the oil pump in which isn't that big of a deal because it doesn't open up to the outside of the case. The other two he destroyed go straight through to open air. What are my options to repair or plug these things so I don't have oil seeping out past my bolts?


I also found this quite interesting, 2 out of the 5 lower crankshaft shell bearings look as if they were squished.


Not all is bad. I did blast and powdercoat the cylinders. This was the first time I've done something so intricate as far as trying to get an even coat in all the nooks and crannies between the fins. It's not perfect but I thought they came out well enough for a 40 year old survivor. Next step for them is a roadtrip with Cal to get bored out to 836cc.


P.S. I also had a broken bolt in the lower case but it came out easy enough with pliers. I figured I would add it to my write up to show the additional fun I've been having.

1972 CB750K2 Resto-mod (836cc Upgrade) - http://forums.sohc4.net/index.php/topic,161782.0.html

Offline calj737

  • Really Old Timer ...
  • *******
  • Posts: 20,980
  • I refuse...
Re: 72' CB750K2 Resto-Mod
« Reply #55 on: December 13, 2016, 04:43:08 am »
I would have those thru-holes welded closed on the backside, and make sure the threads are repaired before going to the trouble of powder coating them. Insert a steel bolt in the hole when welding to prevent the filler from buggering up the hole itself.
'74 550 Build http://forums.sohc4.net/index.php?topic=126401.0
'73 500 Build http://forums.sohc4.net/index.php?topic=132935.0

"Of all tyrannies, a tyranny sincerely exercised for the good of it's victim may be the most oppressive. It may be better to live under robber barons than under omnipotent moral busybodies. The robber baron's cruelty may sometimes sleep, his cupidity may at some point be satiated, but those who torment us for our own good will torment us without end for they do so with the approval of their own conscience." - C.S. Lewis

Offline FridgeRaider

  • Enthusiast
  • **
  • Posts: 133
Re: 72' CB750K2 Resto-Mod
« Reply #56 on: December 13, 2016, 08:45:29 am »
I would have those thru-holes welded closed on the backside, and make sure the threads are repaired before going to the trouble of powder coating them. Insert a steel bolt in the hole when welding to prevent the filler from buggering up the hole itself.

Hey, are there any options that don't involve welding. I dont own a welder nor the skills. I was think possibly redoing the threads with a long timesert and closing the ends up with JB weld.
1972 CB750K2 Resto-mod (836cc Upgrade) - http://forums.sohc4.net/index.php/topic,161782.0.html

Offline markreimer

  • Expert
  • ****
  • Posts: 1,192
Re: 72' CB750K2 Resto-Mod
« Reply #57 on: December 13, 2016, 09:29:07 am »
Could you take it to a welder? I've tried JB on engine case repairs in the past, not terribly reliable in my personal experience. If I had the engine apart to the degree you do, I would absolutely have it done by a welder. Then you know it's rock solid for life.

Offline RAFster122s

  • I feel like a really really
  • Really Old Timer ...
  • *******
  • Posts: 12,198
  • SOHC4 member # 2605
Re: 72' CB750K2 Resto-Mod
« Reply #58 on: December 13, 2016, 12:14:22 pm »
You need to bake the cases to get the oil absorbed by the cases to come to the surface so it can be cleaned with acetone using several clean cloths with it to remove the oil.  If I remember Cal's advice you should TIG under a gas to get a much cleaner weld.

I am sure they can clarify the techniques to use.  Even if you use epoxy to fix it you would need to purge as much oil as possible.  To allow a better adhesion.

Another option is to buy another set of cases without the damage.
David- back in the desert SW!

Offline markreimer

  • Expert
  • ****
  • Posts: 1,192
Re: 72' CB750K2 Resto-Mod
« Reply #59 on: December 13, 2016, 12:21:44 pm »
that's what I ended up doing. but only because I didn't feel confident enough in my skills to crack the bottom end... :-\

Offline calj737

  • Really Old Timer ...
  • *******
  • Posts: 20,980
  • I refuse...
Re: 72' CB750K2 Resto-Mod
« Reply #60 on: December 13, 2016, 01:34:34 pm »
Hey, are there any options that don't involve welding. I dont own a welder nor the skills. I was think possibly redoing the threads with a long timesert and closing the ends up with JB weld.
PM sent
'74 550 Build http://forums.sohc4.net/index.php?topic=126401.0
'73 500 Build http://forums.sohc4.net/index.php?topic=132935.0

"Of all tyrannies, a tyranny sincerely exercised for the good of it's victim may be the most oppressive. It may be better to live under robber barons than under omnipotent moral busybodies. The robber baron's cruelty may sometimes sleep, his cupidity may at some point be satiated, but those who torment us for our own good will torment us without end for they do so with the approval of their own conscience." - C.S. Lewis

Offline riverfever

  • Master
  • *****
  • Posts: 1,796
Re: 72' CB750K2 Resto-Mod
« Reply #61 on: December 13, 2016, 06:09:58 pm »
Stator cover turned out real sharp!
http://forums.sohc4.net/index.php?topic=127186.0

"You wouldn't think that out here...a man could simply run clear...out of country but oh my...oh my...nothing but the light." -Ben Nichols

Offline FridgeRaider

  • Enthusiast
  • **
  • Posts: 133
Re: 72' CB750K2 Resto-Mod
« Reply #62 on: December 13, 2016, 07:51:14 pm »

Another option is to buy another set of cases without the damage.


I'm trying my best to avoid that. Cal offered to pick it up (along my my cylinders) and weld it at his home base. A lot of the damage to the engine has had me scratching my head as to what the previous owner was thinking.

Stator cover turned out real sharp!

Thanks! I won't ever be a professional pinstriper or surgeon but I got it to where I liked it.
1972 CB750K2 Resto-mod (836cc Upgrade) - http://forums.sohc4.net/index.php/topic,161782.0.html

Offline RAFster122s

  • I feel like a really really
  • Really Old Timer ...
  • *******
  • Posts: 12,198
  • SOHC4 member # 2605
Re: 72' CB750K2 Resto-Mod
« Reply #63 on: December 13, 2016, 09:33:30 pm »
Everything you have been doing has come out great! Many would have thrown in the towel on her so, kudos to bringing her back.  Cal will do a fantastic job on the case repairs.  Mad skills and he has created a little welding porn he has shared in various threads.  He has the gear and experience to do a solid repair.
BTW, you are not alone finding inside the case damage, just this is extremely case.  Makes you wonder what the PO was thinking.
David- back in the desert SW!

Offline rickmoore24

  • Be led by your dreams, not pushed by your problems.
  • Hot Shot
  • ***
  • Posts: 747
  • I <3 SOHC4's
    • Rosenbard Films
Re: 72' CB750K2 Resto-Mod
« Reply #64 on: December 13, 2016, 10:00:45 pm »
Fantastic work so far! Funny about the missing powder coat on the neck vin stamp. My powder coater went over the stamp on my first build and the CHP officer who inspected my bike hassled me about it, but not to badly as he gave me a green light. Looking forward to the rest!
1972 CB750 K2 (Daily Runner)
1972 CB750 K2 (Sold)
1973 CB750 K3 (Hardtail 836cc)
1998 CBR F3 - R.I.P., went down on the 101 in Calabasas, Ca.
1995 EG6

Offline FridgeRaider

  • Enthusiast
  • **
  • Posts: 133
Re: 72' CB750K2 Resto-Mod
« Reply #65 on: January 29, 2017, 05:22:53 pm »
So a big shout out to forum member Calj737! Over the past month or so he has helped me out big time with the work I needed done to the engine. He stopped by one day in December to pick up my cylinders, piston kit, and the bottom half of my crankcase. While we were talking, he inspected the rest of the engine parts and found a couple of small chips in two of my exhaust valve guides. He convinced me to have those replaced by his machinist/mechanic while he was at it boring out my cylinders. Thanks to him, my engine ended up getting the full treatment:

- Bored Cylinders for 836 kit
- Rings gapped
- Milled cylinder surface
- Piston heads coated (ceramic I think?)
- Piston skirts coated (dry film lubricant?)
- Decked head
- New exhaust guides
- Re-cut valves seats, both intake & exhaust
- Valves lapped
- Intakes ported (PO had a questionable go at it himself so it need it)
- New valves springs installed (I sent the Kibble White HD springs that I had bought with Cal)

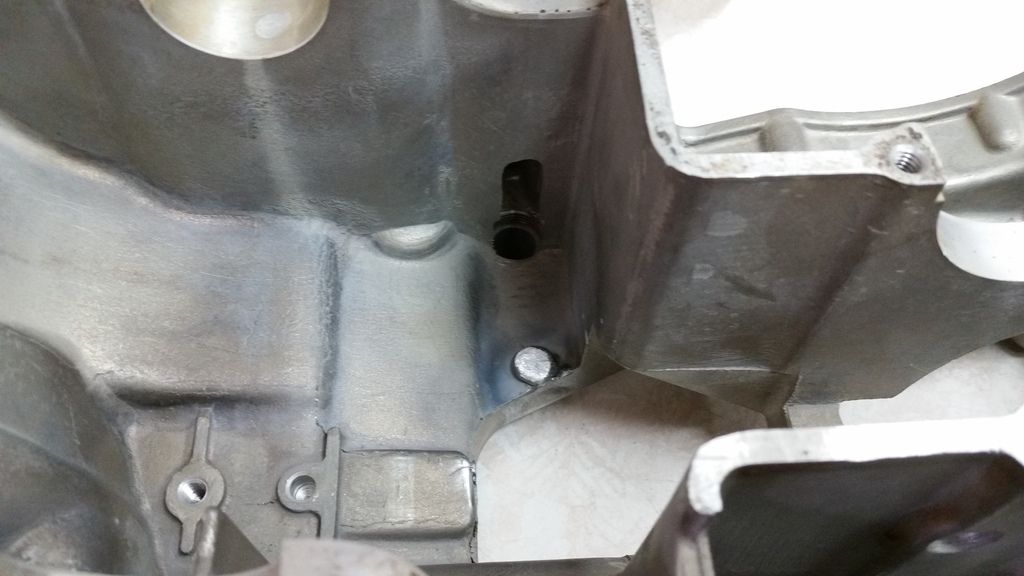
He was also nice enough to even weld up the screw holes that were letting in daylight on the lower half of my crankcase and ship it back. I know I've told him a thousand times but thanks again!

Here's a couple pics of the repaired threads. I'll post pics of the head and cylinders once I un-box them for install.


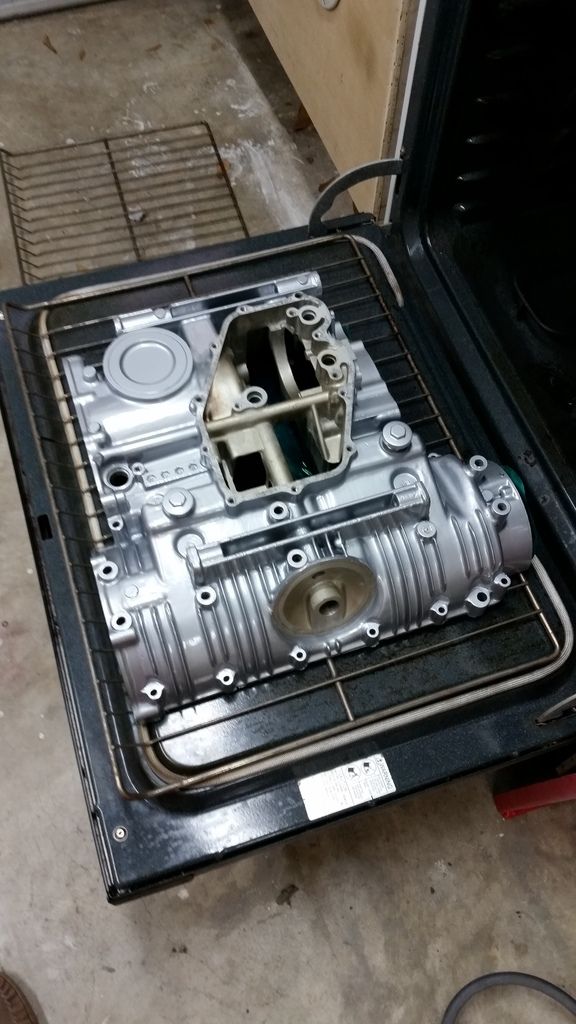
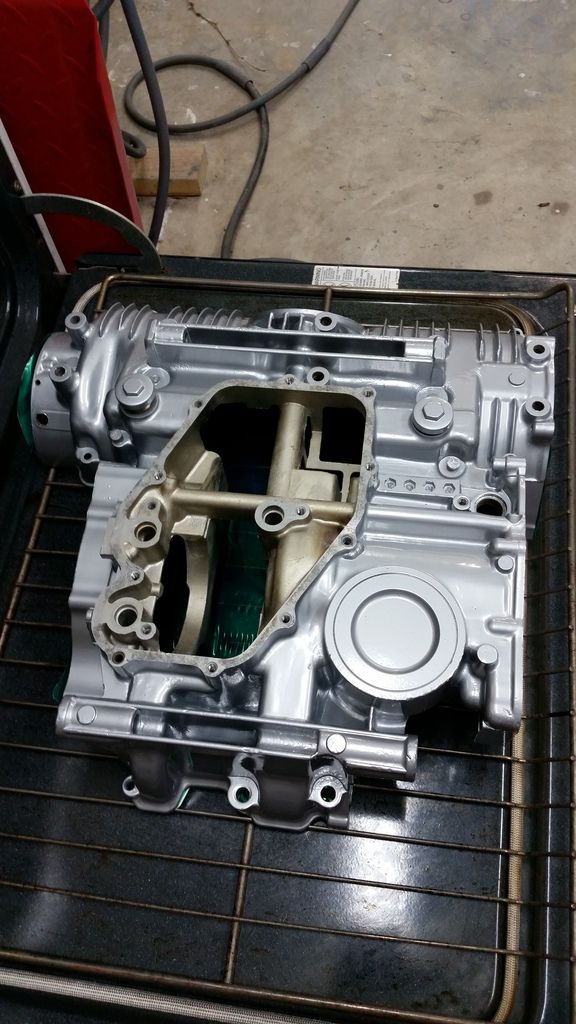
I took a break from working on the bike for the most part while the top end was in Virginia (I think?) with Cal. Now that it's all back and just itching to be put back together, I tackled powder coating the crankcase shells this weekend. For the most part they came out really nice, not show quality but none-the-less nice for such a first time endeavor. I even had to upgrade my oven in the garage to fit them in. I played musical chairs (but with ovens) to make that happen. I bought a new one for my kitchen, moved the kitchen one to the garage, and then moved the small garage one to the curb. 


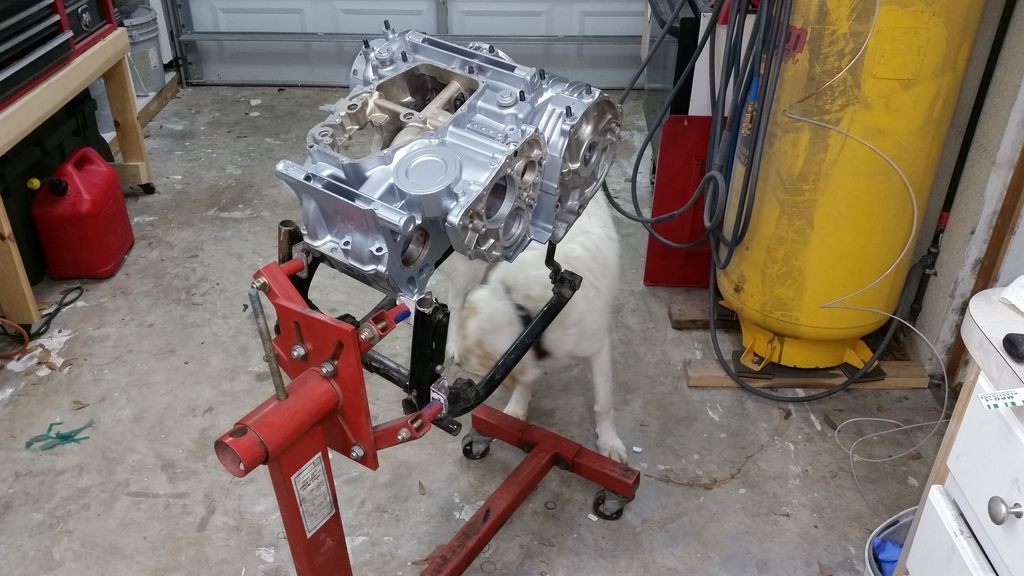
My expertly engineered engine adapter. I had an old junk frame sitting out back behind a shed that I thought would be a perfect sacrificial lamb to hold the engine up for the rebuild.


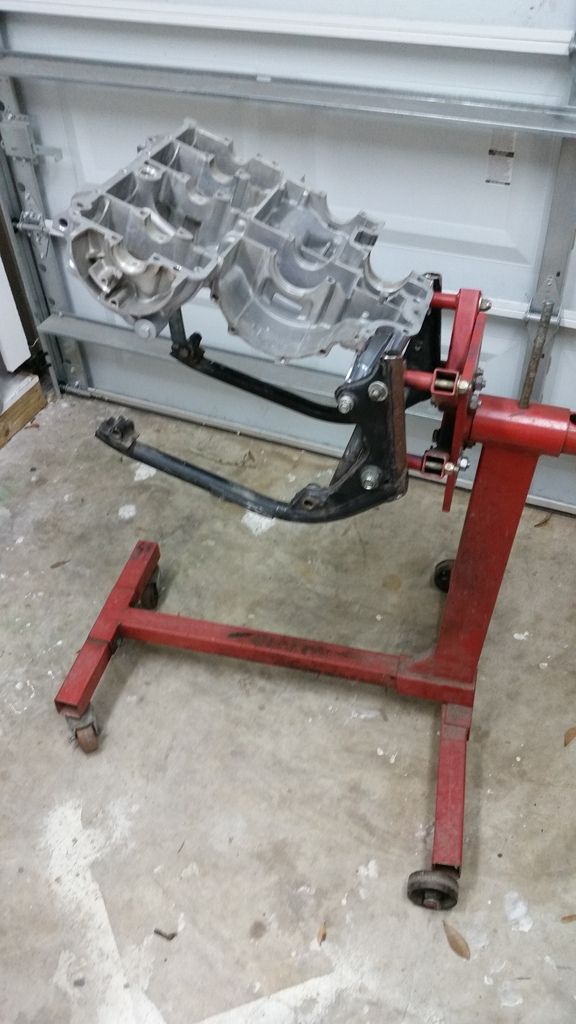
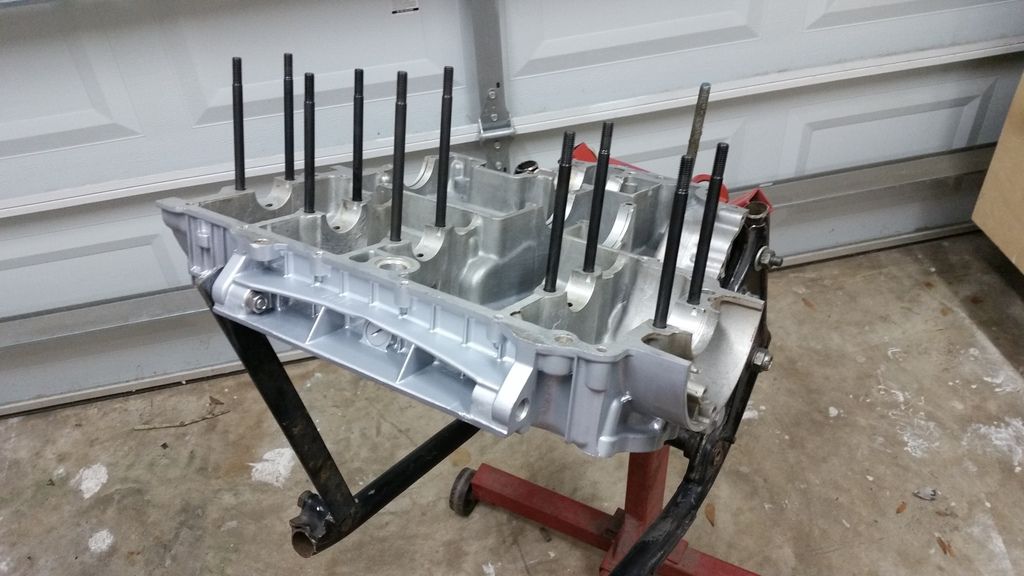
Obviously when I get the crankcase rebuilt, I can just flip it and have it sit normally in the frame for the top end portion of the rebuild. The crankshaft bolts that came with the engine looked like garbage so I bought APE's HD Main Bearing Studs and installed them per their directions on the website.


I used a Motion Pro M8 Stud Installer to torque them into place and ran into a pet peeve of mine. It's obviously designed to be used on metric studs but the mechanism that allows you to relieve pressure off the stud requires an SAE allen wrench. I took me a couple minutes to realize this when trying to get a metric allen wrench to work. We need to just switch over to all metric as a country already. *insert angry fist waving*   


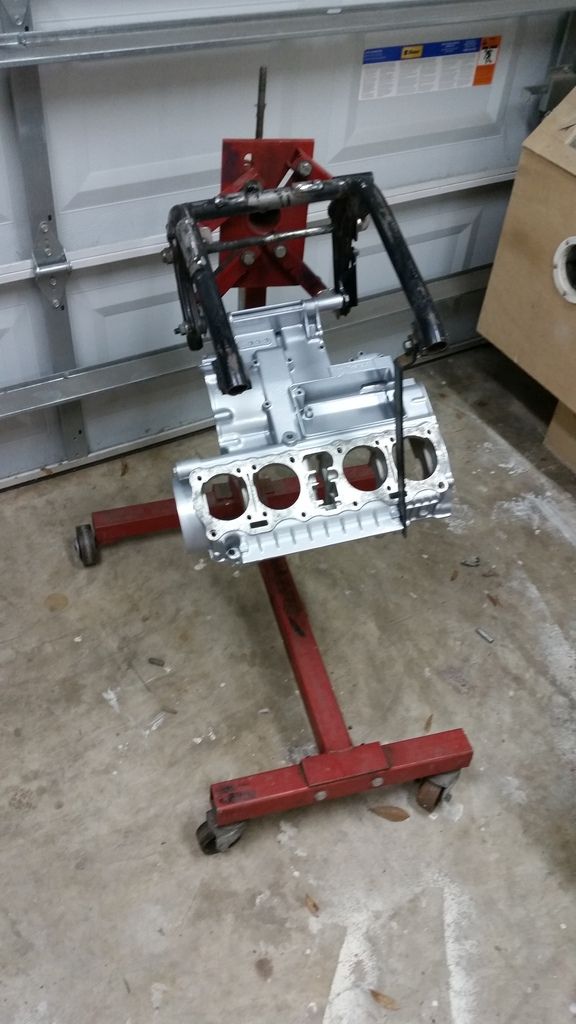
bottom end sandblasted and powder-coated


I did purchase two new sets of OEM green crankshaft bearings to replace the two sets that look liked they had been squished. I plasti-gauged them all and they ended up being within the upper limit of .08mm.

My father wants to participate in putting the engine back together so I will have to find some time next weekend to invite him over. He has a CB550 project of his own at the moment so it will be a good learning opportunity for him (and me). 


« Last Edit: January 29, 2017, 05:29:42 pm by FridgeRaider »
1972 CB750K2 Resto-mod (836cc Upgrade) - http://forums.sohc4.net/index.php/topic,161782.0.html

Offline calj737

  • Really Old Timer ...
  • *******
  • Posts: 20,980
  • I refuse...
Re: 72' CB750K2 Resto-Mod
« Reply #66 on: January 29, 2017, 05:26:53 pm »
You're a man of your word, Fridge! Updated post by Sunday evening. Lol!
'74 550 Build http://forums.sohc4.net/index.php?topic=126401.0
'73 500 Build http://forums.sohc4.net/index.php?topic=132935.0

"Of all tyrannies, a tyranny sincerely exercised for the good of it's victim may be the most oppressive. It may be better to live under robber barons than under omnipotent moral busybodies. The robber baron's cruelty may sometimes sleep, his cupidity may at some point be satiated, but those who torment us for our own good will torment us without end for they do so with the approval of their own conscience." - C.S. Lewis

Offline Johnny340

  • Hot Shot
  • ***
  • Posts: 431
Re: 72' CB750K2 Resto-Mod
« Reply #67 on: January 31, 2017, 05:19:19 pm »

I used a Motion Pro M8 Stud Installer to torque them into place and ran into a pet peeve of mine. It's obviously designed to be used on metric studs but the mechanism that allows you to relieve pressure off the stud requires an SAE allen wrench. I took me a couple minutes to realize this when trying to get a metric allen wrench to work. We need to just switch over to all metric as a country already. *insert angry fist waving*   


I agree!  Apparently we switched here in Canada in 1979 but still use 'standard' in machine shops and other surprising places...like the new billet Jetski part I bought that had both metric and standard threads in the same piece!  I digress..

Awesome work so far!!
Subscribed.
1975 CB750F0 Super Sport
1972 CB750K2
1981 CB650
1974 T-500
2003 GSXR750
2006 YZ250

Offline FridgeRaider

  • Enthusiast
  • **
  • Posts: 133
Re: 72' CB750K2 Resto-Mod
« Reply #68 on: February 18, 2017, 04:37:29 pm »
So progress on rebuilding the engine has been tediously slow. Every step forward is met with a new challenge that required me to wait for a missing part before I could proceed. At first it was when I was mocking up the transmission that I found that I was missing a half moon key that holds one of the transmission bearings in place.


I found a member who tossed one in the mail for me (thanks again Mike!) and a couple days later a I was "back on track". The next set back I found myself with was after I cleaned and prepped all the innards for the crankcases. I mocked them up and when I went to grab my Hondabond to seal both halves together, it was nowhere to be found. I seem to have misplaced it during a couple of moves over the past year and a half. So there went another week awaiting a new tube to arrive by mail. 

That brings me back to last night, where I finally had all pieces I needed to mate the two halves together. All new seals, cam chain, and crankshaft bearings that plastiguaged within spec.


Inevitably I have run into another issue that I can't figure out after installing the shifter mechanism. I'm hoping that someone with more experience with these transmissions can help me understand what would cause the following. Hopefully a solution can be found without me tearing the cases apart (doubtful but I can still dream right?). When I go to try to shift through the gears, it only wants to do half shifts. It feels like the gears only mesh up in certain spots once I rotate the final drive shaft (front sprocket) by hand.

This is the sequence of the events happening: shift from 1st to 2nd -> half shift up -> shift back to 2nd -> spin final drive shaft a bit -> shift to 3rd -> shift down to 2nd -> now I can't shift back down to first. Sometimes I have to do this to shift up and down through each gear, sometimes I can shift a couple of gears before it will half shift again.   

Another interesting part is if I try to shift from neutral to 1st it will sometimes half shift. It acts like it is still in neutral until I spin the final drive shaft a couple of rotations and I can actually feel the gear engage the clutch shaft (I dont know the technical term) and then I can actually shift it fully into 1st gear.

Half shift to 1st:


1st (sorry for blurry pic, you get the idea):


I tried loosening the neutral indicator thinking it might be to tight and pinning the shift drum but no change. :-\
1972 CB750K2 Resto-mod (836cc Upgrade) - http://forums.sohc4.net/index.php/topic,161782.0.html

Offline FridgeRaider

  • Enthusiast
  • **
  • Posts: 133
Re: 72' CB750K2 Resto-Mod
« Reply #69 on: March 01, 2017, 08:46:13 am »
I posted my concerns about the transmission not shifting through all the gears as smoothly as I would like in a help thread and received some good feedback. Most were in agreement that I wouldn't be able to 100% tell if there are any issues until I hook it all up in frame and have adequate oil pressure to the gears and splines. So I pressed forward......slowly.

link to help thread: http://forums.sohc4.net/index.php/topic,163911.msg1890010.html#msg1890010

I seem to always take before pictures but forget to take any during/after pics. I modified my clutch hub per Hondaman's book. I drilled 8 additional holes to allow extra oil to get to the plates. Here's a pic of the hub ready to be drilled in a vice.


clutch buttoned up:


I started adding all the covers, found out that I was missing the shifter cover gasket. Another incident of having to buy one piece and wait for it to arrive in the mail  :'( Good thing the stator cover looks amazing.


Next up: Cruzin_image's 836 pistons that had the ceramic coating on top and the dry film lubricant on the skirts. It's a shame that the cylinders aren't see-through cause this pistons are pretty.


I picked up the Kibble White HD cylinder studs while CycleX had them on sale for ~$90 or so. Here was my procedure to installing them:

- run M8 tap into each thread to clean them up
- blow out with compressed air
- add blue loctite to longer threaded end (instructions say to use only if threads are loose, I chose the better safe than sorry route)
- torque down to 8 ft-lbs with help of Motion-Pro M8 stud installer (this made it quicker/easier than double nut method)


There isn't a big rush to finish the engine right now. I'm still trying to find a source for the early style oil jets for the head. A couple members suggested making my own on a lathe but that is a really daunting task for my current machining skills (which is essentially non-existent).
1972 CB750K2 Resto-mod (836cc Upgrade) - http://forums.sohc4.net/index.php/topic,161782.0.html

Offline calj737

  • Really Old Timer ...
  • *******
  • Posts: 20,980
  • I refuse...
Re: 72' CB750K2 Resto-Mod
« Reply #70 on: March 01, 2017, 09:37:51 am »
If you know the dimensions for the jets, send them to me. I'll cut them this weekend if I get a chance.
'74 550 Build http://forums.sohc4.net/index.php?topic=126401.0
'73 500 Build http://forums.sohc4.net/index.php?topic=132935.0

"Of all tyrannies, a tyranny sincerely exercised for the good of it's victim may be the most oppressive. It may be better to live under robber barons than under omnipotent moral busybodies. The robber baron's cruelty may sometimes sleep, his cupidity may at some point be satiated, but those who torment us for our own good will torment us without end for they do so with the approval of their own conscience." - C.S. Lewis

Offline FridgeRaider

  • Enthusiast
  • **
  • Posts: 133
Re: 72' CB750K2 Resto-Mod
« Reply #71 on: March 01, 2017, 04:16:19 pm »
If you know the dimensions for the jets, send them to me. I'll cut them this weekend if I get a chance.

I'll do my best to get you some accurate dimensions on these darn things. Are they just restrictors to increase oil pressure to the top end? Whats the purpose of the screen on the backside of the early ones? I cant see them designed as a long term filtering device. (I know 750s aren't your thing Cal, maybe someone else can chime in)
1972 CB750K2 Resto-mod (836cc Upgrade) - http://forums.sohc4.net/index.php/topic,161782.0.html

Offline Stev-o

  • Ain't no
  • Really Old Timer ...
  • *******
  • Posts: 34,171
  • Central Texas
Re: 72' CB750K2 Resto-Mod
« Reply #72 on: March 01, 2017, 04:25:53 pm »
Motor is looking good
'74 "Big Bang" Honda 750K [836].....'76 Honda 550F.....K3 Park Racer!......and a Bomber!............plus plus plus.........

Offline BPellerine

  • Master
  • *****
  • Posts: 2,222
Re: 72' CB750K2 Resto-Mod
« Reply #73 on: March 01, 2017, 06:02:22 pm »
when I had my early jets out,I had to clean them,what came out would have been enough to plug the jet,the screen holes are really too big to keep stuff out,the only way to clean them is through the screen holes,using small wire to dislodge dirt and spray cleaner to drive it out,multiple times.the later jets did not have screens so I think a simple disc with the right size metering hole would be ok,but the centre is raised to keep the small oring in place.sandcast did not have screen as well.bill
1978 CB 750K ard and webers
another anfob

Offline FridgeRaider

  • Enthusiast
  • **
  • Posts: 133
Re: 72' CB750K2 Resto-Mod
« Reply #74 on: March 03, 2017, 06:13:18 am »
Motor is looking good

Thanks!

If you know the dimensions for the jets, send them to me. I'll cut them this weekend if I get a chance.

So the measurements are 11mm diameter and 6.3mm deep. I don't know what size the metering hole is or how high it's raised as BPellerine mentioned.
1972 CB750K2 Resto-mod (836cc Upgrade) - http://forums.sohc4.net/index.php/topic,161782.0.html