Author Topic: I Fixed my CB550 Start Switch - For Real (Updated)  (Read 13300 times)

0 Members and 1 Guest are viewing this topic.

Offline Smudgemo

  • Hot Shot
  • ***
  • Posts: 329
  • Maker of Stuff
I Fixed my CB550 Start Switch - For Real (Updated)
« on: January 14, 2017, 04:21:13 pm »
Edited: Note that the PB photo hosting was killed for cash.  I declined to negotiate with terrorists so the photo links are broken as of July 2017.  I have uploaded a few photos at the end of this thread to help keep it useful.  And now later, I tried to upload some from my Flickr account, but they don't match perfectly, so this isn't a perfect thread.  You'll get the idea.  This isn't rocket-surgery.  You only need to replace the plastic switch housing and you're golden.

This is the story of how I fixed my 550 start button(s) and I hope it's a help to the members of this community.

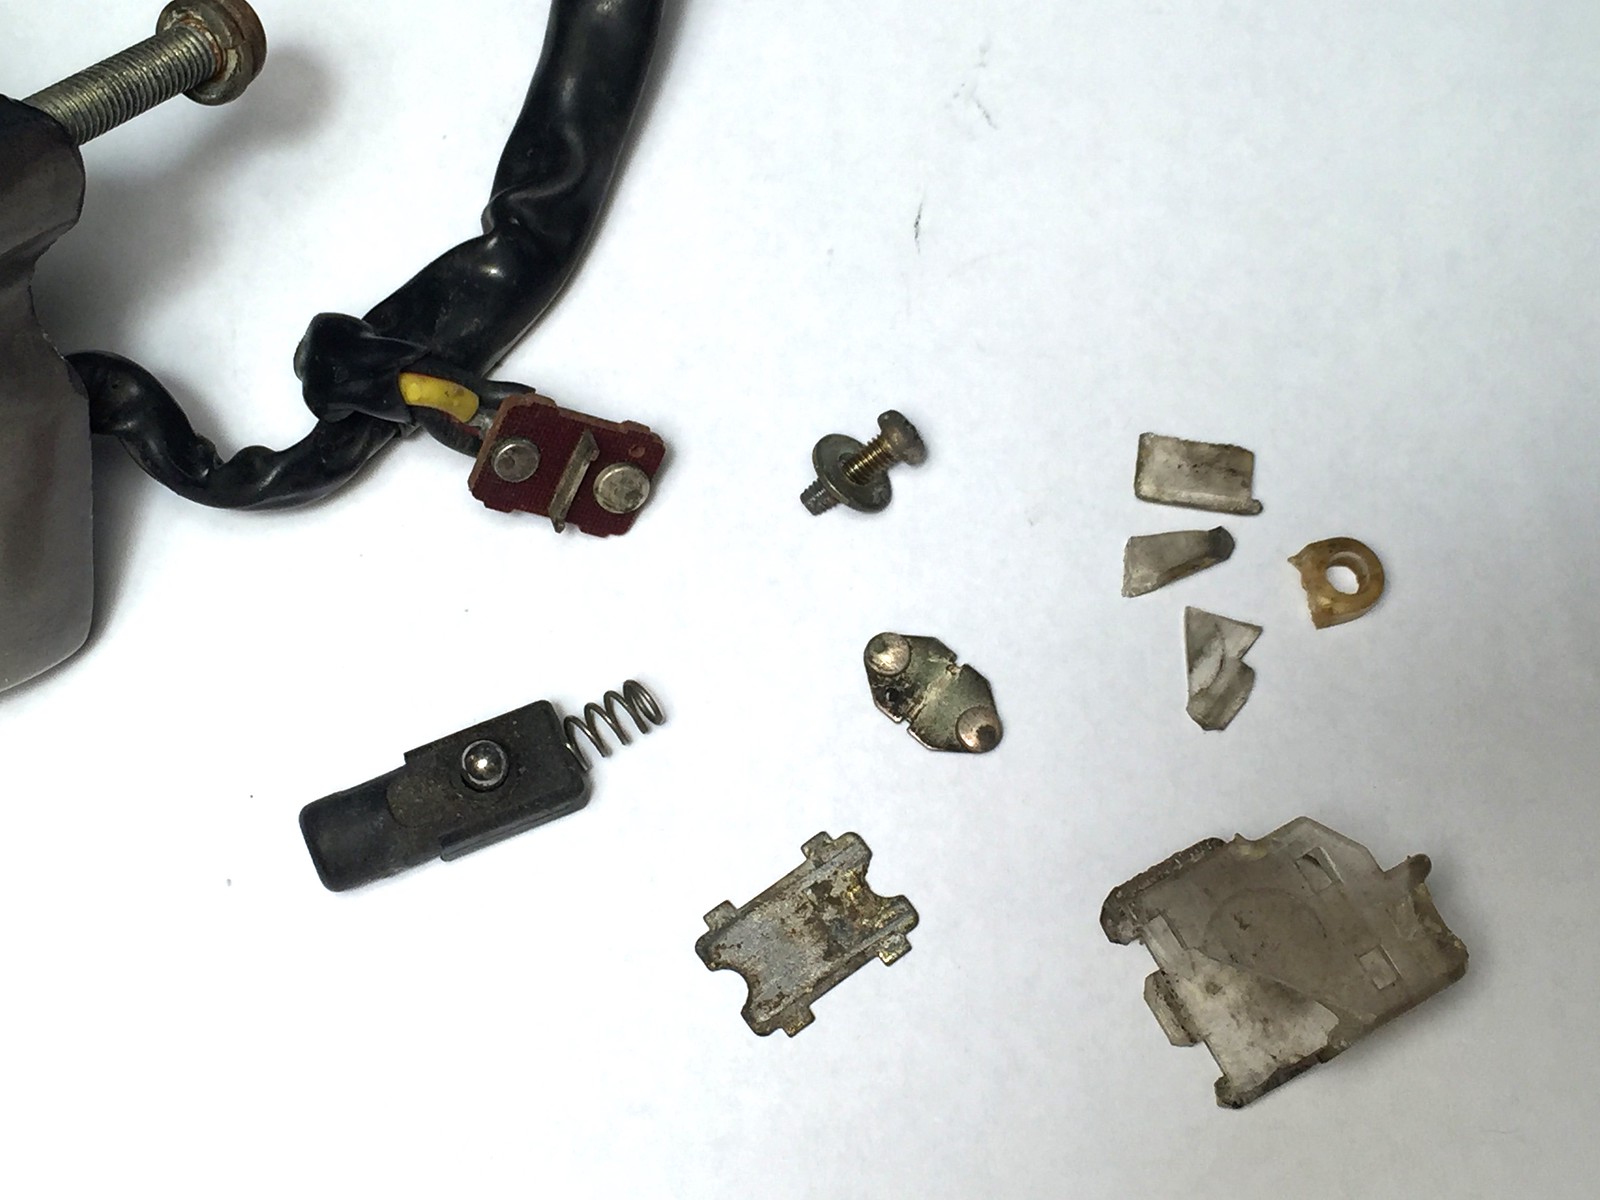
Of course, the start button has the issue where the button no longer works.  I wanted to test it with a multimeter, but I had recently fried mine (don't ask..) and asked my neighbor George to stop by with his.  The button still worked, but the switch did not work as it should so George (the engineer and curious guy) says we might as well take it apart and see what's in there.  I'm curious, too, so it's game-on.  Of course, we find the plastic housing is broken so the switch doesn't work like it should.  However, we find the wires test out like they should, and even better, the housing is only in five pieces and we are able to measure the dimensions.


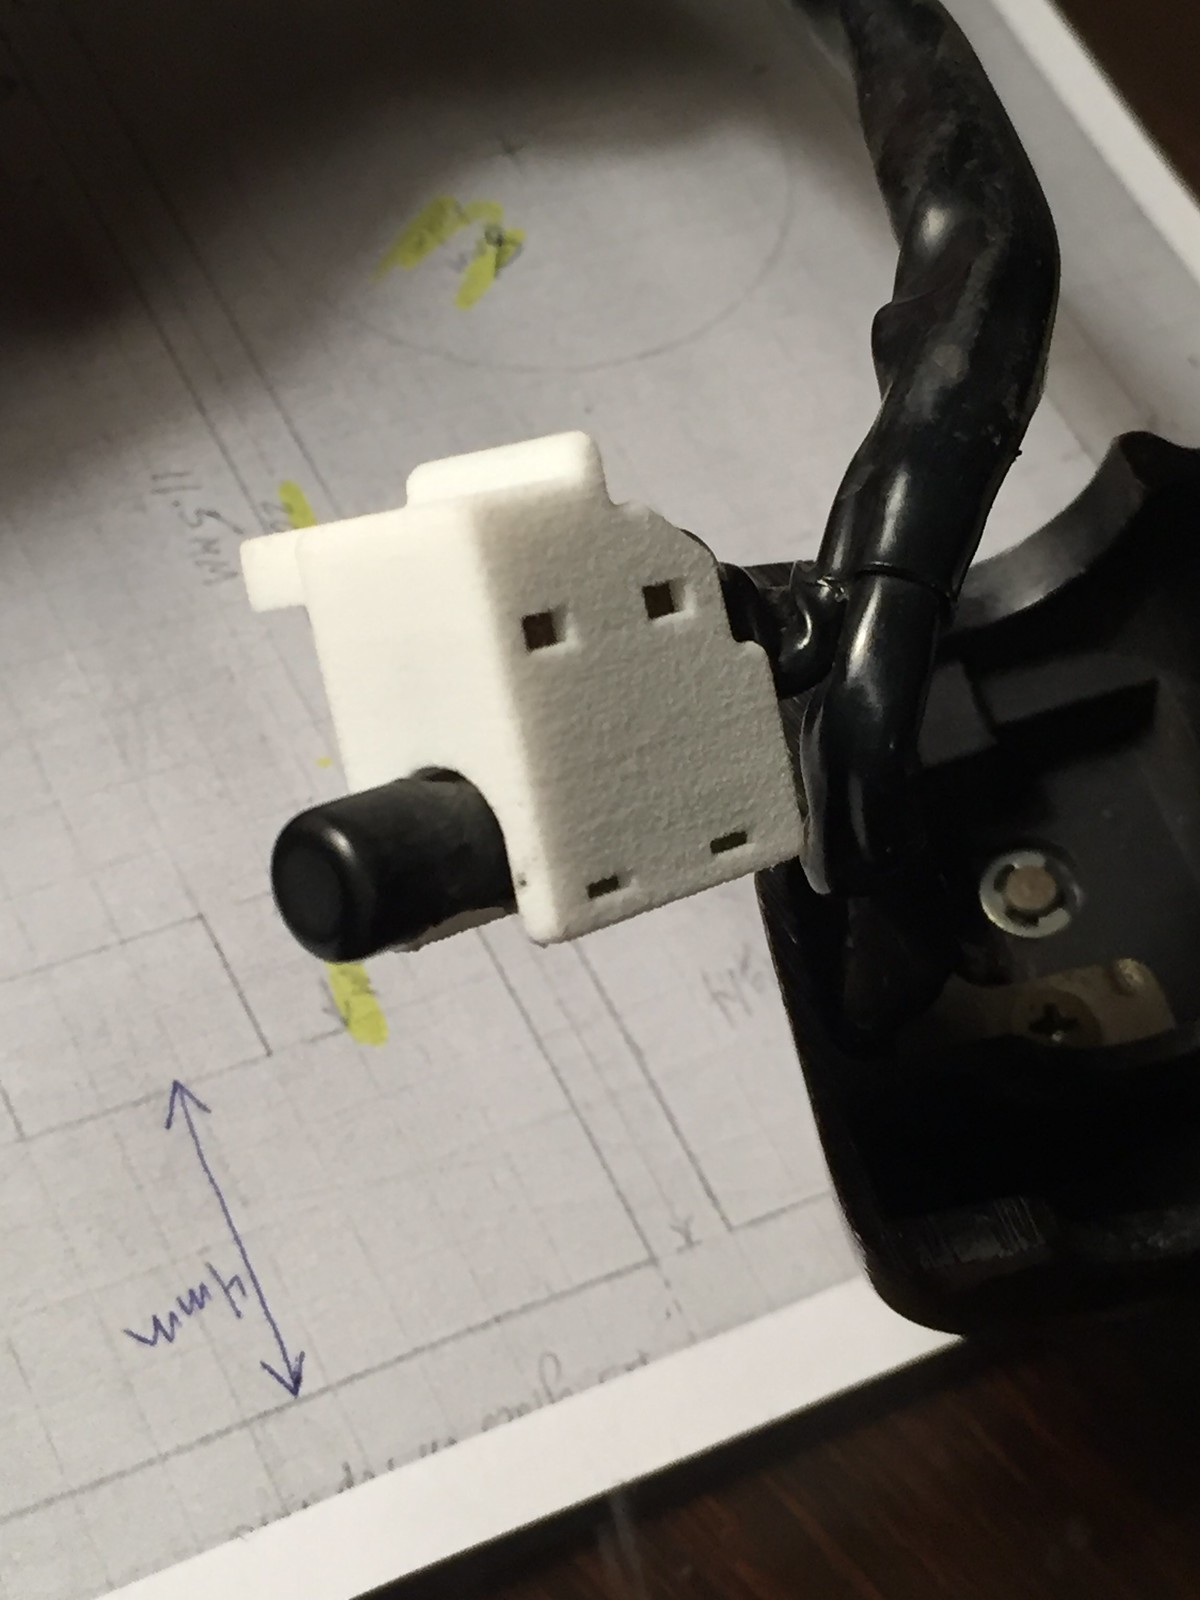
A couple of days later George has done a replacement in CAD and sent the file off to an outfit that does 3D printing with quality equipment.  A week later we get our replacement.  I assembled the parts in the new housing, and everything fit perfectly, so I'm pretty excited, but have a week of work before I can install it.  I want to see if I can do this fix having only removed the throttle cables.  (Spoiler alert: I did.)


Before beginning this project, the headlight didn't come on and (of course) the starter didn't turn over.  Everything else seems okay other than the flasher doesn't flash.

Not the definitive way to do this, but here's how I did it.
1. I last rebuilt the carbs, so the tank was already off.  Unhook the negative battery cable.
2. Unhook the throttle cables from the carbs.
3. Open the control and lift the top away.  Remove the throttle cables and tube.
4. Over a bag/box/soft towel, open the lower control and unscrew the tab holding the wires in place.  I think this is a phillips screw, not JIS.
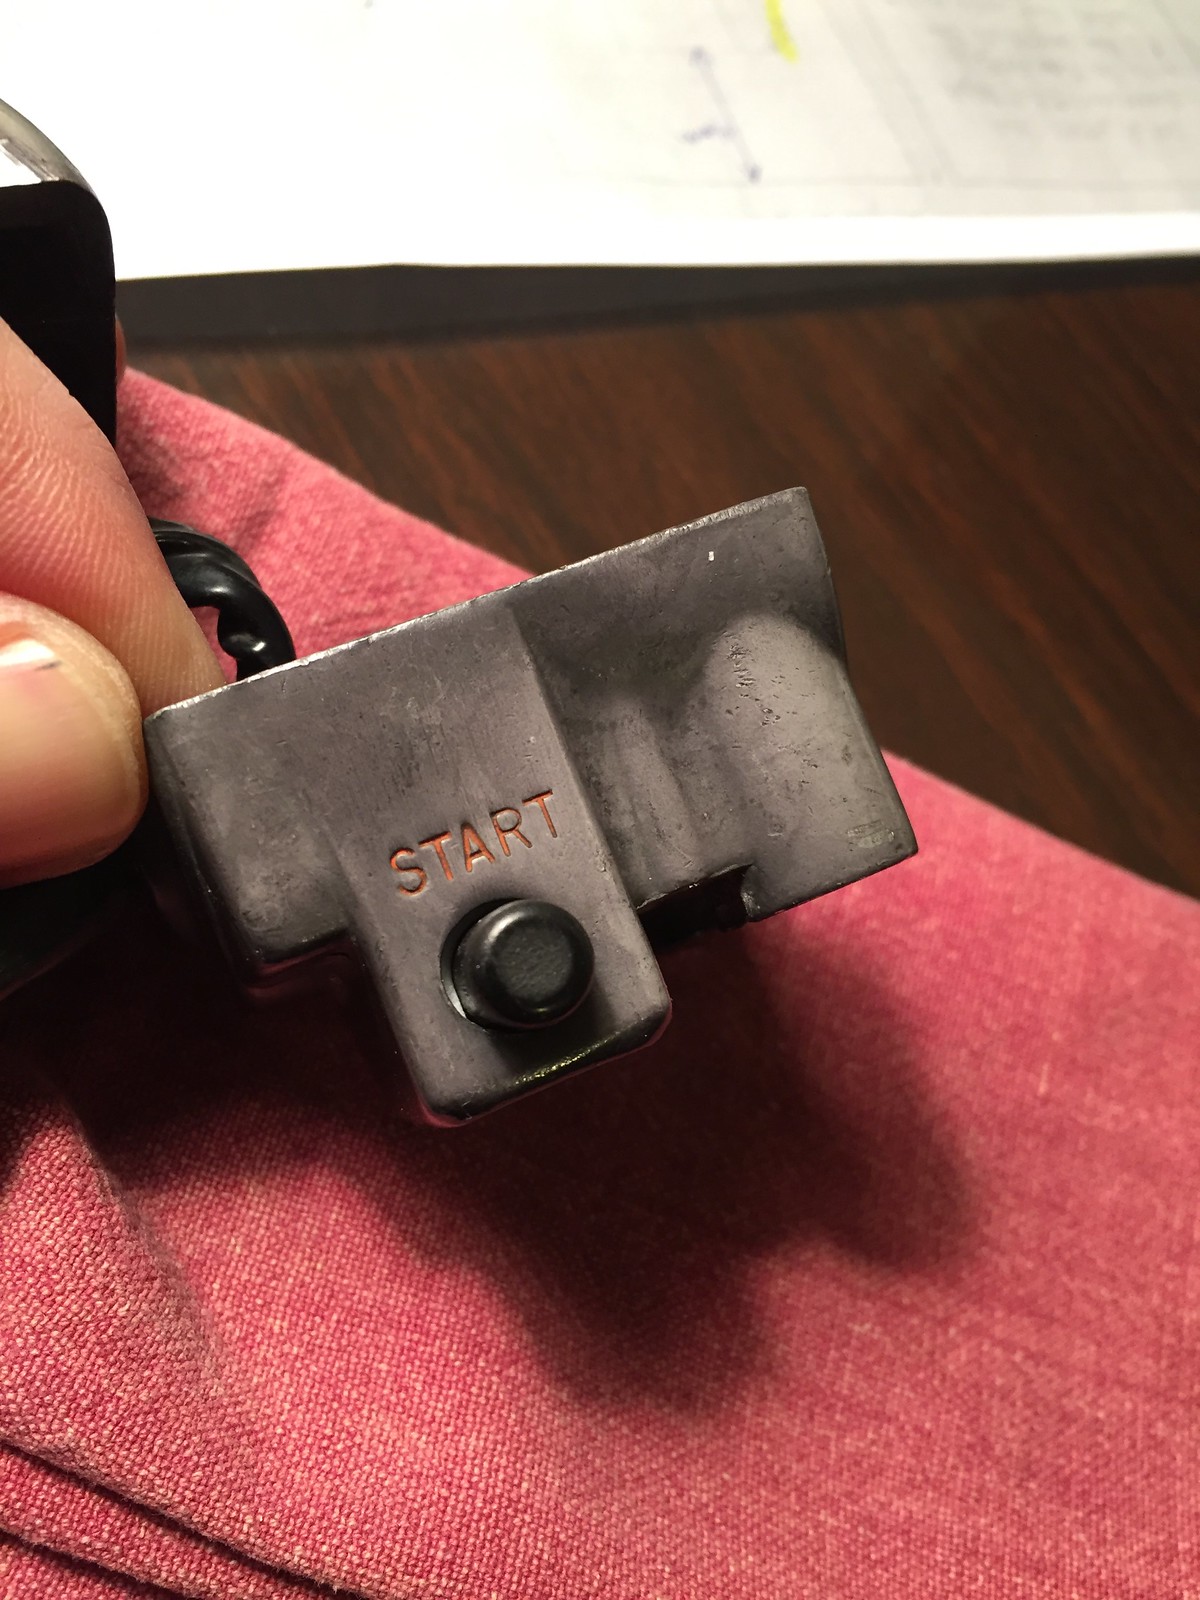
5. Remove the screw holding the housing to the control.  Mine had lots of crud in it:


6. Remove the starter button components (and be careful not to lose the small parts.)  There will be a board with three wires soldered to it that stays attached to the bike.  Now you end up with a mess like this:


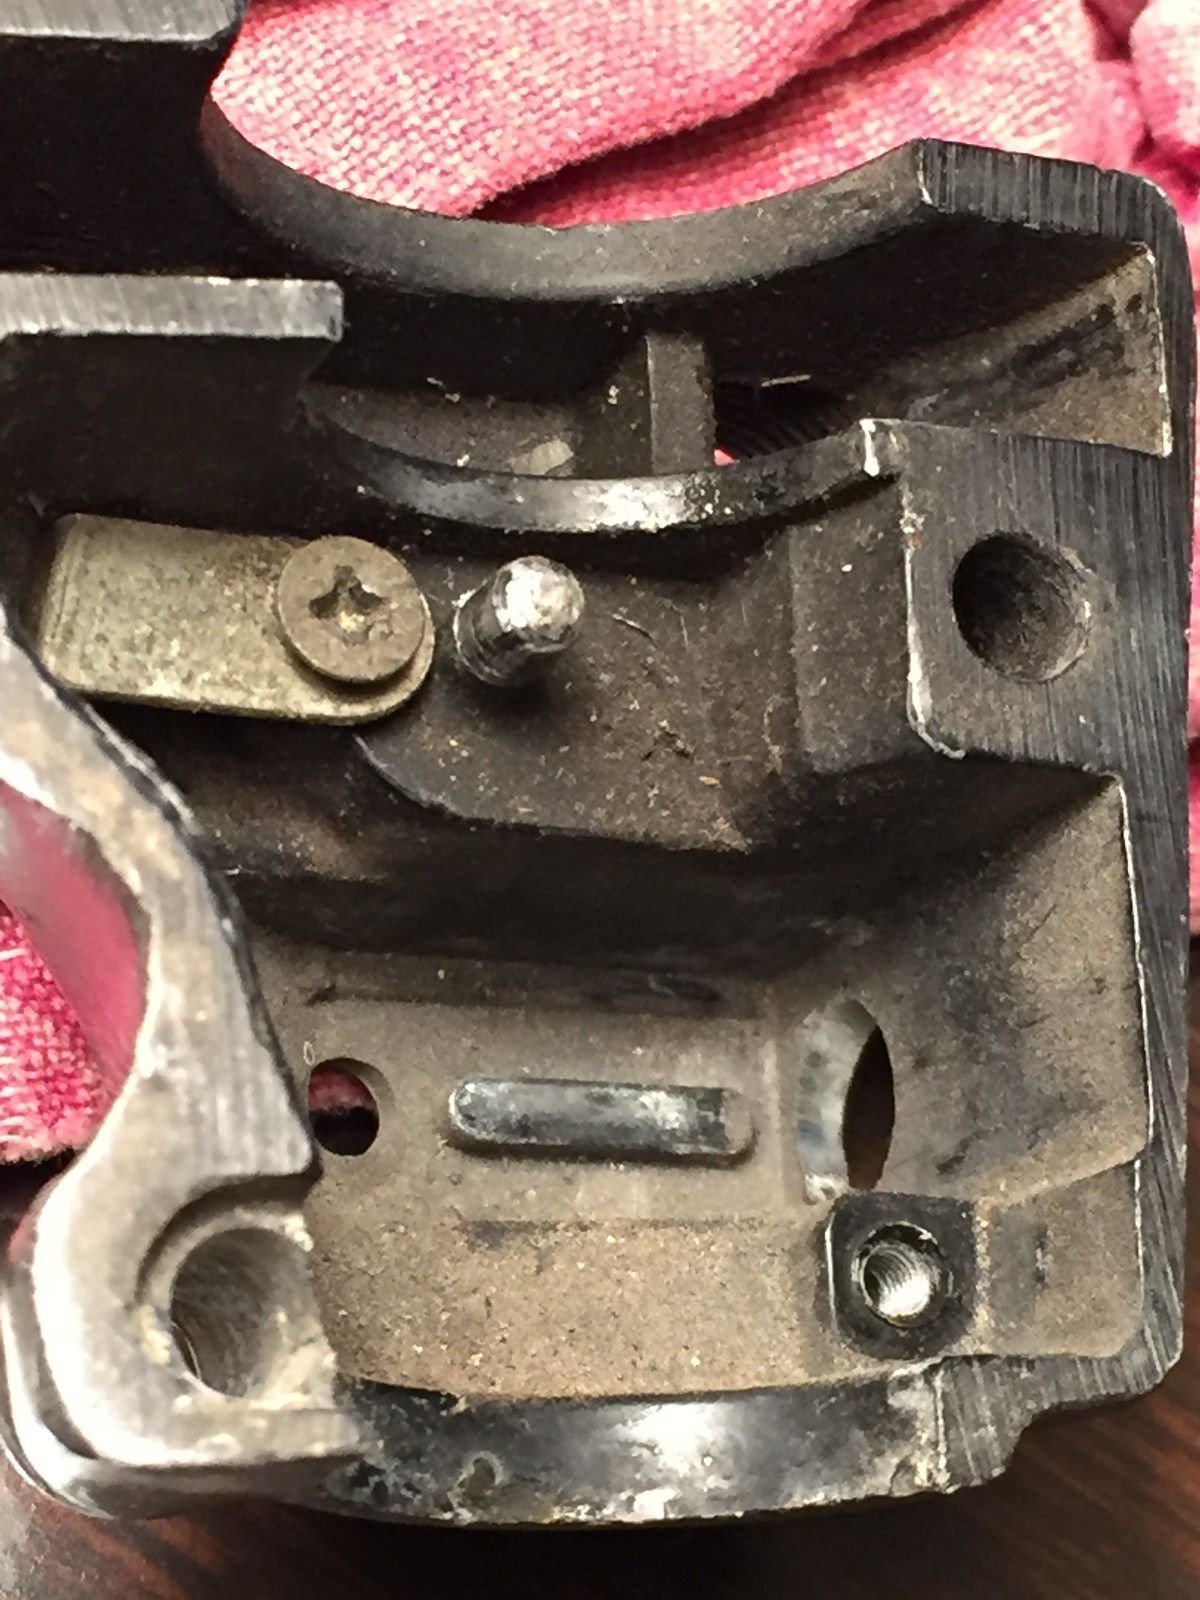
7. Clean everything.  I took some carb cleaner to the control housing, and used circuit cleaner and 400 wet or dry / scrub pad to carefully clean up the electrical surfaces.  DON'T OVERDO IT!!  I also soaked some parts in Evap-O-Rust to clean up the corrosion.

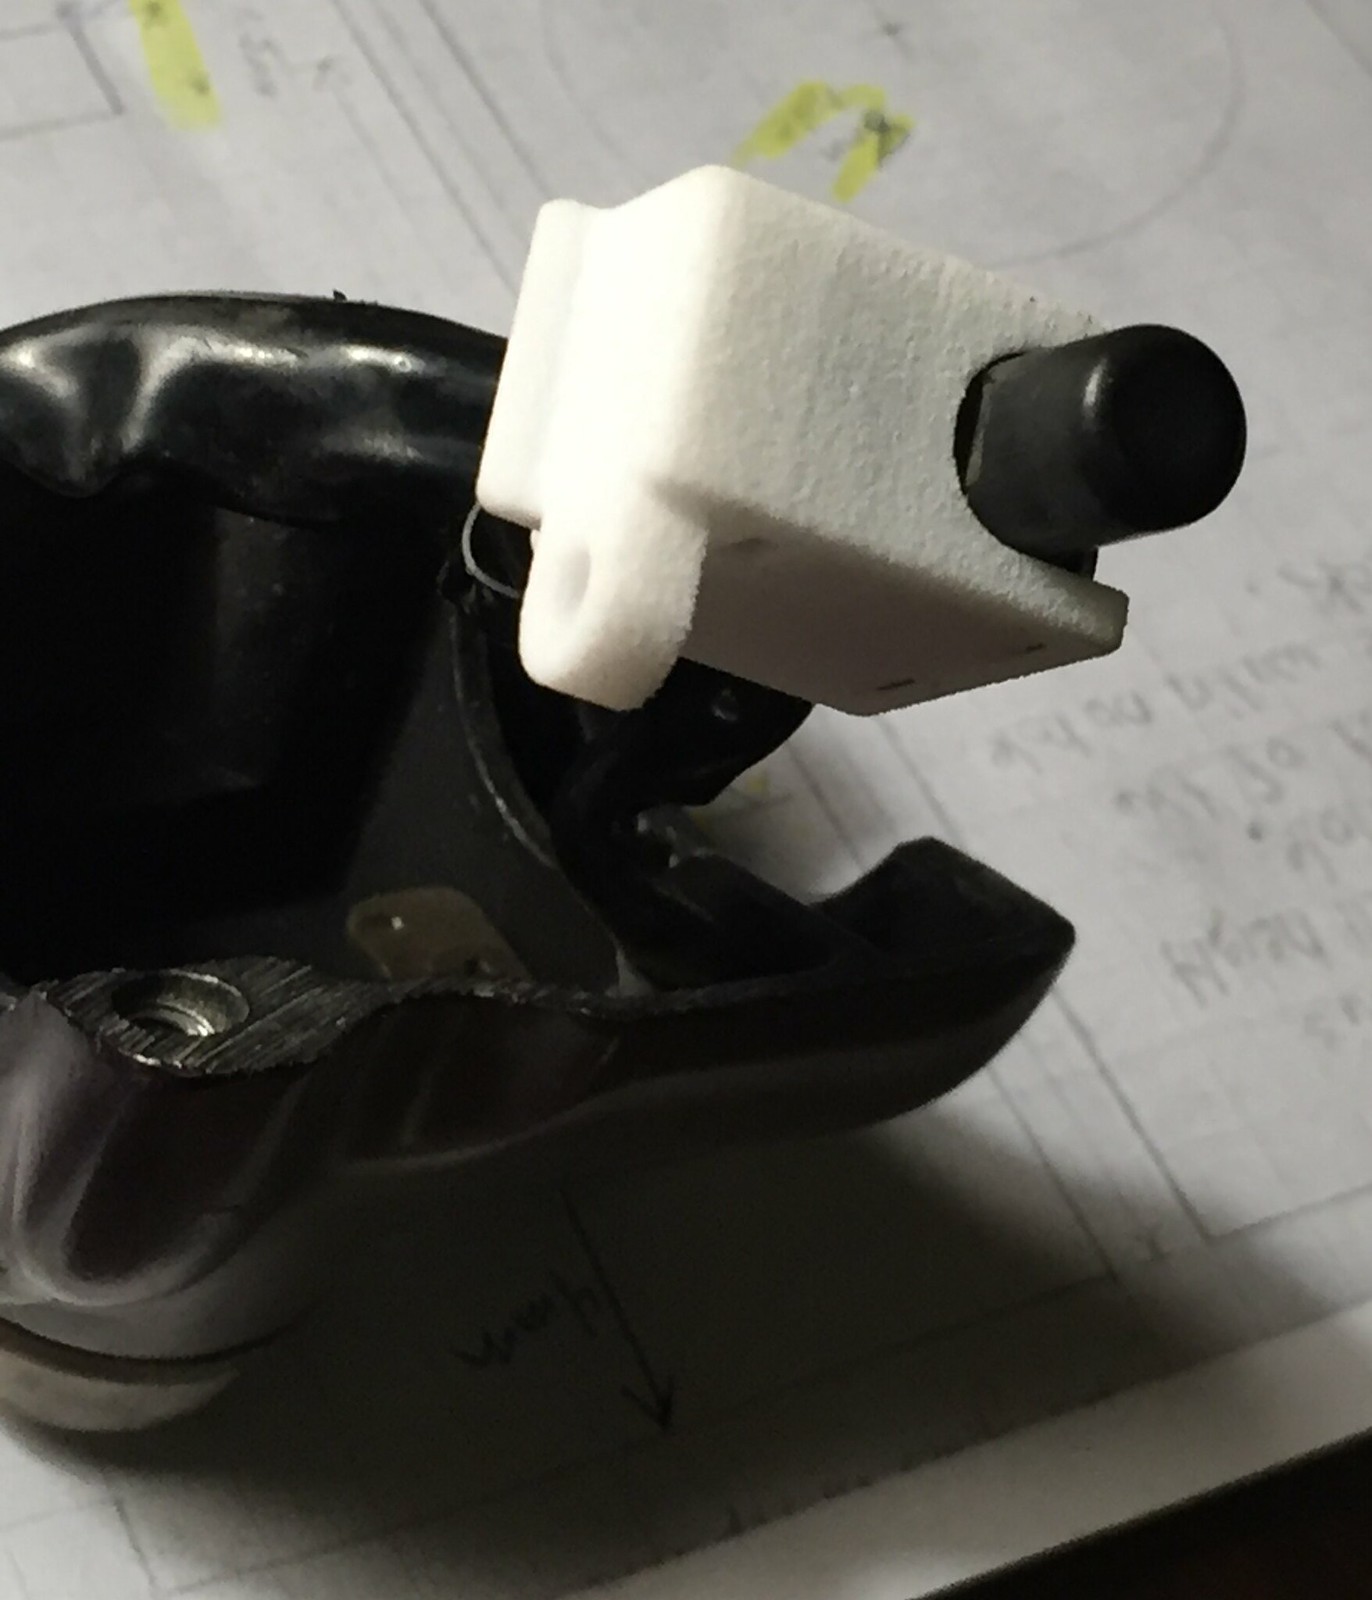
8. Coat the parts lightly with plastic-safe dielectric grease and insert the board into the housing.  I pushed mine in at an angle but level.  The housing is flexible enough to handle the slight movement.  George thinks Honda did it the same way.  I thought maybe two halves glued together, but one piece sure seems easier to assemble.  When I got it in far enough, I pushed the rear down and then the front up with a blunt tool.  Both ends snapped in place perfectly.  Note the appropriately sized square holes for the board and plate.
9. Turn the housing over and drop in the rocker.  Make sure it's properly in place.
10. I put some grease on the spring under the ball and on the ball to keep them in place while inverted.  You need to put them in place on the rocker, so turn the button over and set it in place.
11. Lube the plate a bit where it contacts the bottom of the button with a bit of dielectric grease and insert the metal cap.  I set one side in place and used a small screwdriver to pry the housing apart slightly.  The plate dropped right in.
12. Done and ready to install.
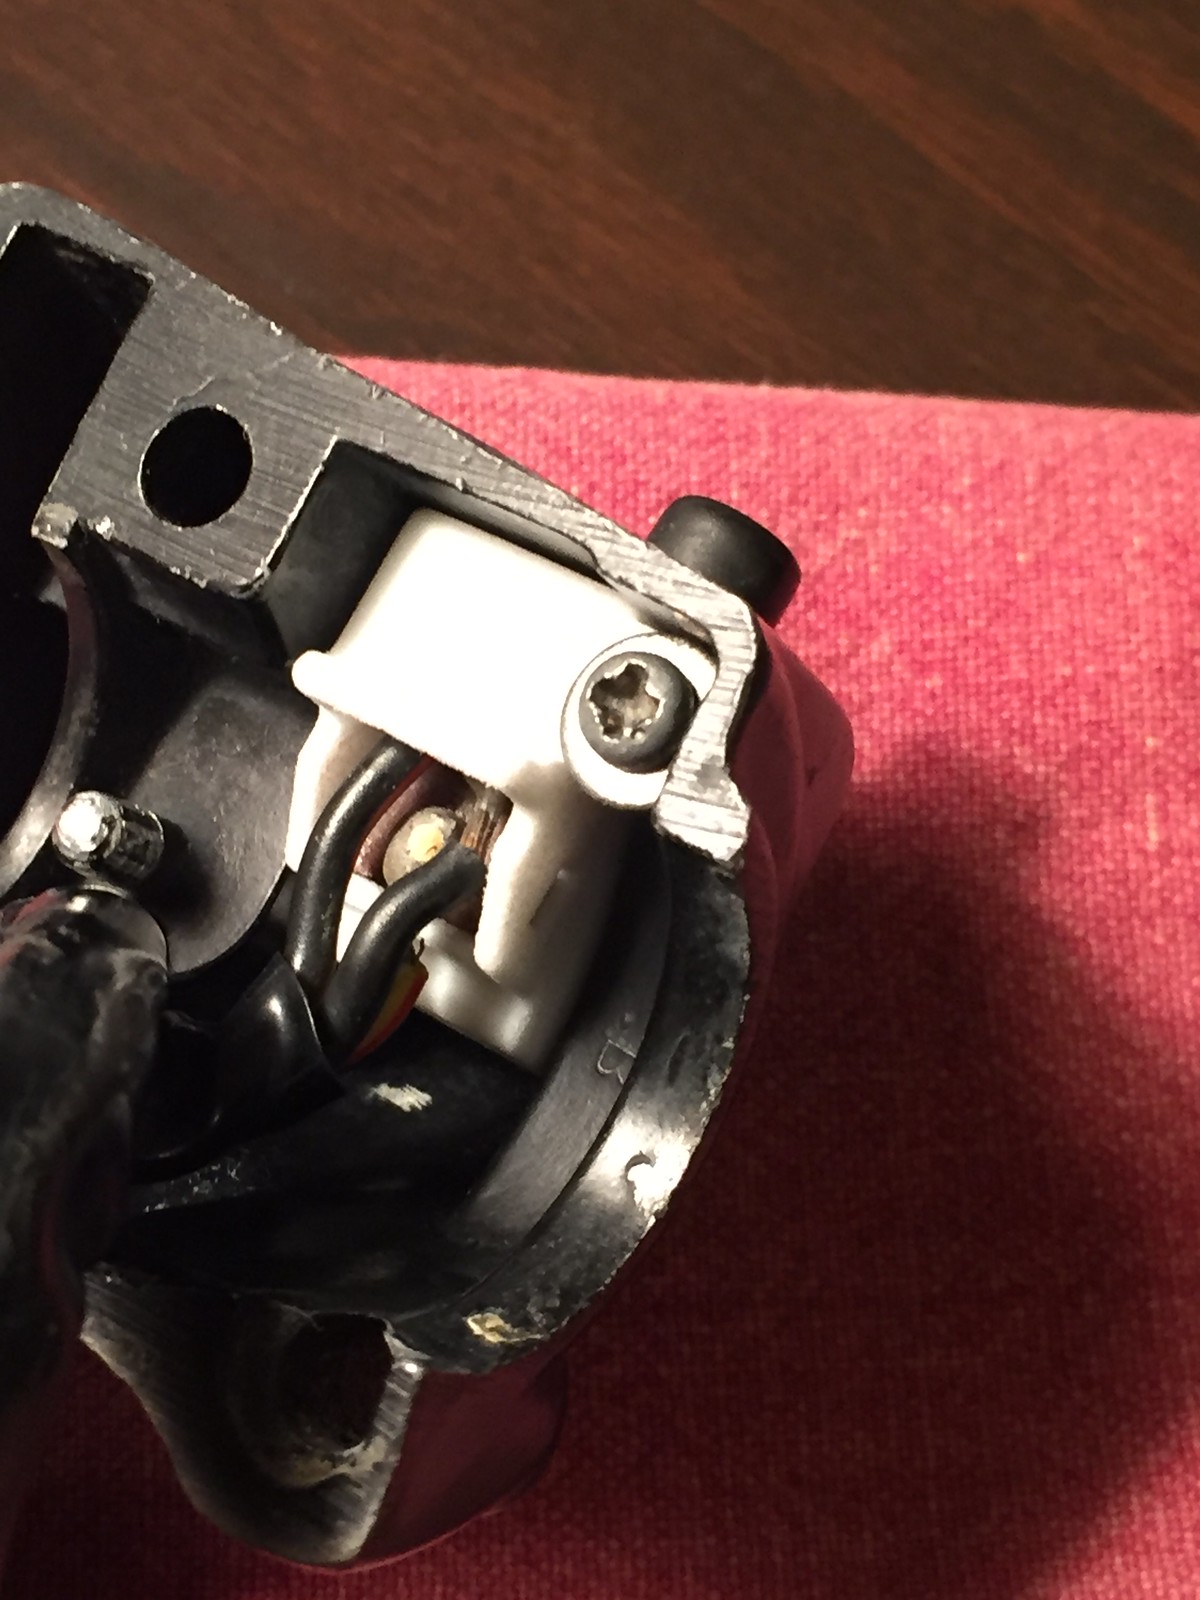
13. Carefully reassemble the control and throttle cables.  I installed the tab to hold the wires in place first, then the hold-down screw.  Bolt the halves together and admire your work.  Don't forget to hook up the battery.

We aren't materials experts, but feel that this plastic is a good balance of durability and stiffness.  I feel that for the cost and ease of installation, even getting five good years is a no-brainer.  Maybe it'll last way longer, I just don't know.

Some things that are extremely cool about this project:
1. No goofing around with pulling wires in or out of the bars.
2. I didn't touch the headlight to get at any wiring.
3. The housing is an exact copy.  There is a fin/hump/whatever that seems to sit against the bars to help keep the housing in place when the button is pushed.
4. No funky work-arounds or buying new controls.  Both switches had perfectly useful parts that ought to outlive any of us.
5. It only takes an hour or so and you're back in business.
6. It has given George and me a ton of extra stuff to talk about on our morning commute.

I still need to address brakes and forks, but this was looking like the most painful thing to deal with.  Turns out it was a ton easier than pulling and installing the carbs.  Now I'm thinking of providing this part if anyone has interest in getting one for their bike.  Again, I have no idea how long it will last, but it's got to be enough seasons to be worth bothering.  Cost would be about $10 each plus $5 for shipping per order.  I'll probably have the printer do the shipping but I don't know about international shipping.  We can figure it out.

Thoughts?
« Last Edit: March 14, 2020, 04:51:30 pm by Smudgemo »
-Ryan
Project 1976 CB550F Rebuild: http://forums.sohc4.net/index.php/topic,160110.0.html
Thread - How to fix your starter button (for real): http://forums.sohc4.net/index.php/topic,163170.0.html

Offline seanbarney41

  • not really that much younger than an
  • Really Old Timer ...
  • *******
  • Posts: 10,593
Re: I Fixed my CB550 Start Switch - For Real
« Reply #1 on: January 14, 2017, 05:12:40 pm »
DO IT!...and nice job!...I'll take 10 to start.
If it works good, it looks good...

Offline rrietman

  • Full Member
  • *
  • Posts: 8
Re: I Fixed my CB550 Start Switch - For Real
« Reply #2 on: January 14, 2017, 05:19:08 pm »
I am in for at least five. these switches are fixable, your part makes it waaaay more doable. just tell me where to send the $$.
Thanks
Randy

Offline pjlogue

  • Expert
  • ****
  • Posts: 966
Re: I Fixed my CB550 Start Switch - For Real
« Reply #3 on: January 14, 2017, 05:19:55 pm »
I'd buy 2!

-P.

Offline Smudgemo

  • Hot Shot
  • ***
  • Posts: 329
  • Maker of Stuff
Re: I Fixed my CB550 Start Switch - For Real
« Reply #4 on: January 14, 2017, 07:59:55 pm »
I think George is setting up a storefront w/ the printer so all you need to do is get the link and order what you want. 

This is a shot of the housing installed on the #1 control on the bench.  You can see how nicely it fits.


These are better shots of the #1 bench assembly:


I could go back to work tomorrow and be happy with my weekend.  This was the one thing I wanted to get squared away, and it went as well as I had hoped for.
« Last Edit: January 22, 2017, 08:46:04 pm by Smudgemo »
-Ryan
Project 1976 CB550F Rebuild: http://forums.sohc4.net/index.php/topic,160110.0.html
Thread - How to fix your starter button (for real): http://forums.sohc4.net/index.php/topic,163170.0.html

Offline flatlander

  • Old Timer
  • ******
  • Posts: 2,597
Re: I Fixed my CB550 Start Switch - For Real
« Reply #5 on: January 15, 2017, 01:52:44 am »
neatly done, and very nicely documented!
i have no problem with my button but will keep an eye on this as it might come in useful one day.

Offline ekpent

  • Really Old Timer ...
  • *******
  • Posts: 13,512
  • To many bikes-but lookin' for more
Re: I Fixed my CB550 Start Switch - For Real
« Reply #6 on: January 15, 2017, 05:02:34 am »
 A product to definitely fill a need. If they work for a 750 I will be down for a couple.

Offline SCRacer

  • Full Member
  • *
  • Posts: 1
Re: I Fixed my CB550 Start Switch - For Real
« Reply #7 on: January 15, 2017, 09:50:10 am »
I have the same problem.
Put me down for 5 pcs.

Thanks
Cliff

Offline Smudgemo

  • Hot Shot
  • ***
  • Posts: 329
  • Maker of Stuff
Re: I Fixed my CB550 Start Switch - For Real
« Reply #8 on: January 16, 2017, 11:38:52 am »
A product to definitely fill a need. If they work for a 750 I will be down for a couple.

I can't say what this will work for other than it works for two '76 550Fs.  Anyone who wants one will need to figure that out.  Maybe we could keep a list of success stories in this thread so others don't need to guess?  I also don't want any hard feelings, so let me reiterate that I can't possibly warrant the materials for how long they will last in this environment.  Maybe it's a long-term solution, and maybe it's a stopgap until printing materials evolve more.  George voiced concerns about current causing heat, and I think about heat from summer sunshine being harmful. 

I should also mention that the internal components in both examples were in good shape, but the buttons do show some wear which might cause some sloppiness.  I noticed that the bike in the video won't turn over if downward pressure is applied to the button when pressing it, but it usually works when pressing straight in, and always when applying some upward pressure.  I'm considering  a move of the holes for the bottom plate upward a very small amount like .25mm to account for button wear, but then it's not to spec.  A better move might be to pull the bottom plate and solder a bit of material to the rocker's contacts if it becomes problematic, but I'm not going back in until it's running and only if it causes problems.

I won't stop anyone from buying a bunch, but you'll be ordering directly from the printer and I won't have any option for refunding a purchase because you can't use them for whatever reason.  You'll want to check the terms and conditions they offer.  I guess I'd rather you guys buy one or two to make sure it's what you want before buying a bunch.  I should have the store link later today.
« Last Edit: January 16, 2017, 11:40:27 am by Smudgemo »
-Ryan
Project 1976 CB550F Rebuild: http://forums.sohc4.net/index.php/topic,160110.0.html
Thread - How to fix your starter button (for real): http://forums.sohc4.net/index.php/topic,163170.0.html

Offline Airborne 82nd

  • Expert
  • ****
  • Posts: 828
Re: I Fixed my CB550 Start Switch - For Real
« Reply #9 on: January 16, 2017, 04:48:45 pm »
Could you print me out four carbs ;D ;D

Offline disco

  • Hot Shot
  • ***
  • Posts: 571
Re: I Fixed my CB550 Start Switch - For Real
« Reply #10 on: January 16, 2017, 06:19:01 pm »
Very cool!! George must be a clever guy.

I have a set of CB750 controls that could use this repair method, so interested to see how other 750 owners go with it.

I was in the US just before Xmas & noted my company's engineering guys also have a 3D printer for producing their prototypes. Hmmmm.....I wonder how much beer might be required for a couple of 'foreign orders'  ;)   
1976 CB750 K6 Sapphire Blue
1972 CB750 K2 836 Orange Sunrise
1972 CB750 K2 Candy Red
1972 CB750 K2 Candy Gold'

Offline sixthwisconsin

  • With an 1855 Springfield, I'm a
  • Hot Shot
  • ***
  • Posts: 553
Re: I Fixed my CB550 Start Switch - For Real
« Reply #11 on: January 16, 2017, 06:55:22 pm »
If you are not interested in selling these yourself, would you be willing to post the CAD files we could take to our local 3D printer? You have come up with a item that would be a nice "open source" type thing and really fill a need. That would be the ultimate contribution to the SOHC community. (and I would completely understand if you don't want to do that).

Offline rrietman

  • Full Member
  • *
  • Posts: 8
Re: I Fixed my CB550 Start Switch - For Real
« Reply #12 on: January 16, 2017, 07:41:43 pm »
I can confirm that this part will fit cb400f, gl1000. if not many others. yes if the file can be shared, we all have access to printers.
Thanks
Randy

Offline Smudgemo

  • Hot Shot
  • ***
  • Posts: 329
  • Maker of Stuff
Re: I Fixed my CB550 Start Switch - For Real
« Reply #13 on: January 19, 2017, 06:12:21 am »
Just a note about the switch contacts.  I realized that the contacts of the switch were worn from use and made worse by my overzealous cleaning of them.  As far as I can tell, the rocker was not properly contacting the fixed contact for the starter when I first assembled it.

To fix things, I simply added a bit of solder to the rocker contacts and filed that smooth.  Now it works perfectly every time.  My suggestion is to only lightly clean things up lightly with electrical contact cleaner or maybe 400+ wet or dry, and maybe apply some dielectric grease when assembling the new switch (I'm not sure how it interacts with momentary contact.)  I was easily able to remove the bottom plate for the fix and get things back together so there isn't any reason to do more than clean everything lightly first.  I also realized that all you only need to unhook is the throttle cables at the carbs, unless you want to completely remove the lower control housing like I did for cleaning.  No need to remove the cables from the control housing just to service the switch.

Below is the link to the store we set up with Shapeways. Note that they ship internationally to most of the world (https://www.shapeways.com/support/shipping?li=faq )  I also did a short video on how to assemble the switch:
Store to purchase: http://shpws.me/NkB8
« Last Edit: January 31, 2017, 07:21:19 am by Smudgemo »
-Ryan
Project 1976 CB550F Rebuild: http://forums.sohc4.net/index.php/topic,160110.0.html
Thread - How to fix your starter button (for real): http://forums.sohc4.net/index.php/topic,163170.0.html

Offline fastbroshi

  • Puppet
  • Old Timer
  • ******
  • Posts: 2,645
Re: I Fixed my CB550 Start Switch - For Real (Updated)
« Reply #14 on: March 02, 2017, 02:58:45 pm »
Bravo man, bravo.  This is such a better alternative to buying the repop Emgo stuff from China.   This needs to be a sticky.
Just call me Timmaaaaay!!!

Offline HondaMan

  • Someone took this pic of me before I became a
  • Really Old Timer ...
  • *******
  • Posts: 13,063
  • ...not my choice, I was nicknamed...
    • Getting 'em Back on the Road
Re: I Fixed my CB550 Start Switch - For Real (Updated)
« Reply #15 on: March 02, 2017, 04:34:55 pm »
I'll take some! :)
PM me when ready, will take 5 as a start.
See SOHC4shop@gmail.com for info about the gadgets I make for these bikes.

The demons are repulsed when a man does good. Use that.
Blood is thicker than water, but motor oil is thicker yet...so, don't mess with my SOHC4, or I might have to hurt you.
Hondaman's creed: "Bikers are family. Treat them accordingly."

Link to Hondaman Ignition: http://forums.sohc4.net/index.php?topic=67543.0

Link to My CB750 Book: https://www.lulu.com/search?adult_audience_rating=00&page=1&pageSize=10&q=my+cb750+book

Link to website: www.SOHC4shop.com

Offline Smudgemo

  • Hot Shot
  • ***
  • Posts: 329
  • Maker of Stuff
Re: I Fixed my CB550 Start Switch - For Real (Updated)
« Reply #16 on: March 02, 2017, 08:24:42 pm »
Guys, you can get them straight from the 3D printer whenever you want.  Shipping is $5, but I think you can buy a bunch of them for the same shipping cost.  Out of curiosity, I added a number of items to a cart that totaled over $100 and the shipping didn't change.

I'd sure like some feedback from anyone that does this fix.  It's an exact copy of the broken part I pulled out of my housing, and both times that I used it, it worked fine.  I'd also like to know what models/years this fits so we can set expectations.  I did two '76 CB550Fs.  I understand that this will work for 400s, maybe 750s and maybe GL1000s, but have no firsthand knowledge.

And, if there is any other type of housing worth reproducing, let me know.  If you have a broken version that is able to be measured, I'm sure George and I could attempt a replacement.
-Ryan
Project 1976 CB550F Rebuild: http://forums.sohc4.net/index.php/topic,160110.0.html
Thread - How to fix your starter button (for real): http://forums.sohc4.net/index.php/topic,163170.0.html

Offline RAFster122s

  • I feel like a really really
  • Really Old Timer ...
  • *******
  • Posts: 11,669
  • SOHC4 member # 2605
Re: I Fixed my CB550 Start Switch - For Real (Updated)
« Reply #17 on: March 02, 2017, 08:40:52 pm »
The start button often fails and crumbles...red plastic doesn't hold up.  Should be able to 3D print one if you have a high resolution printer.
David
David- back in the desert SW!

Offline Smudgemo

  • Hot Shot
  • ***
  • Posts: 329
  • Maker of Stuff
Re: I Fixed my CB550 Start Switch - For Real (Updated)
« Reply #18 on: April 10, 2017, 09:09:30 pm »
The start button often fails and crumbles...red plastic doesn't hold up.  Should be able to 3D print one if you have a high resolution printer.

Right - that's the point of this thread.  My neighbor and I were able to replicate the switch housing using 3D printing.

But, I was struggling a bit with the switch contacts building up carbon from the  on-off action of the rocker.  Worked fine for awhile but then the starter would only work intermittently at best until I pulled the switch apart to clean the contacts.  Once clean, it would be back to 100%.  For awhile.

Originally, I lightly cleaned up the contacts with a file, realized that was a bad idea, tried to add some solder to build it back up but found the solder wasn't good for repeated cycling.  Copper seems like the right stuff, so I grabbed some copper garden snail barrier, cleaned it up with a scuff pad, tinned one side with solder (to make it more easily stick to the contact, and used a leather punch to make nicely domed pucks.  They soldered on easily and over the last few days of using the button, performance has not diminished.  It's going to take a lot more use to be sure it's a good fix, but it seems to be off to a good start.


The housing is a perfect fit, but I'd suggest you do not touch the contacts and try it out that way.  The housing from the 3D printer is plenty flexible enough to take things apart, so no downside to using things as is to see how they work.

Another few suggestions:
- don't let the springs go flying or let the ball bearing drop on the floor or you'll never find them
- be careful soldering or the wires will drop off the board (yeah, I did that too..)
-Ryan
Project 1976 CB550F Rebuild: http://forums.sohc4.net/index.php/topic,160110.0.html
Thread - How to fix your starter button (for real): http://forums.sohc4.net/index.php/topic,163170.0.html

Offline Bankerdanny

  • Eventually I will be old enough in reality to be
  • Really Old Timer ...
  • *******
  • Posts: 7,577
  • Endeavor to persevere
Re: I Fixed my CB550 Start Switch - For Real (Updated)
« Reply #19 on: April 11, 2017, 01:33:48 pm »
I'll be ordering a couple at the end of the week rather than spending $50 on a whole new switch. Well done to you and George!
"The problem with quotes on the Internet is that you never know if they're true" - Abraham Lincoln

Current: '76 CB750F. Previous:  '75 CB550F, 2007 Yamaha Vino 125 Scooter, '75 Harley FXE Superglide, '77 GL1000, '77 CB550k, '68 Suzuki K10 80, '68 Yamaha YR2, '69 BMW R69S, '71 Honda SL175, '02 Royal Enfield Bullet 500, '89 Yamaha FJ1200

Offline Smudgemo

  • Hot Shot
  • ***
  • Posts: 329
  • Maker of Stuff
Re: I Fixed my CB550 Start Switch - For Real (Updated)
« Reply #20 on: April 11, 2017, 08:40:23 pm »
Thanks.  We really did it for me, but figured it would be a great save for other guys on the forum. 
I'm super-impressed with how perfectly it fits.  George keeps asking if there has been any feedback, so let me know what you think when you've got yours working.  I personally think not pulling any wires is a huge plus to this repair.  Now I just need to get the housings re-anno'd.
-Ryan
Project 1976 CB550F Rebuild: http://forums.sohc4.net/index.php/topic,160110.0.html
Thread - How to fix your starter button (for real): http://forums.sohc4.net/index.php/topic,163170.0.html

Offline RAFster122s

  • I feel like a really really
  • Really Old Timer ...
  • *******
  • Posts: 11,669
  • SOHC4 member # 2605
Re: I Fixed my CB550 Start Switch - For Real (Updated)
« Reply #21 on: April 11, 2017, 09:19:07 pm »
Hard teflon coating is another option worth looking at as it will shed the brake fluid with no impact. If it were to see a drop or two.
 Polishing them before giving them to your anodizing guy...will save them some work and they will be able have ability to finish the polish so they can get a good anodize layer.

Thanks for making the 3d printed parts available.

David
David- back in the desert SW!

Offline Bankerdanny

  • Eventually I will be old enough in reality to be
  • Really Old Timer ...
  • *******
  • Posts: 7,577
  • Endeavor to persevere
Re: I Fixed my CB550 Start Switch - For Real (Updated)
« Reply #22 on: April 14, 2017, 10:06:39 am »
Order placed. I am looking forward to using my electric start again!
"The problem with quotes on the Internet is that you never know if they're true" - Abraham Lincoln

Current: '76 CB750F. Previous:  '75 CB550F, 2007 Yamaha Vino 125 Scooter, '75 Harley FXE Superglide, '77 GL1000, '77 CB550k, '68 Suzuki K10 80, '68 Yamaha YR2, '69 BMW R69S, '71 Honda SL175, '02 Royal Enfield Bullet 500, '89 Yamaha FJ1200

Offline Smudgemo

  • Hot Shot
  • ***
  • Posts: 329
  • Maker of Stuff
Re: I Fixed my CB550 Start Switch - For Real (Updated)
« Reply #23 on: April 14, 2017, 10:32:45 am »
Try it w/o doing anything to the contacts to begin with.  I think cleaning them up was a mistake for my bike, but the copper caps I added are working so far, so maybe it'll be fine. 
-Ryan
Project 1976 CB550F Rebuild: http://forums.sohc4.net/index.php/topic,160110.0.html
Thread - How to fix your starter button (for real): http://forums.sohc4.net/index.php/topic,163170.0.html

Offline Buzzbeer

  • Full Member
  • *
  • Posts: 3
Re: I Fixed my CB550 Start Switch - For Real (Updated)
« Reply #24 on: April 28, 2017, 09:08:17 am »
I just ordered one for my 1974 cb550. I will let you know if it works for this year.  Cost for Canadian orders is 13.31 for part and 15 bucks shipping.