Author Topic: CB750K3 pickup.  (Read 11653 times)

0 Members and 1 Guest are viewing this topic.

Offline seanbarney41

  • not really that much younger than an
  • Really Old Timer ...
  • *******
  • Posts: 10,830
Re: CB750K3 pickup.
« Reply #50 on: February 02, 2016, 07:14:58 PM »
At least at the end of all this, you will have total confidence in that motor
If it works good, it looks good...

Offline seanbarney41

  • not really that much younger than an
  • Really Old Timer ...
  • *******
  • Posts: 10,830
Re: CB750K3 pickup.
« Reply #51 on: February 02, 2016, 07:16:18 PM »
I still don't know why we were not seeing more oil under the tappet covers.
If it works good, it looks good...

Offline 754

  • Really Old Timer ...
  • *******
  • Posts: 29,058
Re: CB750K3 pickup.
« Reply #52 on: February 02, 2016, 11:30:15 PM »
Run a Qtip down the hole beneath the oil jet and see what comes out there . My oil jet did not look completely plugged but it ate one end of cam, two lobes ..4 rockers..
 I would not say fir sure it should be spraying out when you pop the tappet cover , but there should be oil on the. Valve spring collar.. If in doubt wipe it clean, ride a mile. ..then check again.

 I lost a lot of metal from the parts , but it all seemed to stay up top, cleaned it all in the frame with Qtips..(after cutting frame and pulling the parts )

 If you havent washed the head try looking underneath where the pucks sit, if they were leaking it should be fairly clean where the oil was flowing..
« Last Edit: February 02, 2016, 11:40:34 PM by 754 »
Maker of the WELDLESS 750 Frame Kit
dodogas99@gmail.com
Kelowna B.C.       Canada

My next bike will be a ..ANFOB.....

It's All part of the ADVENTURE...

73 836cc.. Green, had it for 3 decades!!
Lost quite a few CB 750's along the way

Offline BrosefStalin

  • Full Member
  • *
  • Posts: 45
Re: CB750K3 pickup.
« Reply #53 on: February 04, 2016, 04:04:12 PM »
Sean, no need to apologize! I actually can thank you and the others who have chimed in enough. The engine was gonna come out of the frame anyway so I figured this was the time for some new gaskets and whatnot anyway.

Further, I have never been this far into an engine so it's rewarding and you're correct, when I button it back up I'll definitely have confidence in the bike, especially knowing that nearly all of the wiring is new, done by me, and connected with very good connectors.

I managed to get the head off last night, came off with no issues and not much tapping was needed.

754, thanks for the suggestions. When I go back downstairs in a bit I will take heed of everything you mentioned.

Frankly, I could have been overreacting about all of this oil stuff, but better safe than sorry.

Last night, for good measure, I blew through both oil lines that travel into the engine to and from the oil tank. Completely clear.

Tonight I'll also take a look at the oil tank itself and see if there were any obstructions. Lastly, I'm going to pull the bottom oil pan to see what I can find. Might as well clean up the pump and get some pics for y'all.

Here's some pictures of the head and bores. I'd say we found our oil leak, eh?!


I have a few questions. A.) what's the best way to clean the head itself without taking the valves off? Am I going to damage anything by using water and whatever chemical I choose? Seems like that's probably a bad idea to get any liquid inside of the valves (Since I'd really prefer to leave them on). If I CAN indeed spray this thing down with the valves on, what liquids/solvents should I avoid?

Thank you all, will be posting more pics tomorrow. 
1973 CB750

Offline seanbarney41

  • not really that much younger than an
  • Really Old Timer ...
  • *******
  • Posts: 10,830
Re: CB750K3 pickup.
« Reply #54 on: February 04, 2016, 04:17:17 PM »
Was just doing this on an XR400...Red Scotchbrite dipped in acetone made quick work of combustion chamber carbon, just don't get a bunch of crusty stuff between the valve and seat...first check valve seal by filling intake and exhaust ports with acetone (or whatever solvent is handy) and noting how long it takes to seep past the valve into the combustion chamber.  The carbon makes it easy to see any wetness.  Water will not hurt anything here either, just make sure to dry everything off and oil it before it rusts.  Also, valve removal is not particularly difficult on these either.  Just got to figure out one of several possible valve spring compressors and keep track of where everything goes.
If it works good, it looks good...

Offline BrosefStalin

  • Full Member
  • *
  • Posts: 45
Re: CB750K3 pickup.
« Reply #55 on: February 10, 2016, 10:07:33 PM »
754,

I went ahead and did what you said about cleaning everything on the top side. Everything was clear but i got it nearly sparkling from the top down (haven't cleaned combustion chamber and valves yet) and didn't find any metal shavings of any sort.

Sean,

As I stated above, I had been working on cleaning everything around the cam area and the fins from the top down. I'm going to paint this part black and polish the fins so I want it as clean as possible.

After doing this, I sprayed carb cleaner in to all of the intake and exhaust ports. None of them really leaked, the ones that did took a while, roughly 5 minutes or so.

That said, the intake valve on cylinder 3 did seem to seep the carb cleaner fairly quickly, there was no drip, and it did hold liquid, but there was a very thin line around the valve itself where you could see the liquid as you said.

Here are some pictures for your viewing pleasure, let me know if you guys catch anything.

Removing oil pan


This is immediately after removing the pan. Note there's just a tiny bit of residue on the screen. Also, in the following pics take note of the oil colors, because I'm curious about it.


Here's the pan after dropping it. Oil is dark there.


Here's a random X on the 3rd cylinder (top?). Safe to say the head has been off before (note that I've already cleaned this, it used to be saturated in oil).


After taking the pump itself off, I gave the gear a spin. There were no hangups, and being that it was full of oil, I'm not sure how "effortless" it should be to spin, but it spun freely enough the it would push the oil out.

It was odd that the oil seemed so clean (see pics, aside from a few dark streaks) coming out of that pump compared to oil elsewhere...but it still didn't seem that it had any obstruction.


And inside, for good measure:


I also looked through the oil tank. I'd imagine that the outermost (return line?) bung on the tank would have a valve, no? the flashlight did not shine through it, but other than that there were no obstructions.

Finally, something to note:

The manual says that oil pressure should be 50-64 PSI at around 3k RPM, and that oil temp should be 140 degrees F OR 60 Degrees, C. I'm going by C, since my oil dipstick gauge is meaured in C.

If you look back on the second page of this thread, you can actually see the true reading of the oil pressure gauge on the video in that post, which was a hair under 70 PSI (it was running at about 1500 rpm at the time). Interesting stuff...too much pressure at idle. Pardon my ignorance, but wouldn't the pressure be higher at higher RPM's?
« Last Edit: February 10, 2016, 10:34:00 PM by BrosefStalin »
1973 CB750

Offline seanbarney41

  • not really that much younger than an
  • Really Old Timer ...
  • *******
  • Posts: 10,830
Re: CB750K3 pickup.
« Reply #56 on: February 11, 2016, 06:08:33 PM »
The oil is thicker, thus more pressure, until the engine is fully warmed up.  It takes a LOOOONNNG time to get the engine fully warm without putting the engine under a load or riding it.
If it works good, it looks good...

Offline BrosefStalin

  • Full Member
  • *
  • Posts: 45
Re: CB750K3 pickup.
« Reply #57 on: February 16, 2016, 06:34:37 PM »
Well then,

I'd say that it's time to order all of my seals and gaskets and continue to clean the engine for paint. I'm going to go with an OEM type aluminum silver (most likely from VHT) and then bake it in a sort of homemade oven deal, aside from the head under the valve cover, I'll do that black and polish the fins.

Everyone keeps mentioning that I really should go OEM for the gaskets (which I agree with), but I'm curious what all of you think about these Cycle-X kits. Comparable? Those little o rings and pucks are PRICEY on the honda parts warehouse.

http://www.cyclexchange.net/Engine%20Parts%20(Non-Cafe-Gaskets).htm

Below the race gaskets, it says conventional type OEM, so I'd assume they are ok.

After paint and reassembly, I'll also need to paint the frame and install the steering head bearings, along with some minor polishing here and there.

The only additional mods I need to figure out are whether or not I want to weld in a seat hoop, or leave the back open.

I'm a firm believer that the Welded in hoop looks cleaner, but I'd like to switch between a few different seat options at my discretion, and I figure I could clean up the open frame by placing blinkers in the exposed holes.

Seat wise, I'll be keeping the pan I use now so that I can ride 2up if necessary, and adding some more foam to it then reupholstering it. Once it gets a little warmer, however, I'd also like to build my own one-up seat with a hump on the back (I enjoy fiberglassing lol), BUT I really like the way the KZ650 ducktail looks with the bike, despite not following the same lines of the tank.

These can be had on Ebay pretty cheap so I'm going to pick one up sometime soon for testing/modifying.

Until Next time, folks.
1973 CB750

Offline mrbreeze

  • Not your average
  • Really Old Timer ...
  • *******
  • Posts: 5,902
  • Shut up when you're talkin' to me!!
Re: CB750K3 pickup.
« Reply #58 on: February 16, 2016, 08:30:13 PM »
That x that's scribed into your head must be a factory thing. Mine has it also.
MEMBER # 257
Fool me once..shame on you. Fool me twice..I'm kickin' your a$$......

Offline 70CB750

  • Labor omnia vincit improbus.
  • Really Old Timer ...
  • *******
  • Posts: 14,801
  • Northern Virginia
Re: CB750K3 pickup.
« Reply #59 on: February 17, 2016, 03:31:28 AM »
What Sean says about the oil.  I run 15W40 in winter and 20w50 in summer and keep an eye on my oil pressure gauge.  Fully warmed engine in summer will go even to 10psi - after several hundred miles touching a ton - but gliding down long hill with idling engine will get it to 30 - 35 psi.

On the other hand, cold engine - like morning frost - the pressure goes to 70-80 psi.


Yeah, I find amusement in simple things like oil pressure  ;)
Prokop
_______________
Pure Gas - find ethanol free gas station near you

I love it when parts come together.

Dorothy - my CB750
CB750K3F - The Red
Sidecar


CB900C

2006 KLR650

Offline BrosefStalin

  • Full Member
  • *
  • Posts: 45
Re: CB750K3 pickup.
« Reply #60 on: February 22, 2016, 09:53:31 PM »
Great reference for the spring though!

As always, life has gotten in the way of the build, but I've slowly but surely been cleaning the engine exterior with plenty of acetone for the paint in the spring, as well as stripping the frame paint.

Since I've got some time before I can paint the motor and frame outside due to temps, I decided to warm up the basement and do some testing on what I believe I want to use for the motor.

Here's what I used:


After cleaning the sprocket cover with brushes and acetone, then using aircraft stripper to remove whatever clearcoat may (or may not be) left on it, I cleaned it more and more with acetone.

I cleaned a few more times with the prep spray, finishing with a tack cloth.

2 light coats of primer followed by one medium coat, and then two light coats of the paint with a third medium/heavy coat.

I spaced all six coats at ten minute intervals, coating entirely within the one hour paint window.

Here's the result (uncured):


Tmrw I'll follow the final direction of baking it at 200 degrees for an hour.

Titanium silver was the color of the paint, and although there's definitely a bit of blue to it, I think it looks good. I'll have to see it in a few different light settings to get a feel for it.

The main point of this little experiment was to see how solvent/oil/gas resistant this stuff actually is with the proper prep and cure, so if I end up disliking the outcome/color...I'm only out a couple of hours.
1973 CB750

Offline BrosefStalin

  • Full Member
  • *
  • Posts: 45
Re: CB750K3 pickup.
« Reply #61 on: February 23, 2016, 08:20:10 PM »
After curing the paint in the oven, I've decided it definitely has too much blue...going to have to get one of VHT's more silver paints.

That said, I now have a little test mule.

So from left to right, here are four common liquids rubbed on to the paint with hard finger pressure.

Acetone, Brake Fluid, Gasoline, Oil.


I'll bake it again next week and then leave some pools of each liquid on the outside of the cover for a day or so, just to see what that effect is; I figure an inexperienced painter with some spray cans like myself might be able to use this as a deciding factor when making engine coat decisions.


« Last Edit: February 23, 2016, 08:21:57 PM by BrosefStalin »
1973 CB750

Offline BrosefStalin

  • Full Member
  • *
  • Posts: 45
Re: CB750K3 pickup.
« Reply #62 on: April 07, 2016, 10:17:30 PM »
I waited a week before I stripped the paint off of that cover, and gave it another wipedown test, and it fared a little bit better. I went ahead and picked up the duplicator silver that everyone has mentioned...Part number 1650.

Since then I have painted the frame and swing arm in black epoxy and they're just going to sit around and cure for a bit, because I'm just waiting on the engine gaskets from cycle-x to get here.

While waiting I've been going over the engine and cleaning it with acetone. Over, and over, and over again. Amazing what years of grime and oil can do. When the engine gets finished with paint I can finally put everything together and do a little carb tuning, and we should be good to go minus some minor odds and ends.

Still need to figure out a new seat situation but I'm not terribly worried about sorting that out quickly. 

It's nice to know that everything (on the top end at least) is good to go and sealed up.

Question:

I remember taking the cam tower/holders off and there being a couple of difficult bolts to get off without a really thin walled tiny socket. Any tricks for buying a certain one for the torque wrench that I'll need to buy? Or should I just go find the longest, thinnest socket I can?

Thanks.
1973 CB750

Offline BrosefStalin

  • Full Member
  • *
  • Posts: 45
Re: CB750K3 pickup.
« Reply #63 on: April 18, 2016, 07:19:23 PM »
The good news is that the top end is back together with new cycle-x gaskets, and the valves are adjusted.

Sadly, I broke my oil pump cover. I bought a torque wrench from Harbor Freight and tightened it WAY too tight, since I wasn't exactly sure how to gauge the correct torque (this was before I used it on the engine, for this reason exactly). So, I wouldnt recommend using those wrenches  :( That said, after putting the motor back together with a good wrench, I've got plenty of "feel" for what 8 and 15 pounds are./


Now to see if I can just find the cover itself, or if I'm going to have to buy the whole assembly.
1973 CB750

Offline BrosefStalin

  • Full Member
  • *
  • Posts: 45
Re: CB750K3 pickup.
« Reply #64 on: November 03, 2016, 11:38:50 AM »
Greetings All!

It has been a while since I updated the thread so I figured I'd pick up where I left off.

As you can see, I had to buy a new oil pump assembly before I could button up the motor, which I took care of, and I was finally able to close it up.

I painted the frame (still need to do the wheels) in 2k paint and then buttoned everything up.

I then ordered an 88 link 630 chain, which I had to cut down two links.

I went with a cone engineering shorty muffler, and at that time It was time to fire up the motor for the first time.

When I fired her up it was fairly quick, and due to synced carbs, in spec valves, and a tightened chain tensioner it sounded fantastic. Naturally, it's loud with the exhaust, but I'm a fan.

Due to the pods and the open exhaust I'm aware that it's gonna need some tuning, but at the moment the only thing I'm dealing with is a small hanging idle, and some very rich looking plugs at idle. I went from stock main jets (which I believe is 110) up to 120, and left my pilots (40) stock. So I think the mains are my problem, but I won't know until spring. For now I'm just working on cosmetics and minor electrical details all winter, from the comfort of inside my home. The bike is re-wired and only needs tails, blinkers, and a horn to be complete, but I'm going to wait on those because I have not figured out my rear fender/seat situation.

I belive I'm going to go with a tuffside cafe seat with a rear cowl that I will hopefully be able to color match to the stock paint. Only then can I deal with the tail-end lighting.

As she sits now from the left:
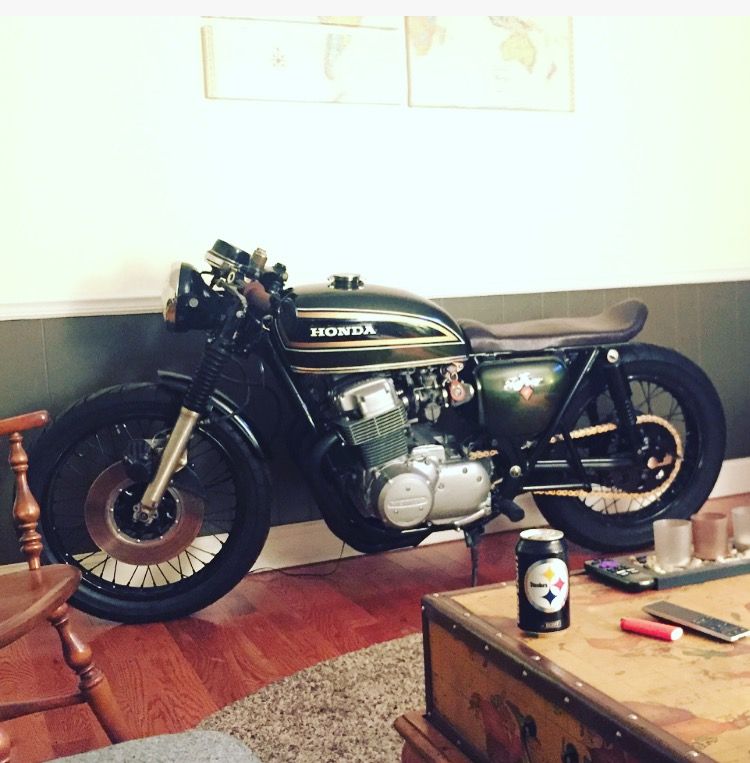

And from the right:
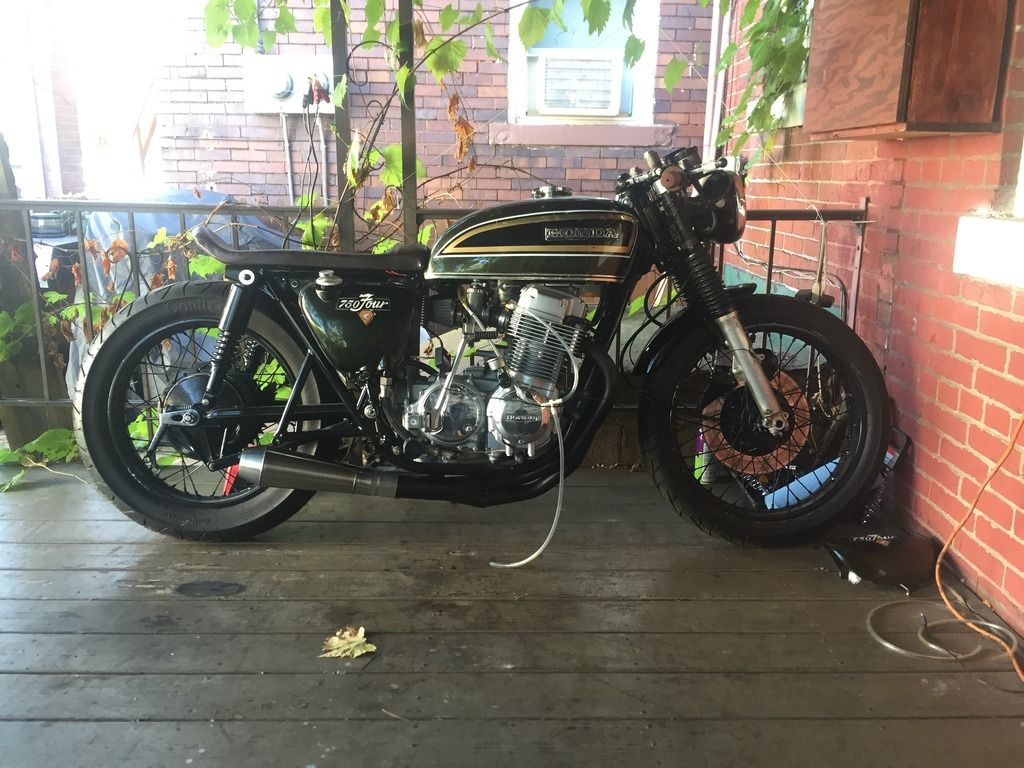

Note that the seat is a fiberglass pan I whipped up, hastily foamed, and covered in hopes I'd get a quick ride in. It detracts from the overall quality (lookswise) of the bike which is why I'm going to upgrade to tuffside, but I hope to have it upholstered in the future so I can switch to a 2-up configuration.

Also, I restored the Honda emblems to near perfection, which this picture does not show.

As you can see, both aftermarket gauges are white with fluorescent orange needles, and I wanted the cockpit to match.
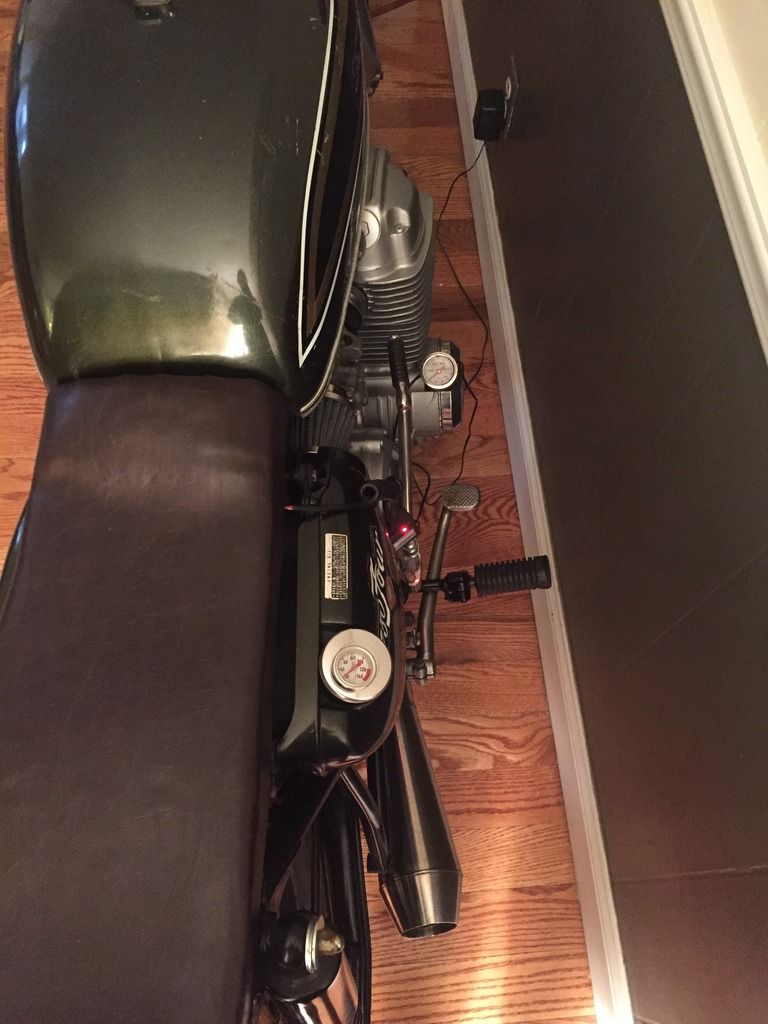
(I need to get some shiny new hardware for the shock mounts, and new safety stickers).

Here is how the cockpit sits today:
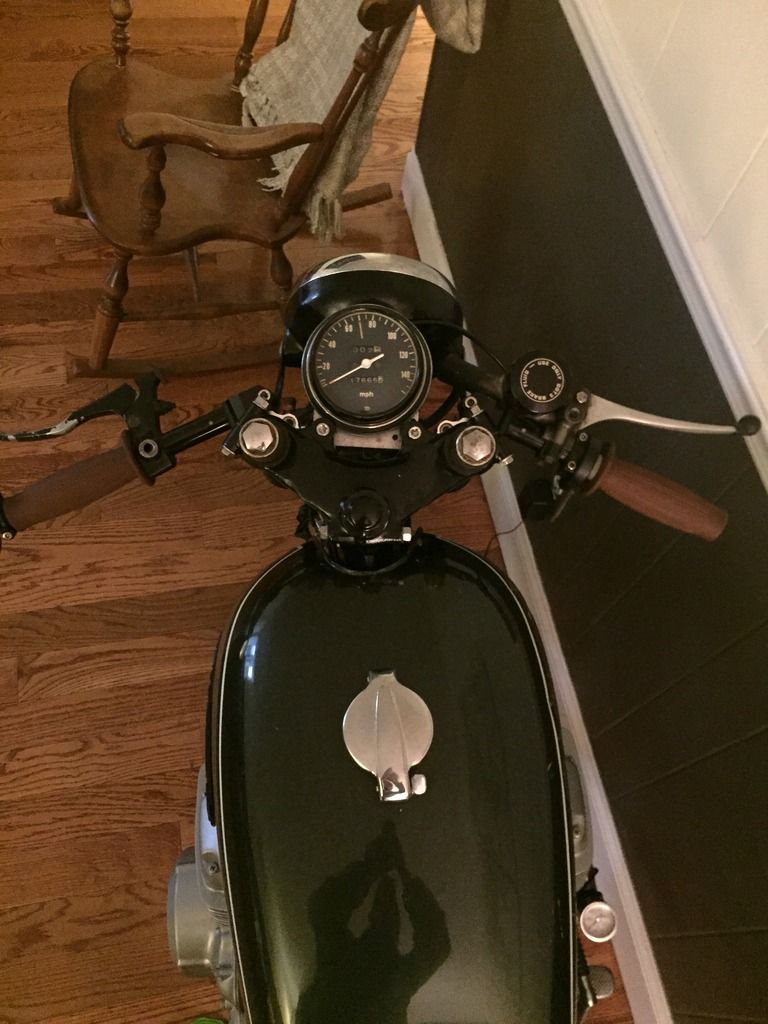

I shaved and painted the stock triple until I can justify buying a new anodized one, and dropped the front an inch.

I am currently waiting on an all new set of OEM type levers and perches in black, as well as white gauge faces, and superbrite BA9S 360 bulbs. I will paint the stock needle orange in Testors paint and I believe this will be a nice match with the temp and pressure gauge. Hopefully the LED bulbs are sufficient, otherwise I will do the LED Strip mod that I've seen on here.

For a fun experiment, I'm also going to use knockoff brooks leather bicycle handlebar wrap to wrap these grips and see how they look.

And finally...I'm contemplating wrapping the Mac 4-1 in black header wrap up to the muffler.

Thanks for checking back in everybody. Comments and criticism welcome.


« Last Edit: November 03, 2016, 11:41:42 AM by BrosefStalin »
1973 CB750

Offline kerryb

  • Not a very
  • Expert
  • ****
  • Posts: 1,149
  • 78 750k 74 cb550k, '83GL1100 FXSTC, 1979 Wilmac
Re: CB750K3 pickup.
« Reply #65 on: December 22, 2016, 05:10:09 AM »
Just found this thread and read it a couple times.  I want to thank you for documenting your activities and results because I ended up learning a bunch!
Your bike looks great,  enjoy the ride!
intrigued by the wail...seduced by the scream.

Offline BrosefStalin

  • Full Member
  • *
  • Posts: 45
Re: CB750K3 pickup.
« Reply #66 on: April 01, 2017, 09:18:42 AM »
Thanks a lot Kerry!

I found an interesting thing on my side covers that leads me to believe they are not from a '73. Maybe you guys can provide some input.

I wanted to replace the side cover sticker with the correct emblems so I started with the "750 Four" one. When I took the sticker off, the recess looks like it's supposed to hold an emblem from a 72 (The smaller Emblem withour the large black border). Further, there are 5 holes drilled. Am I correct to assume this side cover has been repainted and drilled?

Still need to figure out if I want to use the stock washers to mount these, or if I want to use something else.


Thanks!

« Last Edit: April 01, 2017, 09:37:39 AM by BrosefStalin »
1973 CB750

Offline mrbreeze

  • Not your average
  • Really Old Timer ...
  • *******
  • Posts: 5,902
  • Shut up when you're talkin' to me!!
Re: CB750K3 pickup.
« Reply #67 on: April 01, 2017, 10:58:56 AM »
When I have questions such as this, I go to the Yamiya site. It will show pictures and years of parts and when they changed. As far as the side covers and badges go..... The K0 had it's own separate style side cover. It had the vents and 1 piece badge. This would be a 69-70 model. In 71-72 they had the 2 piece badge that had the diamond and script style 750 four badge. For 73-76 they had the diamond and larger 750 four badge. The side covers from 71-76 all had the embossment for the badges. The earlier 71-72 fit into the embossment and the newer 73-76 fit over it. The 750 four badge has 3 mounting pins and the diamond has 2 for a total of 5. You can get the speed nuts that mount on the pins or you can use glue or double sided tape if the pins are missing.
So get us up to speed on your bike. Are you getting good oil flow to your top end now? Just reread your post and saw I posted on it a couple of years ago. Noticed you didn't care for the Titanium Silver VHT engine paint. That's what I'm using. It is kinda bluish but I like it. There are a few other members that are using it also. No big deal....just a matter of what you prefer.
MEMBER # 257
Fool me once..shame on you. Fool me twice..I'm kickin' your a$$......

Offline BrosefStalin

  • Full Member
  • *
  • Posts: 45
Re: CB750K3 pickup.
« Reply #68 on: April 01, 2017, 02:57:27 PM »
Thanks for the help Mr. Breeze. The reason I ask about the mounting questions is because I think it might be nice to have a way to easily remove them when waxing/clawing the bike.

The bike itself is assembled and in my living room. I'm about to soak the carb boots in xylene and wintergreen to soften them up a bit for some air leak insurance and then I figure I'll have the bike outside pretty soon.

The motor now gives adequate oil pressure and was leaking out of the tappey covers so I believe we are ready to roll. Further it  has no leaks so far. That could all change when I actually ride it on a long distance.

Lastly, yes I opted to ditch titanium silver in favor of duplicator "cast aluminum" (part number 1650). Titanium was fine, but I opted for the more silvery look. Would love to see your full engine picture though to see what could have been. How has it held up for you??
1973 CB750