Thanks guys, the guy I bought it from is 1000 miles away, so I might not get to show him in person but I posted a couple of vids on FB, and he was 'rapt that it was a goer again.
So what's been happening with "Effie"? Well yesterday (Saturday) was miserable, back to winter with lots of rain and no sunshine. As all of my work on the old rat has been out in the driveway, I needed to do a job I could do in the (cramped) garage. What about a frame kit? Well I can't ride it any distance until I replace those frame sections, so why not?
Per mentioned my earlier kit that I made using CB750 fork legs, probably the strongest frame kit ever made, but over engineered to the max. Back when I cut the guts of of the Redneck K2 "Bitsa" to help swap the engine out, I looked at a better, lighter frame kit. Using a 1mm thick cut off disk to cut thru the frame sections, you don't need 75mm of 5mm thick wall steel tube to keep it all in place, so I ditched the used CB750 fork tubes, and found some 2mm thick alloy seamless tube that was a nice tight fit over the OEM Honda support tubes, and some machinable alloy bar that I could machine down to 22mm OD, to fit tightly into the inside of the OEM support tubes. I didn't take any pics of the K2's frame kit, but someone here asked me to post some of Effie's frame kit, so here we go. First of all, I had to turn my machineable alloy bar to a tad under 22mm OD, for a tight fit up the frame tube, to make a "nut".
 Terry’s F2.2 frame kit 12 Sep 2020
 by
Terry Prendergast, on Flickr
Once I'd machined it down, I needed to drill and thread it for 8mm bolts, as that was all I had in the right length. on my K2 I used 2 x 6mm screws per joint, but that was overkill. Probably fine if just using an external clamp, but unnecessary when anchoring the sleeve to the frame tube. Anyone wanna buy a flute?
 Terry’s F2.2 frame kit 12 Sep 2020 1
 by
Terry Prendergast, on Flickr
Each of the "Nuts" were tapped up into the tube and manipulated into place for the bolts. They're all threaded internally so that I can pull them out if need be.
 Terry’s F2.2 frame kit 12 Sep 2020 4
 by
Terry Prendergast, on Flickr
The outer sleeves are so tight that I had to grind off the powdercoat on the frame tubes so that I could slide them over the bare steel tubes and even then, I still had to use a pair off "Multigrips" to maneuver the holes over the threaded "nuts inside the frame tubes. .
 Terry’s F2.2 frame kit 12 Sep 2020 3
 by
Terry Prendergast, on Flickr
Then the 8mm bolts were threaded in, and tightened. No need for washers.
 Terry’s F2.2 frame kit 12 Sep 2020 5
 by
Terry Prendergast, on Flickr
This morning was just as miserable, so I continued with the frame kit, and made a couple of threaded "nuts" for the frame triangle.
 Terry’s Effing F2.2 13 Sep 2020
 by
Terry Prendergast, on Flickr
Everything was bolted up, and felt nice and tight again.
 Terry’s Effing F2.2 13 Sep 2020 1
 by
Terry Prendergast, on Flickr
Sadly the rust had got under the thick powdercoat, so I had to grind it off too, with a flap wheel on my dad's old dremel tool, then gave it a squirt with some satin black paint just to stop it rusting further.
 Terry’s Effing F2.2 13 Sep 2020 2
 by
Terry Prendergast, on Flickr.
About this time, the sun finally came back, and I couldn't help but start singing George Harrison's "Here come the sun" under my breath as as I looked at other things I could do. First job was fitting the new cheap arse chinese coils. These things are supposed to fit pretty much any UJM (remember what that stands for?) and I was sceptical, but the only issue was that the rear mount doesn't fit,and it WILL cause the power wire to short out on the rear bracket, blowing the main fuse. What's the fix? Well the OEM wiring harness has an earth wire that mounts on the front coil mount, so all you need in the back end is a couple of cable ties, and it's all good.
 Terry’s Effing F2.2 13 Sep 2020 4
 by
Terry Prendergast, on Flickr
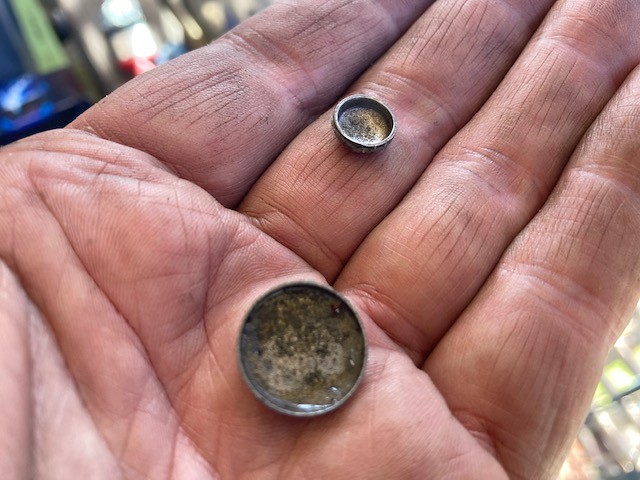
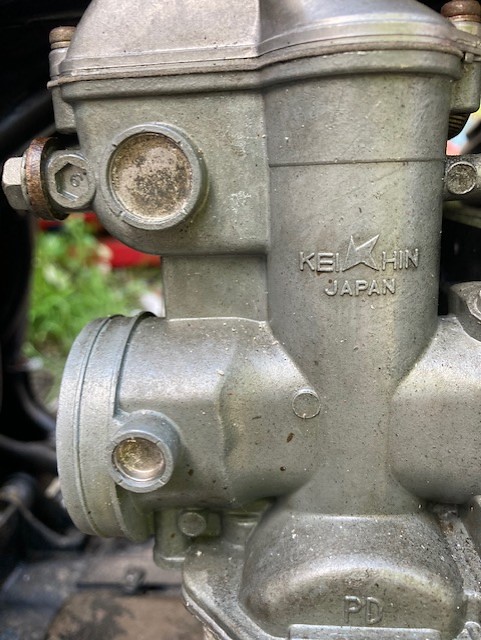
I cut the plug wires to length, leaving plenty of extra wire, it's easier to shorten a plug wire than lengthen it, and the coil wires I had on it previously were a tad too short, so I was happy to have some extra that I can trim later, if necessary. Anyway, I turned the key, hit the button, and it fired right up. No issues, but for the occasional "pop" from the exhaust, which was annoying? Ignition, or carbs? Hmmnnn. I'd noticed this earlier in the week, the "welsh plugs" on the carbs were missing? WTF? Could air be entering via the slides and causing this conundrum?
 Terry’s Effing F2.2 13 Sep 2020 5
 by
Terry Prendergast, on Flickr
Well I love my ultrasonic cleaner, so as the day was slowing dissipating, I thought, "Why not clean the original carbs?" They were filthy, but as noted previously the float bowls looked quite clean, so I thought it would't hurt to strip them and chuck them in the ultrasonic cleaner? I thought I best clean it out first though, and when I did, I found these..........
 Terry’s Effing F2.2 13 Sep 2020 7
 by
Terry Prendergast, on Flickr
Wow, the vibey little cleaner had vibrated these plugs right out, amazing! I reinstalled them and the bike ran better, but a small one is still missing from the left side, so I still needed to clean the original carbs.
 Terry’s Effing F2.2 13 Sep 2020 8
 by
Terry Prendergast, on Flickr
When I stripped them, I could see that the carbs had been rebuilt (poorly) not too long ago, as there were new air screws, slide top gaskets, etc. No "O" rings or washers under the air screws, and the pilot jets had never been removed, and were all still plugged. I threw everything in the ultrasonic cleaner for an hour @ 50 deg C, and once done I hosed them all out, blew out all the circuits with compressed air, sprayed heaps of WD40 on everything, then threw them in the industrial oven @ 100 deg C for an hour. Tomorrow I'll re-assemble them, and install them, and see if the popping stops. If not, the points are getting the flick........... More soon.

 Terry’s Effing F2.2 13 Sep 2020 9
 by
Terry Prendergast, on Flickr