Author Topic: Restoration of a 350 four update: Back from the Dead  (Read 66218 times)

0 Members and 1 Guest are viewing this topic.

Offline HondanutRider

  • Ride often - ride long - ride SAFE...and be an
  • Expert
  • ****
  • Posts: 1,283
Re: Restoration of a 350 four update:7/10/10
« Reply #150 on: July 11, 2010, 06:50:43 AM »
I'll be interested to see how you make out on this fuel economy and performance issue.  I haven't any personal reference to which to compare the performance, but I also have the MIVV mufflers on my 1974 CB350F with everything pretty well set to stock for the carburation.  My mileage is exactly the same as yours - barely 50 mpg, which seems very poor when compared to my 2003 Goldwing which also gets 50 mpg with its 6 cylinders and 1800cc motor!

From what I've heard, the CB350F fuel mileage is about normal for what others report.  Performance wise, it isn't that great when compared to a twin of the same size.  Any improvements (on either fuel or performance), with the MIVV mufflers installed, would be good news.  Perhaps the MIVV set-up, with all four exhausts working independently instead of being paired with cross-overs as in the original set-up, is the stumbling block to be overcome.  The four-into-two set-up to which you compare performance, certainly had more potential for scavenging than even the original.

Offline hoodellyhoo

  • CB350F
  • Master
  • *****
  • Posts: 1,726
Re: Restoration of a 350 four update:7/10/10
« Reply #151 on: July 22, 2010, 07:23:32 PM »
Alright, I've done some reading and experimenting and I think I know what I have to do.

Here are my old plugs. Everything on the bike is stock and set properly except for the neeld clip is one leaner than stock and I haven't checked my timing with a timing light in a while but the static timing is good. The bike runs and drives just fine except for the fuel economy and it seems to be choking slightly at high rpms. The only real inidcation of leaness is the color of the plugs. Sorry for the bad pic but the insulators are too light and there is white stuff on all the metal bits. There has never been any popping or other typical signs of leaness.


Okay, time to experiment. Brand new D8EA's correctly gapped. I set the neddle clip one step richer from stock and headed out on the highway. High speed performance was deffinitely worse. I had trouble holding 70 or more on the speedo and wide open the best I could do was an indicated 78 ( had done 83 indicated a few nights prior with the old steup). I won't post pics of each plug cause they all looked the same. Basically they looked brand new which means leaness.


After this I headed out on some coutry roads to see how the reduced throttle opening would affect the plug color. It is then that I noticed some bogging and what-not during slow speed riding. 60mph crusing was about the same as it was before. Here are the plugs from that run. The look the same as before (ie, no coloring at all)


After this I rode without the airbox cover on just to see what that did. Other than more noise ( I assume just intake noise), there was no difference in performance or throttle response.

Fast forward a week and I changed the carbs back to the old setting just so I could ride it. The slow speed bogging and poor perfomance made me feel unsafe, not to mention annoyed.

After consulting Hondaman's book and posts on this forum I have come to these conclusions:

The bike is obviously running lean ( no surprise there).

I will go one step further and say that the bike is only running lean at higher speeds (and correspondning high throttle openings) because the bike runs and drives great at slower speeds (with their corresponding smaller throttle openings) and have no issues with surging or bogging.

After I changed my clip back, I still was only able to reach 81 on the speedo. This was on a hot day in the middle ofthe afternoon. When riding at night a few days prior (with the cooler, denser air) I got to about 84 on the speedo. This incresed speed with the cooler air is another indication of leaness.

My old exhaust must have been more restrictive (it was much quieter) and that must have suited the stock carburation better because I know I used to have light tan spark plugs. This new MIVV exhaust is louder (less restrictive). I wont go so far as to say it is a loud exhaust, just more noise than the old one. The reduced restriction must be causing the leaness.

According to period magazine tests, my bike used to be capable of about 85 actual mph. Accounting for the 10% optimism in the speedo that equates to  about 95 on the speedo. I don't remember but I think the highest speed I've ever reached was around 83 on the speedo which equates to about 75 actual mph. I know my bike is almost 40 years old but that's a big difference in performance, hence my desire to fiddle with the carbs.

According to Hondaman's book the needle clip position doesn't have much affect above 1/2 throttle (the area where I do most of my riding and the area which I am trying to adjust). This would explain my poor slow speed performance when I changed the clip position.

....and along the same line, according to Hondaman's book, the only adjustment I can make to improve my higher speed riding  (1/2+ throttle openings) is to change the main jet. So, long story short, I want to try some larger main jets. I know I read on the forums here about a member with a 350 and an aftermarket exhaust (jardine?) that had to go up on the main jets so that makes me feel better.
1972 CB350F (Back from the Dead!)- http://forums.sohc4.net/index.php?topic=20822.0
1965? S65 - Coming Eventually!
1972 CB750K2 (father-son project)
1976 CB750K6- (sold) http://forums.sohc4.net/index.php?topic=96859.0
1976 CB750K6 (sold)- http://forums.sohc4.net/index.php?topic=62569.0

Offline hoodellyhoo

  • CB350F
  • Master
  • *****
  • Posts: 1,726
Re: Restoration of a 350 four update:7/22/10
« Reply #152 on: July 22, 2010, 07:27:34 PM »
And I almost forgot..

Even though she wasn't running too great with the new carb settings she sure was looking pretty in the sunlight so I had to take a picture.

1972 CB350F (Back from the Dead!)- http://forums.sohc4.net/index.php?topic=20822.0
1965? S65 - Coming Eventually!
1972 CB750K2 (father-son project)
1976 CB750K6- (sold) http://forums.sohc4.net/index.php?topic=96859.0
1976 CB750K6 (sold)- http://forums.sohc4.net/index.php?topic=62569.0

Offline hoodellyhoo

  • CB350F
  • Master
  • *****
  • Posts: 1,726
Re: Restoration of a 350 four update:10/15/10
« Reply #153 on: October 15, 2010, 09:12:34 PM »
I still haven't done anything to try and improve my high rpm performance issue BUT today I can cross another possible culprit off the list. Turns out, my harbor freight compression tester that I bought a couple years ago and thought was broken isn't actually broken. I did a test today (cold motor) and here's the numbers:

#1 175
#2 170
#3 170
#4 175

I'm pretty happy with that. I suppose a motor with 15k on it shouldn't have bad compression but I thought it was a possibility because when I put my hand over the #3 muffler at idle it puffs out with noticeably less force than the other 3. I guess it's just the leak I have in the joint at the headpipe?

I also felt the headers as the bike started up and all 4 seemed to heat up at the same rate so that's good.

Today's other project actually started almost 3 years ago. When I fist rode this bike I started having issues with the tach needle getting stuck and then "jumping". At the end of the season I took the tach off to dig into it and lube it during the winter. I read about cutting the chrome ring that holds it together with a dremel and I gave it a try.


After taking the face off I put all the parts in a box where they sat until today. Part of the reason they sat so long was because my spare tach I was using worked just fine, although it was more faded that the speedo. The other reason was that I wasn't thrilled about using a hose clamp and some jb weld to put the gauge back together. Even though I could postion the ugly joint out of the way, I would always know it was there. Fast forward a while and I read threads like this one http://forums.sohc4.net/index.php?topic=58003.0 and I decide to some day try prying the ring off my spare speedometer and using that to reassemble my original tach. Today was the day.

I found it very difficult to get started but by using a tiny flathead screwdriver I was able to get a small section of the ring lifted up. I was then able to use a lager screwdriver on the "started" section and slowly go around the ring and pry it up.


Eventually I was able to fit the screwdriver between the ring and the edge of the gauge housing in order to pry the ring enough to get it to come off. Unfortunately because this was a speedometer the ring didn't just slip off. I had to also remove the trip knob and pull the mechanicals out before I could get the ring free from the black housing.


I found a lighter oil to use to lube the tachometer so I disassembled the mechanism as best I could to oil all the moving parts, including the bracket I am holding which is where the other end of the needle shaft rests.


With everything (hopefully) sliding better I put the tach insides back together.


Just like taking the ring off, putting the ring back on was harder than I thought it would be. I found it hard to get the ring to start bending back over. Using a pliers with tape on the ends I eventually got it going.


As I was going though, I had a problem. I couldn't get the ring to stay "square" with the gauge. I think it had something to do with not being able to compress the rubber gasket in between the two halves compressed as well as the original process that was used. I tried my best but it still ended up crooked.


Even though it probably won't be that noticeable, I'm thinking of getting a hoseclamp tomorrow to see if that will help get the ring to sit flatter on the outside. Also, even though I was careful, I still ended up with small dents on the visible side of the ring. Again, probably not too noticeable but it could be better.


Overall I guess it was a good first try but I wish it looked better. All I know is someone needs to recreate the tool they used to do this originally and then sell a bunch of them for cheap.

And just for kicks, here's a random walk around/start-up video I made during the summer. Nothing special but it's the first video I've made with the new mufflers.

http://www.youtube.com/watch?v=BFricKCDqk0
« Last Edit: October 16, 2010, 05:56:14 AM by hoodellyhoo »
1972 CB350F (Back from the Dead!)- http://forums.sohc4.net/index.php?topic=20822.0
1965? S65 - Coming Eventually!
1972 CB750K2 (father-son project)
1976 CB750K6- (sold) http://forums.sohc4.net/index.php?topic=96859.0
1976 CB750K6 (sold)- http://forums.sohc4.net/index.php?topic=62569.0

Offline hoodellyhoo

  • CB350F
  • Master
  • *****
  • Posts: 1,726
Re: Restoration of a 350 four update:10/15/10
« Reply #154 on: October 16, 2010, 02:59:21 PM »
Here's some pics of the washers I boughht to fix my wobbly gauges. See how the collar fits through them to compress the rubber.


And after I fitted the tach this morning:


Unfortunately my issues with this tach are not resolved. I was out riding today and even though the needle was dead smooth, my rpm's were still reading a little high, especially at lower revs. At first I just thought it was because I didn't hlave the needle back on exactly where it was but on the way home it was showing 1,000 rpm too high (75mph but 8,5000 rpm). I guess I'll just put the spare back on and maybe someday swap the faces.
1972 CB350F (Back from the Dead!)- http://forums.sohc4.net/index.php?topic=20822.0
1965? S65 - Coming Eventually!
1972 CB750K2 (father-son project)
1976 CB750K6- (sold) http://forums.sohc4.net/index.php?topic=96859.0
1976 CB750K6 (sold)- http://forums.sohc4.net/index.php?topic=62569.0

Offline HondanutRider

  • Ride often - ride long - ride SAFE...and be an
  • Expert
  • ****
  • Posts: 1,283
Re: Restoration of a 350 four update:10/16/10
« Reply #155 on: October 16, 2010, 04:14:32 PM »
Hate to say, but your 350 Four doesn't sound as good as mine, which also has the MIVV mufflers and stock jets installed.  Yours sounds rough and not too smooth at idle and when you roll-on the throttle it sounds to hesitate...to my ears from the video.  I wonder if you should check for air/vacuum leaks and also do a carb synchronization.  That might explain why you have trouble reaching a top speed.

Offline hoodellyhoo

  • CB350F
  • Master
  • *****
  • Posts: 1,726
Re: Restoration of a 350 four update:10/16/10
« Reply #156 on: October 16, 2010, 04:29:36 PM »
Hate to say, but your 350 Four doesn't sound as good as mine, which also has the MIVV mufflers and stock jets installed.  Yours sounds rough and not too smooth at idle and when you roll-on the throttle it sounds to hesitate...to my ears from the video.  I wonder if you should check for air/vacuum leaks and also do a carb synchronization.  That might explain why you have trouble reaching a top speed.

It deffinitely needs another carb synch and it was running rougher on that day. The camera pics up a lot more noise that their really is. I wouldn't say that there is a hesitation, at least not too bad. I will be doing another leak test soon just to be sure. If it's leaking anywhere it's probably from where the rubber boots go into the airbox. Those boots have been getting harder and can now spin in their holes.

Question for you: Do your carbs stay in synch very well? I find that mine go out of synch somewhat easily (within a week or two). Mind you they don't go really far out, but it's never as sweet as right after a synch.
1972 CB350F (Back from the Dead!)- http://forums.sohc4.net/index.php?topic=20822.0
1965? S65 - Coming Eventually!
1972 CB750K2 (father-son project)
1976 CB750K6- (sold) http://forums.sohc4.net/index.php?topic=96859.0
1976 CB750K6 (sold)- http://forums.sohc4.net/index.php?topic=62569.0

Offline HondanutRider

  • Ride often - ride long - ride SAFE...and be an
  • Expert
  • ****
  • Posts: 1,283
Re: Restoration of a 350 four update:10/16/10
« Reply #157 on: October 16, 2010, 05:24:08 PM »
Question for you: Do your carbs stay in synch very well? I find that mine go out of synch somewhat easily (within a week or two). Mind you they don't go really far out, but it's never as sweet as right after a synch.

I haven't really noticed a deterioration in the synch that I originally did.  It seems to stay true since I set it. 

To be truthful, this was the first 4-carb setup I had done...I was used to synching two carbs using a hose to my ear and the pitch they generated.  I found it rather a neat project to assemble my own vacuum gauges and hook them up for the proper synch.  I don't get to use the 350 Four too much, but in the past year it has always run and performed well - except when the carbs got clogged a bit with sediment.  Mind you, I still get about the same gas mileage as you do; and as for top speed...it goes better that yours seems to - but it does take its time to get there. ;)

Offline hoodellyhoo

  • CB350F
  • Master
  • *****
  • Posts: 1,726
Re: Restoration of a 350 four update:10/16/10
« Reply #158 on: April 02, 2011, 06:04:39 PM »
Today was the first day of the year I went out into the garage to work on the bike. A few weeks ago I ordered a bunch of new parts (Spark plug boots, spark plug wire, Chain, and sprockets).

I began the day running around town to pick up a few things for wrenching today. I wanted to try the wintergreen oil rubber renew on a bunch of my parts. I was able to source the xylene and a paint bucket at Lowes but after trying a few places the only wintergreen oil I found was $8 for one ounce and I wasn't going to pay that. I'll order some online and report back with how it all works.

My other quest was for some clear tubing. I wanted to place it in the float bowl drain hole and see exactly what my fuel level was in all my bowls. Even though I had all four floats set the same I found the fuel levels all varied:

#1 - 3mm below bowl
#2 - 2mm Below bowl
#3 - 1mm below bowl
#4 - 2mm below bowl

I ended up adjusting the floats so that all four fuel levels were the same (about 3mm below the bowl). I have no idea if that's a good height or not but I feel better having them all the same. While I was in the carbs I replaced the #80 main jets I put in last fall with the stock 75's. The only differences I noticed with the 80's was more noise and worse mpg. There was no difference in my plug chops.

My greatest discovery of today is also quite embarrassing and may possibly be the source of my high speed/rpm issues. Before today I always thought that the end of the plug boots that attached to the wire was just a pin and you pushed the wire into the boot and "into" the pin. As I inspected my new plug boots I saw that there infact is no pin, it's a screw ::) ::) ::). All this while I've only been pressing my plug wires into the boots when I should have twisted/screwed the boots onto the wire. I could see on some of the wire ends that I wasn't getting a good connection. Oh well, noobie mistake I guess. I know for sure that my #4 plug boot was bad so hopefully the new (and PROPERLY installed) boots will fix my issues.

I ended the day by trying to install the new chain and sprockets. The sprockets went on okay (I HATE that circlip for the rear sprocket), but the chain wasn't so okay. I've had a problem finding 530 in less than 100 links (96 is stock). I ended up with a chain with 120 links. I triple checked my link counts before I shortened it but when I went to install it it was too short >:( >:( >:(. Live and learn I guess. Now all that's stopping me from riding is better weather and a new chain to arrive.
1972 CB350F (Back from the Dead!)- http://forums.sohc4.net/index.php?topic=20822.0
1965? S65 - Coming Eventually!
1972 CB750K2 (father-son project)
1976 CB750K6- (sold) http://forums.sohc4.net/index.php?topic=96859.0
1976 CB750K6 (sold)- http://forums.sohc4.net/index.php?topic=62569.0

Offline esquire

  • Full Member
  • *
  • Posts: 38
Re: Restoration of a 350 four update:4/2/11
« Reply #159 on: September 26, 2011, 10:28:55 AM »
Tagged for future reference.
1973 CB350F

Offline hoodellyhoo

  • CB350F
  • Master
  • *****
  • Posts: 1,726
Re: Restoration of a 350 four update:10/17/11
« Reply #160 on: October 17, 2011, 02:49:52 PM »
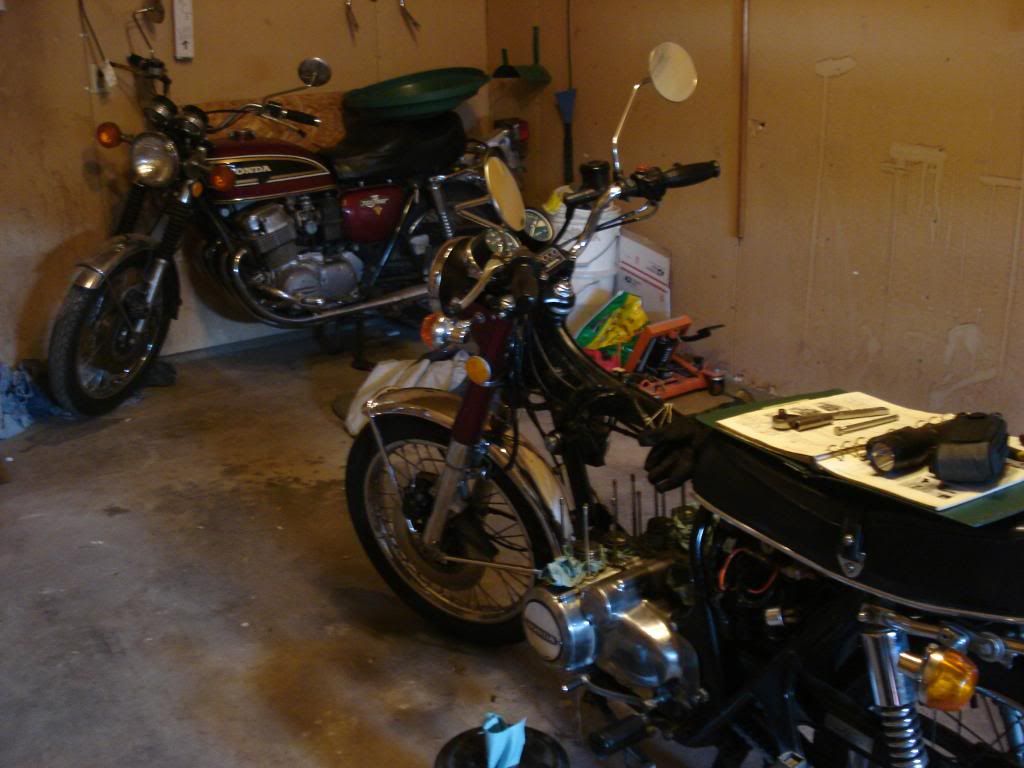
On saturday I got out in the garage and worked on both my bikes. I've probably said in the past how my top end had been progressively leaking more and more oil out of a few places. It's gotten so bad the past couple years that I have a special pair of jeans I use just for riding the 350 that have oil stains on both the shins. Even though I don't have hardly any time or money to fix this problem I decided to take the first step towards fixing it and disassemble my top end. The riding season's pretty much over anyways so I figure I've got nothing to lose.

Here we go! Got the carbs off. I kinda hate how good I am at taking them off. I've done it too many times.
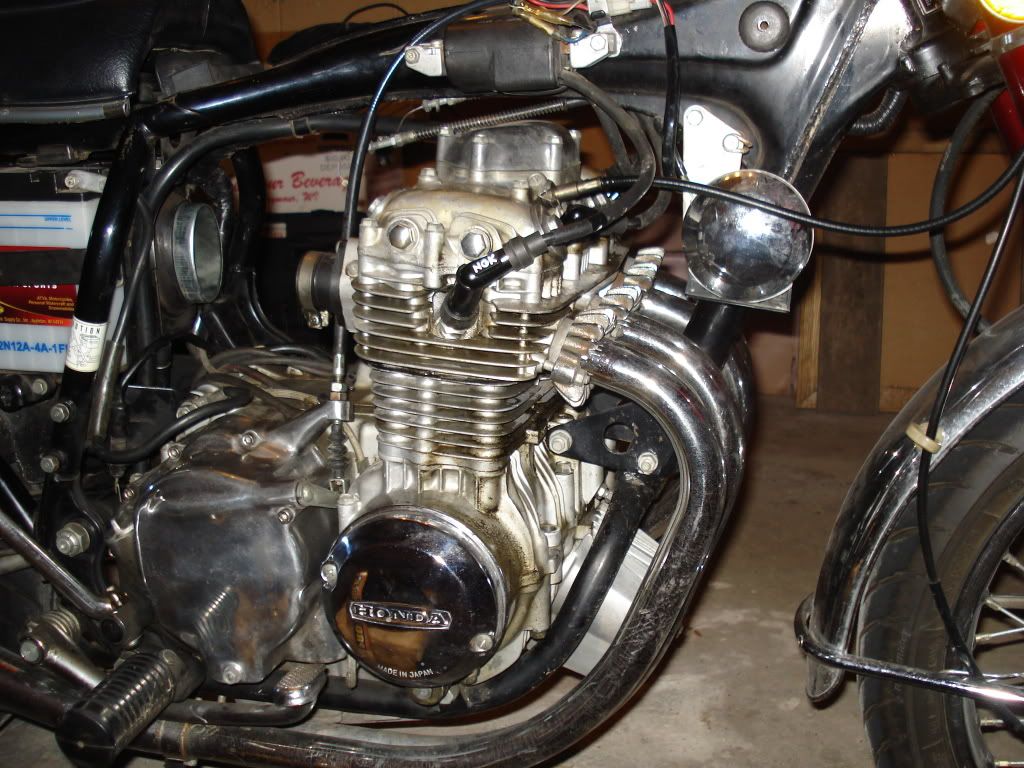


You can see how bad the leaks were
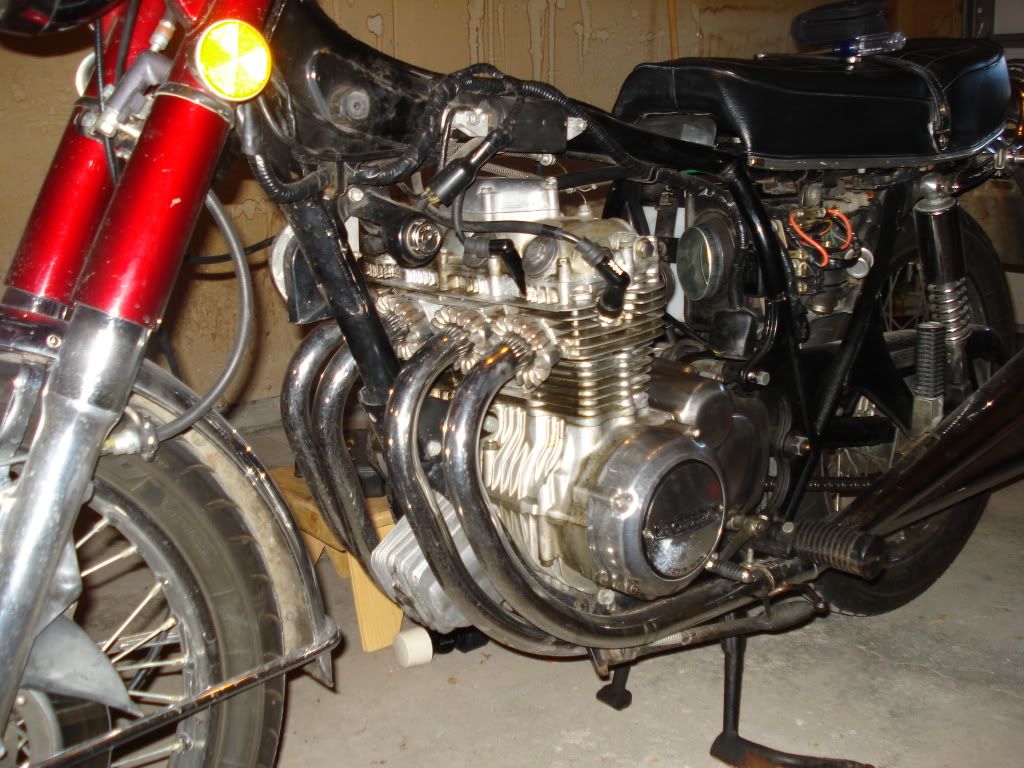


Next off was the coils and valve cover. I hadn't been into this area since 2007 and I was glad to see that all the surfaces still look as good now as they did then. The new tensioner and guide that I installed had what seems to be an appropriate amount of wear for the miles.
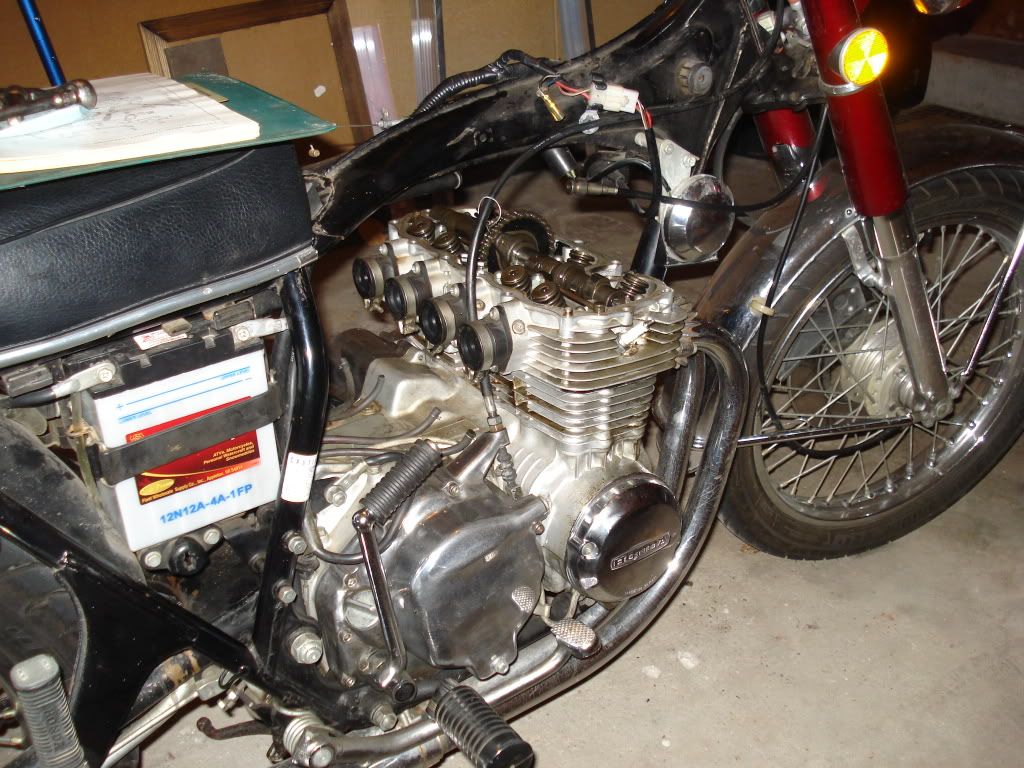


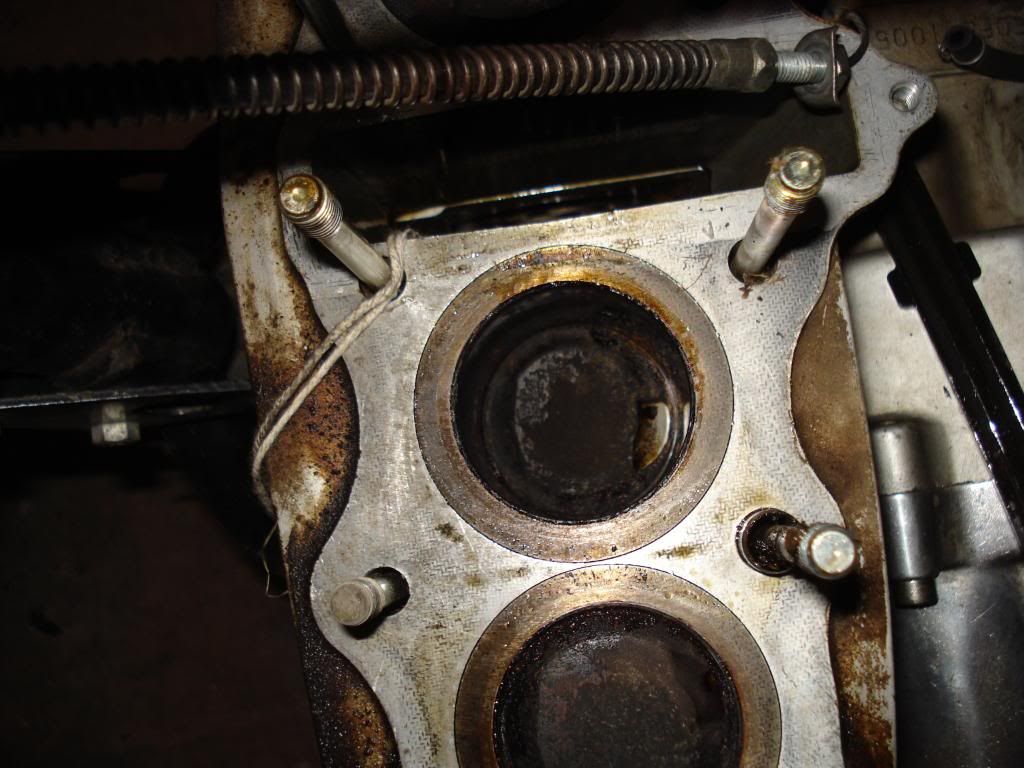
Took me a while to figure out how to get the cam out. You undo the cam sprocket and slide it off to the side a bit. This gives you enough slack in the cam chain to take it off the sprocket and you can then slide the cam out. I tied a string to the cam chain to keep from losing it down into the engine.
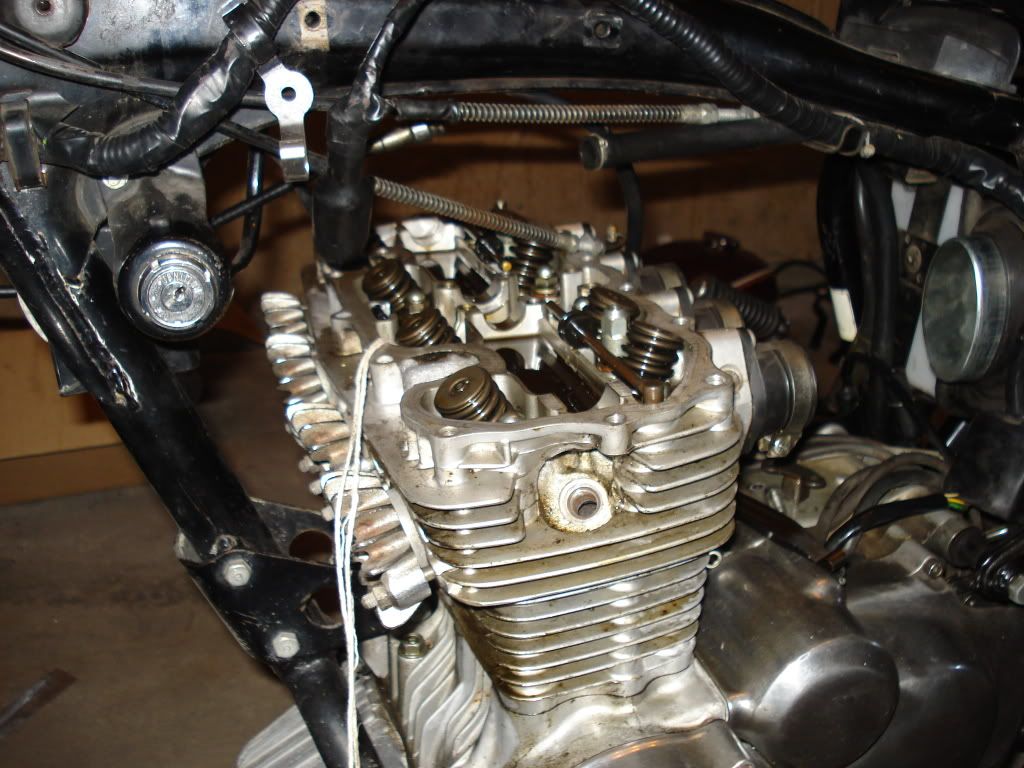


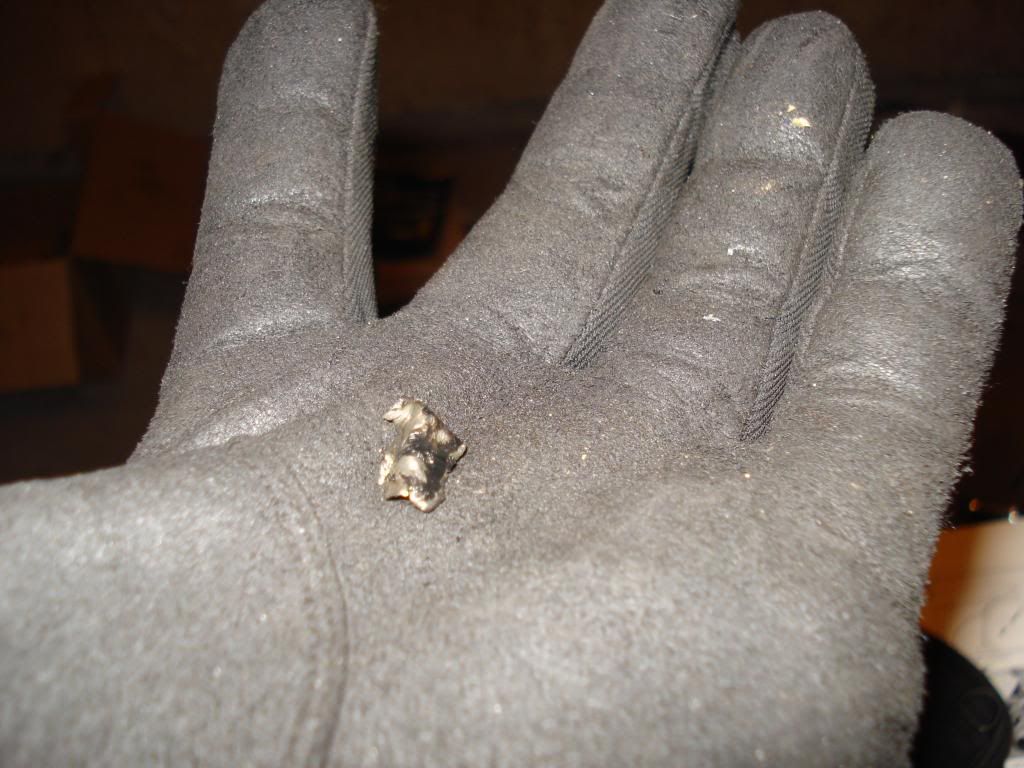
Sitting perched near the bracket to hold down the tensioner blade was this piece of metal. I assume it came from the tensioning horseshoe getting rubbed on because it was steel. Either way I'm glad it didn't cause any massive damage :o


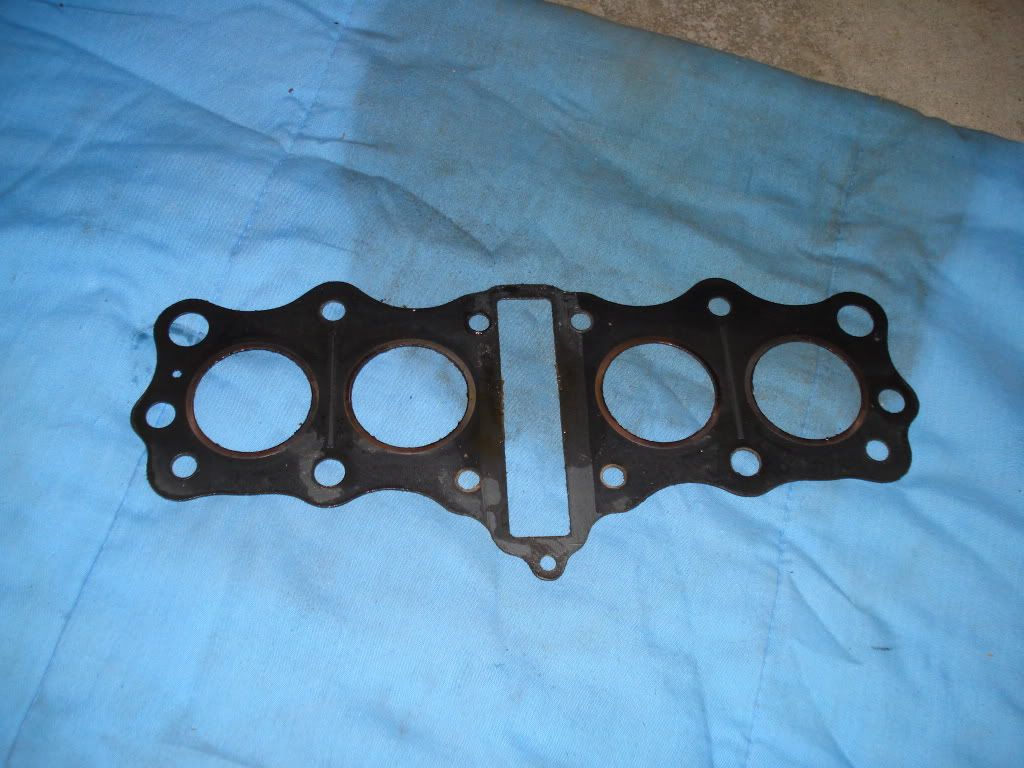
Time to remove the head (or as I called it, the point of no return) I would have gotten it off on my first try if I had noticed the one 10mm bolt that sits on the outside right behind the cam chain tunnel.


Anyone want a gently used head gasket?


The combustion chambers all looked good. Just your standard carbon buildup.
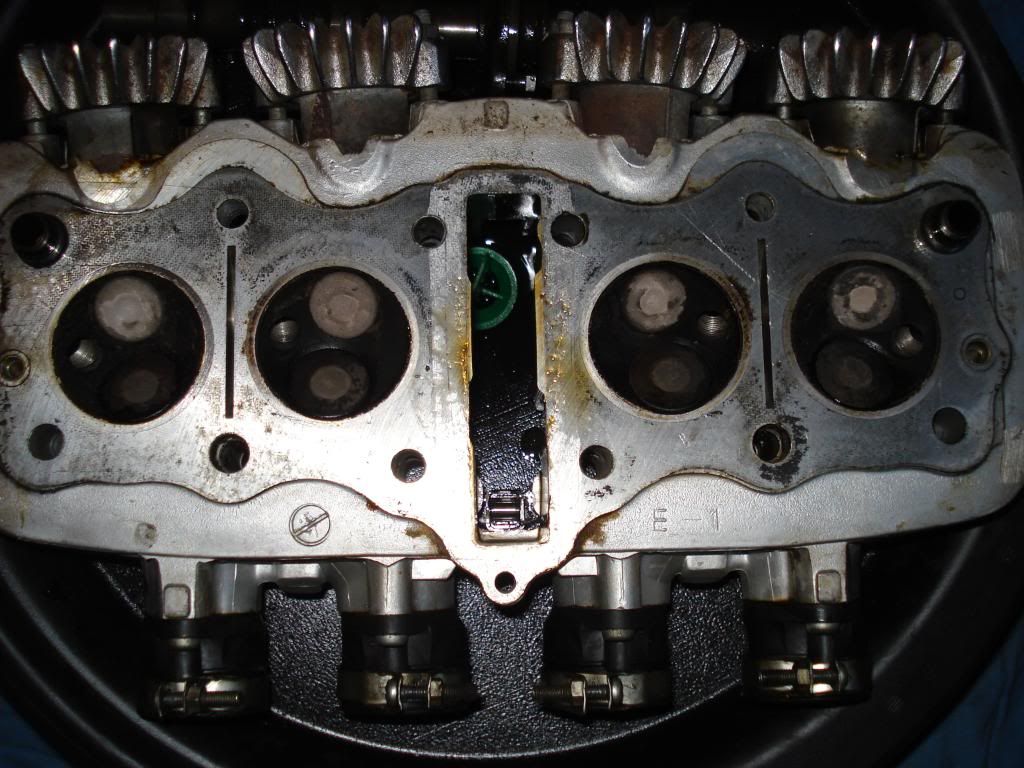


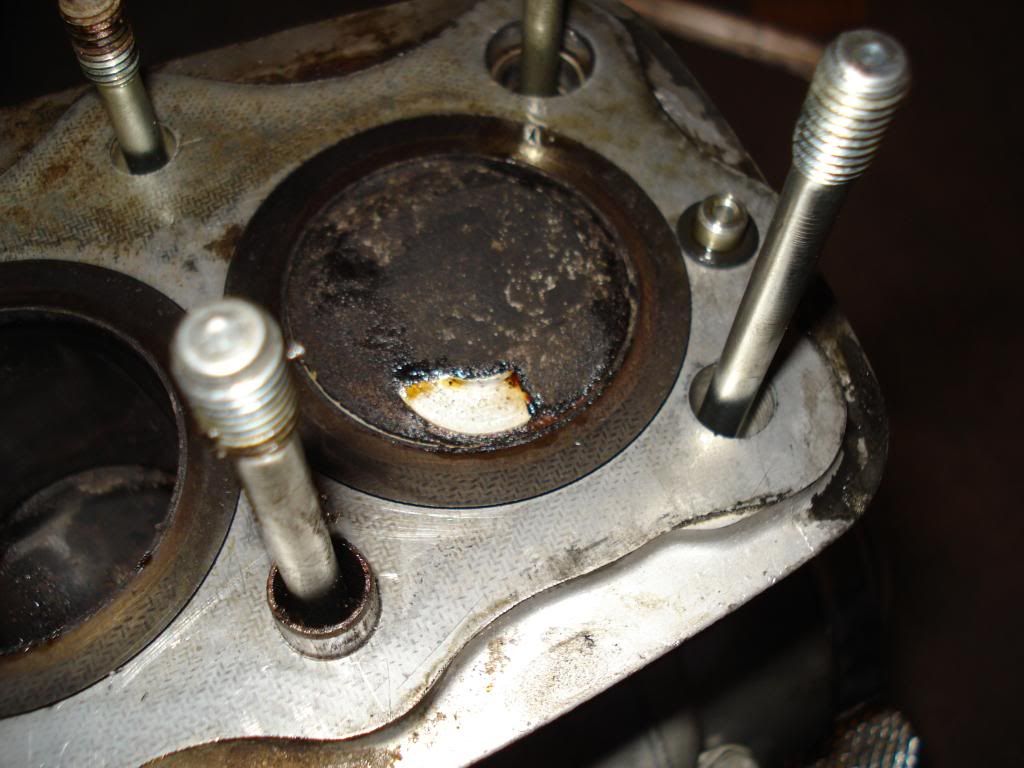
Now for the not-so-great findings. I don't recall ever seeing this on other motor teardowns but these marks were on 2 or 3 of the pistons. It looks like the intake valve was hitting the piston but there wasn't any evidence of this on the valves  ???


I also discovered that I am missing the rubber holder for the bottom of the tensioning blade. It wasn't on the blade when I pulled it out and It isn't in the end of the horseshoe. It must have fallen off when I installed the blade in 2007 because I found one in the sump when I replaced the sump gasket a couple years ago. I don't remember what I did with it then but I think I threw it out >:(

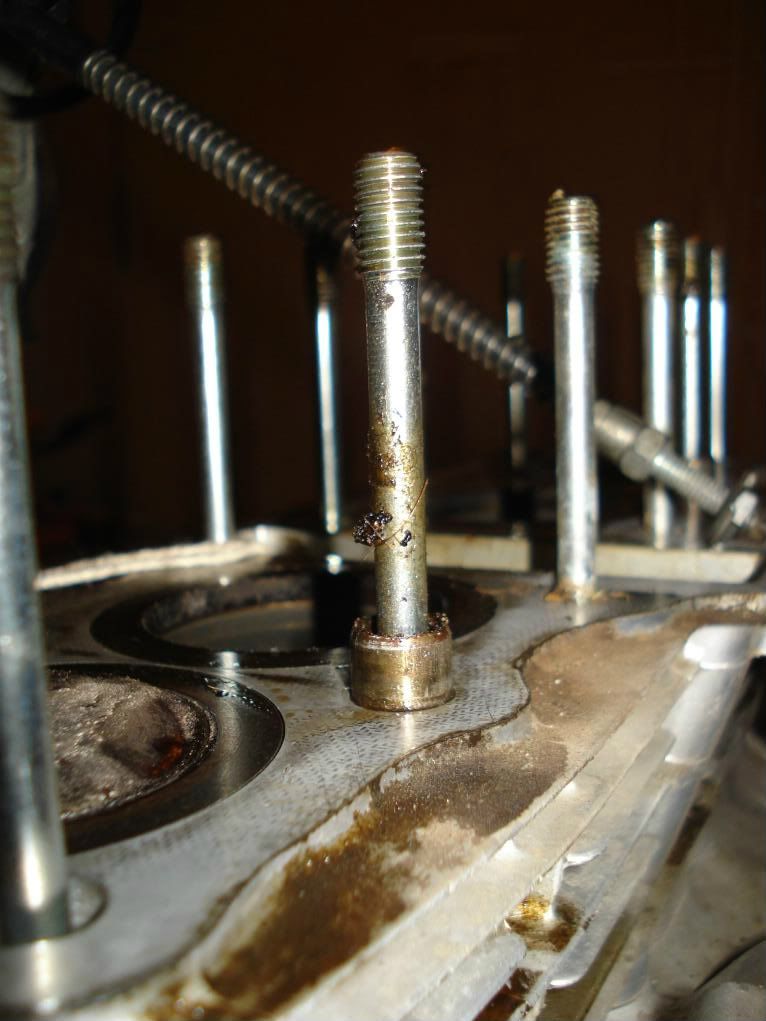
The final not-so-great discovery was the crud build up on the studs that sit in the oil supply routes to the head. Luckily nothing had gotten high enough to get stuck in one of the oil jets for the cam lobes but I don't want to have to tear the rest of the motor down to clean this crud out of all the oil passages. It looks worse than the picture shows


Final order of business was to remove the cylinders. I had read that some of these bikes have special pry spots for getting the cylinders lose. I couldn't find any so, not wanting to damage any fins, I found the area near the "347" was beefier than the rest of the fins so I tried prying like this:
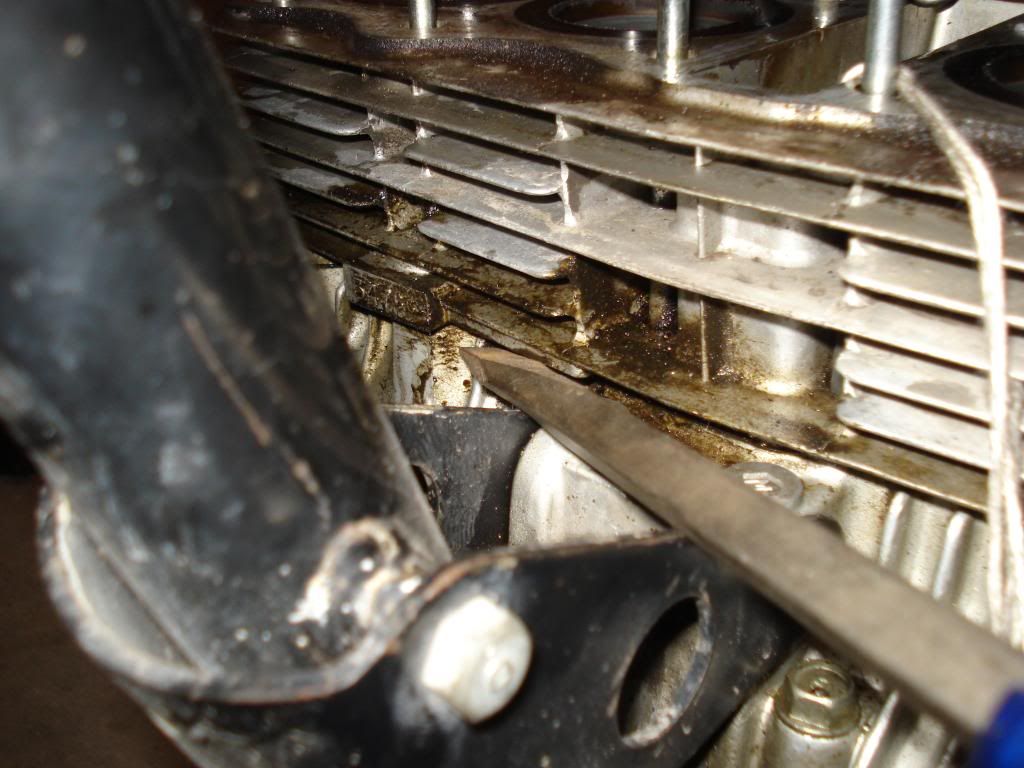

 
That didn't get me anywhere so I used my screwdriver and hammered from the bottom on this same area and the cylinders came free. The bores all looked shiney with no scratches, just a ridge on the top. All the pistons looked fine as well. You can also see the crud in that oil passage on the left.
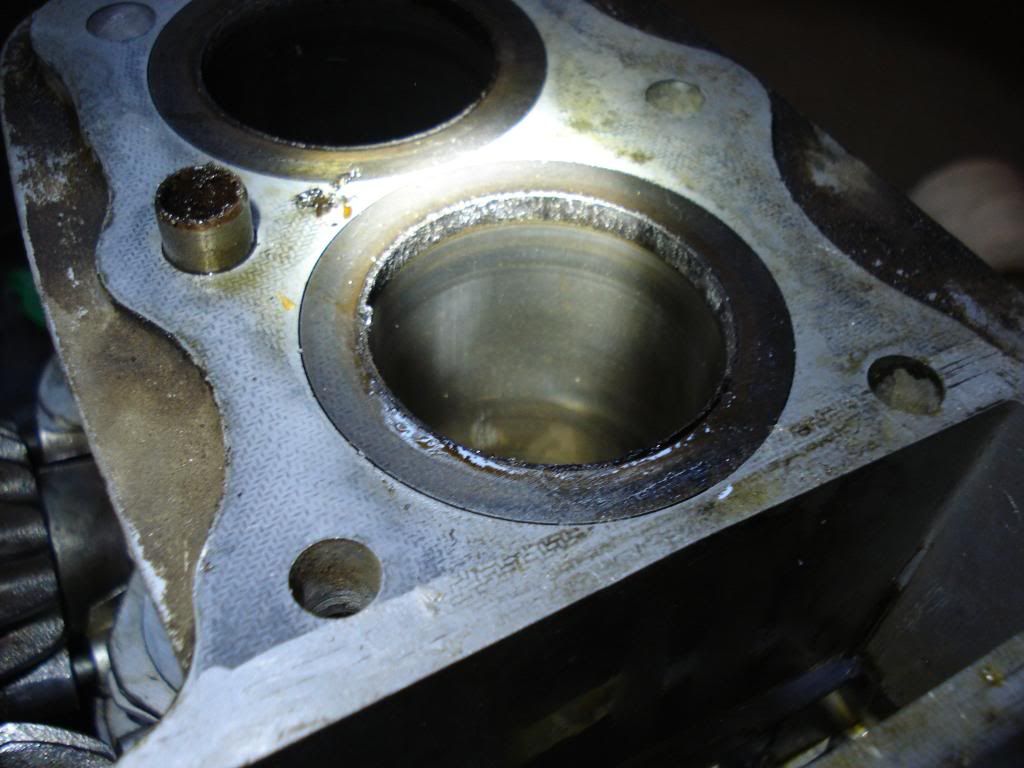


Kinda sad looking, I thought:


Now for the thing I am debating in my head. There was a debate on this site some time ago about if it is truly necessary to replace the piston rings if you pull the motor apart. Some said yes, other said no. I'm leaning towards not doing this because, as some said in the thread, my rings were already perfectly bedded in (as shown by the shiny cylinder walls and great compression readings), and the piston rings move around during normal operation so their orientation isn't a big issue. I do have an oem set of standard bore pistons with rings that I was planning on selling someday but would still need to pay to get the cylinders honed and then end up with slightly larger bores and I may not get quite as good of compression numbers as I had before. A re-ring obviously wouldn't cost me all that much  since I have the parts but I'm trying to cut costs whereever possible. So what are your opinions?

Finally, I forgot that I wanted to get a picture of both bikes together before I started tearing the 350 down but this will have to do.
1972 CB350F (Back from the Dead!)- http://forums.sohc4.net/index.php?topic=20822.0
1965? S65 - Coming Eventually!
1972 CB750K2 (father-son project)
1976 CB750K6- (sold) http://forums.sohc4.net/index.php?topic=96859.0
1976 CB750K6 (sold)- http://forums.sohc4.net/index.php?topic=62569.0

Offline toytuff

  • "watching the pinheads"
  • Old Timer
  • ******
  • Posts: 4,349
Re: Restoration of a 350 four update:10/17/11
« Reply #161 on: October 17, 2011, 03:59:25 PM »
Very nice 350 F you have there.

My I introduce her Sister Scarlet?

 :)

tt

Offline hoodellyhoo

  • CB350F
  • Master
  • *****
  • Posts: 1,726
Re: Restoration of a 350 four update:10/17/11
« Reply #162 on: October 17, 2011, 05:19:09 PM »
A nice bike you have as well! Glad to hear she's going to be made even more original than she already is. Good luck finding original pipes for a decent price.
1972 CB350F (Back from the Dead!)- http://forums.sohc4.net/index.php?topic=20822.0
1965? S65 - Coming Eventually!
1972 CB750K2 (father-son project)
1976 CB750K6- (sold) http://forums.sohc4.net/index.php?topic=96859.0
1976 CB750K6 (sold)- http://forums.sohc4.net/index.php?topic=62569.0

Offline toytuff

  • "watching the pinheads"
  • Old Timer
  • ******
  • Posts: 4,349
Re: Restoration of a 350 four update:10/17/11
« Reply #163 on: October 17, 2011, 06:13:10 PM »
A nice bike you have as well! Glad to hear she's going to be made even more original than she already is. Good luck finding original pipes for a decent price.

I have to go repo. None to be found. Yet.

I have some PO work receipts with a compression check. Not nearly as good as yours. 140,130,130,130. Might be a project down the road.

tt
« Last Edit: October 17, 2011, 06:15:56 PM by toytuff »

Offline hoodellyhoo

  • CB350F
  • Master
  • *****
  • Posts: 1,726
Re: Restoration of a 350 four update:10/17/11
« Reply #164 on: October 17, 2011, 06:25:27 PM »
A nice bike you have as well! Glad to hear she's going to be made even more original than she already is. Good luck finding original pipes for a decent price.

I have to go repo. None to be found. Yet.

I have some PO work receipts with a compression check. Not nearly as good as yours. 140,130,130,130. Might be a project down the road.

tt

I wouldn't be worried with those numbers at all. They say that the important thing is that all the readings are close (which yours are). The actual numbers are more dependent on the specific tool used for the readings. My compression tester is from Harbor Freight so I take the numbers with a grain of salt, but at least I know they are all similar.
1972 CB350F (Back from the Dead!)- http://forums.sohc4.net/index.php?topic=20822.0
1965? S65 - Coming Eventually!
1972 CB750K2 (father-son project)
1976 CB750K6- (sold) http://forums.sohc4.net/index.php?topic=96859.0
1976 CB750K6 (sold)- http://forums.sohc4.net/index.php?topic=62569.0

Offline toytuff

  • "watching the pinheads"
  • Old Timer
  • ******
  • Posts: 4,349
Re: Restoration of a 350 four update:10/17/11
« Reply #165 on: October 17, 2011, 07:00:18 PM »
A nice bike you have as well! Glad to hear she's going to be made even more original than she already is. Good luck finding original pipes for a decent price.

I have to go repo. None to be found. Yet.

I have some PO work receipts with a compression check. Not nearly as good as yours. 140,130,130,130. Might be a project down the road.

tt

I wouldn't be worried with those numbers at all. They say that the important thing is that all the readings are close (which yours are). The actual numbers are more dependent on the specific tool used for the readings. My compression tester is from Harbor Freight so I take the numbers with a grain of salt, but at least I know they are all similar.

It was a Honda Authorized dealer in Vegas. Good to know. I can sleep tonight!  :)

tt

Offline midnightrider

  • Out of the SOHC4 world for a while...
  • Enthusiast
  • **
  • Posts: 154
Re: Restoration of a 350 four update:10/17/11
« Reply #166 on: November 18, 2011, 09:59:10 AM »
glad to see that you're still working on this bike, hoodelly.  This thread was one of my original inspirations... :)


Quote
but would still need to pay to get the cylinders honed

you could use a dingleberry hone...
I used one with my drill - it seems to have worked well to me even though I put one of the old rings back after breaking one of the new ones.  Never had a compression test though because I don't have a tester kit.... it runs fine (and tremendously better than before) so I never cared much to pay to find out the specifics on the compression.  I know of those that have honed with dingleberrys and had good post-rebuild compression though.  You can see the dingleberry in my build thread.

Good luck!


1972 CB350 Four - "The Green Hornet"
http://forums.sohc4.net/index.php?topic=84975.0


I love being alive and I will be the best man I possibly can; I will take love wherever I find it and offer it to everyone who will take it... seek knowledge from those wiser and teach those who wish to learn from me.
-- Duane Allman's epitaph

Offline crazypj

  • I'm brill, me
  • Old Timer
  • ******
  • Posts: 4,467
  • first 100,000 miles. 1977 CB550F
Re: Restoration of a 350 four update:10/17/11
« Reply #167 on: November 18, 2011, 12:14:23 PM »
Plugs are real lean.
 You need bigger main-jets plus check all the float AND fuel levels are the same
 The body of plug (not insulator) should not be grey
The ground strap shows a definite 'line' which means heat range is good
 This is something I pulled off the net

This is how my plugs look, slightly richer which is probably better for an air cooled engine
I fake being smart pretty good
'you can take my word for it or argue until you find out I'm right'

Offline hoodellyhoo

  • CB350F
  • Master
  • *****
  • Posts: 1,726
Re: Restoration of a 350 four update: The Return?
« Reply #168 on: December 22, 2012, 04:14:06 PM »
Sorry that there's no new progress to report, BUT (and this is a big "but") I should finally have the time get this thing going again. I recently graduated, thus ending my school semester from hell. No job yet but some good prospects.

Now that I'm done building a few christmas presents my workbech can get back to it's intended purpose of holding old honda parts.

I miss riding this bike! Time to Git-er-done!

1972 CB350F (Back from the Dead!)- http://forums.sohc4.net/index.php?topic=20822.0
1965? S65 - Coming Eventually!
1972 CB750K2 (father-son project)
1976 CB750K6- (sold) http://forums.sohc4.net/index.php?topic=96859.0
1976 CB750K6 (sold)- http://forums.sohc4.net/index.php?topic=62569.0

Offline Johnie

  • Really Old Timer ...
  • *******
  • Posts: 8,609
Re: Restoration of a 350 four update: The Return?
« Reply #169 on: December 23, 2012, 11:19:16 AM »
That bike deserves to see the sun this summer Trevor!!! Glad to see you are back at it and congrats on the graduation.
1970 CB750K0 - Candy Ruby Red
1973 CB750K3 - Candy Bacchus Olive or Sunflake Orange
1970 Chevy Chevelle SS396 - Cortez Silver
1976 GL1000 Sulphur Yellow

Oshkosh, WI  USA

Offline Tews19

  • I am no
  • Really Old Timer ...
  • *******
  • Posts: 6,465
Re: Restoration of a 350 four update: The Return?
« Reply #170 on: December 25, 2012, 05:40:31 PM »
Congrats on finishing school. Be patient when it comes to finding work and don't let it Overwhelm you. After I finished grad school it took me 9 months and about 57 places that I applied to before taking a job. Very interesting build and look forward to the updates.
1969 Honda CB750... Basket case
1970 Honda CB750 survivor.

Offline hoodellyhoo

  • CB350F
  • Master
  • *****
  • Posts: 1,726
Re: Restoration of a 350 four update: The Return?
« Reply #171 on: January 05, 2013, 01:22:01 PM »
Spent some time in the basement today. Mostly I was organizing and putting up the shelves I got for christmas. Started calalouging the parts that I need to sell to fund the work on the 350.


The only 350-specific work I did was some cleanup on the replacement rocker cover and breather cover. I had stripped the rocker cover a number of years ago but there was still some flakes and what-not still on it so I hit it with the wire wheel to get the rest of the crud off of it.


Does anybody know what the original finish of these rocker covers was? On this replacement cover I've removed flakes that look like silver paint but on the original cover it appears to have yellowed clearcoat on it as if it was originally lightly polished. The casting is pretty rough and complex so I doubt that it was polished at the factory. I'm leaning towards painting the cover but them I'm afraid of it looking different from the cylinders and cylinder head. I could possibly paint all three parts but then it may look different from the paint on the engine cases.

Any opinions on what I should do?
1972 CB350F (Back from the Dead!)- http://forums.sohc4.net/index.php?topic=20822.0
1965? S65 - Coming Eventually!
1972 CB750K2 (father-son project)
1976 CB750K6- (sold) http://forums.sohc4.net/index.php?topic=96859.0
1976 CB750K6 (sold)- http://forums.sohc4.net/index.php?topic=62569.0

Offline HondanutRider

  • Ride often - ride long - ride SAFE...and be an
  • Expert
  • ****
  • Posts: 1,283
Re: Restoration of a 350 four update: The Return?
« Reply #172 on: January 05, 2013, 02:13:34 PM »
Originally, most engine parts from Honda that were aluminum alloy, were painted with a dull silver paint.  An exception is some of the covers on dynos, that were polished and clear-coated, or a chrome layer.  A lot of the aluminum spray paints match this fairly close.  Sometimes in restoration a clear-coat was added (not sure if that was really original) that with the engine heat will often turn yellow.  Many times people will polish parts up to a high luster, but that will quickly fade and oxidize unless regularly polished and waxed, or a clear-coat added to protect (...but then you run risk of yellowing).
« Last Edit: January 05, 2013, 02:15:30 PM by HondanutRider »

derkapitan

  • Guest
Re: Restoration of a 350 four update: The Return?
« Reply #173 on: June 14, 2013, 02:09:46 PM »
Just found this thread, very nice! 350Fours are taking over WI! I'm down the road in West Bend, just starting a resto on one of two 350Fours :o

Offline hoodellyhoo

  • CB350F
  • Master
  • *****
  • Posts: 1,726
Re: Restoration of a 350 four update: The Return?
« Reply #174 on: June 15, 2013, 09:15:50 AM »
Imagine my surpise when I saw my thread was bumped up to the top.

Welcome to the site derkapitan. Let me know if you need any help on those bikes.

Sadly, not much to report on my 350. I finally started a job about a month ago so financials are still in the "healing" phase. I do have a set of 400f foot controls and sprocket cover that I can clean up. For now I'm hoping to have the bike put back together by fall.
1972 CB350F (Back from the Dead!)- http://forums.sohc4.net/index.php?topic=20822.0
1965? S65 - Coming Eventually!
1972 CB750K2 (father-son project)
1976 CB750K6- (sold) http://forums.sohc4.net/index.php?topic=96859.0
1976 CB750K6 (sold)- http://forums.sohc4.net/index.php?topic=62569.0