Author Topic: 1972 CB450 "Supersport" NOW SHE REALLY LIVES!!!!!  (Read 101657 times)

0 Members and 3 Guests are viewing this topic.

Offline hoodellyhoo

  • CB350F
  • Master
  • *****
  • Posts: 1,726
Re: 1972 CB450 "Supersport" Prepping the Frame and Painting the Engine
« Reply #75 on: January 27, 2010, 09:05:58 PM »
Neat idea for the fins! That looks great!

Would you happen to have pics of the results you are getting from the HF tumblers? I think I read on here once that a person got really crappy results from them so I'm surprised that you say the opposite. I'd love to give their larger ultrasonic cleaner a try sometime.
1972 CB350F (Back from the Dead!)- http://forums.sohc4.net/index.php?topic=20822.0
1965? S65 - Coming Eventually!
1972 CB750K2 (father-son project)
1976 CB750K6- (sold) http://forums.sohc4.net/index.php?topic=96859.0
1976 CB750K6 (sold)- http://forums.sohc4.net/index.php?topic=62569.0

Offline dagersh

  • "A country attempting to tax itself into prosperity is akin to a man standing in a bucket attempting to lift that bucket by its handle. - Winston Churchill"
  • Expert
  • ****
  • Posts: 1,010
    • Photos
Re: 1972 CB450 "Supersport" Prepping the Frame and Painting the Engine
« Reply #76 on: January 28, 2010, 09:34:13 AM »
Hoodelly -

It takes some patience, but the Tumblers are no different than what anyone else sells.  The Eastwood site has a video from Jay Leno's Garage, and they recommend running the cycles for 24 to 48 hours.  Here is a link to the video:

http://www.eastwood.com/ew-hd-vibratory-tumbler-w-media-pushbutton.html

I really like the Tumblers because I have too many windows, cars and other bikes that would suffer from a nut or bolt being shot into them from my buffer. 

I use a 2 to 3 step process.  The first round is with the green plastic resin "pyramids".  These do a very good job of cleaning off rust and oxidation, and will even remove some paint, as long as it has not been properly applied.  I run the stuff between 6 and 24 hours, checking the process every so often.  I then use a course Walnut shell media.  This step takes a minimum of 12 hours.  I put a little Simichrome in with this step.  The results are pretty spectacular.  The pieces come out with a better than stock shine on them.  I am now experimenting with a fine grade Walnut Shell media just to see if there is a difference in luster. 

So Far I have cleaned my rear spokes which were very nasty.  I first let them soak in mineral sprits in my parts washer to break down the caked on grease.  I then sent them through the pyramids and then the course walnut shells with Simichrome.  They came out fantastic.  I should have probably left them in for another day, but I will try them in the fine shells to get a final polish on them.  I won’t  be reusing them, so I want to get them very clean so that I can sell them on Ebay.  I also did my crankcase and engine mounting bolts to great effect as well. 

The bottom line with these tumblers is that they will save you from some tedious polishing chores, but not all.  They are limited by how much they can hold at one time, and also by how long the pieces are.  A good example is that my front spokes are too long to be effectively cleaned in these units.  Occasionally I will get a piece with some really old hardened grease or dirt on them that need to see the wire wheel to get absolutely clean.  However, it will then polish up very nicely in tumblers.

All in all, I would recommend them.  For $55, plus the cost of media, you can’t go wrong.  I will update this with some pics this weekend.
1962 CA95
1966 Black Bomber
1966 CA77 Dream
1967 Superhawk
1970 CB750K0
1972 CL350
1972 CB450/500 Custom
1972 CB500K1
1975 CB550F
1976 CB400F
1975 CB750 Future Restoration
1976 CB750K6
1976 CB750F
1976 GL1000


1968 Suzuki T500 Cobra
1990 BMW K1
2001 'Busa
2003 RC 51
Bunch of Guzzi's

http://www.sohc4.us/gallery/v/members/personal/dagersh/

Offline Slams77

  • Enthusiast
  • **
  • Posts: 162
  • Naturally Aspirated
Re: 1972 CB450 "Supersport" Prepping the Frame and Painting the Engine
« Reply #77 on: January 28, 2010, 08:45:25 PM »
Marking the post for some pointers.  I have a complete 1971 CB450 that isn’t running (been sitting for about twenty years) and I’ve started to disassemble it.  This is totally going to help me get started in the right direction.  Great detail on your work.

Offline dagersh

  • "A country attempting to tax itself into prosperity is akin to a man standing in a bucket attempting to lift that bucket by its handle. - Winston Churchill"
  • Expert
  • ****
  • Posts: 1,010
    • Photos
Re: 1972 CB450 "Supersport" Prepping the Frame and Painting the Engine
« Reply #78 on: January 29, 2010, 01:51:46 PM »
Thanks Slams!  I hope this helps!  Anything you need, just ask.  Keep us all posted with your progress, and DO NOT FORGET PICTURES!!!!!!

Sorry to yell, I am all excited!
1962 CA95
1966 Black Bomber
1966 CA77 Dream
1967 Superhawk
1970 CB750K0
1972 CL350
1972 CB450/500 Custom
1972 CB500K1
1975 CB550F
1976 CB400F
1975 CB750 Future Restoration
1976 CB750K6
1976 CB750F
1976 GL1000


1968 Suzuki T500 Cobra
1990 BMW K1
2001 'Busa
2003 RC 51
Bunch of Guzzi's

http://www.sohc4.us/gallery/v/members/personal/dagersh/

Offline Slams77

  • Enthusiast
  • **
  • Posts: 162
  • Naturally Aspirated
Re: 1972 CB450 "Supersport" Prepping the Frame and Painting the Engine
« Reply #79 on: January 29, 2010, 05:47:59 PM »
Thanks Slams!  I hope this helps!  Anything you need, just ask.  Keep us all posted with your progress, and DO NOT FORGET PICTURES!!!!!!

Sorry to yell, I am all excited!
Thanks, I’m going to need all the help I can get.  Here is a pic of the bike as it stood a couple of days ago.  I have since started to disassemble it and I will put it in the project shop once I officially start to do any work on it.

Offline 72 yellow

  • Expert
  • ****
  • Posts: 1,218
Re: 1972 CB450 "Supersport" Prepping the Frame and Painting the Engine
« Reply #80 on: January 30, 2010, 11:04:02 AM »
Is that a piece of pipe that the handlebar risers are attached to ?

Offline dagersh

  • "A country attempting to tax itself into prosperity is akin to a man standing in a bucket attempting to lift that bucket by its handle. - Winston Churchill"
  • Expert
  • ****
  • Posts: 1,010
    • Photos
Re: 1972 CB450 "Supersport" Prepping the Frame and Painting the Engine
« Reply #81 on: January 30, 2010, 12:36:56 PM »
I think that is a pipe!!!

Slams,

The bike looks very complete.  The first thing I would do is coat every metal surface with PB Blaster or the like, let it sit for a couple of days, do it again, and let sit again.  Then give it a real good wash before you start disassembly.  I have some stock bars in decent condition when you are ready to swap out those monsterous Apes!

PM me whenever, and we will work out something.

Gersh
1962 CA95
1966 Black Bomber
1966 CA77 Dream
1967 Superhawk
1970 CB750K0
1972 CL350
1972 CB450/500 Custom
1972 CB500K1
1975 CB550F
1976 CB400F
1975 CB750 Future Restoration
1976 CB750K6
1976 CB750F
1976 GL1000


1968 Suzuki T500 Cobra
1990 BMW K1
2001 'Busa
2003 RC 51
Bunch of Guzzi's

http://www.sohc4.us/gallery/v/members/personal/dagersh/

Offline Slams77

  • Enthusiast
  • **
  • Posts: 162
  • Naturally Aspirated
Re: 1972 CB450 "Supersport" Prepping the Frame and Painting the Engine
« Reply #82 on: January 30, 2010, 01:20:42 PM »
Is that a piece of pipe that the handlebar risers are attached to ?
The lower bar attches to the triple tree and the two vertical bars attach to the lower bar and the handle bars.  Not sure how well they worked when first installed, but there is a lot of flex in them while moving the bike around.

Offline Slams77

  • Enthusiast
  • **
  • Posts: 162
  • Naturally Aspirated
Re: 1972 CB450 "Supersport" Prepping the Frame and Painting the Engine
« Reply #83 on: January 30, 2010, 01:33:56 PM »
I think that is a pipe!!!

Slams,

The bike looks very complete.  The first thing I would do is coat every metal surface with PB Blaster or the like, let it sit for a couple of days, do it again, and let sit again.  Then give it a real good wash before you start disassembly.  I have some stock bars in decent condition when you are ready to swap out those monsterous Apes!

PM me whenever, and we will work out something.

Gersh

Thanks Gersh, I’ll let you know about the bars when I decide which direction I go with the build.  Now, I’m still new at this and I have never disassembled a bike before so I’ll have a lot of questions (hopefully not as many dumb ones) as I go along.  First one, am I going to spray PB blaster on every metal surface, or is it mainly on anything I will need to remove a bolt from? 

Offline dagersh

  • "A country attempting to tax itself into prosperity is akin to a man standing in a bucket attempting to lift that bucket by its handle. - Winston Churchill"
  • Expert
  • ****
  • Posts: 1,010
    • Photos
Re: 1972 CB450 "Supersport" Prepping the Frame and Painting the Engine
« Reply #84 on: January 30, 2010, 01:55:25 PM »
Anything that you even think you are going to remove.  Pay special attention to the case bolts on the engine covers.  The bodywork, does not necessarily need the PB Blaster, I should have been more clear on that.  The PB won't hurt anything, this is just to get some penetrant onto mating surfaces.

Most importantly, there are no dumb questions, unless they are unasked!

PICTURES!!!!!  Make sure you document everything!  Keep subassemblies together, and make sure you have a manual and access to parts fiche.

Talk soon.

Gersh
1962 CA95
1966 Black Bomber
1966 CA77 Dream
1967 Superhawk
1970 CB750K0
1972 CL350
1972 CB450/500 Custom
1972 CB500K1
1975 CB550F
1976 CB400F
1975 CB750 Future Restoration
1976 CB750K6
1976 CB750F
1976 GL1000


1968 Suzuki T500 Cobra
1990 BMW K1
2001 'Busa
2003 RC 51
Bunch of Guzzi's

http://www.sohc4.us/gallery/v/members/personal/dagersh/

Offline seaweb11

  • 1st Mate &
  • Really Old Timer ...
  • *******
  • Posts: 6,258
  • Ride & Smile
    • Playground Directory
Re: 1972 CB450 "Supersport" Prepping the Frame and Painting the Engine
« Reply #85 on: January 30, 2010, 02:37:38 PM »
Really nice build 8)

Great thread with an emphases on detail and photos.  Should go in FAQs ;)

Offline 72 yellow

  • Expert
  • ****
  • Posts: 1,218
Re: 1972 CB450 "Supersport" Prepping the Frame and Painting the Engine
« Reply #86 on: January 30, 2010, 07:07:20 PM »
Is that a piece of pipe that the handlebar risers are attached to ?
The lower bar attches to the triple tree and the two vertical bars attach to the lower bar and the handle bars.  Not sure how well they worked when first installed, but there is a lot of flex in them while moving the bike around.
Good luck with the build.  I had a new 70 1/2 CB450.  Really liked it.  I had no trouble keeping up with the 650 BSA's and Triumphs or anything else.  Kind of wish I still had it.

Offline Slams77

  • Enthusiast
  • **
  • Posts: 162
  • Naturally Aspirated
Re: 1972 CB450 "Supersport" Prepping the Frame and Painting the Engine
« Reply #87 on: January 30, 2010, 08:52:30 PM »
Is that a piece of pipe that the handlebar risers are attached to ?
The lower bar attches to the triple tree and the two vertical bars attach to the lower bar and the handle bars.  Not sure how well they worked when first installed, but there is a lot of flex in them while moving the bike around.
Good luck with the build.  I had a new 70 1/2 CB450.  Really liked it.  I had no trouble keeping up with the 650 BSA's and Triumphs or anything else.  Kind of wish I still had it.
Thanks 72 yellow.  With all the info and step by steps Gersh has already provided, I'm going to have plenty to get me started on the process.  Look for pics of my build in the project shop in the near future.

Offline dagersh

  • "A country attempting to tax itself into prosperity is akin to a man standing in a bucket attempting to lift that bucket by its handle. - Winston Churchill"
  • Expert
  • ****
  • Posts: 1,010
    • Photos
Re: 1972 CB450 "Supersport" Prepping the Frame and Painting the Engine
« Reply #88 on: January 31, 2010, 09:13:24 AM »
Thanks Seaweb,

That means quite a lot coming from you.  I have kept constant tabs on your projects and posts.  You are one of the Gurus!

Gersh
« Last Edit: January 31, 2010, 09:48:18 AM by dagersh »
1962 CA95
1966 Black Bomber
1966 CA77 Dream
1967 Superhawk
1970 CB750K0
1972 CL350
1972 CB450/500 Custom
1972 CB500K1
1975 CB550F
1976 CB400F
1975 CB750 Future Restoration
1976 CB750K6
1976 CB750F
1976 GL1000


1968 Suzuki T500 Cobra
1990 BMW K1
2001 'Busa
2003 RC 51
Bunch of Guzzi's

http://www.sohc4.us/gallery/v/members/personal/dagersh/

Offline dagersh

  • "A country attempting to tax itself into prosperity is akin to a man standing in a bucket attempting to lift that bucket by its handle. - Winston Churchill"
  • Expert
  • ****
  • Posts: 1,010
    • Photos
Re: 1972 CB450 "Supersport" Prepping the Frame and Painting the Engine
« Reply #89 on: January 31, 2010, 09:47:47 AM »
So, yesterday i was able to mask and paint the crank case.  I did not want to use any color, so I am attempting to just use a clear coat.  I first cleaned up the aluminum cases with a Red Scotchbrite pad, just by hand, and I was getting great results.  However, I am patient with most things, but I quickly lost patience for this, so off to the Auto Supply place to see what could help me get this done a bit faster.  I found the round Rock-Lock Scotchbrite pads, and decided that the Green (Fine Grit) pad could do the job.  I bought a bunch of them, but was able to do the job using up 1 ½ pads.  I bought the mandrel for them and put them into my grinder.


I was very careful to keep the pad moving, so as not to burn the metal at the revs the grinder hits.  You could probably get a little more control if you use a power drill instead.  I will try that next time.  However, the results were more than satisfactory.  I really just concentrated on what would be visible when the engine is back on the bike, and completely ignored the bottom side.


After the Scotchbite treatment

I then masked off all the surfaces I wanted free from paint, making especially sure the gasket surfaces would be protected.  I then sprayed everything down with a copious amount of acetone, let that air dry and followed up with Brake Parts Cleaner, and let that air dry as well.  I then used Plastic-coat Engine Enamel Clear, after letting it heat up in a pot of hot water.  I followed the directions, shaking the can for 2 full minutes and applying 3 light coats, spaced 10 minutes apart, and then one medium wet coat, watching for runs.  Note here, when using clear, keep the spray moving, as runs are hard to see.  Luckily, I did not see any.  As of this morning, there is a nice smooth coat on the parts, and they look great!


Very happy with the results.  I don’t think I am ready to paint bodywork yet, but this was pretty easy.  The key, as everyone says, is prep, prep, prep and then make sure your prep is good!!!!

« Last Edit: December 18, 2013, 01:48:54 PM by dagersh »
1962 CA95
1966 Black Bomber
1966 CA77 Dream
1967 Superhawk
1970 CB750K0
1972 CL350
1972 CB450/500 Custom
1972 CB500K1
1975 CB550F
1976 CB400F
1975 CB750 Future Restoration
1976 CB750K6
1976 CB750F
1976 GL1000


1968 Suzuki T500 Cobra
1990 BMW K1
2001 'Busa
2003 RC 51
Bunch of Guzzi's

http://www.sohc4.us/gallery/v/members/personal/dagersh/

Offline dagersh

  • "A country attempting to tax itself into prosperity is akin to a man standing in a bucket attempting to lift that bucket by its handle. - Winston Churchill"
  • Expert
  • ****
  • Posts: 1,010
    • Photos
Re: 1972 CB450 "Supersport" Prepping the Frame and Painting the Engine
« Reply #90 on: January 31, 2010, 05:09:44 PM »
Got some more work done today.  I went after the valve seat seal installation.  I have the Vesrah gasket and seal kit, and I went to use the Valve Seat Seals that are provided in their kit.  I don’t get it.  They are impossible to fit onto the seats, and the orifice is WAY too small for the valve stems to penetrate.  So, I put them aside. 
The original valve stem seats are in very good condition, and make a nice seal on the valve stems.  If anyone thinks this is a bad idea, please let me know, and I will suck it up and order 4 new ones from Honda @ $8.50 per….

Here they are installed:


I have promised to post pics of the THR Pistons, which are made by Wiseco….  But they are darn sexy anyway!!!  The kit came with a slick copper head gasket, so I am happy with it.


Pistons – oooooo!  Shiney!!!
 

I read the ring installation directions, but I readily admit, I have no idea what I am doing.  I understand how and why the gaps are offset around the piston, but I get the feeling I did not put them in the right order on the Piston….  I definitely need a helping hand here, so if anyone has input, I am all eyes and ears!!!!
Here is how I put them on:


I get the feeling that the 2 Oil Rails are supposed to surround the Oil Ring Expander.  The problem is that there is a vacant groove if I do that (the oil Rings are stacked on one another, second groove from the top in the picture).  The top and Second Rings were both installed with their marked sides up.  I obviously put the copper ring (looks gray as opposed to  copper) at the uppermost groove, as it fit into that groove, whereas the bottom (black thick ring above the Oil Ring Expander) only fits in that groove.  The Oil Ring Expander tips are properly butted against one another, and I will triple check that they remain that way before the pistons get installed into the cylinders.
« Last Edit: December 18, 2013, 01:55:20 PM by dagersh »
1962 CA95
1966 Black Bomber
1966 CA77 Dream
1967 Superhawk
1970 CB750K0
1972 CL350
1972 CB450/500 Custom
1972 CB500K1
1975 CB550F
1976 CB400F
1975 CB750 Future Restoration
1976 CB750K6
1976 CB750F
1976 GL1000


1968 Suzuki T500 Cobra
1990 BMW K1
2001 'Busa
2003 RC 51
Bunch of Guzzi's

http://www.sohc4.us/gallery/v/members/personal/dagersh/

Offline dagersh

  • "A country attempting to tax itself into prosperity is akin to a man standing in a bucket attempting to lift that bucket by its handle. - Winston Churchill"
  • Expert
  • ****
  • Posts: 1,010
    • Photos
Re: 1972 CB450 "Supersport" Prepping the Frame and Painting the Engine
« Reply #91 on: January 31, 2010, 05:24:34 PM »
OK, so much for a thourough search.  I found my answer....  The oil rings sandwich the OIl Ring Expander!  Check out this neat video.  Scroll down to see it.

http://www.howautowork.com/part_1/ch_1/Piston_rings_27.html


I need to check out that site more!

1962 CA95
1966 Black Bomber
1966 CA77 Dream
1967 Superhawk
1970 CB750K0
1972 CL350
1972 CB450/500 Custom
1972 CB500K1
1975 CB550F
1976 CB400F
1975 CB750 Future Restoration
1976 CB750K6
1976 CB750F
1976 GL1000


1968 Suzuki T500 Cobra
1990 BMW K1
2001 'Busa
2003 RC 51
Bunch of Guzzi's

http://www.sohc4.us/gallery/v/members/personal/dagersh/

Offline dagersh

  • "A country attempting to tax itself into prosperity is akin to a man standing in a bucket attempting to lift that bucket by its handle. - Winston Churchill"
  • Expert
  • ****
  • Posts: 1,010
    • Photos
Re: 1972 CB450 "Supersport" Prepping the Frame and Painting the Engine
« Reply #92 on: January 31, 2010, 05:53:29 PM »
here is how they are supposed to look...


Sometimes it's good to answer your own question!!!
« Last Edit: December 18, 2013, 01:58:06 PM by dagersh »
1962 CA95
1966 Black Bomber
1966 CA77 Dream
1967 Superhawk
1970 CB750K0
1972 CL350
1972 CB450/500 Custom
1972 CB500K1
1975 CB550F
1976 CB400F
1975 CB750 Future Restoration
1976 CB750K6
1976 CB750F
1976 GL1000


1968 Suzuki T500 Cobra
1990 BMW K1
2001 'Busa
2003 RC 51
Bunch of Guzzi's

http://www.sohc4.us/gallery/v/members/personal/dagersh/

Offline fastbroshi

  • Puppet
  • Old Timer
  • ******
  • Posts: 2,645
Re: 1972 CB450 "Supersport" Prepping the Frame and Painting the Engine
« Reply #93 on: January 31, 2010, 07:15:55 PM »
If I'd seen this earlier I'd have commented but it looks like you're pretty good at searching.  Those pistons are very cool looking!  Definitely a popup piston if there ever was one.  They're stock compression, right?
Just call me Timmaaaaay!!!

Offline dagersh

  • "A country attempting to tax itself into prosperity is akin to a man standing in a bucket attempting to lift that bucket by its handle. - Winston Churchill"
  • Expert
  • ****
  • Posts: 1,010
    • Photos
Re: 1972 CB450 "Supersport" Prepping the Frame and Painting the Engine
« Reply #94 on: February 01, 2010, 09:21:31 AM »
Yes, no milling of the head is necessary.  Is that the right answer?  I told you I have no idea what I am doing.
1962 CA95
1966 Black Bomber
1966 CA77 Dream
1967 Superhawk
1970 CB750K0
1972 CL350
1972 CB450/500 Custom
1972 CB500K1
1975 CB550F
1976 CB400F
1975 CB750 Future Restoration
1976 CB750K6
1976 CB750F
1976 GL1000


1968 Suzuki T500 Cobra
1990 BMW K1
2001 'Busa
2003 RC 51
Bunch of Guzzi's

http://www.sohc4.us/gallery/v/members/personal/dagersh/

Offline fastbroshi

  • Puppet
  • Old Timer
  • ******
  • Posts: 2,645
Re: 1972 CB450 "Supersport" Prepping the Frame and Painting the Engine
« Reply #95 on: February 01, 2010, 04:42:48 PM »
Yes, no milling of the head is necessary.  Is that the right answer?  I told you I have no idea what I am doing.

How is that possible with all those bikes in your sig?  Are you saying you never worked on one 'til now?  OH THE HUMANITY!!!
Just call me Timmaaaaay!!!

Offline dagersh

  • "A country attempting to tax itself into prosperity is akin to a man standing in a bucket attempting to lift that bucket by its handle. - Winston Churchill"
  • Expert
  • ****
  • Posts: 1,010
    • Photos
Re: 1972 CB450 "Supersport" Prepping the Frame and Painting the Engine
« Reply #96 on: February 02, 2010, 10:23:18 AM »
I have a disease.....  that's all I can say.  I actually bought the 450 as a Guinea Pig, I definitely did not want to tear into one of the 4's or the Guzzi's until I had some confidence.  As this build is coming together, I have a non-running but complete '77 550F that will be next on the table.  That one will be a nut and bolt stock restoration.
1962 CA95
1966 Black Bomber
1966 CA77 Dream
1967 Superhawk
1970 CB750K0
1972 CL350
1972 CB450/500 Custom
1972 CB500K1
1975 CB550F
1976 CB400F
1975 CB750 Future Restoration
1976 CB750K6
1976 CB750F
1976 GL1000


1968 Suzuki T500 Cobra
1990 BMW K1
2001 'Busa
2003 RC 51
Bunch of Guzzi's

http://www.sohc4.us/gallery/v/members/personal/dagersh/

Offline fastbroshi

  • Puppet
  • Old Timer
  • ******
  • Posts: 2,645
Re: 1972 CB450 "Supersport" Prepping the Frame and Painting the Engine
« Reply #97 on: February 02, 2010, 06:03:54 PM »
I've said it before and I'll say it again.  I think the 550f's and cb400's had some of the best pipes ever.
Just call me Timmaaaaay!!!

Offline dagersh

  • "A country attempting to tax itself into prosperity is akin to a man standing in a bucket attempting to lift that bucket by its handle. - Winston Churchill"
  • Expert
  • ****
  • Posts: 1,010
    • Photos
Re: 1972 CB450 "Supersport" Prepping the Frame and Painting the Engine
« Reply #98 on: February 03, 2010, 09:39:12 AM »
Heartily agreed.  Honda should have used the same on the 750F's as well.
1962 CA95
1966 Black Bomber
1966 CA77 Dream
1967 Superhawk
1970 CB750K0
1972 CL350
1972 CB450/500 Custom
1972 CB500K1
1975 CB550F
1976 CB400F
1975 CB750 Future Restoration
1976 CB750K6
1976 CB750F
1976 GL1000


1968 Suzuki T500 Cobra
1990 BMW K1
2001 'Busa
2003 RC 51
Bunch of Guzzi's

http://www.sohc4.us/gallery/v/members/personal/dagersh/

Offline dagersh

  • "A country attempting to tax itself into prosperity is akin to a man standing in a bucket attempting to lift that bucket by its handle. - Winston Churchill"
  • Expert
  • ****
  • Posts: 1,010
    • Photos
Re: 1972 CB450 "Supersport" Finally, onto Assembly!!!!!
« Reply #99 on: February 10, 2010, 11:34:45 AM »
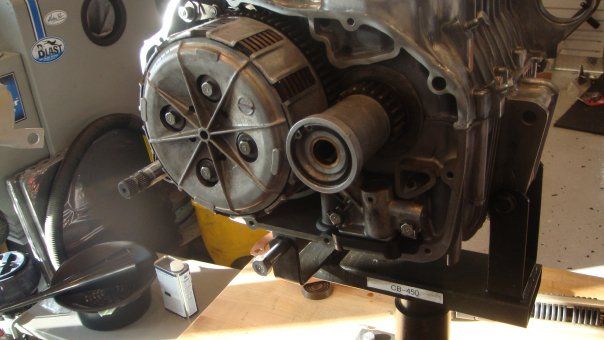
Finally, I have left the disassembly stage, and I started putting the engine back together again.  Truthfully, I was really nervous about whether everything would come back together again.  In reality, it all pretty much fell together, and though I had some brain farts along the way, it took a fraction of the time I thought it would.

Important lesson learned…  before putting the case halves together, make sure you apply the Hondabond!!!!  I will just use the excuse that I was test fitting everything! 
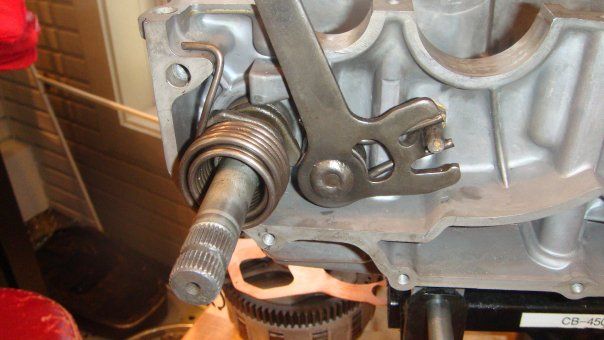


The Kickstarter and Shift Stop Cam Assemblies
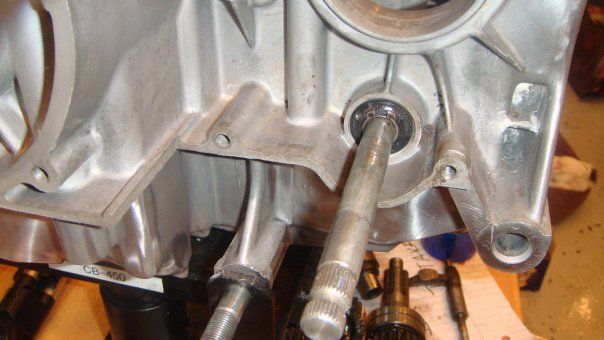


You can see the new Oil Seal and the Circlip inserted, making sure it is sitting in its groove.
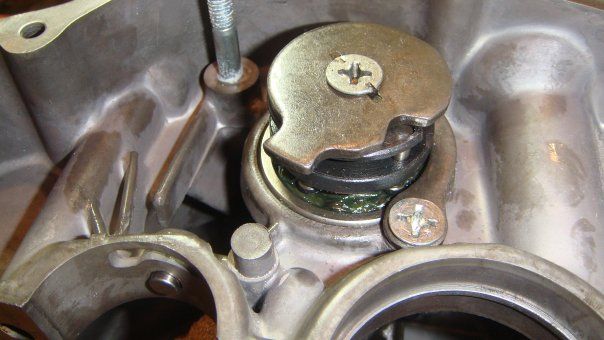


Here is the Shifter Cam that fits on the Gear Shift Drum.  I used blue Lock-tite and made sure the knock marks on the screw lined up with the marks on the Cam Plate surface.  I cannot get it any tighter than it is, so I will have to assume its OK.  There were no torque specs given for it.
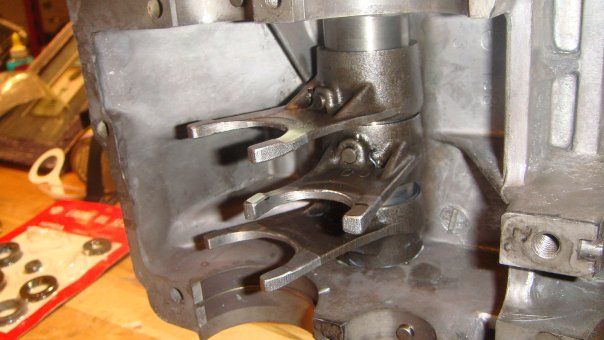


Here is the Shift Fork Assembly.  After a few tries, I realized it had to be assembled as the Gear Shift Drum is inserted into the case, attaching the shift forks one at a time.  This took me a few times to get it right.  I kept the manual in front of me to make sure that everything went together correctly.
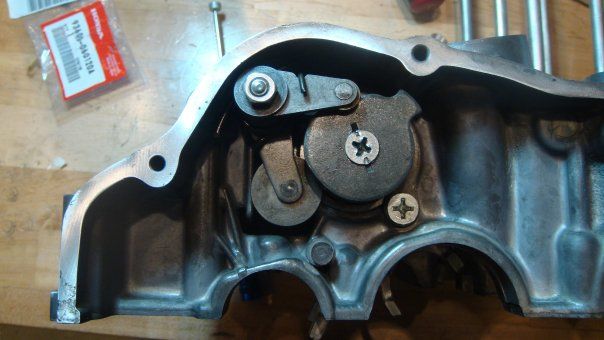


Another view of the Shifter Cam.  I just had to be careful to get the orientation of the springs correct, but it’s a pretty straight forward assembly.
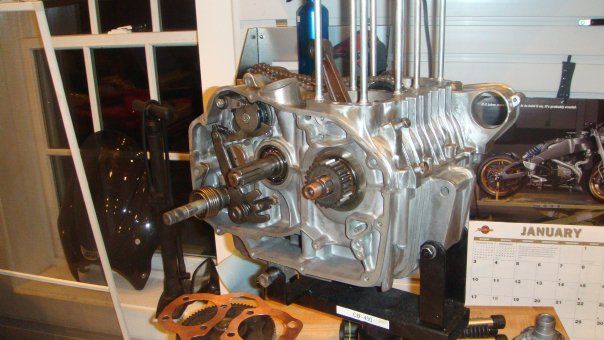
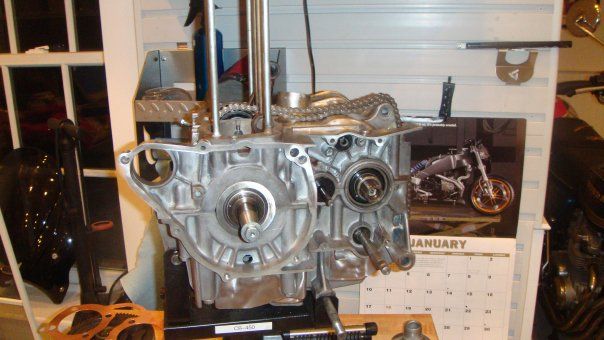


Starting to look like an engine!!!!!!!  However, I forgot to apply Hondabond to the case halves, so this would all come apart again in the morning. 
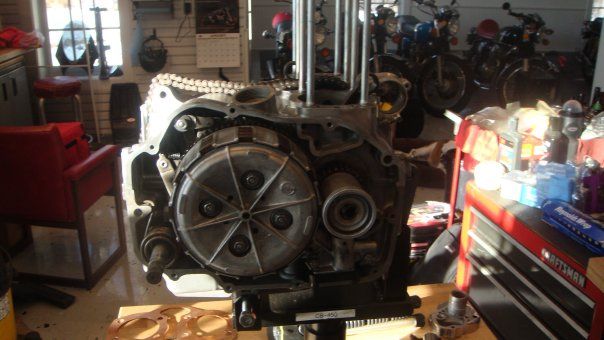


Clutch assembly and oil pump in, after I disassembled the case halves and applied the Hondabond.
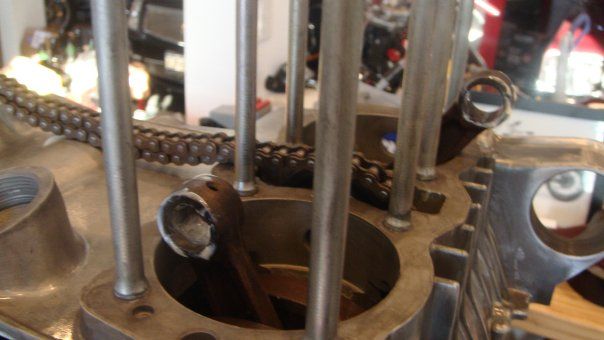


Assembly Lube on the Connecting Rod Bushing surfaces.
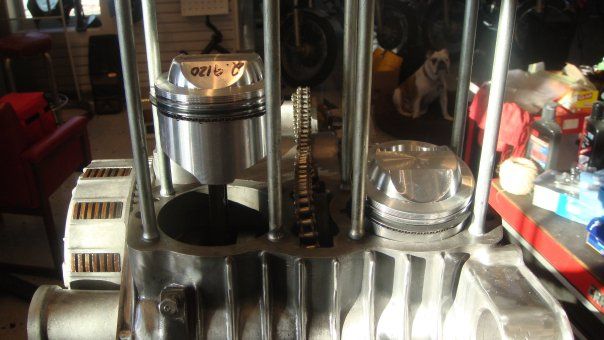


Pistons installed!!!  Ok, second big lesson….  If your Cylinder Head Studs are in, make sure you install the Pistons so that they are in the middle (i.e. The pistons do not fit through the gaps between the studs!!!)  Damn…  those piston pin clips sure can fly along way very fast!!!!!!!!  Luckily, I found it.

Also, make sure you put on your gaskets before doing anything, and test fit to make sure of their orientation – again, ask me how I know!  Anyway, a bit of Hondabond, and the crankcase to cylinder gasket was on.

So I had to leave it here.  I had a ring compressor, but it was one piece and won’t work in this situation.  I need to get hose clamps and install the pistons into the cylinders this weekend.  So I carefully covered everything, as I had lubed up all the surfaces thinking I was going to get this done.
« Last Edit: December 18, 2013, 02:09:06 PM by dagersh »
1962 CA95
1966 Black Bomber
1966 CA77 Dream
1967 Superhawk
1970 CB750K0
1972 CL350
1972 CB450/500 Custom
1972 CB500K1
1975 CB550F
1976 CB400F
1975 CB750 Future Restoration
1976 CB750K6
1976 CB750F
1976 GL1000


1968 Suzuki T500 Cobra
1990 BMW K1
2001 'Busa
2003 RC 51
Bunch of Guzzi's

http://www.sohc4.us/gallery/v/members/personal/dagersh/