Author Topic: Keep telling yourself - a restored 750 K2 is an investment  (Read 38576 times)

0 Members and 1 Guest are viewing this topic.

Offline HondaMan

  • Someone took this pic of me before I became a
  • Really Old Timer ...
  • *******
  • Posts: 13,845
  • ...not my choice, I was nicknamed...
    • Getting 'em Back on the Road
Re: Keep telling yourself - a restored 750 K2 is an investment
« Reply #175 on: March 09, 2009, 08:07:01 PM »
Intake valves are always bigger than exhausts. Generally, the exhaust is 65% to 85% of the intake size, depending on the engine's torque design.

The 450 camchain can be tough for a couple of reasons: first thing, remove the chain tensioner completely when trying to clip the chain together, or you will never get it done. Usually, that will give you a full link of extra working length and the marks match up real close to the pictures then.

Afterward, push the tensioner plunger in most of the way by hand and "dry run" it a time or two by releasing the little bolt and watching the plunger snap out. Then, set it all the way in, install the tensioner, put the crankshaft 15 degrees past right cylinder TDC on the intake stroke, and snap the plunger in to pull out the slack. Set the little bolt onto the tensioner shaft, then turn the engine over slowly to make sure no valves and pistons meet. I have actually assembled them wrong before, with one cam out of position by 45 degrees, because for a while, Honda had 2 marks on the exhaust cam on the 450s. The pistons and valves would hit if I got the wrong one: then I knew it was the other one.... but, I don't remember which years those cams appeared, anymore. I think it was the early 1970s (71-73) but not sure.
See SOHC4shop@gmail.com for info about the gadgets I make for these bikes.

The demons are repulsed when a man does good. Use that.
Blood is thicker than water, but motor oil is thicker yet...so, don't mess with my SOHC4, or I might have to hurt you.
Hondaman's creed: "Bikers are family. Treat them accordingly."

Link to Hondaman Ignition: http://forums.sohc4.net/index.php?topic=67543.0

Link to My CB750 Book: https://www.lulu.com/search?adult_audience_rating=00&page=1&pageSize=10&q=my+cb750+book

Link to website: www.SOHC4shop.com

Offline the-chauffeur

  • Enthusiast
  • **
  • Posts: 236
Re: Keep telling yourself - a restored 750 K2 is an investment
« Reply #176 on: March 10, 2009, 08:40:32 AM »

2 marks on the exhaust cams?  Don't fancy the sound of that much. 

Thanks for the pointers on the tensioner, valves and the chain (which I gather is much easier to join at the rear than at the front of the engine) but I'm still struggling with the timing marks not matching up with the indicators on the engine cases. Like I said, they're a couple of mm out and no matter what I do - either rotating the cams or the follower spindles or both - I can't get them into a position where they match up.  Basically, what happens is that the cams rotate far enough so that one of the lobes engages with the follower and then won't go any further - or at least I can't get them to rotate any further by hand 'cos the opposing pressure forces generated by the valve spring bars are too great. And the gap between the front timing mark and the engine indicator is different to the gap between the rear mark and its corresponding indicator. There simply isn't any way for me to get enough purchase on the cams to force them into the right position - and something tells me that forcing them really isn't the best way to sort this out. Logic dictates that when the left piston is at TDC, both left intake and exhaust valves should be closed, so the cam shouldn't be touching either follower. Consequently, I'd've thought the cams should line up without any force being applied anywhere.

It seems to me that the only way to get them to line up would be to get the respective timing marks equidistant from their corresponding engine indicators, then connect the ends of the camchain, then somehow rotate the chain which would pull the cams round so that the marks align without disturbing the crank position.  Does that make sense - even if it doesn't sound right?

And again - sorry about this.  The main 450 forum folded recently (one of the MSN group casualties), so I'm struggling to find help elsewhere.

Offline the-chauffeur

  • Enthusiast
  • **
  • Posts: 236
Re: Keep telling yourself - a restored 750 K2 is an investment
« Reply #177 on: March 10, 2009, 01:52:19 PM »

After some meddling and careful nudging and twisting, I think I've answered my own question.  It seems that the only way to get the exhaust cam timing marks to line up is to carefully rotate the cam about 20-30 deg.  I found the safest way to do that (without resorting to tools with teeth) was to hook a ring spanner over the cam teeth and gently lever the cam round . . . didn't feel particularly comfortable, but it worked.

So I guess it's time to attach the chain . . .

Offline the-chauffeur

  • Enthusiast
  • **
  • Posts: 236
Re: Keep telling yourself - a restored 750 K2 is an investment
« Reply #178 on: March 16, 2009, 01:57:18 PM »

At v-e-r-y long last, the 750 kicked itself into life yesterday.  It ran very well - and more importantly, it's pretty much oil tight (yay!!).  So well in fact that I took it for a good ol' drive round (50+ miles) and everything went very smoothly - from the engine perspective at least.  The run did confirm that the shocks are completely shot, so new ones are on the way/  The run also chucked up a couple of little tweaky issues though - two electrical (maybe) and one fulling.

Electrics - After the first 10 miles or so, the rear indicators gave up . . . by which I mean that they stopped working - and while the fronts worked, they didn't flash. Checked the rear indicator wiring ('cos it doesn't necessitate any major surgery) and it's fine, so my guess is it's something up front - and almost certainly a loose connection or two.

More disconcerting was the loss of battery charge.  Having fully charged the battery before I left, I had no trouble running out and back.  But having left the bike off charge overnight, I went out to it this afternoon to find that there was next to no charge in the battery.  A quick blast on the charger put enough ooomph back into it to get the bike started, but the drop seems way too fast to be right.  Any chance this issue is linked to the other?

The fuelling is an odd one. Three of the four carbs are fine - hey, they were all rebuilt with new float needles and seats, so they should be.  But the forth seems intent on spitting out the contents (more or less) of the float bowl out when the bike is turned off.  It's happened three or four times now, and it's almost as though there's an air bubble trapped somewhere, but I can't think where.  Before I go tearing them off (and apart again), any pointers?

Thanks again

Oh - and more news on the 450: the frame is up, the engine is back in and the back wheel is on.  I've also chosen a colour - not cheap, but I'll put up photo's when the tank, sides and headlight ears come back from the spray shop.

Offline andy750

  • Really Old Timer ...
  • *******
  • Posts: 7,938
Re: Keep telling yourself - a restored 750 K2 is an investment
« Reply #179 on: March 16, 2009, 02:05:18 PM »
Congrats on finally getting the 750 running and Im sure it must have been a great ride. The overflowing carb may be the float valve not sealing around the o-ring properly so likely worth a check there. Alternatively check the level of your floats -perhaps its off and causing too much gas to get into the carb? Lastly check for a pinched float bowl gasket -easy enough to do.

Non-blinking indicators - check the electronic flasher (maybe you still have an old thermal flasher) under the left sidecover - towards the back - has two wires - a grey one and I forget the other colour - anyway a new 12V electronic flasher from Halfords will work and may cure the issue. Alternatively check the wiring in the headlight shell and make sure you have your oranges and blues hooked up correctly - colour to colour!

Good luck with it and I am sure Hondaman will come along shortly and fill in my gaps!

cheers
Andy
Current bikes
1. CB750K4: Long distance bike, 17 countries and counting...2001 - Trans-USA-Mexico, 2003 - European Tour, 2004 - SOHC Easy Rider Trip , 2008 - Adirondack Tour 2-up , 2013 - Tail of the Dragon Tour , 2017: 836 kit install and bottom end rebuild. And rebirth: http://forums.sohc4.net/index.php/topic,173213.msg2029836.html#msg2029836
2. CB750/810cc K2  - road racer with JMR worked head 71 hp
3. Yamaha Tenere T700 2022

Where did you go on your bike today? - http://forums.sohc4.net/index.php?topic=45183.2350

Offline mystic_1

  • Really Old Timer ...
  • *******
  • Posts: 6,071
  • 1970 CB750K
Re: Keep telling yourself - a restored 750 K2 is an investment
« Reply #180 on: March 16, 2009, 05:25:56 PM »
Check the float bowl for a cracked standpipe.

Swap the bowl from the leaking carb onto a different one.  Does the leak follow the bowl?

mystic_1
"A ship in harbor is safe, but that is not what ships are built for."
- John Augustus Shedd

My build thread:  http://forums.sohc4.net/index.php?topic=68952.0

Offline the-chauffeur

  • Enthusiast
  • **
  • Posts: 236
Re: Keep telling yourself - a restored 750 K2 is an investment
« Reply #181 on: March 17, 2009, 02:51:59 PM »
Thanks for the pointers and words of wisdom/support, folks.  Pleased to say that the indicator trouble turned out to be a combination of a broken wire at one end of the bike and a loose connection at the other.  The fuelling seems to have ceased to be a problem after I pulled off the carb bowl, gently   tweaked the float and cleared the drain pipe with a thin wire.

And so without further ado, here it is . . .


Some other angles for those interested:

,
Am I pleased with it?  Well, it's about 7/8ths there.  I have to admit to being extremely unhappy with the paint finish on the engine.  I think I've mentioned the troubles I've had applying coatings for no very good reason at least once or twice in this thread, so I won't go on about it too much, except to say that to my mind, it's way messy.  Still, doesn't stop me riding it, so I guess I'll just have to work on it over time.

The other bits I'm not so chuffed with are smaller, but still annoying.  These two will give you an idea:

,
The first is the clocks and the neck of the tank; the second is the left side panel with the dodgy bottom.  The tank and panel will be pretty straightforward - I've got the Honda swoosh decals to the sides of the tank, so I'll get the dings and other scruffy bits touched up while the decals are being lacquered on.

The clocks are more troublesome.  I refaced them, and the speedo went back together without much of a fight.  The same can't be said of the tacho, which put up an almighty fight.  Consequently, while the face looks fine, the casing looks bloody awful.  Another thing to keep an eye out for - along with a metal chain guard, which I'm having real trouble finding.

To round off, a couple of images of the 450 progress:

,
Not the easiest of angles to see it from, but you get the idea.  Paint's on its way, so the next big update may take a little while, but I'm sure I'll get stuck on the little things in the meantime . . .
« Last Edit: March 17, 2009, 02:55:32 PM by the-chauffeur »

Offline the-chauffeur

  • Enthusiast
  • **
  • Posts: 236
Re: Keep telling yourself - a restored 750 K2 is an investment
« Reply #182 on: March 18, 2009, 09:36:46 AM »

Forgot to mention - seems to me that the reg/rect has had it.  The reason the bike had a flat battery after my last run was that it wasn't charging (obvious, really).

Suggestions for replacements, anyone?

Offline Magpie

  • Old Timer
  • ******
  • Posts: 3,298
Re: Keep telling yourself - a restored 750 K2 is an investment
« Reply #183 on: March 18, 2009, 09:58:42 AM »
That looks great! May I respectfully suggest you swap the red Honda wing diamonds on the sidecovers side for side. You've done such a nice job and that would ice it I think.
Cheers,
Cliff.

Offline HondaMan

  • Someone took this pic of me before I became a
  • Really Old Timer ...
  • *******
  • Posts: 13,845
  • ...not my choice, I was nicknamed...
    • Getting 'em Back on the Road
Re: Keep telling yourself - a restored 750 K2 is an investment
« Reply #184 on: March 18, 2009, 09:31:29 PM »
Now that I've seen the whole bike, Chauf: that's a K1. You get a couple of extra HP over the K2 with that one. The K1 signs: silver handlebar switches, taillight bracket like the K0, seat like the K0 minus the ducktail, cast aluminum instrument mount (one piece with the top triple tree). These are all unique K1 features. That is, presuming someone else hasn't changed them, earlier. What is the serial number on the triple tree, and is is stamped into the head, or is it on a silver plate that is riveted to the head?

Do the pipes have fiberglass muffler inserts, too? These have a small vertical bar across the opening, and the numbers "HM300" stamped on the pipes, near the footpegs. And the sweetest sound a 750-4 could make, IMO.

Now, I'm jealous...  :P  I think the only bike I'd trade my K2 early for would be another K1 like I had at first, but with a straight frame (which mine did not have). Mine has the K1 engine and carbs, and the same steel chain guard as the K1, which you should look for now: the K2 is a bit different in the bolt holes.
See SOHC4shop@gmail.com for info about the gadgets I make for these bikes.

The demons are repulsed when a man does good. Use that.
Blood is thicker than water, but motor oil is thicker yet...so, don't mess with my SOHC4, or I might have to hurt you.
Hondaman's creed: "Bikers are family. Treat them accordingly."

Link to Hondaman Ignition: http://forums.sohc4.net/index.php?topic=67543.0

Link to My CB750 Book: https://www.lulu.com/search?adult_audience_rating=00&page=1&pageSize=10&q=my+cb750+book

Link to website: www.SOHC4shop.com

Offline Magpie

  • Old Timer
  • ******
  • Posts: 3,298
Re: Keep telling yourself - a restored 750 K2 is an investment
« Reply #185 on: March 18, 2009, 10:34:18 PM »
Hondaman, I think you'll find the K1 has a plastic chain guard, at least mine does and I've had it since new. It also has "slots" on the inside front of the swing arm that the chain guard fits into. On the later models I believe it's bolted there and can only be seen by looking throught the rear wheel. And, yes the K1 pipes make music!
I think it's a K2 with K1 touches. K2: chrome headlight brackets, instruments w/o idiot lights, the idiot light panel. K1? Mine never had silver handlebar switches. The think the cast instrument mount carried over to the K2.
The again I acquired a K0 with a K2+ swing arm, K1 forks, K2+ tailight - these things change over the years.
Still and all, it's a gorgous 750!
Cliff.

Offline HondaMan

  • Someone took this pic of me before I became a
  • Really Old Timer ...
  • *******
  • Posts: 13,845
  • ...not my choice, I was nicknamed...
    • Getting 'em Back on the Road
Re: Keep telling yourself - a restored 750 K2 is an investment
« Reply #186 on: March 19, 2009, 05:39:34 AM »
Hondaman, I think you'll find the K1 has a plastic chain guard, at least mine does and I've had it since new. It also has "slots" on the inside front of the swing arm that the chain guard fits into. On the later models I believe it's bolted there and can only be seen by looking throught the rear wheel. And, yes the K1 pipes make music!
I think it's a K2 with K1 touches. K2: chrome headlight brackets, instruments w/o idiot lights, the idiot light panel. K1? Mine never had silver handlebar switches. The think the cast instrument mount carried over to the K2.
The again I acquired a K0 with a K2+ swing arm, K1 forks, K2+ tailight - these things change over the years.
Still and all, it's a gorgous 750!
Cliff.

Boy, it sure is, he's done a nice job - especially with the struggle he's had with the shop.  :-\  I find it interesting that your K1 has a plastic chain guard: mine was steel! Mine also had the silver handlebars switches, but had a black front brake caliper. It was a 1970 K1, one of the first few months of production, I bought it in late July of 1970.

My own K2 (#530 of the first 800 shipped to the States) is one of those "cross breeds", too. Inside the engine, it's all K1, except the serial number. The frame, too: mine had the older style Zamac swingarm bushings that were replaced with phenolic in the "real" K2 and later bikes. Mine still has that cast upper triple tree for the instrument mount: one of the other K2s I'm rebuilding, made 5 months later, has the stamped-steel double plates for the instruments.

At first, I thought Chauf's bike was the K2 because of the dashboard. But, only the instruments and dashboard appear to be the K2-like parts: the rest appears to be earlier than that (or kludged together...).

At least, these parts mostly fit together, 30+ years later!  :D
See SOHC4shop@gmail.com for info about the gadgets I make for these bikes.

The demons are repulsed when a man does good. Use that.
Blood is thicker than water, but motor oil is thicker yet...so, don't mess with my SOHC4, or I might have to hurt you.
Hondaman's creed: "Bikers are family. Treat them accordingly."

Link to Hondaman Ignition: http://forums.sohc4.net/index.php?topic=67543.0

Link to My CB750 Book: https://www.lulu.com/search?adult_audience_rating=00&page=1&pageSize=10&q=my+cb750+book

Link to website: www.SOHC4shop.com

Offline andy750

  • Really Old Timer ...
  • *******
  • Posts: 7,938
Re: Keep telling yourself - a restored 750 K2 is an investment
« Reply #187 on: March 19, 2009, 05:46:35 AM »
Keep in mind he is in the Uk and the K2 there is likely different from the US K2/K1.

cheers
Andy
Current bikes
1. CB750K4: Long distance bike, 17 countries and counting...2001 - Trans-USA-Mexico, 2003 - European Tour, 2004 - SOHC Easy Rider Trip , 2008 - Adirondack Tour 2-up , 2013 - Tail of the Dragon Tour , 2017: 836 kit install and bottom end rebuild. And rebirth: http://forums.sohc4.net/index.php/topic,173213.msg2029836.html#msg2029836
2. CB750/810cc K2  - road racer with JMR worked head 71 hp
3. Yamaha Tenere T700 2022

Where did you go on your bike today? - http://forums.sohc4.net/index.php?topic=45183.2350

Offline Magpie

  • Old Timer
  • ******
  • Posts: 3,298
Re: Keep telling yourself - a restored 750 K2 is an investment
« Reply #188 on: March 19, 2009, 07:12:33 AM »
Interesting, Hondaman. My K1 was built 7/71 and purchased in September of '71. Black switches and black caliper. In a bunch of stuff I bought I got a fibreglass replacement chain guard or was that a stock item at one time too? I guess they used what came to the assembly line at the time and depended on what country it was going to.
THAT is what makes it all so interesting and frustrating at times to make one "stock". I kind of use my original K1 as a template.
Cheers,
Cliff.

Offline the-chauffeur

  • Enthusiast
  • **
  • Posts: 236
Re: Keep telling yourself - a restored 750 K2 is an investment
« Reply #189 on: March 19, 2009, 02:24:22 PM »
Aw, fella's - you're just too kind.  

The disappointments and niggles mentioned above aside, I'm very pleased with it and determined to get more use out of it than the bike it replaced - a Hayabusa.  That was/is a truly great bike, and one I'd always wanted, but it didn't take me long to realise that this country's road system just isn't built for such an awesome machine. And it's getting worse; the government has just announced plans to reduce rural speed limits in the UK from 60/70mph to 50mph, and to introduce road monitoring equipment (speed cameras) that will essentially follow driver's progress, mapping the areas they've covered and calculating average speeds - all in the name of reducing road road casualties, apparently. Can't say I agree, but I s'pose we're on a small island and we've only got so much space.  Anyhoo, how does the old adage go - it's better to ride a slow bike fast than a fast bike slow.  So I've traded down early . . .

Now, moving on to the K1/K2 debate, I can fill you in on some - but not all - of the details.  The bike was not originally imported into the UK; it only got here in 1994. My guess is that it was a European market model (rather than US) 'cos it came with a KPH speedo - and the only history I've got tells me that it's had seven owners since it was imported, and that in that time it's only done 22,000km.  More specifically:

 - switchgear - started life dressed in black.  They're shiny now because I had them blasted and polished.  The LHS gear has an integrated horn/passing light button.
 - front caliper - same as the switchgear.  I intend to put both back to black at some point.
 - rear mudguard - apparently it's a K0/K1 US piece.  It's the only NOS style that Silver's stock  
 - taillight assembly - is the one that came with the bike (although I seem to recall it was painted red - as was the original mudguard)
 - seat - as it came with the bike.  I have a feeling the cover has been replaced at some point 'cos it's trimmed with the same edging I got in the kit to recover the 450 seat (but didn't use).  The other giveaway is that the pan looks markedly more worn than the cover
 - instrument mount - as it came. No changes that I'm aware of
 - headstock - frame number is stamped on the headstock
 - VIN plate - reattached (maybe in the wrong place) following frame powdercoating

I dunno whether this will tell anyone anything (other than the obvious), but here's a picture of the VIN plate - looks to me to be a different style to those on the US bikes I've seen:


So what does that little lot tell you - other than it's something of a shiny mongrel?

Oh - and I still need to apply these:
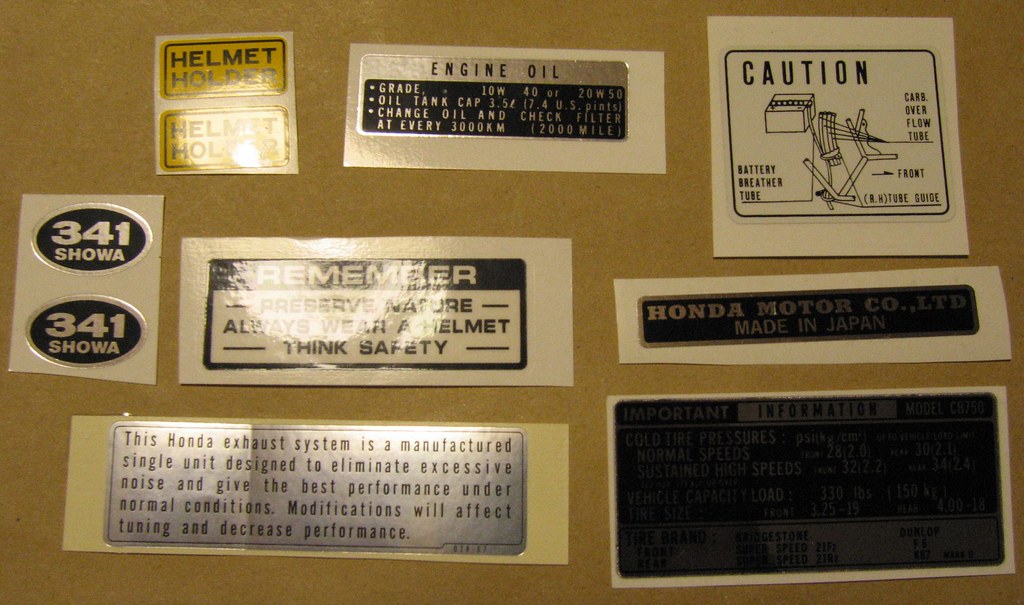


New reg/rect on its way, along with some rather fetching chrome engine bars.


Magpie - thanks for the pointer on the badges.  I'd never have noticed.   I'll ask for them to be changed when I get the tank and panels touched up.
« Last Edit: March 19, 2009, 03:02:17 PM by the-chauffeur »

Offline Magpie

  • Old Timer
  • ******
  • Posts: 3,298
Re: Keep telling yourself - a restored 750 K2 is an investment
« Reply #190 on: March 19, 2009, 03:31:35 PM »
According to the info I have 2000001-2200001 are K2 frames. Release date was 03/01/72. So, a K2 with K1 bits. And it DOES look great!
Cheers,
Cliff.

Offline HondaMan

  • Someone took this pic of me before I became a
  • Really Old Timer ...
  • *******
  • Posts: 13,845
  • ...not my choice, I was nicknamed...
    • Getting 'em Back on the Road
Re: Keep telling yourself - a restored 750 K2 is an investment
« Reply #191 on: March 19, 2009, 09:09:04 PM »
Interesting, Hondaman. My K1 was built 7/71 and purchased in September of '71. Black switches and black caliper. In a bunch of stuff I bought I got a fibreglass replacement chain guard or was that a stock item at one time too? I guess they used what came to the assembly line at the time and depended on what country it was going to.
THAT is what makes it all so interesting and frustrating at times to make one "stock". I kind of use my original K1 as a template.
Cheers,
Cliff.

It's cool to see the "other country" differences, up close!  8)

Magpie: the original K0 chainguards were shorter than the ones 3 month later. The rear sprocket was smaller, and the guards were made from fiberglass. They clipped on in the front, only had 2 bolts that mounted their whole length. The length difference was about 1.5" longer on the later ones. They went to steel near the end of the K1, because the fiberglass ones gave way to plastic that broke and caused warranty issues. I remember riders asking for the metal ones when they appeared, and using my K2 bike as the template for marking and drilling that 3rd hole when we had to replace a guard that was damaged from a chain incident, then ending up with one of the plastic ones from Honda's stock. It was a get-what-you-could scenario in the 1971-73 time period, as the parts were not even as plentiful as they are today, it seemed.
See SOHC4shop@gmail.com for info about the gadgets I make for these bikes.

The demons are repulsed when a man does good. Use that.
Blood is thicker than water, but motor oil is thicker yet...so, don't mess with my SOHC4, or I might have to hurt you.
Hondaman's creed: "Bikers are family. Treat them accordingly."

Link to Hondaman Ignition: http://forums.sohc4.net/index.php?topic=67543.0

Link to My CB750 Book: https://www.lulu.com/search?adult_audience_rating=00&page=1&pageSize=10&q=my+cb750+book

Link to website: www.SOHC4shop.com

Offline Magpie

  • Old Timer
  • ******
  • Posts: 3,298
Re: Keep telling yourself - a restored 750 K2 is an investment
« Reply #192 on: March 19, 2009, 10:42:08 PM »
Cool, that means I have a near new correct fibreglass chain guard for my K0! I also have a couple of plastic ones but have to repair cracks and figure out how to refinish the plastic so it shows better - plastic bumber paint?
So the K1 I recently finished is "correct" with the metal chain guard and 3 bolt swingarm. Nice. However I've just found one of the early swingarms from a forum member and being too anal will probably mount it in place of the later one.
It never ends does it? Every day is a treasure hunt or Honda history lesson. A friend of mine called it "the sickness".
Cheers,
Cliff.

Offline the-chauffeur

  • Enthusiast
  • **
  • Posts: 236
Re: Keep telling yourself - a restored 750 K2 is an investment
« Reply #193 on: March 21, 2009, 05:04:55 PM »

Nope, Maggie, there's no end to it . . .

Clutch question, folks.  I'm getting some slip as I go up through the rev range, and I think it's one of two things - either the oil I've used, or the clutch pack isn't assembled properly.  What I need to know is the assembly order for the clutch plates - and most importantly, what type of plate goes in first (and mates against the rear of the basket)?  The workshop manual doesn't give any pointers; the fiche is largely unclear and the only detailed guide I've been able to find is in the Haynes manual - which seems to suggest that the first one in is a drive plate.  I can't remember which way round I've built it, so I thought I'd ask before checking  :D


And did I mention the paint has arrived for the 450?  All the bits have gone away to be sprayed . . . and in the meantime, I'm repainting the side badges.  Still going . . .  ::)

Offline the-chauffeur

  • Enthusiast
  • **
  • Posts: 236
Re: Keep telling yourself - a restored 750 K2 is an investment
« Reply #194 on: March 24, 2009, 01:31:34 PM »

OK . . . so I think I've found the answer to the clutch question, but now I'm stuck back on to the electrical side of things.

I changed the original rectifier for an aftermarket reg/rect. hoping that would resolve the charging issues which I seem to be plagued with - and I'm not convinced it's had any effect whatsoever.  Much to my surprise, the new unit doesn't take the place of the original regulator module - although it seems to do the job of both the reg and the rect.  Running the bike at idle with the sidelight on (I've wired the lights as always on), the battery voltage hovers around 11.9; trouble is, this figure doesn't increase when the revs are at 2-3k.  It doesn't seem to drop, but it certainly doesn't raise (like the book says it should).

Apart from anything else, I'm having real trouble understanding how the original regulator works.  Again, the book says its adjustable under the cover, but no matter how I adjusted the gaps (only two of which I understand), it made no difference to the charge going to the battery.  Also, is it going to make the slightest difference adjusting the gaps knowing that the bike has now got a combined reg/rect? 

Can't . . . get . . . head . . . round . . . this.

Suggestions . . . please . . .

Offline mystic_1

  • Really Old Timer ...
  • *******
  • Posts: 6,071
  • 1970 CB750K
Re: Keep telling yourself - a restored 750 K2 is an investment
« Reply #195 on: March 24, 2009, 04:11:23 PM »
What I need to know is the assembly order for the clutch plates - and most importantly, what type of plate goes in first (and mates against the rear of the basket)?

IIRC, the first item into the basket is the clutch pressure plate, #7.  Next thing in should be a friction plate, then alternate steel and friction plates.  Last thing in should be a friction plate, then the clutch center #2.

This particular picture makes it look like you put a steel plate in first, against the pressure plate.  I don't think that's correct.


mystic_1
"A ship in harbor is safe, but that is not what ships are built for."
- John Augustus Shedd

My build thread:  http://forums.sohc4.net/index.php?topic=68952.0

Offline HondaMan

  • Someone took this pic of me before I became a
  • Really Old Timer ...
  • *******
  • Posts: 13,845
  • ...not my choice, I was nicknamed...
    • Getting 'em Back on the Road
Re: Keep telling yourself - a restored 750 K2 is an investment
« Reply #196 on: March 25, 2009, 05:39:58 AM »
There is a flat steel plate that goes in first on most 750s, because the hub itself is aluminum. That's what you're seeing in this picture. This plate varies in thickness, depending on the "K" model of the bike: the K0 had thicker ones than the K1-later engines.
See SOHC4shop@gmail.com for info about the gadgets I make for these bikes.

The demons are repulsed when a man does good. Use that.
Blood is thicker than water, but motor oil is thicker yet...so, don't mess with my SOHC4, or I might have to hurt you.
Hondaman's creed: "Bikers are family. Treat them accordingly."

Link to Hondaman Ignition: http://forums.sohc4.net/index.php?topic=67543.0

Link to My CB750 Book: https://www.lulu.com/search?adult_audience_rating=00&page=1&pageSize=10&q=my+cb750+book

Link to website: www.SOHC4shop.com

Offline the-chauffeur

  • Enthusiast
  • **
  • Posts: 236
Re: Keep telling yourself - a restored 750 K2 is an investment
« Reply #197 on: March 25, 2009, 06:54:21 AM »

Thanks guys.  In addition to all that's gone before, I gather the first friction plate that goes in when you build the basket is different to all the others.  I'll have to check that when I open the side up.

Any thoughts on the electrics - which are still stumping me?

Offline HondaMan

  • Someone took this pic of me before I became a
  • Really Old Timer ...
  • *******
  • Posts: 13,845
  • ...not my choice, I was nicknamed...
    • Getting 'em Back on the Road
Re: Keep telling yourself - a restored 750 K2 is an investment
« Reply #198 on: March 25, 2009, 07:38:47 PM »

Thanks guys.  In addition to all that's gone before, I gather the first friction plate that goes in when you build the basket is different to all the others.  I'll have to check that when I open the side up.

Any thoughts on the electrics - which are still stumping me?

Well, first off, I'd go back to the stock unit and start there. If you are handy with an ohmmeter, check these things:

1. Field wires to the alternator (WHITE and GREEN): they should measure about 7.5 ohms for the field coil.
2. Check the green resistor on the voltage regulator, in case it got broken (OEM unit, here...). It has 3 taps, one on each end and one in the middle. I think the whole end-to-end reading is about 35 ohms, and the tap is about 7.5 ohms from one end (leaving a little over 27 ohms between the tap and the other end).
3. For a "raw" test of the field coil, to see if it's working, disconnect the WHITE and BLACK wires from the regulator and jump them together. Then bring the RPM up to about 3K to see if the voltage rises. Then remove the jumper and see if it drops off again. This will show if the coil is working, at least.
4. Set the regulator gap core gap (between the magnetic pole and the bottom points contacts) at .030". This is done by moving the lower contact on the regulator.
5. Set the point gap to .014" while pushing the contacts open with your finger, against the magnetic pole. This is done as a check: bend the upper arm a little bit up or down for the gap.

Above all, make sure the points are CLEAN and SMOOTH. They must carry 1.6 amps of current to do their job, and sitting lets them corrode just enough that they conduct poorly.

Often, after removing the cover, the reassembly goes wrong. With the luck you've been having, try running with the cover off, just to see if you haven't shorted the cover to the moving parts inside: if the cover is on 180 degrees out, it will almost always short the points (it's not symmetric!). You should be able to see the points pull in at about 3K RPM, after the battery voltage has risen over 12.8 volts or so. This lowers the charging current until the voltage drops again, then the little contacts relax and the cycle starts over again. It's a slow process, measured in minutes if your battery is low.
See SOHC4shop@gmail.com for info about the gadgets I make for these bikes.

The demons are repulsed when a man does good. Use that.
Blood is thicker than water, but motor oil is thicker yet...so, don't mess with my SOHC4, or I might have to hurt you.
Hondaman's creed: "Bikers are family. Treat them accordingly."

Link to Hondaman Ignition: http://forums.sohc4.net/index.php?topic=67543.0

Link to My CB750 Book: https://www.lulu.com/search?adult_audience_rating=00&page=1&pageSize=10&q=my+cb750+book

Link to website: www.SOHC4shop.com

Offline the-chauffeur

  • Enthusiast
  • **
  • Posts: 236
Re: Keep telling yourself - a restored 750 K2 is an investment
« Reply #199 on: April 07, 2009, 04:52:25 PM »

 . . . 3 . . . 2 . . . 1 . . . and we're back in the room . . .

 . . . although I'm not entirely sure we're any further forward than the last time we spoke. After trying all of the various suggestions above and not seeing any real change in the charging capacity, I swapped out the generator assembly with a cheap secondhand unit I picked up.  Rather unsurprisingly, it made no noticeable difference whatsoever, other than dropping oil on the floor.  I checked over the reg/rect assemblies too, and nothing out of place there.

So I ended up checking round the other electrical circuits, on the assumption that if there's nothing wrong with the charging system, there might be some irregular resistance elsewhere. Couldn't find any shorts or obvious wonky wiring and nothing obvious jumped out until I opened the headlight, which didn't seem to be earthing properly.  By which I mean that when the rim and reflector were detached from the main bowl, the sidelight would glow very dimly, but would light itself up fully when the headlight was reassembled. 

After much consulting of wiring diagrams and scratching my head, I couldn't understand what was missing, so I had a look at the microfiche on the CMSNL website.  It turns out that one of the only obsolete headlight parts is the main bulb holder (which is the bit I thought was faulty), but fortunately the site has a picture of the bits, even if they don't have any more in stock.  It was only when I'd studied the photo that I noticed the holder had one more wire on it than mine - for some reason, my bulb holder was missing a green connecting wire that completes the sidelight circuit (and hence the strange glow when the headlight reflector and bowl were disconnected.  Needless to say that I've since replaced the missing wire, although I now seem to be having some issues with getting high beam to work. 

Whether the missing green wire caused a loss of power or poor charging, I can't really say; I've run some basic tests but without the main beam circuit issues being resolved, I'm still not sure whether the problem might all be down to crappy/poor charging batteries.  I'll do some more work later in the week and see what I can find.

Meantime, I pulled the clutch and replaced one of the friction plates and one of the thrust plates with a plate from a Goldwing (apparently it was a mod recommended in the 70's to stop clutch rattle).  Seems to work pretty well, but it wasn't cheap - £30+ for one clutch plate  :o  Ouch.