Author Topic: FREE CB 350f  (Read 6596 times)

0 Members and 1 Guest are viewing this topic.

Offline faux fiddy

  • Just becaus I'm the second post on the pissed off thread doesn't mean I'm an
  • Old Timer
  • ******
  • Posts: 4,812
  • bike in a box
FREE CB 350f
« on: September 20, 2009, 02:12:44 AM »
Hey I thought the title would result in many clicks.  If I can figure out the website well enough I will post as much as I can know or learn about the bike I have been given.

At this point I can only say what is done so far. It has been taken apart. I will post photos as I figure out how on this website.

The bike arrived in my possession locked up with about 10,000 miles on the odometer. It is  volcano lava red as is the bike of the month. I have reasons to believe that (with god Or buddah's blessing) this will be it's second reincarnation if I succeed to reanimate it.

It has a look of a bike that was not abused,  but the odometer reading the  dent in the tank indicates an early death and a few garage/ barn  accidents rather than anything high speed. I think that any cosmetic damage came after it's first period of suspended animation. With 10,000 showing on the ODO it surely can not be overall worn to dirt, and after opening up the motor [which was frozen up] it has signs of a second life that might have caused minor reparable damage to one of the wrist pins.


I  arrived mostly intact with the carbs  off, and with no seat, and perhaps a short history of being stored outside. The head and pistons are now off things are becoming more scattered but at the same time the motor is finally coming back together. I finally began taking pictures last Friday.

I figure it's time to share knowedge and sources and pics with enthusiasts who might help me with my 'free'  bike.

And obviously I will have to  give shameless plugs to the eBay seller who has kept me and  the project in an enthusiastic forward direction.


Wow, the spell l check on your site helps me do things quick post nnd not look like an idiot!
^^^^^^^/l^^^^^^^^^^^^^^/l^^^
. . ______/ l_________________/  l
<'  '  '   '  o .  . . . . . . .................(
 ' VVVVV'   ')))))____>-''''''''''''''''''\  l
' . vvvv_   -              -                 \/

Offline faux fiddy

  • Just becaus I'm the second post on the pissed off thread doesn't mean I'm an
  • Old Timer
  • ******
  • Posts: 4,812
  • bike in a box
Re: FREE CB 350f
« Reply #1 on: September 20, 2009, 02:32:25 AM »
The engine was stuck  so the  head and cylinders had to come off. Tried to rock it back and forth to break it loose of course. to make it run and  avoid work. (Ask a lazy person how that works). Friend who is working in a machine shop is helping, so he is indispensible as well as very experienced with many makes and models and their perhaps interchangeable [read:available] parts. Everything came apart before any pics were taken.


Back again when I figure out how to post the pics here....
^^^^^^^/l^^^^^^^^^^^^^^/l^^^
. . ______/ l_________________/  l
<'  '  '   '  o .  . . . . . . .................(
 ' VVVVV'   ')))))____>-''''''''''''''''''\  l
' . vvvv_   -              -                 \/

Offline OldSchool_IsCool

  • Really feeling like an
  • Old Timer
  • ******
  • Posts: 4,350
  • WARNING: Objects in mirror appear to be LOSING!
Re: FREE CB 350f
« Reply #2 on: September 20, 2009, 06:03:44 AM »
Two ways to post pics.  You can use the "Additional Options" link (lower left of any post input page) to upload pics from your computer or, if your pics are on say photobucket.com, you can copy the "IMG code" and paste it right in the body of your post.  Direct posting has limits, so consider image code links.

IMG Code:


Direct upload:
Can I have a motorcycle when I get old enough?
If you take care of it.
What do you have to do?
Lot’s of things. You’ve been watching me.
Will you show me all of them?
Sure.
Is it hard?
Not if you have the right attitudes. It’s having the right attitudes that’s hard.

Offline faux fiddy

  • Just becaus I'm the second post on the pissed off thread doesn't mean I'm an
  • Old Timer
  • ******
  • Posts: 4,812
  • bike in a box
Re: FREE CB 350f
« Reply #3 on: September 20, 2009, 08:51:37 PM »
Thanks , OS. I knew how to work the photobucket , but  after getting pics  uploaded and another post ready my login timed out so my post  evaporated, and I decided to go to bed. The additional options feature is one I did not know about.

The first problem encountered was that  as the motor was seized, one of the bolts on the cam sprocket was inaccessible for even the slimmist wrench. After brainstorming on a similar problem with my friends powerstroke injection system I suggested grinding a bit of the casting that interferes with getting a wrench on, and the idea worked for both applications.  Care was taken to stuff a rag into the case to catch as many of the filings, and with a small file I was able to remove enough to slip a wrench down far enough to get a bite on the cam sprocket bolt. At first we thought that  breaking the chain or  junking the motor was the only option but it worked good and a removing a bit of the casting did no harm.

The cylinders had been soaked with a couple tablespoons of ATF for a week, so after getting the camshaft loose and taking the head off, a bit of rocking the bike back and forth in gear and tapping the bores with a plastic mallet loosened them up where they could be wiggled off.


Bike as it sits.


LOOK MOM, NO PISTONS!

The next problem was getting the rings free and floating in the grooves.  I used a toaster oven to heat up the pistons and then dunked them in a Teflon type lubricant. Eventually they come loose, but I did break two. I  ordered one set of rings, but after talking with the e-bay seller and realizing the top and second ring are not made to be interchangeable, I thought I would have to re-order. Days later I got a package with a whole set for all four pistons and I have the e- bay seller to keep my project moving in a forward direction. I highly recommend his product, and his reviews all are good, not to mention the good kharma. I decided to use all new rings since I had them. I saved the spares as many of them looked and measured out good, and who knows when they might be needed in a pinch.

Please check him first if you need something he has at http://myworld.ebay.com/ebaymotors/motorcycle-parts-supply/

Another problem was one of the wrist pins had excessive wear, and was wobbly on the connecting rod. With only 10,000 miles on the bike it seemed unusual. Our theory is that this might have happened on it's first reincarnation, as the previous owner said they had it running after it had been given to them dead. We figure one of the cylinders did not get oil for a bit of it's brief startup and the wrist pin ran without lubrication during that time. All the others looked fine.

After looking around for a wrist pin, my friend remembered  there were a couple pistons off of other bikes, and so we checked those. Sure enough, an XR -80 was exactly the same. Though i did not measure the piston exactly, it appears that the XR-80 pistons are the same height from the wrist pin up and a very similar sized bore. Below they are a bit shorter, and a bit lighter, so they might  work if you wanted to build  motor with lighter weight moving parts.  It turns out to be a good thing that the XR piston was saved for a reason unknown for five previous years.......


Pistons cleaned up and ready to install. On the foreground left is ring spares, in the middle is the xr-80 piston  with the unusable wrist pin, and on the right is an XL-100 which is bigger.


pistons back in

Re installing the first wrist pin retainer was a bit tricky, but after the first the rest seem easy.  I found that if you hold it where the gap is about nine o'clock, and you use a needle nose pliers at about six o'clock, you can begin to insert the ring starting at the 9 position. Working your way around the pliers fit in the small gap in the bottom, and from there you can use pressure from the pliers in your right hand and your left thumb to press it in the rest of the way.


sump and filter housing cleaned up pretty well while I was waiting around...


^^^^^^^/l^^^^^^^^^^^^^^/l^^^
. . ______/ l_________________/  l
<'  '  '   '  o .  . . . . . . .................(
 ' VVVVV'   ')))))____>-''''''''''''''''''\  l
' . vvvv_   -              -                 \/

Offline Hush

  • Finally they realise that I am an
  • Really Old Timer ...
  • *******
  • Posts: 6,761
  • "Lady, I've heard it all before"!
Re: FREE CB 350f
« Reply #4 on: September 20, 2009, 09:11:16 PM »
Cool, any bike you get for free is a bonus, the other $5000 you have to spend on it is is inconsequential after that. ;D
I think the thing I most like about motorcycling is the speed at which my brain must process information at to avoid the numb skulls who are eating pies, playing the ukulele, applying make-up etc in the comfort of their airconditioned armchairs as they make random attempts to kill me!!!!!!!

Offline faux fiddy

  • Just becaus I'm the second post on the pissed off thread doesn't mean I'm an
  • Old Timer
  • ******
  • Posts: 4,812
  • bike in a box
Re: FREE CB 350f
« Reply #5 on: September 21, 2009, 12:51:20 AM »
Yeah, I was hoping it would stay free except for well, free time...
^^^^^^^/l^^^^^^^^^^^^^^/l^^^
. . ______/ l_________________/  l
<'  '  '   '  o .  . . . . . . .................(
 ' VVVVV'   ')))))____>-''''''''''''''''''\  l
' . vvvv_   -              -                 \/

Offline Ecosse

  • Really Old Timer ...
  • *******
  • Posts: 5,051
  • Member #4139
    • My 550 walk around video
Re: FREE CB 350f
« Reply #6 on: September 21, 2009, 12:52:32 AM »
Cool, any bike you get for free is a bonus, the other $5000 you have to spend on it is is inconsequential after that. ;D

 :D

i like these lil bikes, they're sharp looking and have their own appeal.

keep at it!
1974 CB550K     
                 
            Help stop TORTURE and SLAUGHTER of cats, dogs, and other kept animals.                                                  www.animalsasia.org

                                  Your 1%er name

                                                A WORTHY EFFORT: http://www.honorflight.org.

Offline faux fiddy

  • Just becaus I'm the second post on the pissed off thread doesn't mean I'm an
  • Old Timer
  • ******
  • Posts: 4,812
  • bike in a box
Re: FREE CB 350f
« Reply #7 on: September 23, 2009, 02:23:33 AM »
Some of you mechanics  may find this bore-ing, or think that I’m some sort of  ‘head’ case, but Here’s some more pics on the free bike project. In some ways the $300 one  on Minneapolis craigslist  that runs looks better, Absolutely. But I’m really looking forward to at least hear this thing  run and seeing it go. And I got the best help possible for the project. It’s highly  desireable  to have someone with knowledge of and access to a machine shop!

The bores were not in terrible shape but   needed a bit of cleaning up, so they since they were off and there was access to a hone they got a clean up.  They were bored  .001 over, and did not really need a full overbore. With just a .001 most of the junk was cleaned up and using a standard ring size shouldn’t  make a huge difference, maybe a half a horespower is what my friend suggested.  Fresh is best, and  I’m glad the thing  came apart. Now I know the rings are free and floating and all the surfaces are fresh.


The gaskets were fine after  coming off, so no need to replace them. It would have been a big  unnecessesary chore to clean this one up. It was just in too good of shape to mess with. A small bead of yama-bond and they should work like new.


The  head gasket left a small bit attached; it was left  on the surface  to fill it’s own void. You can see a small bit in the upper foreground.

The bores cleaned up real nice. They were taken .oo1 over. Might lose a half a horesepower but it will work fine with the standard rings. Save the .025 over bore for 50,000 miles….or later.


The head  had a fair bit of hand work up to this point. All the carbon removed from  the combustion chambers, valves lapped in a bit.


I did not feel in the know enough to  do a full porting on the intake and exhaust but there were a few casting lines in them that thought I’d care enough to file smooth before things went back together.


Around the back side of valve guides on both the intake an exhaust ports there was some rough metal. I figure if you have the head off it is worth cleaning them up by smoothing  them up with a special file. You can see the areas that look scratched  up. The before photo would have had a  quite a bit of testure.


I thought I would try to take a picture of the area filed that I discussed in previous posts, but the pic is actually pretty busy to tell what is going on. The magnifying glass is on the area that cradles the camshaft surface where the cam chain  and  sprocket ride. About a couple  mm  of the corner was taken off the   with a small file just enough  to slip the wrench in.  Plenty of metal there so not a problem, but a solution for a when  motor stuck in the wrong position and leaves an obstruction. 


Valves cleaned up of carbon, lapped in and ready to install.


Missed the pic of the actual valve assembly, but maybe I can fake one later.  As I said it’s a huge advantage to have some access to a machine shop , machinist, (and better yet a bike nut).  We didn’t have a valve spring compressor that was small enough for the 350 heads.  Some of the things just laying around there are perfect application.  One example is this thing that is about the size and shape of a  small deep wall socket. One end has a raised edge that fits on spring retainer.  It is bored end to end  hollowed out and slotted  just so; keepers go into the middle while the spring is depressed.


Pipes are something I still have some time to think about. Right now it looks to be  developing into a weld  a four  into two using a combination of original headpipes, and the cans off a later model  honda that had  four into two.  Anyone got an old four into one to donate?


The tank has what I described as a garage dent probably long after the thing was ridden.. Doesn’t look high speed or anything. I really don’t want to do much to fix it.  I wonder if that will put me out of the running for next march’s bike of the month?
^^^^^^^/l^^^^^^^^^^^^^^/l^^^
. . ______/ l_________________/  l
<'  '  '   '  o .  . . . . . . .................(
 ' VVVVV'   ')))))____>-''''''''''''''''''\  l
' . vvvv_   -              -                 \/

jerrit1

  • Guest
Re: FREE CB 350f
« Reply #8 on: September 23, 2009, 06:30:06 AM »
Nice free bike there....I got a free 78 CB 750 with a froze motor too. Im currently about to cut the timing chain off so I can remove the head since I cant rotate the motor to get to the chain master link. Plus I guess I gotta order a special thin walled wrench to get the head bolts off. 

Offline BVCB650

  • Too Much Thin Air
  • Hot Shot
  • ***
  • Posts: 561
Re: FREE CB 350f
« Reply #9 on: September 23, 2009, 06:51:46 AM »
Nice free bike there....I got a free 78 CB 750 with a froze motor too. Im currently about to cut the timing chain off so I can remove the head since I cant rotate the motor to get to the chain master link. Plus I guess I gotta order a special thin walled wrench to get the head bolts off. 


When I took my head off, I thought the same way. Closer examination revealed years of dirt, oil, gunk had solidified between the head bolts and the walls. I was able to get an ice pick down there and slowly but surely chip away at the solidified mass and eventually, I was able to get my socket on the head bolts. The ones in the front were naturally worse than the rest.
1979 CB650, 25K miles, recently refurbished

Offline hoodellyhoo

  • CB350F
  • Master
  • *****
  • Posts: 1,726
Re: FREE CB 350f
« Reply #10 on: September 23, 2009, 07:18:17 AM »
Keep the updates coming!

Maybe you should move this to the poject shop?
1972 CB350F (Back from the Dead!)- http://forums.sohc4.net/index.php?topic=20822.0
1965? S65 - Coming Eventually!
1972 CB750K2 (father-son project)
1976 CB750K6- (sold) http://forums.sohc4.net/index.php?topic=96859.0
1976 CB750K6 (sold)- http://forums.sohc4.net/index.php?topic=62569.0

Offline faux fiddy

  • Just becaus I'm the second post on the pissed off thread doesn't mean I'm an
  • Old Timer
  • ******
  • Posts: 4,812
  • bike in a box
Re: FREE CB 350f
« Reply #11 on: September 23, 2009, 11:33:30 AM »
Nice free bike there....I got a free 78 CB 750 with a froze motor too. Im currently about to cut the timing chain off so I can remove the head since I cant rotate the motor to get to the chain master link. Plus I guess I gotta order a special thin walled wrench to get the head bolts off. 


When I took my head off, I thought the same way. Closer examination revealed years of dirt, oil, gunk had solidified between the head bolts and the walls. I was able to get an ice pick down there and slowly but surely chip away at the solidified mass and eventually, I was able to get my socket on the head bolts. The ones in the front were naturally worse than the rest.

Getting a wrench to fit down to the camsprocket bolts is all you need to do.  If you can sacrifice a wrench and grind some thickness off it it's a good start. many tool shops will sell a small wrench pretty cheap now adays. The camsprocket bolts don't have a whole lot of torque.  ANd as I did, you can  get away with filing off a bit of the cast. There's plenty of metal there to use up

This one had very few miles and the cam chain was in good shape and it's supposed to be a free bike, so I hated to break the chain. See what you can do with a tiny file..

I'll try to post a few pics of some of the files I used,  a couple are curved and have got a lot of service in this type of application  around the shop.

They were also useful for putting a bit of a radius on the corners of the top of the valve seats which could use a bit of smoothness to increase air flow.
^^^^^^^/l^^^^^^^^^^^^^^/l^^^
. . ______/ l_________________/  l
<'  '  '   '  o .  . . . . . . .................(
 ' VVVVV'   ')))))____>-''''''''''''''''''\  l
' . vvvv_   -              -                 \/

Offline faux fiddy

  • Just becaus I'm the second post on the pissed off thread doesn't mean I'm an
  • Old Timer
  • ******
  • Posts: 4,812
  • bike in a box
Re: FREE CB 350f
« Reply #12 on: October 20, 2009, 12:38:19 AM »
Kind of a lull in activity on the bike.

Unfortunately one of the oil valve inserts that sits on the ends of the bores fell out and I have to find another replacement or go looking with a metal detector.

If any one has one sitting around or has knowledge of interchangeability with other modles chime in.


Here's the arbor press set up with the tool I showed earlier.


Here's the valves installed in the head.


Here are a couple of the files I talked about for cleaning up ports, made by heating up and bending an ordinary file.
^^^^^^^/l^^^^^^^^^^^^^^/l^^^
. . ______/ l_________________/  l
<'  '  '   '  o .  . . . . . . .................(
 ' VVVVV'   ')))))____>-''''''''''''''''''\  l
' . vvvv_   -              -                 \/

Offline faux fiddy

  • Just becaus I'm the second post on the pissed off thread doesn't mean I'm an
  • Old Timer
  • ******
  • Posts: 4,812
  • bike in a box
Re: FREE CB 350f
« Reply #13 on: October 23, 2009, 09:32:02 PM »
Back with  some 'non' updates.  The  loss of the oil orfice/valve is causing some delay. The usual places to look are unable to help so I need to put out some feelers.  If any one has a pile of motors laying around, or know of someone who does, please forward some information  contacts.
The piece I am looking for is described as an oil orfice, or 'valve' as they call it in the bike bandit site. It is part #3 and the gasket is #5.  I guess it fell out while I took the cylinders outside in the light to photo.
<p>


http://www.bikebandit.com/houseofmotorcycles/showschematic/m9197sch395982

It is about the size of a small machine screw with a tall head. Here is a pic of the remaining one. I am pretty sure that either the 350f or the 400 f use the exact same part so anyone who can help find one it would be much appreciated.

Several hours of driving around and looking to borrow a metal detector, but  it’s a big area so I am hoping to find one any way I can. Links or phone #’s  to junkyards, etc would be great because the thing just isn’t going together without it.  I'm ready to see a few less scattered parts and a motor in one piece.


Here’s the remainder if the orifice pair, as described.

Next concern is one of the rockers has a bit of a scuff on the surface that contacts the camshaft. The rest are all in good shape, and the cam looks good, but I’d really rather find another one in better shape before the cover   goes back on.


slight bit  of hardened surface is falling off in lower corner of contact surface.

The carbs were in a box when I got the bike. One slide was stuck so it was the first to come apart, apparently  the project started  by the previous owner.  It seems like a bit of clean up did the trick and it will work fine. Used a plastic pen to push the emulsion tube out from behind,  info from the forum that worked great .  The  o-ring on the emulsion tube was stuck, shrunk up, all of them will need replaced.


The other three slides seem to work mechanically, but no doubt they will need to come apart and  have a thorough cleanup.  Start out with cleaning up the outsides and  vortexes in the parts washer for something to do. Probably going to do one at a time just for a few less small parts apart at once. I can tell the little pegs that hold the corners of the carbs together are missing, but it is a simple thing to improvise a replacement.

Part of the parts search was to a swap meet. There was a 4- n2- 1 pipe for cheap that the guy said he thought was off a 400f. Maybe it’s not is what I think, but may be adapted to work with a bit of welding on the flanges and a bit of bending. Anyone got a clue what this is to? Are there aftermarket  products that don’t have the extreme bends around the oil filter you know of? Like this ?


The price seemed reasonable and the size and shape seemed applicable. I figured I could take a few pics on a milk crate and extrapolate the size and shape  that way.  It seems like adapting something like this would be easy as starting from scratch, or with the parts I now have, and to me 4- n2- 1 is more desireable.
Any clues as to what it is?
^^^^^^^/l^^^^^^^^^^^^^^/l^^^
. . ______/ l_________________/  l
<'  '  '   '  o .  . . . . . . .................(
 ' VVVVV'   ')))))____>-''''''''''''''''''\  l
' . vvvv_   -              -                 \/

Offline faux fiddy

  • Just becaus I'm the second post on the pissed off thread doesn't mean I'm an
  • Old Timer
  • ******
  • Posts: 4,812
  • bike in a box
Re: FREE CB 350f
« Reply #14 on: October 23, 2009, 10:54:40 PM »


Anyone have pipes that go under? Clearance problems?
^^^^^^^/l^^^^^^^^^^^^^^/l^^^
. . ______/ l_________________/  l
<'  '  '   '  o .  . . . . . . .................(
 ' VVVVV'   ')))))____>-''''''''''''''''''\  l
' . vvvv_   -              -                 \/

Offline fmctm1sw

  • Old Timer
  • ******
  • Posts: 3,042
Re: FREE CB 350f
« Reply #15 on: October 24, 2009, 06:56:26 AM »
Part of the parts search was to a swap meet. There was a 4- n2- 1 pipe for cheap that the guy said he thought was off a 400f. Maybe it’s not is what I think, but may be adapted to work with a bit of welding on the flanges and a bit of bending. Anyone got a clue what this is to? Are there aftermarket  products that don’t have the extreme bends around the oil filter you know of? Like this ?


The price seemed reasonable and the size and shape seemed applicable. I figured I could take a few pics on a milk crate and extrapolate the size and shape  that way.  It seems like adapting something like this would be easy as starting from scratch, or with the parts I now have, and to me 4- n2- 1 is more desireable.
Any clues as to what it is?

I don't think that is going to fit on a 400F or at least fit very easily.  I believe the 400F exhaust studs are like the 350F and I just looked at my 350Fs.  The angle of those flanges (assuming they are welded in that position) don't look right at all.  
Quote from: 754
Dude is that a tire ? or an O-ring..??

Quote from: inkscars
This is not a pod thread
This is not a #$%* on my vacuum gauges thread
This is a help or GTFO thread.

1973 CB350F
1973 CB350G
1975 CB550K
1983 GL650I
1973 CB750K3 (http://forums.sohc4.net/index.php?topic=92888.0)
1984 Kawasaki KLT-250 (AKA 3 wheeler of death)
1994 Honda TRX300
1999 Honda TRX250

Offline wingman

  • Enthusiast
  • **
  • Posts: 113
Re: FREE CB 350f
« Reply #16 on: October 24, 2009, 07:41:39 AM »
I don't think they will fit either - My 350 pipes (and all the 400s I have seen) are spaced to allow access to the oil filter - they are split either 2 on either side of the filter or all 4 go around the right side of the filter.  Those don't - and the flanges don't look like they will fit.
1972 CB350F - Who needs TV?  I have a motorcycle in my living room! http://forums.sohc4.net/index.php?topic=67528.0

Offline faux fiddy

  • Just becaus I'm the second post on the pissed off thread doesn't mean I'm an
  • Old Timer
  • ******
  • Posts: 4,812
  • bike in a box
Re: FREE CB 350f
« Reply #17 on: October 24, 2009, 09:24:39 PM »
Yeah that pic I posted was a mac that went under from their website. I thought it may be something like that. And like I thought most have access to the oil filter, but this has a tube welded across the front. Maybe it's off a ninja.

The flanges are not the same. but the chop saw can take them off completely and whatever ends up as pipes on the thing is going to require welding.
^^^^^^^/l^^^^^^^^^^^^^^/l^^^
. . ______/ l_________________/  l
<'  '  '   '  o .  . . . . . . .................(
 ' VVVVV'   ')))))____>-''''''''''''''''''\  l
' . vvvv_   -              -                 \/

Online Trevor from Warragul

  • Expert
  • ****
  • Posts: 1,084
Re: FREE CB 350f
« Reply #18 on: October 25, 2009, 04:47:29 AM »
I have a spare orifice but without the washer, if you want it..
1971 Kawasaki H1A
1972 Honda CB350F
1976 Moto Morini 3 1/2 Sport
1978 Honda CBX
1997 Suzuki Bandit 1200
1999 Ducati Monster 750

Offline faux fiddy

  • Just becaus I'm the second post on the pissed off thread doesn't mean I'm an
  • Old Timer
  • ******
  • Posts: 4,812
  • bike in a box
Re: FREE CB 350f
« Reply #19 on: October 26, 2009, 01:30:43 AM »
Wow Morini, that would be great! .  I was so hapily surprised when I saw that post. I can figure out something that will work or be made to work  as far as the  gasket/washer is concerned.  I might even be able to make it out of delron.  Where I am is one shop that is like the guy that is an orderly independent who hasn’t says he hasn’t seen a 350f in 20 years and another place that said he was pretty sure he didn’t have anything he knew of but let me go look at the ‘motor pile’ warning me that it was overgrown with weeds. Other than that it’s all new stuff  shops and harley.

I will keep looking but in the mean time if you can e-mail me at muffhugger.jr (at) gmail dot com . That is the only thing holding me up on getting  a big pile of parts out of the boxes  and where they belong.

In the mean time I got the first carb  all cleaned up and back together. Then I figured out the same problem still existed that made the slide sticky. After the linkage was back together I found the lever would have a hard pull and then a snap all the way open and a but of force to snap it back closed. Something wasn’t right. I found that there was  a problem inside the slide piston which I had overlooked.


The a piece that attaches to the bottom of the slide piston by two small screws. After disassembly the snap thing became obvious when I opened another carb to compare it to.  Something just looked bent down in there and who knows how it could have happened.


The little ball end is supposed to be paralell to the flat end that attaches to the piston. I used a plyars and a small end wrench to bend it back into shape and reassembled it. It slides fine now, no stick no  snap open.

I  found the smallest piece of wire to plook through the pilot jet.  This may not be recommended if you don’t have a measuing tool.  I think the jetting is 12 or 14 thousandths. The wire brush had the skinniest wire and measured would fit, but tight. No forcing anything, and make sure it’s a straight piece of wire. It slid right through just a slight  bit sticky.

Upon reassembly I found that some areas had two layers of gasket, so I pulled all the tops and matched them.


Matched up the gasket breaks with their ‘mirror image’ on the tops. I  know I’ll probably replace them eventually during tuning but for now that’s hopefully above waterline as it’s supposed to be. Shouldn’t leak like a siev anyway…


One other thing that was curious was these things that look remarkably like a piece of a coors beer can cut up that touches the bottom of the float bowl.  The two bowls I opened up both have them, but they look slightly different and home made-ish. Definitely don’t look like something honda made to me. I have read the thread about the jet and emulsion tube falling out, and I was wondering if these are some after market fix or recall to help with that problem.They snap into the groove in the main jet. Are these on all keihn of this model?

^^^^^^^/l^^^^^^^^^^^^^^/l^^^
. . ______/ l_________________/  l
<'  '  '   '  o .  . . . . . . .................(
 ' VVVVV'   ')))))____>-''''''''''''''''''\  l
' . vvvv_   -              -                 \/

Offline faux fiddy

  • Just becaus I'm the second post on the pissed off thread doesn't mean I'm an
  • Old Timer
  • ******
  • Posts: 4,812
  • bike in a box
Re: FREE CB 350f
« Reply #20 on: October 26, 2009, 01:35:42 AM »
Uh yeah, the tiny wire.


Carb cleaner, compressed air,now I can see dayight through the jet.
^^^^^^^/l^^^^^^^^^^^^^^/l^^^
. . ______/ l_________________/  l
<'  '  '   '  o .  . . . . . . .................(
 ' VVVVV'   ')))))____>-''''''''''''''''''\  l
' . vvvv_   -              -                 \/

Offline faux fiddy

  • Just becaus I'm the second post on the pissed off thread doesn't mean I'm an
  • Old Timer
  • ******
  • Posts: 4,812
  • bike in a box
Re: FREE CB 350f
« Reply #21 on: November 09, 2009, 06:28:25 PM »
QUESTIONS QUESTIONS QUESTIONS

The Carbs were pretty much what  what a friend who used to work at a mower shop used to call a "BOX JOB."


Been a while since I did a post and a  now Just a little further along. Pre-assembly and re-assembly  of the carbs is probably the best way to figure out what to do and how to do it as far as tuning,  once it comes time to start it up. I have them pretty much together, and I know they will come back apart from the yoke at least one more time to connect  the bowl vent connection hoses between them.
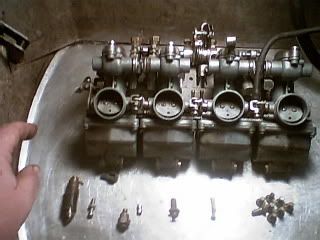

still figuring out the little bits-pan screws and spring were easy..

I got to studying the exploded view schematics and it appears  there are some retainers that clip to the main jet and hold it up from the bottom  of the carb and I have nothing like it, so I guess  the things that I described as looking like 'Coors beer can', and  'homemadish' are probably exactly that.

All four  carbs have all been given a similar treatment for cleaning up the jets, slides, and  float bowls. The most clogged and least important of the  holes were in the  bowl drain screws. Considering the amount of film in the bowls  left by evaporated gas, there's  somewhat obvious reasons why they were plugged  up. That all  mostly cleaned up with a soak in solvent and toothbrush. I used carb cleaner on the tougher spots in the corners of the float bowl- figured get them as clean as possible and as close to new instead of dirty.

 The rest of the fuel and air passages have been confirmed as cleared with an apropriate sized wires, a  blast of carb cleaner and compressed air. 

I found O-rings that fit most of the stuff that was loose, and wanted to come out.  A couple of the float valves seemed pretty  darn tight so I figured they were  sealed up and left them as they were. There was one that fell out and fit tighter with new rubber on it.  All the main jets got new O-rings and were pressed in tight. 

The Carbs really were in a box, and the linkage was all in pieces so it was kind of  a puzzle to put it back together.  There are a few pieces missing ,but considering the amount of time the thing spent disassembled it's not too bad and better than 90% there.

The slides all work, but at first seemed to stop about halfway open when they should be all but closed. I adjusted the linkages a bit and the two carbs that have the parts came a little closer to closed.  The  'starboard side' pair is missing  the adjustment screws and the small linkage that holds them together, and the slides continue to stay about half open when they should be closed. Hopefully when it is complete they will all close as they should.
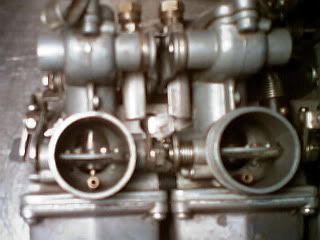

these two slides are in the ballpark when closed
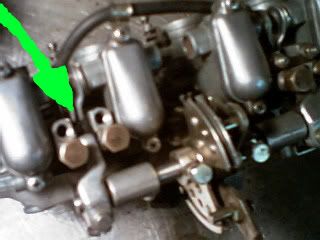

Starboard pair missing adjustment screws on linkage

The choke butterflys all link up and seem to do what they should, but I'm sure I'll be having some questions about fine tuning the stops on their linkages.

I  hope I assumed correctly that the spring goes from the cable pivot to the little dowel that sits between the two middle carbs.(?)

Of the missing parts are:


1) at least one of the spring/ plunger that holds the ball ends of the linkage together.

One short of this

2) one  float valve retainer and screw that holds it (4x10 if I remember correctly). Searched  through a few junk keihn/mikuni carbs but find nothing like it inside their float bowls.  This thing might be easy to make. but I'll put the feelers out for the real deal. It kind of looks like a piece of a bicycle chain link and holds the

3)Most important missing  is the adjustment screws that  bring the slides up and down, that hold the spring/plunger assemblies in place.
Not sure what the schematic calls it but, I have one so I know what it looks like. It is two adjustment screws held together by a thin link.
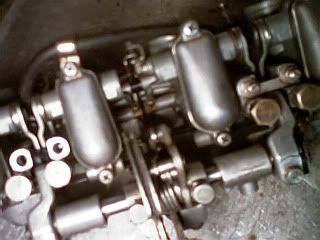

adjustment pieces missing from linkage
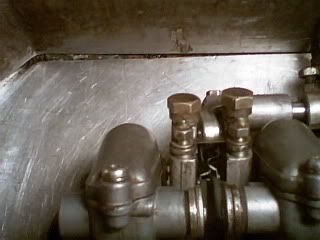

It is now installed on one pair

Of what appears to be extra  pieces are:
 
1) a small ball end on a threaded screw. I figure this may have come from a different project. I see all the things remotely  like it on the schematic,   they are there  and this  is extra.
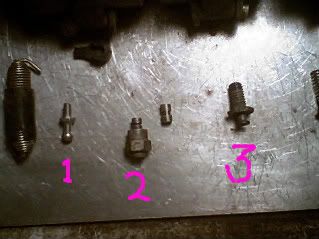
looks like a ball for a very small trailor hitch

2) There are two  larger  bolts (about 12mm or so)  with some special purpose that may also have come from a different project. One has an end on it about the size  of the allignment dowel between the two middle carbs.  The other has an end sticking out of it like a nail head. No clue as to what these are or where they go. They both have the same coarse  thread size and one has a nut on it and look to be English threads.  Any clues if they belong with the carbs? Or where they go if not part of the carbs?

(pictured as 2,3 above)
 

I am kind of curious about a small spring loaded tab that sits on the motor side of the yoke that holds the four carbs together. It has a 90 degree bend and sits near the outside carburetor on the side opposite of the large adjustment screw (also motor side) for the stop on the shaft that pivots with  the throttle cable linkage. I can't really describe it much better than that because it's no longer right in front of me.

This little tab seems to have no purpose I can see yet, but maybe once it all starts comming together it will make more sense, but for now it just looks like something in the way.


I will have a bunch more carb questions the more I figure out and will use the FAQs, but  if there are people who know the carbs in and out, the questions I have  for now are are:


Any clue what are these extra pieces I have or if they definitely don't belong?,

What  is this little spring loaded tab on the yoke  I describe, and how and what does it articulate with?

What do the original retainers that clip on the main jet look like, are they easily lost/destroyed/removed/left out, what is their function,  are these beer can things going to serve the same funcion suitably,  and or should I try to find or fabricate something more like  the real thing which I do not have, and have not yet seen one?


^^^^^^^/l^^^^^^^^^^^^^^/l^^^
. . ______/ l_________________/  l
<'  '  '   '  o .  . . . . . . .................(
 ' VVVVV'   ')))))____>-''''''''''''''''''\  l
' . vvvv_   -              -                 \/

Offline faux fiddy

  • Just becaus I'm the second post on the pissed off thread doesn't mean I'm an
  • Old Timer
  • ******
  • Posts: 4,812
  • bike in a box
Re: FREE CB 350f
« Reply #22 on: December 21, 2009, 04:57:10 PM »
Finally had some time to do some work and  download photos  and post.

Thing went pretty smoothly, pre-assembly is always a good way to make sure things are going to go together without a hitch. I used yamabond to seal the gasket surfaces and used the old gaskets because they were still in good shape. Yamabond is highly recommend product, and it was available at the shop. I have been told that people run and race using yamabond without a gasket. Not that I'd want to try that myself, but it is a way to get a bit more compression as it squishes down to virtually nothing, but seals good.

Slowly but surely the parts are coming out of the box and becoming a unit.


I kept all the stuff in bags to keep it clean while waiting for assembly, including the motor.


The rings are supposed to be installed with the gaps of each at 120' around the piston. The manual also says do not align any ring gap in line with the wrist pin nor perpendicular to the wrist pin. This was hard to image in a  photograph, and hard to be precise once the bores are going on , but an effort was made to pre-position it all in that configuration.
After  first fit of the bores I put about a cap full of oil down the bores, pouring it down the back side first and making sure a bit works it's way around.


With the inner pistons at top dead center the bores are lowered into place.


A bit of wiggling and using my fingers and or a very  small screw driver to compress the rings and it begins to lower onto the cylinders. No forcing things. A bit if rocking from side to side and they work their way in.

Some posts suggest that using hose clamps to compress rings is the way to do it.  I think this sounds like an unnecessesary pain in the butt. It seems that with the small amount of space, it would be just an added hassle. The bores are tapered quite enough that you can tuck the rings in if you are patient. I don't see how the use of any type ring compressor would be of help unless you are assembling something through the top of the bore. This is just not a situation where it would make assembly any easier.

At this point I made sure to insert any  alignment dowels necessesary.

I temporarily put a wire  through the chain  to take up slack  and hold it out of the way.   After the inner two bores were in, I spun the motor just a bit to bring the outer pistons up and simultaneously feed them into the bores.  Again  patience and no forcing things. Once they were working their way  in, the surface of the top of the motor case was given a thin coat of yamabond.

After the bores are lowered in place , I used some spacers to take up the space of the head and tightened  down three nuts  enough to seat the bores and squish out the excess yamabond. There was not much, but a bit confirms that the surfaces are being squeezed together. I let this sit overnight before doing anything more. The recommended torque when the head is on should make a very good seal that will last.


SORRY ABOUT THE KILTERED PHOTOS. FOR SOME REASON THEY DON'T POST THE WAY I ROTATED THEM ON PHOTOBUCKET.
^^^^^^^/l^^^^^^^^^^^^^^/l^^^
. . ______/ l_________________/  l
<'  '  '   '  o .  . . . . . . .................(
 ' VVVVV'   ')))))____>-''''''''''''''''''\  l
' . vvvv_   -              -                 \/

Offline faux fiddy

  • Just becaus I'm the second post on the pissed off thread doesn't mean I'm an
  • Old Timer
  • ******
  • Posts: 4,812
  • bike in a box
Re: FREE CB 350f
« Reply #23 on: December 21, 2009, 06:26:47 PM »
The next day was time to put the head on.

This was done with the pistons all halfway down at first. Again I pre-assembled the parts to see how things would fit.  Then came the yamabond on both sides of the head gasket which I was re-using. some say not to reuse, but this one seemed in good enough shape, so I figured run it. As I have heard people even race bikes using just yamabond and no gasket, it's really good stuff and highly recommended by people who have used it.

I inserted the four allignment dowels and two oil valve orifices, and put a bit of yamabond on the outside of the gaskets around the orifices.

I searched the FAQ's and found these pics at this link. I pulled them up and left the window open so I could see it on the laptop at the shop. (no wi-fi out there). These pics are better than what my camera takes, so I will re-post them and the link for anyone doing this project on their own bike.

Setting the head on was pretty simple.  The installation of the cam chain and sprocket was pretty simple following this set of photos from a previous post  as a guide.


I put the cam sprocket in place to hold the chain  out of the way, and again  used a wire to keep it up until I was ready to put the cam in.


This set of photos was for a 550 I believe, but is similar enough to the 350f and and the process is the same. Having the motor out is better for photographing, but is not necessesary, as this can be done very easily with the motor installed in the frame.

I did not have the tightening sequence in front of me , but I used common sense and previous experience. Tighten cris-crossing  from center out and from front to back a little at a time. I did not apply full torque, again just tightening enough to make the yamabond squeeze out and make a uniform thickness of the headgasket. Enough to tighten it, I will use a torque wrench  and proper sequence at least once or twice more. I have read that it is a good idea to retighten these, and probably after it has run and heated up good it is good to tighten them again.

http://forums.sohc4.net/index.php?topic=369.0


The  rocker arms and rocker are in the valve cover  so there is no need to compress springs while installing the cam and sprocket. Alligning the timing mark under the timing cover puts the #1 piston at TDC. It is safe to roll the motor over doing this because the valves will not be pushed down without the valve cover that holds the rockers and shaft. After that the cam sprocket  bolt holes will allign in the right place if most all the cam lobes are down. Read the manual for a better description of this.


Moving right along, slow progress getting it out of the box.

Wait a minute... where's my cam?
^^^^^^^/l^^^^^^^^^^^^^^/l^^^
. . ______/ l_________________/  l
<'  '  '   '  o .  . . . . . . .................(
 ' VVVVV'   ')))))____>-''''''''''''''''''\  l
' . vvvv_   -              -                 \/

Offline steamnjn23

  • Enthusiast
  • **
  • Posts: 102
Re: FREE CB 350f
« Reply #24 on: January 08, 2010, 09:38:08 PM »
bump
1976 cb550