Author Topic: Sandcast Restoration - Done (for now)  (Read 50956 times)

0 Members and 1 Guest are viewing this topic.

Offline markb

  • When I finish my current project I might be a
  • Master
  • *****
  • Posts: 1,615
Sandcast Restoration - Done (for now)
« on: January 18, 2010, 01:25:28 pm »
I decided to post my sandcast restoration.  I was hesitant but then I figured maybe someone can learn from my mistakes or better yet maybe someone will pipe in with some good ideas.  It didn’t start out as a total restore.  I just finished my K0 last spring and I thought I’d had enough.  I had a chance to pick up an earlier numbered sandcast motor and frame and let it slip away and have been kicking myself in the a$$ ever since (you just don’t get that many chances).  So now I’ve got some extra cash so I decided to tackle another project.  It actually wasn’t too bad but certainly beyond keeping original.  The PO had repainted the tank and side covers in a color that almost matched.  So I already had everything repainted last summer but just hadn’t put it together yet.  So then I decide I’d get the frame and all the black painted and a few parts chromed (they're already out) but do nothing to the motor.  But now I’ve decided to do it all.  Unfortunately this is the point where I started taking pictures so this thread will only be the build and not the tear down.  Here are a few photos of my K0.  I hope the sandcast turns out as well or better.  It was good practice.


« Last Edit: May 03, 2010, 07:35:23 am by markb »
1969 CB750 sandcast #97 restored - Sold Restoration thread link
1969 CB750 sandcaxt #576 - Sold
1969 CB750 sandcast #1553 - Sold
1969 CB750 sandcast #1990 - Sold
1969 CB750 sandcast #5383 restored - Sold Restoration thread link
1970 CB750 K0 restored - Sold
2010 H-D Tri Glide Ultra Classic (Huh?)

Offline markb

  • When I finish my current project I might be a
  • Master
  • *****
  • Posts: 1,615
Re: Sandcast Restoration
« Reply #1 on: January 18, 2010, 01:29:30 pm »
Ok, here's the motor.  Like I said it wasn't too bad but it is leaking a little oil.  


This is where I was at after about 6 hours.  Only glitch was when I went to pull the head and the cylinder came along with it.  Oops, forgot to remove the screws under the pucks.  No problem, they both had to come off anyway.  Of course everything was bagged and labeled so I know where it goes.  Hardest part was getting the old studs out.  They'll be replaced with APE studs, the only non-correct part of the motor (don't tell anyone).  What I do is put a vice grip down low to the case and use a heat gun (heady-duty hair dryer) to preheat the case for about 3 minutes and they come out pretty good.
« Last Edit: January 25, 2010, 02:24:21 pm by markb »
1969 CB750 sandcast #97 restored - Sold Restoration thread link
1969 CB750 sandcaxt #576 - Sold
1969 CB750 sandcast #1553 - Sold
1969 CB750 sandcast #1990 - Sold
1969 CB750 sandcast #5383 restored - Sold Restoration thread link
1970 CB750 K0 restored - Sold
2010 H-D Tri Glide Ultra Classic (Huh?)

Offline markb

  • When I finish my current project I might be a
  • Master
  • *****
  • Posts: 1,615
Re: Sandcast Restoration
« Reply #2 on: January 18, 2010, 01:52:23 pm »
Here I'm getting ready to split the cases.  Note the unpainted oil pan on the sandcast.  Doesn't look quite as clean on the bottom.  Everything looks good inside.  I removed the crank without removing the rotor and the transmission shaft without removing the clutch.  Now comes the fun part.  Here's my process for the getting the cases ready to paint (anal warning).
1.  Remove everthing and lable bearings, etc.
2.  Degrease and clean inside and out.
3.  Take to the carwash and degrease and wash inside and out (so there's nothing that blasting media would stick too).
4.  Mask all machined surfaces.
5.  Sandblast (very fine) or bead blast.  I don't think it's as critical on the sandcasts.
6.  Blow off good before removing masking.
7.  Remove masking.
8.  Take to carwash and wash inside and out a couple of times (because no matter how careful you are you will get grit inside).
9.  Blow out all the holes and dry.
10. Remask for painting.
11. Wash everything with acetone (the painter will do this too before he paints.
This process almost took me the entire weekend (I even missed part of the Vikings game) and brings me up to date with my progress.


« Last Edit: January 26, 2010, 06:15:19 am by markb »
1969 CB750 sandcast #97 restored - Sold Restoration thread link
1969 CB750 sandcaxt #576 - Sold
1969 CB750 sandcast #1553 - Sold
1969 CB750 sandcast #1990 - Sold
1969 CB750 sandcast #5383 restored - Sold Restoration thread link
1970 CB750 K0 restored - Sold
2010 H-D Tri Glide Ultra Classic (Huh?)

Offline blake255

  • Full Member
  • *
  • Posts: 68
  • Look Out! I'm about to crank this thing!
Re: Sandcast Restoration
« Reply #3 on: January 18, 2010, 01:54:54 pm »
SUBSCRIBED!  You've certainly got my attention.  Good luck!
1970 CB750 K0 Project 1
1969 CB750 Sandcast Project 2
1969 CB750 Sandcast Project 3
2009 Yamaha YZF R6

Offline Johnie

  • Really Old Timer ...
  • *******
  • Posts: 8,507
Re: Sandcast Restoration
« Reply #4 on: January 18, 2010, 02:15:11 pm »
Looking good Mark. Can't wait for the rest...
1970 CB750K0 - Candy Ruby Red
1973 CB750K3 - Candy Bacchus Olive or Sunflake Orange
1970 Chevy Chevelle SS396 - Cortez Silver
1976 GL1000 sulphur yellow (current project)

Oshkosh, WI  USA

Offline markb

  • When I finish my current project I might be a
  • Master
  • *****
  • Posts: 1,615
Re: Sandcast Restoration
« Reply #5 on: January 18, 2010, 02:19:14 pm »
Thanks guys.  If you see something you think I should do different let me know.  You won't hurt my feelings, much.
blake255, I see you have a couple sandcasts.  Let me know if you get tired of one of them.  I'm not going to let the next one slip away.
1969 CB750 sandcast #97 restored - Sold Restoration thread link
1969 CB750 sandcaxt #576 - Sold
1969 CB750 sandcast #1553 - Sold
1969 CB750 sandcast #1990 - Sold
1969 CB750 sandcast #5383 restored - Sold Restoration thread link
1970 CB750 K0 restored - Sold
2010 H-D Tri Glide Ultra Classic (Huh?)

Offline Simpson

  • I ain't no
  • Expert
  • ****
  • Posts: 791
  • Aged to perfection
Re: Sandcast Restoration
« Reply #6 on: January 18, 2010, 02:45:04 pm »
Yout got my atttentionn also. This will be good, so tell all Mark. BTW I put the head stock sticker on regardless. My bike is not 100% correct. Heck, I've got a sandcast oil filter cover on it just because I think it looks better. Most everything else is pretty darn close though. Looking forward to reading your story. Thanks for posting.
« Last Edit: January 18, 2010, 03:50:46 pm by Simpson »
1970 CB750 K0
1975 CL/CB 360 Mix

Offline markb

  • When I finish my current project I might be a
  • Master
  • *****
  • Posts: 1,615
Re: Sandcast Restoration
« Reply #7 on: January 20, 2010, 03:29:15 pm »
Just a quick update.  Dropped the cases off for painting Monday.  A body shop I know does it for me with the Duplicolor 1615 rattlecans.  They've got the booth and all and I don't really have a place to do it.  I had really good results on my K0 and its held up great.  They're already done but I probably won't pick them up until Saturday.  Too much real work to do.  Dropped off my motor zinc stuff for plating today.  Should be ready next week.  Forgot to get a picture of the cases all masked for painting but I promise I'll get a shot when I pick them up.  I hope to have the rest of the engine parts ready for paint by Saturday.
« Last Edit: January 22, 2010, 12:51:09 pm by markb »
1969 CB750 sandcast #97 restored - Sold Restoration thread link
1969 CB750 sandcaxt #576 - Sold
1969 CB750 sandcast #1553 - Sold
1969 CB750 sandcast #1990 - Sold
1969 CB750 sandcast #5383 restored - Sold Restoration thread link
1970 CB750 K0 restored - Sold
2010 H-D Tri Glide Ultra Classic (Huh?)

Offline andy750

  • Really Old Timer ...
  • *******
  • Posts: 7,853
Re: Sandcast Restoration
« Reply #8 on: January 20, 2010, 04:05:04 pm »
Sign me up for a lesson!

Current bikes
1. CB750K4: Long distance bike, 17 countries and counting...2001 - Trans-USA-Mexico, 2003 - European Tour, 2004 - SOHC Easy Rider Trip , 2008 - Adirondack Tour 2-up , 2013 - Tail of the Dragon Tour , 2017: 836 kit install and bottom end rebuild. And rebirth: http://forums.sohc4.net/index.php/topic,173213.msg2029836.html#msg2029836
2. CB750/810cc K2  - road racer with JMR worked head 71 hp
3. Yamaha Tenere T700 2022

Where did you go on your bike today? - http://forums.sohc4.net/index.php?topic=45183.2350

Offline markb

  • When I finish my current project I might be a
  • Master
  • *****
  • Posts: 1,615
Re: Sandcast Restoration
« Reply #9 on: January 25, 2010, 02:43:32 pm »
Ok, I spent some time changing my photos using Photobucket.  I like not having to click to enlarge the photos.  Maybe you noticed things were hosed up for a bit, sorry.  I hope you like it better too.  Anyway, all my blasting is done now (except for the oil pan which won't get painted).  Same process for the head and cylinders as I did for the cases.

I decided to assemble the valves before painting to avoid dinging the head up later.


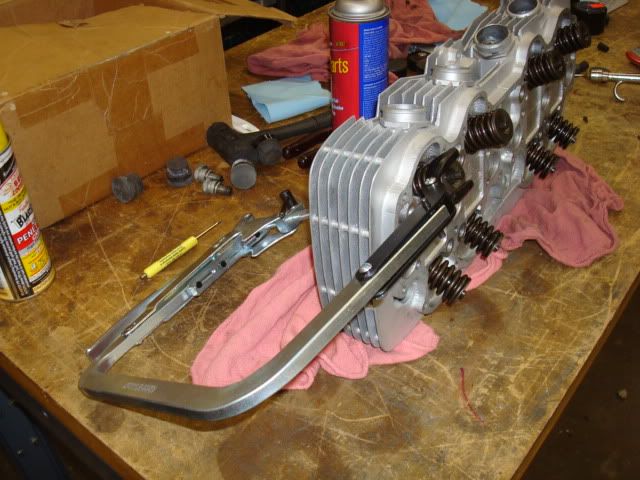
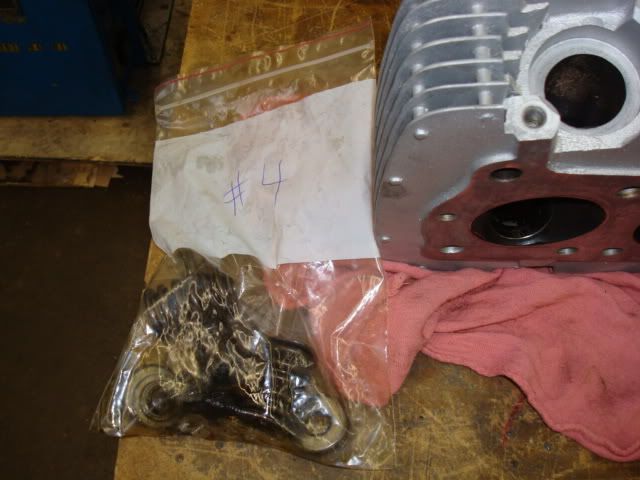
I bagged and labeled all the valves and parts so they would go back in the same place.


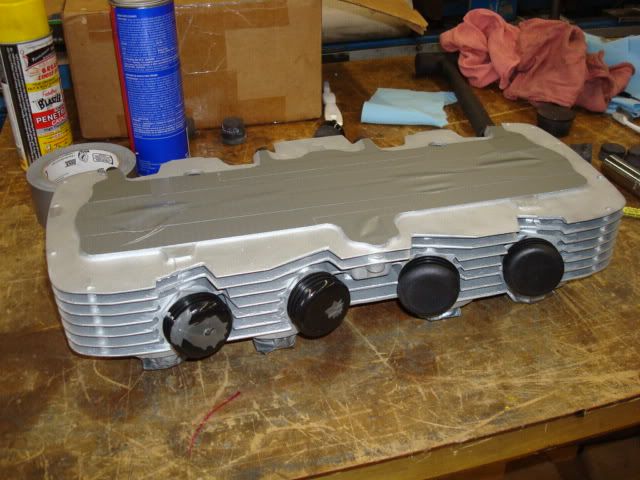
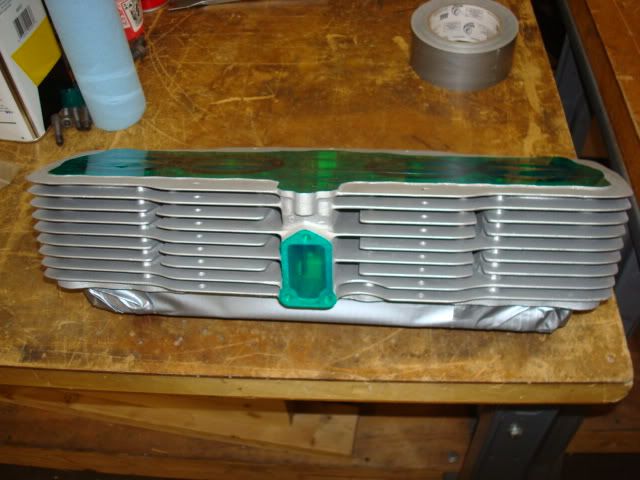
Here's the head all masked for painting.  


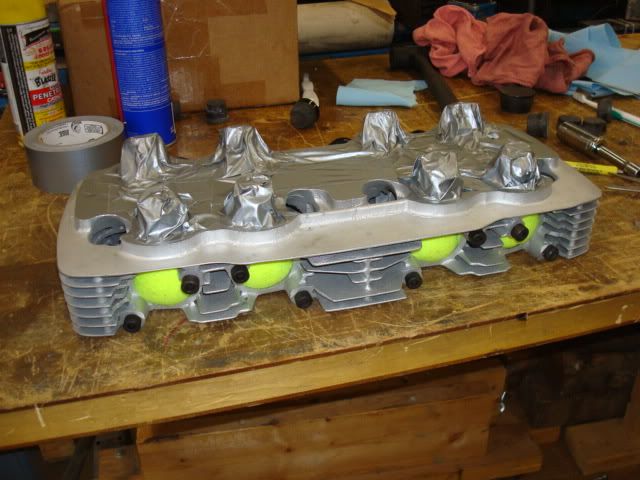
I cut up some tennis balls to plug the exhaust holes.  I don't like the paint where the copper rings go in, seems to burn them in place.  I also plug the exhaust clamp holes with short socket head screws.  Don't want paint in there either.  I use broken off sparkplugs to plug the sparkplug holes.  lThe duct tape makes it easy to cover the valve springs, etc.


Here's the cylinder.  I tried using some of the high temp masking tape the power coaters use.  Didn't like it much.  Used the blue paper masking tape on the cases.  Duct tape seems to trim the best and sticks to itself the best.


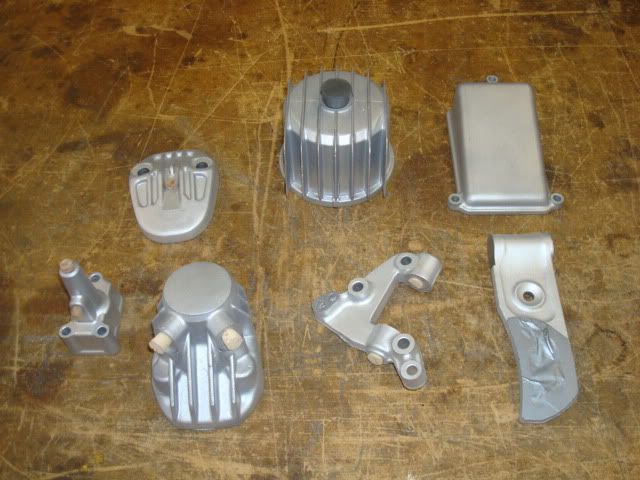
Here are the small parts.  Besides the breather cap, cam chain adjuster holder and oil filter housing, I also did the front brake caliper parts.  I'd read somewhere that they are the same color as the engine.  I figure they're close enough and the engine paint might be a little more reistant to brake fluid than other paints.


After everything is masked I wash everything with acetone using a paint brush and air gun.  Then I'm careful not to touch them with dirty hands.  Everything got dropped off yesterday and I picked up the frame and cases (photos coming in next posting).  All together about 14 hours of prep work but I don't think you can overdo this step.
« Last Edit: January 26, 2010, 06:18:37 am by markb »
1969 CB750 sandcast #97 restored - Sold Restoration thread link
1969 CB750 sandcaxt #576 - Sold
1969 CB750 sandcast #1553 - Sold
1969 CB750 sandcast #1990 - Sold
1969 CB750 sandcast #5383 restored - Sold Restoration thread link
1970 CB750 K0 restored - Sold
2010 H-D Tri Glide Ultra Classic (Huh?)

Offline Johnie

  • Really Old Timer ...
  • *******
  • Posts: 8,507
Re: Sandcast Restoration
« Reply #10 on: January 25, 2010, 03:28:11 pm »
I think I am in love Mark...nice job ol' boy!!! I did get to see the Vikes yesterday. Being an old Brett Farve Packer fan I would not miss it. I would have liked to see him in the big bowl. There are a lot of Packer fans that wished he could have got there. Maybe next year...you have a good looking team there if they can keep the core of the good people.
1970 CB750K0 - Candy Ruby Red
1973 CB750K3 - Candy Bacchus Olive or Sunflake Orange
1970 Chevy Chevelle SS396 - Cortez Silver
1976 GL1000 sulphur yellow (current project)

Oshkosh, WI  USA

Offline markb

  • When I finish my current project I might be a
  • Master
  • *****
  • Posts: 1,615
Re: Sandcast Restoration
« Reply #11 on: January 25, 2010, 04:17:38 pm »
Thanks, it was a tough loss.  But this cheers me up.  The frame and the rest of the black is back.  I set up the frame to get a photo but the motor assembly will come first.


Here's the motor with all the masking in place.  If you look close you can see where I plugged all the holes.  Not sure I needed to but I feel better not having paint in them, especially the threaded ones.


Can't see it real good here but the hardest hole to plug is where the bearing for the drive shaft is.  I tape off the bearing surface first and then cut a tennis ball in half and it fits the hole perfect.


The numbers still look good I think but you can tell that a fresh paint job doesn't make those rough cases any smoother.


Speaking of rough, there's plenty of areas on the cases and the frame too that could be cleaned up.  I leave everythink, including welding berries, etc. to help keep everything looking authentic.
« Last Edit: January 28, 2010, 05:27:34 am by markb »
1969 CB750 sandcast #97 restored - Sold Restoration thread link
1969 CB750 sandcaxt #576 - Sold
1969 CB750 sandcast #1553 - Sold
1969 CB750 sandcast #1990 - Sold
1969 CB750 sandcast #5383 restored - Sold Restoration thread link
1970 CB750 K0 restored - Sold
2010 H-D Tri Glide Ultra Classic (Huh?)

Offline Johnie

  • Really Old Timer ...
  • *******
  • Posts: 8,507
Re: Sandcast Restoration
« Reply #12 on: January 25, 2010, 05:49:12 pm »
Hey Mark...why don't you putty up those ugly numbers there... ;D  Gosh the case looks good.
1970 CB750K0 - Candy Ruby Red
1973 CB750K3 - Candy Bacchus Olive or Sunflake Orange
1970 Chevy Chevelle SS396 - Cortez Silver
1976 GL1000 sulphur yellow (current project)

Oshkosh, WI  USA

Offline blake255

  • Full Member
  • *
  • Posts: 68
  • Look Out! I'm about to crank this thing!
Re: Sandcast Restoration
« Reply #13 on: January 25, 2010, 06:47:24 pm »
Speaking of rough, there's plenty of areas on the cases and the frame too that could be cleaned up.  I leave everythink, including welding berries, etc. to help keep everything looking authentic.

I love "beauty marks".  They give the bike character.
1970 CB750 K0 Project 1
1969 CB750 Sandcast Project 2
1969 CB750 Sandcast Project 3
2009 Yamaha YZF R6

Offline markb

  • When I finish my current project I might be a
  • Master
  • *****
  • Posts: 1,615
Re: Sandcast Restoration
« Reply #14 on: January 26, 2010, 10:44:06 am »
I probably shouldn’t have but I made some edits to previous postings after I thought of some things.  I’m going to change one of the photos when I get around to it but I’ll try to keep the edits to a minimum.

Things are coming together as far as being able to make some significant progress.  One thing that really hung me up on my last project was I didn’t have everything I needed whether it was parts or tools.  For example:
I had the gasket set but not the seals and o-rings.
Ready to put the cases together and no sealant.
Ready to install pistons and no rings.
I could go on but you get the idea.  I wasted weeks waiting for parts.  Anyway, this time I kept a list as I was tearing apart the frame and motor of everything I would need like the o-rings for the oil pump (I like to replace all the rubber), knock pins (I damaged a couple getting them out), piston pin clips (I never reuse them), screws that were buggered up, every little detail.  I still need to order piston rings (double checked to make sure I had standard size pistons) and APE studs but everything else is here or on the way.  I should be able to pick up the rest of my engine paint tomorrow night and my zinc by Friday.  Chrome should be done about the first week of February.  The last #$%*y part is the covers.  I hate that most of all.  They’ve been polished and there’s no clear coat left on them so it shouldn’t be too bad.  So the tip for the day is plan ahead and it will save you a lot of time.
1969 CB750 sandcast #97 restored - Sold Restoration thread link
1969 CB750 sandcaxt #576 - Sold
1969 CB750 sandcast #1553 - Sold
1969 CB750 sandcast #1990 - Sold
1969 CB750 sandcast #5383 restored - Sold Restoration thread link
1970 CB750 K0 restored - Sold
2010 H-D Tri Glide Ultra Classic (Huh?)

Offline markb

  • When I finish my current project I might be a
  • Master
  • *****
  • Posts: 1,615
Re: Sandcast Restoration
« Reply #15 on: February 01, 2010, 08:25:30 am »
OK, it’s finally going back together.  I finished removing all the masking from the engine and frame parts before it sits any longer.  Here are the cases freshly painted with the masking removed.  I used the Duplicolor 500 degree engine enamel with ceramic.  There’s one coat of DE1612 grey primer and 2 coats of DE1615 Aluminum.  I tried many different paints and colors and in my opinion this is closest match to the original.  I’ve read some posts where other users haven’t had good luck with it but after 2 seasons my K0 is holding up well.  I got gas on it while working on the carbs and no problem (of course I removed it right away).  I noticed it was still a little soft when I was removing the masking and I remember this from last time too.  But being in Minnesota it will be months (like last time too) before it sees road dirt, oil, gas, etc. giving it plenty of time to harden up.  Maybe that’s the difference.


I start by making sure all the gasket surfaces are clean and flat and install the crankshaft bearings first, each in a separate labeled bag so they go back in the same place.


Everything is back in the upper case and the inside of the lower case.  The kick start gear went in easier than I remember it.  By the way, I plug the little hole in the drive shaft with a bit of o-ring to disable the chain oiler before I install the shaft.


Next I’ll flip over the bottom case and do the oil pump and oil pan before I assembly the halves.  It sure is nice working with clean parts.  Gotta quit for now, the plater let me down on the zinc so I couldn’t do the pan anyway besides having relatives in from out of town.
1969 CB750 sandcast #97 restored - Sold Restoration thread link
1969 CB750 sandcaxt #576 - Sold
1969 CB750 sandcast #1553 - Sold
1969 CB750 sandcast #1990 - Sold
1969 CB750 sandcast #5383 restored - Sold Restoration thread link
1970 CB750 K0 restored - Sold
2010 H-D Tri Glide Ultra Classic (Huh?)

Offline Magpie

  • Old Timer
  • ******
  • Posts: 3,250
Re: Sandcast Restoration
« Reply #16 on: February 01, 2010, 08:44:15 am »
Nice work!!
Cliff.

Offline johnsy

  • Hot Shot
  • ***
  • Posts: 271
    • what I do!
Re: Sandcast Restoration
« Reply #17 on: February 01, 2010, 09:04:57 am »
Great build. hope to see you on the streets of Min this spring.
Cheers
1-daily driver, 2007 CBR 600rr
current project, cb550 four
75 360T

Offline markb

  • When I finish my current project I might be a
  • Master
  • *****
  • Posts: 1,615
Re: Sandcast Restoration
« Reply #18 on: February 03, 2010, 07:10:51 am »
Thanks Cliff, and johnsy I definately plan on being done by spring.

Finally got a chance do a little work again last night.  The problem is I don’t have a place at home so I have everything at my company’s shop.  So when the wife has plans I can budget some time after hours and weekends.  I miss being able to run out to the garage whenever I have some spare time but the upside is I have access to things like the sandblaster, hydraulic press, air compressor, hoist, tools, etc.

Last night I had a chance to work on the oil pump.  I have the wet sump problem common to these motors (same as my K0 had).  I don’t think it’s a serious problem as long as you check your oil right after shutting off the motor but I’d like to fix it if I can.  The stopper valve seems to hang up so what I do is clean and polish it with some grey Scotchbrite in the long direction (not radially).  While I’m at it I do the relief valve too (both shown in photo).


Last time I wanted to replace the stopper valve seal but couldn’t find one anywhere.  This time when I was ordering some parts from Western Hills Honda and asked them if they had one.  (I have a list of “can’t find” parts that I always ask about when I call the dealers.  Occasionally a dealer will pick up inventory from another dealer so I check every time).  Anyway, they didn’t have one but recommended Performance Cycle in Cambridge, Ontario, 519-658-5819.  They had probably the last one known to mankind.  I bought it.  To be honest it didn’t look any better than the old one but it can’t hurt.  If I’m looking at it right, it seals on the face of it, not the OD so it seems like it shouldn’t wear out but maybe they just get hard.  I also check to make sure there's no sludge in where the seal contacts.  My K0 was much better even without replacing the seal so hopefully this will help.

Everything else looked good so I put it back together and reinstalled it.  I hope my plating gets done this week.  I'd like to get the oilpan on and put the cases together but I need screws!


By the way, I recommend both Western Hills Honda and Performance Cycle.  They both have a lot of vintage parts and are very friendly and helpful.
« Last Edit: February 16, 2010, 07:52:11 am by markb »
1969 CB750 sandcast #97 restored - Sold Restoration thread link
1969 CB750 sandcaxt #576 - Sold
1969 CB750 sandcast #1553 - Sold
1969 CB750 sandcast #1990 - Sold
1969 CB750 sandcast #5383 restored - Sold Restoration thread link
1970 CB750 K0 restored - Sold
2010 H-D Tri Glide Ultra Classic (Huh?)

Offline Johnie

  • Really Old Timer ...
  • *******
  • Posts: 8,507
Re: Sandcast Restoration
« Reply #19 on: February 03, 2010, 08:47:38 am »
It is coming along nice Mark. Great pics too. I will 2nd the help and friendly attitude of Western Hills Honda.
1970 CB750K0 - Candy Ruby Red
1973 CB750K3 - Candy Bacchus Olive or Sunflake Orange
1970 Chevy Chevelle SS396 - Cortez Silver
1976 GL1000 sulphur yellow (current project)

Oshkosh, WI  USA

traveler

  • Guest
Re: Sandcast Restoration
« Reply #20 on: February 03, 2010, 10:42:58 am »
Mark,

Thank you very much for taking the time to share with us your build progress and the pics.

I have been trying hard to do the same with my 550.  It seems to help others, and makes for great reading!  I think it also makes the website that much better.

Seems like with the sandcast bikes, that there are alot of little bits and pieces that are K0 specific....and the challenge is to know the differences, and get those parts together on the bike.

There are so many nice K0 pressure cast bikes on here....it's nice to occassionally see someone actually FIND and restore a true sandcast 750 to original.

~Joe

Offline buzzard750

  • Full Member
  • *
  • Posts: 8
Re: Sandcast Restoration
« Reply #21 on: February 04, 2010, 06:15:49 pm »
Mark
This is great stuff! Thank you for sharing. I recently picked up a sandcast (748) that I used to ride when I was in my teens. I'm curious as to how you finished the frame since that will be my first area to concentrate on when I get 748 tore down. Did you powder coat or other paint process?

Wayne

Offline markb

  • When I finish my current project I might be a
  • Master
  • *****
  • Posts: 1,615
Re: Sandcast Restoration
« Reply #22 on: February 05, 2010, 07:12:16 am »
Nice on the sandcast, I'm jealous. 
I'm not a painter, I've tried and I just don't have the knack for it.  I have a friend who does automotive body repair who does it for me.  He does a single-stage black urethane paint.  It's not that I don't like powdercoat but I'm going for a more original look.  First I mask and plug as much as I can (saves him time).  I don't worry much about the tapped holes, I just run a tap through later (something that's hard to do with powercoat).  Then he has the frame and all the steel parts sandblasted.  We don't do anything to the frame as far as cleaning up weld spatter, etc., that's they way they looked although obvious non-factory gouges are filled and sanded.  I "sand" the the top fork bridge with scotchbrite.  I also had some badly faded controls and master cylinder so I decided to throw them in too (gave up on finding someone who would anodize them).  Since they're aluminum too I did the scotchbrite on them as well.   For the aluminum parts he dulls down the gloss.  I have some NOS controls so he could try to match.  I think they turned out pretty good but I still may use the NOS controls, I haven't decided yet.  By the way, on the engine painting I do plug all the tapped holes.  Sorry for the long-winded answer but I hope that helps.  Like I said, I have nothing against powdercoat but my opinion is if you're doing the resto, never.
1969 CB750 sandcast #97 restored - Sold Restoration thread link
1969 CB750 sandcaxt #576 - Sold
1969 CB750 sandcast #1553 - Sold
1969 CB750 sandcast #1990 - Sold
1969 CB750 sandcast #5383 restored - Sold Restoration thread link
1970 CB750 K0 restored - Sold
2010 H-D Tri Glide Ultra Classic (Huh?)

Offline buzzard750

  • Full Member
  • *
  • Posts: 8
Re: Sandcast Restoration
« Reply #23 on: February 05, 2010, 08:01:34 am »
Thanks Mark
I think I'm going to go with the urethane paint as well. I have seen a couple of restorations using poweder coat, I guess curiosity got me as to why. The only benefit I see is cost. Pretty cheap to blast and powder a frame.

Now I will really make you cry. When I last rode this bike back on the late 70's it had 28,000 or so miles on it. The odometer now reads just over 29,000. I have documentation proving original miles. Sad part is the bike wasn't well stored and he changed out some of the original parts, painted it etc. Nothing I can't fix up! It does have early oil lines, straight fitting on front brake line, wrinkle tank and a two mounting hole air box. It's even sitting on the original rubber although they are badly weather cracked. Lots of fun stuff to work with. I can't wait to get in to it!

Thanks again for your info. You can follow my build once I get going at:

http://1969cb750sandcast.com

Wayne
« Last Edit: February 05, 2010, 08:03:30 am by buzzard750 »

Offline markb

  • When I finish my current project I might be a
  • Master
  • *****
  • Posts: 1,615
Re: Sandcast Restoration
« Reply #24 on: February 05, 2010, 08:32:39 am »
Those wet spots you see on your screen are tears.  Seriously, what a great story when its all done.  Good luck and I'll definately watch you're progress.  There's at least several other members here that are much more of an expert than I am.  I've learned a lot from them.  I'd recommend doing a lot of searching here.
1969 CB750 sandcast #97 restored - Sold Restoration thread link
1969 CB750 sandcaxt #576 - Sold
1969 CB750 sandcast #1553 - Sold
1969 CB750 sandcast #1990 - Sold
1969 CB750 sandcast #5383 restored - Sold Restoration thread link
1970 CB750 K0 restored - Sold
2010 H-D Tri Glide Ultra Classic (Huh?)