Author Topic: Sandcast Restoration - Done (for now)  (Read 54647 times)

0 Members and 1 Guest are viewing this topic.

Offline markb

  • When I finish my current project I might be a
  • Master
  • *****
  • Posts: 1,615
Re: Sandcast Restoration
« Reply #25 on: February 07, 2010, 02:57:12 PM »
Well my plating didn't get done so I decided to tackle the covers.  Maybe this is better then they will be done when I need them.  One problem though, when I went to take the coil and rotor out of the cover, despite using a good impact driver, one of the screws for the coil rounded out.  So off to the drill press.  I use a 7/32" drill, slightly larger than the diameter of the screw.  Go slow until the head breaks loose.


If you're going too fast the drill can turn the headless screw into the rotor (or whatever you may be working on).  Fortunately there was enough screw sticking out and I removed it with my fingers.


I tackled the valve cover first because its the worst and I wanted to get it out of the way.  Sorry but I didn't get a before shot.


One down, four to go.


Here's a before on the transmission cover.


First step is the Airplane Remover.  I let it sit for 10 minutes and then use a brush on it.


It come's out nice and clean.  The PO had polished them and clear coated with something.  I know he polished them because they're way too shiny for original.


Here's what it looks like after I "brush" it.  I start with 400 grit sandpaper to remove scratches.  Sometimes 220 grit if they're deep.  Then I use maroon, then gray, then white Scotchbrite.  I my opinion it turns out pretty close to original.  You just have to pay attention to the direction of the brush strokes.  Its hard to get photos that actually show it well.


I do the 8 caps by putting some duct tape on the threads and carefully chucking them in the lathe.  I didn't do my rotor cover yet because I noticed it has a dent in it, right by one of the a's in "Made In Japan".  Its not cracked on the outside but there are small cracks on the inside.  If I had to guess I would say someone missed an impact driver with a hammer (not me).  I do have a NOS one that I bought to use as a model for the finish and the black lettering.  I will probably use it.

By the way, I am not making any recommendations here.  This is just what I do.  Next installment will be clear coating.
« Last Edit: February 16, 2010, 07:55:55 AM by markb »
1969 CB750 sandcast #97 restored - Sold Restoration thread link
1969 CB750 sandcaxt #576 - Sold
1969 CB750 sandcast #1553 - Sold
1969 CB750 sandcast #1990 - Sold
1969 CB750 sandcast #5383 restored - Sold Restoration thread link
1970 CB750 K0 restored - Sold
2010 H-D Tri Glide Ultra Classic (Huh?)

Offline markb

  • When I finish my current project I might be a
  • Master
  • *****
  • Posts: 1,615
Re: Sandcast Restoration
« Reply #26 on: February 07, 2010, 03:38:28 PM »
I should mention that this process is a real pain.  The highly polished surfaces seem to resist tarnishing but this rougher finish tarnishes right away.  You cannot touch it or it will tarnish.  I clean the parts with acetone after every step and wash my hands often too.  Of course the clear coat will stick better to this surface too.  But you have to spray it on right away.  What I'll do is make arrangements with my painter when he will do it and I will go over them completely one more time before I drop them off and he shoots them right away.  
« Last Edit: February 08, 2010, 06:55:20 AM by markb »
1969 CB750 sandcast #97 restored - Sold Restoration thread link
1969 CB750 sandcaxt #576 - Sold
1969 CB750 sandcast #1553 - Sold
1969 CB750 sandcast #1990 - Sold
1969 CB750 sandcast #5383 restored - Sold Restoration thread link
1970 CB750 K0 restored - Sold
2010 H-D Tri Glide Ultra Classic (Huh?)

traveler

  • Guest
Re: Sandcast Restoration
« Reply #27 on: February 07, 2010, 03:51:57 PM »
If you use Nevr Dull, it leaves a oil residue that will keep it from tarnishing....it also helps add a shine.

~Joe

Offline hoodellyhoo

  • CB350F
  • Master
  • *****
  • Posts: 1,726
Re: Sandcast Restoration
« Reply #28 on: February 07, 2010, 07:56:52 PM »
Interesting to see a member that's actually going for an original finish on the covers. Way to go on the attention to detail!
1972 CB350F (Back from the Dead!)- http://forums.sohc4.net/index.php?topic=20822.0
1965? S65 - Coming Eventually!
1972 CB750K2 (father-son project)
1976 CB750K6- (sold) http://forums.sohc4.net/index.php?topic=96859.0
1976 CB750K6 (sold)- http://forums.sohc4.net/index.php?topic=62569.0

Offline markb

  • When I finish my current project I might be a
  • Master
  • *****
  • Posts: 1,615
Re: Sandcast Restoration
« Reply #29 on: February 08, 2010, 07:12:57 AM »
If you use Nevr Dull, it leaves a oil residue that will keep it from tarnishing....it also helps add a shine.

~Joe

Thanks for the tip, I'll check it out.
Interesting to see a member that's actually going for an original finish on the covers. Way to go on the attention to detail!
Thanks.  Its not that I don't like "non-original".  In fact I'm a fan of many of the cafes here.  They pay attention to detail too, just different detail.
1969 CB750 sandcast #97 restored - Sold Restoration thread link
1969 CB750 sandcaxt #576 - Sold
1969 CB750 sandcast #1553 - Sold
1969 CB750 sandcast #1990 - Sold
1969 CB750 sandcast #5383 restored - Sold Restoration thread link
1970 CB750 K0 restored - Sold
2010 H-D Tri Glide Ultra Classic (Huh?)

Offline markb

  • When I finish my current project I might be a
  • Master
  • *****
  • Posts: 1,615
Re: Sandcast Restoration
« Reply #30 on: February 14, 2010, 02:42:01 PM »
Not much progress this weekend.  My plating still isn't done.  Its frustrating.  He did a nice job last time but this time its been 5 weeks.  And my clearcoat didn't show up until Saturday so that isn't done yet.  I'm going to give the covers a quick once over and drop it off Monday morning.  So I did a couple of little projects.  I sandblasted my oil pan.  Looks pretty close to the paint color.  I just need the screws now.  


I made a couple of stud inserters.  I saw APE sold one but too spendy.  I just cut off some hex stock and drilled and tapped one 6mm and one 8mm.  Then put a short screw in one end.  They wouldn't work for removal though.


Not having my clearcoat I decided to do something different to hold my tappet hole caps.  Instead of sticking in a hole in cardboard, I found some plugs that I screwed onto a board.  They fit over the threads perfect and then I don't have the bottom of the caps setting right on the cardboard where the clearcoat might buildup.  


Last little project was to put the badges, cap and petcock on the tank.  The pin is pretty snug and may not fall out but what I do is put a small steel ball on the end (the rag helps hold it in place) and use a channel lock to squeeze the ball into the end of the pin.  Flares it out perfectly.  I put an aluminum block on the head so it doesn't get marred.  Ran into a problem when I went to put on the petcock.  The little red fiber washers were too small.  I double checked the part number and they should have been correct.  Anyone else have the same problem?


Here's the (almost) finished tank.  It was probably a good idea to pull it out of the box to make sure it was OK.  It's been sitting there since last summer.  Just seeing the color is getting me excited to get going on this thing.  Hopefully by next weekend I can really rock and roll.
« Last Edit: February 14, 2010, 02:53:53 PM by markb »
1969 CB750 sandcast #97 restored - Sold Restoration thread link
1969 CB750 sandcaxt #576 - Sold
1969 CB750 sandcast #1553 - Sold
1969 CB750 sandcast #1990 - Sold
1969 CB750 sandcast #5383 restored - Sold Restoration thread link
1970 CB750 K0 restored - Sold
2010 H-D Tri Glide Ultra Classic (Huh?)

Offline tomsweb1

  • '78 CB750A
  • Hot Shot
  • ***
  • Posts: 278
  • '78 CB750A
Re: Sandcast Restoration
« Reply #31 on: February 14, 2010, 03:28:12 PM »
Wow! looks like it's turning out beautifully so far. Can't wait to see more.
Present: 1978 CB750A, 1978 CB400A, 1983 Nighthawk 550, 1984 CM250C

Past: 1977 XL100, 1982 KZ1300

Offline Johnie

  • Really Old Timer ...
  • *******
  • Posts: 8,615
Re: Sandcast Restoration
« Reply #32 on: February 14, 2010, 03:31:57 PM »
Mark...looking amazing there. Is that tank a yamiya or repaint of your OEM?
1970 CB750K0 - Candy Ruby Red
1973 CB750K3 - Candy Bacchus Olive or Sunflake Orange
1970 Chevy Chevelle SS396 - Cortez Silver
1976 GL1000 Sulphur Yellow

Oshkosh, WI  USA

Offline markb

  • When I finish my current project I might be a
  • Master
  • *****
  • Posts: 1,615
Re: Sandcast Restoration
« Reply #33 on: February 15, 2010, 03:10:50 AM »
I had the tank and everythink painted by Blake Conway in CA.  He does the painting for Vic World's restorations.  Its supposedly the original red candy color with the silver base coat, color coats and clear coats.  He says the trick is to get the right thickness and number of the color layers to get the right shade.  He did the blue/green on my K0 too.  I have to believe they're as close to original as it gets.  Not cheap though.  $1100 for the tank, air box, side cover, fork ears and headlight bucket.  That included derusting the inside of the tank that he coats with a clear coating from Caswell.  I would recommend him. 
1969 CB750 sandcast #97 restored - Sold Restoration thread link
1969 CB750 sandcaxt #576 - Sold
1969 CB750 sandcast #1553 - Sold
1969 CB750 sandcast #1990 - Sold
1969 CB750 sandcast #5383 restored - Sold Restoration thread link
1970 CB750 K0 restored - Sold
2010 H-D Tri Glide Ultra Classic (Huh?)

Offline andy750

  • Really Old Timer ...
  • *******
  • Posts: 7,940
Re: Sandcast Restoration
« Reply #34 on: February 15, 2010, 04:42:56 AM »
Mark your attention to detail is inspiring! The tank looks amazing! I cant wait to see the finished product.

Between yourself, Johnie and Magpie its great to watch such attention to detail. Really is very impressive.

good luck
Andy
Current bikes
1. CB750K4: Long distance bike, 17 countries and counting...2001 - Trans-USA-Mexico, 2003 - European Tour, 2004 - SOHC Easy Rider Trip , 2008 - Adirondack Tour 2-up , 2013 - Tail of the Dragon Tour , 2017: 836 kit install and bottom end rebuild. And rebirth: http://forums.sohc4.net/index.php/topic,173213.msg2029836.html#msg2029836
2. CB750/810cc K2  - road racer with JMR worked head 71 hp
3. Yamaha Tenere T700 2022

Where did you go on your bike today? - http://forums.sohc4.net/index.php?topic=45183.2350

Offline buzzard750

  • Full Member
  • *
  • Posts: 8
Re: Sandcast Restoration
« Reply #35 on: February 15, 2010, 07:00:06 AM »
I had the tank and everythink painted by Blake Conway in CA.  He does the painting for Vic World's restorations.  Its supposedly the original red candy color with the silver base coat, color coats and clear coats.  He says the trick is to get the right thickness and number of the color layers to get the right shade.  He did the blue/green on my K0 too.  I have to believe they're as close to original as it gets.  Not cheap though.  $1100 for the tank, air box, side cover, fork ears and headlight bucket.  That included derusting the inside of the tank that he coats with a clear coating from Caswell.  I would recommend him. 

Looks great Mark. $1100.00 isn't bad for perfection. I recently had the tins on my Harley repainted and that came to $1700.00. Blake looks like the man but I would be so nervous about shipping my tank etc. to CA. I may have to drive my stuff out there!

Offline markb

  • When I finish my current project I might be a
  • Master
  • *****
  • Posts: 1,615
Re: Sandcast Restoration
« Reply #36 on: February 15, 2010, 07:19:36 AM »
Thanks Andy.

Buzzard750, if you get a chance to go there he won't mind showing you around.  I was visiting a sister-in-law who lives in San Diego and drove up to Blake's place in Vista so I could meet him before he did the work on my K0.  A really cool place east of town out in the country.  He probably has a 100 bikes, mostly British, BSA's Triumphs, Nortons.  He showed me a K0 with the paint color I was going to get and I was sold.  Should have brought the stuff with me but I shipped it as soon as I got back home.  I was nervous too but it turned out OK twice now.  He really packs it up good too, all wrapped in heavy towels and padded.
1969 CB750 sandcast #97 restored - Sold Restoration thread link
1969 CB750 sandcaxt #576 - Sold
1969 CB750 sandcast #1553 - Sold
1969 CB750 sandcast #1990 - Sold
1969 CB750 sandcast #5383 restored - Sold Restoration thread link
1970 CB750 K0 restored - Sold
2010 H-D Tri Glide Ultra Classic (Huh?)

Offline Magpie

  • Old Timer
  • ******
  • Posts: 3,319
Re: Sandcast Restoration
« Reply #37 on: February 15, 2010, 07:37:08 AM »
I think you've just moved the bar up a few notches for the rest of us following! Great work!
Cliff.

Offline markb

  • When I finish my current project I might be a
  • Master
  • *****
  • Posts: 1,615
Re: Sandcast Restoration
« Reply #38 on: February 18, 2010, 08:01:45 AM »
Thanks Cliff, you're embarrassing me.  From what I see your work is top notch.

Anyway, time for an update.  I received my clear coat on Saturday. Monday morning I gave the covers a quick once-over to make sure they hadn’t tarnished at all and dropped them off at the painter’s. He shot them Monday and I picked them up Tuesday night.  I debated using some other products but I wanted a more permanent solution and decided to do the same as my K0 even though that was somewhat of a nightmare.  I ended up using Eastwoods Diamond Clear Extreme.  Last time it took me 3 tries to get it right.

First go round I used an Eastwood spray can clear coat. For whatever reason it just peeled right off. Maybe it just wasn’t clean enough. After stripping and “rebrushing” I chose the Diamond Clear Extreme for the second try. That time the painter couldn't get to it right away so I asked him to make sure they still looked good before he shot them. Well he touched them up but didn't really pay attention to the “brush” stroke direction and between the fingerprints and runs and sags they were a disaster. Here's where the big problem came in.  I tried all kinds of nasty solvents and even Aircraft Remover and nothing would touch it. After an hour using sandpaper (the stuff is hard as nails) I finally sent them out for bead blasting and polishing. Then I brought them back to a satin finish with the Scotchbrite. Third time, as they say, was a charm. Then I ran into another problem.  I tried to paint the black around HONDA on the rotor cover and the paint would not stick, it just beaded up.  So after trying a couple different things I found the Bulldog Adhesion Promoter. Here are the products I used.
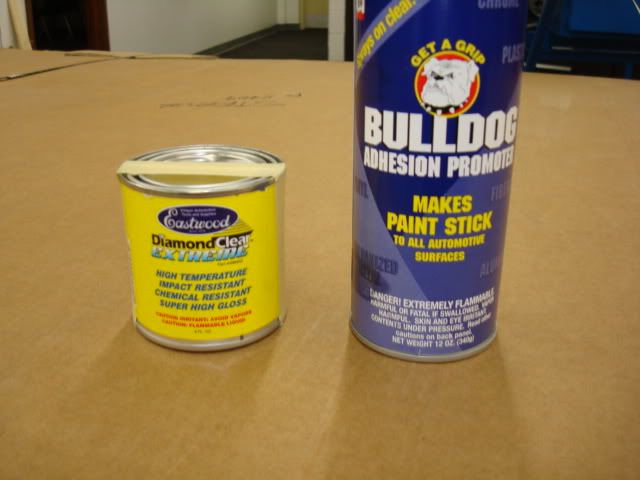

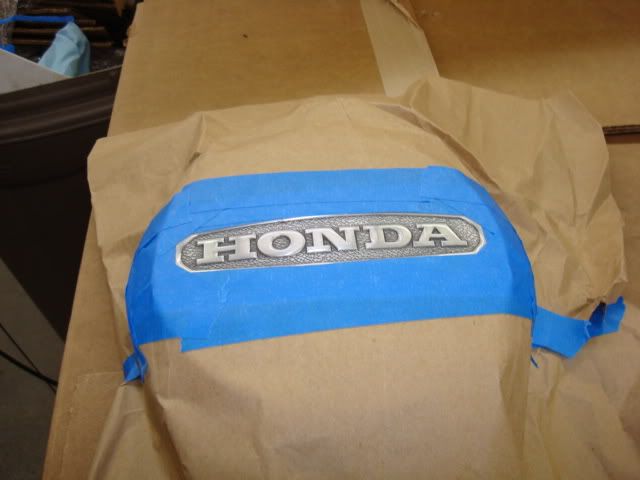
The first thing I did was mask the area around HONDA.  I didn't worry about the letters or getting too close to the recess I just wanted to reduce the amount of paint that had to be wiped off.

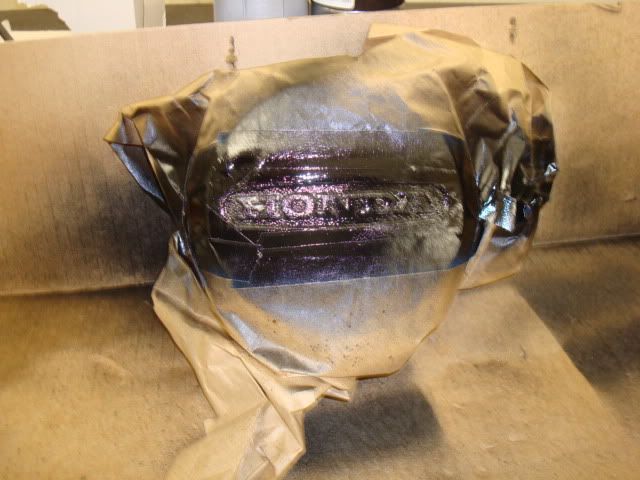
First I sprayed it will the adhesion promoter. Even that wants to bead up so while it's still wet I used the tip of a 1” paintbrush to make sure the recess is completely covered.  I did two coats. After the second coat I waited 10 minutes and sprayed the black, two coats and used the brush again between the coats.  I used the Duplicolor DE1635 semi-gloss black. It may be a little shinier than original but I think the DE1634 low gloss is too dull. After another 10 minutes I peeled off the masking and used a piece of blue paper shop towel wrapped tightly around a small flat block to wipe off the excess paint.  I dampen the towel with acetone and only make one wipe per piece.

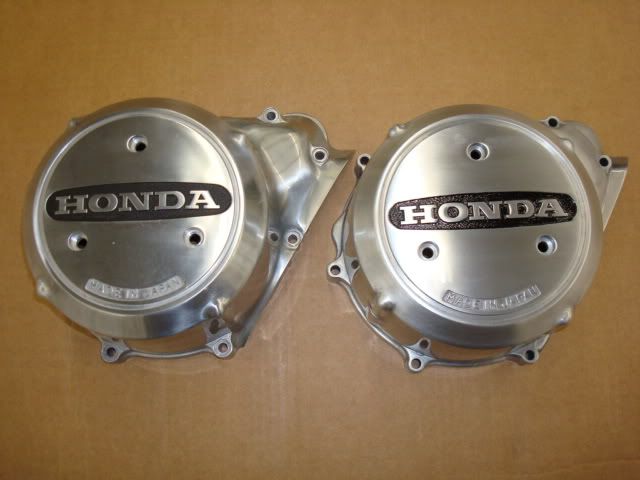
Here's the finished product along side a NOS cover. Can you tell which one is the restore? They both have imperfections and the restored one is just slightly less shiny than the NOS one and I think than my K0 ones. This could be because the K0 ones were more polished when I used the Scotchbrite to bring it back to the more satin, brushed look and I did so some 800 and 1000 grit wet sanding before finishing with the white Scotchbrite this time . In person you could definitely tell the difference but by itself, on the bike, from a few feet away it will look pretty close.

Now a disclaimer.  I am not recommending this process; this is just what I did. If you try it you are at your own risk. My brushing method is close but not perfect. The clear coat is totally unforgiving if you make a mistake and my painter says not to breath it, it's the nastiest s**t He's ever seen (plus its about $50 for that little can) and I don't know how well it would stick to a brightly polished surface. If you use a different clear coat I'm not sure you could use my spray and wipe method, the paint might stick much better. Also it remains to be seen how well the black will hold up over time. It's been on the K0 for two years but I don't use anything strong near it when I wash the bike. If you try it good luck. If you find something that works better please let me know.  I'm going to find some old covers and do some more experimenting (when my fingers are healed up).  I wish I could find out how Honda did it. My guess is it was some kind of long, soft, fine grit rotary bristle brush.

Now I just need my zinc plating!
« Last Edit: February 18, 2010, 03:02:56 PM by markb »
1969 CB750 sandcast #97 restored - Sold Restoration thread link
1969 CB750 sandcaxt #576 - Sold
1969 CB750 sandcast #1553 - Sold
1969 CB750 sandcast #1990 - Sold
1969 CB750 sandcast #5383 restored - Sold Restoration thread link
1970 CB750 K0 restored - Sold
2010 H-D Tri Glide Ultra Classic (Huh?)

Offline Magpie

  • Old Timer
  • ******
  • Posts: 3,319
Re: Sandcast Restoration
« Reply #39 on: February 18, 2010, 09:01:03 AM »
Mark, your restoration is going way beyond the level of mine! The cover looks perfect. Not meant to embarass, just a recognition of amazing work and dedication.
Another observation of how the motors changed. In the photo above the letters Honda are surrounded by "dimples" I guess they could be called or like an orange peel. On mine that area is smooth. Little changes that drive me nuts.
Cheers,
Cliff.

Offline markb

  • When I finish my current project I might be a
  • Master
  • *****
  • Posts: 1,615
Re: Sandcast Restoration
« Reply #40 on: February 18, 2010, 09:06:09 AM »
Thanks again.  By the way, the resto is on the right.
1969 CB750 sandcast #97 restored - Sold Restoration thread link
1969 CB750 sandcaxt #576 - Sold
1969 CB750 sandcast #1553 - Sold
1969 CB750 sandcast #1990 - Sold
1969 CB750 sandcast #5383 restored - Sold Restoration thread link
1970 CB750 K0 restored - Sold
2010 H-D Tri Glide Ultra Classic (Huh?)

Offline Simpson

  • I ain't no
  • Expert
  • ****
  • Posts: 791
  • Aged to perfection
Re: Sandcast Restoration
« Reply #41 on: February 18, 2010, 10:03:55 PM »
I just want to thank you for putting this thread together. I love these stock restros!!!
1970 CB750 K0
1975 CL/CB 360 Mix

Offline markb

  • When I finish my current project I might be a
  • Master
  • *****
  • Posts: 1,615
Re: Sandcast Restoration
« Reply #42 on: February 19, 2010, 11:12:50 AM »
After weeks of waiting, still no zinc plating.  The plater promised me last week that it would be done today.  It wasn't.  Fourth time he's broken his promise.  Then to make it worse when I called today to see if it was done he got pissed and said to come pick my stuff.   ???  He had it since before Christmas and he's pissed at me!  So don't do business with Deter's Custom Metal Polishing in Forest Lake, MN.  On the bright side there is another plating business right next door.  I walked over there and they said they would do it.  They are going to try for next Friday but wouldn't guarantee it.  I had big plans to really dig in this weekend but I guess not.  It's really frustrating. >:(
1969 CB750 sandcast #97 restored - Sold Restoration thread link
1969 CB750 sandcaxt #576 - Sold
1969 CB750 sandcast #1553 - Sold
1969 CB750 sandcast #1990 - Sold
1969 CB750 sandcast #5383 restored - Sold Restoration thread link
1970 CB750 K0 restored - Sold
2010 H-D Tri Glide Ultra Classic (Huh?)

Offline markb

  • When I finish my current project I might be a
  • Master
  • *****
  • Posts: 1,615
Re: Sandcast Restoration
« Reply #43 on: February 22, 2010, 06:40:15 AM »
Since my plating wasn’t back I decided to go to Duluth, MN for the weekend and take in the boat show.  Working on the bikes is my winter passion but boating and fishing is my summer passion.  That’s why not getting my plating is so annoying.  I want to get the bike done by summer.  Actually my goal is to have it done by May 22 for a small, local VJMC bike show.  Seems like a ways off but I know it will come quick.  Once summer comes, that’s it until fall.  Here’s a picture of my boat.  I do charter fishing on the weekends on Lake Superior out of Knife River.  If you’re ever up that way look me up, Reel Escape Charters www.reelescape.net.  I’ll knock off 25% to any SOHC/4er.

The break was actually a good idea.  When I got back Sunday afternoon I worked on a couple of small projects.  I installed everything in the rotor cover and the seals in the other covers and got organized.  I was kind of hung up on not making progress without having my plating, but there is plenty I can work on.  Such as the caliper, master cylinder, clean up the rear wheel (front is done), steering stem and all the rubber bits on the frame.  So I will have work this weekend even without the screws and it will save me time later.  Now I feel better.
« Last Edit: February 23, 2010, 02:10:51 PM by markb »
1969 CB750 sandcast #97 restored - Sold Restoration thread link
1969 CB750 sandcaxt #576 - Sold
1969 CB750 sandcast #1553 - Sold
1969 CB750 sandcast #1990 - Sold
1969 CB750 sandcast #5383 restored - Sold Restoration thread link
1970 CB750 K0 restored - Sold
2010 H-D Tri Glide Ultra Classic (Huh?)

Offline markb

  • When I finish my current project I might be a
  • Master
  • *****
  • Posts: 1,615
Re: Sandcast Restoration
« Reply #44 on: February 27, 2010, 04:31:26 PM »
I finally got my zinc plating yesterday!  The new guy got it done in a week.  But he sure saw me coming on the price.  When he told me $300 I about crapped my pants.  He said, "You wanted me to rush it didn't you?"  Well I guess I did but I should have gotten a quote.  I found out he preps everything there but sends it out he pushed me ahead of a couple other jobs.  So I suppose he marks it up too.  The good news is it looks fantastic and I have it.  Here it is.  Doesn't look like much but its every zinc part on the bike except internal engine stuff.  I spent the better part of the day sorting it out and getting organized.  It's amazing how many different sizes there are of just the 6mm washers.  By the way, I didn't replate the standard washers, I found a source where I could by them cheap.  There's no way you're going to sort that all out without a parts manual.  

I finally got the oil pan on and feel like I'm getting somewhere.  Now the bad news.  Between the 3 parties involved a couple of pieces are missing.  After kicking around at the first guys place I have my theory.  So far I'm missing one of the thick washers for the 8mm bolts on the case, the little pin that connects the brake linkage to the pedal and one of the four collars that goes in the rubber for mounting the battery box.  I may discover more later.  What a nuisance.  Luckily the local shop had the washers so I'm planning on putting the cases together tomorrow.  
« Last Edit: February 27, 2010, 05:18:41 PM by markb »
1969 CB750 sandcast #97 restored - Sold Restoration thread link
1969 CB750 sandcaxt #576 - Sold
1969 CB750 sandcast #1553 - Sold
1969 CB750 sandcast #1990 - Sold
1969 CB750 sandcast #5383 restored - Sold Restoration thread link
1970 CB750 K0 restored - Sold
2010 H-D Tri Glide Ultra Classic (Huh?)

Offline markb

  • When I finish my current project I might be a
  • Master
  • *****
  • Posts: 1,615
Re: Sandcast Restoration
« Reply #45 on: February 28, 2010, 04:02:10 PM »
Here's the oil pan in place.  The sandcast has a different one than the later models.  I got the gasket kit from Yamiya.  A little spendy but they include the sandcast gasket.


I forgot to install the clips for the neutral switch wire and the points wire last time.  This time I remembered.  The neutral switch one isn't too bad to install later but the points wire one is impossible after the engine is in the frame.  Last time I had to partially remove the motor to get it in.  I won't do that again and now hopefully you won't either.


Bottom side is all buttoned up.  After a dry run to practice putting on the bottom case I applied sealer to the top half and put the bottom half on.  Didn't want to drop in place right away so I jiggled the crank a litte to move the gears and she dropped right down.


Here's the routing on the neutral switch wire.  Does it look right?


Here's where I wrapped up today.  Bottom end is about done.


Other side.  I sure am glad I have my covers done now.


I'm also glad I have a good torque wrench.  I would be overtightening everything, especially the 6mm bolts.  That's it for the day.  It felt good to put something together finally and have it go so smooth.
« Last Edit: March 01, 2010, 04:53:33 AM by markb »
1969 CB750 sandcast #97 restored - Sold Restoration thread link
1969 CB750 sandcaxt #576 - Sold
1969 CB750 sandcast #1553 - Sold
1969 CB750 sandcast #1990 - Sold
1969 CB750 sandcast #5383 restored - Sold Restoration thread link
1970 CB750 K0 restored - Sold
2010 H-D Tri Glide Ultra Classic (Huh?)

Offline Magpie

  • Old Timer
  • ******
  • Posts: 3,319
Re: Sandcast Restoration
« Reply #46 on: February 28, 2010, 04:04:10 PM »
Looking GOOD!
Cliff.

Offline markb

  • When I finish my current project I might be a
  • Master
  • *****
  • Posts: 1,615
Re: Sandcast Restoration
« Reply #47 on: March 01, 2010, 04:47:52 AM »
Thanks.  A couple more good days like that and hopefully I'll catch up to you!
1969 CB750 sandcast #97 restored - Sold Restoration thread link
1969 CB750 sandcaxt #576 - Sold
1969 CB750 sandcast #1553 - Sold
1969 CB750 sandcast #1990 - Sold
1969 CB750 sandcast #5383 restored - Sold Restoration thread link
1970 CB750 K0 restored - Sold
2010 H-D Tri Glide Ultra Classic (Huh?)

Offline markb

  • When I finish my current project I might be a
  • Master
  • *****
  • Posts: 1,615
Re: Sandcast Restoration
« Reply #48 on: March 05, 2010, 08:19:14 AM »
I had a little time last night so I was going to try to get the head on and torqued down.  Things always take longer than you think.  I got my pistons back on.  I've got my rags covering the holes so I don't lose a pin clip.  They only time I ever dropped one was when I didn't have the holes covered!  Notice I've got hose clamps to compress my rings.  I oil them up good and make sure they slide easy so they won't scratch the pistons when they slide while installing the cylinder.  This has always worked well for me.


Then I got my new APE studs installed.  My new little installation tool worked great.  Easier and saves a lot of time over double-nutting.  So that's as far as I got.  I could have put the jugs on but wanted to wait until I could do the head too.  I'd like to get them on tonight so I can let it sit for 24 hours and then retorque.
1969 CB750 sandcast #97 restored - Sold Restoration thread link
1969 CB750 sandcaxt #576 - Sold
1969 CB750 sandcast #1553 - Sold
1969 CB750 sandcast #1990 - Sold
1969 CB750 sandcast #5383 restored - Sold Restoration thread link
1970 CB750 K0 restored - Sold
2010 H-D Tri Glide Ultra Classic (Huh?)

Offline Johnie

  • Really Old Timer ...
  • *******
  • Posts: 8,615
Re: Sandcast Restoration
« Reply #49 on: March 05, 2010, 08:46:12 AM »
Great pics Mark!!! Coming along fine. With temps going up we should be able to hear that mike purrrrrrrrrrrrrrrrrrr soon!!! You have a great thread going here.
1970 CB750K0 - Candy Ruby Red
1973 CB750K3 - Candy Bacchus Olive or Sunflake Orange
1970 Chevy Chevelle SS396 - Cortez Silver
1976 GL1000 Sulphur Yellow

Oshkosh, WI  USA