Author Topic: '75 CB550 K1 revisited  (Read 5575 times)

0 Members and 1 Guest are viewing this topic.

Offline ewendkos

  • Full Member
  • *
  • Posts: 51
'75 CB550 K1 revisited
« on: January 23, 2010, 02:53:18 PM »
Hi everyone.  I started a build on a 1975 CB550 K1 over a year and a half ago and long story short, it's just been sitting.  Times got tough, I had lots of issues come up, yadda yadda, my original thread hasn't been moved - whatevs.

In any case, I decided to get back at it.  Luckily, my blog is still up and you can check out the old progress there at http://cb550k1.blogspot.com/.

So today, I finally got back to working on it.

Here's the results:  I got nearly everything out of the frame except the chain.  I can't figure out if the guy who I bought it from hard tailed it with the chain still sitting in the swingarm!  I can't see a master link, so it's gotta be that, but geez.


I suppose I'll have to cut off the chain in order to get started on stripping and refinishing the frame but I guess I need to do more research to figure out what to go with afterwards.


The more work I do on this the more I realize that the stuff I thought would be bad is ok, but the stuff I thought was ok is bad.  Like, the motor mount hardware is all stripped so I'll need to find more of that.

Anyways, I'll be back to it slowly this time, probaby a weekend only job but I am enjoying the learning!
Follow my '75 CB550 K1 build thread http://forums.sohc4.net/index.php?topic=64582.0

Offline ewendkos

  • Full Member
  • *
  • Posts: 51
Re: '75 CB550 K1 revisited
« Reply #1 on: January 29, 2010, 09:39:12 PM »
A mixture of elbow grease, Tal stripper (miracle stuff) and brake cleaner has helped me make some progress.  The pics below show the amount of cleanup I've been able to get done on the engine case.  It's important to note that I've really been taking my time with this - first because I don't have a whole lot of time, but second that stuff is REALLY STRONG.  I don't want to be around it for too long.  That being said, I'm pretty happy with what I've done so far.

I've also been going through the box of parts to try and figure out what's missing.

<edit> Keep in mind all the aluminum that you see now was previously about 6 coats of black paint </edit>

Things I'll need:
  • Front sprocket cover (this is missing from both engines)
  • Throttle body

Anyways, I know this is going slowly, but there are great folks on here who've been really helpful.  I really need to get someone to come by and look at the frame but soon enough.


« Last Edit: January 30, 2010, 06:21:44 PM by ewendkos »
Follow my '75 CB550 K1 build thread http://forums.sohc4.net/index.php?topic=64582.0

Offline KB02

  • Take it easy there, Sonny, I'm an
  • Old Timer
  • ******
  • Posts: 3,760
Re: '75 CB550 K1 revisited
« Reply #2 on: January 31, 2010, 05:00:59 AM »
Yeah, that is an odd choice about the chain. You'll just have to cut and get a new chain with a master link. You could also get a chain rivet tool and take the chain on and off with that. Master links tend to be easier, though.

It's an interesting hardtail set up. I've never been a fan of just using struts to replace the shocks. Your setup keep the swing arm, but the rest is cut and welded. It's kind of a half way there option, but it works.  :)
1978 CB750K Project
2000 Ducati ST2
...and a pedal bike

Join the AMA today!!

My project thread Part I: K8 Project "Parts Bike"
My project thread Part II: Finishing (yeah, right) touches on Project "Parts Bike"

Offline ewendkos

  • Full Member
  • *
  • Posts: 51
Re: '75 CB550 K1 revisited
« Reply #3 on: January 31, 2010, 01:00:37 PM »
Ran compression tests this afternoon, and I'm pretty sure this is bad news:

I ran it with facing the front of the engine with 1 on the left and 4 on the right.

Cylinder 1 - great!  120 psi
Cylinder 2 - essentially 0 psi (there was compression, but not enough to register on the dial)
Cylinder 3 - 110 psi
Cylinder 4 - 100 psi There was also a pretty decent clunk on cylinder 4.

I tested all cylinders at approx 8 seconds each.  I triple-checked cylinder number 2.

So?  What does this mean?  I have a second engine if that would be helpful but I haven't compression tested it yet.
Follow my '75 CB550 K1 build thread http://forums.sohc4.net/index.php?topic=64582.0

Offline ewendkos

  • Full Member
  • *
  • Posts: 51
Re: '75 CB550 K1 revisited
« Reply #4 on: February 13, 2010, 03:12:31 PM »
I finally picked up a work bench this week.  I desperately needed a place that I could assemble, disassemble, clean, and store my tools.  I found it on Craigslist for $75 and I'm extremely pleased with it.  The guy selling it was in the process of moving his mom out of her house and into a retirement, so I feel extra good because I did a good deed helping him out.  Apparently, it was built by his dad who was a woodworker.  I remember when we had to move my grandmother - it was not a particularly pleasant experience due to the emotions, so I'm glad I could help.

The workbench (cleaning and organizing underway):

As an added bonus, the vise was included - this will come in very handy and I'm glad I didn't have to shell out another $50-100 to get a new one.  Plus, the top drawer was FULL of fasteners.  It took me nearly an hour to clean it out.

Drawer:

I also stopped and picked up a few tools I've been needing.  I got a digital caliper (I have a real nice analog german one, but I figured digital is just easier to deal with), a valve spring puller, and an impact wrench.  The valve spring puller is essentially a giant screw clamp that compresses valve springs so you can pull them out in one piece without mucking up engine internals.  I was a little confused as the instructions said you have to use some air attachments but apparently that's for situation where you're not pulling the top end off first.  The air basically prevents the pistons from falling into the engine.

So once I got everything cleaned and organized, I figured I'd take the first step and pull the oil pan on the motorcycle to get a look at what I was dealing with.  Man am I not pleased.  First of all, the thing was missing a bolt that holds on the oil pan.  That's right - you see the 10 holes?  Only 9 of them had bolts.  One was open.  On top of that it looks like either make-a-gasket or paint is on the part where the one bolt was missing.  I'm assuming gasket material since there was no bolt.

Oil Pan as removed:

I got started cleaning it up, and there was all sorts of gunk in there.  It looks like there's a gasket that's been shredded?  Either that or maybe this is part of a ring and that's what's caused my compression problem?  I don't know but clearly I have some detective work to do.  Maybe this is remnants of that gasket material?  I'll probably also go ahead and buy a new oil pan gasket.

Gunk I pulled from the oil pan:

So once I got started pulling that gunk out of the pan, it took me a while.  A combination of some large tweezers I have, several rags, q-tips, engine degreaser and brake cleaner got it looking pretty good, if I do say so myself.  If you enlarge the image, you can see at the top left where there's still some remnant gasket material.  Yup that was the open hole.

A much cleaner oil pan:

The other issue is that there's a good amount of gunk on the oil pump screen.  Any advice on how to get that gunk off the screen without damaging it?

Gunk on screen:

Another problem I noticed is that there's some rust inside on the gears.  Not sure how big of a deal this is - though my gut tells me rust is BAD.  What do you all think?

Screen gunk and rusty gear (bottom right):

Not sure what this part is but you can clearly see the rust:

Well, more to come.  I was hoping to get the top end off and start disassembly today, but that may have to wait.

***Edit***
I managed to get the screen cleaned up with a combination of a very soft bristle brush and a rag.  I think it's looking much better now.  That's not rust (I don't think so anyways) I think it's just a remnant of the photo.

Cleaned screen:
« Last Edit: February 13, 2010, 05:42:21 PM by ewendkos »
Follow my '75 CB550 K1 build thread http://forums.sohc4.net/index.php?topic=64582.0

Offline elquenada

  • Hot Shot
  • ***
  • Posts: 275
Re: '75 CB550 K1 revisited
« Reply #5 on: February 13, 2010, 04:01:48 PM »
dont worry about the "rusty gear" thats just your kick start assembly and they just look like that.  I had the same thought when I broken open my 75 550 a few months ago and when I ran it by the forum gurus I realized it was no big deal.  also, I bought a second engine for parts and it looked exactly the same.  it must be made of a strange alloy which makes it discolor oer time.
 ps if you need any bottom end parts let me know cause I have lots of extra stuff.
1975 CB 550

"A veces lo que es contra lo justo
por la misma razón deleita el gusto" 
Lope de Vega

Offline ewendkos

  • Full Member
  • *
  • Posts: 51
Re: '75 CB550 K1 revisited
« Reply #6 on: February 13, 2010, 10:08:23 PM »
Thanks for that elquenada - very helpful.

In the meantime, while I wait for the experts to weigh in, I figured I'd do some cleanup of the frame so we could get a closer look at those welds.

I think I got a bit of good news.

2 things - I hit one of the forks with my trusty TAL stripper and it appears that all the crud was paint.  There's minimal surface rust and a few scratches, but I should be able to buff those out and get these forks looking good.


For the second bit of good news, it appears that the PO left the rear shock mounts on the frame.  I never looked closely before, but I assumed that he must have ground them off - I think these are them, aren't they?


At any rate, here's the rest of the pics of the welds with the paint removed... What do you think?  Considering that I'd like to do a modified brat style bike, is this frame salvageable?

Welds at the top near the old seat

Welds at the rear

More rear welds

Front welds

More front welds

Still more of the front

And if I haven't said it yet, THANKS!  Your help has been invaluable.
Follow my '75 CB550 K1 build thread http://forums.sohc4.net/index.php?topic=64582.0

Offline KB02

  • Take it easy there, Sonny, I'm an
  • Old Timer
  • ******
  • Posts: 3,760
Re: '75 CB550 K1 revisited
« Reply #7 on: February 14, 2010, 06:23:02 AM »
Those last two welds look a bit scary, but nothing that a god welder couldn't fix/give their own opinion on.
1978 CB750K Project
2000 Ducati ST2
...and a pedal bike

Join the AMA today!!

My project thread Part I: K8 Project "Parts Bike"
My project thread Part II: Finishing (yeah, right) touches on Project "Parts Bike"

traveler

  • Guest
Re: '75 CB550 K1 revisited
« Reply #8 on: February 14, 2010, 09:16:42 AM »
the frame welds make me nervous....when welding on a hardtail, it is damn important that the guy use "slugs" to make tubing together.  The slug is a piece of pipe that is smaller and can be tapped with ahammer into the cut piece of frame pipe.  It is basically a sleeve, and when you weld the frame, the weld seeps into the slug making the welded section STRONGER than the rest of the frame....it is the safe and smart way to so that.

Better have a welder look over this frame, IMHO.

On the compression....could be as simple as a valvejob and seals, or could be rings are shot.....better plan on a rebuild.

~Joe

Offline ewendkos

  • Full Member
  • *
  • Posts: 51
Re: '75 CB550 K1 revisited
« Reply #9 on: February 14, 2010, 10:05:22 PM »
Those last two welds look a bit scary, but nothing that a god welder couldn't fix/give their own opinion on.

Any idea where I might be able to find a GOD welder?  ;)
Follow my '75 CB550 K1 build thread http://forums.sohc4.net/index.php?topic=64582.0

Offline KB02

  • Take it easy there, Sonny, I'm an
  • Old Timer
  • ******
  • Posts: 3,760
Re: '75 CB550 K1 revisited
« Reply #10 on: February 15, 2010, 04:30:20 AM »
Those last two welds look a bit scary, but nothing that a god welder couldn't fix/give their own opinion on.

Any idea where I might be able to find a GOD welder?  ;)

 ;D ;D  Oops...  ;D ;D
1978 CB750K Project
2000 Ducati ST2
...and a pedal bike

Join the AMA today!!

My project thread Part I: K8 Project "Parts Bike"
My project thread Part II: Finishing (yeah, right) touches on Project "Parts Bike"

Offline crazypj

  • I'm brill, me
  • Old Timer
  • ******
  • Posts: 4,467
  • first 100,000 miles. 1977 CB550F
Re: '75 CB550 K1 revisited
« Reply #11 on: February 15, 2010, 12:41:54 PM »
Just cut the crappy welds off and put a subframe back on.
 You can grind off at swingarm end then fit new bushings
You will need a couple of inserts to tie front and back together or, you could weld lower on front part of frame then gusset to get a lower seat height.

PJ
I fake being smart pretty good
'you can take my word for it or argue until you find out I'm right'

Offline ewendkos

  • Full Member
  • *
  • Posts: 51
Re: '75 CB550 K1 revisited
« Reply #12 on: February 15, 2010, 05:05:33 PM »
PJ, can you help me understand what you mean by the gusset bit?  Since I'm a noob and not a welder, I'd be curious to see your vision since it sounds kinda like what I want to do...
Follow my '75 CB550 K1 build thread http://forums.sohc4.net/index.php?topic=64582.0

Offline crazypj

  • I'm brill, me
  • Old Timer
  • ******
  • Posts: 4,467
  • first 100,000 miles. 1977 CB550F
Re: '75 CB550 K1 revisited
« Reply #13 on: February 16, 2010, 08:05:32 PM »
Heres  a very quick idea.
 Cut out the bit arrowed and weld in some tubes.
 Gussets are just reinforcements where tubes join, has same effect as using shorter tubes if done correctly

Spent a tiny bit more time, this would have top tubes welded on lower to seat tubes and use shorter shock. Not too good at using keypad on laptop  ;D


PJ
« Last Edit: February 16, 2010, 08:32:54 PM by crazypj »
I fake being smart pretty good
'you can take my word for it or argue until you find out I'm right'

Offline ewendkos

  • Full Member
  • *
  • Posts: 51
Re: '75 CB550 K1 revisited
« Reply #14 on: February 17, 2010, 07:24:58 AM »
Awesome PJ that helps.  So I see 3 spots for gussets for a total of 6.  You're also suggesting putting the shock mount at the very end of the top of that new section.  Hopefully whoever I end up going to to weld it up will be able to work over measurements on it as well.  Stay tuned, more to come!
Follow my '75 CB550 K1 build thread http://forums.sohc4.net/index.php?topic=64582.0

Offline JP

  • Enthusiast
  • **
  • Posts: 105
Re: '75 CB550 K1 revisited
« Reply #15 on: February 18, 2010, 05:45:26 AM »
Ewen,
 I do weld and I could weld small things for you, but I don't think my employer would like the idea of me bringing in an entire frame.  Kinda hard to sneak past suspicious eyes while basically carrying a motorcycle into the plant!  I don't have a welder at home, so looks like you'll need to take it to a shop for that one.  But small stuff, sure.  Just let me know if I can help.

JP
Rockers Unite!  I want to start a Ton Up/Rockers bike club around the Atlanta area, who's with me?  Send me a message.

Offline ewendkos

  • Full Member
  • *
  • Posts: 51
Re: '75 CB550 K1 revisited
« Reply #16 on: February 28, 2010, 08:35:18 PM »
I finally had some time to get at the top end this weekend.  I'm partly documenting this for anyone else who may be doing the same thing, but mostly so I'll have a record for when I put it back together.  I followed the instructions contained in the shop manual.

First thing is loosen the 6 bolts holding down the breather cover (mine was already off for cleaning). 

Next, remove tappet hole caps, 12 screws, and 6 bolts holding down the cylinder head cover.

View of the cylinder head block with the cylinder head cover off:


That cylinder head cover contains the rockers.  There is an intake and exhaust rocker.  These are the pieces that the camshaft moves and the opposite side is the tappets that govern how much movement play there is for these rockers.  I will be doing a thorough examination of the rocker arms, but initially I'm seeing wear that I would expect.

Hopefully y'all will let me know if you see anything unusual.

Rocker arms for cylinder 1:
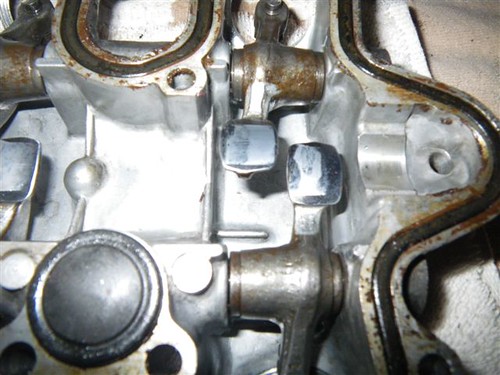
Rocker arms for cylinder 2:

Rocker arms for cylinder 3:
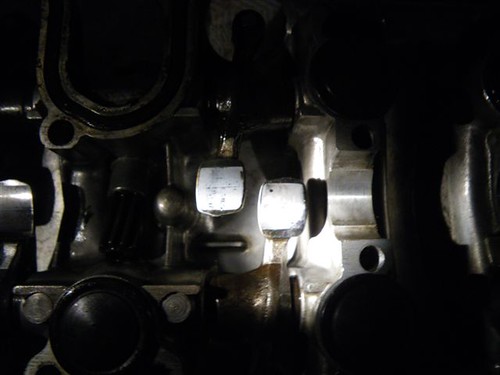
Rocker arms for cylinder 4:
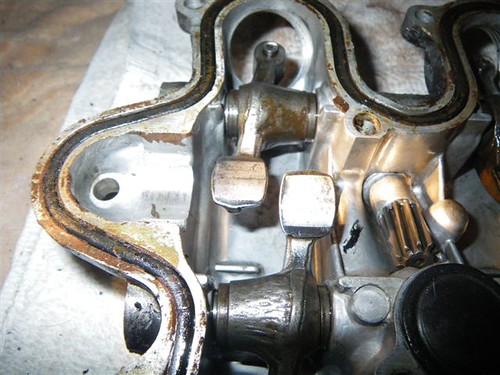
Next, there's a good bit of wrangling to get at the cylinder block.  First, loosen the camchain tensioner lock nut and turn the camchain tensioner screw clockwise.  There's a bit of resistance there, so push clockwise and you'll feel a bit of give.  It helps if you have the cylinder head cover off so you can feel the cam chain getting loose as you turn with your opposite hand.  On my engine, there was about 45 degrees of turn before it was as loose as can go. 

The previous owner (PO) must have done some significant hacking on the camchain tensioner screw - it's not in great shape.

camchain tensioner screw:

After you've taken tension off the cam chain, tighten down the locknut to keep the tension off, then remove the two cam sprocket mounting bolts.

cam sprocket mounting bolts (side of cylinders 1 & 2):
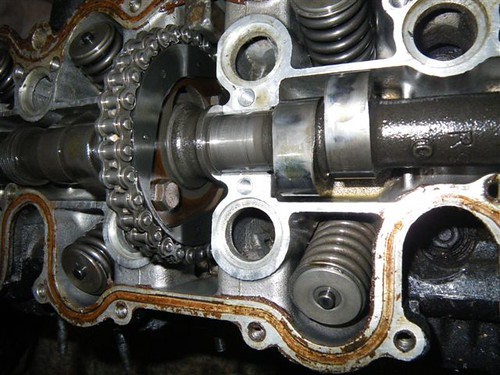
cam sprocket mounting bolts (side of cyliinders 3 & 4):
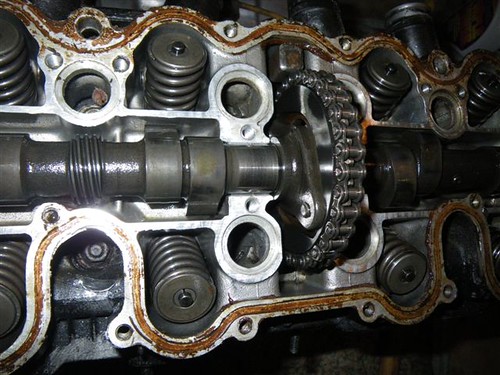
Next is where it gets interesting.  After you remove those bolts (bag and label them for reassembly), you basically just separate the sprocket from the camshaft.  It just sits on there a little off kilter.  Then you pull the chain from the sprocket.  Then you pull the sprocket of the camshaft.  Finally, keeping a grip on the cam chain, you pull the camshaft out from the chain.  Be careful not to drop the chain since it's a bit of a pain to get it back out.

Bolts out and sprocket separated:
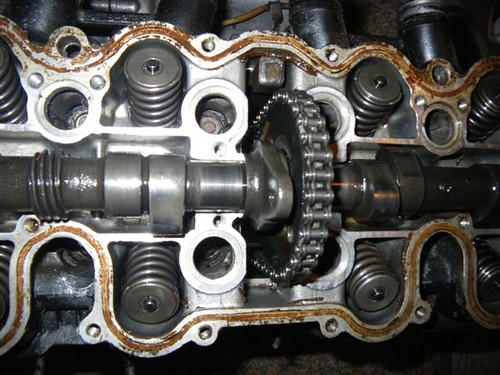
Cam chain off the sprocket:
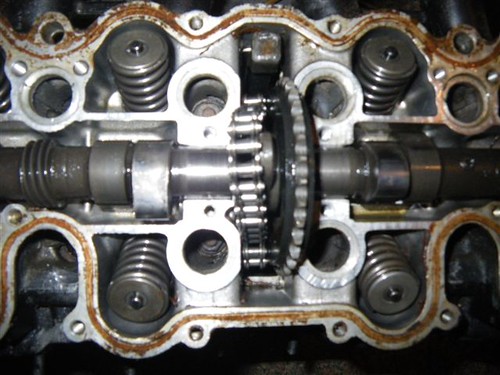
Now that the camshaft and sprocket are removed, you can use a screwdriver to loop through the cam chain to keep it from falling into the engine while you perform the next steps.

First, loosen the cam tensioner mounting bolt.  I took it out entirely.  Again bag and label.  Next, unscrew the 12 cylinder head mounting nuts and the two flange bolts.  There is a specific order to this since the nuts are torqued.  It basically goes in x's starting at the inside - top left (center), bottom right (center), Bottom left (center), top right (center), then the next group.  Loosen the two flange bolts last.  Make sure that you keep track of which of those flange bolts goes where - I market my bag with instructions.

Now that you have everything all loosened, you'll need to carefully pry up the cylinder head block and remove it in order to remove the cam chain guide and cam chain tensioner.

Cylinder head block off:
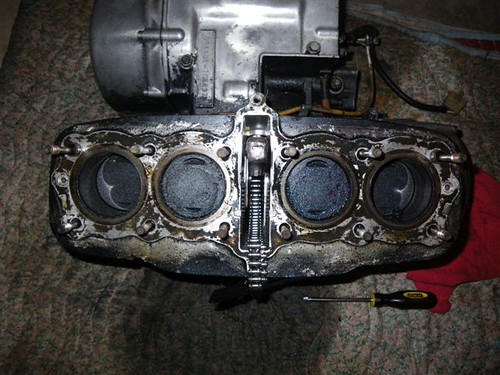
Now that you have the cylinder head block off, it's pretty easy to pull the cam chain guide.  Just pull up and turn 90 degrees.

In order to get the cam chain tensioner out, you need to carefully pry up the cylinder block and then squeeze the spring a bit.  It should wiggle out without much fuss now.

Finally, pull the cylinder block off.  It should be loose enough now that you're broken the seal.  Just carefully pull it off level - again, don't lose that cam chain.

View of the bottom end with the cylinder block off (pistons still atached):
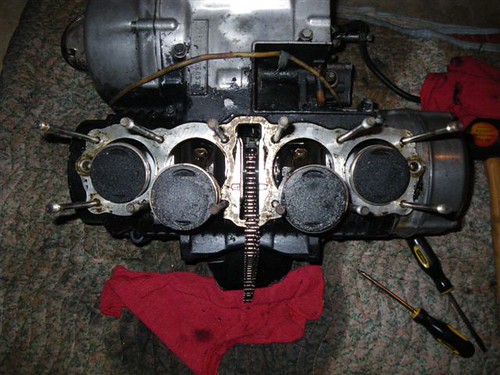
I'll pull the pistons off tomorrow.  There are essentially some circular piston clips in the bearings that require a pretty small set of needle-nose pliers.  Mine weren't small enough so I'll need to pick some up tomorrow.

Here are some assorted pictures of parts.

Disassembled top end except for pistons:

Head gasket:

Cam tensioner, Cam chain guide, cam sprocket:
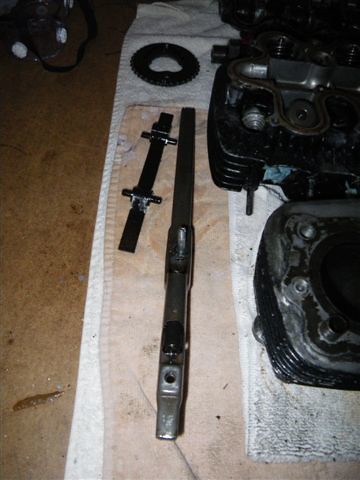
Finally, a question:

I found a small o-ring inside of cylinder no. 1 when I pulled everything apart.  It's in good shape, so I'm assuming it fell off of something during disassembly rather than it having been in there for some time.  Any idea where it came from?  **Edit*** I think I figured it out reading the shop manual again - looks like it might be one of the upper crankcase o-rings (that go along with the dowel pins).

O-ring in cylinder:

O-ring removed close-up:

This is the most small engine work I've ever done - I gotta say I'm really glad I decided to stick with it and keep going.  Clearly there is going to be a TON of cleanup necessary here, but elbow-grease is something I have plenty of. 
« Last Edit: February 28, 2010, 09:38:43 PM by ewendkos »
Follow my '75 CB550 K1 build thread http://forums.sohc4.net/index.php?topic=64582.0

Offline ewendkos

  • Full Member
  • *
  • Posts: 51
Re: '75 CB550 K1 revisited
« Reply #17 on: March 07, 2010, 04:31:52 PM »
I finally had a chance to sit and get the pistons off.  I haven't gone over the rings yet, but I'm assuming that I'll probably need new ones.

I also got started on cleaning the cylinder block.  It is quite a chore.  Tried a drill-mounted paint stripper and that only got to the outsides.  Tried a buffing wheel and there wasn't enough abrasives.  Went back to my trusty TAL stripper - that stuff is amazing!  Still, there's much more work to be done.

I gave a closer look to the cylinders since I hadn't had a chance prior.  Cylinder no. 2 looks like it's got some pretty serious surface rust at the bottom end.  Guess I'll have to bring them in and have some work done.

The other cylinders have a spot of rust here and there, but nothing like no. 2 - given I haven't taken a close look at the rings yet - but maybe this is part of the reason I had no compression on no. 2?

There's a pretty good shot of no. 2

No. 2 closeup

And the block before I started cleaning it:
Follow my '75 CB550 K1 build thread http://forums.sohc4.net/index.php?topic=64582.0