Author Topic: '75 CB550F restoration: Project Lolita  (Read 53849 times)

0 Members and 3 Guests are viewing this topic.

Offline TyMatthews

  • Enthusiast
  • **
  • Posts: 103
Re: '75 CB550F restoration: The Eviscerator
« Reply #75 on: April 14, 2010, 09:56:42 PM »
How much for the seat cover?

I don't know how much used ones are worth, so PM me with an offer and she's yours.  I bought the new black one for $85 off EBay, but I can't find any used ones to judge a value.

traveler

  • Guest
Re: '75 CB550F restoration: The Eviscerator
« Reply #76 on: April 15, 2010, 06:58:31 AM »
I see your point....but if the blinkers are small....then what is the use?  For legal reasons, I can see, but a tiny light is not very effective, IMHO.

~Joe

Offline Zaipai

  • I am getting closer to being an
  • Old Timer
  • ******
  • Posts: 3,400
    • My Home page
Re: '75 CB550F restoration: The Eviscerator
« Reply #77 on: April 15, 2010, 05:56:33 PM »
I see your point....but if the blinkers are small....then what is the use?  For legal reasons, I can see, but a tiny light is not very effective, IMHO.

~Joe

I don't get it either, however the others on the road respond to them no matter the size.. I can't speak for other area's but around here.. You got to have some thing that lights up, or you take your chances...

.: Scott :.
Its my Avatar..

75 CB550F  | 


Offline TyMatthews

  • Enthusiast
  • **
  • Posts: 103
Re: '75 CB550F restoration: Project Lolita
« Reply #78 on: April 18, 2010, 11:42:50 PM »
Day 22 update:

I spent most of the last few days working on the aluminum covers.  In particular, the crankcase cover, the rear brake housing, and the stator cover.  Started out with 400 wet sandpaper and a truckload of elbow grease, but it quickly became apparent that it was going to take forever to get the crud and oxidation off.  So I switched down to 220 grit, which was the coarsest wet paper I could find.  That seemed to be sufficient for at least getting somewhere.  Getting into the tiny crevices, particularly on the crankcase cover and brake housing, proved especially brutal.  Suffice it to say every muscle in my hands and forearms is sore and tired.  And this is the only the first, rough pass!  All I have utilized to this point is the sandpaper and water, powered by human energy.

Enough with the explanation, time for some pics.  Note this is at 220 grit; additional passes at successively higher grits will be forthcoming.  Even these aren't quite as brushed down as I'd like... the brake housing and stator cover still need quite a bit of work to fully remove all the crap.  I'm just too damn sore to do any more at the present moment.  Maybe in a couple days I'll resurrect my strength and continue on.

Here's how they started:


and the current shots:


I met up with Josh (aka GreasyJ) today and we played around with his "washing machine" blasting cabinet by working on a crankcase cover he had.  The aluminum oxide media really went to town on the surface; however, after wet sanding with 600 or 1000 paper it still had a number of pits visible.  His cabinet is freaking awesome, and he offered to let me use it for some of the parts I need.  After seeing it tear through the cover, I was hesitant to start using it on the remaining bits of my already-polished parts.  So the first things I'll use it on are the 'hidden" metal support brackets, like the electrical panel, the seat hinge support, etc.  Just minor things that need to get blasted and painted.  Then I'll hit up the fender, gas tank, etc.  His cabinet is pretty damn big; can't fit a frame in there, but just about everything else.

[EDIT]

I've also re-christened this as "Project Lolita", as some of my colleagues at school suggested I've been spending WAY too much time with her.  And since I've been doting on her hand and foot, "Eviscerator" didn't really fit the bill anymore.
« Last Edit: April 18, 2010, 11:48:10 PM by TyMatthews »

Zpack

  • Guest
Re: '75 CB550F restoration: Project Lolita
« Reply #79 on: April 19, 2010, 12:35:15 AM »
   I can already tell this is going to look great when it's done, good work!

traveler

  • Guest
Re: '75 CB550F restoration: Project Lolita
« Reply #80 on: April 19, 2010, 04:43:21 AM »
I've ended up with the same surface you now have by using 100 grit, then 150 grit and 220 grit sandpaper.  Got there alot quicker.  as you step it out, you change the direction you are sanding which eats away the scratches the coarser grit made....You CAN start with coarser grit paper and step it out.  starting with 220 just means you will be there scrubbing for weeks, instead of 1.5 hours at the max.  Only difference is you want full polish, I want matte finish, which means buffing wheel and rouge versus fine steel wool and a buff with a white texture (fine) scrubbing pad and WD-40.

Just my .02.

Again, I did mine....it went FAST.

~Joe

Offline Zaipai

  • I am getting closer to being an
  • Old Timer
  • ******
  • Posts: 3,400
    • My Home page
Re: '75 CB550F restoration: Project Lolita
« Reply #81 on: April 19, 2010, 05:38:36 AM »
Yes I agree with traveler, you don't need wet sandpaper for the first pass just pick up some 100 grit from the local hardware store.. It will help. Personally I am liking how they look, they will be VERY polished once you finish. As sore as you are its well worth it I think.. Some thing I will probably do to mine next winter..

Enjoy!

.: Scott :.
Its my Avatar..

75 CB550F  | 


Offline TyMatthews

  • Enthusiast
  • **
  • Posts: 103
Re: '75 CB550F restoration: Project Lolita
« Reply #82 on: April 19, 2010, 09:55:23 AM »
Yeah, I chose wet sanding because I didn't want to be inhaling all the aluminum oxide dust.  But seeing how it's taking a long time to get at the crevices, I think I'll just start with a low-grit dry and only go back to wet after the main crud has been removed.  Shouldn't take long, since the flat surfaces are pretty damn clean now.

Can't wait to be at the final buffing parts so I can start using some machines to polish!

Offline TyMatthews

  • Enthusiast
  • **
  • Posts: 103
Re: '75 CB550F restoration: Project Lolita
« Reply #83 on: April 20, 2010, 12:35:35 AM »
Day 23 update:

Some new parts arrived today (yay!)  I always love coming home to find boxes of goodies at the door:


I'm loving the new shocks; they look really spiffy and seem pretty damn nice quality.  I'm going to paint the housing to match the frame, however.  Only the springs will remain black.  I found a place in Oakland, less than 10 miles from me, that offers stripping and electroplating services.  They do chrome, nickel, silver, copper, & zinc (maybe others?)  I'm going to take my tach and speedo cover, headlight rim, seat strap mounting hardware, and a bunch of engine mounting bolts over to them and see what they estimate it will take to redo.  Guy seemed nice over the phone, and he said they prefer to work on small projects.  The tach/speedo covers and the headlight rim will go back to chrome.  The seat strap hardware and engine mount bolts I'm thinking of satin nickel; something to prevent corrosion of the raw steel, but without the large grain size and bluish tint you get with zinc.

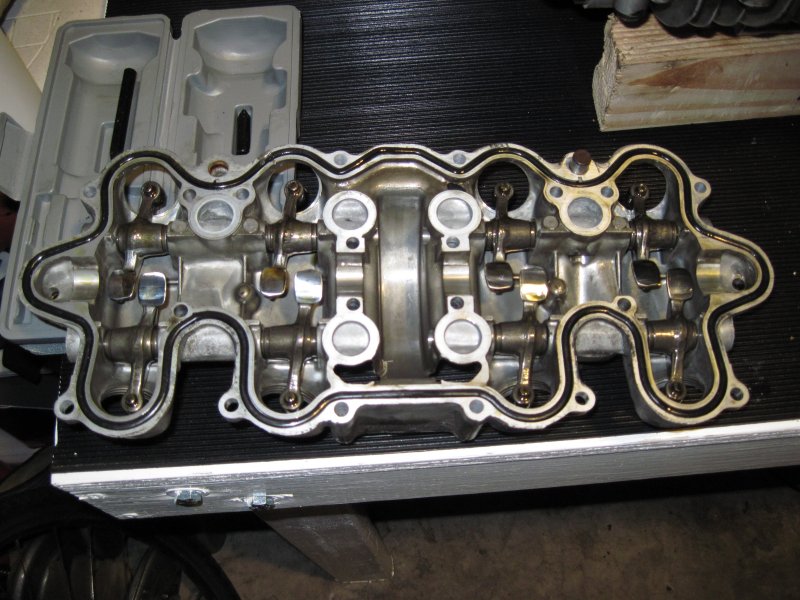
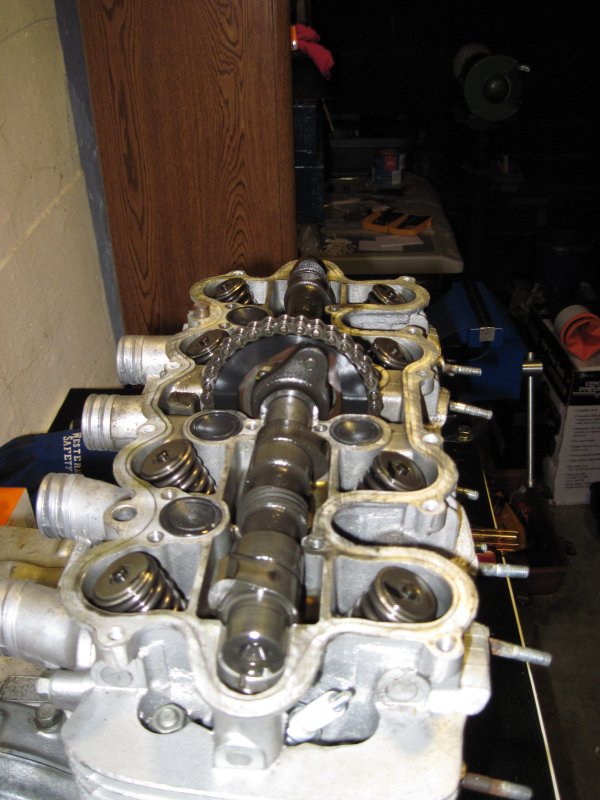
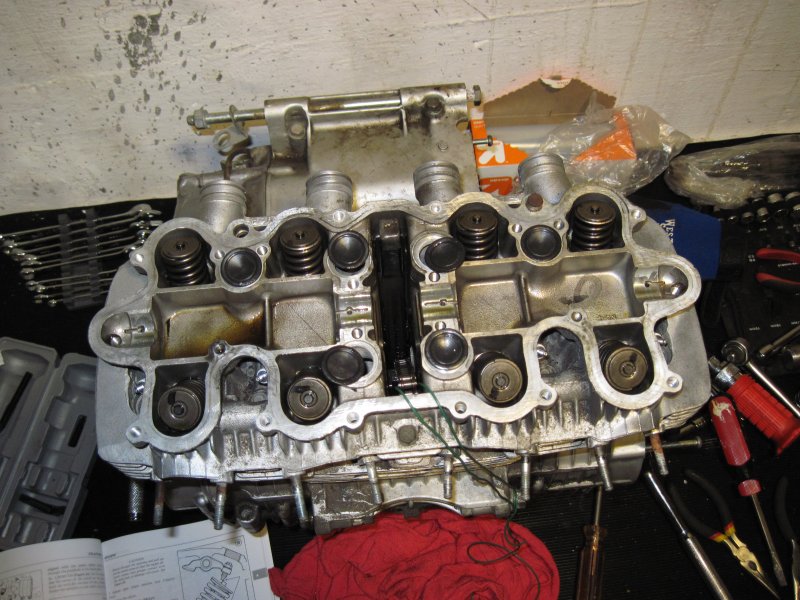
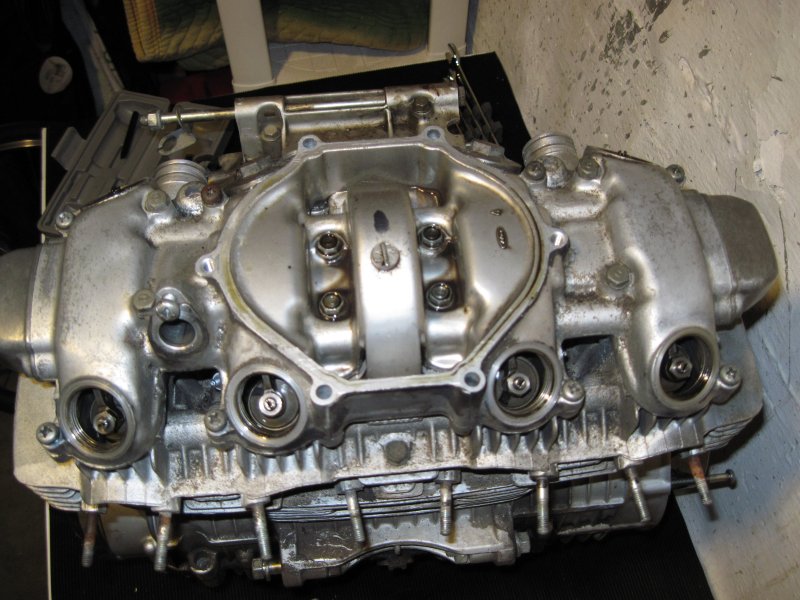
Work on the engine was on call for this evening.  I removed the valve cover, tappets, cam, and cam chain sprocket.  Went surprisingly easy, after wedging the cover off.  Had to bust out the impact driver, of course (this tool is simply INDISPENSIBLE).  Had to stop when I realized I didn't have a deep socket for the spark plugs and the auto parts store was long ago closed (damnit!!)  I have no idea yet whether the internal engine components are to spec or not, but I bought a micrometer so a more detailed inspection is in order. 

To remove the tappet stems, I just utilized one of the M6 bolts (~5 cm in length) recently removed from the valve cover and screwed it a bit into the stem then pulled it right on out.  For the "deeper" ones closer to the center, I carefully slid my new bolt "tool" through the hole where the other tappet had been, twisted a few times to catch the threads, and then fished the entire assembly through.  Worked really well; it was only the very last stem that gave me any real resistance, and even then it was pretty minor.  Just had to wiggle the tappet around a bit to free it up. 

I'm really enjoying taking the engine apart; this is my first go at doing anything this extensive with an engine, so it's a lot of learning as I read through Clymer's trying to figure out how best to achieve the desired goal.  Of course I'm also taking a thousand pictures and carefully documenting everything I've removed.  We'll see how thrilled I am about the process during re-assembly!

Here are some pics:


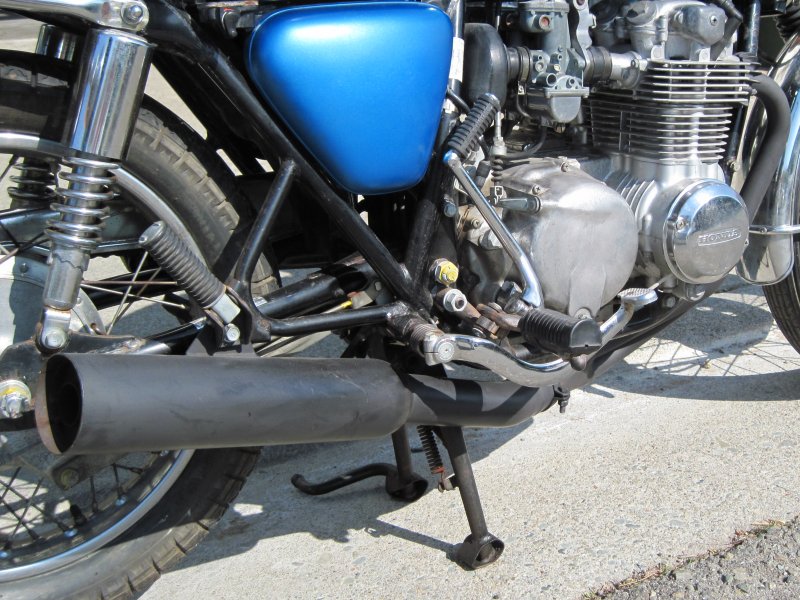
I'm also debating what to do with the exhaust, considering I am going to be getting stuff chromed soon.  I think the current exhaust that the Colgetts (POs) put on is going to work well, as it seems to be in really good shape.  It's dirty, and there's a bit of surface rust on the inner walls near the very tip of the muffler, but it's quite minor.  No holes or anything.  The headers look to be in really great condition.


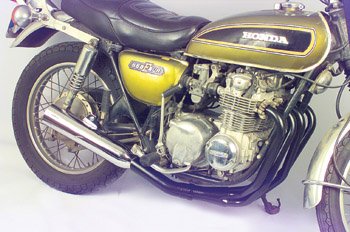
It looks like a Mac exhaust (Tyler, can you confirm?)  They sell 4-into-1 sets that are all-black, all-chrome, or a hybrid with black headers and a chrome tip after the collection point:


I don't care for that look, as the transition doesn't look normal; I want the headers to be black, and the muffler to be chrome, but not the entire section.  I'd rather it emulate the look of a slip-on.  So I pieced together the two different versions from the Mac web site in Photoshop and came up with this:


Might have to add a faux clamp there at the black:chrome interface, just to avoid transition inconsistencies.  What do you guys think?

traveler

  • Guest
Re: '75 CB550F restoration: Project Lolita
« Reply #84 on: April 20, 2010, 05:24:48 AM »
MAC exhaust.  I recognize the yellow CB550 from a MAC ad.

Are you rebuilding the motor?  I thought she only had 3,000 miles on her! :-\

~Joe
« Last Edit: May 02, 2010, 08:26:31 AM by traveler »

Offline Zaipai

  • I am getting closer to being an
  • Old Timer
  • ******
  • Posts: 3,400
    • My Home page
Re: '75 CB550F restoration: Project Lolita
« Reply #85 on: April 20, 2010, 05:40:17 AM »
I think you are on the right track.

I like this exhaust..


That said, if you can make the transition from black to chrome smooth it could look very good.

.: Scott :.
Its my Avatar..

75 CB550F  | 


Offline TyMatthews

  • Enthusiast
  • **
  • Posts: 103
Re: '75 CB550F restoration: Project Lolita
« Reply #86 on: April 20, 2010, 12:27:31 PM »
MAC exhaust.  I recognize the yellow CB550 from a MAC ad.

Are you rebuilding the motor?  I thought she only had 3,000 miels on her! :-\

The ad image above is what I pulled directly from the Mac website, so yes it's definitely Mac.  My question is whether that's what was on the bike when I bought it.  I think I've convinced myself that it pretty much has to be.  What else could it be?

I'm taking apart the engine to inspect, clean, and re-paint, so "rebuild" isn't quite what I'm doing.  The bike sat for a long time, and there were insect cocoons embedded within the crevices of the valve cover (not to mention in just about every other crevice on the bike).  I figured it'd be wise to at least take a look at everything before running it hard again.  I'll probably put more than 3600 miles on it in the first year once she's built!  The engine might not need any modifications at all; however, I'll first inspect the valves and seats and perhaps do the lapping/cutting.  GreasyJ is taking an engine rebuild course down in the city, and they have a really nice setup to do the cutting and lapping.  The course is over in a few weeks, so if I'm going to do it myself I need to get it in before then.  After that, replace piston rings, all new gaskets, etc, but if I can get away with not honing the cylinder walls, all the better.  In the end it may likely just be a disassemble/re-assemble without any changes other than a thorough cleaning and re-paint.  I'm having fun doing it, learning a lot, and what better chance to do so?

I think you are on the right track.

I like this exhaust..

That said, if you can make the transition from black to chrome smooth it could look very good.

Yeah, that's exactly the look I'm going for.  Simple, tidy, and with some contrast.  Choosing the right location for the transition is key.  It looks better IMO when that transition occurs at a natural break in the tubing or where the muffler begins to flare out.  Then it looks like a chrome slip-on instead of something that was partly painted over.  Like if someone painted the front half of the gas tank in one color, then the back half in a second, completely opposite color.  It just doesn't look right if that transition is across an otherwise arbitrary line.

traveler

  • Guest
Re: '75 CB550F restoration: Project Lolita
« Reply #87 on: April 20, 2010, 12:44:56 PM »
Agreed.

When the motor is out is the best time to check everything over.

Freshly lapped valves and a modern head gasket to prevent leakage is a good thing as well.

The rings and bearings should be fine......replacing the chain is ALWAYS a good move.

~Joe

Offline TyMatthews

  • Enthusiast
  • **
  • Posts: 103
Re: '75 CB550F restoration: Project Lolita
« Reply #88 on: April 20, 2010, 01:54:12 PM »
Agreed.

When the motor is out is the best time to check everything over.

Freshly lapped valves and a modern head gasket to prevent leakage is a good thing as well.

The rings and bearings should be fine......replacing the chain is ALWAYS a good move.

You mean the cam chain, right?

Offline Gcolgett

  • Full Member
  • *
  • Posts: 35
Re: '75 CB550F restoration: Project Lolita
« Reply #89 on: April 20, 2010, 02:26:40 PM »
Hy Ty: There is a spark plug wrench in the tool kit that was in the rear of the seat. George Colgett ;D

Offline TyMatthews

  • Enthusiast
  • **
  • Posts: 103
Re: '75 CB550F restoration: Project Lolita
« Reply #90 on: April 20, 2010, 03:51:00 PM »
Hy Ty: There is a spark plug wrench in the tool kit that was in the rear of the seat. George Colgett ;D

Yeah, I realized that just this morning.  DOH!  :: slaps forehead with palm ::  Oh well, it was a good place to end for the day, anyhow.  Gives me a good reason to get back into it this evening.

traveler

  • Guest
Re: '75 CB550F restoration: Project Lolita
« Reply #91 on: April 20, 2010, 04:40:43 PM »
Yes, cam chain.

~Joe

Offline TyMatthews

  • Enthusiast
  • **
  • Posts: 103
Re: '75 CB550F restoration: Project Lolita
« Reply #92 on: April 20, 2010, 10:45:30 PM »
Damnit, I can't seem to get the cylinder head separated from the cylinder block.  I've read a number of posts on here discussing tricks to get it off, but nothing has worked so far.  Tried tapping the entire perimeter with a rubber mallet, and that made no difference.  Yes, all 12 nuts have been fully removed, along with the two 6 mm flange bolts and the cam chain tensioner mounting bolt.  The Honda workshop manual says to simply "remove the head".  Yeah, right.  Not happening.  Clymer's suggests "lifting the head off the block".  Awesome. 

This head has never been removed, and has likely been in this position since it was torqued down in the factory back in 1975.  It will not yield gracefully.  I don't want to jam screwdrivers into the gap where the gasket sits now for fear of gouging the crap out of either part (or both).  What to do?!

Offline kap384@telus.net

  • Hot Shot
  • ***
  • Posts: 552
Re: '75 CB550F restoration: Project Lolita
« Reply #93 on: April 21, 2010, 08:52:33 AM »
Here's a fairly 'gentle' way to get more leverage.  Cut some wooden wedges out of wood, wide enough that they'll be tight in the fin gap between the head and the block.  Have 4 or more so you can tap them in all around the head.  Obviously not prying the the mating surface, just a gently upward push on the fins.  Might work.  That's how mine came off when I didn't want to disturb the cylinder block to case gasket.
1965 Honda CB450K0
1972 Honda CT70K1
1975 Honda MR50
1975 Honda CB400F Supersport
1977 Honda CB750F2 Supersport
1978 Honda XL100
1979 Honda CBX Supersport
1982 Honda VF750S Sabre - Adventure Bike modified
1983 Honda CX650T
1995 Honda VFR750
2016 Honda CRF1000L Africa Twin
2015 KTM 200 XC-W
1963 Suzuki T10
My 1977 CB750F restoration - http://forums.sohc4.net/index.php?topic=66779.0
My 1975 CB400F restoration -
http://forums.sohc4.net/index.php?topic=145196.msg1651779#msg1651779
'More Stock Than Not' thread - http://forums.sohc4.net/index.php?topic=90807.500
My CT70 Resurrection - http://forums.sohc4.net/index.php?topic=145221.0
Best Motorcycle Tool Ever - https://www.engduro.com

Offline Gcolgett

  • Full Member
  • *
  • Posts: 35
Re: '75 CB550F restoration: Project Lolita
« Reply #94 on: April 21, 2010, 10:15:57 AM »
Hi Ty: What we did was to fill all spark plug holes full of grease  and turn the motor over this will force the head off with the plugs put back in. GC And no damage to the fins!

Offline TyMatthews

  • Enthusiast
  • **
  • Posts: 103
Re: '75 CB550F restoration: Project Lolita
« Reply #95 on: April 21, 2010, 10:32:39 AM »
Hi Ty: What we did was to fill all spark plug holes full of grease  and turn the motor over this will force the head off with the plugs put back in. GC And no damage to the fins!

Oh, I like that idea.  Physics at work!

Offline Captainkirk

  • Certified bike nut
  • Enthusiast
  • **
  • Posts: 146
Re: '75 CB550F restoration: Project Lolita
« Reply #96 on: April 21, 2010, 08:25:36 PM »
Try slipping a length of nylon rope in the outboard cylinders and then lever the kickstart by hand. Works like a charm! Be sure to knot the end of the rope so it doesn't slip down inside.
It's easier to ask forgiveness than to gain permission.

traveler

  • Guest
Re: '75 CB550F restoration: Project Lolita
« Reply #97 on: April 21, 2010, 08:32:12 PM »
prybar?

Offline greasy j

  • lanesplitting
  • Expert
  • ****
  • Posts: 853
  • non serviam
    • Dimale Painting & Restoration
Re: '75 CB550F restoration: Project Lolita
« Reply #98 on: April 22, 2010, 09:38:38 PM »
have you tried the grease yet?

and I did the same thing you're talking about w/ my exhaust.

you could chrome the muffler, then paint the part that looks like it should be the header still, after the transition-bend in part. painting chrome is possible, just need to prep it right. or maybe they can just chrome part of it? not sure if you can mask before chroming.

Offline TyMatthews

  • Enthusiast
  • **
  • Posts: 103
Re: '75 CB550F restoration: Project Lolita
« Reply #99 on: April 23, 2010, 12:11:59 AM »
have you tried the grease yet?

and I did the same thing you're talking about w/ my exhaust.

you could chrome the muffler, then paint the part that looks like it should be the header still, after the transition-bend in part. painting chrome is possible, just need to prep it right. or maybe they can just chrome part of it? not sure if you can mask before chroming.

I haven't tried the grease yet... been busy at school working on a final project the last couple nights.  I hope to be able to get to the cylinder head tomorrow, though.  I did get the grease from the hardware store, so it's all ready to try out.

Masking before chroming would be hard for them, I suspect.  It has to withstand numerous caustic solutions and physical manipulation.  It might be easier/cheaper to just get a new already-chromed exhaust and then paint/powdercoat black the necessary parts.  Not sure if Mac sells just the muffler end, in lieu of a full kit.