Author Topic: '75 CB550F restoration: Project Lolita  (Read 53853 times)

0 Members and 4 Guests are viewing this topic.

Offline TyMatthews

  • Enthusiast
  • **
  • Posts: 103
Re: '75 CB550F restoration: Project Lolita
« Reply #125 on: May 03, 2010, 09:51:03 PM »
Wow that is a lot going on for you. I am almost done putting my bike back together and at this point I am itching to get it back on the road, as its the only bike I have and weather has been fantastic. So tearing parts down now to powdercoat (even for almost free) is not a option but I appreciate the offer!..

Yeah, I have two other bikes that I switch back and forth on (mostly the FJR) so I get my riding thrills out that way.  This bike rebuild is a hobby for me, and I want to do it exactly right the first time.  I am very much a perfectionist, and could spend a considerable amount of time perfecting something that likely very few people will ever see or even think about seeing; however, I really just can't help it.  If I see something rough and rusty, even if it's buried deep inside the bike, I can't help but make it right.  I know it's there, even if no one else does.  And that's who I'm building the bike for, right?  As a result, certain things are gonna take a lot of time and effort (all mine, though).  It'll only be when I get really bored with doing something that I finally internally agree to just stop working on it and move on.

Correct me if I am wrong, as I don't know much about powder coating, however the side covers can't be done because they are metal correct? So even if they could take the heat the paint cant stick because no charge can be run thru the plastic...

I assume you meant "they are plastic" and not "they are metal"?  Charge does indeed stick to plastics, in fact it's next impossible to get charge off of them, since they're such good insulators.  They'll hold crazy static electricity (as anyone dealing with those styrofoam peanuts coming out of a plastic bag can attest.)  That actually is the problem with powder coating plastic... the powder coating gun pumps electrons via an extremely high bias potential (kilovolts range) into the aerosolized paint as it flies by.  Thus, you want an efficient mechanism for those electrons to get back to ground, which they very much want to do.  Plastics will just hold and build up the immense charge, which helps to repel other electrons, whereas a metal will give a nice quick conductive path.  That said, the powder coating paint does attach itself to plastic; we had a very "fun" time cleaning off the plastic container that holds the paint once it got covered with overspray.  In fact, it took quite a bit of effort and high-pressure air flow to fully remove it.  The gun itself, which in our case was made of plastic, had some paint remnants from past jobs that simply won't come off.  The instructor was like "yeah, you'll want to buy your own hoses and such if you really care about not mixing up paint."  Good to know!

Can't wait to see the tank when you finish it..

I've got the PPG numbers for the paint I want, so a quick trip to the auto paint supply store and I'll have it to shoot.  There's still quite a bit of prep work to go, like some additional lacquer filler/sanding of those small spots I missed, maybe a light sand of the first primer, and then another lighter primer before any final color gets laid down.  I just hope by the time it gets to shooting the final color I'll be decent enough at it to not get any runs.  Still haven't completely mastered that yet with the primer.  With Greasy's help, though, it should go well!  And then I'll have the satisfaction knowing I saved some $$$ by doing all the work (mostly) by myself.  I mean, who else is willing to put all this time and effort into my tank?  Without costing a small fortune in labor, that is?

Oh, that reminds me... I'd really love to put some kind of Vargas girl decal or painting on the gas cap lid (the flat metal piece that sits atop the recessed section).  I guess the stock lid was black, while the rest of the tank was in sunrise orange.  So before applying the clear coats maybe I can commission someone to either draw one up digitally that I can have printed off as a decal, or have someone paint it on directly by hand.  A little bit of flair for an otherwise ho-hum functional part.

Offline greasy j

  • lanesplitting
  • Expert
  • ****
  • Posts: 853
  • non serviam
    • Dimale Painting & Restoration
Re: '75 CB550F restoration: Project Lolita
« Reply #126 on: May 03, 2010, 10:29:11 PM »
you might want to get a decal made. I can paint girls sometimes, but it's easy to mess up the face. and then she's not pretty. I'm better at lettering and stripes and stuff. and snakes and skulls. :P if you find someone good enough they will charge a lot. I have a friend who's good at that stuff but he's really busy...

if you get a decal we can put it between clear coats. and if you get sick of it, it's a little piece. easy to repaint.

usually I would say screw decals, I'll do it with 1 shot. but girls are hard. :-\

oh and by the way, Bre's sister is an amazing digital artist and she's really good at making pin up girls out of real girls. she did good ones of her and Bre. she could draw something super pro looking and it could be specific to what you want. she does that stuff for a living. and builds hot rods, too.
« Last Edit: May 03, 2010, 10:33:12 PM by greasy j »

Offline RAFster122s

  • I feel like a really really
  • Really Old Timer ...
  • *******
  • Posts: 12,368
  • SOHC4 member # 2605
Re: '75 CB550F restoration: Project Lolita
« Reply #127 on: May 03, 2010, 11:51:04 PM »
If you find artwork you like www.calliegraphics.com  does amazing work and can make you decals or if it is simple, a set of vinyl transfers to apply. Callie, she's a true artist...
She could take the digital work from your pin-up artist friend and make decals for you to apply.

David
David- back in the desert SW!

Offline Zaipai

  • I am getting closer to being an
  • Old Timer
  • ******
  • Posts: 3,400
    • My Home page
Re: '75 CB550F restoration: Project Lolita
« Reply #128 on: May 05, 2010, 02:51:49 PM »
I am very much a perfectionist

Yea, it shows, this is going to be a great build.. It has all the makings..

.: Scott :.
Its my Avatar..

75 CB550F  | 


Offline TyMatthews

  • Enthusiast
  • **
  • Posts: 103
Re: '75 CB550F restoration: Project Lolita
« Reply #129 on: May 06, 2010, 11:54:20 AM »
Quick edit to the previous update post.  Here are some pics of the gas tank after blasting it with Al2O3.  I wasn't able to completely remove every last spec of original paint or primer, as I just couldn't see well enough inside the cabinet, but it's damn near close to 100% raw metal:


Offline Zaipai

  • I am getting closer to being an
  • Old Timer
  • ******
  • Posts: 3,400
    • My Home page
Re: '75 CB550F restoration: Project Lolita
« Reply #130 on: May 06, 2010, 04:56:34 PM »
Very nice. I bet she paint's up really nice!

.: Scott :.
Its my Avatar..

75 CB550F  | 


Offline RAFster122s

  • I feel like a really really
  • Really Old Timer ...
  • *******
  • Posts: 12,368
  • SOHC4 member # 2605
Re: '75 CB550F restoration: Project Lolita
« Reply #131 on: May 07, 2010, 10:55:59 AM »
Hope you didn't leave it out long as freshly sand blasted stuff will start to oxidize very quickly. An oilless compressor works well for drying parts, the oiled compressors work but trapping the oil and water is critical then.

Primer alone won't eliminate rust so, a phosphoric acid wash and then rinse and good drying to get it bone dry is important has been my experience. Working in a 50% humidity environment isn't a good place to be doing paint work in my opinion.

David
David- back in the desert SW!

Offline TyMatthews

  • Enthusiast
  • **
  • Posts: 103
Re: '75 CB550F restoration: Project Lolita
« Reply #132 on: May 07, 2010, 11:43:36 AM »
Hope you didn't leave it out long as freshly sand blasted stuff will start to oxidize very quickly. An oilless compressor works well for drying parts, the oiled compressors work but trapping the oil and water is critical then.

Primer alone won't eliminate rust so, a phosphoric acid wash and then rinse and good drying to get it bone dry is important has been my experience. Working in a 50% humidity environment isn't a good place to be doing paint work in my opinion.

The tank was primed very shortly after these pics were taken.  Had to do some body filling and sanding first, but I found no traces of flash rust upon doing the priming.  Greasy's compressor has a giant dessicator and oil trap, so we felt pretty good about the part being completely dry and dust-free before priming.  Couldn't control the humidity levels inside his paint booth, however.

Offline TyMatthews

  • Enthusiast
  • **
  • Posts: 103
Re: '75 CB550F restoration: Project Lolita
« Reply #133 on: May 08, 2010, 01:46:13 AM »
Day 41 update:

Yesterday my order of silver-colored powdered paint (sample size, 2 oz) came in from Columbia Coatings.  So I headed down to TechShop this evening to sign up for a month of use.  I promptly shot three small strips of aluminum with one color each so I could compare and decide on which one would become the frame color.  I took a picture of the results; however, it's next to impossible to tell the difference from the resulting image so it's of no use to share.  Instead, I'll just point to the images directly from Columbia's website.  I've pretty much decided on the first one.

Silver Metallic Urethane:


This one came out nice, with a decent gloss and not the overdone metal flake look.

Anodized Aluminum:


This was very matte, requiring a clear coat to get any kind of gloss.  It would make an excellent color for the engine, however.  I think the only problem with powder coating the engine is the lack of thermal conductivity in the paint.  That is, they're most often insulators.  Not good for an air-cooled engine to be coated in a blanket.

Wheel Silver:


This one had a glossy sheen; however, it screamed "flat gray" and just didn't do anything for me.

Of course, the colors you see on their website aren't perfect matches to what you get in reality.  Which is why I ordered small bottles to try them out myself.  I also ordered a bottle of Sheen Black TGIC, which was advertised as having 80% gloss.  Decided to hit up the battery box, air duct mount plate, and cable protector plate with it.  Here are the results!

This one is done, as it is completely coated and looks good:
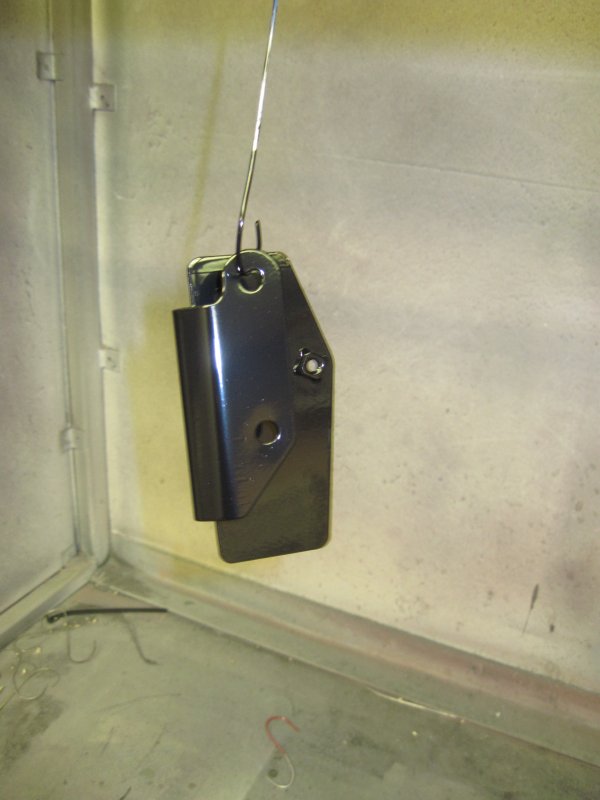

The battery box has a couple small thin areas, and I accidentally brushed the powder with my glove in one spot while transferring it to the oven :(  So I'll be doing a second coat... just couldn't do it tonight as they close at midnight and I ran out of time.
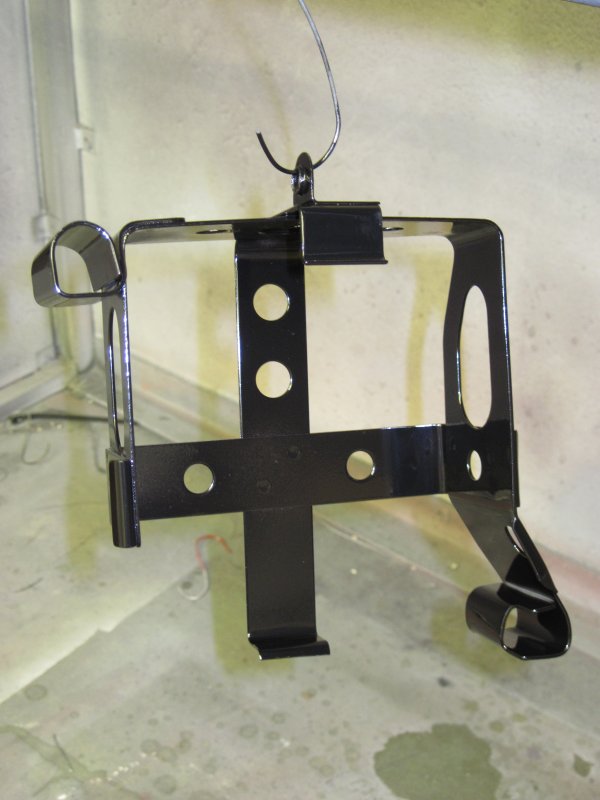

The air duct mount is also basically finished, although I might hit it up again, as the edge perimeter could use a little more coverage:
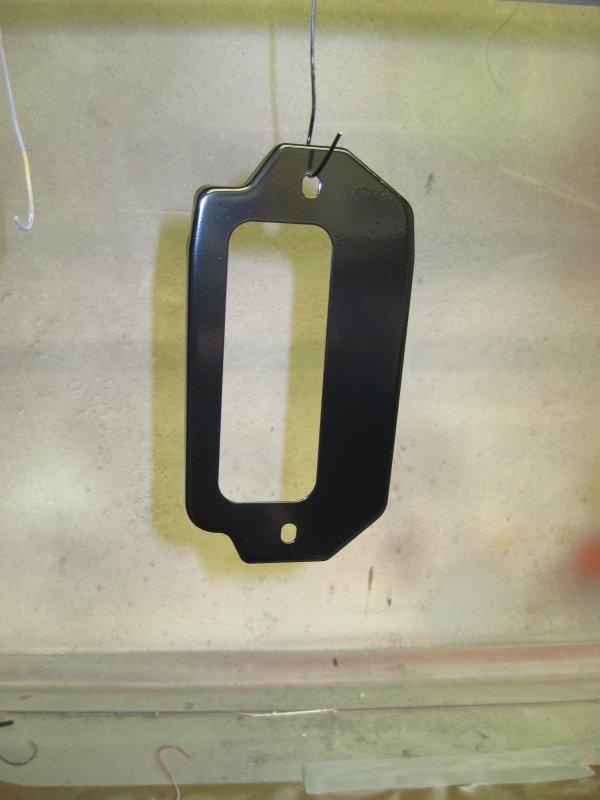

All in all, I'm really pleased with the results.  Practice will make perfect, but it's pretty hard to screw up powder coating too horribly.  The curing temp and duration is specified by the manufacturer and written right on the bottle. The hardest part is getting into the tight crevices; the paint won't always go exactly where you want it to (or think it will go).  Once it finds an outlet for the high potential, it clings there tightly.  This was most noticeable on the battery box.  I think a second coat will get it all, as those thin areas have more metal exposed and thus the paint should stick there preferentially.

I'll close with some pics of the facilities at TechShop:

Powder coating gun:
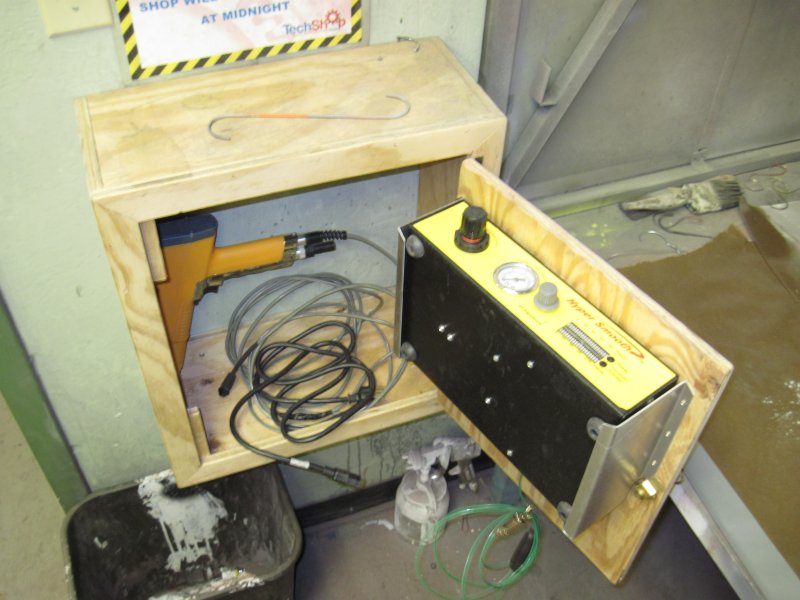

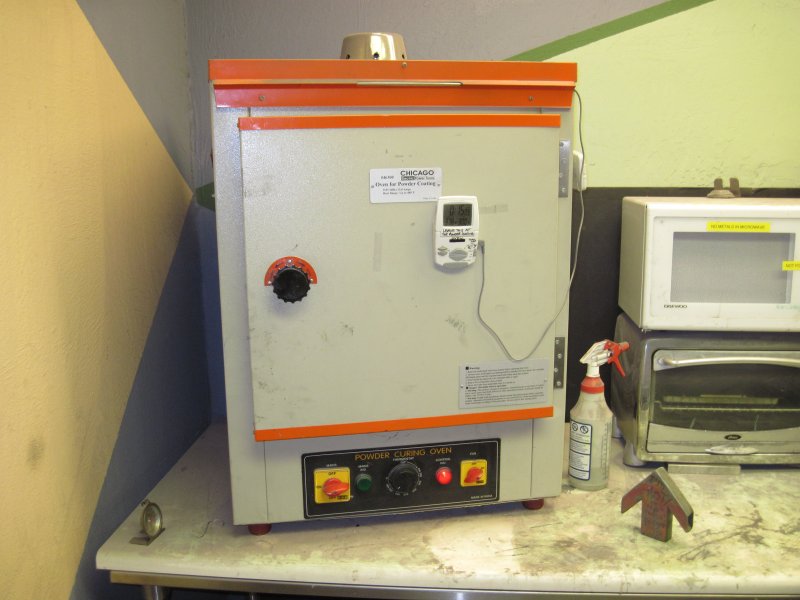
20" x 20" x 20" oven (smells pretty bad):

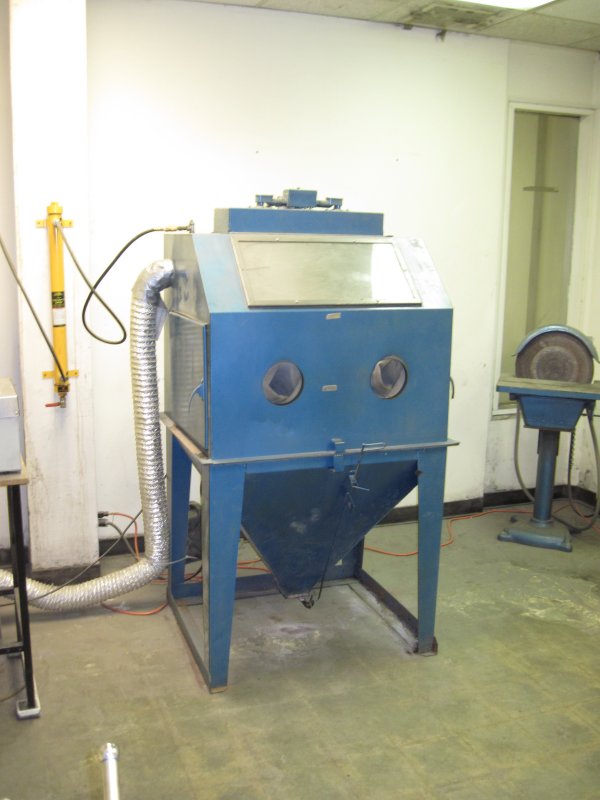
Standard upright sandblasting cabinet:

I also discovered that they have a laser cutting machine.  Which means I can fabricate new gauge face plates out of acrylic in order to replace the stock ones (and not disturb them).  Just have to come up with a drawing to specify the correct dimensions, then let the laser go to town, so to speak.  Make up a couple new decals to lay down on top, and they're done!

Offline Zaipai

  • I am getting closer to being an
  • Old Timer
  • ******
  • Posts: 3,400
    • My Home page
Re: '75 CB550F restoration: Project Lolita
« Reply #134 on: May 08, 2010, 03:32:10 PM »
Man that is nice, I sure would love to be able to do that. Even if its just the small parts..

Good work man..

.: Scott :.
Its my Avatar..

75 CB550F  | 


Offline TyMatthews

  • Enthusiast
  • **
  • Posts: 103
Re: '75 CB550F restoration: Project Lolita
« Reply #135 on: May 09, 2010, 02:43:45 AM »
Man that is nice, I sure would love to be able to do that. Even if its just the small parts..

Good work man..

Thanks!  It's been a lot of fun, too.  Well, I could do without the seemingly endless standing at the sandblasting cabinet, but pulling the part out of the oven after curing the powder and seeing the final results makes it all worthwhile.

Day 42:

Spent 6 more hours down at TechShop doing another batch of parts with the powder coater.  After deciding which color to paint the frame, I used up the remaining amount of powder I had left to do those parts that I wanted to match the frame.  This was just enough to do the foot rests and engine mounting brackets.  After shooting silver for a few hours, I switched to the gloss black again and did the electrical panel and the small spring-like piece that provides tension on the right driver footrest.  I'll start with some pics of the electrical panel first, then a series of before/after shots of the footrests.  Really exhausted right now, so I'm gonna stick to terse text mode and let the pics do the talking.

Electrical panel before:


...after blasting:


...and powder-coated:


Here it is as of right now, after installing the new (modern engineered) R & R units and the corpus callosum, if you will. I haven't wired up the new connector that will replace the three prongs of the old regulator in order to mate properly to the new regulator, but that's coming soon to a solder gun near you:


Now some footrest parts before:


... and after:


Engine mounting brackets and center stand spring lever doo-hickey:


Here's the right footrest, before anything was restored:


... and here it is in all its restored glory.  The only new parts are the two screws holding the rubber in and the cotter pin.  The cast iron parts were blasted and powder-coated, while the pin and washer were chemically-treated and then polished.  I cleaned the rubber with just soap and hot water, scrubbing it down and then giving it a little shine with some isopropyl alcohol:


Had a minor setback today with my choice of paint... more details to follow this week after I figure out what to do about it.  The short of it is the State of California has seen fit to not allow certain paint chemicals to be utilized within its borders.  The Honda Candy Orange that I want just so happens to use one of those chemicals.  So... either I do it illegally, cross the border into Nevada and do it there, or find another color that closely matches and IS allowed to be sprayed here.

Offline RAFster122s

  • I feel like a really really
  • Really Old Timer ...
  • *******
  • Posts: 12,368
  • SOHC4 member # 2605
Re: '75 CB550F restoration: Project Lolita
« Reply #136 on: May 09, 2010, 03:21:49 AM »
Some nice work Ty!
That electrical panel looks nice now  as does the footpegs...

Just remind yourself that the time you invest now will pay off long term if you keep your bike  covered or garaged most of the time the powder coat will have a long life.

Have you had to chase threads with a tap before reassembly after powder coating?

David
David- back in the desert SW!

Offline Stev-o

  • Ain't no
  • Really Old Timer ...
  • *******
  • Posts: 34,324
  • Central Texas
Re: '75 CB550F restoration: Project Lolita
« Reply #137 on: May 09, 2010, 05:38:38 AM »
Great job on the restoration of the small pieces!
'74 "Big Bang" Honda 750K [836].....'76 Honda 550F.....K3 Park Racer!......and a Bomber!............plus plus plus.........

Offline Zaipai

  • I am getting closer to being an
  • Old Timer
  • ******
  • Posts: 3,400
    • My Home page
Re: '75 CB550F restoration: Project Lolita
« Reply #138 on: May 09, 2010, 07:24:05 AM »
Wow, that is awesome.. That electrical panel looks brand new.. dang.. Love the silver..

.: Scott :.
Its my Avatar..

75 CB550F  | 


traveler

  • Guest
Re: '75 CB550F restoration: Project Lolita
« Reply #139 on: May 09, 2010, 08:17:38 AM »
Easy for me to say Ty.....but I would paint it the way you want it, and let King Arnold find out about it, if he may.

~Joe

Offline TyMatthews

  • Enthusiast
  • **
  • Posts: 103
Re: '75 CB550F restoration: Project Lolita
« Reply #140 on: May 10, 2010, 01:42:20 AM »
Thanks for the positive feedback guys!

Have you had to chase threads with a tap before reassembly after powder coating?

I haven't had to tap anything so far.  That's not to say the screws go in as easily as they did before I coated the parts; I'd say more than half of them are somewhat stiff and require more torque to push through.  That is, I can't finger tighten them past a certain point that's clearly not the same as before.  I just grab my socket driver and push through.  Once I do, however, they're good to go and I can finger tighten all the way again.  I suppose that's sort of a way to re-tap them, just not with an actual tap.

Day 43 update:

Miscellaneous prep items were on task today.  I'm planning on dropping the frame and swingarm off at a local powder coater this week, as soon as my order for more silver metallic powder comes in from Columbia.  I talked to the shop owner directly when I went down there (it's in Hayward), and he's a nice guy.  I asked if I could bring my own powder instead of using what he had in stock, and he didn't hesitate in saying yes.  He even shot me a sample plate of a silver color they did have in stock, although I didn't care for it.  They have a giant, two-man sandblasting cabinet, and a car-sized oven for curing.  They had dozens of commercial jobs lined up and in the works when I walked through, so it looks like they know what they're doing and get a lot done.  I hope I can be persuasive enough that they'll pay attention and not screw up what to mask.  Think I'll take some pictures first showing exactly which points need to be masked off, in case my tape falls off or they drop a plug or two during handling.

Items marked off the ToDo list:

  • Removed all remaining bits of hardware from the frame and thoroughly washed/scrubbed it down with Simple Green and hot water, then let it dry and marked all of the spots to not be powder-coated.  Yes, they will sandblast it first, so you'd think prep would not be necessary, but it is.  You don't want them to sandblast any oil or grease, as that could potentially get embedded deeper into the metal.  Such buried oil could vaporize during curing at high temp, blasting away the paint and ruining the job.  Any little, simple steps I can do to help assure that doesn't happen, I'm willing to do.
  • Cut out the old swingarm bushings using the hacksaw trick... they came out nicely after chopping out a small section.  Washed down just like the frame.  I'd removed the shock bushings a while ago using the vise and socket trick.
  • Separated the lower triple bearing race from the stem.  I'm guessing that the stem cannot be separated from the lower triple fork mount, correct?  They seem to be welded as a single piece.  I'll powder coat the lower part myself, after masking off the stem.
  • Split apart the seat lock mechanism with an impact driver (why on Earth was that so difficult to do?) to prep for powder-coating.
  • Cut off the old female connectors from the electrical panel wire harness and soldered/heat shrunk up new connectors to insert into the three-pronged adapter for the replacement regulator (see below).

Old connector/ugliness:

(this is an old image, re-using here for posterity sake... I know what that green lead is now :) )

... and newer/better:

Offline Stev-o

  • Ain't no
  • Really Old Timer ...
  • *******
  • Posts: 34,324
  • Central Texas
Re: '75 CB550F restoration: Project Lolita
« Reply #141 on: May 10, 2010, 05:09:18 AM »
Nice! Looking forward to seeing your "new" frame.
'74 "Big Bang" Honda 750K [836].....'76 Honda 550F.....K3 Park Racer!......and a Bomber!............plus plus plus.........

Offline greasy j

  • lanesplitting
  • Expert
  • ****
  • Posts: 853
  • non serviam
    • Dimale Painting & Restoration
Re: '75 CB550F restoration: Project Lolita
« Reply #142 on: May 10, 2010, 02:08:16 PM »
Hope you didn't leave it out long as freshly sand blasted stuff will start to oxidize very quickly. An oilless compressor works well for drying parts, the oiled compressors work but trapping the oil and water is critical then.

Primer alone won't eliminate rust so, a phosphoric acid wash and then rinse and good drying to get it bone dry is important has been my experience. Working in a 50% humidity environment isn't a good place to be doing paint work in my opinion.

The tank was primed very shortly after these pics were taken.  Had to do some body filling and sanding first, but I found no traces of flash rust upon doing the priming.  Greasy's compressor has a giant dessicator and oil trap, so we felt pretty good about the part being completely dry and dust-free before priming.  Couldn't control the humidity levels inside his paint booth, however.

humidity isn't much of a prob with this primer, but it is a factor when we spray the waterborne paint. and we can control it in the booth to some degree. I'll show you what I mean when we get into the base coat.

traveler

  • Guest
Re: '75 CB550F restoration: Project Lolita
« Reply #143 on: May 10, 2010, 03:12:31 PM »
Looks great!

Not to be a downer, but have a plan "B" in case they forget to mask....these things happen.....either that or find out when he will spray and be there.

are you going to powder the wheels?

~Joe

Offline RAFster122s

  • I feel like a really really
  • Really Old Timer ...
  • *******
  • Posts: 12,368
  • SOHC4 member # 2605
Re: '75 CB550F restoration: Project Lolita
« Reply #144 on: May 10, 2010, 06:36:09 PM »
Greasy j,
I guess I should have clarified, most of my experience is with traditional paints and not powdercoating. A good primer/sealer should take care of any water issues, no?

Ty,
One concern I have with powder coating is the longevity and the ability to touch up the inevitable nicks that might occur.
I know it is a problem when powdercoating steel wheels as it is tough to touch-up any spots that get nicks.  From what I've understood about powdercoating is you get about 5-7 years max before the gloss has faded and it looks flat and not as nice. Keeping it covered or garaged when not being ridden will extend that time I'm told.

Is powder coating beginning to progress beyond that point?
It is cool you've been able to have access to the shop and greasyj is a friend...always good to apprentice sometimes with other and learn tips and tricks.

I looked at the coatings possible with powder coating and it is getting amazing what you can do if you are willing to spend the time and money on it. Pearls and flake powder coatings? Wow! Who would have thunk?

One nice thing about powdercoated things is you can clean them very easily. A strong stream of water will often rinse them clean.

David
David- back in the desert SW!

Offline TyMatthews

  • Enthusiast
  • **
  • Posts: 103
Re: '75 CB550F restoration: Project Lolita
« Reply #145 on: May 12, 2010, 06:40:06 PM »
Ty,
One concern I have with powder coating is the longevity and the ability to touch up the inevitable nicks that might occur.
I know it is a problem when powdercoating steel wheels as it is tough to touch-up any spots that get nicks.  From what I've understood about powdercoating is you get about 5-7 years max before the gloss has faded and it looks flat and not as nice. Keeping it covered or garaged when not being ridden will extend that time I'm told.

Is powder coating beginning to progress beyond that point?
It is cool you've been able to have access to the shop and greasyj is a friend...always good to apprentice sometimes with other and learn tips and tricks.

I looked at the coatings possible with powder coating and it is getting amazing what you can do if you are willing to spend the time and money on it. Pearls and flake powder coatings? Wow! Who would have thunk?

One nice thing about powdercoated things is you can clean them very easily. A strong stream of water will often rinse them clean.

The longevity of a powder coating job will be extended if you include a clear coat on top, also a powdered layer.  I think the biggest problem with fading over time is the sensitivity to UV light; however, this problem affects a number of paint jobs, and isn't purely a problem with powder coatings.  Since this is my first exposure to painting this way, I suppose only time will tell whether the job lasts or needs to be re-done in the future.  For small nicks, I don't expect it to be entirely impossible to touch them up with something that closely matches.  It might not be perfect, but unless you're looking up close, it might be hard to tell.  The other choice would be to simply submit it for re-coating again, assuming the original powder is still available.  If it's anything but the frame or swingarm, I can just re-do it myself.

The color parts (tank, fenders, side covers) will all be done the traditional way, with waterborne paints... I think I've found an awesome replacement color for that Honda Candy Orange that can't be painted here in CA.  It's called Atomic Orange, and was painted on recent-model Corvettes:


Offline fastbroshi

  • Puppet
  • Old Timer
  • ******
  • Posts: 2,645
Re: '75 CB550F restoration: Project Lolita
« Reply #146 on: May 12, 2010, 07:31:18 PM »
Or how about this?

Just call me Timmaaaaay!!!

Offline Zaipai

  • I am getting closer to being an
  • Old Timer
  • ******
  • Posts: 3,400
    • My Home page
Re: '75 CB550F restoration: Project Lolita
« Reply #147 on: May 12, 2010, 08:23:07 PM »
Or how about this?


That your toy Fastbroshi? Man I would be afraid to drive that for fear that some stray rock would hit the paint..

.: Scott :.
Its my Avatar..

75 CB550F  | 


Offline fastbroshi

  • Puppet
  • Old Timer
  • ******
  • Posts: 2,645
Re: '75 CB550F restoration: Project Lolita
« Reply #148 on: May 12, 2010, 09:07:59 PM »
Nah, those 4th gen F-bodies rattle like crazy, I wouldn't own one.  Now the 5th gen is a different story.
Just call me Timmaaaaay!!!

Offline FunJimmy

  • Who you calling
  • Old Timer
  • ******
  • Posts: 3,802
  • Vancouver
Re: '75 CB550F restoration: Project Lolita
« Reply #149 on: May 14, 2010, 07:08:57 AM »
Great stuff.
You never see a motorcycle parked outside of a psychiatrist's office!

CB550 Cafe Interceptor a Gentlemans Roadster
http://forums.sohc4.net/index.php?topic=27159.0