Author Topic: '75 CB550F restoration: Project Lolita  (Read 53640 times)

0 Members and 8 Guests are viewing this topic.

Offline greasy j

  • lanesplitting
  • Expert
  • ****
  • Posts: 853
  • non serviam
    • Dimale Painting & Restoration
Re: '75 CB550F restoration: Project Lolita
« Reply #175 on: June 08, 2010, 08:53:57 am »
wow, those look awesome. you can straighten that rod back out pretty easy I think.

how much did they charge for all that? I might have to use that place...

Offline TyMatthews

  • Enthusiast
  • **
  • Posts: 103
Re: '75 CB550F restoration: Project Lolita
« Reply #176 on: June 08, 2010, 01:27:44 pm »
That rod for your rear drum isn't bent?

Yea, looks bent to me, however I bet it can be straightened easy enough.. This is going to be a dandy restore, attention to detail is amazing..

wow, those look awesome. you can straighten that rod back out pretty easy I think.

how much did they charge for all that? I might have to use that place...

I'm not sure about that rod.  When I pulled it off the bike it had a similar shape profile to it, and it was working fine.  Maybe it was bent by the PO on purpose at some point?  I definitely didn't bend it taking it off, so I dunno?  Looking at the service manual, it appears that the stock version is supposed to be straight, so I guess I'll straighten it out!

They charged $140 for all of the parts.  They originally quoted $85, but that was a rough estimate based on the handful of items I brought.

Offline greasy j

  • lanesplitting
  • Expert
  • ****
  • Posts: 853
  • non serviam
    • Dimale Painting & Restoration
Re: '75 CB550F restoration: Project Lolita
« Reply #177 on: June 09, 2010, 01:22:18 pm »
cool, thanks.

so, I forgot, was that home plating system a lot more expensive than that? or was there some other reason why it was a bad idea?

Offline TyMatthews

  • Enthusiast
  • **
  • Posts: 103
Re: '75 CB550F restoration: Project Lolita
« Reply #178 on: June 09, 2010, 11:02:58 pm »
cool, thanks.

so, I forgot, was that home plating system a lot more expensive than that? or was there some other reason why it was a bad idea?

I think the home plating was like $165 for a kit.  The reason I chose to go with them was because you can't compare a DIY job with what a professional plater can do.  I tried my hand at plating zinc, and it just didn't turn out so hot.  I got zinc, but it wasn't very shiny, and it wasn't homogeneous.  Plus, they can handle just about any size part, whereas the kit has limits in the size of the container you use.  I wanted my stuff to look really nice, so I let the pros handle it.

Offline greasy j

  • lanesplitting
  • Expert
  • ****
  • Posts: 853
  • non serviam
    • Dimale Painting & Restoration
Re: '75 CB550F restoration: Project Lolita
« Reply #179 on: June 10, 2010, 09:18:05 am »
oh, yeah. I remember you tried it at the lab. ok, I think I'll just use the guys you did. I wonder if they have the black and green plating and all that jazz.

traveler

  • Guest
Re: '75 CB550F restoration: Project Lolita
« Reply #180 on: June 27, 2010, 08:50:18 pm »
Did you give up?  ???

Offline TyMatthews

  • Enthusiast
  • **
  • Posts: 103
Re: '75 CB550F restoration: Project Lolita
« Reply #181 on: June 28, 2010, 02:36:58 am »
Did you give up?  ???

Of course not.  Just been extremely busy lately with research, and haven't had much progress to show here.  I'll update again when I get a substantial amount done.

Offline greasy j

  • lanesplitting
  • Expert
  • ****
  • Posts: 853
  • non serviam
    • Dimale Painting & Restoration
Re: '75 CB550F restoration: Project Lolita
« Reply #182 on: June 28, 2010, 12:29:08 pm »
never surrender!!!

you were making such fast progress before that you set a precedent. your gas tank keeps asking me when he gets to put something on. I think it's cold in just it's primer underwear. :P

Offline TyMatthews

  • Enthusiast
  • **
  • Posts: 103
Re: '75 CB550F restoration: Project Lolita
« Reply #183 on: June 28, 2010, 12:35:43 pm »

never surrender!!!

you were making such fast progress before that you set a precedent. your gas tank keeps asking me when he gets to put something on. I think it's cold in just it's primer underwear. :P

Believe me, there's nothing I'd rather be doing than working on her night and day!  Grad school takes priority, however, and I've been making a lot of progress recently on this one project that I've been working on for more than a year.  I hope to get out a publication within the next couple months, and my advisor is pushing me hard to collect more data.

As for the gas tank, I'm still waiting on the chrome place to finish stripping all my other parts that I'm going to have painted.  They called me to tell me they were finished a couple weeks ago, so I stopped by the place to pick them up, only to find out that they weren't actually done with them after all.  Apparently they got my order mixed up with someone else.  Bastards!

Also still trying to get the god damned primary shaft out.  I think at this point I'm just going to take it to a mechanic and have them pull the #$%*er out.

Offline greasy j

  • lanesplitting
  • Expert
  • ****
  • Posts: 853
  • non serviam
    • Dimale Painting & Restoration
Re: '75 CB550F restoration: Project Lolita
« Reply #184 on: June 28, 2010, 12:46:13 pm »
I was kidding about the tank. no rush at all.

I might've gotten an idea about how to use all of those walnut shells. I'm going to try a mix, with either the alum oxide or maybe soda. hopefully then it won't clog since only a few walnut chunks at a time are coming through. I'm tempted to get a grinder and make the shells finer, also. gonna try to get the chrome off my starter cover that way. see what happens...

traveler

  • Guest
Re: '75 CB550F restoration: Project Lolita
« Reply #185 on: June 29, 2010, 08:21:37 pm »
Hope your thesis goes well, and you can get back to work on the bike soon!

~Joe

Offline Zaipai

  • I am getting closer to being an
  • Old Timer
  • ******
  • Posts: 3,400
    • My Home page
Re: '75 CB550F restoration: Project Lolita
« Reply #186 on: July 01, 2010, 06:50:40 pm »
+1

.: Scott :.
Its my Avatar..

75 CB550F  | 


Offline P_Camps

  • Enthusiast
  • **
  • Posts: 124
Re: '75 CB550F restoration: Project Lolita
« Reply #187 on: September 10, 2010, 09:51:54 pm »
I'm subscribed.... keep at it bro
1978 CB550

Offline RickB

  • Hot Shot
  • ***
  • Posts: 571
    • Pop Magazine
Re: '75 CB550F restoration: Project Lolita
« Reply #188 on: September 11, 2010, 12:01:40 am »
You're making me think I should electroplate everything! Good work mate, keep it up.

Offline Old75_ratafe

  • CB750 Cave Spelunking
  • Expert
  • ****
  • Posts: 801
  • 1975 CB750K
Re: '75 CB550F restoration: Project Lolita
« Reply #189 on: September 12, 2010, 01:02:45 am »
Nah, those 4th gen F-bodies rattle like crazy, I wouldn't own one.  Now the 5th gen is a different story.

The "5th gen" is actually not a F-body its a Zeta platform IE a aussie holden platform not F... Says the guy with a 2nd and 3rd gen F-body ;)
(sorry didn't mean to thread jack)
« Last Edit: September 12, 2010, 01:09:07 am by Old75_ratafe »
1975 CB750K
Project Back in Black

Sent from my Texas Instruments TI99/4A Computer

Offline fastbroshi

  • Puppet
  • Old Timer
  • ******
  • Posts: 2,645
Re: '75 CB550F restoration: Project Lolita
« Reply #190 on: September 12, 2010, 01:24:45 am »
Anyone in the know will  know what car I'm talking about.   At least I won't get any weird looks among afficianados now when I talk about the new one.
Just call me Timmaaaaay!!!

Offline going4speed

  • Enthusiast
  • **
  • Posts: 203
Re: '75 CB550F restoration: Project Lolita
« Reply #191 on: November 18, 2010, 06:32:20 pm »
Did you put gas in the tank yet?

I just had the kbs fail in my tank after a couple of weeks.

Going to try again  :(

Offline TyMatthews

  • Enthusiast
  • **
  • Posts: 103
Re: '75 CB550F restoration: Project Lolita
« Reply #192 on: December 31, 2010, 03:52:49 pm »

Hello kids!

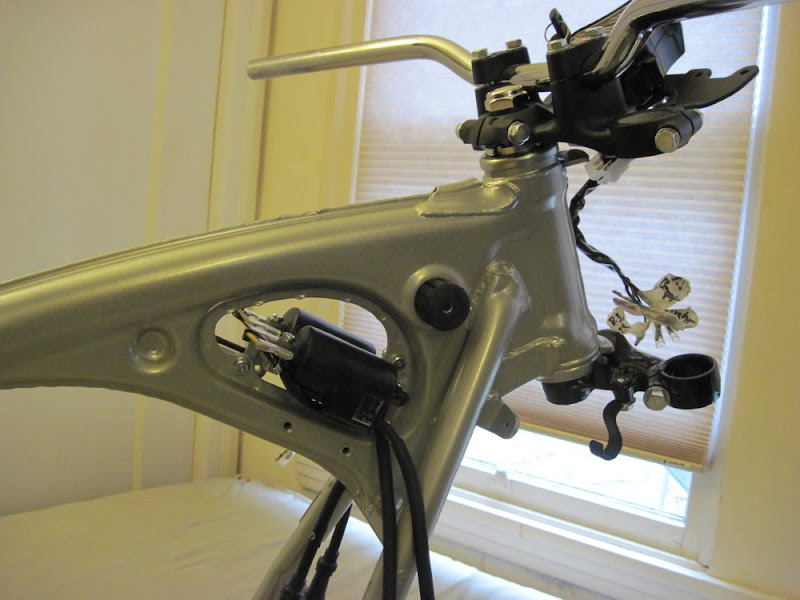
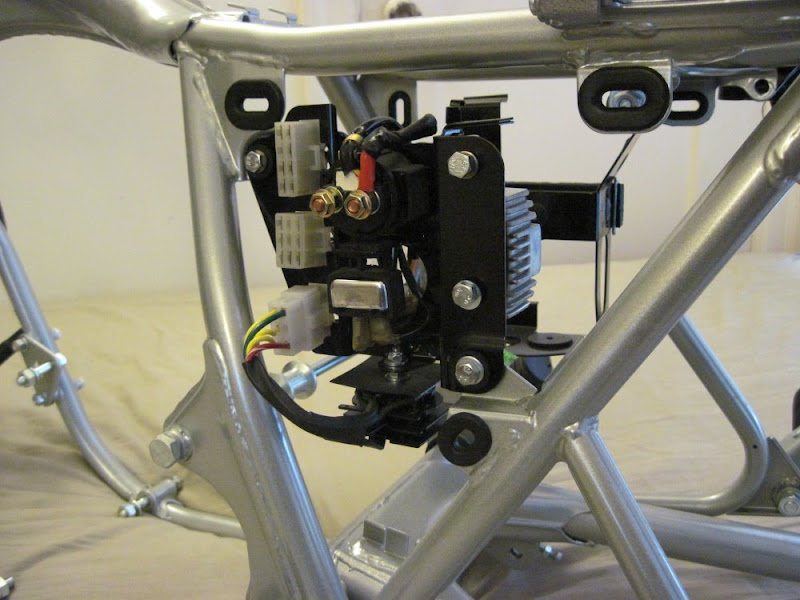
It's been forever since my last update.  My apologies... real life and classwork consumed me this past semester, and I didn't have anywhere near the free time I would have liked to spend on this project.  That said, I did chip away at various items over the past 6 months and would like to share what I've done.  Owing to the winter rains here in NorCal, I've moved everything that has been completed into the house... actually, into my bedroom to be exact.  I've got the frame and its various components sitting on the floor.  I suppose having it lying in the middle of my room makes me think about it each and every day... there is no "out of sight out of mind" for me!

So over the course of the last 6 months, I had a bunch of parts chromed and polished, the ignition coils assembled and mounted, fabricated a new mounting bracket out of aluminum to account for the shorter aftermarket coils, cleaned and "rebuilt" the seat lock assembly, and started assembling everything, as you'll see in the images below.  I am having a problem now with rebuilding the front forks, so stay tuned to the end of this post for an inquiry that I have.

The chroming was done at Brown's Plating in Kentucky.  They did an absolutely fabulous job... just check out these parts:


They are a bit on the pricey side, but I am beyond satisfied with the results.  Honestly, they turned out far better than I was even expecting.  I recommend them highly if you're looking for a quality chrome job.

So on with the pics!


And now here's my latest problem: I'm trying to replace the fork seals, and clean/polish both portions of the outer fork housing (the steel tube and the aluminum assembly where the axle attaches).  I cannot get the bolt that holds the damper in place to separate from the damper (the hex allen bolt).  The two just turn and turn and turn together, and I cannot figure out a way to prevent that from happening.  The manuals I have just say to leave the filler cap and fork springs in place, which will provide a downward force on the damper and thus allow the bolt to be removed; however, this does not appear to be the case.  No amount of force that I've been able to muster in pushing down that spring will secure the damper and allow the bolt to be removed.  Without that bolt coming out, I can't remove the damper, which means I can't remove the fork tubes, which means I can't replace the seals or start to clean and polish the parts.  Damnit!

Here's the hex allen bolt I'm referring to:


Is there a special trick to getting this thing to come out?  I see no means of holding the damper in place.  Anyone have some advice or tips in getting past this problem?

Offline TyMatthews

  • Enthusiast
  • **
  • Posts: 103
Re: '75 CB550F restoration: Project Lolita
« Reply #193 on: December 31, 2010, 03:56:01 pm »
Did you put gas in the tank yet?

I just had the kbs fail in my tank after a couple of weeks.

Going to try again  :(

I haven't painted the tank yet, and so it hasn't had any fluid of any kind placed in it yet.  How long did you wait between applying the sealer and putting in gas?  Did you follow all the instructions to the letter?  Like really make sure the insides were bone dry before proceeding?  That's an absolute must... I let my tank dry for multiple days before applying the sealer.  And now the sealer has been curing/drying for like 6 months, so it too is fully cured and (should be) ready to go.

gsnorcal

  • Guest
Re: '75 CB550F restoration: Project Lolita
« Reply #194 on: December 31, 2010, 04:12:01 pm »
Is there a special trick to getting this thing to come out?  I see no means of holding the damper in place.  Anyone have some advice or tips in getting past this problem?

Impact driver? I understand the back side is spinning on it's own, but maybe the jerky nature of the impact driver would sort of break it free?

BTW, I'm super, super impressed with your project! I'm over in San Rafael, just starting my own project. Maybe we'll get a chance to ride together when they are done.

Dave

Offline going4speed

  • Enthusiast
  • **
  • Posts: 203
Re: '75 CB550F restoration: Project Lolita
« Reply #195 on: December 31, 2010, 04:20:40 pm »
I followed it letter of the law and called them to make sure what I was seeing was right.  They said it was.  I left the tank sit for four or five days before sealing and two weeks before any gas went in.

They gave me my money back so I cant fault them there.

I purchased another tank in better condition and gave up on the failed liner tank.

If it were me I would try fuel in that tank before you put money into painting but you will likely have better luck than I.

Did you put gas in the tank yet?

I just had the kbs fail in my tank after a couple of weeks.

Going to try again  :(

I haven't painted the tank yet, and so it hasn't had any fluid of any kind placed in it yet.  How long did you wait between applying the sealer and putting in gas?  Did you follow all the instructions to the letter?  Like really make sure the insides were bone dry before proceeding?  That's an absolute must... I let my tank dry for multiple days before applying the sealer.  And now the sealer has been curing/drying for like 6 months, so it too is fully cured and (should be) ready to go.

Offline going4speed

  • Enthusiast
  • **
  • Posts: 203
Re: '75 CB550F restoration: Project Lolita
« Reply #196 on: December 31, 2010, 04:21:35 pm »
As for the damper bolt I cheated and used an impact.

Perhaps a run to a mechanic and asking them to just blast that out of there may do the trick.

Offline Zaipai

  • I am getting closer to being an
  • Old Timer
  • ******
  • Posts: 3,400
    • My Home page
Re: '75 CB550F restoration: Project Lolita
« Reply #197 on: December 31, 2010, 05:33:21 pm »
Fantastic work so far. Love the silver and black..!

.: Scott :.
Its my Avatar..

75 CB550F  | 


Offline brandEn

  • Old Timer
  • ******
  • Posts: 3,205
Re: '75 CB550F restoration: Project Lolita
« Reply #198 on: December 31, 2010, 06:10:38 pm »
looking real good. I like your style, looks like your working in a lab!

Offline fastbroshi

  • Puppet
  • Old Timer
  • ******
  • Posts: 2,645
Re: '75 CB550F restoration: Project Lolita
« Reply #199 on: December 31, 2010, 11:17:30 pm »
+1 on the impact, heck even my handheld battery powered one worked on mine.  I don't know if the handheld hit-with-a-hammer type would work though.  Might be worth a shot.
Just call me Timmaaaaay!!!