Author Topic: Pamco CB750A Ignition Install  (Read 3906 times)

0 Members and 1 Guest are viewing this topic.

Offline limerence

  • Full Member
  • *
  • Posts: 44
Pamco CB750A Ignition Install
« on: July 26, 2014, 10:57:37 AM »
Hi Folks,

I got the Pamco Ultimate Ignition Kit and will be installing it in my 1978 CB750A. Not knowing at all what I am doing, I looked for videos for anyone doing an install on a CB750A or honda in general but had no luck. I reached out to PamcoPete and asked him if he had one but he said he didnt, but to give it a shot and he could help along the way, and that people have been successful installing it with the instructions on his site thus far. Unfortunately, he underestimates the power of my stupidity. So I thought I would create a thread to track my install and ask questions from you guys and PamcoPete along the way. I will update the thread with the correct steps as I progress so that other noobs such as myself can hopefully make use of this thread. Some of the steps or this thread in general might be painfully obvious to some of you guys but hopefully you will bear with me. My old computer science teacher once told us, "if you can't explain a concept in a simpler form to a third grader, you didn't really understand it yourself."

I've copied some of PamcoPete's instructions for my specific kit and pics (http://www.cb750ignition.com/installation3.htm) and will add my own pics and questions as well. (Hopefully this is ok Pete, please let me know if otherwise). I do not know names of parts. The ones used below are those from PamcoPete with me cross referencing eBay auctions to see what they look like. Please let me know if I am using incorrect wording, or if any of my steps and/or pictures are wrong and I will update.

Thanks,
John

So let's start.


- Remove the phillips screws and remove the cover.


- Remove the nut in the middle and the three screws holding the points plate. Underneath the points plate you will see the advance mechanism.
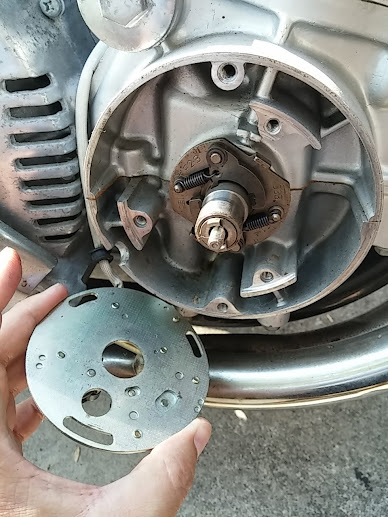

- Remove the advance mechanism


- Remove the points cam. You will need to position the weights in a position so that it releases the points cam. I did this be removing the springs and then putting it back after I removed the cam. Here is a pic of the cam when it is free


- Apply a light coat of grease to the shaft and bolt
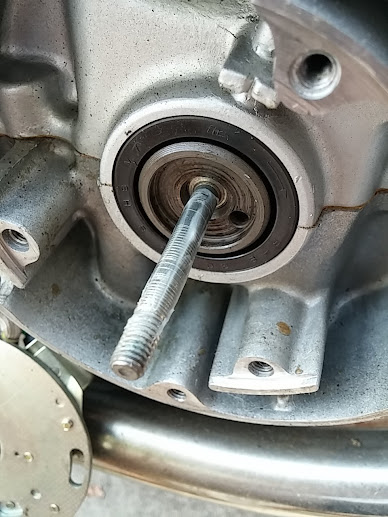

- The below is from PamcoPete's instructions. Unfortunately, I do not know what it looks like and where I should be looking for the small pin. Help here please.
Note: On some advancers there is a small pin located on the shaft of the advancer. If you have this pin on your advancer, follow these instructions:
1.  Check for the pin and if there grind off with small grinding tool or file.  If
necessary clean with WD-40 to remove metal particles then apply
 light oil to prevent rust.
2. Apply a light coating of grease on the advancer shaft.
3. Once the rotor is bolted to advancer check for free movement and spring return.


- Next, what will need to be done is to create a sandwich of the following items: rotor, then pamco plate, then advance mechanism. You have to do it in a certain fashion in order for it to work properly, the call out here is the orientation for the rotor (from the kit) and the advance mechanism due to how the weights have to be situated in order for the two to fit together. Here are the two without the Pamco plate in the middle for demonstration purposes. You will need to have it in the same orientation but with the Pamco plate in between.


You can do this by doing the following:
- Place the rotor on a flat surface


- Place the Pamco plate on the rotor


- Hold the weights in the extended position and insert the tabs on the weights into the slots of the PAMCO rotor.


- This is how it should look like together (front and side view)
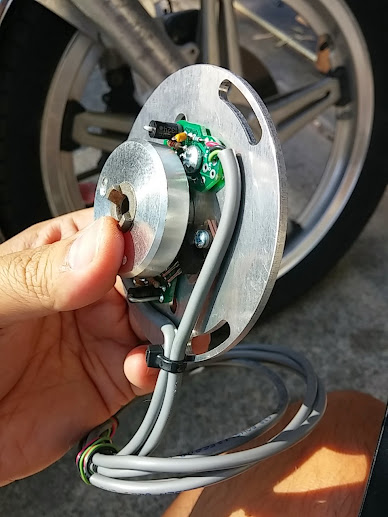


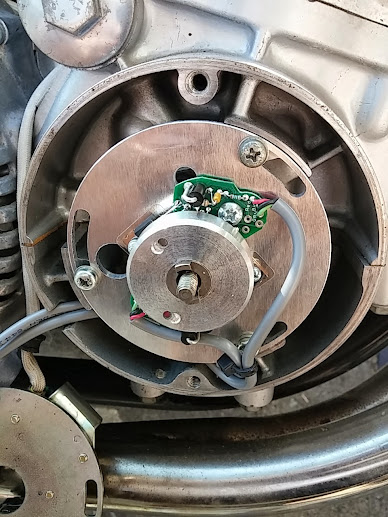
This is how she looks like put back in

Since I bought the Ultimate Ignition Kit, it came with new coils as well so I had to remove the old ones. Here is how the old ones were attached. (View from both sides)


Here's how it looks like removed:
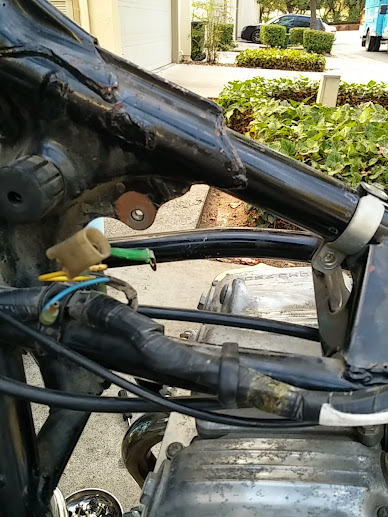

The kit came with four bolts, two of which will be used to hold up the new coils. Unfortunately, I did not see any nuts in the kit. I kept everything together so I'm wondering if I misplaced it, or if it was missing in my kit. In looking at the pics of the kit where I bought it from, I believe it normally comes with it.
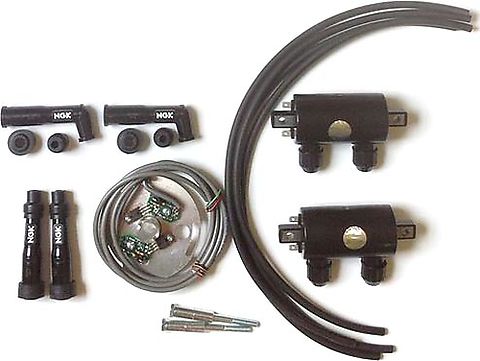

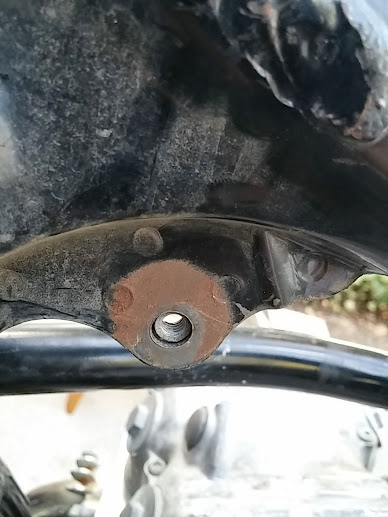
I'll try to pick up some nuts from Home Depot to use. However, I ran into a slight problem.
Although the rear bolt could slide through the hanger fine, I was not able to lace through the front bolt since the the original nut was attached to the frame. Does anyone else have this same issue?


« Last Edit: July 29, 2014, 05:31:23 PM by limerence »

Offline limerence

  • Full Member
  • *
  • Posts: 44
Re: Pamco CB750A Ignition Install
« Reply #1 on: July 26, 2014, 10:58:37 AM »
PLACEHOLDER

Just in case I need more room for steps.

Offline pamcopete

  • Enthusiast
  • **
  • Posts: 153
  • Ride. Enjoy. Life is simple
    • CB750Ignition
Re: Pamco CB750A Ignition Install
« Reply #2 on: July 26, 2014, 11:33:01 AM »
Your'e doing great so far. I might just reverse this and use some of your excellant pics in the "official" instructions.

Getting the correct green wire to the appropriate coil can be tricky, but just do your best. If you get them reversed, its easier to just revers the green wires to the coils rather than take the whole thing apart. You will know if they are reversed because you will be getting spark but the timing will be 180 degrees out, meaning you will see the timing marks for cylinders 2-3 when you are looking for cylinders 1-4. and, of course, the engine won't start.

The blue and yellow wires are located  in the vicinity of the wires for the rear brake switch on the lower right side of the frame. That's where the blue and yellow wires from the points plate are connected.
« Last Edit: July 26, 2014, 11:36:47 AM by pamcopete »

Offline limerence

  • Full Member
  • *
  • Posts: 44
Re: Pamco CB750A Ignition Install
« Reply #3 on: July 26, 2014, 06:13:51 PM »
Hi Pete,

I am still trying to absorb the instructions on the step. Note that I don't know how ignition systems work as this is all new to me. But I think I somewhat understand this now:

With the trigger magnet positioned as shown above, the green wire from the trigger on the right goes to the coil for cylinders 1 and 4 (blue wire), and the other green wire goes to the coil for cylinders 2 and 3 (yellow wire). If you assemble the rotor with 2-3 in place of 1-4 as shown, then you can either do it again, or just reverse the wires for each cylinder.

Initially, the blue wire and yellow wire reference threw me off since I didn't see that anywhere. I realized you were referencing the wires on the bike harness. From the instructions above, how can I tell which green wire is the green wire from the trigger (that goes to yellow), as opposed to the other green wire (that goes to blue)?

Also, you mentioned:
Note: On some advancers there is a small pin located on the shaft of the advancer. If you have this pin on your advancer, follow these instructions:
1.  Check for the pin and if there grind off with small grinding tool or file.  If
necessary clean with WD-40 to remove metal particles then apply


Is the small pin that you are referring to this one below? (The one close to my pointing finger)


Thanks,
John


Offline POPS 911

  • Expert
  • ****
  • Posts: 926
Re: Pamco CB750A Ignition Install
« Reply #4 on: July 28, 2014, 03:36:00 PM »
Great job of showing others a way to install this new ignition part.  Now if you can find someone to make a mold for injection rubber, I got a nice set of boots for the 750A's they could use to digitize the mold.........  bet you could sell many on this site and to local HONDA dealers and repair shops who work on this old bikes.

Offline pamcopete

  • Enthusiast
  • **
  • Posts: 153
  • Ride. Enjoy. Life is simple
    • CB750Ignition
Re: Pamco CB750A Ignition Install
« Reply #5 on: July 29, 2014, 04:19:47 AM »
Hi Pete,

I am still trying to absorb the instructions on the step. Note that I don't know how ignition systems work as this is all new to me. But I think I somewhat understand this now:

With the trigger magnet positioned as shown above, the green wire from the trigger on the right goes to the coil for cylinders 1 and 4 (blue wire), and the other green wire goes to the coil for cylinders 2 and 3 (yellow wire). If you assemble the rotor with 2-3 in place of 1-4 as shown, then you can either do it again, or just reverse the wires for each cylinder.

Initially, the blue wire and yellow wire reference threw me off since I didn't see that anywhere. I realized you were referencing the wires on the bike harness. From the instructions above, how can I tell which green wire is the green wire from the trigger (that goes to yellow), as opposed to the other green wire (that goes to blue)?

Also, you mentioned:
Note: On some advancers there is a small pin located on the shaft of the advancer. If you have this pin on your advancer, follow these instructions:
1.  Check for the pin and if there grind off with small grinding tool or file.  If
necessary clean with WD-40 to remove metal particles then apply


Is the small pin that you are referring to this one below? (The one close to my pointing finger)


Thanks,
John

No, that is not the pin referred to in the instructions. It would be located on the shaft of the advancer. It is mostly found on CB500 and CB550 engines.

Read through the instructions again for a clue as to which wire goes to which blue or yellow wire, but it really doesn't matter if you get them backwards because that will be evident when you go to start the engine because if they are reversed, the engine won't start. You will also see that the 2-3 "F" mark shows up with the timing light  connected to #4 cylinder. If that happens, then just reverse the green wires.

Also, your pic showing greasing the bolt that holds the advancer to the crank shaft is incorrect. The oil or grease is applied to the shaft of the advancer.


Offline limerence

  • Full Member
  • *
  • Posts: 44
Re: Pamco CB750A Ignition Install
« Reply #6 on: July 29, 2014, 07:51:12 AM »
Also, your pic showing greasing the bolt that holds the advancer to the crank shaft is incorrect. The oil or grease is applied to the shaft of the advancer.

Thanks Pete. I only showed the bolt, but I actually greased both the bolt and the inside of the advancer. Not sure if that was bad to do, but if you look closely in the picture, it looks like the bolt has been scored so I was trying to be extra safe.

Offline pamcopete

  • Enthusiast
  • **
  • Posts: 153
  • Ride. Enjoy. Life is simple
    • CB750Ignition
Re: Pamco CB750A Ignition Install
« Reply #7 on: August 07, 2014, 04:17:58 PM »
limerence,

OK. Where are you now with the install?

Offline limerence

  • Full Member
  • *
  • Posts: 44
Re: Pamco CB750A Ignition Install
« Reply #8 on: August 07, 2014, 07:34:02 PM »
Hi Pete,

I updated Post #1 at the bottom as to where I am. I haven't had a chance to go to Home Depot yet to pick up a smaller bolt (that can pass through the nut in the pic that is stuck on the frame) and a matching nut. Let me know if you have come across this before. To mount the coils, do you only need two bolts and nuts? If so, what are the other two bolts used for?

After I get it mounted, another thing to figure out is how the plug caps and lines get all connected. I thought they would be all connected. I havent attached any wires together yet because I wanted to pick up some wire caps to test it with, if it starts up, then I would solder them together.

-John

Offline pamcopete

  • Enthusiast
  • **
  • Posts: 153
  • Ride. Enjoy. Life is simple
    • CB750Ignition
Re: Pamco CB750A Ignition Install
« Reply #9 on: August 08, 2014, 04:08:39 AM »
There are a couple of pics of the coil mounted in the instructions:

http://www.cb750ignition.com/installation3.htm

Just two long bolts are used to mount the coils. The factory frame is not used.

Not sure which wires you are referring to. If it is the spark plug wires, they simply screw into the coil towers and the caps. No soldering needed.

Offline limerence

  • Full Member
  • *
  • Posts: 44
Re: Pamco CB750A Ignition Install
« Reply #10 on: August 11, 2014, 11:15:48 PM »
Hi Pete,

Havent had a chance to work on it again since I've been busy with work but I'm trying to see how the frame isn't used. I know the rear bolt has a hanger it can go through. Where does the front bolt go through if it is not through part of the frame?

Oh and by wires, I meant the wires to the harness being temporarily wire nutted to the wires coming from your plate.

As for the spark plug wires, thanks since I was looking at them and didnt know how they attached since I'm used to the plugs and caps all being connected.

Thanks,
John

Offline pamcopete

  • Enthusiast
  • **
  • Posts: 153
  • Ride. Enjoy. Life is simple
    • CB750Ignition
Re: Pamco CB750A Ignition Install
« Reply #11 on: August 13, 2014, 03:51:30 AM »
I meant the little sub frame that the stock coils mount in. Take a look at the pictures in the web site.

Offline pamcopete

  • Enthusiast
  • **
  • Posts: 153
  • Ride. Enjoy. Life is simple
    • CB750Ignition
Re: Pamco CB750A Ignition Install
« Reply #12 on: August 28, 2014, 05:59:48 AM »
limerence,

Whatsup?