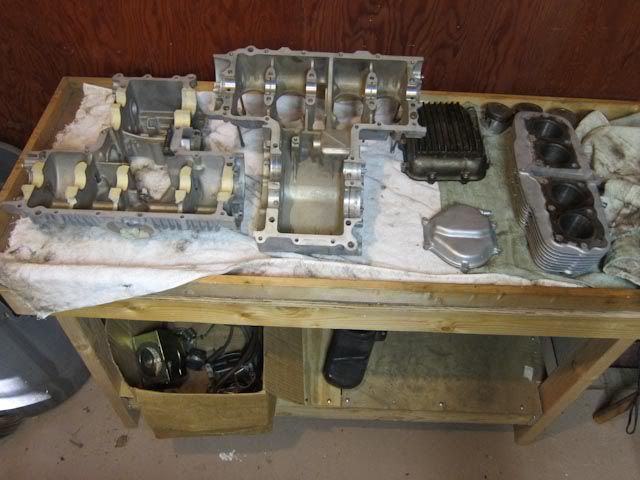
Author Topic: James' 77 550f.  (Read 49291 times)

0 Members and 1 Guest are viewing this topic.

Offline luceja

  • Enthusiast
  • **
  • Posts: 169
Re: James' 77 550f - motor apart, then the rest
« Reply #50 on: October 15, 2010, 02:05:07 AM »
I made a spreadsheet to log all the engine measurements, picked up some iffy micrometers & bore gauges, and went on a measuring frenzy. Things look good, but a few questions I'd like to figure out:

- The piston diameters were fine if I measured the long part of the skirt (front to back, "Y"), but were all under spec and EXACTLY the same as each other if measured diameter (left to right, parallel to the wrist pin, "X"). My manual doe just says to measure the skirts, so I assume that just means the long part and that everything is fine.

- The wrist pin bores were sometimes less than spec, but when I compared to the outer diameter of the pin, clearance was less than .001.. so I'm not really sweating that

- Some of the oil ring gaps were bigger than spec, but since they are so flimsy, I'm going to chalk that up to flex in the ring as I measured


I'm hoping I didn't over-clean the pistons - I carefully used a very small screwdriver to clean the carbon out from behind the rings, and I worry that was stupid and will actually hurt their sealing, and I used a soft wire wheel to remove the carbon on the face and super gently on the side of the pistons between the 1st ring and the top, since it was pretty caked on there. I'm thinking I didn't do any harm because the wire wheel wasn't eroding the face to the point where it hid the original machining marks, nor did I brush the sides down to the point where the stained aluminum turned to clean new aluminum.


« Last Edit: October 15, 2010, 02:09:07 AM by luceja »
'75 cb400f, '77 cb550f , CB160 road racer, '88 Hawk GT track bike, FZR400 race bike, and a bunch of old hondas in boxes.

Offline luceja

  • Enthusiast
  • **
  • Posts: 169
Re: James' 77 550f - motor apart, then the rest
« Reply #51 on: October 15, 2010, 02:11:42 AM »
Oh that and I got a "ready to drop in" ebay camshaft and the lobes are clearly unusably pitted and look like the rust was just cleaned off. I really don't know how some people sleep at night.
'75 cb400f, '77 cb550f , CB160 road racer, '88 Hawk GT track bike, FZR400 race bike, and a bunch of old hondas in boxes.

Offline fastbroshi

  • Puppet
  • Old Timer
  • ******
  • Posts: 2,645
Re: James' 77 550f - motor apart, then the rest
« Reply #52 on: October 16, 2010, 12:11:06 AM »
yeah you need to be very specific when you ask your questions.  If the pictures suck it kinda makes me wary.
Just call me Timmaaaaay!!!

Offline luceja

  • Enthusiast
  • **
  • Posts: 169
Re: James' 77 550f - motor apart, then the rest
« Reply #53 on: October 16, 2010, 03:04:08 AM »
yeah you need to be very specific when you ask your questions.  If the pictures suck it kinda makes me wary.

I figured "smooth and ready to drop in" was a blanket statement that would include "no have half-millimeter deep pits right on the crowns of the lobes". I'm a tenacious bastard and I'll receive satisfaction, mark my words.

In a related story, I'm super stoked on building this bike. I got to spend a day in a rad shop that's working on lots of crazy harleys, triumphs, and bsas, and I'm wondering how I can incorporate some of the awesome ideas I saw there into this bike. Lots of exposed welds, metal to metal rivets, complex brass tubing running all over the place, lighting fixtures made from reclaimed little bits of metal.. just rad stuff, all around.
« Last Edit: October 16, 2010, 02:30:40 PM by luceja »
'75 cb400f, '77 cb550f , CB160 road racer, '88 Hawk GT track bike, FZR400 race bike, and a bunch of old hondas in boxes.

Offline paulages

  • Old Timer
  • ******
  • Posts: 3,876
  • 1976 cb735
    • DOOMTOWN RIDERS P.R.M.C.
Re: James' 77 550f - motor apart, then the rest
« Reply #54 on: October 21, 2010, 02:38:52 AM »
James,

Measure the piston at the bottom of the skirt, in the axis perpendicular to the wrist pin. You'll find that this will be your largest measurement.
paul
SOHC4 member #1050

1974 CB550 (735cc)
1976 CB550 (590cc) road racer
1973 CB750K3
1972 NORTON Commando Combat
1996 KLX650 R

Offline paulages

  • Old Timer
  • ******
  • Posts: 3,876
  • 1976 cb735
    • DOOMTOWN RIDERS P.R.M.C.
Re: James' 77 550f - motor apart, then the rest
« Reply #55 on: October 21, 2010, 02:48:12 AM »
Also... if you bought a bore gauge, the way to measure piston to wall clearances is like this: measure the skirt where I told you, then lock the micrometer. Set in in a vice to hold it steady, then put your bore gauge in between the jaws. rock it back and forth to find the smallest measurement, then zero out the dial indicator here. Then, work the bore gauge in your cylinders, in both axes and at the top and bottom. rock the bore gauge around while measuring, and record the smallest measurement. this will be your clearance, and should be somewhere in the .0012-.002 range, ideally.

paul
SOHC4 member #1050

1974 CB550 (735cc)
1976 CB550 (590cc) road racer
1973 CB750K3
1972 NORTON Commando Combat
1996 KLX650 R

Offline luceja

  • Enthusiast
  • **
  • Posts: 169
Re: James' 77 550f - motor apart, then the rest
« Reply #56 on: October 21, 2010, 02:04:39 PM »
Also... if you bought a bore gauge, the way to measure piston to wall clearances is like this: measure the skirt where I told you, then lock the micrometer. Set in in a vice to hold it steady, then put your bore gauge in between the jaws. rock it back and forth to find the smallest measurement, then zero out the dial indicator here. Then, work the bore gauge in your cylinders, in both axes and at the top and bottom. rock the bore gauge around while measuring, and record the smallest measurement. this will be your clearance, and should be somewhere in the .0012-.002 range, ideally.


I think I need to take another pass, since I just noticed that some of my bore measurements are actually smaller than the piston measurements on the same axis. Thanks for the tips on procedure, I'll take another shot at it that way. Either I did a slop job  or there's just a big margin of error with the crappy mechanism on the harbor freight bore gauges.

the good news is that doing a quick job, it doesn't look like things are badly out of round or there's big clearance issues, but while I wait for seals and gaskets.. might as well measure twice (assemble once)..
« Last Edit: May 26, 2011, 04:05:11 PM by luceja »
'75 cb400f, '77 cb550f , CB160 road racer, '88 Hawk GT track bike, FZR400 race bike, and a bunch of old hondas in boxes.

Offline luceja

  • Enthusiast
  • **
  • Posts: 169
Re: James' 77 550f - motor apart, then the rest
« Reply #57 on: January 06, 2011, 01:00:08 AM »
ooook. Been a couple of months, but finally got things rolling along.

1. Moved everything into the basement. Much, much nicer. Will do the project down here and just do finished assembly in the detached (cold) garage in the spring.


2. Realized 3 of four carbs were frozen solid, and messed one up (scored the slide valve and housing trying to free it)


3. Learned that a 20$ bucket of carb cleaner is the greatest thing on earth. I'll be honest, cleaning and reassembling carbs is pretty damned fun.


Quick mental checklist of upcoming stuff to do:

1. replace the carb I killed
2. finish cleaning carbs/clearing jets/buying gasket kits or maybe just replacing the jets as well (~75$?)
3. finish cleaning engine case (been scrubbing with jasco and wire brushes until I hate life)
4. measure pistons/cylinders again
5. find remaining engine bits - camshaft, main chain, the little oil seal that has no hole and has the pin on the clutch side of the case
6. Assemble (have hondabond, all gaskets and seals)
7. Paint engine (black case, silver jugs/head/valve cover/covers, or duplicolor cast coat iron like other members have been using)
8. decide on frame hoop in back or not
9. make seatpan (started a sheet metal one, got an E for effort), get it covered
10. clean up/paint tank
11. everything else (tires, pads, little stuff).
'75 cb400f, '77 cb550f , CB160 road racer, '88 Hawk GT track bike, FZR400 race bike, and a bunch of old hondas in boxes.

Offline fastbroshi

  • Puppet
  • Old Timer
  • ******
  • Posts: 2,645
Re: James' 77 550f - motor apart, then the rest
« Reply #58 on: January 06, 2011, 01:39:57 AM »
  How bad is the gouge in the carb body?  You may be able to make it OK with a fine Dremel buff, taking off fractions of .001" at a time.  This was the maroon colored one that vaguely resembles a cotton ball. 

  I nearly did the same thing but got that shiver up my spine telling me I was about to do something naughty, so I went about getting it out gently.  Once I got it out I noticed the valve had been deformed at the bottom, making a teeny little bit hang on the pathway it slides up and down in.  Probably from ham-fisting the throttle, causing the throttle to slam down into the carb body (synced correctly?).   I was able to grind it down every so gently with my Dremel, checking every couple of passes until it slid freely. 
 
  Keep in mind, even if it has proper clearance, they may not slide as freely as you think they should since you may have cleaned the carbs already. 
 
  If that doesn't work for you,  I may have the carb body and slide you need.  I've got bunch of 069a-022 parts here.  Which carb is it?  Post a couple pics to make sure.
Just call me Timmaaaaay!!!

Offline Stev-o

  • Ain't no
  • Really Old Timer ...
  • *******
  • Posts: 34,400
  • Central Texas
Re: James' 77 550f - motor apart, then the rest
« Reply #59 on: January 06, 2011, 05:28:53 PM »
Nice setup in the basement. Wish I had one!
'74 "Big Bang" Honda 750K [836].....'76 Honda 550F.....K3 Park Racer!......and a Bomber!............plus plus plus.........

Offline paulages

  • Old Timer
  • ******
  • Posts: 3,876
  • 1976 cb735
    • DOOMTOWN RIDERS P.R.M.C.
Re: James' 77 550f - motor apart, then the rest
« Reply #60 on: January 07, 2011, 11:35:49 AM »
ooook. Been a couple of months, but finally got things rolling along.

1. Moved everything into the basement. Much, much nicer. Will do the project down here and just do finished assembly in the detached (cold) garage in the spring.


2. Realized 3 of four carbs were frozen solid, and messed one up (scored the slide valve and housing trying to free it)


3. Learned that a 20$ bucket of carb cleaner is the greatest thing on earth. I'll be honest, cleaning and reassembling carbs is pretty damned fun.


Quick mental checklist of upcoming stuff to do:

1. replace the carb I killed
2. finish cleaning carbs/clearing jets/buying gasket kits or maybe just replacing the jets as well (~75$?)
3. finish cleaning engine case (been scrubbing with jasco and wire brushes until I hate life)
4. measure pistons/cylinders again
5. find remaining engine bits - camshaft, main chain, the little oil seal that has no hole and has the pin on the clutch side of the case
6. Assemble (have hondabond, all gaskets and seals)
7. Paint engine (black case, silver jugs/head/valve cover/covers, or duplicolor cast coat iron like other members have been using)
8. decide on frame hoop in back or not
9. make seatpan (started a sheet metal one, got an E for effort), get it covered
10. clean up/paint tank
11. everything else (tires, pads, little stuff).


James,

I think I have a nice rack of PD carbs somewhere you could have for a 6 pack of beer... I rebuilt them, then one of the pilot screws broke a tip off in the carb body. That carb won't be good obviouslt, but it should be good for parts. I think it has all new gaskets, etc. too.

Paul
paul
SOHC4 member #1050

1974 CB550 (735cc)
1976 CB550 (590cc) road racer
1973 CB750K3
1972 NORTON Commando Combat
1996 KLX650 R

Offline luceja

  • Enthusiast
  • **
  • Posts: 169
Re: James' 77 550f - motor apart, then the rest
« Reply #61 on: January 07, 2011, 11:44:59 AM »
Thanks Broshi. Yes, it was definitely one of those situations where I figured I was doing something naughty but hoped it'd be fine. three of the four carbs are now shiny and clean and happy and one of my four housemates is not happy about the smell.

Out of curiosity, what do you think the consequence of overdoing the grinding would be? For example, let's say it slides freely, but isn't as tight of an air seal as it should be. I'm thinking that air can probably pass through that felt/plastic seal where the arm/shaft enters of the top of the carb, so if air could get by the slide easily, it would affect things.. but maybe not? How well does the needle seal to the bottom of the slide anyway? (Seems like it just sorta dangles there).

  How bad is the gouge in the carb body?  You may be able to make it OK with a fine Dremel buff, taking off fractions of .001" at a time.  This was the maroon colored one that vaguely resembles a cotton ball. 

  I nearly did the same thing but got that shiver up my spine telling me I was about to do something naughty, so I went about getting it out gently.  Once I got it out I noticed the valve had been deformed at the bottom, making a teeny little bit hang on the pathway it slides up and down in.  Probably from ham-fisting the throttle, causing the throttle to slam down into the carb body (synced correctly?).   I was able to grind it down every so gently with my Dremel, checking every couple of passes until it slid freely. 
 
  Keep in mind, even if it has proper clearance, they may not slide as freely as you think they should since you may have cleaned the carbs already. 
 
  If that doesn't work for you,  I may have the carb body and slide you need.  I've got bunch of 069a-022 parts here.  Which carb is it?  Post a couple pics to make sure.
'75 cb400f, '77 cb550f , CB160 road racer, '88 Hawk GT track bike, FZR400 race bike, and a bunch of old hondas in boxes.

Offline luceja

  • Enthusiast
  • **
  • Posts: 169
Re: James' 77 550f - motor apart, then the rest
« Reply #62 on: January 07, 2011, 11:47:39 AM »
Nice setup in the basement. Wish I had one!

Thanks - super grateful for my current living situation. I'm like a lizard.. give me workspace and I'll fill it.
'75 cb400f, '77 cb550f , CB160 road racer, '88 Hawk GT track bike, FZR400 race bike, and a bunch of old hondas in boxes.

Offline luceja

  • Enthusiast
  • **
  • Posts: 169
Re: James' 77 550f - motor apart, then the rest
« Reply #63 on: January 07, 2011, 11:51:20 AM »
James,

I think I have a nice rack of PD carbs somewhere you could have for a 6 pack of beer... I rebuilt them, then one of the pilot screws broke a tip off in the carb body. That carb won't be good obviouslt, but it should be good for parts. I think it has all new gaskets, etc. too.

Paul

I'll take that offer & hit you up when you're back in town. I'd be glad to trade you back the leftover parts, they'd find more use in your shop than mine.
'75 cb400f, '77 cb550f , CB160 road racer, '88 Hawk GT track bike, FZR400 race bike, and a bunch of old hondas in boxes.

Offline fastbroshi

  • Puppet
  • Old Timer
  • ******
  • Posts: 2,645
Re: James' 77 550f - motor apart, then the rest
« Reply #64 on: January 07, 2011, 05:13:48 PM »
Out of curiosity, what do you think the consequence of overdoing the grinding would be? For example, let's say it slides freely, but isn't as tight of an air seal as it should be. I'm thinking that air can probably pass through that felt/plastic seal where the arm/shaft enters of the top of the carb, so if air could get by the slide easily, it would affect things.. but maybe not? How well does the needle seal to the bottom of the slide anyway? (Seems like it just sorta dangles there).

  The consequences might be a carb that wouldn't work.  It's not like that part of the carb is vented to atmosphere, so the air shouldn't be trying to fill any voids in pressure  ???.  However it could induce some misplacement of the throttle slide, causing it to hang up in its bore (jet needle? I've seen it called this, totally separate from the needle jet).   Anyway, you could go the slide and carb repair route, or maybe we can help, up to you bud.
Just call me Timmaaaaay!!!

Offline luceja

  • Enthusiast
  • **
  • Posts: 169
Re: James' 77 550f - motor apart, then the rest
« Reply #65 on: February 17, 2011, 12:13:12 AM »
Thinking about what work I've done lately, I think I can confidently say I'm mangling this pile of honda parts and I won't be shocked at all if it seizes up, explodes into flames, or just comes to a smoking, shuddering halt right about when I think I've gotten away with it.

I basically needed a carb with a functioning slide because I killed mine, probably with glass bits, and my original bowl really didn't like the degreaser I dunked it in. I bought a semi complete carb off of a member and ended up with more or less two carbs worth of bits.
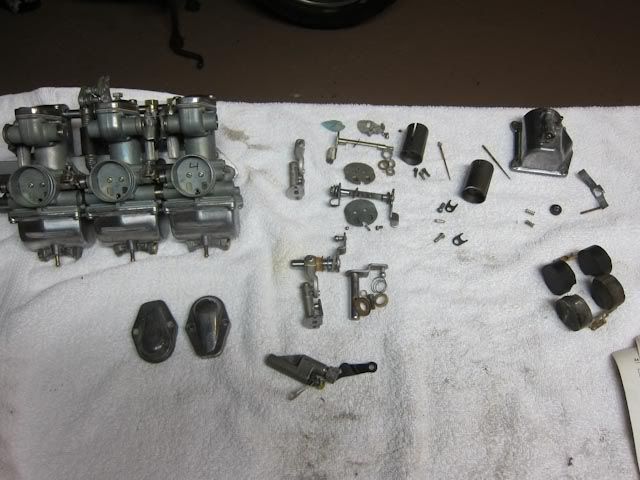


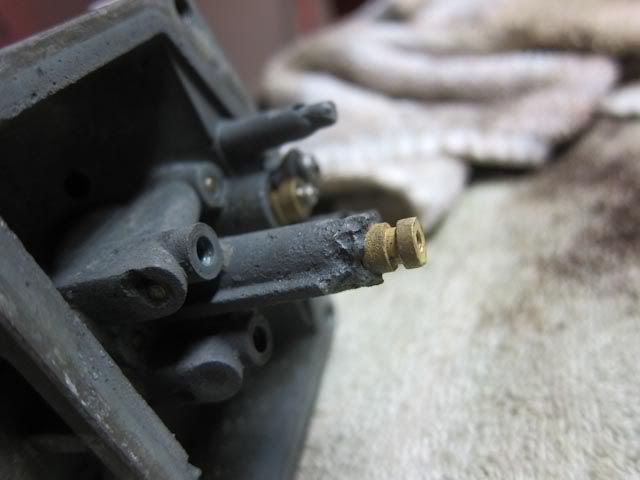
but it turned out the the carb body I bought was.. well, there was enough corrosion in the bowl that I didn't think the main jet's oring would actually seal:


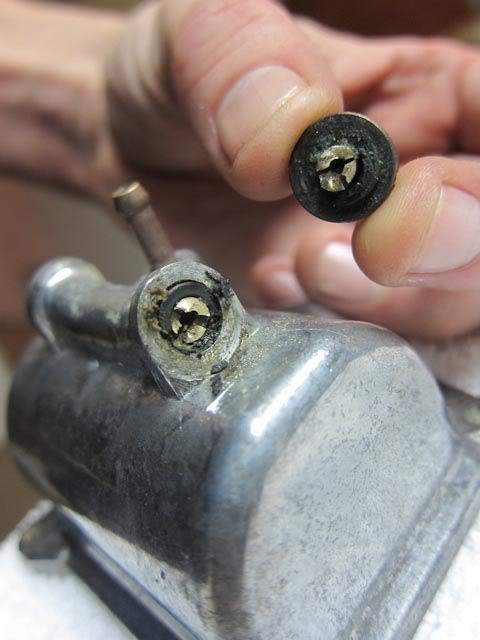
I couldn't use the bowl it came with either - after a soak in the carb cleaner bucket and some pb blaster, this happened, and when I tried to use a bit extractor it just broke the bowl as I figured it would:


My last original bowl had some funky corrosion from some degreaser which really liked to eat aluminum..
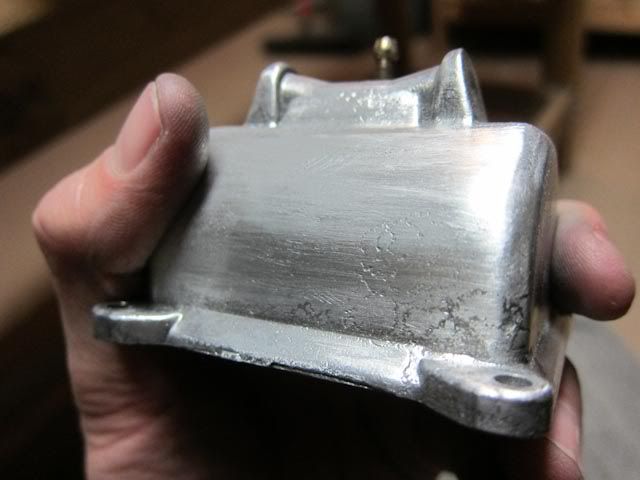


so I went from ~240 grit up to 1000 and then steel wool:
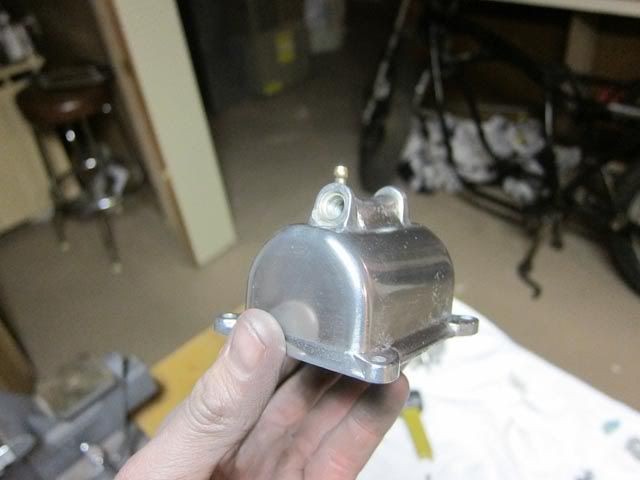


to deal with my original carb/slide that I damaged like a moron (see above), I used some 1000 grit really gently on the inside of my original carb in the slide's cylinder and now we have a carb with a functioning slide. I used a dremel buff but it didn't seem to be having the intended effect since the gouges had a bit of height to them and possibly a few kernels of glass. The 1000 grit seems to have freed it up and it slides fine. I'm wondering what effects it might have if I took a little too much off in there. To the eye, it looks fine?
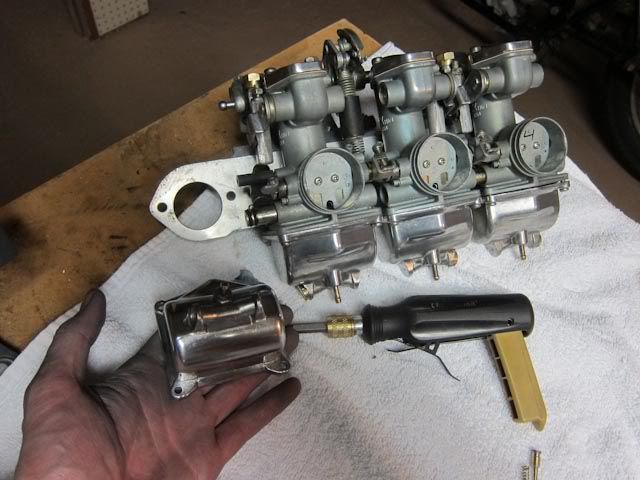


All the rubber and gaskets are new, but I'm a little concerned about the mains - they're a little rough/corroded/pitted on the outside. Looking through them, the actual orifices 'look' even and round and all the same size... but, well, if the outsides were pitted, I don't see why the insides wouldn't be funky. They're good and clean after lots of carb cleaner and compressed air at least. Once I get around to actually having a muffler and have a running bike, I'll worry about jetting and new jets.

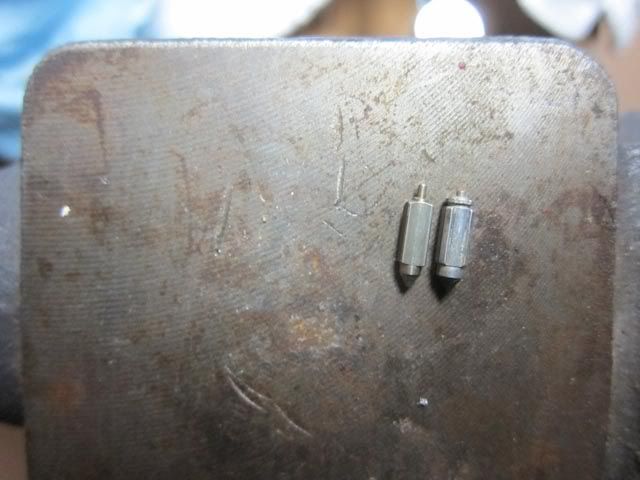
Also, I lost one of my original float valves (the one on the left) and the carb I bought had the kind on the right. I have to admit, I don't know how the hell these things affect the carb and I don't know what difference they make, but they seem to be designed pretty specifically and something tells me I can't just mix and match in there...


also, lugged my cases over to doowntown:
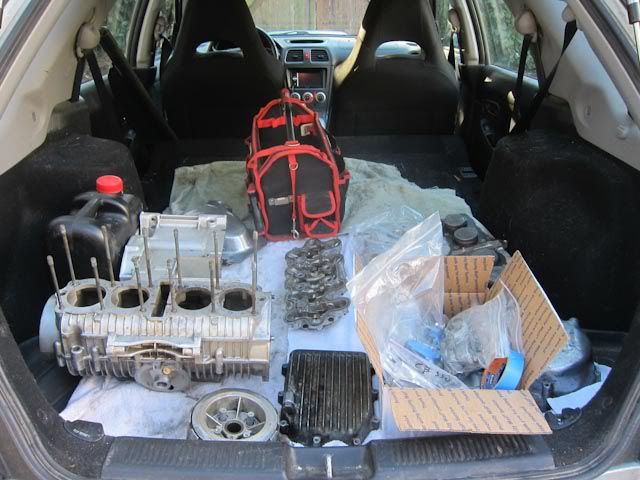


gave them a good blast down:
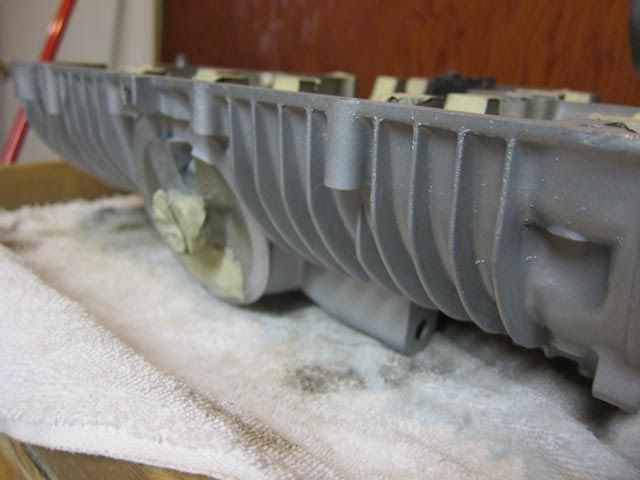


I tried using tal strip, it did nothing. I tried jasco, it did very little. Wire brushes, dremel tips.. I don't know how you guys do it. I tried blasting with walnut but that just seemed to piss the paint off. In the end I taped things up and used glass bead, telling myself I would clean everything so thoroughly that I wouldn't destroy the engine. Maybe that was the dumbest thing in the world.. maybe it'll be OK.

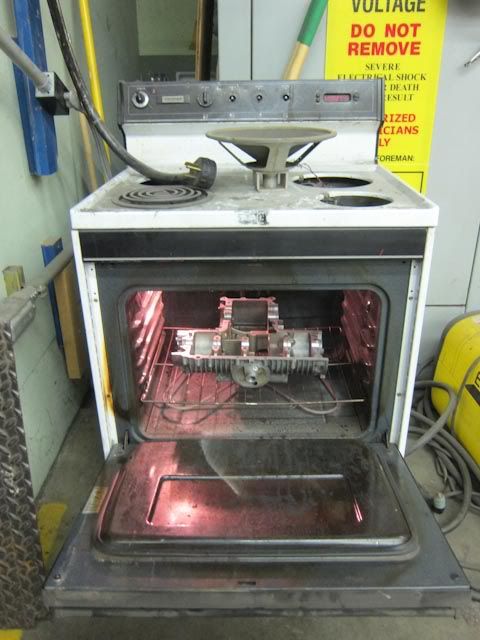
Paul advised getting the bearing out from behind the oil pump with the oven method which worked like a charm:


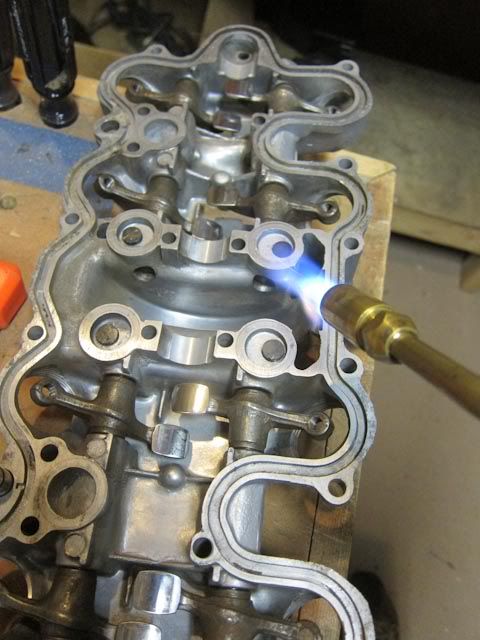
something else I may regret - since it's a '77, the rocker arm shafts are held in with wedge bolts. These bastards were seriously, seriously tight. Like I was hitting it hard enough to risk destroying the nut/thread/bolt end or just breaking the cover. I tried pb blaster, I tried using a clamp rigged up properly, but in the end, I just got it good and hot and it gave way with a few hits. I didn't like the idea of getting just one spot hot an then hitting the thing.. seems like a good recipe to warp it, but then again it has lots of bolts forcing it flush with the head. Probably should have used the oven.


and as a final note: seriously? a good screwdriver vs this lil old screw? wtf?


now to clean, clean, clean, clean, clean the cases. I'll use every single method I can find someone mentioning being a good idea and then do it again. I think I've got everything I need to assemble except a camshaft and some engine paint.

I realize a lot of people do a build the other way around - the chassis and fun bits first. Makes sense to me. For me, I'm going from the engine out. Engine/carbs/electrical/exhaust, then frame, then seat/tank/fender, then wheels/tires/suspension/brakes, then controls and lighting. Doing this the first time, it's amazing how much persistence it takes. I wonder if when I'm done I'll want to start again, thinking it will be easier, or if I'll never want to even consider it. I wonder how I'll take it if/when it turns out that the motor I've built has some serious issue (glass? compression? piston wear? rings? head gasket? journals/bearings/crank? contamination?). Y'all are committed, I'll give you that.
[/quote]
« Last Edit: February 17, 2011, 12:19:39 AM by luceja »
'75 cb400f, '77 cb550f , CB160 road racer, '88 Hawk GT track bike, FZR400 race bike, and a bunch of old hondas in boxes.

Offline paulages

  • Old Timer
  • ******
  • Posts: 3,876
  • 1976 cb735
    • DOOMTOWN RIDERS P.R.M.C.
Re: James' 77 550f - motor apart, then the rest
« Reply #66 on: February 17, 2011, 09:03:17 AM »
I think you've got it right, James. Get the engine buttoned up, as it's the most critical and time-intensive single part of your rebuild. Then it won't hold you up when it's time to put it in the frame.

When you get your cases ready to paint, bring them back down to the shop and use that oven again. Also, you can run it through the parts washer a few times and blast the #$%* out of all of the oil galleries with compressed air. You'll also want to run a tap through all of the screw holes to clean them up.
« Last Edit: February 17, 2011, 09:05:04 AM by paulages »
paul
SOHC4 member #1050

1974 CB550 (735cc)
1976 CB550 (590cc) road racer
1973 CB750K3
1972 NORTON Commando Combat
1996 KLX650 R

Offline luceja

  • Enthusiast
  • **
  • Posts: 169
Re: James' 77 550f - motor apart, then the rest
« Reply #67 on: May 16, 2011, 12:50:46 PM »
Haven't updated the thread in a long time, but have been moving along piece by piece. I will update with pics, but I finally have something genuinely unique to document and show: I picked up a set of what appear to be shelby dowd 500/550 mags - dual disc front, disc rear, with what appear to be 750 style tokico front calipers and brackets, but no rear caliper, master cylinder, or brackets, etc.

Big concern right now is that the frame is off getting powdercoated and I'm worried I will have to mod the frame to work a rear master cylinder. Hopefully I can make that happen just using brackets mounted to the frame.

To be honest I really didn't want to powdercoat the frame, but when I started stripping the frame and realized that I really couldn't get into the spaces (brackets, welds, etc) to prep for paint without blasting, the perfectionist in me just said 'give up on this one and just pay someone'. If I had access to a blasting cabinet that could fit a frame, things would have been different.

OK, pics to come.
'75 cb400f, '77 cb550f , CB160 road racer, '88 Hawk GT track bike, FZR400 race bike, and a bunch of old hondas in boxes.

Offline luceja

  • Enthusiast
  • **
  • Posts: 169
Re: James' 77 550f - motor rebuild resto-mod, now with mags!
« Reply #68 on: May 17, 2011, 11:53:07 AM »
Bottom end was painted with pj1 satin black, no primer, baked in oven. I baked the halves seperate before assembly and it turned out well- looks like minimal chipping. The pj1 was great to use. I wiped down with acetone before painting, heated the halves and the paint. You could see a couple spots where the metal may have not been clean by how the paint stuck (or didn't want to stick). Motor assembly went fine, used hondabond. Only fear is that I didn't replace the primary chain. I need to doublecheck that it's not contacting the case before putting on the top end.


Insides are nice and clean:


A LONG time ago I had the head done (surface, valves etc) and it came back from the machine shop perfectly fresh and raw metal, but now there's light oxidation on it.. which is a huge pain in the ass right now, because I can't paint it, I don't know how to get in there without stripping the head and either blasting it or having it dipped/cleaned again. Another roadblock.. I just want this damned motor together.

Took the frame, centerstand and swingarm to get powdercoated. Going with a 60% gloss black which looks like stock. I didn't want to powdercoat but like I mentioned, I got really frustrated/perfectionist with the frame cleanup and ended up just giving in so I can move forward.

I used the socket / bolt method to get the shock bushings out of the swingarm:


I'm wondering where I can source fresh bushings.

Next, I followed a craigslist ad for some 'cb550' parts because I could see a set of shelby dowd wheels in the picture. I ended up trading a little pistol I don't use for a whole pile of parts mostly related to a '71 500/4. Along with the stock and cast wheels, there was the top of a motor, carbs, another frame, tanks, stock and fiberglass fenders, an aftermarket exhaust, a cam which I am suspicious is a cb750 cam and possibly a performance one, etc etc etc. It's going to be a while going through things.


twas all under the tarp


loaded in


frames


About half of the haul


tanks that came with it all


Looks like someone was plastigaugin' and note the piston circlips..


Mocked up the brakes on my forks


you can see the weld on the inside of the right front bracket. The weld doesn't go through the bracket.


Inside of the calipers - no seal, piston looks about the same as the stock tokicos..


look at that big old sprocket. 48t.


shelby dowds, right? I see no markings without taking things apart.


Same spacing and diameter as the 550 forks...


close up of the brand stamp


exhaust that came with the pile. Like everything else, it's in rough shape.

This cam is definitely longer than 550/500, which makes me think it's 750. The lobes have no pitting. Note the markings:


Some really nice 500 gauges which will go on the 550. I was stoked to find these because my 550 gauges are pretty beat, and these 500's are smaller. Score!

There's some parts that aren't 500/550 in the mix.... looks like 750 oil pans and part of the clutch cover...


There's also side covers and a gauge from a yamaha exciter 250..  we'll see.

To be honest, there's enough of the 500/4 here that it makes sense to clean it up and put it together when I'm done with my 550. It doesn't end, huh?
« Last Edit: May 17, 2011, 12:10:23 PM by luceja »
'75 cb400f, '77 cb550f , CB160 road racer, '88 Hawk GT track bike, FZR400 race bike, and a bunch of old hondas in boxes.

Offline luceja

  • Enthusiast
  • **
  • Posts: 169
Re: James' 77 550f - motor rebuild resto-mod, now with mags!
« Reply #69 on: May 26, 2011, 03:51:31 PM »
OK - lots in progress.

Got the frame. swingarm and centerstand back from the powdercoater:


And put the motor in the frame:


But after, I remembered the last time I assembled the engine I let it sit with the bolts snugged and didn't torque them. So, pulled it out of the frame, back down to the basement, and torquing to spec actually broke two of the case bolts, which was really unexpected considering how lightly they go on. So, had to split the cases, strip the motor, clean everything, hondabond and back together for the 4th time?


At this point I can put the bottom of this motor together really, really quickly. One upside is I definitely used too much hondabond last time. This time I angled the top of the motor and could see in the reflection exactly how thick and even it was going on and I think I did a better job this time. Also, I took the opportunity to go down to tacoma screw and replace as much of the case bolts as possible with stainless socket cap types. The only things I left original were the 10 crank bolts, the two above the oil filter (for clearance), and two of the odd ones (long 8mm at the top corner of the case, long 6mm that goes up through the bottom) which they didn't have. Cleaned up and painted the front mounts (unhappy with the 'epoxy' rattlecan - it was soft after curing and softer after an attempt at baking. Back to good old rustoleum for that kind of stuff), wirewheeled all of the hardware back to shiny and put it into the frame. As a tip, put the back bottom long bolt through first. It's easier to finagle the front mounts, very hard to finagle that long one in the back.

I left the bushings in the swingarm when it got powdercoated, so they're toast:


So I'm trying to get the bushings out of the swingarm from a cb500 frame I have:


Which has the swingarm bolt type that has grease fittings on the ends of the bolts:


but one of the fittings is very clogged unfortunately.

My 550 came with tapered bearings, but they're driving me crazy: the top bearing doesn't fit snugly on the triple post, and there's nothing that really centers it, so it bounces around. This photo is supposed to show how it doesn't fit tightly to the post:


The top of the bearing looks like it's made to seat balls.. hmm? Either way, it has some pitting so I ordered an all balls kit to replace it. At some point someone REALLY buggered up the triple post.. The threads were so shot I broke my kit tool that puts the top on, and had to work the threads with a file to clean them up. I may use the cb500 triple I have instead.. it's not so messy.

Got some sweet old grips:


And a gratuitous 'it's summer, go ride' shot from a ride on the 400 the other day:


« Last Edit: May 26, 2011, 03:57:04 PM by luceja »
'75 cb400f, '77 cb550f , CB160 road racer, '88 Hawk GT track bike, FZR400 race bike, and a bunch of old hondas in boxes.

Offline luceja

  • Enthusiast
  • **
  • Posts: 169
Re: James' 77 550f - motor rebuild resto-mod, now with mags!
« Reply #70 on: May 26, 2011, 03:53:17 PM »
And on a seperate note, I realized that judging by the 48t sprocket, I probably have cb750 shelby dowd mags, which I understand will have fitment issues on a 550 (sprocket offset). Meh. Meanwhile, an identical set went for 600 on ebay the other day. I talked to the seller and he said he's seen them go for 1200. Hmm. I've seen talk of much less on this forum. Anyhow...
'75 cb400f, '77 cb550f , CB160 road racer, '88 Hawk GT track bike, FZR400 race bike, and a bunch of old hondas in boxes.

Offline Greggo

  • Somebody's
  • Old Timer
  • ******
  • Posts: 4,164
  • Helmets Save Lives. Period.
Re: James' 77 550f - resto-mod, now with mags!
« Reply #71 on: May 26, 2011, 04:20:43 PM »
Those rims look like Kimtabs.  I could be correct, but if I'm right, they're worth a small fortune on ebay (like 800 bucks...)

Offline luceja

  • Enthusiast
  • **
  • Posts: 169
Re: James' 77 550f - resto-mod, now with mags!
« Reply #72 on: May 26, 2011, 04:34:04 PM »
I think kimtabs are the snowflake styled ones that are actually magnesium (like this http://4.bp.blogspot.com/-dzU1j0SdLlY/TcScGrFD_8I/AAAAAAAASHY/yoAn_32OcBQ/s1600/KimTabs.jpg) - I only figured they were shelby dowds from this post - http://forums.sohc4.net/index.php?topic=44776.0.

Meanwhile, all balls steering bearings in the mail. Sweet.
'75 cb400f, '77 cb550f , CB160 road racer, '88 Hawk GT track bike, FZR400 race bike, and a bunch of old hondas in boxes.

Offline Flying J

  • Old Timer
  • ******
  • Posts: 3,386
Re: James' 77 550f - resto-mod, now with mags!
« Reply #73 on: May 26, 2011, 07:38:43 PM »
Nice score on the loot. 8) What is your method of assembling the lower cases?

Offline Greggo

  • Somebody's
  • Old Timer
  • ******
  • Posts: 4,164
  • Helmets Save Lives. Period.
Re: James' 77 550f - resto-mod, now with mags!
« Reply #74 on: May 26, 2011, 08:43:31 PM »
I think kimtabs are the snowflake styled ones that are actually magnesium (like this http://4.bp.blogspot.com/-dzU1j0SdLlY/TcScGrFD_8I/AAAAAAAASHY/yoAn_32OcBQ/s1600/KimTabs.jpg) - I only figured they were shelby dowds from this post - http://forums.sohc4.net/index.php?topic=44776.0.

Meanwhile, all balls steering bearings in the mail. Sweet.

Yup, I was wrong.