Author Topic: AgPete139's K5 Cafe Project  (Read 4679 times)

0 Members and 1 Guest are viewing this topic.

Offline AgPete139

  • Full Member
  • *
  • Posts: 18
AgPete139's K5 Cafe Project
« on: April 21, 2013, 01:16:00 am »
Hey guys,

I'm just going to throw a bunch of pics in here (since we all know we love them), and hopefully you can figure out what's going on.

As she stands tonight, 4/20/2013:


  • Kleen-ed the inside of the tank. Carbs kept fouling/gunking, and I threw screws, nuts, bolts, & washers in with 4 gallons of vinegar for a 3 days. Shook, dumped, rinsed, then coated. It's unbelievable how much rust came out. Seriously, I continued to be amazed with each additional shake how many clumps kept falling out.


  • New parts!

  • After seeing the rust, I wanted to make sure it hadn't rusted a hole in the tank. Stripped, cleaned, glassed & Bondo'd, primered, & rattle-canned painted tank here at home. It's currently being wetsanded, and given a proper coat of true white by my bodyman. It had 7...SEVEN layers of different colors of paint (one could have been primer though). Maybe that's why he kept repainting it...he didn't know to use primer?


Friend, who rides a Ninja 250, is assisting:


  • Upgraded to Dyna Coils 3 Ohm and the Dyna S igntion (cheaper setup, not the $350 ignition). How do I advance/retard the timing with a magnetic pickup, as opposed to the contact points? Rotate the assembly, right? I am unsure how to get it correctly in sync. I checked my Chilton. I guess I'm stupid?


  • Made a practically new harness from scratch in most areas with 18 GA from O'Reilly's. It had frayed & burned small wire (over 20 GA) from previous owner. Color coding / wire diagram is consistent. (except for brown, don't have that spool color). A black wire was twist-tied to a red wire, capped to a yellow wire, electrical taped to a white wire! This was everywhere!

Ripped this #$%* out:


  • Reconditioned/cleaned up tach & speedo. Added LED SAE #57 / A9S bulbs from SuperBrightLEDs.com. $2 each.  Each stock incandescent bulb draws 3 amps current, IIRC. Each LED draws 0.25 amps.

    After 10 bulbs...2.5 amps is SUBSTANTIALLY less than 30 amps on this old charging system. I've read on here that this is a problem, so I decided to go this route. It actually lights up now, too! It's a nice white background with a green tinge (from the face) on the gauges.


  • It didn't have a working high beam. Fixed that. Also, fixed horn & diaphragm. Needs to be louder if I want to be heard at 70 mph. Re-soldered connections. I have a horn now! Woohoo!


  • My lower tree clamp was secured with the below attached, solo, copper bolt that was stripping out. It was missing other bolts! This only one left could have dislodged while riding.


  • I have also discovered that random SAE/STD bolts are being used, and that suspension components are being used with varying nuts sizes (10mm, 12mm, 1/2" all on the same part). 10mm nuts should probably not be used on suspension components, just saying.
  • I'm going to polish the spokes, rims, engine pieces, and brake caliper. Crappy black paint is flaking off.


[/list]


I'm finding out I paid too much for her from Craigslist. :-(


It's late. This seems scatter-brained.

More to come later.


Pete
K5 -- Cafe Racer in progress

Offline AgPete139

  • Full Member
  • *
  • Posts: 18
Re: AgPete139's K5 Cafe Project
« Reply #1 on: April 21, 2013, 01:39:21 am »
This is my eventual concept / goal:


I ordered a few toys earlier today.

I also bought the Rocket 4 Seat from Nostalgia Speed & Cycle. That dude is wicked cool. They have picked up both times I called & ordered parts, and I chatted with him. He is the nicest guy around, and VERY helpful when we were discussing seating options & bolting. This guy has my business first.

I thought Dime City couldn't be bothered, and was rude to me on the phone. I left 1 message, and called 5 separate times before I actually got the receptionist. After all of that, they did not have 4 of the seats I was looking for in stock, and apparently for one of their seats (that they sell, but don't make) is back-ordered for 2 months. Contacted the supplier, no dice.


Oh, sidenote: I shaved down the contacts on the rear brake switch, and pulled the spring out for more tension. I reassembled it and glued it together. I wish I had taken it apart FIRST before being hasty and ordering a brand new rear brake switch from Carpy.


BTW, what is this part? I've been trying to figure it out...


K5 -- Cafe Racer in progress

Offline bjbuchanan

  • Master
  • *****
  • Posts: 2,276
Re: AgPete139's K5 Cafe Project
« Reply #2 on: April 21, 2013, 07:13:51 pm »
If that is wired to that plug I would guess it is a later style rectifier pulled from some bike with a compatible charging system. Converts the alternator AC to your bike DC. Stock looka like dis

https://www.google.com/search?hl=en&site=imghp&tbm=isch&source=hp&biw=1366&bih=664&q=cb750+rectifier&oq=cb750+rectifier&gs_l=img.3..0.1885.6786.0.7218.15.7.0.8.8.0.92.515.7.7.0...0.0...1ac.1.9.img.QBY0CAGQmKQ

The crusty looking ones
The dirty girl-1976 cb750k, Ebay 836, Tracy bodykit
Round top carbs w/ 38 pilots, middle needle position, airscrew 7/8ths out, 122 main jet
Stock airbox w/ drop in K&N, Hooker 4-1

Don't trust me alone with a claw hammer and some pliers

Offline AgPete139

  • Full Member
  • *
  • Posts: 18
Re: AgPete139's K5 Cafe Project
« Reply #3 on: April 21, 2013, 10:24:51 pm »
If that is wired to that plug I would guess it is a later style rectifier pulled from some bike with a compatible charging system. Converts the alternator AC to your bike DC. Stock looka like dis

The crusty looking ones


Thank you Buchanan, but I'm still not completely convinced. Isn't this this is the rectifier from the bird's nest?


I still don't know what part this black cube plays in helping the rectifier (for AC/DC conversion).


The wiring diagrams I have pulled online, for the most part, don't exactly coincide with the standard Honda color scheme, hence the overhaul. I tried looking again today, and found nothing new.  Does anyone else have any ideas?

G     =  Solid dark green
G/R  =  Dark green with red stripe
Bl     =  Black
Y/R   =  Yellow with red stripe
LG/R =  Light green with red stripe

To my understanding:
LG/R goes to the neutral safety light, , neutral switch, and starter safety unit.
Y/R goes to starter magnetic switch/15amp fuse. (This is the starter solenoid, right?)
Bl is obviously a power wire, stemming from where is not known.
G & G/R are unknown.

Any other thoughts on this guys? If I don't reach an epiphany by tomorrow evening, I'll try to post this question in another section, which isn't the "Project Shops" section.


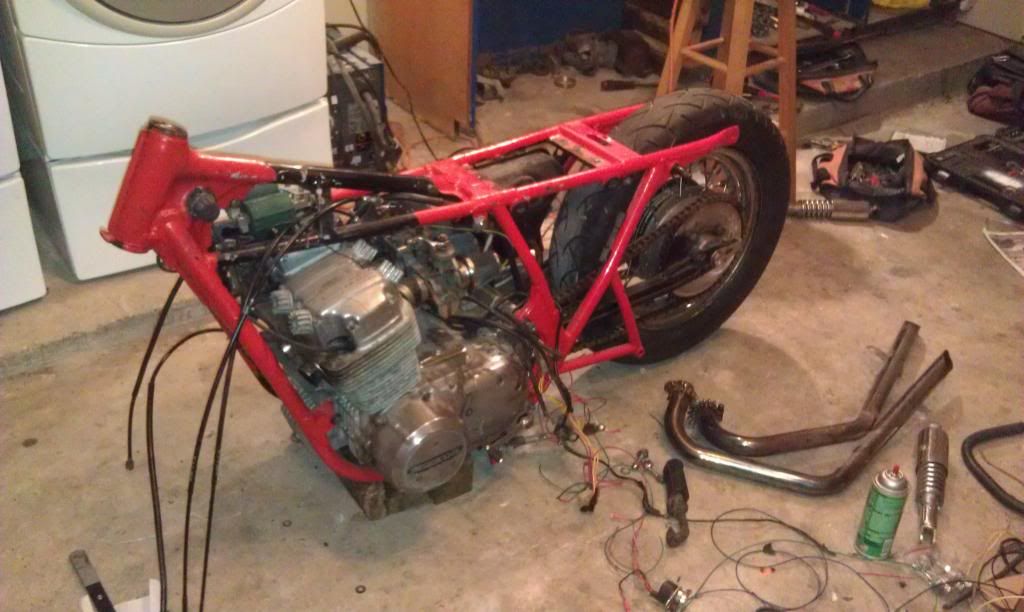
Well, on another note, as I looked at the bike tonight, I got a little disgusted at the frame. A latex paint was used on it, and while I'm sure it looked good at the time, it looks terrible now against the test of time. She is flaking and chipping more every day. Not only that, but the previous previous owner only painted the outside frame, what he could see and reach. On the inside, underneath, and in crevices, you still see the original black frame. Also, the red latex is really runny and drippy in many areas.

I've decided tonight that this will be a full overhaul. The frame will be powdercoated. Putting so much time into something with a sh!tty foundation is a waste, I suppose.

More of the bike was disassembled tonight (rear shocks, exhaust, footpegs, support bracing, battery box + regulator, & oil catch can.


K5 -- Cafe Racer in progress

Offline iron_worker

  • Master
  • *****
  • Posts: 2,081
Re: AgPete139's K5 Cafe Project
« Reply #4 on: April 22, 2013, 09:27:10 am »
That piece would be the Safety Starting Unit I think. Looks like it has the little bolt flanges broken off. (And yes, that second piece you posted was the rectifier.)

http://www.cmsnl.com/honda-cb750-four-k5-usa_model483/partslist/F++25.html#results (#5 from that fiche)

It basically only allows you to start the bike with the clutch pulled and with it in neutral I believe.

P.S. - More pics of your helper.  ;D

IW
« Last Edit: April 22, 2013, 09:29:16 am by iron_worker »

Offline AgPete139

  • Full Member
  • *
  • Posts: 18
Re: AgPete139's K5 Cafe Project
« Reply #5 on: April 22, 2013, 11:12:10 am »
Wow, that is it! Since the bike is already missing the neutral switch and dummy light, I'll be bypassing this. Not an absolute necessity, so it's got to go by cafe standards, right? Ha.

Thank you very much, IW! Thank you even more for the linky. Hopefully I'll be bothering people less with that additional resource.  :)

As thanks, here's a Meat Turtle. It's 3 hotdogs, covered with a hamburger beef patty, and overlaid with laced bacon strips. That's a carnivor's delight!


Pete
K5 -- Cafe Racer in progress

Offline AgPete139

  • Full Member
  • *
  • Posts: 18
Re: AgPete139's K5 Cafe Project
« Reply #6 on: April 22, 2013, 10:41:31 pm »
Well y'all, I played around a little more tonight.


Here's the frame by itself. Note the beautiful weld puddles! It looks even worse without anything hiding it. Maybe that's why I'm initially leery of women that wear too much makeup.   ;D


Oh man! I think I just killed Mila Kunis in my fantasy world:  :o


I will be cutting the frame and welding tabs onto it over the next few days. I'm also going to trim the frame for larger tolerances to clear the motor easier when I go to install it. After that, it goes to powdercoat for a proper frame color scheme.  I found 50-75% of the bolts were not torqued to spec or were missing entirely regarding rear wheel, engine, & tranny assemblies.


I rigged up a pretty nifty pulley system in my garage to lift the frame off, drop the bike on the right side, and give additional support where needed.

After tonight's ordeal, I'm going to invest in a bike lift. On the far backburner is a mid-engine 914/6 that is apart as well, and all of the P-guys say to get one when the time comes to reinstall. Might as well get it now...


Oh, I also scored this exact setup for only $260 from Craigslist yesterday (barely used, minor scratches in a couple places):   :)


Also, for anyone else reading this, definitely remove the carbs from the motor (at the rubber elbows) before attempting to remove the frame. Some people have been successful, but in my instance, it made a considerable positive difference with play. Also, remove the finned camshaft valve caps on the valve cover. This truly made a huge difference as well.

These are going to be rebuilt and possibly soda blasted. I don't think it really needs a soda blasting though.


Pete
K5 -- Cafe Racer in progress

Offline AgPete139

  • Full Member
  • *
  • Posts: 18
Re: AgPete139's K5 Cafe Project
« Reply #7 on: April 27, 2013, 12:44:11 am »
That piece would be the Safety Starting Unit I think. Looks like it has the little bolt flanges broken off. (And yes, that second piece you posted was the rectifier.)

http://www.cmsnl.com/honda-cb750-four-k5-usa_model483/partslist/F++25.html#results (#5 from that fiche)

It basically only allows you to start the bike with the clutch pulled and with it in neutral I believe.

P.S. - More pics of your helper.  ;D

IW


She laughed, and said I should add these pictures specially for you, IW.


She came over tonight to help with the frame. Pictures of the naked and shaved redhead will be up soon. :)

I detabbed the frame, and everything associated with the center stand is gone. I also trimmed some of the brackets and interfaces got a smoother, sleeker look.

In the above picture, I was showing her how to switch plugs, lean the a:f, and a couple other maintenance issues.

She's a good friend. I've gotta get a picture of my wife working on the bike, too.

 Have a good weekend, y'all.

 
« Last Edit: April 27, 2013, 12:47:25 am by AgPete139 »
K5 -- Cafe Racer in progress

Offline AgPete139

  • Full Member
  • *
  • Posts: 18
Motor Update
« Reply #8 on: May 07, 2013, 08:13:50 pm »
I've completely stripped the frame, removed all of the tabs, and shaved some close areas with the motor. I rounded out smaller welds and brackets, too. Subtle differences that make a difference to me, I guess.

I tore into the motor, simply for the piece of mind that it's fresh and nothing is going to go to #$%* while I'm in a corner one day. I also did it because I want to paint it a nice gloss black. /vain  ;D

All of the cylinders looks good, and #4 looks to have run a little bit richer than the rest judging from the carbon deposits. Everything appears to be original, with the exception of the exhaust flange bolts when the previous owner swapped them out for the drag TT pipes.

The heads and pistons will be cleaned, the valves will be lapped, and the cylinder bores will be honed.

Stay tuned...


K5 -- Cafe Racer in progress

Offline AgPete139

  • Full Member
  • *
  • Posts: 18
Re: AgPete139's K5 Cafe Project
« Reply #9 on: May 07, 2013, 08:17:32 pm »
NOTE: The exhaust flange bolts on #2 & #3 are completely stripped from the previous owner as well. One of them was rounded out, while the other had a screwdriver bit broken in it. I tried to remove the #3 bolt, but I broke my Craftman extractor bit.


Should I do mainly a top end rebuild, or should I dig into the lower half as well?


K5 -- Cafe Racer in progress