Author Topic: Sandcast #97 restoration  (Read 201882 times)

0 Members and 3 Guests are viewing this topic.

Offline MoMo

  • Really Old Timer ...
  • *******
  • Posts: 8,275
  • Ride like you're invisible
Re: Sandcast #97 restoration
« Reply #600 on: January 04, 2015, 02:50:59 PM »
I'd take the starter apart Mark, you could find oxidation and a good cleaning should make it purr

Offline markb

  • When I finish my current project I might be a
  • Master
  • *****
  • Posts: 1,615
Re: Sandcast #97 restoration
« Reply #601 on: January 04, 2015, 03:38:06 PM »
Nice progress Mark!  You wouldn't happen to have the specs handy for the two screws on the rear of the breather cover, would you?  I'm sure it's M6x1, but I'm not sure of the length.  I seem to have used them or lost them, and need a set before I put the motor back in.  Thanks!
The book says 71mm but mine measured closer to 70mm.  The diecasts are 75mm.  They may work too because mine didn't stick out quite as much before tightening as the other screws did.  I always put the screws in without the cover and then measure to make sure they will tighten.  Sometimes there's a bad thread or junk in the hole or even a mistake in the parts book.  For what it's worth I checked my notes and E1789 had 69mm.  Sorry, that's probably more information than you wanted/needed.  ::)
1969 CB750 sandcast #97 restored - Sold Restoration thread link
1969 CB750 sandcaxt #576 - Sold
1969 CB750 sandcast #1553 - Sold
1969 CB750 sandcast #1990 - Sold
1969 CB750 sandcast #5383 restored - Sold Restoration thread link
1970 CB750 K0 restored - Sold
2010 H-D Tri Glide Ultra Classic (Huh?)

Offline Prospect

  • Expert
  • ****
  • Posts: 1,171
Re: Sandcast #97 restoration
« Reply #602 on: January 04, 2015, 06:44:01 PM »
Are you getting a good ground to the starter after freshly painting the cases? 
Current Bikes

1969 CB750  Sandcast #256
1971 CB750K1
1972 CB750K1
1975 CB400F
1975 GL1000 Goldwing
1954 Harley Davidson Panhead
1957 Harley Davidson Panhead

Toronto Canada

Offline markb

  • When I finish my current project I might be a
  • Master
  • *****
  • Posts: 1,615
Re: Sandcast #97 restoration
« Reply #603 on: January 05, 2015, 05:38:59 AM »
I actually tested it before assembling it into the case.  I dug out the best of my other starters and tried the same test and it worked.  Then I compared the two and found that what I thought was an early NOS starter wasn’t even the same, as you can see in the photo.  :o The one on the left is the “NOS” one.  Probably for a later diecast.  I bought it several years ago and supposedly it was an early one and it came in a Honda box with the correct part number.  I never really looked that close at it, just put in on the shelf waiting to install.  Looking closer at it now I think maybe it might have been used or at least installed.  ???  I think I got scammed.  I’m glad I tested it or I would have installed an incorrect part and it would have sucked to have to replace it later.  ::)

1969 CB750 sandcast #97 restored - Sold Restoration thread link
1969 CB750 sandcaxt #576 - Sold
1969 CB750 sandcast #1553 - Sold
1969 CB750 sandcast #1990 - Sold
1969 CB750 sandcast #5383 restored - Sold Restoration thread link
1970 CB750 K0 restored - Sold
2010 H-D Tri Glide Ultra Classic (Huh?)

Offline ekpent

  • Really Old Timer ...
  • *******
  • Posts: 13,512
  • To many bikes-but lookin' for more
Re: Sandcast #97 restoration
« Reply #604 on: January 05, 2015, 06:33:13 AM »
Yet another difference I have learned, thanks for posting all this up Mark, very educational.   What is the length of those 1/2 thread screws you are looking for ? - can check my stash sometime.
« Last Edit: January 05, 2015, 06:35:26 AM by ekpent »

Offline Greggo

  • Somebody's
  • Old Timer
  • ******
  • Posts: 4,164
  • Helmets Save Lives. Period.
Re: Sandcast #97 restoration
« Reply #605 on: January 06, 2015, 11:39:57 AM »
Nice progress Mark!  You wouldn't happen to have the specs handy for the two screws on the rear of the breather cover, would you?  I'm sure it's M6x1, but I'm not sure of the length.  I seem to have used them or lost them, and need a set before I put the motor back in.  Thanks!
The book says 71mm but mine measured closer to 70mm.  The diecasts are 75mm.  They may work too because mine didn't stick out quite as much before tightening as the other screws did.  I always put the screws in without the cover and then measure to make sure they will tighten.  Sometimes there's a bad thread or junk in the hole or even a mistake in the parts book.  For what it's worth I checked my notes and E1789 had 69mm.  Sorry, that's probably more information than you wanted/needed.  ::)

That gives me a range Mark, which is perfect. Thanks!!

Offline markb

  • When I finish my current project I might be a
  • Master
  • *****
  • Posts: 1,615
Re: Sandcast #97 restoration
« Reply #606 on: January 06, 2015, 02:45:30 PM »
Yet another difference I have learned, thanks for posting all this up Mark, very educational.   What is the length of those 1/2 thread screws you are looking for ? - can check my stash sometime.
For sure I need a 50mm.  I'll know more after next week.  I'm heading out of town for a week and hopefully when I get back I'll be able to finish put on the covers. 
1969 CB750 sandcast #97 restored - Sold Restoration thread link
1969 CB750 sandcaxt #576 - Sold
1969 CB750 sandcast #1553 - Sold
1969 CB750 sandcast #1990 - Sold
1969 CB750 sandcast #5383 restored - Sold Restoration thread link
1970 CB750 K0 restored - Sold
2010 H-D Tri Glide Ultra Classic (Huh?)

Offline markb

  • When I finish my current project I might be a
  • Master
  • *****
  • Posts: 1,615
Re: Sandcast #97 restoration
« Reply #607 on: January 18, 2015, 03:42:04 PM »
Back in town and I got my rebuild kit and I’m ready to tear into the starter.  The first thing I noticed is there are marks that show where the end caps line up.


There was quite a bit of carbon dust in it.


I cleaned up everything real good and here’s the new springs and brushes installed.


I tested it and it ran fine.  Here‘s the starter in the engine.  By the way I did tear apart the “NOS” starter.  It looked like brand new inside.  The reason it wouldn’t run is the armature is stuck.  I tried tapping it with a hammer and it wouldn’t come out.  I didn’t hit it real hard.  I’ll look closer at it later. 
« Last Edit: January 18, 2015, 04:00:17 PM by markb »
1969 CB750 sandcast #97 restored - Sold Restoration thread link
1969 CB750 sandcaxt #576 - Sold
1969 CB750 sandcast #1553 - Sold
1969 CB750 sandcast #1990 - Sold
1969 CB750 sandcast #5383 restored - Sold Restoration thread link
1970 CB750 K0 restored - Sold
2010 H-D Tri Glide Ultra Classic (Huh?)

Offline markb

  • When I finish my current project I might be a
  • Master
  • *****
  • Posts: 1,615
Re: Sandcast #97 restoration
« Reply #608 on: January 19, 2015, 06:27:37 AM »
I ran into another snag.  I have a NOS breaker assembly that I installed.  I got the point gap adjusted and went to set the timing and found that the plate fit very tightly into the mounting on the case.  Even with the three screws out I couldn’t turn the plate.  So I took all the parts from the NOS plate and mounted them on a decent used plate.  Fits perfect and I can rotate it easily.  In the process I found that there are differences in the plates.  The early version is on the left.  The main difference is in the lubricating pad mount.


I reset the gaps and then worked on setting the timing.  The 1-4 adjustment is just about to the end of the slots.  The 2-3 adjustment is to the end of the slots and just to the position where the points are opening and in the direction it should go relative to how much 1-4 is off.  Has anyone seen this before?  It just seems odd to me that I would be right at the limits.  I compared the parts to make sure the ones I swapped were the same.  Something tells me it might have something to do with the spark advancer.  I tore everything apart and checked the spark advancer and everything seems OK.  Put it back together and the same thing.  I’m just not feeling good about it.  Could it be the cam on the spark advancer is worn.  Any thoughts?

1969 CB750 sandcast #97 restored - Sold Restoration thread link
1969 CB750 sandcaxt #576 - Sold
1969 CB750 sandcast #1553 - Sold
1969 CB750 sandcast #1990 - Sold
1969 CB750 sandcast #5383 restored - Sold Restoration thread link
1970 CB750 K0 restored - Sold
2010 H-D Tri Glide Ultra Classic (Huh?)

Offline greenjeans

  • Industrial strengthed dreamer.
  • Old Timer
  • ******
  • Posts: 2,962
  • 1972 CB750K2
Re: Sandcast #97 restoration
« Reply #609 on: January 21, 2015, 09:34:09 AM »
Been watching your sandcast buildups for quite a while now.  I'm the type of guy that occasionally travels great distances to see one of my favorite bands in a location that I haven't seen.   I swear, this bike is going to turn into some sort of pilgrimage for me to see it.  You sir, are setting the bar.
Yep, I'm the kid that figured out how to put things back together...eventually.

Offline markb

  • When I finish my current project I might be a
  • Master
  • *****
  • Posts: 1,615
Re: Sandcast #97 restoration
« Reply #610 on: January 25, 2015, 03:45:32 PM »
Thank you for the flattering comments.  If I can figure out my timing issue I would almost feel like I deserve it.  :D 

A bent shaft seems the most logical so I rigged a setup to check it.  I first mounted the magnetic base to my cart but the engine supports aren’t very rigid so whenever I turned on the rotor bolt the indicator would wiggle.  I found a 7/16” bolt that went in tight on the right, upper engine mount hole.  Then I mounted the magnetic V-base on the bolt.  It doesn’t look very solid but I checked it buy pushing on the indicator from both sides and it always returned to the same spot.  So I found there was .025” run out.  I was able to straighten it to less than .001”.  I figured that had to be the problem.  I put everything back together, set the point gap and when I tried to set the timing it was worse!    :o I hadn’t put the nut on the spark advancer yet and found it had a lot of play on the shaft.  I put the nut on and tried again and still the same.  Now I was afraid I might have bent the shaft when I tightened the nut so I took it all apart and it still indicated less than .001”.  I put it all back together – still the same thing.  ??? In the course of the next 5 hours I swapped sparked advancers, points, point plates and still couldn’t get there.  Finally by pushing the points and the points plate to one side of the clearance and reducing the point gap down to .012” I was able to get the points to break right at the F marks.  But I am still bottomed out in the slots for the timing adjustment.  It just doesn’t seem right but I don’t know what else to do.  It’s not like I haven’t done this before but I never had this issue.  Any ideas?
« Last Edit: January 25, 2015, 04:00:44 PM by markb »
1969 CB750 sandcast #97 restored - Sold Restoration thread link
1969 CB750 sandcaxt #576 - Sold
1969 CB750 sandcast #1553 - Sold
1969 CB750 sandcast #1990 - Sold
1969 CB750 sandcast #5383 restored - Sold Restoration thread link
1970 CB750 K0 restored - Sold
2010 H-D Tri Glide Ultra Classic (Huh?)

Offline markb

  • When I finish my current project I might be a
  • Master
  • *****
  • Posts: 1,615
Re: Sandcast #97 restoration
« Reply #611 on: January 26, 2015, 07:30:33 AM »
After doing some searching it appears there is plenty of info regarding what I am seeing here.  I never had a problem with this but I will get it sorted out.  Just a question, how many degrees is it between the T and F marks?
1969 CB750 sandcast #97 restored - Sold Restoration thread link
1969 CB750 sandcaxt #576 - Sold
1969 CB750 sandcast #1553 - Sold
1969 CB750 sandcast #1990 - Sold
1969 CB750 sandcast #5383 restored - Sold Restoration thread link
1970 CB750 K0 restored - Sold
2010 H-D Tri Glide Ultra Classic (Huh?)

Offline Prospect

  • Expert
  • ****
  • Posts: 1,171
Re: Sandcast #97 restoration
« Reply #612 on: January 26, 2015, 07:44:49 AM »
I've had the same issue on one of my k1's. I would go right to thr stops to get the timing right. What I needed to do is cut down the springs on the advance mechanism to provide more tension. I might have a picture of it somewhere but the springs are just worn out and need a little bit more resistance against the plate. There is a thread on this somewhere.
Current Bikes

1969 CB750  Sandcast #256
1971 CB750K1
1972 CB750K1
1975 CB400F
1975 GL1000 Goldwing
1954 Harley Davidson Panhead
1957 Harley Davidson Panhead

Toronto Canada

Offline markb

  • When I finish my current project I might be a
  • Master
  • *****
  • Posts: 1,615
Re: Sandcast #97 restoration
« Reply #613 on: February 01, 2015, 12:32:12 PM »
I'm taking a little break from the points and the timing.  The new oil pressure wire that I bought had a ring terminal instead of the old style spade terminal.  I wanted to change it and in the process I found an excellent resource for parts for repairing wire harnesses.  Check out this thread:
http://forums.sohc4.net/index.php?topic=144682.msg1646689#msg1646689

So I was able to change to the correct terminal and it looks great especially with the NOS oil pressure sensor.  I also used the correct pan head screw instead of the hex head.


Now I can put the starter motor cover on.  I used the acorn head screws from Yamiya just for fun.

« Last Edit: February 01, 2015, 12:36:54 PM by markb »
1969 CB750 sandcast #97 restored - Sold Restoration thread link
1969 CB750 sandcaxt #576 - Sold
1969 CB750 sandcast #1553 - Sold
1969 CB750 sandcast #1990 - Sold
1969 CB750 sandcast #5383 restored - Sold Restoration thread link
1970 CB750 K0 restored - Sold
2010 H-D Tri Glide Ultra Classic (Huh?)

Offline Bill/BentON Racing

  • Really Old Timer ...
  • *******
  • Posts: 6,725
  • Ex Honda Service Manager, Cert. Honda Tech - Racer
    • BentON Racing
Re: Sandcast #97 restoration
« Reply #614 on: February 01, 2015, 12:56:39 PM »
Great news, yes awesome build. Mark, I knew you could do it! See you in Valdosta!  ;D Bill
BentON Racing Website
OEM Parts | Service | Custom Builds
BentON Racing Facebook
Over 35 years of experience working on vintage motorcycles, with a speciality in Honda SOHC/4 with a focus on the CB750 and other models as well from 1966 - 1985.
______________________________________
1993 HRC RS125 | 1984 NS400R | 1974 Honda CB750/836cc (Calendar Girl) | 1972 CB 500/550 Yoshi Kitted 590cc | 1965 Honda CB450 Black Bomber | 1972 Suzuki T350 | 1973 88cc | Z50/Falcons Pit Bike | 1967 CA100| 1974 CB350 (400F motor)...and more.
______________________________________
See our latest build 'Captain Marvel' CLICK HERE

Offline markb

  • When I finish my current project I might be a
  • Master
  • *****
  • Posts: 1,615
Re: Sandcast #97 restoration
« Reply #615 on: February 01, 2015, 02:05:19 PM »
OK, back to the ignition.  I decided to check the run out on the spark advancer shaft one more time.  I wasn’t real happy with my indicator mount so I sawed out a ¼” steel plate to mount to the points cover holes.  Nice and rigid now.  Shaft indicated true so on to the next step.


I broke the rules when it comes to diagnosing a problem.  You should only change one thing at a time to see if there is a change.  But I went ahead and put in a different spark advancer and new points.  I also put a .003” shim on the O.D. of the plate at each of the three locating ridges to take out the play and center the plate.  I saw where some guys would jam it all one way but it made more sense to me to center it.  Since I had my indicator setup I found a slick way to set the points.  The picture is a little hard to see but I put the indicator on the pivoting half of the points.  Then I put a .015” thick feeler between the points and adjusted the points until I saw the needle move .001”.  Then as I snugged it down if I saw the needle move I would tweak the adjustment until I got the screw tight.  I pulled the feeler out and when I put it back in it deflected .001” so my gap is exactly .014”.  Other side same thing.  It was super easy.  Then I did the timing.  I was concerned about the springs being tight enough to keep the spark advancer from rotating but realized that as long as you only turn the crank clockwise the friction of the lubricating felt and the points followers will keep the spark advancer in the right position.  Then I set the timing.  


As you can see the plates are rotated near the end of the slots as before but there is a good 1/16” before they would bottom out.  At least there is a little room.  And the points and timing are dead on.  Bottom line – I’m calling it good.  :) It still puzzles me a bit as to why it’s near the end of travel but I’m confidant it’s OK.  I probably shouldn’t have been concerned about it.  ::)

1969 CB750 sandcast #97 restored - Sold Restoration thread link
1969 CB750 sandcaxt #576 - Sold
1969 CB750 sandcast #1553 - Sold
1969 CB750 sandcast #1990 - Sold
1969 CB750 sandcast #5383 restored - Sold Restoration thread link
1970 CB750 K0 restored - Sold
2010 H-D Tri Glide Ultra Classic (Huh?)

Offline markb

  • When I finish my current project I might be a
  • Master
  • *****
  • Posts: 1,615
Re: Sandcast #97 restoration
« Reply #616 on: February 01, 2015, 02:46:58 PM »
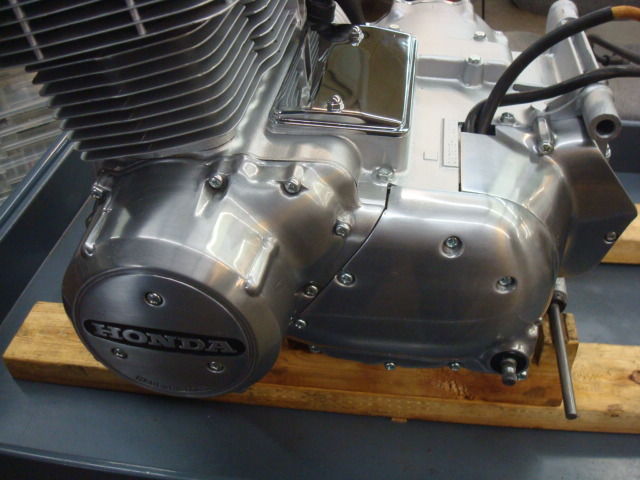
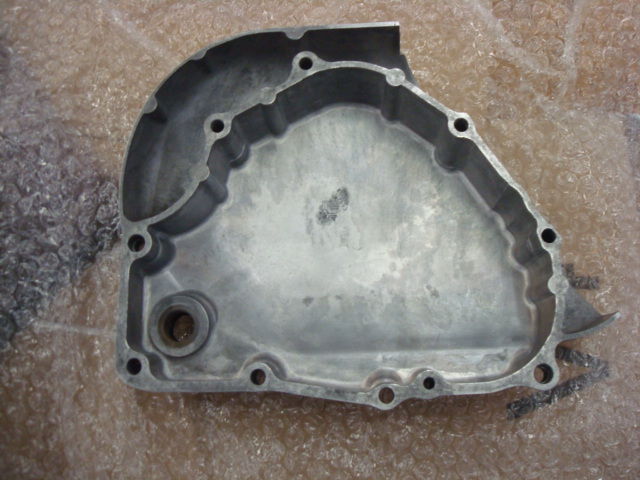
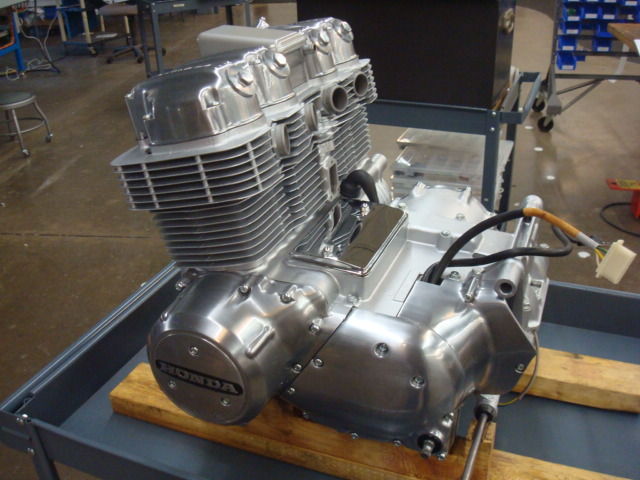
By the way, I had the rotor cover off and used the rotor bolt to turn the crank.  Then I didn’t have to worry about bending the spark advancer shaft.  So now I can put on the left side covers.  Here is the transmission cover on the inside.  This is the one that came off and should be correct.

Here is the sprocket cover.  I believe it to be correct too although it was missing when I got the bike.  If someone thinks otherwise please let me know.
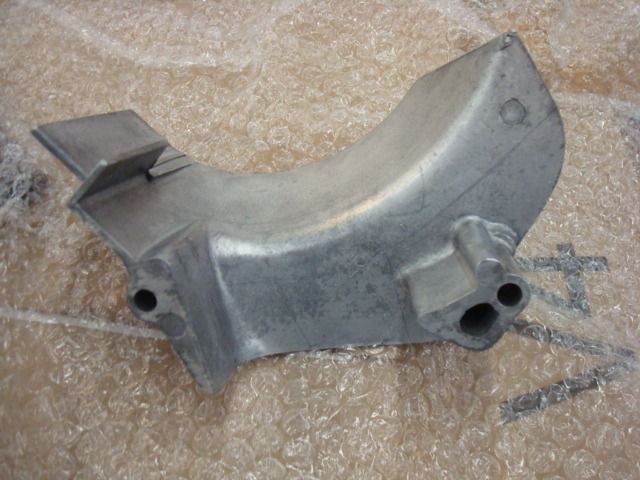

Now it’s looking like something got done.  But I have to say not without a struggle…again.  When I went to put the sprocket cover on it wouldn’t fit.  I had to sand about .020” off the mounting pads on the inside to get it to fit between the cases and the transmission cover.  Maybe it is not correct?  ???


Just for fun I put the oil filter housing on just to see how it looked.  This is my fake one (saving the real one for good) but I like it.  ;)  I realize I’ll have to take it off anyway to put the engine in the frame.
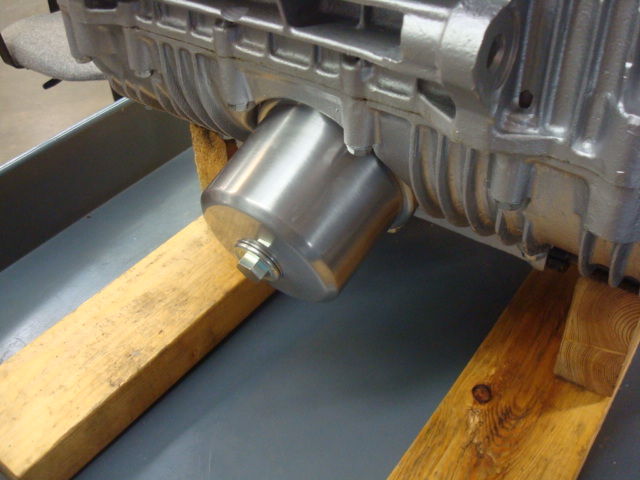

I have the cam chain tensioner and except for the points cover and clutch adjustment cover, that’s about it on the engine.  I could really put the engine in any time now.  I need to assemble the rear brake shaft and the center stand then I just might do that.

Actually I should do some other prep.  I had the 19 liter tank painted a long time ago and in fact I had two sets of red but I don’t have them anymore.  Of the two sets, I had one set painted gold for my K0 and the other set went with 5383.  So I need to get parts out for painting.  The other thing I need to do is get all my controls and master cylinders out for black anodizing.  I have a little cleaning and polishing to do first.  I don’t want to be waiting for that stuff when I’m ready for it.  After that it should go pretty good.  All of the black paint, zinc and chrome are done although I’m sure there will be something to hang me up.  ::)
1969 CB750 sandcast #97 restored - Sold Restoration thread link
1969 CB750 sandcaxt #576 - Sold
1969 CB750 sandcast #1553 - Sold
1969 CB750 sandcast #1990 - Sold
1969 CB750 sandcast #5383 restored - Sold Restoration thread link
1970 CB750 K0 restored - Sold
2010 H-D Tri Glide Ultra Classic (Huh?)

Offline Greggo

  • Somebody's
  • Old Timer
  • ******
  • Posts: 4,164
  • Helmets Save Lives. Period.
Re: Sandcast #97 restoration
« Reply #617 on: February 01, 2015, 06:42:18 PM »
Great looking progress Mark!  I'm having a problem with the chain rubbing on the rubber guard of the inside sprocket cover with the 16-tooth sprocket...I'm curious to hear if you have the same issue.

Offline markb

  • When I finish my current project I might be a
  • Master
  • *****
  • Posts: 1,615
Re: Sandcast #97 restoration
« Reply #618 on: February 02, 2015, 06:49:47 AM »
Sorry I can't help you there.  I won't have that issue because the earlier cover doesn't have the post for the rubber guide.  Here's a thread on the SOOC site will show you the differences in the covers.  No help with the rubbing issue though.
http://cb750sandcastonly.com/smf_forum/index.php?topic=499.0
1969 CB750 sandcast #97 restored - Sold Restoration thread link
1969 CB750 sandcaxt #576 - Sold
1969 CB750 sandcast #1553 - Sold
1969 CB750 sandcast #1990 - Sold
1969 CB750 sandcast #5383 restored - Sold Restoration thread link
1970 CB750 K0 restored - Sold
2010 H-D Tri Glide Ultra Classic (Huh?)

Offline Greggo

  • Somebody's
  • Old Timer
  • ******
  • Posts: 4,164
  • Helmets Save Lives. Period.
Re: Sandcast #97 restoration
« Reply #619 on: February 02, 2015, 09:01:02 AM »
Sorry I can't help you there.  I won't have that issue because the earlier cover doesn't have the post for the rubber guide.  Here's a thread on the SOOC site will show you the differences in the covers.  No help with the rubbing issue though.
http://cb750sandcastonly.com/smf_forum/index.php?topic=499.0

You say you can't help Mark, but that link you provided did, so thank you!  371 should have the earlier cover, but did not come with it...ALL 371's covers were exchanged for chrome years ago, including the thin lip alternator cover.  I think I will saw that post out of the later cover to stop the rubbing.  I want to stay with the 16-tooth sprocket. 

Offline markb

  • When I finish my current project I might be a
  • Master
  • *****
  • Posts: 1,615
Re: Sandcast #97 restoration
« Reply #620 on: February 02, 2015, 11:19:54 AM »
Good deal.  I'm glad it helped.  There should be plenty of the later covers around.
1969 CB750 sandcast #97 restored - Sold Restoration thread link
1969 CB750 sandcaxt #576 - Sold
1969 CB750 sandcast #1553 - Sold
1969 CB750 sandcast #1990 - Sold
1969 CB750 sandcast #5383 restored - Sold Restoration thread link
1970 CB750 K0 restored - Sold
2010 H-D Tri Glide Ultra Classic (Huh?)

Offline CycleRanger

  • No comment about being an
  • Really Old Timer ...
  • *******
  • Posts: 5,418
  • Central Texas Shop Manual Advocate
Re: Sandcast #97 restoration
« Reply #621 on: February 09, 2015, 04:58:04 PM »
Recheck the timing after you install the cam chain tensioner.
Do you have a copy of the Honda Shop Manual or Parts List for your bike? Get one here:
https://www.honda4fun.com/materiale/documentazione-tecnica
CB750K5        '79 XL250s     CL350K3
CB750K3        '76 XS650      '76 CJ360T

Offline markb

  • When I finish my current project I might be a
  • Master
  • *****
  • Posts: 1,615
Re: Sandcast #97 restoration
« Reply #622 on: February 10, 2015, 06:36:48 AM »
Doh!  :o Good point.  Thanks for pointing that out.  My chain is pretty snug even without the tensioner but I will definitely check it out.  I can't believe I didn't think of that.  I am going to replace the seal in the tensioner with a new one.  I had put a good looking used one in but decided for the cost of the seal it was worth changing.  I just hadn't got around to it.   ::)
1969 CB750 sandcast #97 restored - Sold Restoration thread link
1969 CB750 sandcaxt #576 - Sold
1969 CB750 sandcast #1553 - Sold
1969 CB750 sandcast #1990 - Sold
1969 CB750 sandcast #5383 restored - Sold Restoration thread link
1970 CB750 K0 restored - Sold
2010 H-D Tri Glide Ultra Classic (Huh?)

Offline kmb69

  • Master
  • *****
  • Posts: 2,041
Re: Sandcast #97 restoration
« Reply #623 on: February 10, 2015, 07:43:06 AM »
Recheck the timing after you install the cam chain tensioner.
.....
Thanks for pointing that out.
.....
Sorry guys, but if you are referring to the ignition timing, I fail to see what the cam chain tensioner has to do with it since the ignition is timed directly off the crankshaft. The only way the cam chain tensioner would effect it is if the tensioner was so tight as to pull all the clearance out between the crank and the bearings or bending the crank. ::) Even at that point, your cam chain would just stretch to accommodate the crank as soon as you ran the engine. It might have some MINISCULE effect on the static timing. If you want it spot on, the dwell and timing need to be set with the engine running when the crank will be assuming its "normal" operating position. Both the dwell and the timing are usually somewhat different from the static timing when the engine is running and that crank starts doing the watusi.

Offline markb

  • When I finish my current project I might be a
  • Master
  • *****
  • Posts: 1,615
Re: Sandcast #97 restoration
« Reply #624 on: February 10, 2015, 11:38:24 AM »
Keith,
I was kicking myself for skipping an assembly step and forgetting about putting the tensioner on and didn't think it through.  Now that I have I think you're absolutely correct.  Thanks for pointing that out.  ;)
Mark
1969 CB750 sandcast #97 restored - Sold Restoration thread link
1969 CB750 sandcaxt #576 - Sold
1969 CB750 sandcast #1553 - Sold
1969 CB750 sandcast #1990 - Sold
1969 CB750 sandcast #5383 restored - Sold Restoration thread link
1970 CB750 K0 restored - Sold
2010 H-D Tri Glide Ultra Classic (Huh?)