Author Topic: Harbor Freight Blasting Cabinet Tips  (Read 22943 times)

0 Members and 1 Guest are viewing this topic.

Offline Rocker

  • The one, the only!
  • Hot Shot
  • ***
  • Posts: 341
Harbor Freight Blasting Cabinet Tips
« on: January 29, 2011, 10:24:06 PM »
Tonight I put together my Harbor Freight blasting cabinet. It's the 40lb. capacity self standing model 93608.

http://www.harborfreight.com/40-lb-capacity-floor-blast-cabinet-93608.html

I wanted to throw out a few items/tips I discovered along the way. Hopefully it will save others a headache.

General info

Online it says the air requirements are 9.5 CFM @ 90 psi. The manual that comes with the unit and the operating sticker on the front of the cabinet both say 12-15 CFM @ 90 psi. I called Harbor Freight tech support and they advised me they performed additional testing recently and lowered the CFM requirements to 9.5. They also advised I download the updated operating manual here (has updates to CFM rating):

http://manuals.harborfreight.com/manuals/93000-93999/93608.pdf

This is a good thing because the price almost doubles for air compressors when you go from one capable of 9.5 CFM to 12-15 CFM.

Tools required (they are left out in the instructions)
-3/8 wrench
-3/4 wrench
-9/16 wrench
-small philips
-medium Philips

Also the folowing items (will explain these later)
-Square piece of plywood (roughly 2'x2')
-Two pieces of 2"x4" about 2' long each
-Motorcycle jack
-Adjustable C clamp


Modified assemble instructions

The assembly instructions are absolutely horrible. In this day and age of technology there is no excuse for using images that are barely distinguishable. The instructions also seem to have been written by a third grader. Here's my advice:

After you unbox all the contents separate the long screws, short screws, nuts, and washers. I used little plastic bins from my work bench. Trust me you think me later. Especially when you are screwing the cabinate body to the lower funnel.
The intructions say this is a two man (or woman) job. I took that on as a challenge to do it by myself. So there Harbor Freight!!

This is not a full set of instructions. Just my tweaks to some of the steps. So make sure to still read the manual.

Start by laying the main cabinet body on it's back. Use one of the thin box sized pieces of Styrofoam to lay it on. It will protect the unit from scratches. Attach the front left and front right legs using the short screws provided. The legs are L shaped and there are two screws per side for a total of four screws per leg. Then attach the back left and back right legs. You will only have access to the two side screws for each leg because the unit is lying on it's back. After tightening these screws lift the unit on to it's left side. Use the Styrofoam piece with the circle hole to again protect the unit from scratches. Why the circle whole you ask? The left side of the cabinate had a plastic port hole that sticks out roughly 3/4" of an inch. Using this specific piece of Styrofoam will allow the cabinate to sit flush to the ground. Now you will have access to the remaining screws.

Stand the unit upright. Now here comes the explanation of the earlier items. Roll the motorcycle jack under the cabinate. Lay the plywood on top of the jack lifting points. Slide the lower funnel under the cabinet and sit it on the plywood. Don't forget to place the screen and screen support shelf inside the funnel. That part if pretty straight forward. Slowly lift the jack until the funnel is in place. Should look like this:
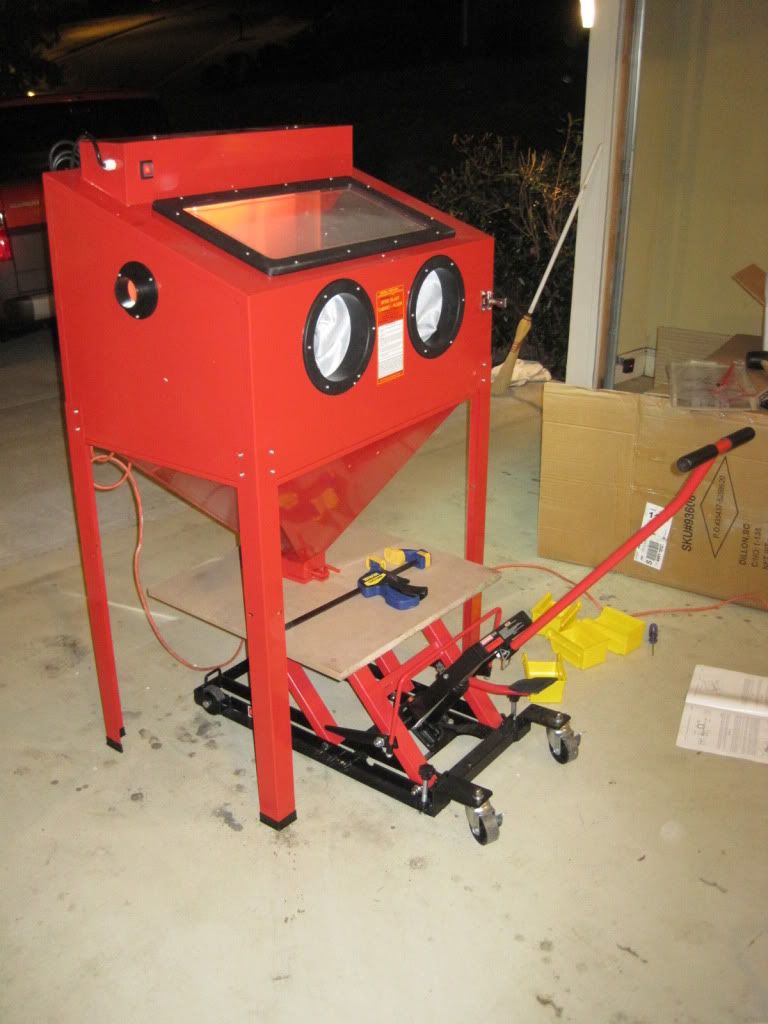
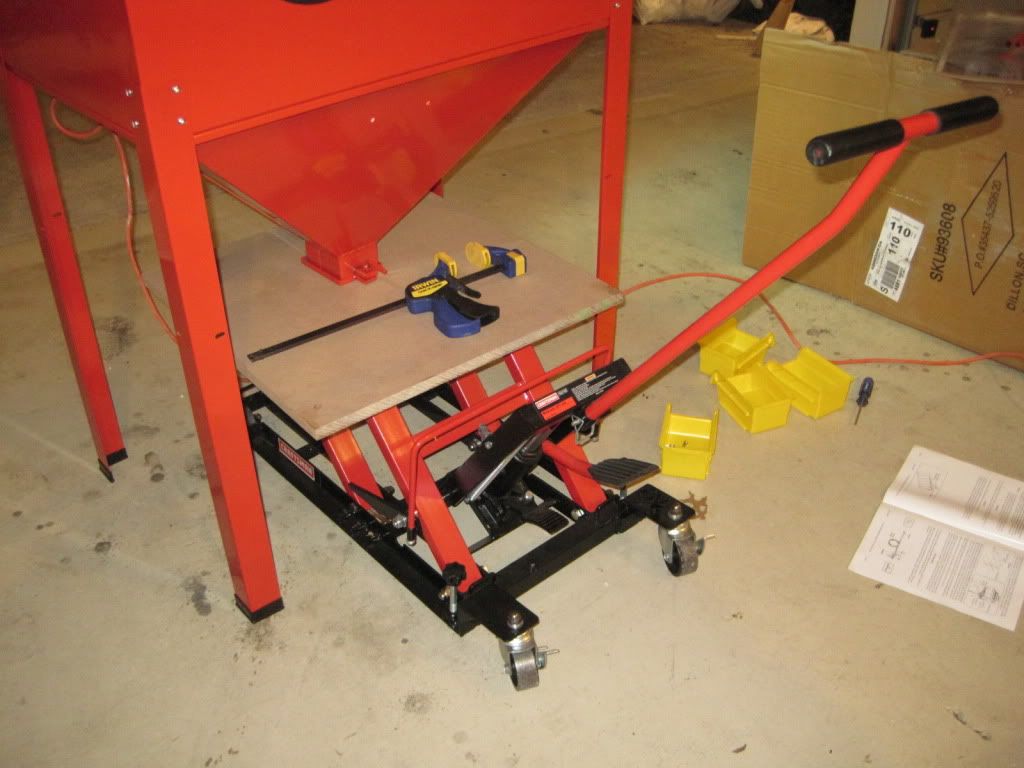


Use the long screws to attach the funnel to the cabinate. The screen support shelf has foam pre-installed and is quite useful (other then sealing the cabinet). The screws go in from the bottom up. Unless you have really longs arms you will not be able to hold the nut and screw at the same time for about half the screws. I found that the foam was enough to hold the screw in place and allowed me to reach inside of the cabinet, drop on the washer, and carefully thread the bolt. I stress the word carefully. I did have to push a screw or two back in a few times. I used the C clamp to hold some of the screws in place. Do this long enough to get a good bite. Then grab your wrench and wedge it in place to allow you to tighten the screw. Like this:


Worked like a charm on all the screws

Now on to the shelf. Lower the motorcycle jack and remove the plywood. Replace it with the 2"x4"s. One on each lifting point. The reason for this is the cabinet funnel sticks down and hits the plywood before you can lift the shelf high enough. This way will allow the lower part of the funnel to go between the lifting points of the jack and position the shelf to screw it in place.

Follow the rest of the instructions and you should be good.
~Rocker (aka Adam) | rocker@sohc4.net | SOHC/4 member #4151 | Facebook

Current Bikes:                   
1975 CB750 K5 pic                 
1974 CB360T " lil' twin " Rebuild thread
1976 CB550 K2 Cafe Racer build thread
1975 CB550 K1 parts bike Parted out and cut up.         
2003 VTX 1800C

Bikes I've had:
1974 CB550 K0
1976 CB750 K6

Offline Zaipai

  • I am getting closer to being an
  • Old Timer
  • ******
  • Posts: 3,400
    • My Home page
Re: Harbor Freight Blasting Cabinet Tips
« Reply #1 on: February 13, 2011, 06:28:21 PM »
Excellent Rocker!! This will come in handy as I now have the air compressor now I am working tword saving for this blaster cabinet. I love write ups like these!

.: Scott :.
Its my Avatar..

75 CB550F  | 


Offline CycleRanger

  • No comment about being an
  • Really Old Timer ...
  • *******
  • Posts: 5,464
  • Central Texas Shop Manual Advocate
Re: Harbor Freight Blasting Cabinet Tips
« Reply #2 on: February 13, 2011, 07:00:22 PM »
Good write up.
You're gonna want to seal all the seams with silicone before you use it.
Do you have a copy of the Honda Shop Manual or Parts List for your bike? Get one here:
https://www.honda4fun.com/materiale/documentazione-tecnica
CB750K5        '79 XL250s     CL350K3
CB750K3        '76 XS650      '76 CJ360T

Offline shinyribs

  • Hot Shot
  • ***
  • Posts: 424
Re: Harbor Freight Blasting Cabinet Tips
« Reply #3 on: July 22, 2012, 11:19:56 PM »
I have the same cabinet. When it comes time to purchase new screens to protect the window go to Eastwood and order them. They are not terribly expensive @ $10 for a pack of $4. They are a tab big,but if trim them down right to the edge of the adhesive they will fit your window perfectly. They are much better quality of the screens that came with the blaster and last much longer.

Oh,and when the light fails ( it will) Harbor Freight will not swap out just that piece,they will gladly give you a whole other cabinet,though :o Too much work. Save yourself the trouble and just go to Lowes and buy a $25 light. Thats what I did,at least.
The darn fool didn't know it couldn't be done...so he went ahead and did it anyway.

My Hackjob build- http://forums.sohc4.net/index.php?topic=106103.0

Offline Faust

  • Enthusiast
  • **
  • Posts: 107
Re: Harbor Freight Blasting Cabinet Tips
« Reply #4 on: November 04, 2012, 06:28:46 PM »
Although I long ago replaced my HF unit with one I bought at auction, here is a suggestion from memory. The protective film for the viewing window has a very short life span. Replacing the film means crawling into the cabinet. After one experience with changing the film, I pulled all of the nuts and bolts that secured the window. I inserted plastic screw anchors in the bolt holes of the cabinet and and replaced the bolts with power drive screws. I can now have the window off in two minutes.

Offline bill440cars

  • Feeling More & More,
  • Really Old Timer ...
  • *******
  • Posts: 12,358
  • Tryin' To Slow Down "Time"!
Re: Harbor Freight Blasting Cabinet Tips
« Reply #5 on: December 28, 2016, 11:24:36 AM »

     Nice comments on the Sandblast Cabinet. I am looking to rework my cabinet, as soon as I can and these ideas will be helpful.  ;)
Member # 1969
PRAYERS ALWAYS FOR: Bre, Jeff & Virginia, Bear, Trevor & Brianna ( Close Friend's Daughter)
"Because HE lives, I can Face Tomorrow"                  
 You CAN Teach An Old Dog New Tricks, Just Takes A Little Bit Longer & A Lot More Patience!! 
             
Main Rides: '02 Durango, '71 Swinger & Dad's '93
                  Dakota LE 4x4 '66 CB77 & '72 SL350K2
Watch What You Step Into, It Could  End Up A Mess!

Offline Lostboy Steve

  • Old Timer
  • ******
  • Posts: 3,096
Harbor Freight Blasting Cabinet Tips
« Reply #6 on: December 28, 2016, 11:58:11 AM »
Also, don't over fill the damn thing. I've made this mistake. If you're having feed problems it may be over filled. Also, for a replacement gun contact Eastwood as well. My gun, after nearly a decade of use developed a hole in it.  Also, hook it up to a shopvac with a media collector in line if you want. Another thing I did was run a 90degree pipe inside the unit for the dust collection so that it doesn't "drag" the debris across the glass and instead pulls the dust downward. This has significantly increased my glass life.


Here's a high tech drawing I made of what I did. You can se that the original design pulls the debris right next to the window.


Sent from my iPhone using Tapatalk
« Last Edit: December 28, 2016, 12:04:05 PM by Lostboy Steve »
1968 Honda Z50
1977 Honda CB550K
2018 Indian Scout

Offline strynboen

  • Old Timer
  • ******
  • Posts: 4,883
    • http://forums.sohc4.net/index.php?PHPSESSID=radjcsbm60vhp1ormh1upag7h6&/topic,60973.0.html
Re: Harbor Freight Blasting Cabinet Tips
« Reply #7 on: December 28, 2016, 01:25:46 PM »
i have taken one of the autdoor modells and moddet it to vork in a 700 litter container..have made a vater trap of a old fire exh..Work fine..dont get any vater in the filter..use 2 small kompressors in tandem,,so the air get some heat=vater
have tryed to use qvarts sand..but the feed system have some problems...must build a small vibrate motor on the tank..so the sand is better floting
« Last Edit: December 28, 2016, 01:30:13 PM by strynboen »
i kan not speak english/but trying!!
http://forums.sohc4.net/index.php?topic=60973.0
http://forums.sohc4.net/index.php?topic=144758.0
i hate all this v-w.... vords