Author Topic: 72 CB500: Rust-Oleum Rest-O  (Read 6475 times)

0 Members and 1 Guest are viewing this topic.

Offline Dreyzar

  • Full Member
  • *
  • Posts: 15
72 CB500: Rust-Oleum Rest-O
« on: February 14, 2009, 10:15:26 PM »
Hey all, 
So I bought this 72 CB500 back in October as my first motorcycle, with my fingers crossed that it'd be a clean-the-carbs-out-and-get-it-running kind of project. Done on a budget. I was woefully mistaken. Retrospectively, $400 was a pretty lousy deal, but live and learn right?
The more I got into it the more I was absolutely stunned by the neglect this bike endured in the hands of its previous owners. Sadly, I didn't have my camera for a few months, so I don't have any 'before' pictures, but here's the rear wheel it came with to give an idea of its overall condition:
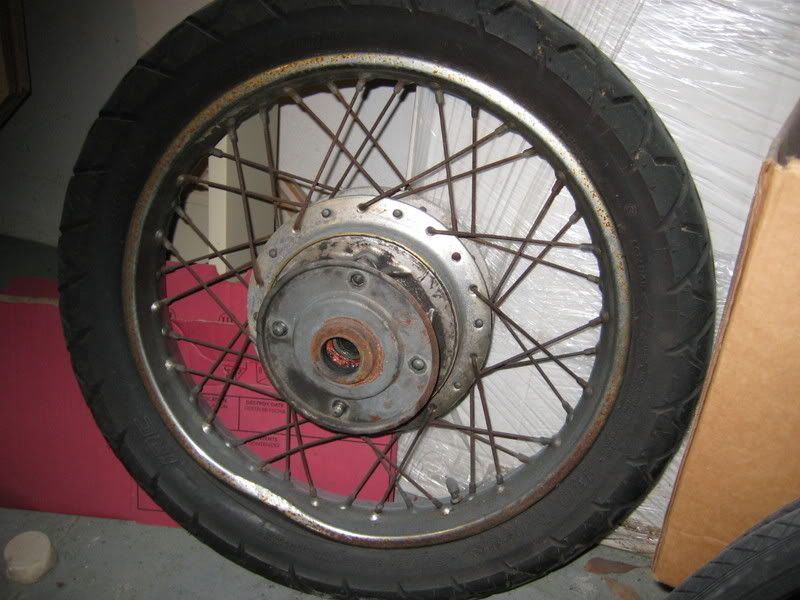
In addition to that massive dent, the chain was literally hanging on by a thread and the upper triple clamp was cracked. Miraculously the tank survived without dents.

As I was getting ready to try and start it after cleaning carbs, etching and lining the tank, and various other bare-minimums, I decided to pull off the oil pan to make sure everything was in order in there and clean it out.
To my dismay, I discovered gear teeth. First and second gear were totally chewed.
That's when it turned into a frame-up project. Charlie at Charlie's Place (an invaluable resource in all this) advised me to replace the entire bottom end, and sold me an engine off a bike that was hit by a car. The crankcase was cracked around the points plate area, and one of the exhaust studs were cracked off as well. Charlie knew it to be a strong-running engine with ~20,000 miles at the time of the accident. He advised me to swap all the internals into my crankcases. Here's what I did instead:
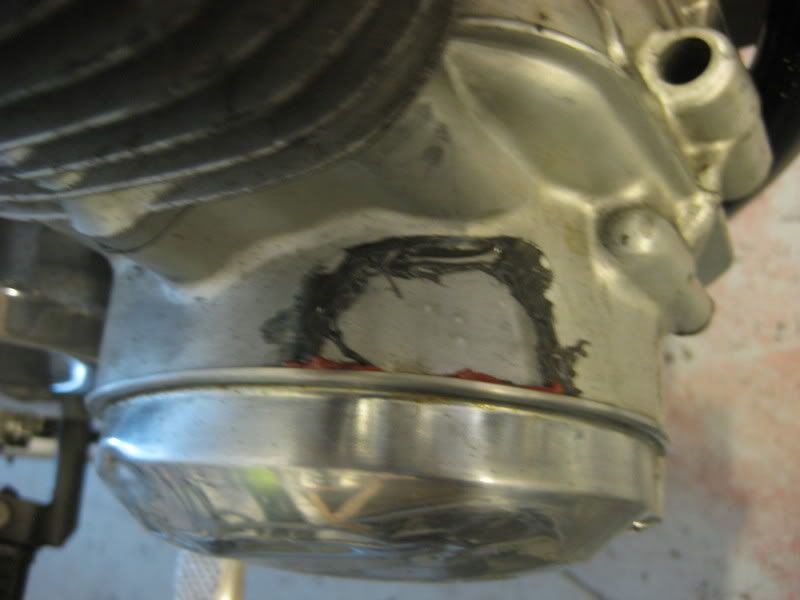
Made a patch out of 1/16" steel plate, and jb welded into place with some gasket compound around the edge to help keep water out. Still gotta take the die grinder to it and clean up that jb weld goo. I figured this wasn't a structurally important part of the case, and that this would work just fine until phase 2 of this project, in which I'll rebuild the original motor. Right now I'm at the point where I just want it on the road.
So, as per the title, it got down to a bare frame, and to keep within some sort of budget, I sprayed the thing with Rustoleum Professional (kind of an oxymoron) spraypaint. The finish came out ok, but of course it scratches all too easily. It'll get a proper powdercoat someday, but its acceptable for now, especially compared to how it was.
Here it is partially reassembled, from about two weeks ago (kindly disregard my "stand"):
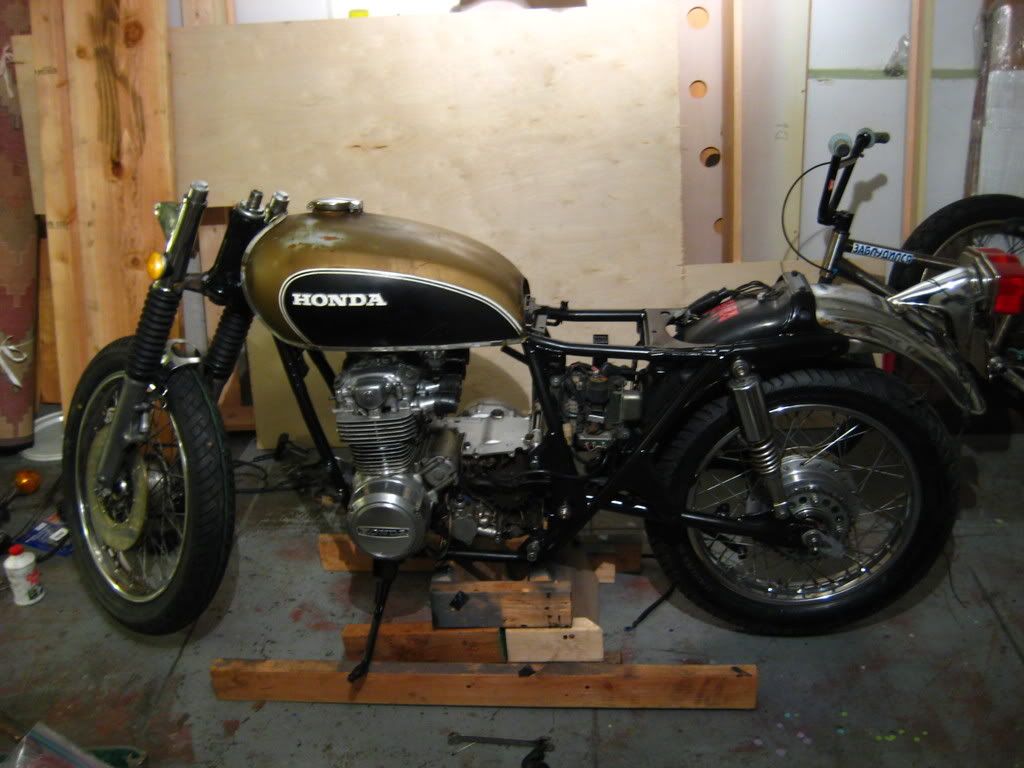
Some things I did to get it to that point:
Pressed bronze bushings into the swingarm
Fitted new rear wheel, $45 shipped off ebay 
New chain (looks like its a link too long... will be remedied)
New upper triple clamp
New Bridgestone BT45 tires
Ground the brace off the front fender (it was in rough shape)
Replaced most bolts with stainless hex bolts, polished the rest with wire wheel on 6" bench grinder (probably the most-used tool on this project  ::))
Sprayed the rusted-beyond-help bits (like the fork caps) with silver caliper paint
Rebuilt the head bearings with new 1/4" balls (surprisingly, the bearing races were damn near perfect) Will replace with tapered roller bearings when funds and time loosen up.
Lots of lazy polishing

Here's the progress since then:
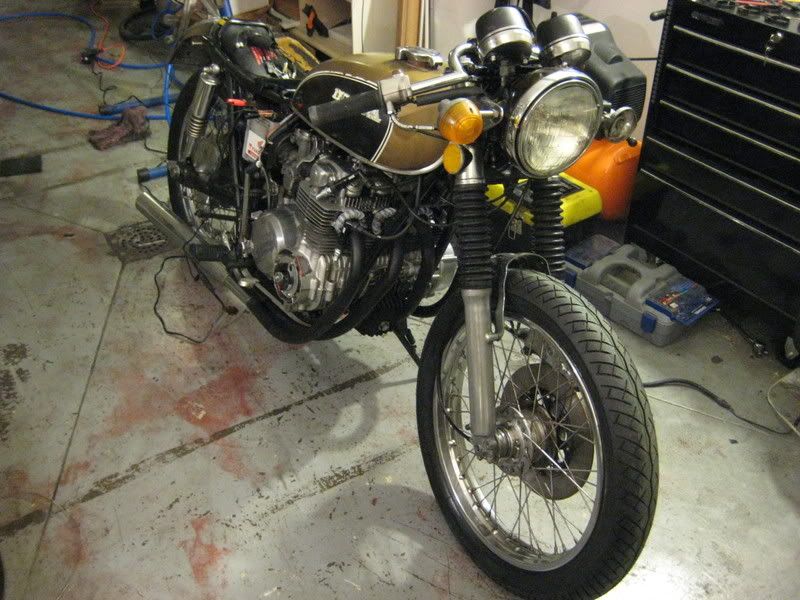
Embarrassing to even mention this with the likes of Mec, FunJimmy, and so many other masterful fabricators around these parts, but I turned myself a new stainless clutch-actuating rod (don't know the more dignified name for it), old one on right is a little bent and chewed up:
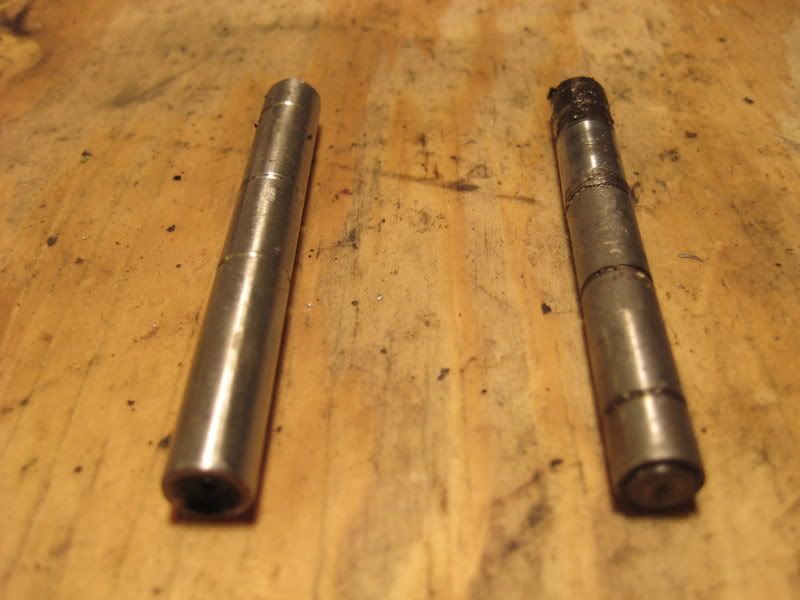

Bit the bullet and bought a Dyno electronic ignition. I'm a little disappointed in myself for not taking the time to adjust the points, but for now I just wanted the set-it-and-forget-it simplicity, in the ignition at least. I timed it with the pulling the plugs and setting them on the engine block trick, and with that I'm delighted to say that I actually got the thing to go around the block under its own power today!
This might have been jumping the gun, its got no mufflers on it and I was definitely being a bad neighbor with the noise, also its (as best I can figure) running way too rich. Spewing lots of smoke, and the motor cuts out if I close the choke all the way. But it runs! And I gotta say, just the sound of it filled me with the kind of childlike excitement that sometimes gets all too few and far between. Motorcycles are pretty great.
Anyway, about the carbs, I'm gonna try backing off the air screw all the way, see if that helps, maybe try lowering the needle some (but, that doesn't really take any effect at idle does it?). Any other basic suggestions?  I have no idea what size jets are in them. How does one determine the # of the size?
What's left to be done:
New seat cover, and probably aftermarket side covers.
Rebuild front brake master cylinder and caliper. Fired the piston out of the caliper yesterday with the air hose. Kaboom:
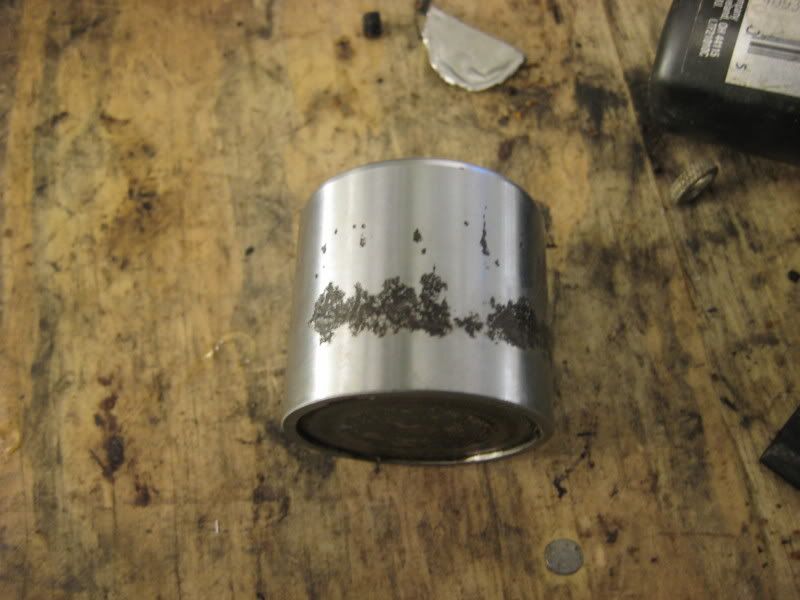
Pitted to high heaven. I'm going to turn a new one out of 303 stainless. About that, I haven't taken the micrometer to it yet, but anyone know what kind of tolerance this wants? Is within .001" acceptable, or does it need to be exactly the OEM dimensions? Also, anyone know why the OEM pistons aren't bored out on the pad side? It looks like there's an insert pressed into them there, is this trying to dampen brake squeal or something? Mine will reassemble these, sold at Charlie's Place:

Now the exhaust...
The chrome on the headers was too pitted, so they got sprayed with Flameproof flat black, not original but I'm pretty happy with the results. Here's the state of the mufflers though:
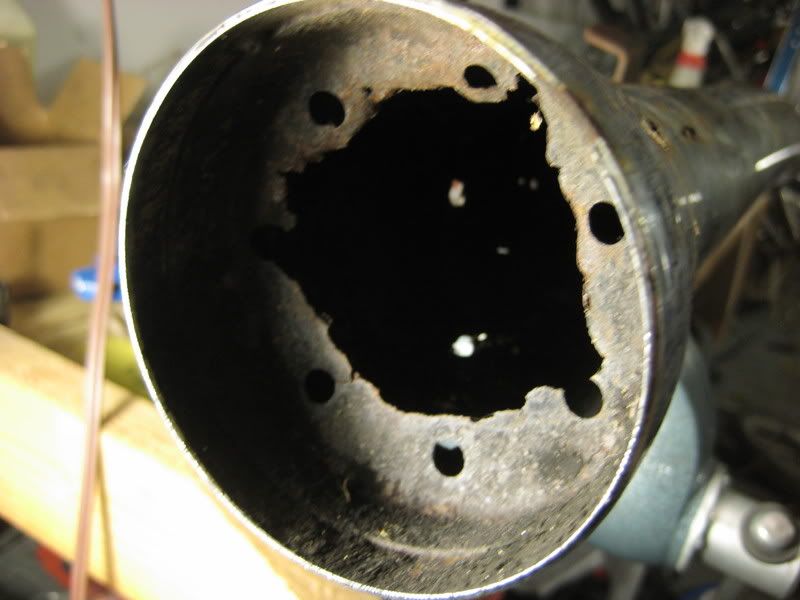
Now quality exhausts are wildly expensive. I'm already WAAAY over my original "budget," so I'm thinking of purchasing or fabricating some baffles. I really need some insight and advice here. I sawed off the flared, rusted out megaphone bits of the current mufflers and am left with a 2.5" straight tube. Any aftermarket baffles that you guys can recommend for this application? If there's nothing off the shelf that will work, or if its too expensive, I'd be into fabricating something if anyone can recommend a simple, functional design to work from.. Input would be greatly appreciated.

Huge thanks to you all as the FAQ and the rest of the forums here have been incredibly informative and inspirational. And thanks for taking a look at my project.


« Last Edit: May 24, 2010, 12:13:43 PM by Dreyzar »

Offline Jinxracing

  • It's hot shit, not
  • Hot Shot
  • ***
  • Posts: 610
  • '70 CB750 K1
    • The Hairy Nickel
Re: 72 CB500: Rust-Oleam Rest-O (with a dash of cafe)
« Reply #1 on: February 14, 2009, 10:45:53 PM »
Hey there Dreyzar, coming along nicely!

Regarding turning a stainless caliper piston out of 303...in addition to the tolerances, I'd be careful with surface finish quality and parallelism too. 303 turns nicely alright, but have you thought about phenolic? I've seen a few guys on eBay selling phenolic caliper pistons and have been wondering if that might be easier to get a good finish on. Just a thought.

Keep the pics coming!

Jinx
"Each of us can find a maggot in our past which will happily devour our futures."

–Captain Horatio Hornblower

www.thehairynickel.com

Offline HavocTurbo

  • Angry little bastard of an
  • Old Timer
  • ******
  • Posts: 3,739
  • Can you tell?
Re: 72 CB500: Rust-Oleam Rest-O (with a dash of cafe)
« Reply #2 on: February 15, 2009, 02:55:00 PM »
I have these in reference to your mufflers.

Not a whole lot of baffling, but may do the trick until you get what you need.

http://mavrik-powersports.com/buy/STREET/Exhaust/Universal/Helix_Universal_Mufflers_507833.aspx
'48 HD Panhead - Exxon Valdez
'78 CB550K - Fokker CB.3
'78 Honda CB750K - Mavrik
'80 Yamaha XS850G - Kanibalistik
09 XL883L - No Name

Offline Alan F.

  • We remember the Night Rider, and we know who you are.
  • Really Old Timer ...
  • *******
  • Posts: 7,346
Re: 72 CB500: Rust-Oleum Rest-O (with a dash of cafe)
« Reply #3 on: February 15, 2009, 04:56:51 PM »
Or if you need more baffling than that you could look into a cherry-bomb muffler(automotive), I think there are a few members that have some recent experience with these.  And the price isn't bad.

Offline fatmatt650

  • Part Deux
  • Hot Shot
  • ***
  • Posts: 720
Re: 72 CB500: Rust-Oleum Rest-O (with a dash of cafe)
« Reply #4 on: May 23, 2010, 09:43:11 PM »
Hi Andrey! ;D
Just thought I'd rub it in that I went for a 70 mile ride today at speeds approaching, maybe even exceeding, the speed limit on a bike that I got for free and required nothing more than steel wool and carb cleaner to get running! BRRRAAAAAAPPPP! Seriously though, your bike is sick, I cant wait to check out your suspension upgrades. Mine is definitely feeling a little harsh. When are we gonna go riding?
So much to do, so little time.

Offline lostinthe202

  • Enthusiast
  • **
  • Posts: 146
  • Quality testing Elite 80's since 1978!
Re: 72 CB500: Rust-Oleum Rest-O (with a dash of cafe)
« Reply #5 on: May 24, 2010, 04:42:55 AM »
Yeah, from your description, it amazing that the tank stayed in such good shape on that bike!  Looks like you've made some good progress so far. 

It think it will be hard for you to diagnose your running conditions until you have conditions a bit more complete.  Like, do you have the airbox assembled and on the bike (with and airfilter of course).  Did you every tear into the carbs?  I don't remember the stock jet sizes but they are etched into the face of the jet itself.  Often you need to lightly scrub the jet with some steel wool to be able to see the marking.  If you haven't done so already, get yourself a workshop manual for it.  You'll need to know that info for certain things as you go along.

On the piston caliper, I can't say for sure, but I'd bet that the tolerance on that is more likely in the +/- .0005 range.  Use a lathe with a DRO if you have access to one.  Those need to be a pretty good fit.  As for surface finish, use a coated carbide insert if you have access to any and sneak up on the last few thou.  Do the last couple of passes turning fastish, 400-600 and use plenty of heavy cutting oil, something dark a sulfery, with a slower feed, like 1-2 ipm.  An alternative would be to get it about .001 or 2 over and polish it to size and finish.  Takes a bit longer, but safer.  Practicing a bit first would be a good idea.

Will-
'72 CB500

Offline Dreyzar

  • Full Member
  • *
  • Posts: 15
Re: 72 CB500: Rust-Oleum Rest-O (with a dash of cafe)
« Reply #6 on: May 24, 2010, 12:13:17 PM »
I've been meaning to update this for months. Lots of progress made since the last post. Had the cylinder bored .50mm over (couldn't find any .25 pistons), had the head rebuilt at Charlie's Place, and rebuilt the top end. I found only one washer in the oil pan after the rebuild!  ;)
Will, rebuilding the carbs was the first thing I did. I was really hoping that the bike in general would be a 'rebuild the carbs and get it on the road' sort of project but that wasn't to be. It's running and sounding pretty good right now, but bogs down real bad at WOT. In fact, at idle WOT actually causes it to die. But it gets around fine at everything up to ~5/8 throttle. The MAC 4-1 I mounted has something to do with this I'm sure. I've got a UNI air filter in the mail. I'll start picking at the jetting once that's mounted.

I've put about 500 miles on it since I got it running. Then someone knocked it over when it was parked in front of a bar downtown. Bent handlebar, turn signal stems, and broken clutch lever. I took this as an opportunity to go for a low-rise bar with a little more width. With that, my $70 goodridge braided brake line is now 1/2" too short. I took this as a sign to go ahead with the dual disc conversion I've been planning. Got some super cherry 550 fork legs on ebay. They were a steal at $10. No rust on the stanchions at all. Incredible.

I'm currently in the process of rebuilding the 550 forks with RaceTech cartridge emulators and springs. The build quality and design on these looks great. Really excited to see how it feels on the road.

Also, the brake piston I turned has been working perfectly. Will have to make another one for my second caliper soon.

Matt, no one else in the world can have your luck with free running motorcycles. I curse and congratulate you.

Please accept my apologies for the lack of photos! I'll try and get some up asap.

Offline lostinthe202

  • Enthusiast
  • **
  • Posts: 146
  • Quality testing Elite 80's since 1978!
Re: 72 CB500: Rust-Oleum Rest-O
« Reply #7 on: May 24, 2010, 01:46:26 PM »
Cool, glad to hear it worked out... sort of ;)

On the carbs, I'm sure you could find your answers if you searched on here.  I seemed to remember running 100 mains with the clip on the need all the way up (or was it down...) for pods and a 4->1 exhaust.  But again, search here and I'm sure you'll come up with the right answers

Will-
'72 CB500

Offline Dreyzar

  • Full Member
  • *
  • Posts: 15
Re: 72 CB500: Rust-Oleum Rest-O
« Reply #8 on: June 22, 2010, 05:27:57 PM »
Time for a long overdue photo update. To review, I got the thing running and put 500 miles on the new top end before my bike got knocked over while parked. The damage sparked a new wave of projects. These are: new clutch, dual drilled discs, tapered head bearings, new suspension all around, and do something about my horrid seat cover.
The seat cover has been at the upholstry guy's shop for about a month. Dan Ackerman's Leatherworks in San Francisco. Really eccentric guy that does great work. But seems to be taking a while.
In the meantime,
Here it is partially disassembled again, but sitting on new Progressive Series 12 shocks, which are .5" longer than stock:


For the dual disc conversion I found some 550f forks on ebay. Got them at a great price despite the immaculate uppers on them. I consider quality suspension of paramount importance, so I rebuilt the forks with Racetech cartridge emulators. First a comparison between the 500 and 550 forks. The 550 forks have a taller lower (which I'm pleased with, suggests more bushing overlap), and are overall about .5" shorter from top-to-axle. I think with the firmer Racetech springs the height under sag should be unchanged, but we'll see.


The Racetech emulator is a great little bit of kit. I was tentative about getting them sight unseen, but was very pleased when they came in. The design and build quality are top notch.

The plate with the hole at the bottom of the spring is the compression circuit. Preload on the spring is adjustable and the emulators come with two different springs as well.

Where they go in the fork. Racetech says that aluminum spacer is necessary so that the bottom of the emulator is at least 5mm above the damper rod. Can't figure out why thats needed:

Drilling additional compression holes is necessary. Someone had already drilled a second 3/16" compression hole. The instructions specify three 1/4"=5/16" holes. Adding two 1/4" holes by my calculations fell into their gray area.


That's all I have time for now. More to follow.

Offline Dreyzar

  • Full Member
  • *
  • Posts: 15
Re: 72 CB500: Rust-Oleum Rest-O
« Reply #9 on: June 23, 2010, 12:33:10 PM »
With the fork legs assembled it was time to tackle the All Balls head bearings. First step is to remove the original races. The races came out of the frame real easy with this, a Park Tool bicycle headset cup remover:


I was hoping to remove the crown race with similar ease with the Park Tool bicycle crown race puller. This thing makes my top-5 all-time favorite tool list, but sadly the skirts at the bottom wouldn't clear the fork stop pegs on the crown:


So, the crown race had to be removed with the old punch-and-hammer. Seemed impossible not to damage the seals whilst doing this, anyone have a better trick for getting these things off?


I pressed the new bearings with the Park Tool headset press. The right thing to do would have been to turn an adapter so the press can push on the outer race only. However, in the spirit of getting it done, I pressed from the inner race with the bearing assembled. I know, not entirely kosher, but the bearings pressed in very smoothly and I felt no harm was done.


I recall coming across a thread that described the upper bearing sticking out of the top as normal. My own measurements confirm this.


For anyone installing All Balls tapered bearings in a cb500, it requires the 2.5mm washer below the lower bearing. Also, don't make the same mistake I did with the seals. The smaller seal goes on the bigger bearing. The big seal won't fit up inside the headtube.

On a slightly different note, my drilled rotor is done. I made a template using a compass and a ruler. I settled on these slow overlapping spirals. I think this'll be an effective pattern for sweeping the brake pad and even rotor wear, but I'm wondering if a more radial, non-directional pattern might have been the way to go. I'm also thinking I might enlarge one of the sets of holes, probably the innermost one, to give more of an immediate sense of a pattern. But in any case, for now, I'm pleased with the results:


Offline camelman

  • Man... Myth... Legend
  • Master
  • *****
  • Posts: 1,899
Re: 72 CB500: Rust-Oleum Rest-O
« Reply #10 on: June 23, 2010, 01:58:06 PM »
Dreyzar,

Looking very nice.  Let me know when you have it up and running.  I live next to a couple other forum enthusiasts near Castro and Market (on the straight side of Castro), and hit the twisties a lot.  Shoot me a PM if you want to meet up.

Camleman
1972 350f rider: sold
1972 350f/466f cafe: for sale
1977 CB400f cafe:sold
1975 CB400f rider: sold
1970 CB750 K0 complete bike: sold
2005 Triumph Sprint ST 1050 rider

We've got to cut it off... and then come down on rockets.  (quoted from: seven minutes of terror)

Offline Dreyzar

  • Full Member
  • *
  • Posts: 15
Re: 72 CB500: Rust-Oleum Rest-O
« Reply #11 on: April 28, 2011, 01:05:07 PM »
No update in a while, sorry. I got it all together and was busy riding it around until the transmission blew within ~1000 miles. It now pops out of every gear under the slightest bit of power.
I was very much lacking the gumption to deal with it, so I've let the thing sit for the past couple months while I figured out what to do.

I spent some time looking for a 550 motor to swap in,  but I'm told by folks on here that the 500 top end will fit on the 550 bottom end. So that's the new plan: I'll put my fresh top end on a donor 550 bottom end with that superior 550 tranny in there.

Behold the donor motor! Pretty crusty. Looking forward to seeing how the tranny looks. Shifts smoothly through the gears and is not seized though, so that's a decent start.


This is unfortunate, somehow when inspecting the motor I didn't notice this crack/dent. I'm thinking a little jb weld should take care of this though.


I realized I've never posted pics of the thing fully assembled in this thread so here it is before I take it apart again:


Wish me luck! Also, what's the wisdom regarding re-using piston rings? My top end was literally not yet broken in when the tranny blew. Can I re-use the rings? And if so, do I pick up where I left off as far as break-in goes, or start over?