Author Topic: **Updated 5/20/13** In over MY head 1975 cb550 cafe. thanks...Dave500, Twotired  (Read 95724 times)

0 Members and 3 Guests are viewing this topic.

Offline jneuf

  • Hot Shot
  • ***
  • Posts: 522
Good idea! And be sure to keep the real, and MS Paint pictures coming  ;D
'75 CB400f

Offline xsmooth69x

  • Master
  • *****
  • Posts: 1,621
Good idea! And be sure to keep the real, and MS Paint pictures coming  ;D

ow yes my CAD drawings are pro  :P
1975 CB550 (FINISHED?!?!?)
first motorcycle ever!!! ow and i dont know how to ride it either :D

raw rust rice venti quad shot cafe racing latte project aka my build..... http://forums.sohc4.net/index.php?topic=88853.0

black and white equation godzilla chalkboard 
1972 cb750 - next in line for some <3

Offline Syscrush

  • Expert
  • ****
  • Posts: 1,419
  • Sold. :(
Looking good.  BTW - you're on the right track with the electronic flasher: you can make it work with an old-school flasher & load resistors, but so much current gets diverted through the load resistors that the signal lights end up visibly dimmer.  Electronic flasher = full power and worry-free.
Life is precious: wear your f'n helmet!
There's nothing more expensive than a free bike...
FWIW, I'm not a shill for Race Tech - I've just got a thing for good suspension and the RTCE's are the most cost-effective mod for these old damping rod front ends.

Offline xsmooth69x

  • Master
  • *****
  • Posts: 1,621
Looking good.  BTW - you're on the right track with the electronic flasher: you can make it work with an old-school flasher & load resistors, but so much current gets diverted through the load resistors that the signal lights end up visibly dimmer.  Electronic flasher = full power and worry-free.

ya thats what a solid state flasher right?
1975 CB550 (FINISHED?!?!?)
first motorcycle ever!!! ow and i dont know how to ride it either :D

raw rust rice venti quad shot cafe racing latte project aka my build..... http://forums.sohc4.net/index.php?topic=88853.0

black and white equation godzilla chalkboard 
1972 cb750 - next in line for some <3

Offline Tews19

  • I am no
  • Really Old Timer ...
  • *******
  • Posts: 6,465
EP35... Ask for it at any auto store. Got it for mine. Works great!

not to hijack, I got my LEDS in the mail that you have. Next week I will be taking apart my gauges..
1969 Honda CB750... Basket case
1970 Honda CB750 survivor.

Offline xsmooth69x

  • Master
  • *****
  • Posts: 1,621
so i decided to wrap my headers!!!

i used a 50 feet 2inch of cream header wrap. so one roll

my first mistake. wear a long sleeve shirt and pants. at least i got the gloves right. another good idea is probably a simple face mask.... after doing everything i notice fiberglass everywhere so i probably breathed in a good amount.

i have a kerker style or something type of header.

if anyone wants to duplicate the wrap i will tell u how!

first remove the header and wash them well to get all the gross stuff off like oil and stuff. it needs to be clean.

u will need....

50 feet of 2 inch header wrap
header
regular zip ties
steel zip ties
needle nose pliers
scissors
tape measure
hot water
bucket
soap

how to wrap the header.....

first put the header wrap unwrapped in the warm water in the bucket.

then the general idea is to start wraping the headers from the top of the headers toward the exhaust.

first measure out where ur exhaust collars are. then start wraping the headers from that gap where ur exhaust collars have to go. i used a 2 pass wrap before starting to go down the pipe

use the regular zip ties first to initially hold the wrap on the header. this is just in case u mess up and have to start over or something and the plastic zip ties give a very strong hold and they are cheap unlike the metal ones.

start wraping the headers with a 1/4 inch over lap. try not to overlap them so much or your headers will get to hot and apparently thats bad.

i labeled the headers 1-4 going left to right

#1 and #2 i wrapped counter clockwise
#3 and #4 i wrapped clockwise

this is just personal preference i thought it looked cool this way


i did #3 first. i used 11ft of header wrap. i used the plastic zip tie to start then at the end of this pipe i used another plastic zip tie to hold it. then right away used a metal tie. make sure to cut off the plastic zip tie.


then i wrapped #4. i used 12ft of header wrap. plastic zip tie at the top and again down the tube. now when i got close to the section where pipe #3 has its metal zip tie i started to wrap both #3 and #4 together. (the reason i did this is because when you wrap all 4 pipes together at the end when u look down the hole u will see all the header pipes wraped all the way down and no sections without the wrap.)


then i wrapped #2. i used 12ft of header wrap. now do the exact same thing as pipe #3

the i wrapped #1 with whatever u have left (16ft). i started like every other pipe then when i got to the metal zip tie of #2 i started wrapping #1 and #2 together. then when i hit the four into collector section i started to wrap all four pipes together. then i continued down till i hit the end of the pipe and u can put a plastic zip tie to hold.

once everything is done put all the metal zip ties on and take off all the plastic zip ties left. i noticed the metal zip ties dont hold and mold like the plastic ones but they still hold well.

also when u put the headers back on the bike u need to burn it in. make sure ur bike is outside and run the bike. when the headers get warm they will start smoking alot!

^^^ this is how you wrap headers in a perfect world unfortunately i F'ed up^^^

everything was fine until i cut too much of my wrap off on pipe #1 the one i used to bring everything together.

so what i had to do was stop wrapping #1 and #2 when it got to the four in one collector part.

then i reversed wrapped the extra slack from the muffler up and ended the wrap and put 2 metal zip ties on the #1 and #2 pipes. which worked out great because this is under the bike and u can not really see them. and it looks alot more clean without the metal zip ties everywhere.


the finished product


i still have the plastic zip ties at the top because i did not have the exhaust collar on hand because im at my college house. when i go to my other house with the bike i will measure them out and make sure is everything is lined up and replace the plastic with metal zip ties  ;D
« Last Edit: May 31, 2012, 08:19:51 PM by xsmooth69x »
1975 CB550 (FINISHED?!?!?)
first motorcycle ever!!! ow and i dont know how to ride it either :D

raw rust rice venti quad shot cafe racing latte project aka my build..... http://forums.sohc4.net/index.php?topic=88853.0

black and white equation godzilla chalkboard 
1972 cb750 - next in line for some <3

Offline xsmooth69x

  • Master
  • *****
  • Posts: 1,621
EP35... Ask for it at any auto store. Got it for mine. Works great!

not to hijack, I got my LEDS in the mail that you have. Next week I will be taking apart my gauges..

yup the is the exact flasher i bought. so that is perfect

and awesome u got the led and good luck with the mod they turn out freakin awesome
1975 CB550 (FINISHED?!?!?)
first motorcycle ever!!! ow and i dont know how to ride it either :D

raw rust rice venti quad shot cafe racing latte project aka my build..... http://forums.sohc4.net/index.php?topic=88853.0

black and white equation godzilla chalkboard 
1972 cb750 - next in line for some <3

Offline dave500

  • Really Old Timer ...
  • *******
  • Posts: 17,016
  • WHAT?no gravy?
dont they have james hardies blue asbestos wrap over there?

Offline xsmooth69x

  • Master
  • *****
  • Posts: 1,621
dont they have james hardies blue asbestos wrap over there?

i thought there was a town in australia called asbestos and they used to mine it there. think its shut down but its ur fault  :P

i would be such a rebel being like hey guys look at my asbestos wrap headers booga wooga
1975 CB550 (FINISHED?!?!?)
first motorcycle ever!!! ow and i dont know how to ride it either :D

raw rust rice venti quad shot cafe racing latte project aka my build..... http://forums.sohc4.net/index.php?topic=88853.0

black and white equation godzilla chalkboard 
1972 cb750 - next in line for some <3

Offline xsmooth69x

  • Master
  • *****
  • Posts: 1,621
ok well this is the first time i ever ever reupholstered anything in my life. so you pros out there dont beat me up.

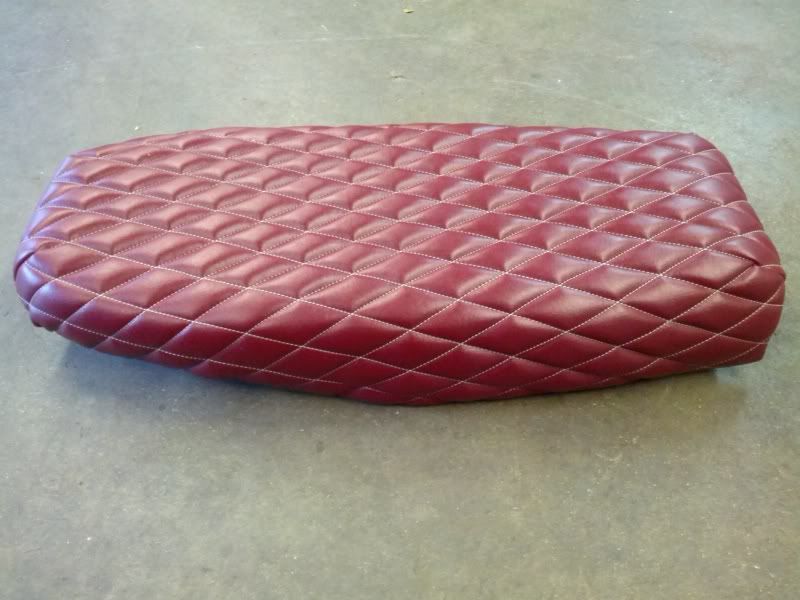
first i wanted something gotti so i decided to do a deep maroon with white raised diamond stitch pattern.

**** this is not possible with a home sewing machine. i was fortunate enough to have an aunt with an industral sewing machine to be able to do all this. u will not be able to sew through all the material. you cant even use the kind of threat i used.****

so what i did is went to Joanns fabrics and picked up some marine grade vinyl. they have a ton of different colors!! i went with a dark maroon.

my aunt had some thick white thread u use on the big industrial sewing machine so i couldnt tell u what kind it is

then i wanted the diamond print to be raised from the pleather so i used some fabric backed foam and sewed the pleather and fabric backed foam together to get that raised print.

**the reason i used fabric backed foam is because its so hard to work with foam sheets or just foam. with the fabric backing its way easier for the needle and thread to just catch the fabric so it dosnt just rip or cut the foam. its easier to use with a sewing machine.**

i used a stencil i made for the diamond print after i got the size and shape i wanted. then i put everything together and sewed the diamond print stitch on the pleather with the fabric backed foam.
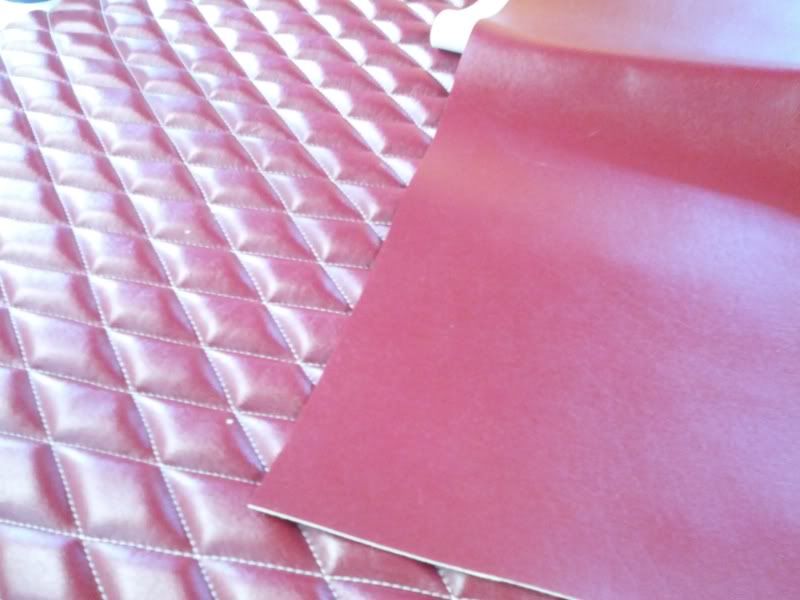
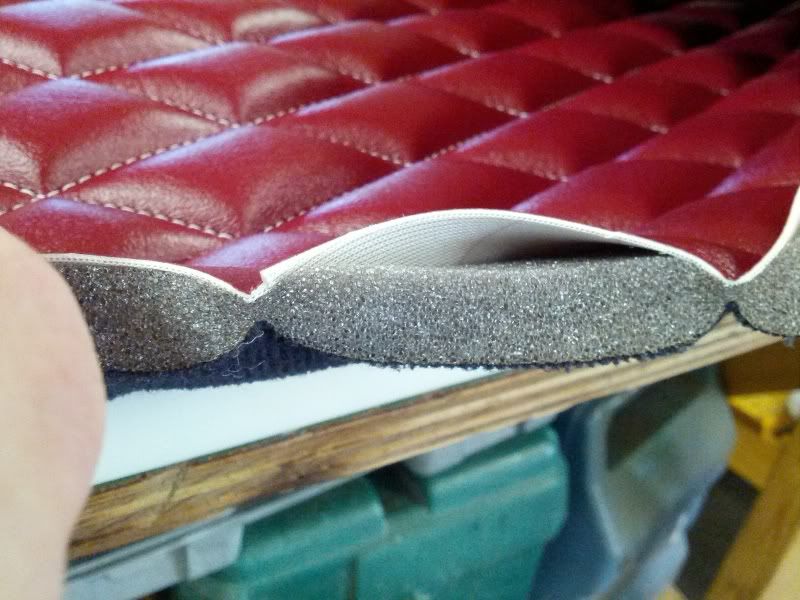
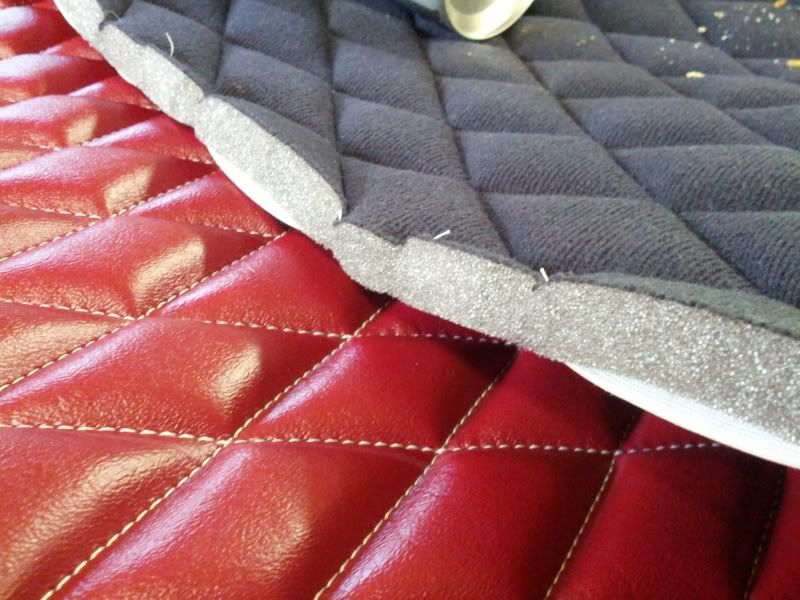


next is the seat!

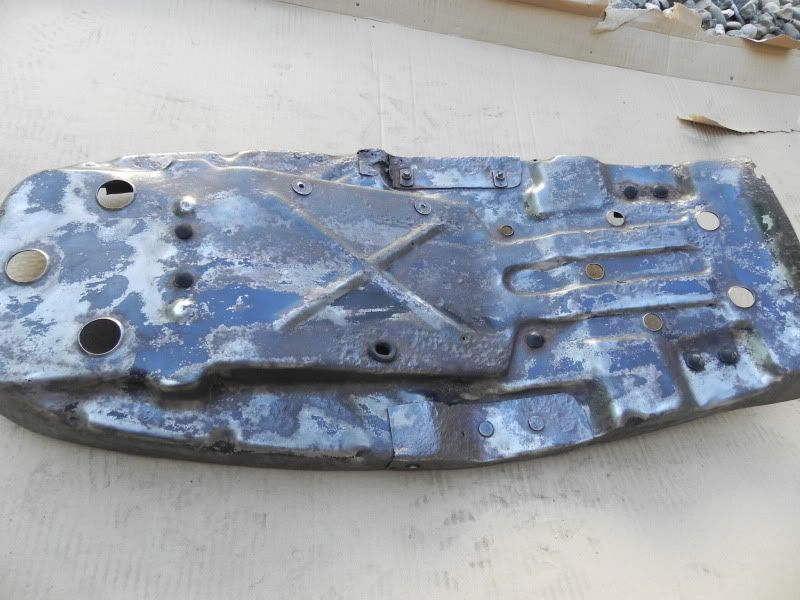
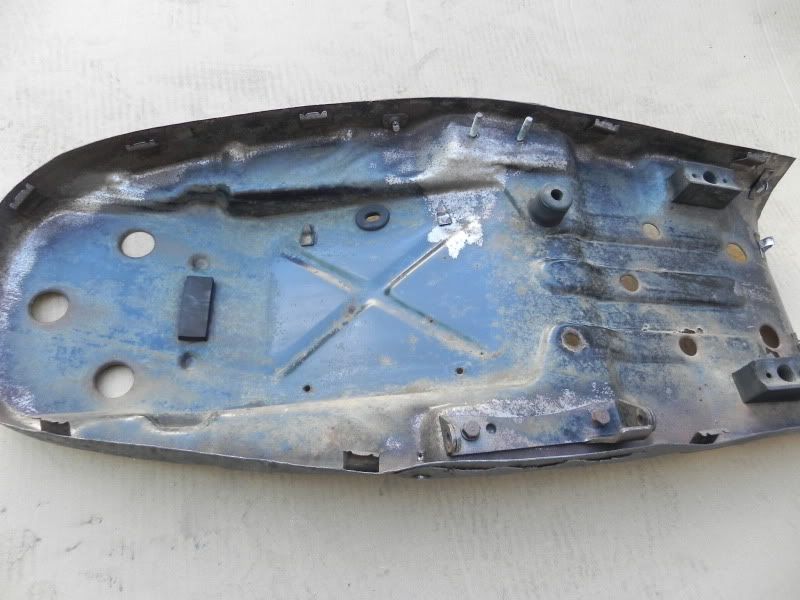
take apart the seat with a razor blade, flat head and philips screw driver (this is if u can actually unscrew the seat strap off)

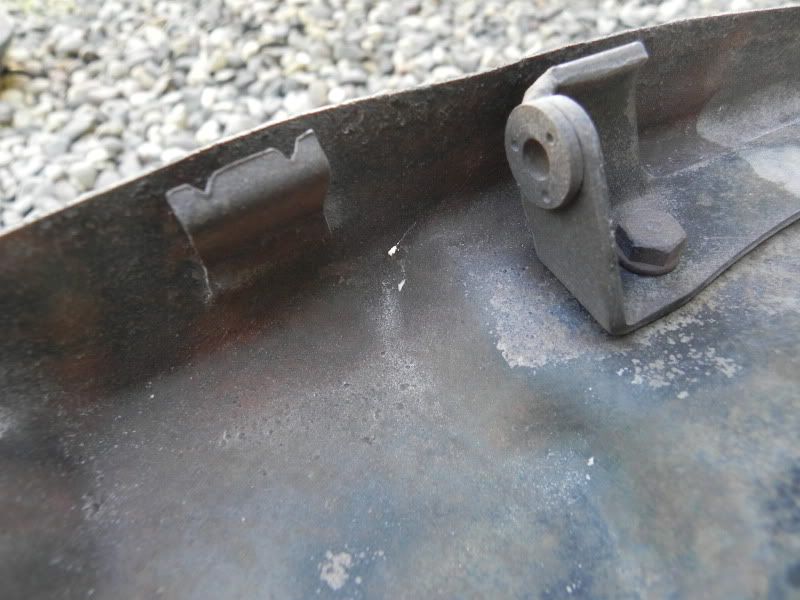
go around the pan and take of the chrome stripping and save it if urs is still good. mine was destroyed. then take the flat head screw driver and pry pack the clips that hold the fabric.

then i slowly and carefully pulled the foam off the pan so i could inspect the pan, clean and paint it.
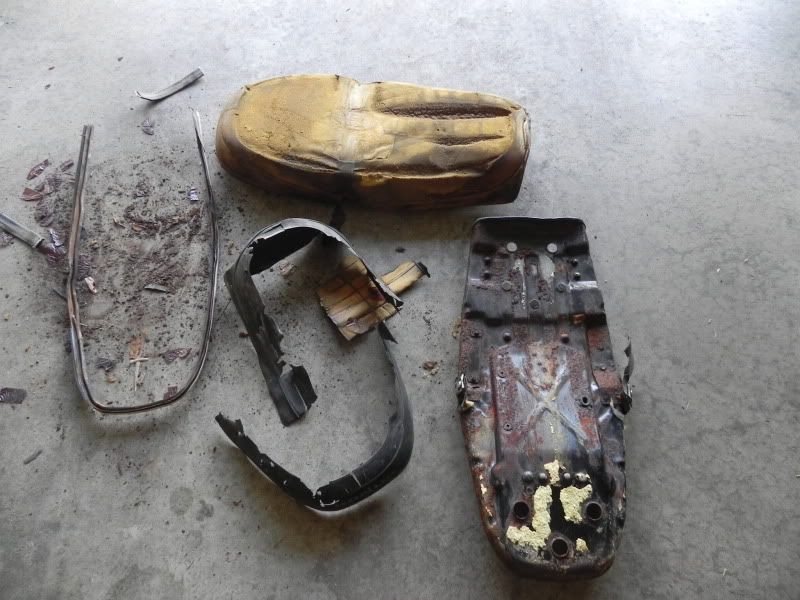


i couldnt get my strap off so i had to cut if off and cut around it
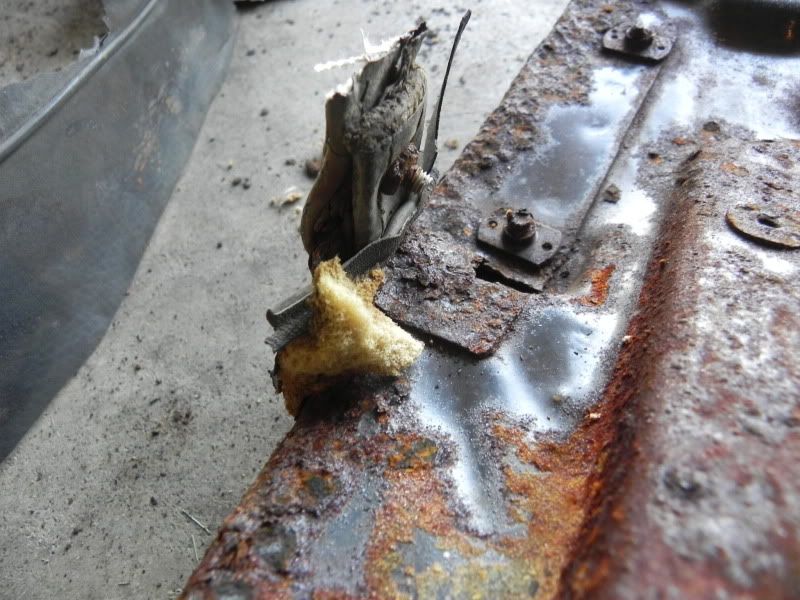


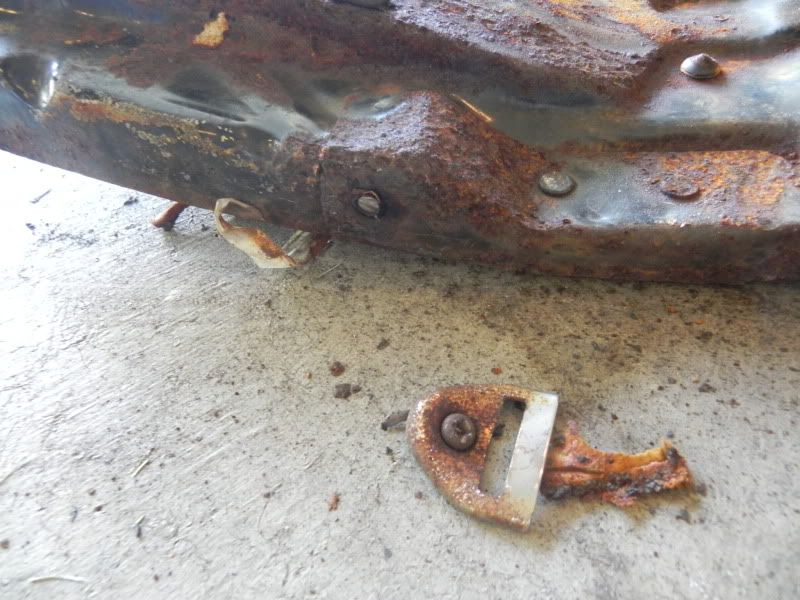
i had to take a grinder and cut the bolts off and the bracket since i dont need it anymore


after this i cleaned up the pan and took off all the rust
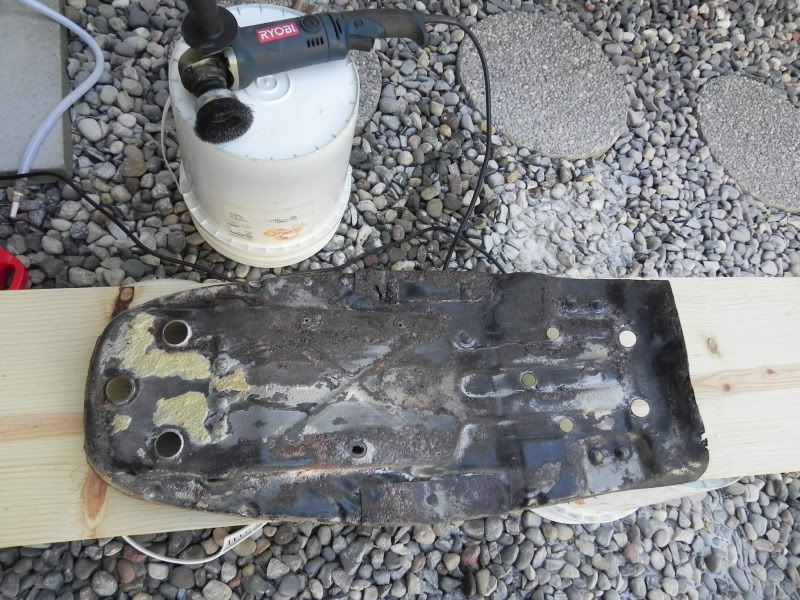


clean  ;D

then i gave it a quick soap wash, a nice dry and took some black spray paint and painted the pan to stop any further rust

after the pan was ready i took some locktight spray on adhesive and sprayed the seat pan and foam and re attached it.

after that i cut down the foam with a bread knife and an electric turkey cuter thing
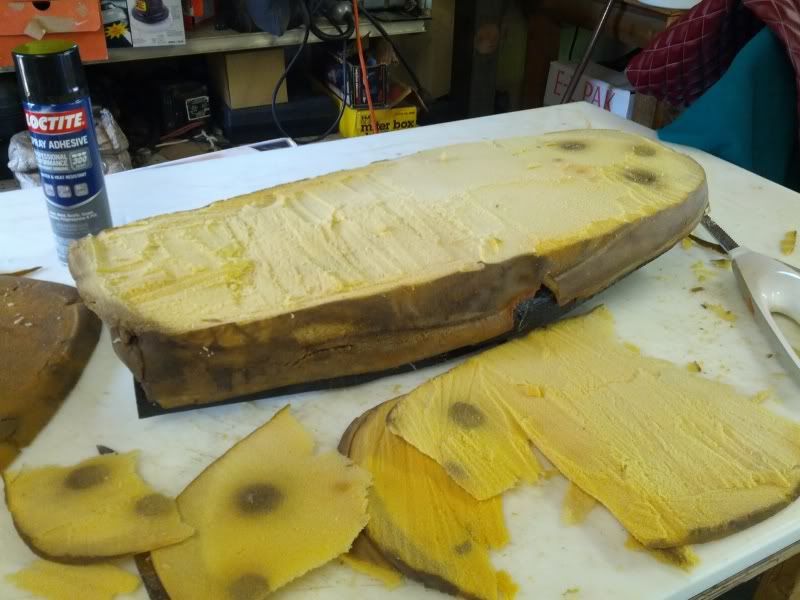


i wanted the seat flat and having a lower profile at the cost of my butt  :P

the back of the seat the foam is quite high and the front was a little low since i had to cut off alot of broken down rotten foam. so i took some of the good foam from the back and placed it in the front.


then used the same spray adhesive and sprayed down the extra piece of foam


now the foam and seat pan is ready plus the fabric.

now putting everything together

first i stretched and held the fabric to get and idea of the shape i had to cut.
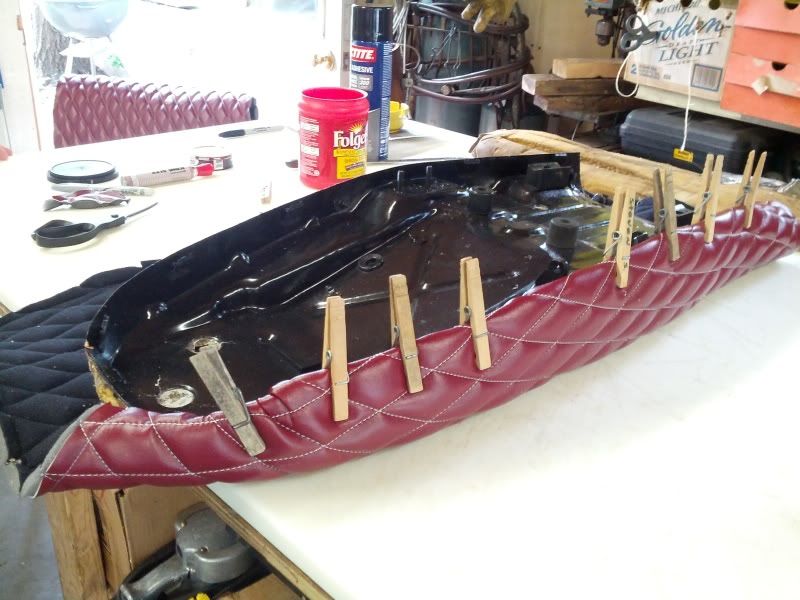


after getting the general shape and lots of measuring i sewed the corner triangles

this is how it came out


this was surprisingly hard for me anyways and now u can kinda see that this is my first time
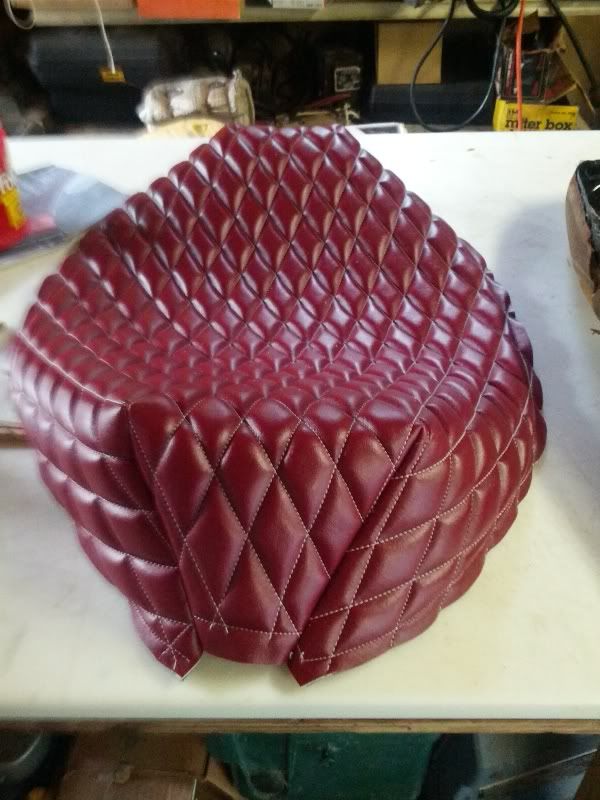


then i stretched the new seat cover over and secured it with the stock tabs.


back


front
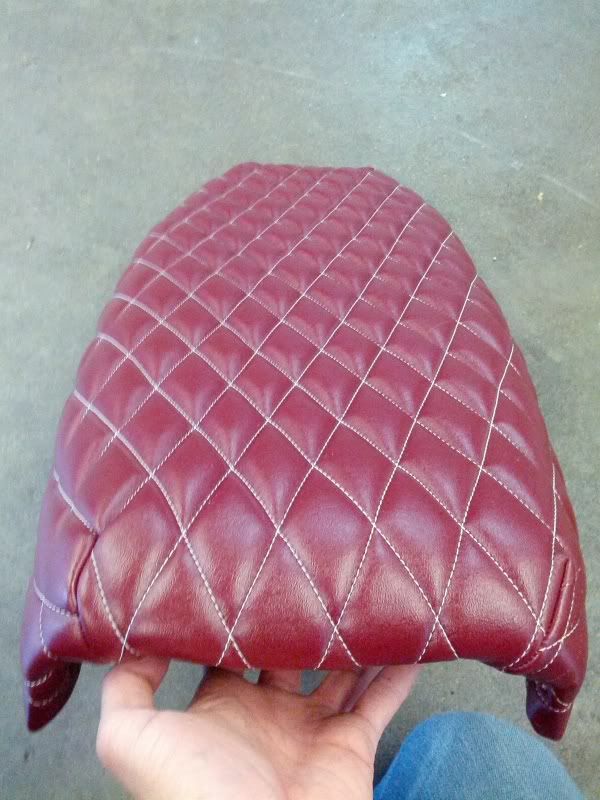


the only thing i have to do is buy some of the rim strip that goes around the rim of the seat to further secure the fabric down.

i will be sanding off all the chrome and then spraying the stripping black. or maybe i might keep the chrome look and see how it is.
1975 CB550 (FINISHED?!?!?)
first motorcycle ever!!! ow and i dont know how to ride it either :D

raw rust rice venti quad shot cafe racing latte project aka my build..... http://forums.sohc4.net/index.php?topic=88853.0

black and white equation godzilla chalkboard 
1972 cb750 - next in line for some <3

maduncle

  • Guest

Hey - nice work on the seat, I do like the diamond stitch pattern you used, well done!

Offline xsmooth69x

  • Master
  • *****
  • Posts: 1,621

Hey - nice work on the seat, I do like the diamond stitch pattern you used, well done!

thanks!!  ;D
1975 CB550 (FINISHED?!?!?)
first motorcycle ever!!! ow and i dont know how to ride it either :D

raw rust rice venti quad shot cafe racing latte project aka my build..... http://forums.sohc4.net/index.php?topic=88853.0

black and white equation godzilla chalkboard 
1972 cb750 - next in line for some <3

Offline Syscrush

  • Expert
  • ****
  • Posts: 1,419
  • Sold. :(
I just re-read this from Page 5, and if I understand correctly, you're still proceeding with the dented frame, right?
Life is precious: wear your f'n helmet!
There's nothing more expensive than a free bike...
FWIW, I'm not a shill for Race Tech - I've just got a thing for good suspension and the RTCE's are the most cost-effective mod for these old damping rod front ends.

Offline Operator

  • Someday I will live up to being a
  • Expert
  • ****
  • Posts: 856
Cool seat, it will go nicely with the green carbs!!
If ever there was a creator of bastard sons, it is the open road, for she has claimed so many young men yearning for freedom......

1973 CB750 K3
1976 CB400F (Cafe Project)
1979 Yamaha XS400 (Currently up for Sale)

Offline Syscrush

  • Expert
  • ****
  • Posts: 1,419
  • Sold. :(
I love the seat, and I'm impressed at the work you did yourself to get it all together.  I also appreciate how you're including a lot of how-to's in your build thread.  All of that is to be commended.

But are you still using that dented frame?

Listen to what he says about creases & dents, and watch to the demo at the end:
NC Science Olympiad: Rolling Stronger Paper
« Last Edit: June 04, 2012, 09:10:40 AM by Syscrush »
Life is precious: wear your f'n helmet!
There's nothing more expensive than a free bike...
FWIW, I'm not a shill for Race Tech - I've just got a thing for good suspension and the RTCE's are the most cost-effective mod for these old damping rod front ends.

Offline xsmooth69x

  • Master
  • *****
  • Posts: 1,621
ugh damn the frame thing is back.....

i did not use the original frame that was horribly messed up.

my second frame the tubes where not bent to the point where the structural integrate was compromised. i took it and talked to a couple mechanics that restore and rebuild old honda's.

the small if any dent was put into a vice and fixed. there wasnt really any fixing at all i just wanted it done so they did it.

i understand the example its just like a beer can. u can stand on an empty one but if u put a small dent in the can it will crush after you stand on it.

after the bike is done im going to take it to the first thursday in minneapolis and talk to other enthusiasts that can see and check it in person. the first thursday is sick alot of old bikes out there moto guzzis nortons ducati honda yamaha suzuki and etc etc crotch rockets choppers and cruisers.

its just so freakin hard to grab a good frame that is "perfect" alot of other frames still have stupid highway pegs that do the same thing or having other problems or rust or they are super difficult about registration blagh.

if and if in some ungodly way it is a problem i will change it out. but this is my first bike and i will probably dump it at least once  :P
« Last Edit: June 04, 2012, 12:04:43 PM by xsmooth69x »
1975 CB550 (FINISHED?!?!?)
first motorcycle ever!!! ow and i dont know how to ride it either :D

raw rust rice venti quad shot cafe racing latte project aka my build..... http://forums.sohc4.net/index.php?topic=88853.0

black and white equation godzilla chalkboard 
1972 cb750 - next in line for some <3

Offline xsmooth69x

  • Master
  • *****
  • Posts: 1,621
but i have crash guards on my bike kinda like this


 :P
1975 CB550 (FINISHED?!?!?)
first motorcycle ever!!! ow and i dont know how to ride it either :D

raw rust rice venti quad shot cafe racing latte project aka my build..... http://forums.sohc4.net/index.php?topic=88853.0

black and white equation godzilla chalkboard 
1972 cb750 - next in line for some <3

Offline xsmooth69x

  • Master
  • *****
  • Posts: 1,621
stupid hints and tips about my headers when i was trying to get them on the bike!!

1) so the one thing u have to be sure of is when u start u must get the spacing for the exhaust clamp brackets spot on.

i thought i could adjust the spacing after wrapping it but it is extremely difficult since i started header down. i dont know what i was thinking wrapping the exhaust just guessing the spacing and thinking i could move it around.

if i wouldve started bottom up this would be no problem. but if you go bottom up it will be very difficult to keep the wrap in place while u set the header and exhaust rings before you put on the metal clips (as explained in part 2 of the hints and tips)

2) also the metal ties have a lower profile then the plastic zip ties but does not clear the exhaust ring that slides down the header tubes.

before putting on the metal ties place the headers on the bike and give the exhaust rings enough space for you to position it on the bike then put the metal ties on! then after that place the exhaust rings tight against the motor. if you put the exhaust rings all the way on then put the metal ties on the next time you take off the headers u will have to cut the metal ties. they are really a pain in the ass to cut btw.
1975 CB550 (FINISHED?!?!?)
first motorcycle ever!!! ow and i dont know how to ride it either :D

raw rust rice venti quad shot cafe racing latte project aka my build..... http://forums.sohc4.net/index.php?topic=88853.0

black and white equation godzilla chalkboard 
1972 cb750 - next in line for some <3

Offline Syscrush

  • Expert
  • ****
  • Posts: 1,419
  • Sold. :(
my second frame the tubes where not bent to the point where the structural integrate was compromised. i took it and talked to a couple mechanics that restore and rebuild old honda's.

the small if any dent was put into a vice and fixed. there wasnt really any fixing at all i just wanted it done so they did it.
Great, that's all I needed to hear.
Life is precious: wear your f'n helmet!
There's nothing more expensive than a free bike...
FWIW, I'm not a shill for Race Tech - I've just got a thing for good suspension and the RTCE's are the most cost-effective mod for these old damping rod front ends.

Offline xsmooth69x

  • Master
  • *****
  • Posts: 1,621
1975 CB550 (FINISHED?!?!?)
first motorcycle ever!!! ow and i dont know how to ride it either :D

raw rust rice venti quad shot cafe racing latte project aka my build..... http://forums.sohc4.net/index.php?topic=88853.0

black and white equation godzilla chalkboard 
1972 cb750 - next in line for some <3

Offline Mcwilliams570

  • Hot Shot
  • ***
  • Posts: 646
Great job on the seat looks very nice. I am almost done with the body work and will be starting on the seat soon so was nice to see how you did it..

Matt
My CB550 project http://forums.sohc4.net/index.php?topic=101182.0

Project UFB Cb550 http://forums.sohc4.net/index.php?topic=112143.0

Like a 10 dollar hooker on Friday night its going to be ridden.

1974 cb550
1975 cb550
2005 vmax
2009 vmax-sold
1981 gl500i

Offline mono

  • Definitely no
  • Expert
  • ****
  • Posts: 1,271
  • 1975 Honda CB550, 1978 CB750K (in progress)
your build is looking good!  great job on that seat cover.  it's crazy how many different skills all of this motorcycle rebuilding/customizing involves.

Offline xsmooth69x

  • Master
  • *****
  • Posts: 1,621
ya this moto alone i have learned so much stuff its amazing.

working on import cars like my subaru and other cars they are all electronically controlled and pretty easy to work on. bolt on parts take it to the dyno get it tuned etc

these bikes on the other hand with the points tappets carburetors and weird mechanical parts are crazy how someone thought this stuff up
1975 CB550 (FINISHED?!?!?)
first motorcycle ever!!! ow and i dont know how to ride it either :D

raw rust rice venti quad shot cafe racing latte project aka my build..... http://forums.sohc4.net/index.php?topic=88853.0

black and white equation godzilla chalkboard 
1972 cb750 - next in line for some <3

Offline mickey6

  • Enthusiast
  • **
  • Posts: 172
don't sit on that sofa in your boxers you'll end up with an itchy bum lol. I like your attention to detail expecially as your first bike build. Keep up the how to's so we can rip them 'er I mean refer to them later ;D
76 cb750F in 7 boxes
73 cb500 daily cafe

Offline xsmooth69x

  • Master
  • *****
  • Posts: 1,621
don't sit on that sofa in your boxers you'll end up with an itchy bum lol. I like your attention to detail expecially as your first bike build. Keep up the how to's so we can rip them 'er I mean refer to them later ;D

ya the headers on the couch was for a quick pic but i made sure to vacuum it.......

also i wrapped my headers in the living room.... i mean i set down some news paper but i didnt know how ummm easily this stuff floats in the air and there are still lil pieces of fiberglass everywhere hahahahahahaha

another word of advice wear a small like doctor face mask i bet i breathed in so much fiber glass. i made sure to keep it wet but still omg  :o
1975 CB550 (FINISHED?!?!?)
first motorcycle ever!!! ow and i dont know how to ride it either :D

raw rust rice venti quad shot cafe racing latte project aka my build..... http://forums.sohc4.net/index.php?topic=88853.0

black and white equation godzilla chalkboard 
1972 cb750 - next in line for some <3