Author Topic: '77 750K Cheap Commuter Project  (Read 7015 times)

0 Members and 1 Guest are viewing this topic.

Offline MorePDX

  • Full Member
  • *
  • Posts: 45
  • the project, '77 750K
'77 750K Cheap Commuter Project
« on: May 28, 2011, 10:47:38 PM »
I've been inspired and emboldened by others here on the forum and finally decided it was time for me to jump into my own project bike and post my progress.  Hopefully, with your help, I can pull off my first big job.

I bought this bike last Summer, intending it to be cheap transportation for me around Denver.  I put new tires on and rode it until Winter.
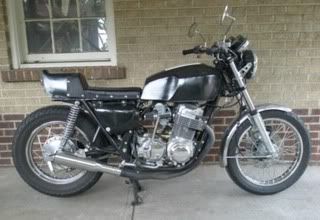


The PO had started to make it into a cafe racer with a cafe seat, custom tank, flat bars, etc.  I soon discovered that the cafe racer set up was not ideal for what I wanted to use the bike for. 


Luckily for me, when I bought the bike I also got a box full of parts the PO had taken off, rear fender, seat pan, turn signals, etc.  I'll be putting some of those things back on to make the bike more comfortable and better for everyday riding.

More importantly, I want to make sure that the mechanics are all in good working order.  I've bought Hondaman's manual and will be using that as a guide to making repairs and tuning.  I will also be using this forum as a resource, so any wisdom you have to share with an enthusiastic amateur is most welcome!  Below is my preliminary list of work items.

Phase I: Frame
1.Remove engine from frame.
2.Fabricate and weld seat brackets onto frame
3.Weld extensions onto rear of frame
4.Powdercoat frame
5.Re- install engine in frame

Phase II: Engine
1.Change engine oil and filter
2.Set valve clearance (lash) and test compression
3.Set and adjust carbs
4.Check coil wire and sparkplug cap conditions
5.Replace sparkplugs
6.Check battery voltage and charging system output
7.Check brakes and brake light  operation
8.Install all electric ignition system
9.Check tire condition and pressures
10.Check the condition of the electrical plugs on the back of the engine, the rectifier, and the exposed connections for the taillight and brake lights.

Phase III: Peripheral
1.Have seat made
2.Change oil in front forks
3.Reinstall fork ears and front turn signals
4.Reinstall rear fender, taillight and turn signals
5.Install windshield
6.Install horn

My goal is to have the work done before mid-July and have spent less than $1000.  Wish me luck!   ;D
« Last Edit: June 08, 2011, 07:10:44 PM by mudhustler »
If it ain't broke, don't fix it!  -my dad

Offline MorePDX

  • Full Member
  • *
  • Posts: 45
  • the project, '77 750K
Re: '77 750K Cheap Commuter Project
« Reply #1 on: May 30, 2011, 10:26:48 AM »
I started tearing her down this weekend, taking advantage of the great weather.

Here was one surprise.  This screw was on top of the transmission, just under the furthest right carb (are the carbs numbered 1 thru 4 from left to right while on the bike?)


Found these cut wires hanging out under the gas tank, I think they must go to the horn, or maybe the turn-signal buzzer.


The exhaust ports looked like this, white build-up on the valve and black gunk all around.  Notice the black stuff up around the spark plug, too.


Here are the old pipes.  They'll be replaced with the same type from Mac.  The muffler had been modified and was too loud for my taste.  I'll be glad to have it quieter.


Lastly, here are the pod filters that never seemed to quite fit and would sometimes just fall off while I was riding.  I found an old airbox with a new K&N filter in it sitting on top of a pile at Steele's Cycles.  I'll re-jet the carbs and see if I can't get some better performance that way.


I'll finish getting the engine ready for removal this week and take the seat pan over to the upholsterer to see what they can do for me.  My dad recommended a place that does the custom upholstery for the Ferrari dealership where he works, good enough for me!


If it ain't broke, don't fix it!  -my dad

Offline MorePDX

  • Full Member
  • *
  • Posts: 45
  • the project, '77 750K
Re: '77 750K Cheap Commuter Project
« Reply #2 on: June 01, 2011, 06:58:39 AM »
I finished getting the engine ready for removal this weekend.  Can anyone tell me how necessary all those emissions tubes are?  It might be nice to clear them out if I don't need them.  Anyway, I'm waiting until next weekend when I can get a friend to help me with the actual removal, wish me luck!


In the meantime, I'm going to start working on the seat. The seat pan I have is missing the rubbers and has a notch missing in the side that I'd have to weld up before I could even take it to the upholstery shop.  I'm going to check at Steele's cycles today and see if they have any  complete seats in decent shape.  That might be the softer, easier way.
If it ain't broke, don't fix it!  -my dad

Offline Bankerdanny

  • Eventually I will be old enough in reality to be
  • Really Old Timer ...
  • *******
  • Posts: 7,626
  • Endeavor to persevere
Re: '77 750K Cheap Commuter Project
« Reply #3 on: June 01, 2011, 09:15:54 AM »
I think you need to re-name your project to Not As Cheap As It Used To Be Commuter Project. LOL
"The problem with quotes on the Internet is that you never know if they're true" - Abraham Lincoln

Current: '76 CB750F. Previous:  '75 CB550F, 2007 Yamaha Vino 125 Scooter, '75 Harley FXE Superglide, '77 GL1000, '77 CB550k, '68 Suzuki K10 80, '68 Yamaha YR2, '69 BMW R69S, '71 Honda SL175, '02 Royal Enfield Bullet 500, '89 Yamaha FJ1200

Offline MorePDX

  • Full Member
  • *
  • Posts: 45
  • the project, '77 750K
'77 750K the project formerly known as the "Cheap Commuter Project"
« Reply #4 on: June 01, 2011, 09:37:30 AM »
I was just looking up replacement exhaust systems online, BankerDanny, and I think you may be right about a name change.   ;D
If it ain't broke, don't fix it!  -my dad

Offline Bankerdanny

  • Eventually I will be old enough in reality to be
  • Really Old Timer ...
  • *******
  • Posts: 7,626
  • Endeavor to persevere
Re: '77 750K Cheap Commuter Project
« Reply #5 on: June 01, 2011, 11:00:01 AM »
If you install a new 4-4 exhaust then my suggested name won't work either, it will have to be It Cost the Earth But It Turned Out Beautiful 750K Commuter
"The problem with quotes on the Internet is that you never know if they're true" - Abraham Lincoln

Current: '76 CB750F. Previous:  '75 CB550F, 2007 Yamaha Vino 125 Scooter, '75 Harley FXE Superglide, '77 GL1000, '77 CB550k, '68 Suzuki K10 80, '68 Yamaha YR2, '69 BMW R69S, '71 Honda SL175, '02 Royal Enfield Bullet 500, '89 Yamaha FJ1200

Offline MorePDX

  • Full Member
  • *
  • Posts: 45
  • the project, '77 750K
Re: '77 750K Cheap Commuter Project
« Reply #6 on: June 01, 2011, 01:09:17 PM »
I'm considering just painting the old pipes with hi-temp header paint and saving my money for my 550 cafe project.
If it ain't broke, don't fix it!  -my dad

Offline MorePDX

  • Full Member
  • *
  • Posts: 45
  • the project, '77 750K
Re: '77 750K Cheap Commuter Project
« Reply #7 on: June 01, 2011, 09:35:22 PM »
I took a closer look at the pipes tonight.  I think they're salvageable.  The muffler, on the other hand, is a mess.

Seems like there's something missing in there.


No wonder I was scared I was waking the neighbors, I probably was.
If it ain't broke, don't fix it!  -my dad

Offline MorePDX

  • Full Member
  • *
  • Posts: 45
  • the project, '77 750K
Re: '77 750K Cheap Commuter Project
« Reply #8 on: June 04, 2011, 10:07:04 PM »
I got the engine out today.  With my friend Jodi's help and direction from Hondaman's book, it went off without a hitch.


Now to start working on the rear fender mounts.  This is what I'm going for.  I'd like to make it somewhat stock with the original fender, seat and grab bar.


I found some EMT that fits perfectly inside the frame where the PO cut it.  I think I can fabricate a flange on the end of  that to accommodate the turnsignal grab bar mounts.

If it ain't broke, don't fix it!  -my dad

Offline MorePDX

  • Full Member
  • *
  • Posts: 45
  • the project, '77 750K
Re: '77 750K Cheap Commuter Project
« Reply #9 on: June 26, 2011, 11:13:19 AM »
I've been working on a job promotion and haven't had much time for the motorcycle lately.  Here are some photos of the little progress I have made.

I discovered my frame is a bit crooked.  I can't find any real evidence of a crash except for some scrapes on the left side of the engine.  The crookedness doesn't seem to affect the handling too badly, though.


I used the parts cleaner at Club Workshop to get some of the grease and grit off.


I also stripped the paint off of the existing pipes.


Finally, I took some Simple Green to the engine.


I'm working on the brackets to hold the rear fender now.
If it ain't broke, don't fix it!  -my dad

Offline MorePDX

  • Full Member
  • *
  • Posts: 45
  • the project, '77 750K
Re: '77 750K Cheap Commuter Project
« Reply #10 on: September 04, 2011, 12:48:21 PM »
So, I haven't posted for quite a while.  I accidentally wiped the memory on my computer along with all the photos I'd taken :'(.  But I haven't stopped working on the bike!  Here's an updated job list (struck out items have been completed, items in red have been added).

Phase I: Frame Etc.
1.Remove engine from frame.
2.Fabricate and weld seat brackets onto frame
3.Weld extensions onto rear of frame
4.Powdercoat frame (changed to touch-up paint on frame)
5.Re- install engine in frame
6.replace steering head bearings with tapered All Balls bearings
7.replace rear wheel bearings with All Balls bearings
8.replace front wheel bearings with All Balls bearings

Phase II: Engine and Drive
1.Change engine oil and filter
2.Set valve clearance (lash) and test compression
3.Set and adjust carbs
3a.Replace screws on float bowls with proper sized screws.  May require re-tapping holes.
4.Check coil wire and sparkplug cap conditions
5.Replace sparkplugs
6.Check battery voltage and charging system output
7.Check brakes and brake light  operation
8.Install all electric ignition system (will look into this later, too $$$ right now)
9.Check tire condition and pressures
10.Check the condition of the electrical plugs on the back of the engine, the rectifier, and the exposed connections for the taillight and brake lights
11. Replace master link on chain.  (Didn't need to be replaced, just needed to know how to re-install it!)
12. Replace O-ring on tachometer cable

Phase III: Peripheral
1.Have seat made
1a.Have key made for seat lock
2.Change oil in front forks
3.Reinstall fork ears and front turn signals
4.Reinstall rear fender, taillight and turn signals
5.Install windshield
6.Install horn
7.Rewire brake lights, turn signals and horn.
7a.Replace original fuse box with blade-type fuse box.
7b.Replace original turnsignal relay with electronic relay.
8.Run control wiring through handlebars.

With all of the above done, I've now got myself a rolling frame.  I had a bicycle accident this week and will have to put off reinstalling the engine in the frame until the concussion heals.  It's frustrating but the smart thing to do.  I'll post more photos soon.
« Last Edit: September 23, 2011, 07:56:58 AM by mudhustler »
If it ain't broke, don't fix it!  -my dad

Offline lucky

  • Really Old Timer ...
  • *******
  • Posts: 6,717
Re: '77 750K Cheap Commuter Project
« Reply #11 on: September 06, 2011, 07:49:30 PM »
I started tearing her down this weekend, taking advantage of the great weather.

Here was one surprise.  This screw was on top of the transmission, just under the furthest right carb (are the carbs numbered 1 thru 4 from left to right while on the bike?)


Found these cut wires hanging out under the gas tank, I think they must go to the horn, or maybe the turn-signal buzzer.


The exhaust ports looked like this, white build-up on the valve and black gunk all around.  Notice the black stuff up around the spark plug, too.


Here are the old pipes.  They'll be replaced with the same type from Mac.  The muffler had been modified and was too loud for my taste.  I'll be glad to have it quieter.


Lastly, here are the pod filters that never seemed to quite fit and would sometimes just fall off while I was riding.  I found an old airbox with a new K&N filter in it sitting on top of a pile at Steele's Cycles.  I'll re-jet the carbs and see if I can't get some better performance that way.


I'll finish getting the engine ready for removal this week and take the seat pan over to the upholsterer to see what they can do for me.  My dad recommended a place that does the custom upholstery for the Ferrari dealership where he works, good enough for me!

All machines in the world have the parts numbered as if you are standing behind them facing forward. Airplanes, motorcycles etc.,.
So yes...  Standing in back facing forward the first engine on the left of a plane is #1.
The first cylinder on the left of a transverse engine is #1 .

Offline lucky

  • Really Old Timer ...
  • *******
  • Posts: 6,717
Re: '77 750K Cheap Commuter Project
« Reply #12 on: September 06, 2011, 07:52:07 PM »
I've been inspired and emboldened by others here on the forum and finally decided it was time for me to jump into my own project bike and post my progress.  Hopefully, with your help, I can pull off my first big job.

I bought this bike last Summer, intending it to be cheap transportation for me around Denver.  I put new tires on and rode it until Winter.


The PO had started to make it into a cafe racer with a cafe seat, custom tank, flat bars, etc.  I soon discovered that the cafe racer set up was not ideal for what I wanted to use the bike for. 
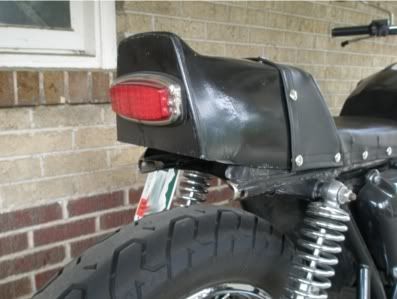


Luckily for me, when I bought the bike I also got a box full of parts the PO had taken off, rear fender, seat pan, turn signals, etc.  I'll be putting some of those things back on to make the bike more comfortable and better for everyday riding.

More importantly, I want to make sure that the mechanics are all in good working order.  I've bought Hondaman's manual and will be using that as a guide to making repairs and tuning.  I will also be using this forum as a resource, so any wisdom you have to share with an enthusiastic amateur is most welcome!  Below is my preliminary list of work items.

Phase I: Frame
1.Remove engine from frame.
2.Fabricate and weld seat brackets onto frame
3.Weld extensions onto rear of frame
4.Powdercoat frame
5.Re- install engine in frame

Phase II: Engine
1.Change engine oil and filter
2.Set valve clearance (lash) and test compression
3.Set and adjust carbs
4.Check coil wire and sparkplug cap conditions
5.Replace sparkplugs
6.Check battery voltage and charging system output
7.Check brakes and brake light  operation
8.Install all electric ignition system
9.Check tire condition and pressures
10.Check the condition of the electrical plugs on the back of the engine, the rectifier, and the exposed connections for the taillight and brake lights.

Phase III: Peripheral
1.Have seat made
2.Change oil in front forks
3.Reinstall fork ears and front turn signals
4.Reinstall rear fender, taillight and turn signals
5.Install windshield
6.Install horn

My goal is to have the work done before mid-July and have spent less than $1000.  Wish me luck!   ;D

Nothing unusual about the photo of the exhaust port. Very common. Normal.

Offline lucky

  • Really Old Timer ...
  • *******
  • Posts: 6,717
Re: '77 750K Cheap Commuter Project
« Reply #13 on: September 06, 2011, 07:55:18 PM »
I started tearing her down this weekend, taking advantage of the great weather.

Here was one surprise.  This screw was on top of the transmission, just under the furthest right carb (are the carbs numbered 1 thru 4 from left to right while on the bike?)


Found these cut wires hanging out under the gas tank, I think they must go to the horn, or maybe the turn-signal buzzer.


The exhaust ports looked like this, white build-up on the valve and black gunk all around.  Notice the black stuff up around the spark plug, too.


Here are the old pipes.  They'll be replaced with the same type from Mac.  The muffler had been modified and was too loud for my taste.  I'll be glad to have it quieter.


Lastly, here are the pod filters that never seemed to quite fit and would sometimes just fall off while I was riding.  I found an old airbox with a new K&N filter in it sitting on top of a pile at Steele's Cycles.  I'll re-jet the carbs and see if I can't get some better performance that way.


I'll finish getting the engine ready for removal this week and take the seat pan over to the upholsterer to see what they can do for me.  My dad recommended a place that does the custom upholstery for the Ferrari dealership where he works, good enough for me!

"All those emissions tubes."  The CB750 had almost nothing.
It has a crankcase breather tube and 4 float bowl drain hoses. Thats it.

Offline lucky

  • Really Old Timer ...
  • *******
  • Posts: 6,717
Re: '77 750K Cheap Commuter Project
« Reply #14 on: September 06, 2011, 07:56:59 PM »
First thing you need to do is buy a workshop manual. You Must have it.

Offline themotoworks

  • addict
  • Enthusiast
  • **
  • Posts: 109
    • roc city cafe racers
Re: '77 750K Cheap Commuter Project
« Reply #15 on: September 06, 2011, 08:45:11 PM »
that screw is from one of the carb bowls, they always fall out when you're replacing the bowls, because we've all got fat american fingers, those bikes were designed by the japanese... usually the screws fall out right onto the chain though, so you find them all mangled a mile later.  +1 on the manual too, there's a good .pdf out there you can get to from dan's mc site, it's about 1000 pages total, but the first 300 or so is the proper shop mechanic's manual for the 750's.  if you can't find it, pm me and i'll email you the doc
www.roccitycafe.com <- my sideline turned living

Offline MorePDX

  • Full Member
  • *
  • Posts: 45
  • the project, '77 750K
Re: '77 750K Cheap Commuter Project
« Reply #16 on: September 07, 2011, 07:08:25 PM »
Thanks for the helpful input!  Roccity, I found that shop manual, thanks a lot!

I found out that this, (the thing that is not the battery overflow tube or the gas tank overflow tube)

is the breather separator that connects the crankcase to the bottom of my airbox!  Good to know.  ::)

Here are a few progress shots:

rear tabs fabricated and welded to the frame


seat brackets fabricated and welded to the frame


horn bracket fabricated and welded to the frame


grease channel cut into length of previously seized swingarm collar


seat back from the upholstery shop


Ron and the crew at Auto Weave did a beautiful job!


rear fender, turn signals, grab-bar and new seat in all their glory
If it ain't broke, don't fix it!  -my dad

Offline mrrch

  • Hot Shot
  • ***
  • Posts: 652
Re: '77 750K Cheap Commuter Project
« Reply #17 on: September 08, 2011, 08:38:28 AM »
They did a great job on the seat!
my build

1977 CB750K WITH 1976 CB750F ENGINE

Offline MorePDX

  • Full Member
  • *
  • Posts: 45
  • the project, '77 750K
Re: '77 750K Cheap Commuter Project
« Reply #18 on: September 09, 2011, 12:33:27 PM »
I'm getting ready to re-jet my carbs. 

I'm using a 4 into 1 Mac header with a 4" diameter, tunable SuperTrapp muffler.  I'm also using the original airbox with a new K&N filter in it.  I live in Denver, altitude 5280 ft. 

The bike came out of the factory with 115 main jets. 

I'm thinking of upping to 120 or 125 jets to adjust for the 4 into 1 header, K&N filter and higher altitude. 

I'm using HedNut's tips from the Carb Tech Thread, found here:  http://forums.sohc4.net/index.php?topic=58112.0

+2  for 4 into 1 pipes
+1  for K&N filter
- 1  for less air up here?
+2  total sizes up from original (115)

115+(2*2.5)=120

Does that sound reasonable to anyone else? ???
« Last Edit: September 09, 2011, 01:01:38 PM by mudhustler »
If it ain't broke, don't fix it!  -my dad

Offline babyfood1217

  • The only way to drink espresso is as a
  • Hot Shot
  • ***
  • Posts: 432
  • I miss my baby...
Re: '77 750K Cheap Commuter Project
« Reply #19 on: September 09, 2011, 07:26:46 PM »
holy crap, x2 on the seat!  Could you perhaps take a side profile shot of the bike with both the seat AND tank on?  That looks great!
I need help moving my project bike from Wisconsin to Seattle, WA.  Willing to pay well.  Contact if interested.

SOHC member: #438

Project: 1976 CB750K
GSXR forks, Monoshock Rear end, 836 in progress, RC51 pipes, custom frame and everything else.

Offline lucky

  • Really Old Timer ...
  • *******
  • Posts: 6,717
Re: '77 750K Cheap Commuter Project
« Reply #20 on: September 09, 2011, 07:55:25 PM »
You did an outstanding job on the seat project and the upholstery design. WOW!

Offline themotoworks

  • addict
  • Enthusiast
  • **
  • Posts: 109
    • roc city cafe racers
Re: '77 750K Cheap Commuter Project
« Reply #21 on: September 10, 2011, 06:21:24 AM »
i've got a 77k with the 4-1 from the f2 model, it might be more restrictive than the mac, and stock airbox with k&n, i've got 115's in now, it runs well mostly.  though i had put 120s in earlier before the 115 jets came in and i'm not completely sure, but it may have felt more powerful at wot with the 120's.  i'd order a set of 115, 118, 120, 122
www.roccitycafe.com <- my sideline turned living

Offline MorePDX

  • Full Member
  • *
  • Posts: 45
  • the project, '77 750K
Re: '77 750K Cheap Commuter Project
« Reply #22 on: September 10, 2011, 10:50:17 AM »
Thanks for the compliments on the seat, guys.  I had a devil of a time cutting down the foam with my mom's electric carving knife!  Took me the better part of a week to get the profile that I wanted.  I've gotten really good results from Auto Weave in the past and knew this job would be no exception.  Overall, with all the brackets and lock welded back on the frame and the custom upholstery job, I'm very happy with the final product.  I'll get that side shot for you later today, BabyFood. ;D

Thanks for the thoughts on the jets, Roccity.  I think you're right about trying out different sizes.  Do you have any suggestions as to where I could get the best prices on them?
If it ain't broke, don't fix it!  -my dad

Offline MorePDX

  • Full Member
  • *
  • Posts: 45
  • the project, '77 750K
Re: '77 750K Cheap Commuter Project
« Reply #23 on: September 11, 2011, 02:36:52 PM »
Here are photos of the progress.


I ran the control wires through the handlebars and ordered some small stuff on Friday.

I'm going to order 117.5 and 120 main jets and give those a try.

Hanger tab is welded onto the muffler, muffler is re-painted and ready to put back together.

Moving right along!
If it ain't broke, don't fix it!  -my dad

Offline liPPy

  • Hot Shot
  • ***
  • Posts: 253
  • 1978 cb750k
Re: '77 750K Cheap Commuter Project
« Reply #24 on: September 13, 2011, 07:31:07 AM »
Love that seat!

So if I understand this correctly, you altered the original profile yourself using a blade, and once you were satisfied with it you sent it to Autoweave?

Might I ask what their turnaround time was as well as a ballpark price? (pm me the last part if you're not comfortable sharing). I'm v. interested...