Author Topic: 1978 CB750 F - Barn find restoration (low quality vids added)  (Read 9159 times)

0 Members and 1 Guest are viewing this topic.

Offline jahmic

  • Enthusiast
  • **
  • Posts: 114
    • 78 750F
Figured if I don't start this now, I never will...


Picked up this 78 750F about a week ago.  It's a runner, but is in need of a tune-up.  Compression test came back with all 4 cylinders within 5% of each other, and there had been no signs of a leak.  So far so good.

I'm not fully decided what I'll be doing as far as restoration goes.  For now, I'm going to get it running, then just clean it up a bit as a decent commuter.  The bike is almost complete...so I don't think I"ll be cutting the frame or anything "drastic" to turn it into a cafe bike...although that is what first drew me into the CB750 to be honest. 

Aside from the mechanical checks and overhaul as needed, I think the first thing that I'll end up giving attention to is the suspension.  I'm a pretty light guy (140 on a good day), so having a bike sprung to my weight helps a bunch with the confidence in turns (err...see profile pic, haha).  I told myself I wouldn't get on the track again ($$$$$), but I'd at least like to build the bike to be as capable as possible.  No form over function in this build...

I guess the purpose of this thread is to keep a nice running log of the process...and hopefully get some feedback as I go along.  I know the PO probably installed some of his own "fixes", so I'll try to take pics of as much as I can so you guys can point out anything that looks out of the ordinary.  I've already discovered some accessory lighting that will need attention.

Anyway, brought the bike home yesterday, and today I plan on pulling the carbs to get them cleaned...tank probably also needs a good cleaning too as I could see a few patches of rust inside.  Haven't decided on a method for cleaning the tank out yet...I'm leaning towards emptying it out and just using the bolt+shake method. 
« Last Edit: July 02, 2011, 06:26:49 pm by jahmic »

Offline zzpete

  • You better get an
  • Expert
  • ****
  • Posts: 831
  • 1969 CB750, 1971 CB750
Re: 1978 CB750 F - barn find restoration
« Reply #1 on: June 19, 2011, 07:44:48 am »
Welcome to the forum. Sounds like you have a good bike to start off with. Here's a couple of links for cleaning the tanks without the nuts and bolts.


http://forums.sohc4.net/index.php?topic=31970.25
http://forums.sohc4.net/index.php?topic=90270.0;topicseen
Don't get dead!

Offline jahmic

  • Enthusiast
  • **
  • Posts: 114
    • 78 750F
Re: 1978 CB750 F - barn find restoration
« Reply #2 on: June 19, 2011, 07:49:11 am »
I should mention what the bike is actually doing...shouldn't I?

So, it starts up immediately, and idles OK with the choke on.  It does idle a little rough, but it sounds like all 4 cylinders are firing.  Rolling on the throttle in neutral with the choke on, you can hear the engine "spitting"...it starts sounding pretty rough.  In gear when trying to take off (cold engine with choke), you can tell there is an issue with fuel delivery.  I haven't confirmed yet, but it sounds and smells like the PO richened the mixture to offset the clogged carbs. 

Once the engine warms up, the bike seems to starts running lean.  Shutting off the choke once the bike is warm results in the bike shutting off.  This happens whether the bike is sitting idling, or if driving down the road.  Cylinders 2 and 3 get HOT, and then the bike stops wanting to go anywhere.  Eventually it will shut down, and doesn't restart until it cools back down. 

I pulled the tank, and started just peaking around the carbs to see if I could notice anything "bad".  No fuel leaks from what I can tell, and the boots seem to be in good condition.  Out of curiosity, I rolled on the throttle a few times (with the tank off) to see if the fuel in the line would run into the bowls and overflow, or if I had another issue that may need attention.  Now, I admit I'm not 100% sure that I diagnosed this properly...but doing so immediately resulted in fuel leaking from the accelerator pump...which I expected to need attention anyway.

I'll probably just be able to get the carbs off today before I need to head out (and help my friend paint his house in exchange for him spending 5 hours transporting the bike yesterday).  I'll be sure to take some before and after pics.  I'll apologize now for cell phone pics...not too comfy bringing the nice camera around the bike while I'm working on the fuel system  ;)

Offline jahmic

  • Enthusiast
  • **
  • Posts: 114
    • 78 750F
Re: 1978 CB750 F - Barn find restoration
« Reply #3 on: June 19, 2011, 06:55:30 pm »
I pulled the tank and carbs earlier today.  I didn't have the time to dig into the carbs all that much, but I did open up bowl #1 to take a quick look inside.  Here's what I've found so far:


Inline filter after the petcock...it almost looks like it's filled with sand  :-\


A "repaired" air box:


Notice the shaft doesn't fit through the hole that the PO set in his repaired airbox.  BRILLIANT.  I found the shaft sitting under the seat pan, and a small piece of electrical tape being used to tack the airbox halves together.  I'm thinking about just replacing the airbox with a used one in better condition, rather than trying to undo what the PO did with this one.


This is what the wiring looks like under the seat pan.  I actually saw this before purchasing, and new I'd probably be fixing this.


Here's what I found under the tank.  Apparently someone didn't second guess wedging the wiring between the frame and the tank  ???  ::)   :o   >:(


I think I have some rewiring to do...


Carbs:


This is what I drained out of the carbs.  There's a good amount of rusty silt in there, probably from the tank that needs a cleaning.


#1


We'll see how the rest of the carbs look, but I was kind of surprised there wasn't more varnish inside those bowls.  With all the rust floating around in the gas though, I'm sure the jets are clogged.  Hopefully I'll have time to clean them tomorrow after work and keep things moving.


Offline jahmic

  • Enthusiast
  • **
  • Posts: 114
    • 78 750F
Re: 1978 CB750 F - barn find restoration
« Reply #4 on: June 19, 2011, 07:06:03 pm »
Welcome to the forum. Sounds like you have a good bike to start off with. Here's a couple of links for cleaning the tanks without the nuts and bolts.


http://forums.sohc4.net/index.php?topic=31970.25
http://forums.sohc4.net/index.php?topic=90270.0;topicseen


Thanks for the welcome...and the useful links.  I've been looking for some alternative methods, but have had difficulty searching through the forums here with the way the search engine works.  I'll definitely be reading those over tonight. 

I was hoping some people would chime in with info as I move along.   Much appreciated.

Offline jahmic

  • Enthusiast
  • **
  • Posts: 114
    • 78 750F
Re: 1978 CB750 F - Barn find restoration
« Reply #5 on: June 21, 2011, 01:00:25 pm »
I finished pulling the carbs apart yesterday.  Here's how the inside of the bowls looked:


The PO indicated that these were a "new" set of carbs on the bike since the previous ones were in bad shape.  I didn't believe him, but it seems likely given the lack of varnish and grime on the carbs.  That...or he just did a somewhat decent job of cleaning things up.  Either way, they certainly didn't look like they'd been sitting full of stale gas for too long.  There was a small amount of varnish and gunk in the bowls; that cleaned up easily with a soak in 50/50 water and simple green.  The main jet looked really good, no sign of buildup on there.

My guess is that he took the bike after it had been sitting forever, either cleaned or replaced the carbs, and just filled up the old rusty tank.  There were obvious deposits of rust from the fuel line that had settled in the bowls.  I also pulled the accelerator pump off the carb body and gave it a test.  It gave a decent squirt, but it was a pretty weak stream.  The good sign was that even after draining the carbs of fuel, the pump was still holding enough gas to take a few pumps to get it to trickle (almost) empty.  Diaphragm looked good...and someone definitely had been in there before and opened up the closed "mouse ear" on that gasket.  I blew through the hole on the pump once it was disassembled, and could tell that it wasn't perfectly clear.  Broke out the carb cleaner, and after a few sprays a steady stream of carb cleaner finally shot out from behind the brass square.  Hopefully that solves part of the fuel delivery issue the bike was apparently having.

After soaking the carb bodies (in hopes it would help free up the stubborn pilots), I grabbed a vice grip and some tubing and went to work. Managed to easily get all 4 out with some elbow grease.  I have a pic that I'll try to get up later...but they were BAD.  Apparently they were neglected in the previous cleaning; they showed no sign of ever being pulled before...they were basically covered in a layer of black grime.  Although you could see light through the center of the pilots, there were some signs of deposit inside of there, and this is after soaking in simple green for 3 hours.  The cross-drilled holes were all completely blocked with who knows what.  They're all soaking in carb cleaner, and will hopefully also help solve the bike's issues once they're cleaned up.


Questions I've come up with so far: 

1-  Any necessary steps in preparing to re-seat the pilot jets?  I'll be cleaning things thoroughly, but didn't know if there are any precautions to take to make sure they don't come loose or seat improperly.

2-  I looked at the factory manual that I downloaded...and either I have the wrong version, couldn't find the info, or the directions are not specific for my set of carbs.  But...where the heck are the adjustment screws for when I sync the carbs?  I noticed the idle adjustment screw, and also noticed that carb #2 has a non-adjustable piston.  I'm assuming that this means that when I go to bench sync the carbs initially, I start with carb #2, and then adjust the other carbs utilizing the screw on the top of the piston...is this correct though?  Sorry if that's a dumb question...seems like every set of carbs I tear into has their own little nuances. 

Once the carbs are cleaned and re-assembled, I'll be cleaning out the gas tank, firing her back up, and seeing where things stand.  I do plan on checking the valves, timing, and points...but would like to see where I'm at before I make a bunch of changes and need to backtrack.

Offline RpBet

  • Full Member
  • *
  • Posts: 89
Re: 1978 CB750 F - Barn find restoration
« Reply #6 on: June 21, 2011, 01:22:16 pm »
 
Questions I've come up with so far: 

1-  Any necessary steps in preparing to re-seat the pilot jets?  I'll be cleaning things thoroughly, but didn't know if there are any precautions to take to make sure they don't come loose or seat improperly.

2-  I looked at the factory manual that I downloaded...and either I have the wrong version, couldn't find the info, or the directions are not specific for my set of carbs.  But...where the heck are the adjustment screws for when I sync the carbs?  I noticed the idle adjustment screw, and also noticed that carb #2 has a non-adjustable piston.  I'm assuming that this means that when I go to bench sync the carbs initially, I start with carb #2, and then adjust the other carbs utilizing the screw on the top of the piston...is this correct though?  Sorry if that's a dumb question...seems like every set of carbs I tear into has their own little nuances. 

Once the carbs are cleaned and re-assembled, I'll be cleaning out the gas tank, firing her back up, and seeing where things stand.  I do plan on checking the valves, timing, and points...but would like to see where I'm at before I make a bunch of changes and need to backtrack.
[/quote]

Once you re-seat the pilot, just be cautious not to over tighten. That is the only way to really do any damage. So, once you have tightened all the pilots the factory recomends to start by adjusting with 1 1/2 turns on all pilots.

The reason your clymer doesn't show that particular carb is because it's a piece on SH$$. :) I have one also. This is what you need http://forums.sohc4.net/index.php?topic=17788.0

It is the file marked HUGE. You are looking for the 78. It has it's own manual. Also check the Faq's under Carb's, it will be a live saver.

Good Luck,

78 cb750 Cafe'

Offline jahmic

  • Enthusiast
  • **
  • Posts: 114
    • 78 750F
Re: 1978 CB750 F - Barn find restoration
« Reply #7 on: June 21, 2011, 02:10:24 pm »
Thanks for the info! 

As far as the pilot jets go...they're not threaded, just press fit.  I guess my concern was that after unseating them, they would be difficult to reseat and keep in place being that they aren't threaded.  I'm obviously not going to loctite or JB weld them in place...but didn't know if there were any tricks to make sure they stay put and go in undamaged.  I was leaning towards just a little WD-40 to help it slide into place.

I'll take a look at that linked manual in a few...it's downloading now.  I was thinking about picking up the Haynes since they've gotten me through a few rebuilds in the past, but hopefully this fills in the gaps from the other manual I had picked up.  Which...yes...was a POS for sure, lol.  Thanks again for the link, I remembered seeing it referenced around here when I was shopping around for a bike, but was unable to find it again...I think I downloaded the wrong one, which was the source of my frustration. 


Offline sopo400f

  • Enthusiast
  • **
  • Posts: 183
Re: 1978 CB750 F - Barn find restoration
« Reply #8 on: June 21, 2011, 02:36:30 pm »
I just used molasses to remove the rust out of my tank. Worked great! Bought a gallon at tractor supply and mixed it with 3 gallons of hot water and let it work for 5 days. I didn't want to go the caustic route, mainly out of fear of either ruining the paint job if I spulled it or getting potholes.
1975 cb400f blue

Offline ZanVooden

  • I don't need no stinkin' title
  • Hot Shot
  • ***
  • Posts: 300
  • This was suppose to be a quick one month job...
Re: 1978 CB750 F - Barn find restoration
« Reply #9 on: June 21, 2011, 03:18:14 pm »
The idle jets just press in. No need to use any lube or anything sticky. Just press them firmly in. As RpBet said, the air mixture screws should be screwed all the way in (lightly) and backed out about 1 and half turns. (I believe through tuning my are out 2 turns).
The sync'ing for these carbs is done with the slides. They are based around carb #2. The adjustments are all made under each carb cap (flat blade screw locked with a 8mm nut). Its been awhile since I've bench sync'ed either of my sets so I have to defer to the forum for the correct procedure for that. To actually sync them you need to have the motor running, timed, and adjusted.

To disagree with RpBet above, I actually like these carbs mostly for the benifit of have the accelerator pump. I've not had any problems with my 2 '78's. But as you will hear many times over in the forum the stock air box saves many headaches in tuning and running these carbs.

Goodluck
Dave

Offline jahmic

  • Enthusiast
  • **
  • Posts: 114
    • 78 750F
Re: 1978 CB750 F - Barn find restoration
« Reply #10 on: June 23, 2011, 07:42:41 am »
Thanks Zan!  I was able to easily get the idle jets back in place by pressing them in with the vice grips...they definitely aren't going anywhere.  I also discovered that 2 of my air mixture screws were missing washers; a forum member pointed me in the direction of some easy replacements found at Radio Shack, so that should be all taken care of as well.  Carbs are finally clean and reassembled...I'll definitely need to bench synch them before installing, then vacuum synch them once everything else checks out (points, valves, etc.)   Oh...PS, maybe I misunderstood, but I thought RpBet was bashing the manual rather than the bike's carbs, but I could be wrong  ;)

Yesterday I enjoyed an episode of "WTF were you thinking PO?"  Here is what I found...can you guys guess what he was trying to do here?  Let's find out, shall we:

That wire that I posted a picture of above wasn't cut by sitting between the gas tank and the frame, it was melted.


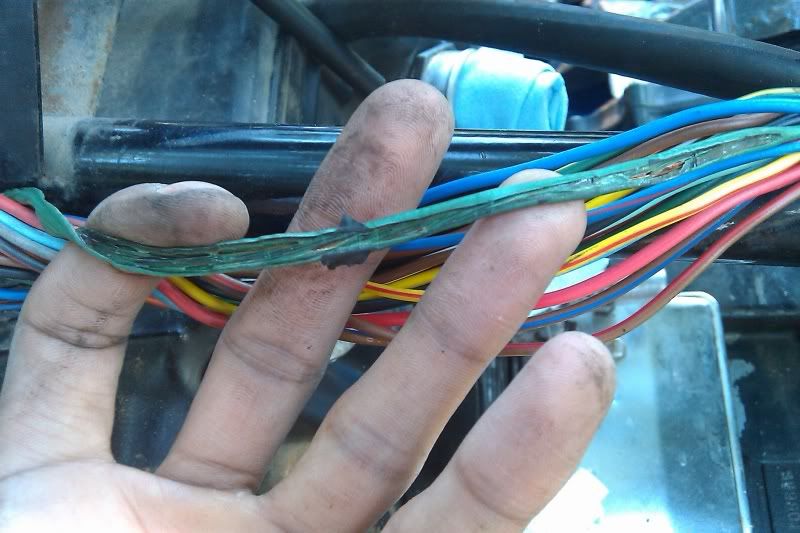
I started pulling apart the harness and found that some of the original wiring had been replaced at some point.  Perfect example of someone knowing just enough about "fixing" things to potential really screw things up...


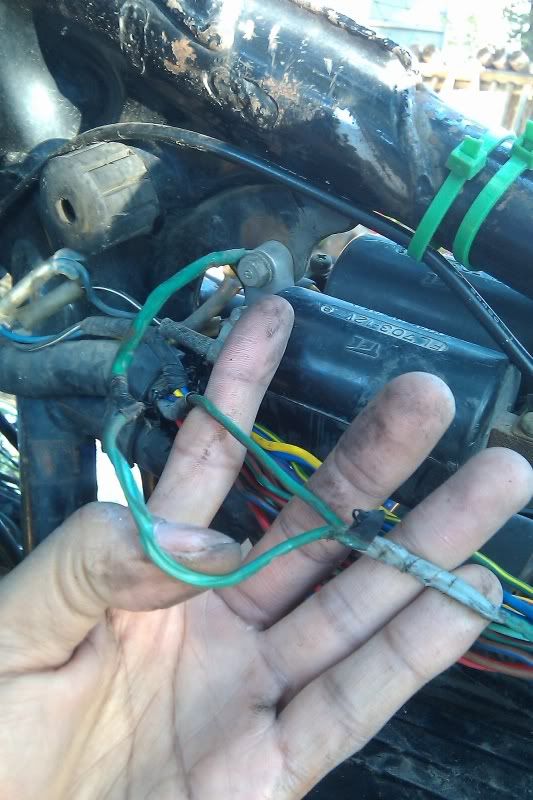
Ok...so obviously he intended this to be a ground wire.  I don't know if I would've picked a location so close to the coil.  I mean...I'm no electrician, but I tend to err on the side of caution and probably would've stayed away from that mounting bolt.  You can see his awesome splicing/insulation job.  Yes, that's double sided tape...


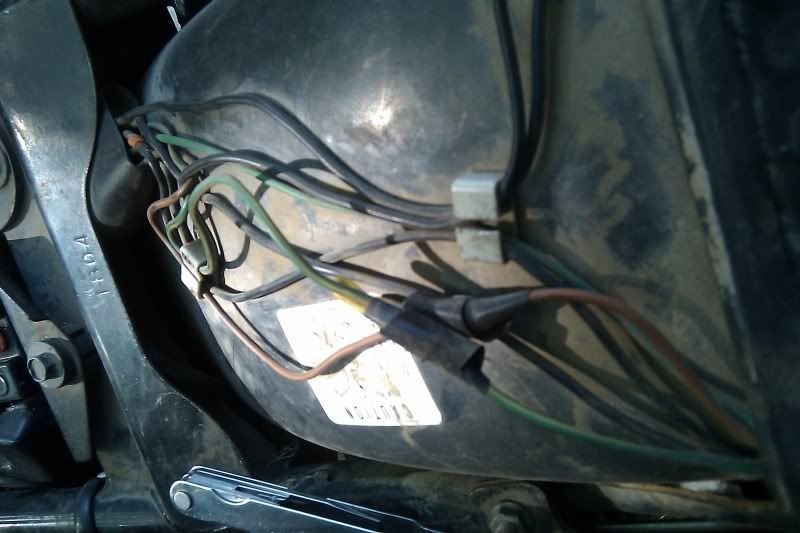
I pulled back some more of the electrical tape to see where this all led and...whoa, another awesome splicing/insulation job:  :o


It splits into 3 wires here...I'm pretty sure I traced them through the birds nest under the headlight fairly well.  It looks like one goes to the headlamp (see below), one goes to the turn signal switch, and the other, presumably, goes to the turn signals.


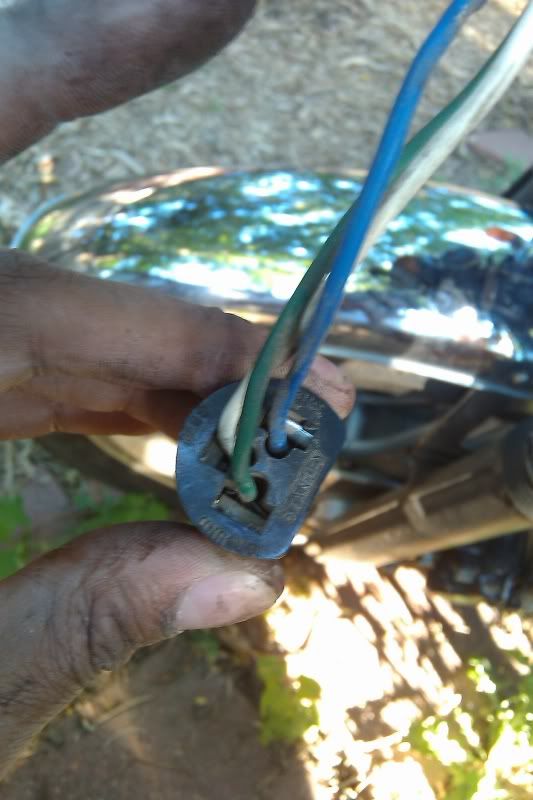
At least he hooked the ground up to the ground on the headlight...


But wait...it doesn't end here...pulled back some more wire and:  :o >:(


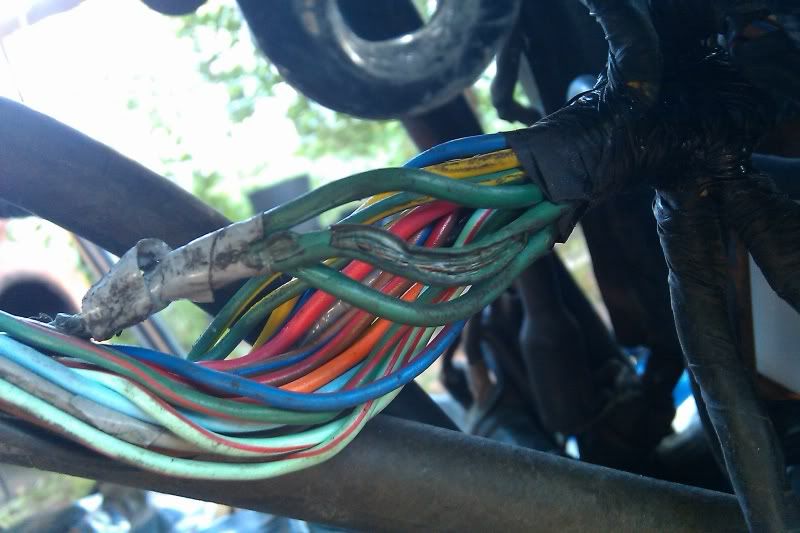
Sweet...it splits AGAIN.  More double sided tape insulation.  This one is located under the tank/seat in case you can't tell from the picture.

And, the eventually lead to this:


I stopped digging at this point, but I can only assume that they go to the brake light and turn signals at the rear of the bike.

I have enough experience to clean this up...but there's clearly a right way and a wrong way.  What I don't want to do is replace this wiring and just make another mess of things.  I was thinking about getting some thicker gauge wire, some bullet connectors, and utilizing 2 separate grounding points on the frame.  If anybody has any specific suggestions, I'd definitely appreciate the guidance.  In the meantime, I'll dig through the forums and see what I can find on basic rewiring.

« Last Edit: June 23, 2011, 07:46:38 am by jahmic »

Offline mrrch

  • Hot Shot
  • ***
  • Posts: 652
Re: 1978 CB750 F - Barn find restoration (wiring help please)
« Reply #11 on: June 23, 2011, 09:36:40 am »
Some of those splices came from the factory that way. Found them in a few harnesses I have taken apart.
my build

1977 CB750K WITH 1976 CB750F ENGINE

Offline jahmic

  • Enthusiast
  • **
  • Posts: 114
    • 78 750F
Re: 1978 CB750 F - Barn find restoration (wiring help please)
« Reply #12 on: June 23, 2011, 12:58:32 pm »
Thanks for clarifying that mrrch...I'll take back my PO comments this time ;)

It does make sense they came that way from factory, I was wondering how some of those wires had shoddy splices on one end, and factory connectors on the other. Does anybody know if that ground location on the coil mount is common? I'm probably going to replace those grounds for now, and rewire the bike over the winter if I can find some garage space to borrow.

All the electronics work...no idea what caused that wire to melt. Perhaps the tank did cut in at one point and caused  a short.

Offline dragracer

  • Really Old Timer ...
  • *******
  • Posts: 5,027
  • CB750F Dragbike
Re: 1978 CB750 F - Barn find restoration (wiring help please)
« Reply #13 on: June 23, 2011, 01:14:55 pm »
That bike looks like a great starting point to an original restoratiion to me. I'd hate to see something that decent get cut up as you mnetioned in your opening post. It seems you're on the right track with the carbs and checking out the wiring etc.. so far. Keep up the good work and thanks for posting your project. Keep asking questions, you've got more resources on this forum than you will ever find in any book.

Welcome to the wonderful world of SOHC's. Lol.

Offline coldwave007

  • Enthusiast
  • **
  • Posts: 120
Re: 1978 CB750 F - Barn find restoration (wiring help please)
« Reply #14 on: June 23, 2011, 03:17:52 pm »
For what it's worth my 80 CB650 has that exact exact same ground at the coil and near as I can tell the harness was never tampered with. 
1980 Honda CB650C Custom, 1972 Yamaha LT-2 100

Offline jahmic

  • Enthusiast
  • **
  • Posts: 114
    • 78 750F
Re: 1978 CB750 F - Barn find restoration (wiring help please)
« Reply #15 on: June 23, 2011, 03:55:25 pm »
For what it's worth my 80 CB650 has that exact exact same ground at the coil and near as I can tell the harness was never tampered with.

 8)

I was convinced the harness had been re-wrapped on my bike due to the tape peeling off the ends in multiple places.  But I suppose that's just what happens after 30 years  ;)

Thanks for the info coldwave; that gives me confidence that I can probably just replace the damaged wiring and not worry too much.  For the sake of convenience, I probably will still ground the taillight and turn signals near the rear of the bike.  I noticed some connections behind the headlight that had some bare wire exposed where the insulation was 'pulled back'.  I'll likely redo those connections while I'm at it. 

Dragracer I couldn't agree with you more.  Every time I look at the bike, I start leaning more and more towards keeping it original.  The turn signals and tail light are 2 things that I'm still considering trimming down...I've built some pretty sweet custom lighting in the past, and may be tempted to do so again on this bike.  The seat does have some tears in it, the locking mechanism is missing, and the pan is rusted out pretty bad...so that's the only thing that will definitely be replaced.  I plan on either building my own on a new pan, or going with Corbin's gunfighter seat. 

Paint is still up in the air too.  I have a friend that does GREAT work...I just don't know if I'll be asking him to restore the original paint scheme, or go with something custom.  Luckily I have til winter to think things over...

Offline Freaky1

  • Hot Shot
  • ***
  • Posts: 719
Re: 1978 CB750 F - Barn find restoration (wiring help please)
« Reply #16 on: June 24, 2011, 05:28:52 am »
The ground at the coil is factory, my '77 was the same. Looks like the gauge changes where the splice is there, I'd go with the same gauge as the original ground. I chucked my entire wiring harness in favor of making my own, but then again I made some big changes to mine (she came with a big, nasty faring that was completely trashed) . I have always been a fan of at least two ground points, I've seen many weird problems because of a shaky ground.
« Last Edit: June 24, 2011, 05:30:23 am by Freaky1 »
That which does not kill you leaves cool scabs which turn into awesome scars.

'77 CB750F Come on...were almost there!

Offline dragracer

  • Really Old Timer ...
  • *******
  • Posts: 5,027
  • CB750F Dragbike
Re: 1978 CB750 F - Barn find restoration (wiring help please)
« Reply #17 on: June 24, 2011, 07:33:04 am »
When i found my F model it had been repainted, the seat pan was rusted through and the cover ripped to shreads, the original F engine had been replaced with a K model that had dropped a valve and was locked up, the frame had been cut to remove the engine. The original tank was in good shape and the side covers were in perfect condition. At that time i wanted to build an F model to dragrace. I've won many races with the bike and still rely on it when i want something simple to race. Now that i'm getting a bit older and have other race bikes, i wish i would have made an attempt restore my bike to the original condition. Too many things have been changed on the chassis at this point to go back.  I don't think you will regret keeping it original. Nothing looks better than a "new" old bike.

Offline jahmic

  • Enthusiast
  • **
  • Posts: 114
    • 78 750F
Re: 1978 CB750 F - Barn find restoration
« Reply #18 on: June 27, 2011, 11:14:10 am »
I'm definitely leaning towards an original restoration more and more...I'm pretty much decided on keeping the original lights now.  The only likely change will be the seat since my pan is falling apart.  As for color...I'm still on the fence.  I think I can pick a nice "classic" color scheme that's somewhat unique but doesn't veer too far from the OEM paintjob.  We'll see what happens though since that's one of the last things on the list.  Thanks for the input dragracer...you struck my sentimental chord, lol.  ;D

I got a lot accomplished over the weekend.  I finished re-wiring the damaged ground wire.  Everything checks out OK, except the annoying "beeping" doesn't sound when the right signal is on.  Actually, it did for a few seconds, then stopped.  I'm willing to bet that may have been the source of the short since it's the only thing malfunctioning since rewiring the ground.  I'll have to dig back in there and see if I can get that squared away. 

Checked my points gaps, and they were both well outside of spec.  1-4 were set at about .022, and 2-3...I didn't even measure, it was probably around .03x or so, the gap was way off.  Also checked the timing (statically), and things seemed to be in order.  Once I get hold of a timing light, I'll be rechecking this prior to tuning the carbs.

Carbs are back on the bike after the cleaning and rebuild.  I also soaked the intake boots in xylene....which gave me mixed results.  They were definitely more pliable, but I could still confirm a vacuum leak at carb #2.  Although that one was worse off than the others, they all did have tiny cracks...might as well just replace them off.  That's next on the to do list.

Also worth mentioning is that I had some issues getting my #3 accelerator pump jet clear.  I tested the pump prior to putting the carbs on the bike, but failed to check and clean the line on the carbs that the pump feeds into.  Of course, all 4 jets were clogged when I reinstalled the carbs and twisted the throttle.  Pulled them back off and was able to get 3 out of 4 clear.  Details on cleaning the stubborn #3 carb jet are here:

http://forums.sohc4.net/index.php?topic=91557.0

Once that was taken care of, carbs went back on and she fired right up once again.  After less than a minute I was able to cut off the choke, and the bike still idled.  I wasn't able to run it without full choke when I first brought it home, so that's a definite improvement.  The idle still migrated due to the vacuum leaks...but that'll be fixed soon (hopefully).  I'll also be needing a new airbox...which I mentioned before.  There's a huge gap between the halves of the box, and you could hear the air billowing through the gap and causing turbulence in the box when cracking the throttle.  Nevertheless... a quick crack of the throttle after holding the revs just above idle and the bike responds immediately...so it looks like the accelerator pump should be up to snuff now. 

This week I'll be changing out the oil, probably bleeding the brakes, and checking the valve tappet clearance...which I still haven't quite figured out.  I understand it...in theory...but haven't really gotten a grasp of how and where these feeler gauges fit in to measure the clearance. 


« Last Edit: June 27, 2011, 03:21:23 pm by jahmic »

Offline dragracer

  • Really Old Timer ...
  • *******
  • Posts: 5,027
  • CB750F Dragbike
Re: 1978 CB750 F - Barn find restoration
« Reply #19 on: June 27, 2011, 02:14:46 pm »
I'm definitely leaning towards an original restoration more and more...I'm pretty much decided on keeping the original lights now.  The only likely change will be the seat since my pan is falling apart.  As for color...I'm still on the fence.  I think I can pick a nice "classic" color scheme that's somewhat unique but doesn't veer too far from the OEM paintjob.  We'll see what happens though since that's one of the last things on the list.  Thanks for the input dragracer...you struck my sentimental chord, lol.  ;D

I got a lot accomplished over the weekend.  I finished re-wiring the damaged ground wire.  Everything checks out OK, except the annoying "beeping" doesn't sound when the right signal is on.  Actually, it did for a few seconds, then stopped.  I'm willing to bet that may have been the source of the short since it's the only thing malfunctioning since rewiring the ground.  I'll have to dig back in there and see if I can get that squared away. 

Checked my points gaps, and they were both well outside of spec.  1-4 were set at about .022, and 2-3...I didn't even measure, it was probably around .03x or so, the gap was way off.  Also checked the timing (statically), and things seemed to be in order.  Once I get hold of a timing light, I'll be rechecking this prior to tuning the carbs.

Carbs are back on the bike after the cleaning and rebuild.  I also soaked the intake boots in xylene....which gave me mixed results.  They were definitely more pliable, but I could still confirm a vacuum leak at carb #2.  Although that one was worse off than the others, they all did have tiny cracks...might as well just replace them off.  That's next on the to do list.

Also worth mentioning is that I had some issues getting my #3 accelerator pump jet clear.  I tested the pump prior to putting the carbs on the bike, but failed to check and clean the line on the carbs that the pump feeds into.  Of course, all 4 jets were clogged when I reinstalled the carbs and twisted the throttle.  Pulled them back off and was able to get 3 out of 4 clear.  Details on cleaning the stubborn #3 carb jet are here:

http://forums.sohc4.net/index.php?topic=91557.0

Once that was taken care of, carbs went back on and she fired right up.  After less than a minute I was able to cut off the choke, and the bike still idled.  I wasn't able to run it without full choke before, so that's a definite improvement.  The idle still migrated due to the vacuum leaks...but that'll be fixed soon (hopefully).  I'll also be needing a new airbox...which I mentioned before.  There's a huge gap between the halves of the box, and you could hear the air billowing through the gap and causing turbulence in the box when cracking the throttle.  Nevertheless... a quick crack of the throttle after holding the revs just above idle and the bike responds immediately...so it looks like the accelerator pump should be up to snuff now. 

This week I'll be changing out the oil, probably bleeding the brakes, and checking the valve tappet clearance...which I still haven't quite figured out.  I understand it...in theory...but haven't really gotten a grasp of how and where these feeler gauges fit in to measure the clearance. 


I'll look to see if i have an original air box from an F model project bike we just finished. We put pods on the bike and rejetted the stock carbs on both the pilots and mains. When i find it, i'll PM you to get your address. I'll see if i can take a few pics of the bike and post them on this thread. We put a GSXR1100 fronend on the bike with a Katana 600 mono shock arm and used a set of polished Hayabusa wheels. Again, this bike was in such a state of disrepair, the only logical and affordable option was to modify it to save it from the junk man.

Offline jahmic

  • Enthusiast
  • **
  • Posts: 114
    • 78 750F
Re: 1978 CB750 F - Barn find restoration
« Reply #20 on: June 27, 2011, 02:50:59 pm »
Almost forgot...

I cleaned out the gas tank as well. I went with the prep and etch (phosphoric acid) followed by a 5 minute flush with the garden hose. After that, I added the water with baking soda to neutralize any leftover acid, then flushed the tank with water again, then used some acetone to get rid of any water left in the tank.

It worked well, the tank was bone dry with no flash rusting.

Before


After:


The petcock filter that i almost forgot to pull


And...the solution to an improper float setting that the PO came up  with...


Offline jahmic

  • Enthusiast
  • **
  • Posts: 114
    • 78 750F
Re: 1978 CB750 F - Barn find restoration
« Reply #21 on: June 27, 2011, 02:58:09 pm »
I'll look to see if i have an original air box from an F model project bike we just finished. We put pods on the bike and rejetted the stock carbs on both the pilots and mains. When i find it, i'll PM you to get your address. I'll see if i can take a few pics of the bike and post them on this thread. We put a GSXR1100 fronend on the bike with a Katana 600 mono shock arm and used a set of polished Hayabusa wheels. Again, this bike was in such a state of disrepair, the only logical and affordable option was to modify it to save it from the junk man.

Ahhh...those mods sounds so appealing.  My profile picture was taken on my 03 600rr...I replaced the front end with an 05 600rr front, had the forks professionally revalved and re-sprung, and put a triple-clicker Fox suspension in the rear.  All of it was set to my weight...and boy was that thing confidence-inspiring when leaned over  ;D ;D   Suspension mods are "my thing", but I'm going to try to work with the front end that's on the bike, and will (possibly) look into replacement shocks in the rear that keep the stock look.  I figure some seat time will help me make a sound decision. 

Thanks a bunch on looking into that airbox for me...I just started looking for one recently, so that'd be a huge help.  Besides the crappy  airbox, the boots on my airbox aren't cracked, but are completely buggered since the PO reinstalled them incorrectly after 'repairing' the airbox...the ends that connect to the carbs are are deformed, and some spots are sheared off in a couple places where the lip is supposed to seal to the airbox.  So...if boots that are in working condition happen to be with that airbox, then that'd be a double bonus for me  ;)
« Last Edit: June 27, 2011, 03:23:36 pm by jahmic »

Offline Freaky1

  • Hot Shot
  • ***
  • Posts: 719
Re: 1978 CB750 F - Barn find restoration
« Reply #22 on: June 28, 2011, 05:18:50 am »

And...the solution to an improper float setting that the PO came up  with...


Aaahhhh those PO mods!
That which does not kill you leaves cool scabs which turn into awesome scars.

'77 CB750F Come on...were almost there!

Offline psycherhexic

  • Full Member
  • *
  • Posts: 39
Re: 1978 CB750 F - Barn find restoration
« Reply #23 on: June 29, 2011, 04:27:06 pm »
cool.. build, wish I could help! for now I'll just watch and learn.  ;)

Offline jahmic

  • Enthusiast
  • **
  • Posts: 114
    • 78 750F
Re: 1978 CB750 F - Barn find restoration
« Reply #24 on: June 30, 2011, 11:05:29 am »
Oil change time.  What's the ABSOLUTE BEST oil for this bike anyway?


haha...kidding.  :P  I swapped out the oil yesterday, and was happy to see that there was no "debris" in the oil I drained out.  Even with the bike on the center-stand, I may have to re-evaluate how I do the change on this bike.  The funnel was much too small and I made a mess draining the tank.  Live and learn.  At least I did the change over some weeds in the backyard...we'll see how tough those dandelions are.

After the change, I turned the bike over and noticed one thing that did apparently worsen with the fresh oil in there.  There were a couple of instances where I would get a small puff of smoke at start-up...and now that puff of smoke is more apparent.  At this point, I'm certain that I'll have to pull the top end at some point...I'll probably wait until winter comes and just enjoy the bike through the summer.  I'm thinking it's a leaky valve seal on cylinder 4.  Of course, there's a chance that there are multiple seals leaking, but I did notice a very small amount of oil around the plug I pulled from that cylinder when I first brought her home.

Not exactly the worse news ever, as it gives me a reason to dig into the engine and clean things up.  I'm hoping the cylinders are still within spec...won't know til I get them checked...but it'd be nice to get away with just a valve job and some new rings.