Author Topic: Minimalist CB550 Cafe build (updated 10/16/2012)  (Read 16315 times)

0 Members and 1 Guest are viewing this topic.

Offline Celco

  • Enthusiast
  • **
  • Posts: 100
Minimalist CB550 Cafe build (updated 10/16/2012)
« on: August 22, 2011, 12:06:32 PM »
(UPDATE 10-16-2012- Summer photos and concrete induced modifications)

[Warning, lame backstory! Skip a head for the build!]
I remember being a kid and seeing the old cafe racers.  They were cool ass bikes and I had fallen in love with the styling.  My grandfathers nick name in the family was "Honda" (given to him by my uncle after 50ish year old grandpa knocked some kid out who was riding a Honda at a traffic light fight) and I am the 2nd to his name... so it kind of fit that I would take the nick name a step further for him. 

My 1st real motorbike was a 78 CB550k barn find basket case that I restored back to the stock trim.  Learned a TON about bikes from that build and my friends helping me. Picture Here!   2nd bike was a 1988 Honda Hawk GT650.  I would say it is the bike that changed my life.  Through about 3 major revisions, 1.5 years building, and too much time and money to count.... I have turned this $100 project bike into something great, looks and motor wise.  Picture Here! 3rd bike was a deal and I couldn't pass it up.  My buddy owed me a chunk of change and I was looking for a bike, he sold me his 2003 Triumph Daytona 955i for a great price and we cleared his debt.  I use this for my long haul trips where comfort is a factor.  I also have 2 other Hawks (1 for parts) and a YZ250. 

But all those bikes never gave me the goosebumps like the old CB550 cafes do.  CB750 were cool, but something about the 550 gets me... and since it was my 1st bike the 550s have a place in my heart.  So it was great to have a buddy of mine up in Michigan offer up a little bit of a trade.  He had a garage of 2 CB500s parts tied up to the ceiling.  There was 72 and 73 cb500 rolling frames, a sad cb500 motor with jugs off, a cb550 motor, full electrics for one, cb500 carbs, and seats and tanks for both.  We made a deal that I would get one running and "restore" it for him, he would pay for parts, and for the labor I would get whatever parts were left over.  Sounded like a pretty sweet deal since I was in need of a little project. Got her running and gave her back.  Learned a lot of restoring techniques this time around too.  Soda blasters are awesome! and how to and not to paint stuff. Finished piece Here!

[/Lame back story]

So on to the 500 in question. I knew it was going to take a while and this thread may become slow to update, but here is where I am at so far. 


Here we are bringing both the 500 frames and parts to Atlanta from Detroit. We also brought this CL360 scrambler home too my buddy won on ebay. 


After getting it home with the 550 motor in frame I started to clean up the frame.
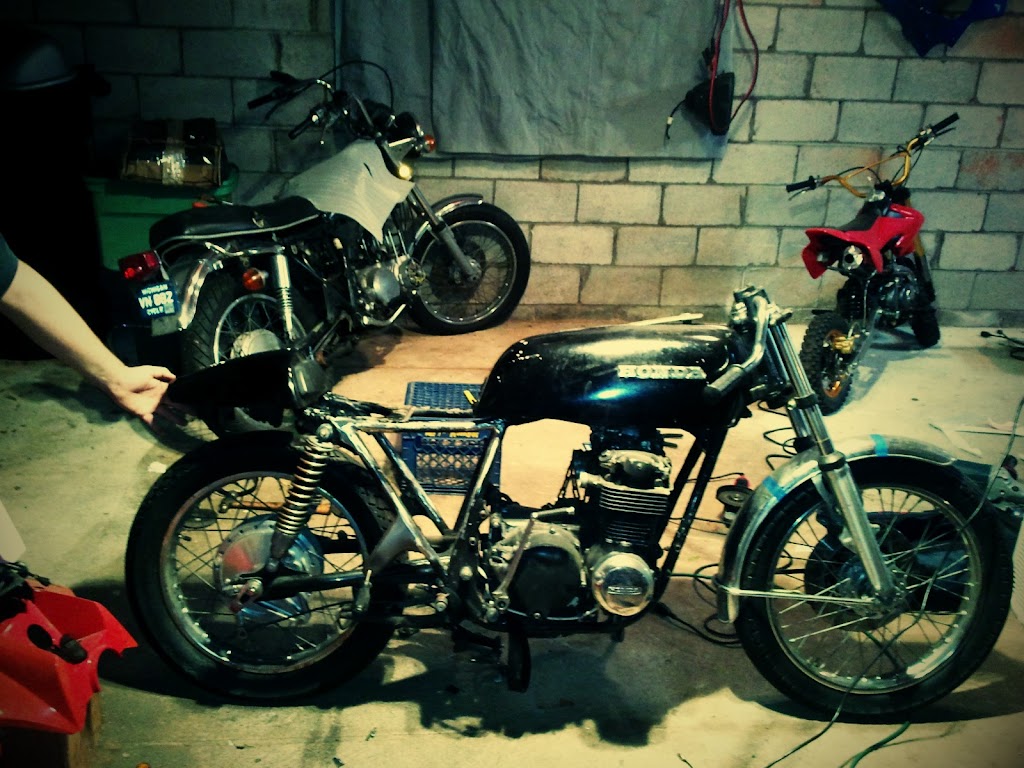

After plotting lines and looking at different tank combos, I found the passenger seat pillion from my triumph made a nice tail section. And it went well with the CB750 boxy toaster looking tank I had. 

I called up looking for another triumph cover because I didn't want to mess up mine.  Detroit triumph had a old one sitting on the shelves special edition blue.  I got it for like $40, but its the shape I want.   

At this time I was still trying to find a motor and carbs.  I wasn't looking hard but I got lucky one day.  Buddy at the motorcycle shop called me... "Dude! 77 CB550 at the shop.  Its got 140psi+ compression on all cylinders.  It is a complete bike and will keep idle just needs TLC to get it running right.  Is poorly painted rattle can black though. $400!"  I was all over it, it answered all my problems.  I needed parts for my buddy's 550 motor into a 500 frame like the wiring harness, non-chopper forks, and what not... and I also needed a motor and carbs.  WIN!  I ended up stripping the bike, keeping all the good stuff, and selling the frame with a basket case 500 motor and extended forks for $150.  So $250 for a motor and carbs for me, and all the bits and bobs for my buddies bike.   

Finally got around to more time with the CB frame last few nights.  Got the welder out and started to make up my tail section.  The plan is to hide all the electrical under the seat hump and try to run most of the wiring through the frame.  All non-essential wiring will be gone.  Head light and tail light only. Key and any switches (hi-lo maybe) under the seat, and not sure if a kill switch or not.  I want to have most things minimal, clear, clean, and smooth.   


Here is where I left off last night.  Tank isn't secured yet, but sits where it will go.  Added the extra bit of tubing to the rear hoop and welded in a seat pan and fender under the tail.  Thinking of adding rearsets to the frame.  Explored the possibility of using a set from an extra hawk, but I may order pegs and arms from Tyga and just make my own jump plates.  Weld on some bungs to the frame to attach that.

I will add more info and pictures as I continue.  Enjoy.
« Last Edit: October 15, 2012, 10:00:26 PM by Celco »

Offline Celco

  • Enthusiast
  • **
  • Posts: 100
Re: Building the CB550 Ive always wanted!
« Reply #1 on: October 20, 2011, 02:38:09 AM »
Got a little further in the build the past few days.  Trying to vent my frustrations with some "life" things by working on the bike and being productive... if even for a hobby. 


Scored some Tarozzi clip ons brand new for $50! Also machined the stock risers off and nipped the mounts for the stock ignition and cluster.  Some random controls I had just to mock up and get a feel.


Neat little thing I did for the fork ears... those are actually the rear passenger peg flaps that I cut from the frame.  Cool way to reuse them I think. (Especially since I kind of wish I didn't cut them off and I could use them for the new rearsets now... oppps!).  Going to shorten them up a little to lower and bring in the light a bit.  Kind of hangs out there right now (profile pic below).


I kind of like this profile with the crazy protruding headlight... but when I moved in the bucket, it really did look better. :/


Needed a spot for the key... slotted up and welded on a washer to mount the ignition! I was kind of bummed to have to run all that wiring to the back now, but it should work out better this way.  Less hassle using the key here, than where I was going to put it. 


Fairly well hidden from the side shot.  Wires are going to run down the backbone and hopefully through the frame to the tail section.


Welded another washer to the interior of the tail for the choke plunger. Its free of the tire travel and strategically placed to operate it when you still have a hand on the throttle. 


Components for the electrical system.  VR730 regulator, 3 phase rectifier, ballistic battery.  I AM DOING KICK ONLY! Please don't lecture on how its tiny, I know! But I think it should be more than enough to power headlight and tail light and run the bike.  (unless of course it just wont work... then Ill get the next size up)


Got a little crazy with the mill on the sprocket cover.

Rear brake too!!! :D


Thats really all for now.  I did put the new longer bolts on for the dual front rotors.  I suppose I didnt have to, but I busted up the speedo housing to get the bushing off of it since the speedo house was crashing into the bolts.  No worries, this thing is not getting a speedo... a visible analog speedo at least.  MIGHT put a bike speedo under the gas latch so I can keep count of mileage.

I have a few goodies on the shelves and on order too.  Shifter and brake lever came in.  I am going to use some of those cheap fold-able toe levers from d2moto and build out my own rearset.  Still debating on welding steel hangers on the frame, or welding on some bungs and then making the rear sets out of stock aluminum and dressing them up a little.  Waiting on CB750supply to get the Ultimate coils back in stock and them I am ordering my Pamco ignition and coils. 

Going to head up to the shop either today or tomorrow and order up the SS brake lines and banjo bolts, throttle assembly, clutch lever/perch, cables... you know the usual!  I think I am going to make the bike run, ride it all ratted out until I part her down, clean her up, and paint/powdercoat goodies.  Get the hammer/weld/sparks flying/cutting/grinding stuff all done first and get the bike running... and then give it the beautification finesse.  Till we meet again!


Offline Steve_K

  • Expert
  • ****
  • Posts: 923
Re: Building the CB550 Ive always wanted! (Update 10/20/2011)
« Reply #2 on: October 22, 2011, 01:43:57 PM »
I like 550s too.  I have a fairly stock 77 550K and a 76 550 that is on its way to a cafe.  I found that when I modify a bike, I redesign my first idea(better?).  It's fun building the parts from the rearsets to moving the wiring.
Looks like a good project.
Steve
Steve_K

76 CB 550, 73CB750, 86 GSX-R750, 16 Slingshot
Old rides:305 Honda, CL350, 74 CB550
 05 SV1000S, 88 CBR600,92 VFR, 88 Hawk GT, 96 Ducati 900SS, 98 Kaw ZX6R, SV650

Offline Celco

  • Enthusiast
  • **
  • Posts: 100
Re: Building the CB550 Ive always wanted! (Update 10/20/2011)
« Reply #3 on: November 01, 2011, 01:38:58 PM »
Well, time for an update.  Being the grinch I am... I stayed in for Halloween this year.  My liver is in need of a break from the many parties and mass amounts of drinking that would have been involved this weekend. 

Anyways on to the build!

Put some flat stock on the bottom of the plastic cowl for some extra rigidity when Im taking putting it on and pulling it off. Also makes it a little easier to mount. 


Welded up some cross members to mount the tail.


Cross member for the rear part of the tank.


Mounted the new Pamco "Super Duper" coils... and rewelded the tank mounting tangs.  Took a 3/8 steel rod cut to size, notched the frame a little, snugged the rod in, and welded up!


Here is the rear of the tank.  Two bolts on old rubber to hold it in.  Going to weld nuts to the metal on the top and get correct length bolts for everything.


Other parts from the Pamco ignition. 


What will probably become my tail light. Might make a fiberglass cap/bezel around the back to close the gaps and cover the poor sheetmetal welding I did. 


Top down view to show the bike inline.  Mounted the headlight and all the controls for the look.  I got a ASV clutch lever assembly for $40 on clearance. 


Profile with the tank and the tail hard mounted.  The tank is moved back a bit more then I thought it was going to be for a few reasons.  Moved back to help bars from hitting the tank, to help match the slop of the tank to the tail, help from having to beat out the tank tunnel more so it would fit... :/

So that is it for now with more to come!  I am going to try to put the motor in soon and start getting her running ready.

Offline Cheffish

  • Hot Shot
  • ***
  • Posts: 303
Re: Minimalist CB550 Cafe build
« Reply #4 on: November 01, 2011, 06:37:39 PM »
Good work man. That tank looks nice

Offline Celco

  • Enthusiast
  • **
  • Posts: 100
Re: Minimalist CB550 Cafe build
« Reply #5 on: November 07, 2011, 01:43:47 AM »
Had a little midnight insiration and decided to knock out this seat.  I made the seat pan a few nights ago, just now working on beefing up the foam with an insert.  It was a little too soft on the end feel. 


Here is the pan bolted down.


With the foam glued.  Figured later I needed an insert as this was plush until you hit the metal seat pan. 


Here is the boogie board cut up for a insert in the middle.  Going to shave the extra off and put the middle I cut out right on top. 


Skipped a few layers with pictures.  But this is Foam covered in two layers of batting glued with super77 and then glued with one layer of felt.


And the almost final layer of neoprene glued down and all trimmed along the edges underneath. 


Leather seat all together.  I would have sewn a proper cover if I had a sewing machine.  Next version maybe... this is good for now.


To insure the leather stay firmly attached past the glue holding it in place, I've laced up the middle bottom with rope to insure it is taut. 


A little bit of bunching in the back with the swoop, but hell for my first try at making a seat its not bad. 


Seems to flow pretty well with the tank/tail combo as well.  With all the layers the seat has a memory foam quality to it and seems pretty comfortable.  Can't wait to have a running bike to real world test it.

Offline Celco

  • Enthusiast
  • **
  • Posts: 100
Re: Minimalist CB550 Cafe build
« Reply #6 on: March 08, 2012, 04:10:05 AM »
Little bit of an update!  Some older pictures that I haven;t posted and a few from today while I have been doing the wiring.

Carbs and exhaust mock fitted.  Looking good though!


Wiring skeleton is starting to get laid down!  Will bundle most of everything together and figure where Ill need to splice and solder while I wait for the sleeving and connectors.


Oil filled oil pressure gauge will be able to be seen thru the stock starter cover door.  It will sit flush, or just a little proud.  Dads making a plug for the starter at work.  Is there any pressure behind there? or would a aluminum slug with 2 grooves and snug o-rings be enough to hold the plug in?


The fittings involved are pretty ghetto to make that oil gauge work.  We will see.

Offline Dyrden

  • Hot Shot
  • ***
  • Posts: 376
Re: Minimalist CB550 Cafe build
« Reply #7 on: March 08, 2012, 09:19:52 AM »
Shes taking shape nicely.  Im not a fan of that train of fittings for the oil gauge.  Thats got to go or come up with a cleaner solution...

Offline Celco

  • Enthusiast
  • **
  • Posts: 100
Re: Minimalist CB550 Cafe build
« Reply #8 on: March 08, 2012, 09:59:38 AM »

Shes taking shape nicely.  Im not a fan of that train of fittings for the oil gauge.  Thats got to go or come up with a cleaner solution...

You and me both brother. That oil fitting was the only way I could think to make it travel and have the dial sit where I want it. Only thing that I know that would clean it up would be a male/female fitting that is about 2-2.5 inches tall. It will be hidden at least.

Offline Dyrden

  • Hot Shot
  • ***
  • Posts: 376
Re: Minimalist CB550 Cafe build
« Reply #9 on: March 08, 2012, 05:32:53 PM »
Can you find some threaded pipe and fill it with sand, cap both ends and bend a sexy shape so you dont have all that crap in the middle?

Offline Celco

  • Enthusiast
  • **
  • Posts: 100
Re: Minimalist CB550 Cafe build
« Reply #10 on: March 08, 2012, 06:01:31 PM »
Can you find some threaded pipe and fill it with sand, cap both ends and bend a sexy shape so you dont have all that crap in the middle?

Worth a shot!  Ill have to see if i can do it and still crank it all in.   Cant have too bit an off center part since the thing still needs clearance to spin and tighten into the oil pump... unless im using compression fittings each end and running a flex line.

Offline Celco

  • Enthusiast
  • **
  • Posts: 100
Re: Minimalist CB550 Cafe build
« Reply #11 on: March 08, 2012, 06:26:00 PM »
Can you find some threaded pipe and fill it with sand, cap both ends and bend a sexy shape so you dont have all that crap in the middle?

Worth a shot!  Ill have to see if i can do it and still crank it all in.   Cant have too bit an off center part since the thing still needs clearance to spin and tighten into the oil pump... unless im using compression fittings each end and running a flex line.

Was going to say, why not a paintball gun macroline and fittings? Quick disconnect and flexible will handle big PSI (350psi+) from paintball gun tanks(4800psi).... but unsure about the temperature rating.  Got to imagine that oil will get pretty hot.  But why not the copper tubing fittings that they use for mechanical oil guages... you know, since they made it for almost exactly this application. Haha!  Spaced out on that one.  Ill have to run to the pipe store and see what we can find locally.  Ill just have to look for male 1/8 NPT to 1/8 copper compression, 1/8 copper line, 1/8 copper compression to female 1/8 NPT.  That will clean up the look and take the weight of the fittings and gauge off of the oil pump threads,  Ill just have to make a stationary mount for the gauge.... say bolted into where the starter motor bolts go?

Offline Celco

  • Enthusiast
  • **
  • Posts: 100
Re: Minimalist CB550 Cafe build
« Reply #12 on: March 12, 2012, 11:15:54 PM »
Update on some of the progress.  Its been a little slow as I am waiting on the braided sleeving from china (ebay).  No point in really nipping and soldering everything if its might change with the covering.  The connectors did come in the mail today.  No pictures, but not bad for $0.50 a piece.  Got them from HERE.  Got an assortment of numbered pins and black and white color styles.  Going to investigate maybe getting "stock" size socket for the wires coming off the stator plug.  These plugs I got are kinda small.

Mounted my HIGH/OFF/LOW switch on the bucket for the headlight.  Seems like an ok spot.  Might move it down and put the neutral light there though. Damn afterthought!


Found a really cool local dude that strips and sells old jap motorcycle parts (mostly Honda).  He just got in a new CB360G and I ended up finally finding a cheap enough 2nd caliper!  He hooked me up!  Thanks again Dan! 


Trying to reuse some spare steel brake lines I have bumming around I think from an R6.  The end fitting (90degree) isn't ideal, but if I tie it down to fork brace (thinking of taking the skeleton from the stock fender) I dont think I will have a problem with the line rubbing the tire.


Rough sketch of some wiring notes.

Offline Celco

  • Enthusiast
  • **
  • Posts: 100
Re: Minimalist CB550 Cafe build
« Reply #13 on: March 27, 2012, 09:52:59 PM »
Well, little update again.  Got the tag for the bike and some goodies from a buddy.  Old roommate owed me some money, so we worked out a deal.  I got a set of D404 tires, 1 tube, set of plugs, handful ($60 worth) of parts to get a CT70 clone up and running, and best of all a set of Tarozzi rearsets for clearing his $350 debt.  Pretty sweet little deal.  Stopped by Summit racing too and pick up some quarter turn fasteners.  I have a ugly welded, but working mock up of how I can lock in the seat with one 1/4 turn right in front of the tail light.  Then just pull the hump right off to get to the electrics. 


Happy day! Solved my last head scratcher... where and how rear-sets.


Sadly... the groovy fork ears I made from the old rear passenger mounts that I cut from the frame had to go back to their homes. :(
They were just too perfect of a piece to not use it for hanging the rider pegs.  I ended up flipping the mounts backwards so they bent in towards the rim, instead of stocks outwards.  I welded the mounts in place where the bolt for the rearset was just below the swing arms longest travel.  Clearance is kind of tight, but I do not see any problems with any interference.  Also the rearsets are place so that the kick arm will not hit the right set without modification of the tarozzi parts.  Might want to fold the peg up when you are going to kick so you don't get your leg by accident, but kicker will not hit! 


Quarter turn incorporated into the rear tail.  This is all I need to turn to get to my battery/fuse box.

Pretty well hidden with all the tail light and plate in the way.  It could have been done cleaner, but it didn't turn out too bad with limited time, tools, and hand power (1 week out of a cast for repair of the UCL "skiers thumb" ligament on my right thumb) that I had at my disposal.

Finally just Monday, got the braided sleeving that I ordered on ebay from China.  Damn near a month later. :(
Should probably be getting into finalizing the wiring harness and putting the sleeving and connectors on everything. 
« Last Edit: March 27, 2012, 09:57:24 PM by Celco »

Offline kennydean2000

  • Full Member
  • *
  • Posts: 31
Re: Minimalist CB550 Cafe build
« Reply #14 on: March 28, 2012, 08:44:56 AM »
Subscribed!  I'm finally getting around to a CB550F (1977) cafe build that the PO got into over his head.  Looking at the minimalist approach too and making my own basic wiring harness.  Happy to watch you taking this one on.  Looks great.
1974 CB750 Stocker, 1977 CB550F Cafe, 2000 Road King

Offline Celco

  • Enthusiast
  • **
  • Posts: 100
Re: Minimalist CB550 Cafe build
« Reply #15 on: April 04, 2012, 10:06:48 AM »
Quick little picture update.  Ordered new float bowl seals, new fork seals, bowl screws and speed bleeders.  Should be in the 5th or 6th. 

Here are some pictures from the blasting adventures I had the other day.

-Tray full of dirty


-Tray full of cleaned!  Sandblasted with "TrinMix 4" sand blasting.  Carbs are waiting for Soda blast.


-Leaving them like this would be pretty awesome too... but I painted them, still look nice!


-Carbs cleaned up


-Hammered up a fender liner for the rear. Think im going to put some risers and lift a small plate with everything mounted to that raised plate. 


-Put the Pamco in its place too.  Showing off the wire braiding too.  Should look pretty nice!


Loose goal is to get this thing running by "Zombie Jesus Day".  Can't pass up the opportunity to get any of that magic Resurrection dust that has seemed to be  present on that day. ;)

Offline stereosilence

  • Hot Shot
  • ***
  • Posts: 544
  • 1975 CB550K
Re: Minimalist CB550 Cafe build
« Reply #16 on: April 04, 2012, 11:35:23 AM »
Are you in Atlanta now? Where did you get your sandblasting? I don't have a setup and have been looking for someplace. Bike is looking good!

Offline nayto550

  • Hot Shot
  • ***
  • Posts: 277
Re: Minimalist CB550 Cafe build
« Reply #17 on: April 04, 2012, 12:58:45 PM »
I like it.  After I'm done with my 750, my wife wants me to redo the 550 for her.  She thought I should put the 750F tank on the 550 and I told her it would look "huge and dumpy" on the little bike, but now that I've seen it, it looks a thousand times better than what I imagined.  Can't wait to see how this turns out in the end.
1976 CB550F
1976 CB750F - in resurrection process
1988 HD FLHS

Offline OneWheelDrive

  • A journey of 1000 miles starts with your first carb overhaul.
  • Hot Shot
  • ***
  • Posts: 497
Re: Minimalist CB550 Cafe build
« Reply #18 on: April 04, 2012, 01:00:34 PM »
Lookin' good!
1975 CB550 cafe
1971 CB500 stocker
2008 Ducati Hypermotard 1100S *sold*
1973 CB350F *sold*
1975 CB550K Project "Keeper" *sold*
2010 Ducati Monster S4RS *sold*
1976 CB360T *sold*
1974 CB550K *sold*
1973 CB750K *sold*
1978 CB550K *sold*
2007 Vespa LX150 *sold*

Offline Celco

  • Enthusiast
  • **
  • Posts: 100
Re: Minimalist CB550 Cafe build
« Reply #19 on: April 04, 2012, 08:55:34 PM »
Are you in Atlanta now?

Im back in Detroit now, where the bike is too.  Sand and soda blaster can be found at harbor freight for not too many dollars.  The special blasting sand in ATL is a mystery to me though. 

Thanks all for the compliments though.  I think I am getting the bowl gaskets tomorrow in the mail, so I might call it an early night and get to wiring so I can be riding by tomorrow or Friday.

Offline Celco

  • Enthusiast
  • **
  • Posts: 100
Re: Minimalist CB550 Cafe build
« Reply #20 on: April 06, 2012, 09:34:35 AM »
Little wiring update!

Finally got the kick in the ass to work on wrapping up this wiring harness.  Turning out pretty good so far.  Pretty much just got to tack it all down with some of the runs with zip ties/wire holders.  Was working until 3am last night getting it "done".  Its looking pretty good and Ive tested some of the lines to make sure everything is connected and not too high of resistance (5-6ohm from headlight to tail sections of wire... shouldn't be too bad).


-Coming together!


-Sub-harness for the coils.  The pamco wires come up and go into a 4pin molex with a blade terminal to get 12v power from the main harness.  End of the sub-harness has a blade terminal for the ground ring terminal.   


-Looks pretty good all wrapped up!  The front half pretty much done.  I wish I would have bought bigger braiding so I would have been able to tuck the wires through the runs a little easier.  I only had to run 2 looms side by side in the rear bit for the wires from the stator. 


-Bad picture, but the 6 pin stator connector.  Have to order the other side of the connector in black, all they had was clear for now.  Im fine with that just to get this thing running.


-Back tray mocked up on some cardboard and the components taped to it to just hold everything down.  I have some risers/standoffs to raise the tray off from the fender liner.    Going to make that with some sheet metal today im pretty sure.


I just got my speed bleeders from ebay and float bowl gaskets yesterday... so this is a dream that is coming closer to become true!
Keep checking in... I hope to have the motor running by Saturday.  Id love to ride this to family Easter brunch this Sunday!

Offline Dyrden

  • Hot Shot
  • ***
  • Posts: 376
Re: Minimalist CB550 Cafe build (updated 4/6/2012)
« Reply #21 on: April 06, 2012, 04:45:07 PM »
Shes getting there.  Im getting to the home stretch on mine too.  Ive got the electrics laid out.  Waiting for my kick stand to come in before I blow it all apart for the billionth time.

Offline Celco

  • Enthusiast
  • **
  • Posts: 100
Re: Minimalist CB550 Cafe build (updated 4/6/2012)
« Reply #22 on: April 07, 2012, 07:21:51 AM »
Wiring harness is complete!  Finished up the rear section last night and tested what I could out at least.  The headlight and tail light work fine along with the switch to power them all!  Ill get some pictures later.  I have to wire in the stator and then put the carbs on. and we can test her out. 

Offline wolfbiker88

  • Full Member
  • *
  • Posts: 19
Re: Minimalist CB550 Cafe build (updated 4/6/2012)
« Reply #23 on: April 07, 2012, 11:02:56 AM »
where did you find that striped power braid wire loom?

Offline Celco

  • Enthusiast
  • **
  • Posts: 100
Re: Minimalist CB550 Cafe build (updated 4/6/2012)
« Reply #24 on: April 07, 2012, 01:22:36 PM »
where did you find that striped power braid wire loom?

EBay.... search for "braided sleeving" you will find tons!  25ft of smaller and 25ft of bigger was $20 shipped from china.  Took like 3.5 weeks to get to the house though, so maybe spend the more money with a US located seller and get it quicker.