Author Topic: CB750K1-My First Build  (Read 6240 times)

0 Members and 1 Guest are viewing this topic.

Offline dtgiven2

  • Full Member
  • *
  • Posts: 14
CB750K1-My First Build
« on: October 01, 2011, 07:58:46 pm »
Hello, I'm Drew, and relatively new to motorcycles. I was introduced to old hondas by Jaguar on this site. We met at Clarkson University, were I am a mechanical engineering major.  I've been seeking a bit of help from him as I work on the bike, and he suggested that I should join this site for more help.  So thank you in advance.

Here is a pic of the bike when i first got it.


I got it back up to Potsdam to see what sort of shape it was in.

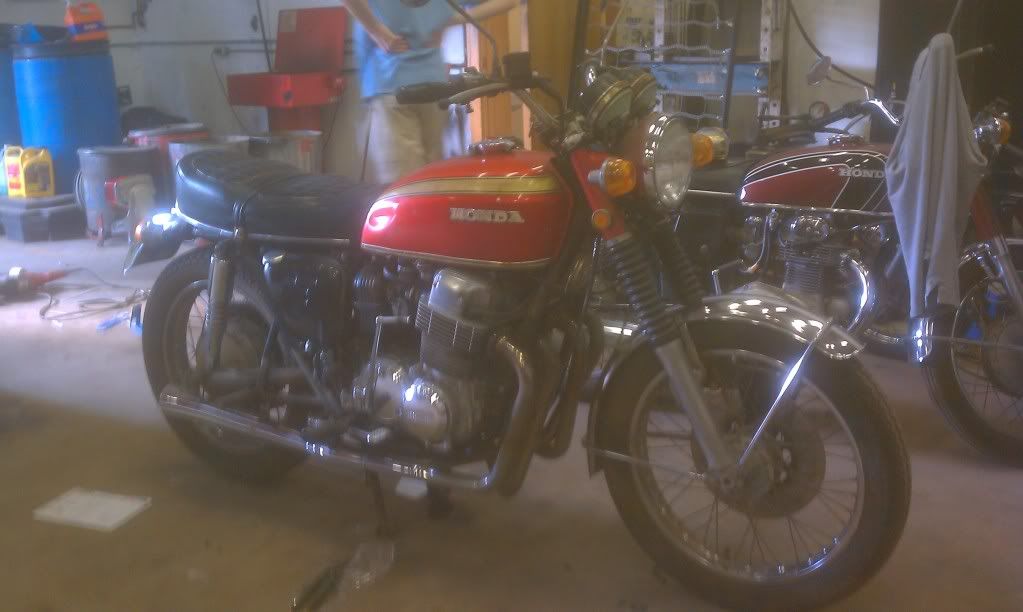
That's my other bike in the back ground, a 1973 CB350K4, and I love that thing.

I had to get a battery for it and tried to start it... and of course it wouldn't be that easy haha

So i cleaned the carbs...


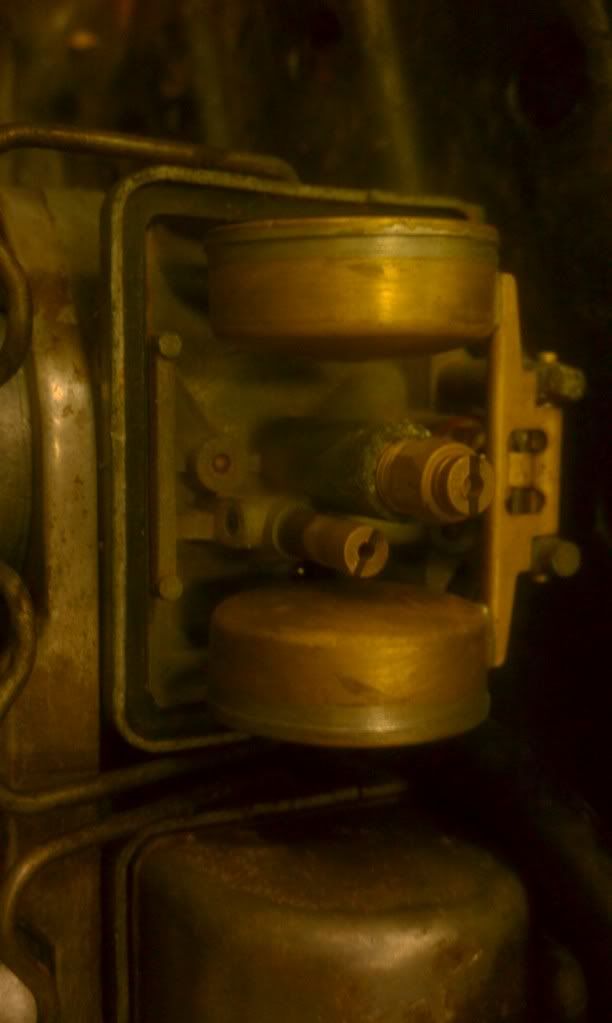
and it runs on 3&4....


now this is where i run into my first issue...

I got the problem down to a carb issue... the floats seem the be hitting the bottom of the float bowls and cutting the fuel flow... so i look at the adjust and they are already screwed all the way in... my floats do float... well when i took them off the carbs and shook them they didn't have any fluid in them... Any suggestions?

Offline BeSeeingYou

  • Old Timer
  • ******
  • Posts: 3,913
Re: CB750K1-My First Build
« Reply #1 on: October 01, 2011, 08:48:11 pm »
I am a bit confused by your description.  How do you know the floats hit the bottom of the bowl?  If they did fuel would continue to flow into the carb as it shuts off when the float rises and pushes up on the needle valve.  I am guessing that when you say the adjustments are screwed all the way in you are referring to the main and idle jets.  They should be fully seated and have nothing to do with the float.  The float is adjusted by bending the small tab that the needle valve sits on (very tiny amounts).  Those copper floats can leak so it's good that you checked them but I suspect they may be in upside down.  I have the same floats in my XS650 and it looks wrong to me.  Honda may be different so maybe someone else will chime in and correct/confirm that.  The carbs don't look all that clean, did you unscrew the jets and make sure they are not plugged.  The idle jet has a very tiny passage.  Did you clean the tank?  How about the needle valve seats? Are you getting spark on all cylinders? 
« Last Edit: October 01, 2011, 08:55:43 pm by srust58 »

Offline jaguar

  • Old Timer
  • ******
  • Posts: 2,763
Re: CB750K1-My First Build
« Reply #2 on: October 01, 2011, 08:53:53 pm »
Drew what do you mean about the carbs?  Think we are missing something.

Offline dtgiven2

  • Full Member
  • *
  • Posts: 14
Re: CB750K1-My First Build
« Reply #3 on: October 02, 2011, 07:25:49 am »
Ok, well when the carbs were on the bike, before hooking up the fuel lines to the bike, i blew into both the fuel lines. When I blew into the line for carbs 3&4 I could feel the air come out the back of the carbs ( where the air box would be connected. When i did the same thing to carbs 1&2 I couldn't blow in at all. So i took off the float bows on 1&2 and I could now blow into the hose, and when i pushed the float bowls up it stopped me from blowing in. So that is what was making me think the floats were hitting the bottom of the float bowl and raising them enough to shut the fuel flow.  I did take out all the main and idol jets, sprayed them with car cleaner than blew them out with a compressor. so i know they are clean.  I thought that the adjustment for the floats was the 8ish mm nut on top of where the needle that the float hits (I think its what you called the needle valve seat? I'm still not totally familiar with all the terms for everything in the carbs, sorry), but it makes more scene adjusting the little tab. I know that there is still a bit of junk in the float bowls, I couldn't get it off with the carb cleaner, I was planning to pick up the material to make a soda blaster, and doing that today as well as trying the tab adjustment.

Offline dtgiven2

  • Full Member
  • *
  • Posts: 14
Re: CB750K1-My First Build
« Reply #4 on: October 02, 2011, 04:40:53 pm »
After my efforts today, I got carb 1 all straitened out, still hit or miss on carb 2. When i said i had spark.... that was an assumption, cylinder 3 was firing and scene 2&3 work off the same coil, i thought it also had spark.... and i'm sorry... i pulled the plug on 2 and found that i didnt have spark, picking up a whole new set of plugs tomorrow, and hopefully that with some more tinkering with the carb will solve my problem. So getting closer to running on all 4.

Offline d1000rr

  • Full Member
  • *
  • Posts: 25
Re: CB750K1-My First Build
« Reply #5 on: October 02, 2011, 07:27:18 pm »
I also recently picked up a 750 K1 as a first build... Good luck with it. :)

Offline dtgiven2

  • Full Member
  • *
  • Posts: 14
Re: CB750K1-My First Build
« Reply #6 on: October 02, 2011, 08:29:42 pm »
thanks you too!

Offline lucky

  • Really Old Timer ...
  • *******
  • Posts: 6,717
Re: CB750K1-My First Build
« Reply #7 on: October 02, 2011, 09:10:06 pm »
You better get some good help!

I am sorry but every time I hear the person is a engineering student I cringe.

Buy new float needles for those carbs or you will be taking them off again.
Take out the idle jets and make sure you can see daylight through them when you hold them up to the light!!!

Do not mess with the float adjustments. right now. Do not adjust them to get them from overflowing, because you would have to set them right back to where they were after you put new float needles in them.

Offline MrGardman

  • Enthusiast
  • **
  • Posts: 236
  • Northern Indiana
Re: CB750K1-My First Build
« Reply #8 on: October 03, 2011, 06:24:15 am »
Agreeing with Lucky on this one. Make sure you either get new needles and seats for the floats or make sure those needles have no wear areas on them. If they still have the small spring loaded peg coming out at the bottom of the needles, make sure those are moving freely also. Then adjust your float level and you will be good to go.

Also pull the idle jets, the smaller threaded ones, and make sure you hold them over a bright light and look down through them. You have to see light through the jet. Carb cleaner shot through them may not clear the idle jets out and you will be disappointed in the way it runs. They have a very small opening and you may have to run a thin wire to clean the junk out of them. Then use the carb cleaner to finish up.

Offline dtgiven2

  • Full Member
  • *
  • Posts: 14
Re: CB750K1-My First Build
« Reply #9 on: October 03, 2011, 07:54:52 am »
Well like i said above, i used carb cleaner as well as a compressor, at about 90-100 psi and I got all the jets completely clear.. I can see light through them when i hold them too the light. The needles look perfect on all 4 and the spring loaded peg also is free on all 4. I think my issue was the floats were kinda tweaked. when i compared them to the working floats (3&4) the floats in carbs 1&2 were almost like twisted a little. One of the two floats was lower that the other, so i carefully twisted them back. Before putting the carbs back on the bike I had a friend hold the gas tank above the carbs to test whether or not they would work... and 1 was working again... so I'm going to play with 2 a bit more today and if that fails.. I will buy new floats and needles. Thanks!

Also what's so bad about engineering students? haha

Offline jaguar

  • Old Timer
  • ******
  • Posts: 2,763
Re: CB750K1-My First Build
« Reply #10 on: October 03, 2011, 09:08:58 am »
Also what's so bad about engineering students? haha


We never leave anything alone
and we sit through one class in statics and think we can build anything...

Offline dtgiven2

  • Full Member
  • *
  • Posts: 14
Re: CB750K1-My First Build
« Reply #11 on: October 03, 2011, 12:59:28 pm »
haha true true....

well got it running good on all 4...

when i picked up spark plugs i pick up some oil, and was going to do an oil change...

when i got to the filter cover i found that someone in the past had mangled it. so i got some vice grips and got it off... going to need a new one of those...


Offline lucky

  • Really Old Timer ...
  • *******
  • Posts: 6,717
Re: CB750K1-My First Build
« Reply #12 on: October 03, 2011, 04:59:51 pm »
Well like i said above, i used carb cleaner as well as a compressor, at about 90-100 psi and I got all the jets completely clear.. I can see light through them when i hold them too the light. The needles look perfect on all 4 and the spring loaded peg also is free on all 4. I think my issue was the floats were kinda tweaked. when i compared them to the working floats (3&4) the floats in carbs 1&2 were almost like twisted a little. One of the two floats was lower that the other, so i carefully twisted them back. Before putting the carbs back on the bike I had a friend hold the gas tank above the carbs to test whether or not they would work... and 1 was working again... so I'm going to play with 2 a bit more today and if that fails.. I will buy new floats and needles. Thanks!

Also what's so bad about engineering students? haha


Like I said buy NEW float needles or you ill be doing it all over.

Even with a magnifying glass you may not be able to tell if the pointed black rubber tip is concentric. The rubber gets hard and it distorts. It is 90% of the carb rebuild along with the idle jet being clear.

Offline lucky

  • Really Old Timer ...
  • *******
  • Posts: 6,717
Re: CB750K1-My First Build
« Reply #13 on: October 03, 2011, 05:00:39 pm »
Well like i said above, i used carb cleaner as well as a compressor, at about 90-100 psi and I got all the jets completely clear.. I can see light through them when i hold them too the light. The needles look perfect on all 4 and the spring loaded peg also is free on all 4. I think my issue was the floats were kinda tweaked. when i compared them to the working floats (3&4) the floats in carbs 1&2 were almost like twisted a little. One of the two floats was lower that the other, so i carefully twisted them back. Before putting the carbs back on the bike I had a friend hold the gas tank above the carbs to test whether or not they would work... and 1 was working again... so I'm going to play with 2 a bit more today and if that fails.. I will buy new floats and needles. Thanks!

Also what's so bad about engineering students? haha

Ask any mechanic.

Offline lucky

  • Really Old Timer ...
  • *******
  • Posts: 6,717
Re: CB750K1-My First Build
« Reply #14 on: October 03, 2011, 05:02:04 pm »
haha true true....

well got it running good on all 4...

when i picked up spark plugs i pick up some oil, and was going to do an oil change...

when i got to the filter cover i found that someone in the past had mangled it. so i got some vice grips and got it off... going to need a new one of those...


Just buy a spin on filter.

Yes...I can see the box end wrench laying there. Good - but too late, because another engineer must have got to it before you. LOL!!!
« Last Edit: October 03, 2011, 05:04:23 pm by lucky »

Offline dtgiven2

  • Full Member
  • *
  • Posts: 14
Re: CB750K1-My First Build
« Reply #15 on: October 03, 2011, 06:15:58 pm »


Ask any mechanic.

haha that made my day  ;D

A friend had mentioned that.. but I  dont think I could live with a filter hanging out down there.. I kinda like the cartrageg thing... plus I wasn't aware of the conversion... and I already ordered the bolt...  :-\ so I'm going to stick with it for now... Probably not my best move...

Offline dtgiven2

  • Full Member
  • *
  • Posts: 14
Re: CB750K1-My First Build
« Reply #16 on: October 09, 2011, 12:07:00 pm »
Got my parts in and put it all together.  I've been riding around campus a lot, and its a blast!

There are only 2 problems that I've come across while riding, they are:
-The engine runs great, but its really angry between Idle (~1000rpm) and 2000. Like an example would be slowing down for a low speed     corner in a parking lot so I'm inn 1st gear and just putting just above idle and the bike eels like is going to stall out, and when I go to get back on the throttle, it falls on its face for a second then it gets above 2000, and is fine again.
-An oil leak from around the drive sprocket. I did read http://forums.sohc4.net/index.php?topic=57296.0 and tried adjusting the screw, but I could turn the screw past the bolt so it was inside of it. Not sure if that's off or flush is off. After making the adjustment and cleaning everything in there, I still noticed a slight stream of oil coming from behind the sprocket... So not sure if its the oil seal of the chain oiler

Offline dtgiven2

  • Full Member
  • *
  • Posts: 14
Re: CB750K1-My First Build
« Reply #17 on: October 24, 2011, 08:02:26 am »
Well I've started taking apart the rear end to do breaks and polish and make sure everything is still in order after 31000 miles.


Old ass break pads


The Before


The start of the sanding


So much for the chrome... maybe polish or paint idk yet...


Offline greenjeans

  • Industrial strengthed dreamer.
  • Old Timer
  • ******
  • Posts: 2,962
  • 1972 CB750K2
Re: CB750K1-My First Build
« Reply #19 on: October 25, 2011, 07:30:18 pm »
you probably are, but just in case - get new brake shoes and pads.  I've had 2 old sets of shoes come apart after sitting for decades.   They both looked serviceable.  I thought the first was a fluke until the second bike did the same thing.   Cheap insurance.

Great looking bike.
Yep, I'm the kid that figured out how to put things back together...eventually.

Offline dtgiven2

  • Full Member
  • *
  • Posts: 14
Re: CB750K1-My First Build
« Reply #20 on: October 31, 2011, 12:10:45 pm »
Yeah That's what I figured. While i have everything apart for cleaning/painting/polishing I figured mite as well do new breaks. Going to start on the front end pretty soon, I got the break pad in as well as fork seals. Still deciding if I want to polish or paint the forks.  I've changed the fork seals on my cb350k before, is the process for the 750 pretty much the same?
« Last Edit: October 31, 2011, 12:51:34 pm by dtgiven2 »

Offline jaguar

  • Old Timer
  • ******
  • Posts: 2,763
Re: CB750K1-My First Build
« Reply #21 on: October 31, 2011, 12:47:12 pm »
yes they are similar and you should be fine

Offline dtgiven2

  • Full Member
  • *
  • Posts: 14
Re: CB750K1-My First Build
« Reply #22 on: November 21, 2011, 10:18:31 am »
I did a compression test on the bike and it was really low, and scene I wanted to pain the frame, I decided to strip everything off and pull the motor. when I got ready to pull to engine, and there was this packing material that was in the area in fount of the drive sprocket that was preventing me to take the chain off (because the chain had worn into the material).  So I decided to try and take the whole sprocket off to see if i could get the chain off that way, and it worked...  Here was this mysterious material.. I wanted to see what it was covering up... so I pulled it off... and to my horror I saw this...


Yup, those are the insides on the out side....

So I pulled the engine trying o deiced to get a new one, or put that bandage back on (better than before). regardless this top end needs rings horribly.  I started to tare down the engine, cuz if I was going to trash this engine I figured it would be good practice to just see how things worked.


and now the head wont come off... I've doubled and tripped counted I have all the bolts and nuts off, but nothing.

Offline Prospect

  • Expert
  • ****
  • Posts: 1,169
Re: CB750K1-My First Build
« Reply #23 on: November 21, 2011, 03:35:37 pm »
Looks like the chain broke at one point and it was never properly repaired.  You'll have to split the cases and have that professionally welded.  I had the same thing in my k1 but it was nicely repaired I'm guessing some time in the 70's. 

Current Bikes

1969 CB750  Sandcast #256
1971 CB750K1
1972 CB750K1
1975 CB400F
1975 GL1000 Goldwing
1954 Harley Davidson Panhead
1957 Harley Davidson Panhead

Toronto Canada

Offline dtgiven2

  • Full Member
  • *
  • Posts: 14
Re: CB750K1-My First Build
« Reply #24 on: November 29, 2011, 11:05:40 am »
Yeah mine looked to be repaired a while ago. All the repair was, was a piece of tin siliconed to the case, with fiberglass over that... I must say it did work, the engine ran pretty well besides a little smoke caused by the need for new rings... so I think in just going to jb weld another piece of metal over the hole and pick up another motor to build and just run my bandaged motor for the time being.

As for the cylinder wall, I feared that it was going to be all scared up... but it wasn't. So going to hone it, out new rings on, and lap the valves, and call it done, and just ride a stock bike for the summer.