Author Topic: How I build a Honda Four  (Read 4622 times)

0 Members and 1 Guest are viewing this topic.

Offline Groover

  • Full Member
  • *
  • Posts: 9
  • Groover
How I build a Honda Four
« on: April 02, 2011, 06:42:18 AM »
To make rabbit stew you must first catch your rabbit,  To (re)build a Honda Four  I will need a neglected bike, And here it is, a CB750 K2 with 16” back wheel and ever so practical semi-ape hangers finished in orange plastic house paint.  I didn’t even attempt to start the bike as I had previously ridden the bike maybe ten years ago and it was very flat when asked to go, possibly due to running too lean with the pod air filters, or perhaps due to some deeper malaise, given the horror stories the PO had told me about breaking a camshaft(!) during his previous rebuild. At leat I know what I am in for.
I am going for a tidy original bike as I think it is hard to improve on the original IMHO. That said there are some very impressive modified bikes on this forum.. In my experience straying too far from standard just brings headaches. But, again, those with the patience can produce some magnificent machines = just look around this site to bear that out. Each to there own. I am at the broken it down into big lumps stage. I am concentrating on the chassis/wheels/brakes before cracking the motor. More pics tomorrow.
« Last Edit: April 03, 2011, 04:34:44 AM by Groover »

Offline Groover

  • Full Member
  • *
  • Posts: 9
  • Groover
Re: How I build a Honda Four
« Reply #1 on: April 03, 2011, 05:02:51 AM »
Today I washed all the things that are going to the powdercoaters. They had previously been soda blasted. Some of the chrome came back last week; I dropped off another batch to be ready in a fortnight - we'll see- the last lot were promised in three weeks, delivered in nine.
 I've decided to sub out the alloy polishing. I started on the fork lowers, but soon realised for the time involved and with my level of equipment I could spend a lot of time acheiving a dissappointing result, so the alloy bits go off this week to the metal polishers. The wheels will go to the wheel builder this week as well. As the rear wheel was 16" I bought a new rear rim, yet chose to have the front re-chromed. He did a great job on a previously quite pitted front rim.
This week I will chase up some bronze swing arm bushes. The old ones had been put in incorrectly on a rusted main collar, a replacement for which is on order from the States. The parity of the Aussie doller with the green back and the lack of Australian Goods and Sevices 10% tax on goods bought overseas plus the larger more competitive US market means that  buying from the States can often work out cheaper, even when freight is taken into account.
Meanwhile more cleaning while the parts are away, all ready for when the frame returns.

Offline MoMo

  • Really Old Timer ...
  • *******
  • Posts: 8,275
  • Ride like you're invisible
Re: How I build a Honda Four
« Reply #2 on: April 03, 2011, 05:58:39 AM »
Welcome,  like your plan of keeping it close as possible to stock. What about the motor, seems like you should have addressed that possible problem first?  Back in the 70's we made an awful lot of street cruisers similar to yours, adding the 16" rear wheel, ape hangers and either 4 into 1 or the ever popular 4 into 2 exhaust- of course, the exhaust had to be loud.  All the stock stuff that was taken off usually was put in the dumpster >:( :o because the owner did not want the parts and at the time there were tons of Honda fours on the road and no market for the parts.  Have fun with your build...Larry

Offline Stev-o

  • Ain't no
  • Really Old Timer ...
  • *******
  • Posts: 34,461
  • Central Texas
Re: How I build a Honda Four
« Reply #3 on: April 03, 2011, 09:00:13 AM »
Looking forward to watching your build. I have a K7 that I have plans to restore - when I can find time.

Godd Luck from Texas.
'74 "Big Bang" Honda 750K [836].....'76 Honda 550F.....K3 Park Racer!......and a Bomber!............plus plus plus.........

Offline Groover

  • Full Member
  • *
  • Posts: 9
  • Groover
Re: How I build a Honda Four
« Reply #4 on: April 27, 2011, 11:42:23 PM »
Plenty of waiting with not much to show this past fortnight, The frame came back from the powdercoaters looking like it had been dipped in liquid gloss black.  I am very happy with the finish and all my prep work paid off. Will pick up the polished alloy later this evening. Included are before and after shots of the resprayed oil tank. I am happy with it. I used a rattle can of gloss black enamel.
Check out the CB 750 exhausts from the Webike web site (Japanese) They speak for themselves.
Still waiting on re-laced wheels to come back, as well as a much chrome work. The guy doing the chrome does very good work, but he is slow. Better than on time and rough, I suppose.

Offline fastbroshi

  • Puppet
  • Old Timer
  • ******
  • Posts: 2,645
Re: How I build a Honda Four
« Reply #5 on: April 28, 2011, 03:12:11 AM »
Those pipes are nice, but I'm afraid to ask what they cost. 
Just call me Timmaaaaay!!!

Offline Doctor_D

  • Hot Shot
  • ***
  • Posts: 722
Re: How I build a Honda Four
« Reply #6 on: April 29, 2011, 06:50:28 AM »
Those pipes are nice, but I'm afraid to ask what they cost.

If they're anywhere near the price I paid for mine... somewhere in the neighborhood of $2k. (And if they're not, I'm going to weep quietly and chalk it up to experience.)
Take care,
David
___________________________________________
1975 CB 750F - Project page: http://forums.sohc4.net/index.php?topic=66026.msg725479#msg725479
1978 CX500
1971 Norton Commando

Offline Greggo

  • Somebody's
  • Old Timer
  • ******
  • Posts: 4,164
  • Helmets Save Lives. Period.
Re: How I build a Honda Four
« Reply #7 on: April 29, 2011, 09:17:48 AM »
Subscribed.

Offline SixGun

  • Full Member
  • *
  • Posts: 85
Re: How I build a Honda Four
« Reply #8 on: May 03, 2011, 05:40:05 AM »
Those pipes looks awesome!

Offline Groover

  • Full Member
  • *
  • Posts: 9
  • Groover
Re: How I build a Honda Four
« Reply #9 on: May 19, 2011, 06:24:49 AM »
This past week had me stripping the carburettors. Like the rest of the bike these components  are beautifully made. Cast in zinc aluminium ally so as to flow easily for such an intricate casting these units only required new "O" rings for the fuelinlets and new jet needles and needle jets. These last components are theonly moving part subject to wear (Yes, the slides move, but are chromed and unlikely to wear. Having said that no doubt someone will no doubt challenge that assertion.)Think about it. The needle moves up and down in the pulsing venturi rubbing against the jet. The are very finely manufactured pieces-moving the circlip on the needle just one notch can make a significant difference to the mixture. Any wear,however slight will cause richness. Best to replace them all while the carbs are apart.
This set of carbs were unmolested The tiny split pins in the chokelevers appeared undisturbed and the needle were set withe the circlips second from bottom as per K2 spec. I put the needles back with the clip in the middle position as I figure I'll be starting tuning from scratch. I'll be running a K+N filter in the original airbox with a 4-1 pipe so mixture will need tweaking.
Other observations re: the carbs: Dip the floatbowls, top rings and top plates in thinners to get rid of the factory clear coat.They then come up well with a polish.
I have an F-series airbox which means the rubbers are bigger than the K series see photo. some kind of adapter plate needed.
Picture of used needle jets and jet needles.
Also pics of respoked wheels. every spoke goes "ping!"

Offline sinister902

  • Hot Shot
  • ***
  • Posts: 512
    • Anger Street Kustoms
Re: How I build a Honda Four
« Reply #10 on: May 19, 2011, 09:58:52 AM »
Subscribed! hose pipes look the business

Offline Groover

  • Full Member
  • *
  • Posts: 9
  • Groover
Re: How I build a Honda Four
« Reply #11 on: December 14, 2011, 10:45:33 PM »
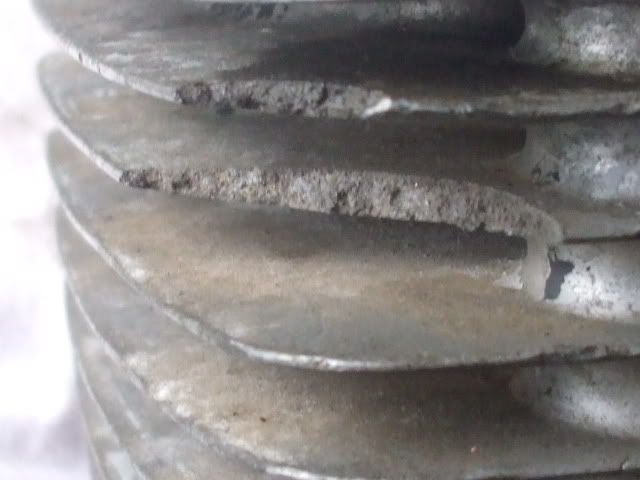
So, the fins were chipped and broken
The Pistons were standard.Bores were shiny but still serviceable.
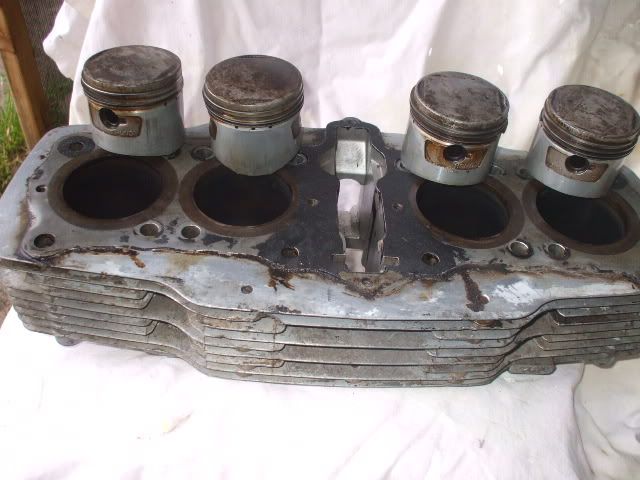
Luckily a spare block came with the block. As mentioned earlier the PO admitted to snapping a camshaft (damage inside the valve cover verified this. I suspect he must have bought a top end complete and changed the head as well as the cam shaft, as the head was from a later model, and the spare barrel I now had matched the head, originally came with the replacement top end).
The barrel with the good fins was from a K3 or later model as it had drillings at the top around some of the studs for the extra dowel (or knock pins, as Honda called them) pins, with their little rubber bands, in the fight against oil leaking from the head gasket. See Honda Service bulletin No. 42 for details of this upgrade.
This new barrel had been left out in the weather and was corroded an the top deck, but the top of the sleeves were good , so I deemed it serviceable and had it bored to suit a K2 Wiseco 836 kit.
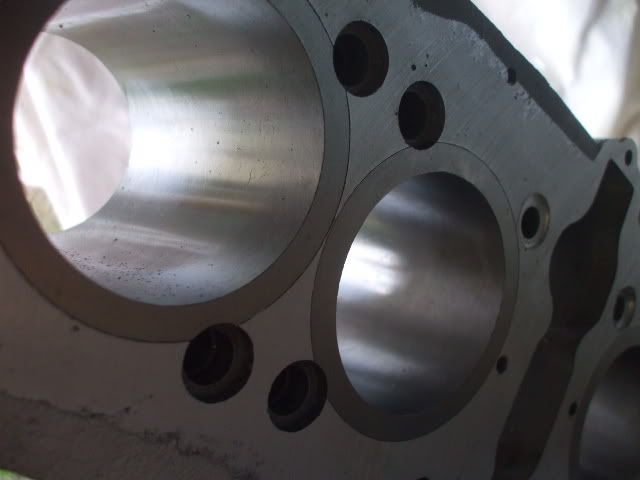
But wait! The K3 barrel is 1mm taller from base to top than the K2 barrel, Perhaps I could have the deck machined to get rid of the areas of corrosion. I suspect Honda changed the piston height when they changed the barrel height since the compression ratio remained constant. I had ordered a K@ Wiseco kit.This came with the earlier style head gasket, so I suspected This piston height was consistent withe earlier engine. What this meant was I could shave the block by 1mm. First I check valve clearance - install a pair of valves with weak springs and dry fitted the head without a gasket and measured the valve stroke , which was 5mm before hitting the piston, which was at TDC. Valve angle is roughly 450, so half 5mm = 2.5 mm clearance, less 1mm if deck shaved + 1mm for gasket = plenty of room to shave the deck
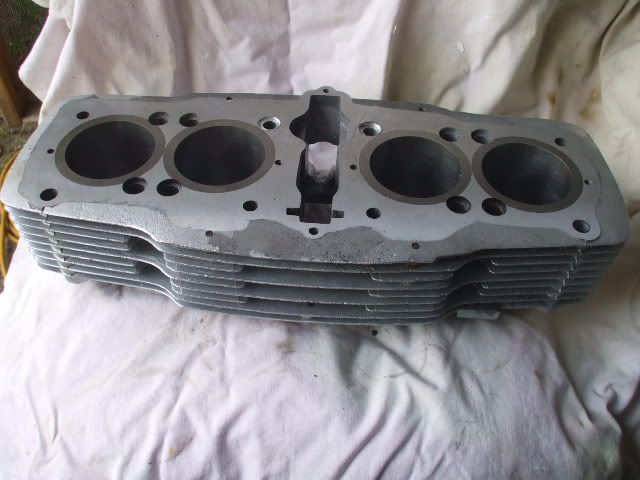
Hold on - the Knock pins sit in the K3+ barrel will need to be shortened 1mm
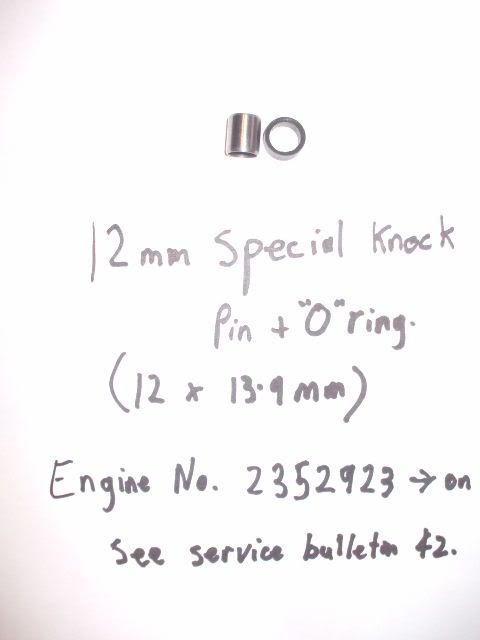
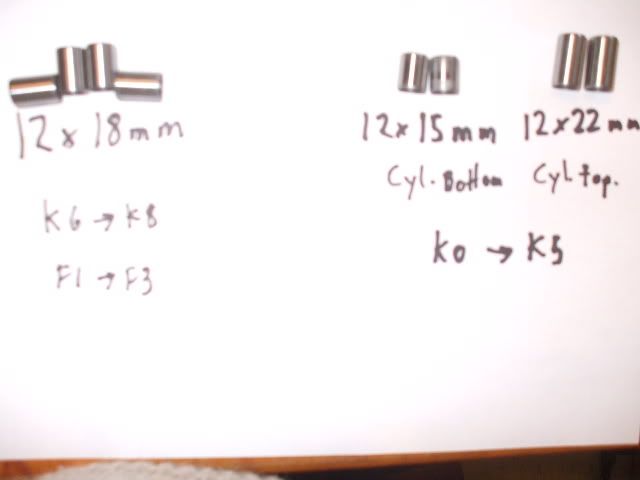
tTe dowels that go in the front corners of the top and bottom of the barrel need attention. Turns out up to K5 had 15mm upper dowels, 22mm lowers, K5 and later 18mm all round. This was the type I now had.
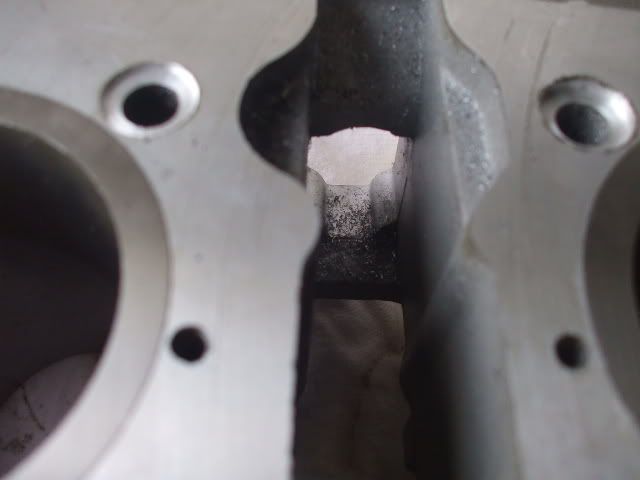
Not finished yet... The top deck had two 1mm deep recess for O rings where the oil is pumped up into the head Barrel had to be taken to a different man than he who bored if for milling.
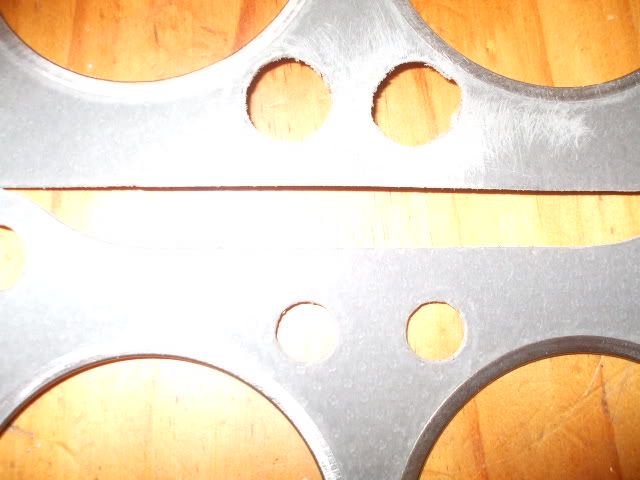
Only thing left is to modify the 836 Wiseco gasket to take the knock pins.
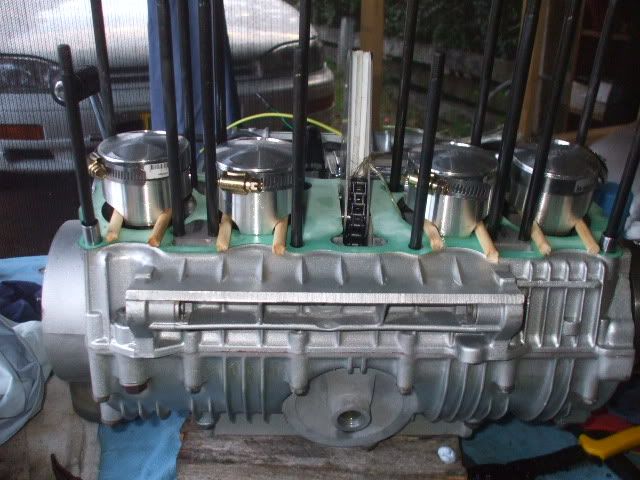
All ready for assembly. Until next time...

Offline dragracer

  • Really Old Timer ...
  • *******
  • Posts: 5,145
  • CB750F Dragbike
Re: How I build a Honda Four
« Reply #12 on: December 15, 2011, 06:32:16 AM »
Looking good!!

Offline lucky

  • Really Old Timer ...
  • *******
  • Posts: 6,717
Re: How I build a Honda Four
« Reply #13 on: December 15, 2011, 11:02:24 PM »
Great job you are doing.
Those exhausts shown would be really great or you could get stock reproduction ones from Yamiya.

Offline Terry in Australia

  • Really Old Timer ...
  • *******
  • Posts: 33,363
  • So, what do ya wanna talk about today?
Re: How I build a Honda Four
« Reply #14 on: December 17, 2011, 03:11:09 AM »
"But wait! The K3 barrel is 1mm taller from base to top than the K2 barrel"

That's interesting mate, I never knew that, I'm going out to my garage tomorrow to measure several different model cylinder blocks and see what the differences are. Cheers, Terry. ;D
I was feeling sorry for myself because I couldn't afford new bike boots, until I met a man with no legs.

So I said, "Hey mate, you haven't got any bike boots you don't need, do you?"

"Crazy is a very misunderstood term, it's a fine line that some of us can lean over and still keep our balance" (thanks RB550Four)

Offline lucky

  • Really Old Timer ...
  • *******
  • Posts: 6,717
Re: How I build a Honda Four
« Reply #15 on: December 19, 2011, 03:19:09 PM »
"But wait! The K3 barrel is 1mm taller from base to top than the K2 barrel"

That's interesting mate, I never knew that, I'm going out to my garage tomorrow to measure several different model cylinder blocks and see what the differences are. Cheers, Terry. ;D

Just measure the height of the dowel pin(cylinder) then measure the depth of the
holes the dowels fit in on each half. Subtract the difference and that is how tall the dowel needs to be Do not count the gasket because that gets crushed down and you want just a little extra wiggle room.