Author Topic: Gordon's Frame Mod Kit install pictures  (Read 13019 times)

0 Members and 1 Guest are viewing this topic.

Offline XN

  • Hot Shot
  • ***
  • Posts: 264
Gordon's Frame Mod Kit install pictures
« on: December 07, 2008, 06:51:13 am »
This should help some.

I marked all cuts like Gordon instructions said.


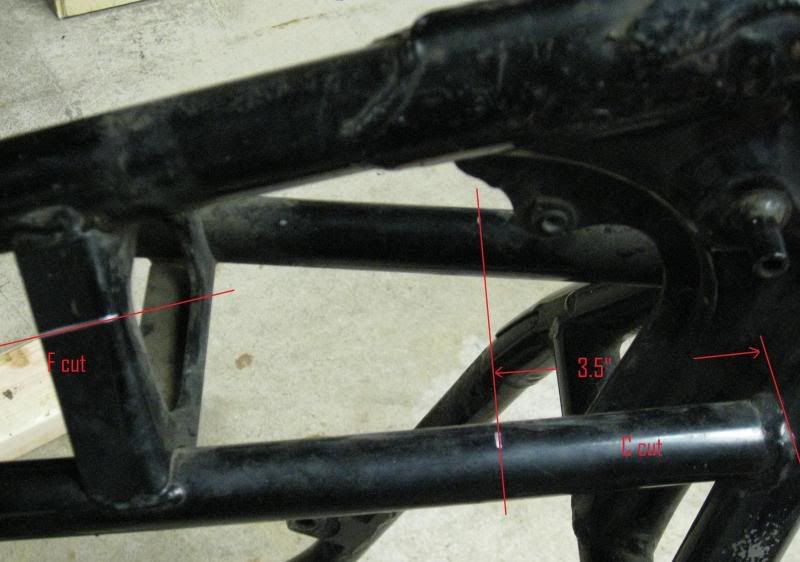
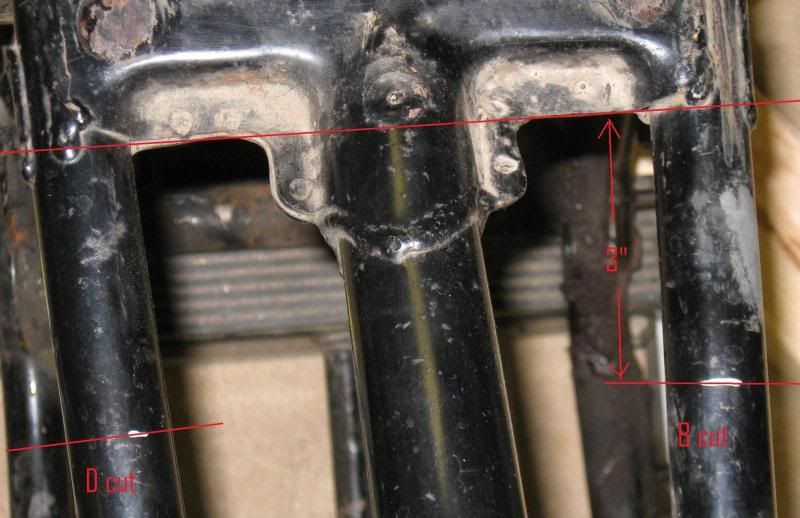
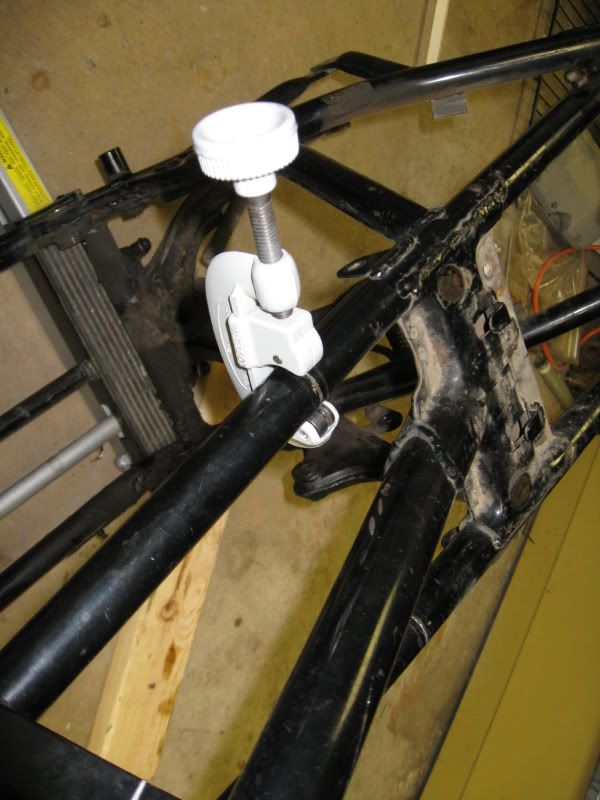
To get a square cut on the tubing I used a tubing cutter to mark the frame so I can cut it. A small tubing cutter could have cut it, but I could not swing this one all the way around.


EDIT: Before you cut anything drill the holes and test fit the small frame pieces in the triangle frame section. I found it would have been much easier to have done this. Ones you get the 2 holes drilled remove them and start cutting. This holes will let you align the whole piece easier. Keep the hole tight on the bolts I used a 5/16 drill bit.

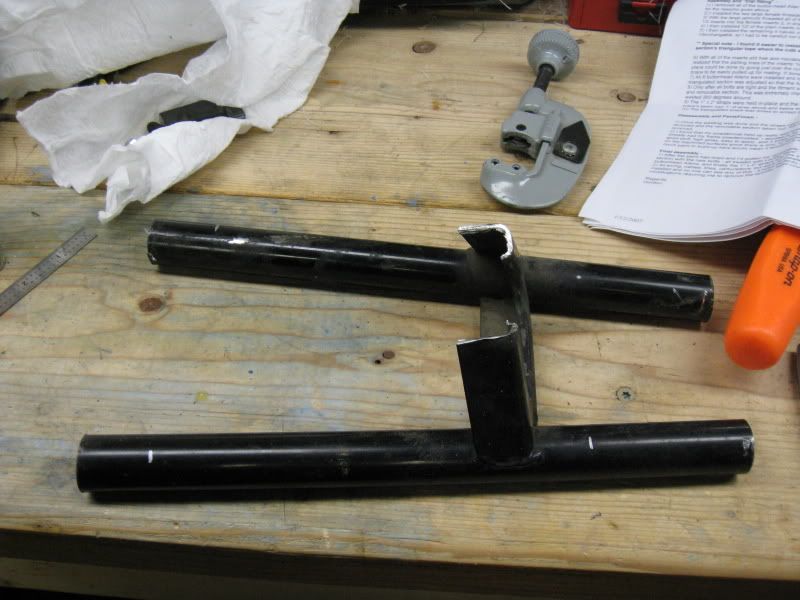
I cut one with a hack saw and then just decided to use my sawzall to cut the rest. I should have stuck to the hack saw because you can control the cut better and the hack saw blade followed the cut from the tubing cutter very nicely.

Then I marked the removed frame to clearance for Gordon's inserts


Testing how they fit. They are a little tight as is. I used a dremel with a sanding roll to clean the inside and tube seam. After that they slide in very nicely.


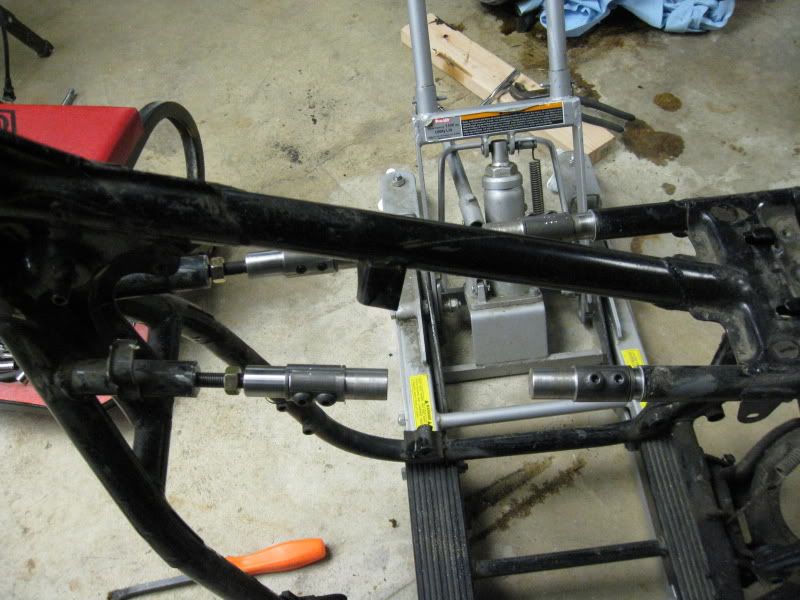
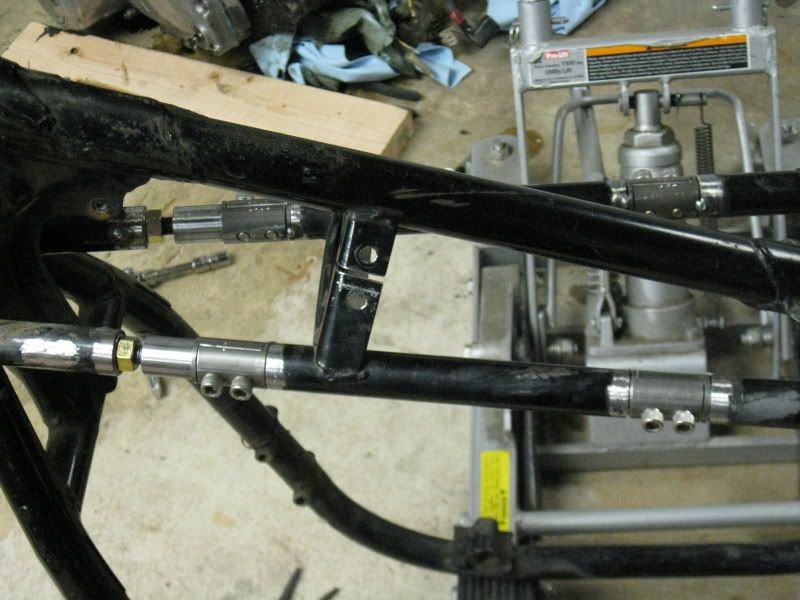
I then proceeded to clearance for each insert one at a time using the front face of the triangle frame as a reference


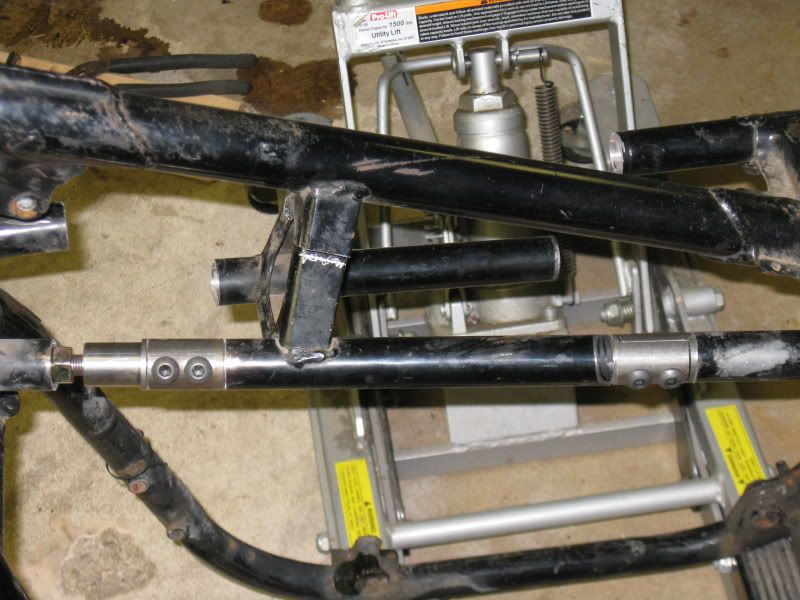
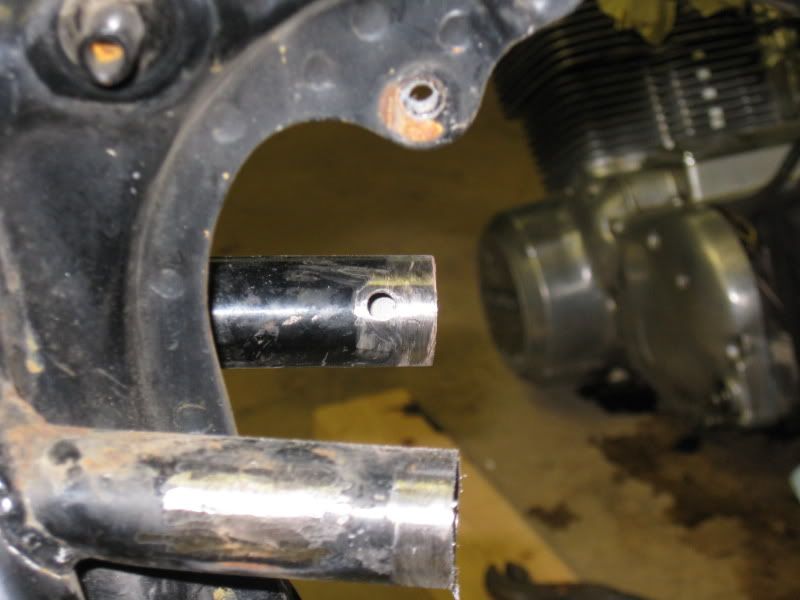
I then drilled a hole in each of the front tubes so I could plug weld the front inserts.


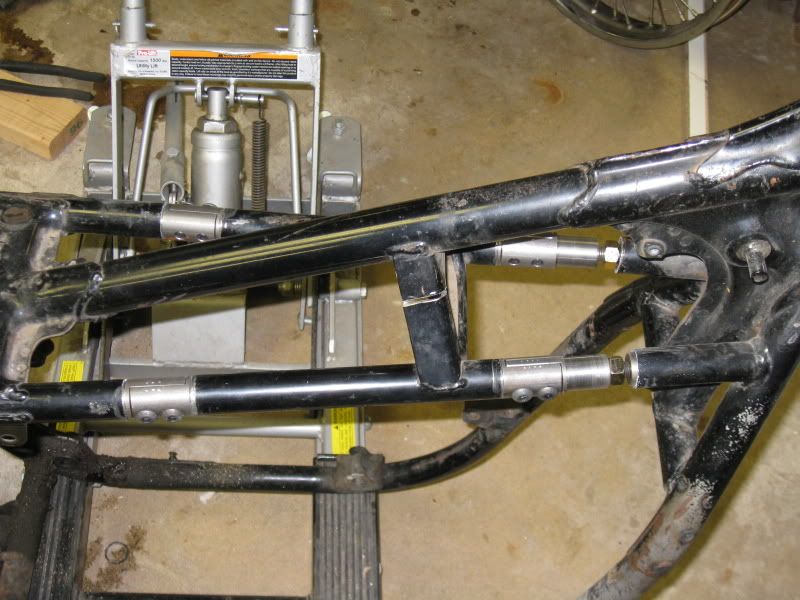
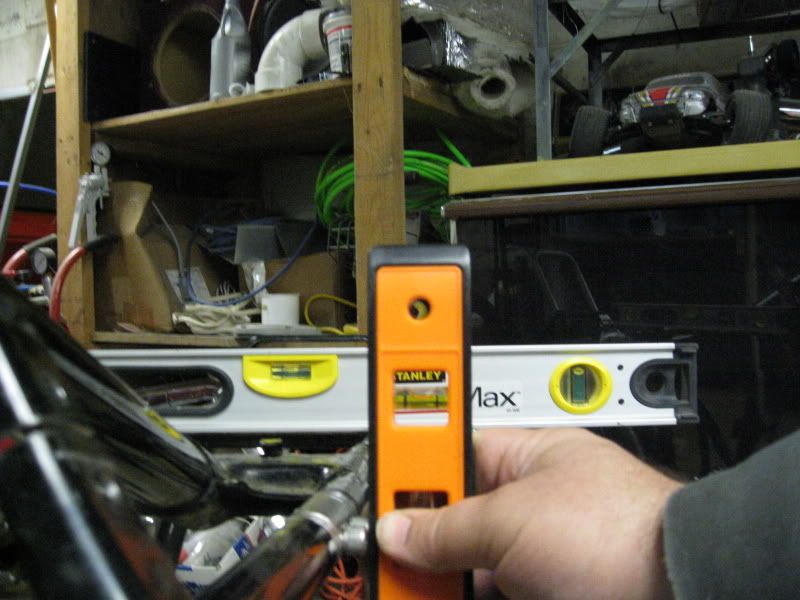
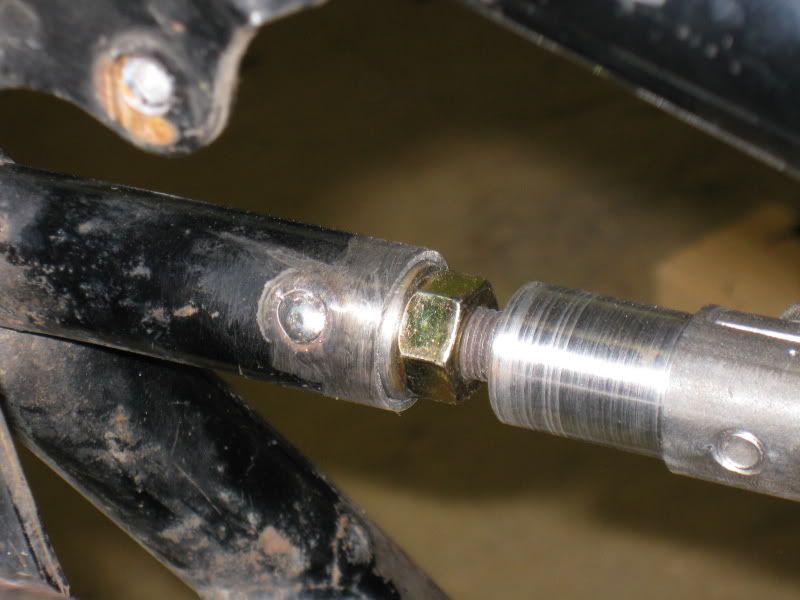
I leveled the rear of the frame across the 2 bars where the seat would sit. I replaced the grade 8 bolts Gordon provided with some socket head cap screws. I will use them until its been finished and powdercoated, and then I will put the grade 8 bolts back in. The nice thing about the socket head cap screws is it provided me a way to plum the inserts So they will all be vertical so the frame can be removed easily.


The tack welding is complete... Man that plug weld sure turned out nice, I wish I would have done that for every insert. Off to the welders for some tig work. I could have welded this and felt that it would have been structurally sound but my welding doesn't look the best so i decided to have some one else weld it. + its very easy to weld into the other side of the insert. One of my tacks stuck the other side of one of the pieces. I guess I should have slid a piece of copper between the 2 when I was welding. None the less I must have done a good job aligning everything cause it comes out nicely.


Thanks Gordon!  ;D
« Last Edit: December 08, 2008, 08:38:50 pm by XN »
78 Honda CB750K
02 Yamaha V-star 650
02 Honda VTX 1800

Offline MRieck

  • Really Old Timer ...
  • *******
  • Posts: 10,452
  • Big ideas....
Re: Gordon's Frame Mod Kit install pictures
« Reply #1 on: December 07, 2008, 08:41:05 am »
Nice pics. Good idea using the tube cutter to mark the cut lines.
« Last Edit: December 07, 2008, 08:45:31 am by MRieck »
Owner of the "Million Dollar CB"

Offline MCRider

  • Such is the life of a
  • Really Old Timer ...
  • *******
  • Posts: 14,376
  • Today's Lesson: One good turn deserves another.
Re: Gordon's Frame Mod Kit install pictures
« Reply #2 on: December 07, 2008, 09:15:48 am »
Thanks XN!
Ride Safe:
Ron
1988 NT650 HawkGT;  1978 CB400 Hawk;  1975 CB750F -Free Bird; 1968 CB77 Super Hawk -Ticker;  Phaedrus 1972 CB750K2- Build Thread
"Sometimes the light's all shining on me, other times I can barely see, lately it appears to me, what a long, strange trip its been."

Offline voxonda

  • Master
  • *****
  • Posts: 2,231
Re: Gordon's Frame Mod Kit install pictures
« Reply #3 on: December 08, 2008, 08:53:29 am »
How did you weld, TIG or MIG?

Thanks.
Better sorry for failing then for the lack of trying.

Offline XN

  • Hot Shot
  • ***
  • Posts: 264
Re: Gordon's Frame Mod Kit install pictures
« Reply #4 on: December 08, 2008, 12:44:39 pm »
No problem guys. Its the least I could do for all the help I've been given here. More pictures to come tonight.

Quote
How did you weld, TIG or MIG?

I tacked it with my MIG  and plan to have another guy TIG weld it.
78 Honda CB750K
02 Yamaha V-star 650
02 Honda VTX 1800

Offline XN

  • Hot Shot
  • ***
  • Posts: 264
Re: Gordon's Frame Mod Kit install pictures
« Reply #5 on: December 08, 2008, 08:42:06 pm »
Bump finished mostly added more pictures in the first post. Only two thing left it finish welding and powdercoat.
78 Honda CB750K
02 Yamaha V-star 650
02 Honda VTX 1800

Offline HedNut

  • Underwater Basket Weaving
  • Expert
  • ****
  • Posts: 844
  • CB750...A Two-wheeled hellcat from Planet Kickass
Re: Gordon's Frame Mod Kit install pictures
« Reply #6 on: January 19, 2010, 09:48:21 am »
How did it turn out!?  I'd love to see some finished pictures!

Sorry for ressurecting this post...I just wanted to let you know that I "Linked" it in my post for making the Gordon Kit available again... I hope you don't mind!?

http://forums.sohc4.net/index.php?topic=64333.new#new

Thank you! and Cheers!

Offline Ricky_Racer

  • Master
  • *****
  • Posts: 1,590
Re: Gordon's Frame Mod Kit install pictures
« Reply #7 on: January 19, 2010, 02:59:05 pm »

I've been wondering if there was any question of maintaining proper frame head alignment as the two side rails are cut. Any thoughts, anyone?  RR

I was put on Earth to accomplish a certain number of things. Now I'm so far behind, I'll never die!

Offline wannabridin

  • Patience made me a
  • Master
  • *****
  • Posts: 2,236
  • -Garrett
    • 1976 CB750K, under construction:
Re: Gordon's Frame Mod Kit install pictures
« Reply #8 on: January 19, 2010, 05:47:00 pm »
well the frame still maintains its triangulation, there's just one "weak" point that i can see, and that's in the vertical segments as they become cut.  but with a properly sized bolt hole and a tightly anchored backing plate, most, if not all or the rigidity is maintained.

all in all, i feel the kit is well engineered, and when it's properly installed with good penetrating welds and properly spaced plug welds, i don't feel there is anything wrong with this kit. 
1976 CB750K, currently under construction:
http://forums.sohc4.net/index.php?topic=64468.0

-And if you don't do it this year, you'll be one year older when you do...

Offline Ricky_Racer

  • Master
  • *****
  • Posts: 1,590
Re: Gordon's Frame Mod Kit install pictures
« Reply #9 on: January 20, 2010, 09:38:40 am »

I'm sorry; I wasn't really clear. I'm not concerned with the alignment after installation, but during. Given the stresses these old frames have had during their use, is it preferable to tack weld a temporary alignment brace to the frame before cutting the tubes, or am I just being neurotic?   ::)  RR

I was put on Earth to accomplish a certain number of things. Now I'm so far behind, I'll never die!

Offline 754

  • Really Old Timer ...
  • *******
  • Posts: 29,058
Re: Gordon's Frame Mod Kit install pictures
« Reply #10 on: January 20, 2010, 09:45:56 am »
RR, dont worry about that.. plenty of hipo ones out there with the whole kit area MISSING.. including a turbo.. :o

 I think the braces that reconnect the triangle are way too heavy..added vibration concentration... and, would be stiffer if they wrapped around..
Maker of the WELDLESS 750 Frame Kit
dodogas99@gmail.com
Kelowna B.C.       Canada

My next bike will be a ..ANFOB.....

It's All part of the ADVENTURE...

73 836cc.. Green, had it for 3 decades!!
Lost quite a few CB 750's along the way

Offline MCRider

  • Such is the life of a
  • Really Old Timer ...
  • *******
  • Posts: 14,376
  • Today's Lesson: One good turn deserves another.
Re: Gordon's Frame Mod Kit install pictures
« Reply #11 on: January 20, 2010, 09:48:27 am »

I'm sorry; I wasn't really clear. I'm not concerned with the alignment after installation, but during. Given the stresses these old frames have had during their use, is it preferable to tack weld a temporary alignment brace to the frame before cutting the tubes, or am I just being neurotic?   ::)  RR


I understood your concerns, hadn't thought of it. But lots of guys ran those frames with the bars cut out of them with no attempt to bolt something back in. Never heard of a neck gettiing tweaked.

I don't see the need for concern personally. But no one can deny the possibility. But again no concern to me. YMMV
Ride Safe:
Ron
1988 NT650 HawkGT;  1978 CB400 Hawk;  1975 CB750F -Free Bird; 1968 CB77 Super Hawk -Ticker;  Phaedrus 1972 CB750K2- Build Thread
"Sometimes the light's all shining on me, other times I can barely see, lately it appears to me, what a long, strange trip its been."

Offline Ricky_Racer

  • Master
  • *****
  • Posts: 1,590
Re: Gordon's Frame Mod Kit install pictures
« Reply #12 on: January 20, 2010, 12:14:47 pm »

Thanks for the feedback, Guys. I knew I was just being neux-rah-tick!   ;D  Okay, here come da SAWZALL:o :D ;D ;)  RR

I was put on Earth to accomplish a certain number of things. Now I'm so far behind, I'll never die!

Offline Don R

  • My Sandcast is a
  • Really Old Timer ...
  • *******
  • Posts: 19,172
  • Saver of unloved motorcycles.
Re: Gordon's Frame Mod Kit install pictures
« Reply #13 on: January 20, 2010, 08:18:09 pm »
Nice job, looks like mine. My bike had the center section hacked out but I found a wrecked frame and welded the triangle section back in, then cut it for the splice. I had some time so I bored out the ends part way through to remove a little weight. Still way thicker than the frame. Good job.
No matter how many times you paint over a shadow, it's still there.
If you love it, set it free, if it stays it's probably one of my 750's.
 CEO at the no kill motorcycle shop.

Offline speedtribe

  • Full Member
  • *
  • Posts: 8
Re: Gordon's Frame Mod Kit install pictures
« Reply #14 on: February 16, 2010, 12:43:58 pm »
Do you guys think this would work without being welded? Would bolting the lugs into the frame be strong enough considering the comments about some bikes running without the triangle?
I am going to do this mod soon but have no welding skills. If I can bolt it in and go, that would be even better.

Offline bwaller

  • Really Old Timer ...
  • *******
  • Posts: 7,479
Re: Gordon's Frame Mod Kit install pictures
« Reply #15 on: February 16, 2010, 01:01:17 pm »
If you're going to do it....do it right. Find a welding shop it won't cost much.

I remember being horrified the first time I saw a frame with that part removed. It wasn't real evident, but it was bent, the paint wrinkled.

Offline tweakin

  • tear down
  • Master
  • *****
  • Posts: 1,955
Re: Gordon's Frame Mod Kit install pictures
« Reply #16 on: February 16, 2010, 04:29:04 pm »
Where can I get this kit and what is the cost?  Nice work...

Offline wannabridin

  • Patience made me a
  • Master
  • *****
  • Posts: 2,236
  • -Garrett
    • 1976 CB750K, under construction:
Re: Gordon's Frame Mod Kit install pictures
« Reply #17 on: February 16, 2010, 06:09:10 pm »
hednut is selling them.  $150+ shipping IIRC, check the for sale section, he has a thread on it.  i should be getting mine anytime now, as it's coming from somewhere in that crazy canadian country to texas
1976 CB750K, currently under construction:
http://forums.sohc4.net/index.php?topic=64468.0

-And if you don't do it this year, you'll be one year older when you do...

Offline tweakin

  • tear down
  • Master
  • *****
  • Posts: 1,955
Re: Gordon's Frame Mod Kit install pictures
« Reply #18 on: February 16, 2010, 06:20:30 pm »
hednut is selling them.  $150+ shipping IIRC, check the for sale section, he has a thread on it.  i should be getting mine anytime now, as it's coming from somewhere in that crazy canadian country to texas
Thanks

bobbyboogie

  • Guest
Re: Gordon's Frame Mod Kit install pictures
« Reply #19 on: April 25, 2010, 09:14:39 am »
I was studying the pictures and wonder why the front part of the kit with the jam nut and stud isnt made like the rear ? It seems to me if it didnt have that stud and nut it would be much more rigid . Is it something to do with removing the kit ?Do you need that little bit of play to remove the  frame  member?

Offline Toxic

  • Expert
  • ****
  • Posts: 1,200
Re: Gordon's Frame Mod Kit install pictures
« Reply #20 on: April 25, 2010, 10:08:26 am »
To get proper clearance at the front you need to unscrew the threaded rod from the insert.