Author Topic: Rust Bucket topless- Engine gurus please!  (Read 5450 times)

0 Members and 1 Guest are viewing this topic.

Offline Graydude

  • Full Member
  • *
  • Posts: 86
Rust Bucket topless- Engine gurus please!
« on: January 19, 2012, 10:55:42 PM »
Got the head pulled off RB tonight.  I'm tearing it down after about 200 miles since my rebuild due to low compression and tons of smoke.  I had the head professionally rebuilt.  Let's start with the valve seals.  I can easily pull the valve past the oil seal.  The valve almost falls out.  Shouldn't their be some resistance to pull the valve past the seal?


On to the cylinder head.  Number 4 is to the right with number 3 to the left.  You are looking at the head gasket just as I pulled the head off.  No wiping (except my tears).  Look at the puddled oil on the piston crowns >:(.  Note the seepage from one of the oil passages into the cylinder.  That can"t be right.  Number 3 is the only piston with that layer of gunk on top.  The other pistons are just oily.  The pistons and rings were brand new 200 miles ago with a .050 overbore.  Nothing was done to the bottom end.  I did not split the cases.  The motor had 24K on it when I started.


Here is the bottom of the head with number 4 to the right and 3 on the left.  Again, no wiping of anything.  Notice the oil on the head>  Did my head gasket fail?  Look at the color of the combustion chamber.


Here is number 2 on the left with number 1 on the right.  I got more oil on top of those pistons than I do in the crankcase.  Why??


Underside of head with number two on the right and 1 on the left.  Again, note the color of the combustion chamber.


Does anyone see anything obvious?  This is my first tear down.  Remember, I only had 90 to 120 PSI with number 4 being the worst at 90 and number 1 the highest at 120.  I had the valves and seats cut and resurfaced but the shop was an auto shop, not a bike shop.  Anyone know of someone in socal I can bring the head to have it checked out?

Thanks in advance folks.
« Last Edit: January 19, 2012, 11:05:30 PM by Graydude »

Offline Danno

  • Hot Shot
  • ***
  • Posts: 715
  • 74 CB550,75 GL1000,76 KZ400,77 GL1000,73 CB750
Re: Rust Bucket topless- Engine gurus please!
« Reply #1 on: January 20, 2012, 12:30:03 AM »
this is just a guess but if you put all the orings around the studs where they belong then I would look at how flat the block and head are you can do this your self with just a steel straight edge like a builders square place it across the head in several different places if you had the head done professionally then it should be flat
next look at the block the thing that makes me wonder is the difference in impressions made by the head gasket
be sure you put all orings in place that are in the manual and new pucks if you can find them 

this is how I would proceed if it were my 74 550
when you own a motorcycle the wife does not have to find you handy she just has to find you

Offline Danno

  • Hot Shot
  • ***
  • Posts: 715
  • 74 CB550,75 GL1000,76 KZ400,77 GL1000,73 CB750
Re: Rust Bucket topless- Engine gurus please!
« Reply #2 on: January 20, 2012, 12:32:26 AM »
something i forgot to tell you as this is an aluminum head you do know that you torque them from the center out in a zig zag pattern don't you ?
when you own a motorcycle the wife does not have to find you handy she just has to find you

Offline MoMo

  • Really Old Timer ...
  • *******
  • Posts: 8,275
  • Ride like you're invisible
Re: Rust Bucket topless- Engine gurus please!
« Reply #3 on: January 20, 2012, 12:45:33 AM »
There should be enough stiction to prevent the valve from sliding past the seal.  It almost seems as though I see a gap between the seal and stem. Have you removed the cylinder? Were the ring end caps checked before the last rebuild?  Sorry for you bad luck...Larry

Offline madmtnmotors

  • When did I get to be a
  • Really Old Timer ...
  • *******
  • Posts: 6,110
  • Sunny Central Florida
Re: Rust Bucket topless- Engine gurus please!
« Reply #4 on: January 20, 2012, 04:34:38 AM »
I think your right and left are mixed up in the photo of the underside of the head at the #3 and #4 cylinders. Looks like #3 (on the right) could have been running rich (carb).

Valve seals won't give much resistance, they are very soft (when new).

Clean up the combustion chamber portion of the head and check the valves for leaks. Check the manual, other posts, other sources for the recommended fluid, I think denatured alcohol might be often used, fill the combustion chamber with fluid and check for leaks past the valves. Make sure all of the valve seals are in place and that one or more did not get overlooked (missing valve seals would not affect compression though).

Might as well pull the jugs while you're this far in and check:
* Ring end gaps
* Ring orientation, i.e. do any have a beveled edge that might be down instead of up or vise-versa? I can't remember which way the beveled edge goes, if they are beveled at all. Not all ring makers use a beveled edge but some do.
* Are the oil rings multi-piece (stacked)? If so, are they in proper order?
* Check the cylinder bores. Maybe pay a different machine shop to verify piston to bore clearances as a quality control check for the work that was done by the original machine shop.

And finally, some builds may smoke some and have uneven compression until break-in has seated the rings, but it sounds like yours may have been excessive. Keep checking and keep us posted.
TAMTF...


Wilbur


Projects:
"Evolution": http://forums.sohc4.net/index.php?topic=100352.0
"P.O. Debacle": http://forums.sohc4.net/index.php/topic,126692.msg1441661.html#msg1441661
F2/F3 O-rings: http://forums.sohc4.net/index.php?topic=113672.msg1300721#msg1300721
Cam Tower Studs: https://www.mcmaster.com/#93210a017/=t19sgp
Clean up that nasty harness: http://forums.sohc4.net/index.php?topic=137351.msg1549191#msg1549191
http://forums.sohc4.net/index.php/topic,148188.msg1688494.html#msg1688494
http://forums.sohc4.net/index.php/topic,139544.msg1579364.html#msg1579364
                                          
Charging system diagnosis: http://forums.sohc4.net/index.php?topic=1012.msg8345#msg8345
Get the manuals: http://manuals.sohc4.net/cb750k/
The Dragon: http://forums.sohc4.net/index.php?topic=45183.msg1571675#msg1571675
Headlight Switch: http://forums.sohc4.net/index.php?topic=113986.msg1283236#msg1283236
Branden's leak free top end thread: http://forums.sohc4.net/index.php?topic=107040.0
Engine Lifting Made Easy: http://forums.sohc4.net/index.php/topic,58210.msg1684742.html#msg1684742
                                      http://forums.sohc4.net/index.php/topic,100352.msg1675840.html#msg1675840
Static and Dynamic Timing: http://www.hondachopper.com/garage/carb_info/timing/timing1.html
Airbox Gasket Replacement: http://forums.sohc4.net/index.php/topic,114485.msg1290000.html#msg1290000
"Café" : http://forums.sohc4.net/index.php/topic,84697.msg953814.html#msg953814
PD Carb Choke Linkage: http://forums.sohc4.net/index.php/topic,100352.msg1669248.html#msg1669248
                                    http://forums.sohc4.net/index.php/topic,110931.msg1248354.html#msg1248354
                                    http://forums.sohc4.net/index.php/topic,48858.msg515204.html#msg515204
Follow up on your damn posts: http://forums.sohc4.net/index.php/topic,144305.msg1791605.html#msg1791605
Taiwanese Cam Chain Tensioners:  http://forums.sohc4.net/index.php/topic,155043.msg1774841.html#msg1774841
Gumtwo Seat Cover: http://forums.sohc4.net/index.php/topic,164440.msg1897366.html#msg1897366
Primary Drive: http://forums.sohc4.net/index.php/topic,166063.msg1919278.html#msg1919278
Tank Latch: http://forums.sohc4.net/index.php/topic,165975.msg1919495.html#msg1919495
Shorten your forks: http://vintage-and-classic-honda-s.456789.n3.nabble.com/How-to-shorten-forks-td4042465.html DO NOT CUT THE SPRINGS!
Clutch How To: http://vintage-and-classic-honda-s.456789.n3.nabble.com/How-to-change-and-adjust-a-clutch-SOHC-td4040391.html
Late model K7/K8/F2/F3 front sprocket cover removal: http://forums.sohc4.net/index.php/topic,178428.msg2072279.html#msg2072279
630 to 530 conversion: http://forums.sohc4.net/index.php/topic,180710.msg2094423.html#msg2094423

Sent from my Tandy TRS-80!

Offline chickenman_26

  • Hot Shot
  • ***
  • Posts: 598
    • Motorcycle Consumer News
Re: Rust Bucket topless- Engine gurus please!
« Reply #5 on: January 20, 2012, 07:26:27 AM »
Got the head pulled off RB tonight.  I'm tearing it down after about 200 miles since my rebuild due to low compression and tons of smoke.  I had the head professionally rebuilt.  Let's start with the valve seals.  I can easily pull the valve past the oil seal.  The valve almost falls out.  Shouldn't their be some resistance to pull the valve past the seal?


On to the cylinder head.  Number 4 is to the right with number 3 to the left.  You are looking at the head gasket just as I pulled the head off.  No wiping (except my tears).  Look at the puddled oil on the piston crowns >:(.  Note the seepage from one of the oil passages into the cylinder.  That can"t be right.  Number 3 is the only piston with that layer of gunk on top.  The other pistons are just oily.  The pistons and rings were brand new 200 miles ago with a .050 overbore.  Nothing was done to the bottom end.  I did not split the cases.  The motor had 24K on it when I started.


Here is the bottom of the head with number 4 to the right and 3 on the left.  Again, no wiping of anything.  Notice the oil on the head>  Did my head gasket fail?  Look at the color of the combustion chamber.


Here is number 2 on the left with number 1 on the right.  I got more oil on top of those pistons than I do in the crankcase.  Why??


Underside of head with number two on the right and 1 on the left.  Again, note the color of the combustion chamber.


Does anyone see anything obvious?
Yes, there should be some resistance. But leaky valve stem seals aren't the cause of your cylinders being literally flooded with oil.
Quote
Does anyone see anything obvious?
Yeah, a couple of things. If this is a '77 or '78 F model, then it's correct for the outboard studs for #s 2 and 3 to not have knock pins or O rings installed. However, those models need to have 5.5mm O rings installed over those studs on the under side of the cylinder. Did you? Even so, I'd think a 5.5mm O ring would have a hard time doing it's job with what appears to be a piece of  allthread substituting for a cylinder stud on #3 rear outboard. What's up with that?

It appears that none of the knock pin O rings have been sealing. Maybe the head work left a burred edge on the holes that the knock pins need to enter, and that would prevent the head from seating fully in those areas. Also be sure that the O rings on those pins are seated against the cylinder and not sitting on the head gasket either top or bottom.

Other than that, you might check the things the other guys have mentioned - excessive piston/bore clearance, rings installed upside down (printing on ring must face up), oil ring installed incorrectly (gaps in scrapers must overlap by at least an inch with gap in expander ring between them). It's really easy to overlap the ends of the expander if you aren't paying close attention - the ends need to butt up against each other. I don't know what the final finish on those bores was, and it's not possible to tell from pictures. But an auto machine shop may have finish honed them with 600 grit stones - way too fine for this application and would be the next best thing to glazed bores.

With the uneven compression you had after the rebuild, you shouldn't have even bothered starting the engine. A fresh top end, properly assembled and sealed, may not have the ultimate compression numbers you could expect after break in. But all cylinders will be within 5 pounds of each other. The 30 psi difference was unacceptable. My hunch is a leak down test at that point would have shown you a bad head gasket seal at several locations, and also valve or ring issues if they existed. Having torn down the top end without doing a leak down test first, now it becomes a guessing game....

Stu
« Last Edit: January 20, 2012, 07:48:57 AM by chickenman_26 »
MCN DTF

Offline madmtnmotors

  • When did I get to be a
  • Really Old Timer ...
  • *******
  • Posts: 6,110
  • Sunny Central Florida
Re: Rust Bucket topless- Engine gurus please!
« Reply #6 on: January 20, 2012, 08:27:46 AM »
Even so, I'd think a 5.5mm O ring would have a hard time doing it's job with what appears to be a piece of  allthread substituting for a cylinder stud on #3 rear outboard. What's up with that?

I completely missed that. That is an unusual detail. I would expect the allthread to have a different tensile strength and may stretch more than a standard (OEM) stud, and thus an adverse affect on torque values.
TAMTF...


Wilbur


Projects:
"Evolution": http://forums.sohc4.net/index.php?topic=100352.0
"P.O. Debacle": http://forums.sohc4.net/index.php/topic,126692.msg1441661.html#msg1441661
F2/F3 O-rings: http://forums.sohc4.net/index.php?topic=113672.msg1300721#msg1300721
Cam Tower Studs: https://www.mcmaster.com/#93210a017/=t19sgp
Clean up that nasty harness: http://forums.sohc4.net/index.php?topic=137351.msg1549191#msg1549191
http://forums.sohc4.net/index.php/topic,148188.msg1688494.html#msg1688494
http://forums.sohc4.net/index.php/topic,139544.msg1579364.html#msg1579364
                                          
Charging system diagnosis: http://forums.sohc4.net/index.php?topic=1012.msg8345#msg8345
Get the manuals: http://manuals.sohc4.net/cb750k/
The Dragon: http://forums.sohc4.net/index.php?topic=45183.msg1571675#msg1571675
Headlight Switch: http://forums.sohc4.net/index.php?topic=113986.msg1283236#msg1283236
Branden's leak free top end thread: http://forums.sohc4.net/index.php?topic=107040.0
Engine Lifting Made Easy: http://forums.sohc4.net/index.php/topic,58210.msg1684742.html#msg1684742
                                      http://forums.sohc4.net/index.php/topic,100352.msg1675840.html#msg1675840
Static and Dynamic Timing: http://www.hondachopper.com/garage/carb_info/timing/timing1.html
Airbox Gasket Replacement: http://forums.sohc4.net/index.php/topic,114485.msg1290000.html#msg1290000
"Café" : http://forums.sohc4.net/index.php/topic,84697.msg953814.html#msg953814
PD Carb Choke Linkage: http://forums.sohc4.net/index.php/topic,100352.msg1669248.html#msg1669248
                                    http://forums.sohc4.net/index.php/topic,110931.msg1248354.html#msg1248354
                                    http://forums.sohc4.net/index.php/topic,48858.msg515204.html#msg515204
Follow up on your damn posts: http://forums.sohc4.net/index.php/topic,144305.msg1791605.html#msg1791605
Taiwanese Cam Chain Tensioners:  http://forums.sohc4.net/index.php/topic,155043.msg1774841.html#msg1774841
Gumtwo Seat Cover: http://forums.sohc4.net/index.php/topic,164440.msg1897366.html#msg1897366
Primary Drive: http://forums.sohc4.net/index.php/topic,166063.msg1919278.html#msg1919278
Tank Latch: http://forums.sohc4.net/index.php/topic,165975.msg1919495.html#msg1919495
Shorten your forks: http://vintage-and-classic-honda-s.456789.n3.nabble.com/How-to-shorten-forks-td4042465.html DO NOT CUT THE SPRINGS!
Clutch How To: http://vintage-and-classic-honda-s.456789.n3.nabble.com/How-to-change-and-adjust-a-clutch-SOHC-td4040391.html
Late model K7/K8/F2/F3 front sprocket cover removal: http://forums.sohc4.net/index.php/topic,178428.msg2072279.html#msg2072279
630 to 530 conversion: http://forums.sohc4.net/index.php/topic,180710.msg2094423.html#msg2094423

Sent from my Tandy TRS-80!

Offline Graydude

  • Full Member
  • *
  • Posts: 86
Re: Rust Bucket topless- Engine gurus please!
« Reply #7 on: January 21, 2012, 01:50:28 PM »
excellent questions Chickenman.  I'll answer as best I can in order to determine the problems:
Yeah, a couple of things. If this is a '77 or '78 F model, then it's correct for the outboard studs for #s 2 and 3 to not have knock pins or O rings installed. However, those models need to have 5.5mm O rings installed over those studs on the under side of the cylinder. Did you? Even so, I'd think a 5.5mm O ring would have a hard time doing it's job with what appears to be a piece of  allthread substituting for a cylinder stud on #3 rear outboard. What's up with that?

It is a 78 F3 model.  I did have the 5.5 mm o rings on the underside of the cylinder head.  The all thread is due to one of the cylinder studs breaking off below the surface when I tried to remove it.


My machine shop suggested drilling out the remaining piece and putting in the all thread.  I did not think it would be much of an issue as I still had 15 OEM studs holding the head down.  Now, I don't know.

It appears that none of the knock pin O rings have been sealing. Maybe the head work left a burred edge on the holes that the knock pins need to enter, and that would prevent the head from seating fully in those areas. Also be sure that the O rings on those pins are seated against the cylinder and not sitting on the head gasket either top or bottom.
I suspect the oil rings are not setting as flat in their holes as they should.  It was a stock head gasket from Athena (sp)

Other than that, you might check the things the other guys have mentioned - excessive piston/bore clearance, rings installed upside down (printing on ring must face up), oil ring installed incorrectly (gaps in scrapers must overlap by at least an inch with gap in expander ring between them). It's really easy to overlap the ends of the expander if you aren't paying close attention - the ends need to butt up against each other. I don't know what the final finish on those bores was, and it's not possible to tell from pictures. But an auto machine shop may have finish honed them with 600 grit stones - way too fine for this application and would be the next best thing to glazed bores.

I could not wait to pull the cylinder head off.  I don't know what those unusual scoring lines are in the cylinders. You can see a faint black oval line on the cylinder wall.  THis oval line is present in all cylinders.  I also notices the scuffing on the piston skirts.  Remember, I don't have More than 200 miles on this engine since rebuild. It's possible the bores were incorrectly done and I just flat out have to much room in their.  I'll be measuring.


Offline MRieck

  • Really Old Timer ...
  • *******
  • Posts: 10,566
  • Big ideas....
Re: Rust Bucket topless- Engine gurus please!
« Reply #8 on: January 21, 2012, 03:43:17 PM »
The leakdown is key on any rebuild (as chickenman suggested). I do it to every engine I rebuild.
Owner of the "Million Dollar CB"

Offline Graydude

  • Full Member
  • *
  • Posts: 86
Re: Rust Bucket topless- Engine gurus please!
« Reply #9 on: January 21, 2012, 04:14:09 PM »
What is the procedure for a leak down test?

Online HondaMan

  • Someone took this pic of me before I became a
  • Really Old Timer ...
  • *******
  • Posts: 13,890
  • ...not my choice, I was nicknamed...
    • Getting 'em Back on the Road
Re: Rust Bucket topless- Engine gurus please!
« Reply #10 on: January 21, 2012, 05:34:17 PM »
A question: did you have the correct length of dowels in the center of each of the long rubber head seals? Honda makes 3 dowel lengths for these engines, and some are too long, which could hold the head from sealing on the head gasket. (Just grabbing for ideas...).

The valves: if the guide-to-stem clearance is too large, those Athena valve seals will not hold oil out, nor hold the valve from sliding out of the head. I discovered this 'sliding' issue on an engine I just got for reassembly (the owner chickened out after the machine work, basically). It has an Athena set: the seals don't even touch the valve stems. Now...there are 2 different valve stem diameters: the F2/3 engines have the smallest ones, and some K7/8 engines have them (like the one I tore down last week, oddly enough). While RXmangriff knows the ins & outs of these F head very well, my collection at the moment has small-diameter stems on both of the "410" casting heads (which are F2/3) and the K8 head (392 casting), while the K7 head has the same (larger) diameter stems as the early engines.

So, it could be that the valve stem seals in your kit were for the earlier engines, or a K7/8 head. Athena has not been known for the accuracy of their gasket kits, just their low price, in my experience.

P.S.: If you need a cylinder stud, I have a whole bunch of them. Pay shipping and they can be yours.
« Last Edit: January 21, 2012, 07:08:41 PM by HondaMan »
See SOHC4shop@gmail.com for info about the gadgets I make for these bikes.

The demons are repulsed when a man does good. Use that.
Blood is thicker than water, but motor oil is thicker yet...so, don't mess with my SOHC4, or I might have to hurt you.
Hondaman's creed: "Bikers are family. Treat them accordingly."

Link to Hondaman Ignition: http://forums.sohc4.net/index.php?topic=67543.0

Link to My CB750 Book: https://www.lulu.com/search?adult_audience_rating=00&page=1&pageSize=10&q=my+cb750+book

Link to website: www.SOHC4shop.com

Offline madmtnmotors

  • When did I get to be a
  • Really Old Timer ...
  • *******
  • Posts: 6,110
  • Sunny Central Florida
Re: Rust Bucket topless- Engine gurus please!
« Reply #11 on: January 21, 2012, 06:22:08 PM »
You might be okay with the all thread in lieu of the OEM cylinder stud. The torque values are very low (less than 25 ft-lbs I believe) and the scoring on the pistons hints at other issues that would not be caused by any potential slight variation in torque on the cylinder studs. Again, these torque values are very low and the all thread should be fine.

Keep us posted on your piston to bore clearances. Good luck.
TAMTF...


Wilbur


Projects:
"Evolution": http://forums.sohc4.net/index.php?topic=100352.0
"P.O. Debacle": http://forums.sohc4.net/index.php/topic,126692.msg1441661.html#msg1441661
F2/F3 O-rings: http://forums.sohc4.net/index.php?topic=113672.msg1300721#msg1300721
Cam Tower Studs: https://www.mcmaster.com/#93210a017/=t19sgp
Clean up that nasty harness: http://forums.sohc4.net/index.php?topic=137351.msg1549191#msg1549191
http://forums.sohc4.net/index.php/topic,148188.msg1688494.html#msg1688494
http://forums.sohc4.net/index.php/topic,139544.msg1579364.html#msg1579364
                                          
Charging system diagnosis: http://forums.sohc4.net/index.php?topic=1012.msg8345#msg8345
Get the manuals: http://manuals.sohc4.net/cb750k/
The Dragon: http://forums.sohc4.net/index.php?topic=45183.msg1571675#msg1571675
Headlight Switch: http://forums.sohc4.net/index.php?topic=113986.msg1283236#msg1283236
Branden's leak free top end thread: http://forums.sohc4.net/index.php?topic=107040.0
Engine Lifting Made Easy: http://forums.sohc4.net/index.php/topic,58210.msg1684742.html#msg1684742
                                      http://forums.sohc4.net/index.php/topic,100352.msg1675840.html#msg1675840
Static and Dynamic Timing: http://www.hondachopper.com/garage/carb_info/timing/timing1.html
Airbox Gasket Replacement: http://forums.sohc4.net/index.php/topic,114485.msg1290000.html#msg1290000
"Café" : http://forums.sohc4.net/index.php/topic,84697.msg953814.html#msg953814
PD Carb Choke Linkage: http://forums.sohc4.net/index.php/topic,100352.msg1669248.html#msg1669248
                                    http://forums.sohc4.net/index.php/topic,110931.msg1248354.html#msg1248354
                                    http://forums.sohc4.net/index.php/topic,48858.msg515204.html#msg515204
Follow up on your damn posts: http://forums.sohc4.net/index.php/topic,144305.msg1791605.html#msg1791605
Taiwanese Cam Chain Tensioners:  http://forums.sohc4.net/index.php/topic,155043.msg1774841.html#msg1774841
Gumtwo Seat Cover: http://forums.sohc4.net/index.php/topic,164440.msg1897366.html#msg1897366
Primary Drive: http://forums.sohc4.net/index.php/topic,166063.msg1919278.html#msg1919278
Tank Latch: http://forums.sohc4.net/index.php/topic,165975.msg1919495.html#msg1919495
Shorten your forks: http://vintage-and-classic-honda-s.456789.n3.nabble.com/How-to-shorten-forks-td4042465.html DO NOT CUT THE SPRINGS!
Clutch How To: http://vintage-and-classic-honda-s.456789.n3.nabble.com/How-to-change-and-adjust-a-clutch-SOHC-td4040391.html
Late model K7/K8/F2/F3 front sprocket cover removal: http://forums.sohc4.net/index.php/topic,178428.msg2072279.html#msg2072279
630 to 530 conversion: http://forums.sohc4.net/index.php/topic,180710.msg2094423.html#msg2094423

Sent from my Tandy TRS-80!

Offline Graydude

  • Full Member
  • *
  • Posts: 86
Re: Rust Bucket topless- Engine gurus please!
« Reply #12 on: February 01, 2012, 09:49:03 AM »
I think the results are in but my pictures did not come out  :-[.  I tore the engine down and the root cause of my low compression/oil burning was  shi**y machining!  First of all, as I was tearing down, I was careful to look for assembly errors by me.  I did not find any.  The rings were installed in correct order with the chrome on top and bevel facing up.  The end gaps were still staggered just as I installed them.  What I have are ring end gaps that are closer to spark plug gaps.  Here are the numbers:

Ring gap spec for top and middle compression ring is .008-.016 with a limit of .0276.  I did not have anything less than 0.030.  Clearly out of spec.

Ring gap for oil scavengers is .004 to .012 with a limit of .0276.  I did not have any less than .032 and I had several above .040.  I can just hear the wind whistleing by the rings as the pistons try in vane to build compression.

The worst indicator is I can see light between the rings and cylinder walls when I shine a flashlight up from the bottom.  I mean lots of light!  I won't bore you with the cylinder readings but I did not have any less than 61.75mm when max should 61.60mm.  I'm running 61.50 mm pistons.

I was able to score an excellent cylinder on flea bay for $60 shipped.  It's a standard bore so now I need to find a shop that knows what the hell they are doing.

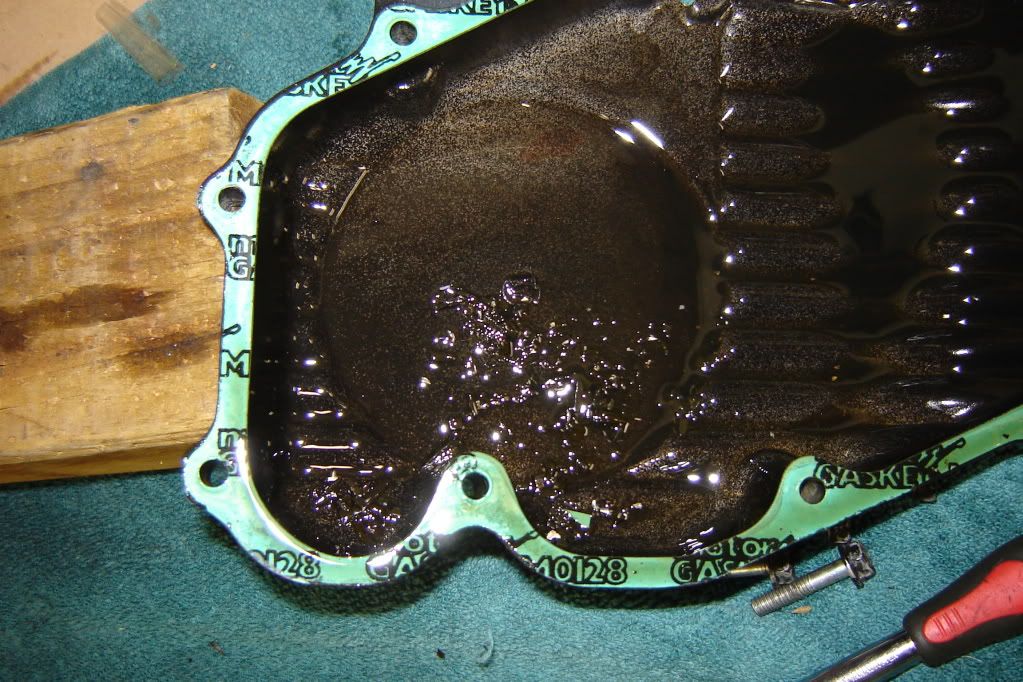
I will be doing the o ring mod to the oil pump (replacing the three o rings).  Here is what I found when I pulled the pan.
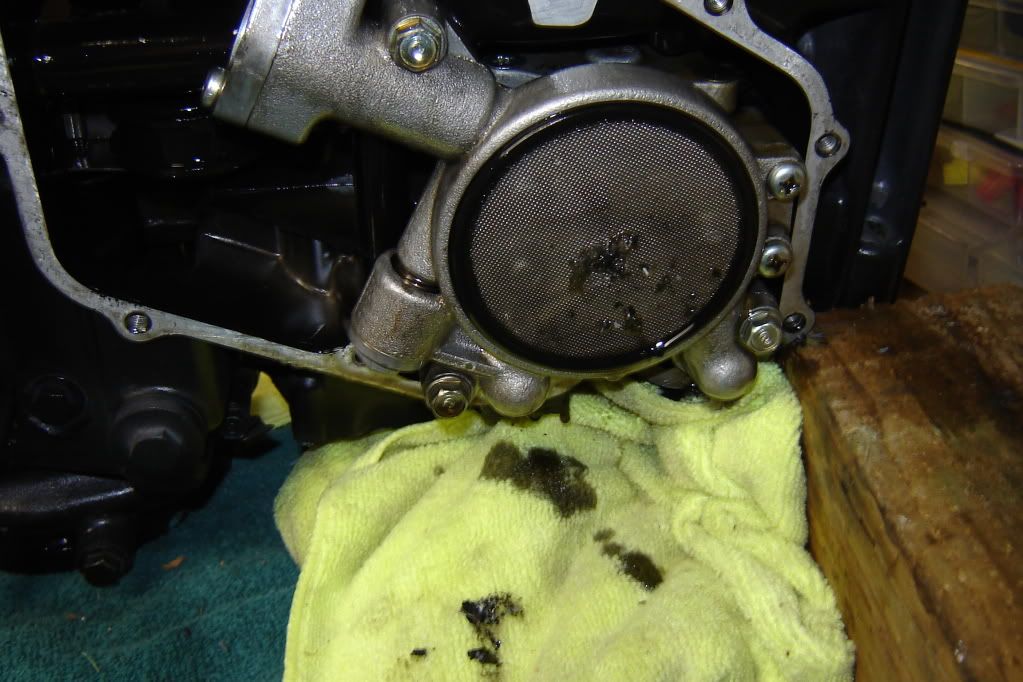


The material is not metallic but crumbly, kinda of rubber stuff.  I have extream wear markets on the cam tension-er idler.  The cam chain really dug in so I'm suspecting that's where the material came from.

Obviously I've gone back to the machine shop for satisfaction.  They measured my cylinder an agreed it is out of spec.  I'm asking for the return of my $180 boring charge, $80 for a new gasket set and $60 for the cylinder from flea bay.  I'll let you know.

Lesson learned:  Make sure the shop has extensive experience with Honda motors

Offline MoMo

  • Really Old Timer ...
  • *******
  • Posts: 8,275
  • Ride like you're invisible
Re: Rust Bucket topless- Engine gurus please!
« Reply #13 on: February 01, 2012, 09:55:53 AM »
Hope the shop does the honorable thing for you and refund your money.  Hard to imagine workmanship that bad...Larry

Offline Pat_at_APE

  • Enthusiast
  • **
  • Posts: 171
    • APE Race Parts
Re: Rust Bucket topless- Engine gurus please!
« Reply #14 on: February 01, 2012, 03:26:36 PM »
APE can do that work for you AND you can be sure that we've done a few so we know what we are doing...   We need the new cylinder block and all 4 pistons.  Labor charge is $189.00 plus return shipping.  We are not too far away by UPS but 3 hrs drive each way. 

Pat at APE
« Last Edit: February 01, 2012, 03:39:41 PM by Pat_at_APE »

Offline Ernest T

  • Hot Shot
  • ***
  • Posts: 302
Re: Rust Bucket topless- Engine gurus please!
« Reply #15 on: February 01, 2012, 04:11:59 PM »
You didn't mic the cylinder when you got it back from the shop?  I always do that just to double check the machine shop.

Offline Graydude

  • Full Member
  • *
  • Posts: 86
Re: Rust Bucket topless- Engine gurus please!
« Reply #16 on: February 01, 2012, 05:43:05 PM »
You didn't mic the cylinder when you got it back from the shop?  I always do that just to double check the machine shop.

This helps me how??

Offline chickenman_26

  • Hot Shot
  • ***
  • Posts: 598
    • Motorcycle Consumer News
Re: Rust Bucket topless- Engine gurus please!
« Reply #17 on: February 05, 2012, 05:57:03 AM »
This helps me how??
I don't think he meant it as criticism. More as a suggestion for your upcoming redo and on future projects.

Stu
MCN DTF