Author Topic: A Noob's Build of a '78 CB750k  (Read 33440 times)

0 Members and 1 Guest are viewing this topic.

Offline Boulevard_beck

  • Full Member
  • *
  • Posts: 97
A Noob's Build of a '78 CB750k
« on: April 30, 2012, 10:10:53 pm »
Up here in Edmonton, Canada, I get a solid 6 months of riding each year. Sometimes more, but a solid 6 months for sure. And that leaves me with a lot of time simply wishing that I could be riding. So, I take it upon myself to do 2 things in the off-season: I plan motorcycle trips, and I online shop for motorcycle parts.

My good old dependable bike is my 2005 Suzuki Boulevard M50 that I bought brand new and it's never let me down. At around 43,000 km, I've been all through the Rockies, most of Western  Canada and some of the Northwestern States. My M50 is at a point where I don't need to modify it any more - I love it exactly how it is.


But this winter, something about cafe racers just clicked. I don't need any parts for my M50, so I got to thinking: I'll just build a new bike. This coming from someone who didn't really know how a carb even worked until a few weeks ago! But, I'm resourceful and I've got the combined collection of all human knowledge on my computer: the Internet.


I found a 1978 Honda CB750k located 4 hours away and went to pick it up. He wanted $3000 for it, but it ran a little rough and needed a bit of TLC, but fired right up and i took it for a spin. I talked him down to $2000 and haven't looked back since.

« Last Edit: May 02, 2012, 07:42:50 pm by Boulevard_beck »

Offline cmonSTART

  • Hot Shot
  • ***
  • Posts: 285
Re: A Noob's Build of a '78 CB750k
« Reply #1 on: May 01, 2012, 06:24:35 am »
Congrats on the bike.  Best of luck with your project. 

That is some fantastic scenery in your first couple pictures!
1981 GL1100 Interstate
1978 CB750F Project

Offline flybox1

  • My wife thinks I'm a
  • Really Old Timer ...
  • *******
  • Posts: 14,301
Re: A Noob's Build of a '78 CB750k
« Reply #2 on: May 01, 2012, 07:47:17 am »
subscribed!  8)
'78 750K (F3 engine) PD42b's, Modified airbox w/K&N  filter, 40/110 jets, 1 needle shim, IMS@ 1 turn out. Kerker + Cone 18" QuietCore

Past Bikes
1974 550K0 (stock), 1973 CB350F (stock), 1983 Yamaha XS400K (POS)
77/78 cool 2 member #3
"Knowledge without mileage equals bullsh!t" - Henry Rollins

"This is my CB. There are many like it, but this one is mine…"

Offline Boulevard_beck

  • Full Member
  • *
  • Posts: 97
Re: A Noob's Build of a '78 CB750k
« Reply #3 on: May 01, 2012, 08:17:13 am »
First thing was first: I assessed the bike to determine what would be needed to restore the bike to it's original goodness. No need to start turning it into a cafe racer without having a good foundation to build on. We'll see how long this goal lasts...I blame BikeExif, PipeBurn and Return of the Cafe Racer.

Someone has taken a liking to the new bike in the garage.


The dust and dirt of 30 years.


50,000km isn't so bad, right? I hope this engine doesn't die on me the first time I take it out.


First up is the carbs. They need to be rebuilt because of the rough running and they sat for a while in the PO's garage...at least that's what think might be a contributing factor. So, I ordered up a carb rebuild kit from eBay through Serious Consolidated Inc in Ontario for $60.50. And after reading all about the wonders of rebuilding carbs, I bucked under the pressure and found a local shop - Edmonton Cycles & Salvage - who used my kits to rebuild them for $156.51 (1.5 hrs labour).

A little gunked up, but not bad. Took that huge airbox off, too. I'll come to regret that I'm sure.


So this is what a carb looks like on the inside.


Got them off with some effort, and now it's off to the shop.


And, here they are all rebuilt.


While I waited for the carbs, I ordered up a few more parts to give it a nice tuneup. Some basic stuff, and some cool cafe stuff to keep me happy.

Bikebandit
 Spark plugs: DR8ES-L (Canadian)
 Airfilter: OEM Ref#17211-405-000
 Chain: DID630V or RK630SO 88 link
 Rear Sprocket: 41 tooth
 Front sprocket: 15 tooth
 Front brakes
 Rear brakes
 Oil Filter: get a k&n one
 Clutch Cable
 Bar End Mirrors black swivel
 Fuses
Total = $366.35

I'm sure I'm going to regret tracking all of these costs. Any bets on how long it will take me to spend more on parts than on the bike itself?
« Last Edit: May 01, 2012, 11:14:53 pm by Boulevard_beck »

Offline Boulevard_beck

  • Full Member
  • *
  • Posts: 97
Re: A Noob's Build of a '78 CB750k
« Reply #4 on: May 01, 2012, 11:21:56 pm »
The thing that kills me most is the 2 week waiting period for shipping from the States to Canada. Darn customs and crappy shipping companies.

As you'll come to see, I have a serious online shopping problem. The way I see it is that if I wait 2 weeks for a package to arrive and then install some parts, I'll just have to wait another 2 weeks when I order some more stuff. It really does make logical sense that I should stagger the shipments so that I'm always receiving some packages every few days. Don't argue, it just makes sense! More on this in a moment...

For now, I figure that I might as well get to know my bike. And how best to do this than by cleaning every inch of the bike. I picked up some degreaser and started cleaning everything. The entire bike was pretty dusty and dirty from years of grit and buildup. No major dings or dents, but lots of dead crickets in the engine fins!

Getting to know my new bike.


Grime all the way under the gas tank.


I took note of some more things to order. Back to Bike Bandit to get some more stuff, since they're pretty cheap. Just odds and ends at this point.

Bikebandit
OEM Brake lever
OEM Clutch lever
Oil filter bolt
the 4 bolts holding the handle bar in place
OEM choke pull.
Both screws from the clutch/turn signals/horn assy
2 x Oil drain plug and washers
Total = $172.62

The air box is pretty dirty and I washed it out in the sink with some degreaser.


After looking at the usual Cafe Racer stores, it looks like Dime City is one of the cheapest. I'll try to fabricate some things, i'm sure. But making my own seat seems a little beyond my skill level right now.

DimeCity
Grips
Sparkplug wire set
Throttle Cables: push and pull in same package
Handlebars: gloss black clubman for $40
Horn: satin black
Air Filter Pods: k&n style, the cheap ones
Fuel filter: retro glass and chrome
Spray Polish
Seat & Mount kit: "Legendary Bug-Eye" with foam and leather options.
Thin Cats Eye Light for seat
Total = $607.99

I'll probably catch some slack on my seat choice, but I think it looks cool and come on, this is a "Noob's Build”...it's a cheap universal seat mounting kit, what could go wrong.

The whole electrical situation is making me think I'll need to give it a complete upgrade.


At this point, my credit card is starting to seriously heat up. Good thing I got my annual bonus to help pay for all of this stuff.

Do you guys enjoy seeing how much all of this is costing me? Or, does it just get in the way of the build?

Offline Toxic

  • Expert
  • ****
  • Posts: 1,200
Re: A Noob's Build of a '78 CB750k
« Reply #5 on: May 02, 2012, 04:09:49 am »
I like knowing I'm not the only nut speeding way way to much money on a 40 year old bike.
But for your own sanity, it's probably not a good idea.

Treat it as a hobby and not an investment and have fun with it.

Offline Boulevard_beck

  • Full Member
  • *
  • Posts: 97
A Noob's Build of a '78 CB750k
« Reply #6 on: May 02, 2012, 10:19:56 am »
Haha...the worst part is that these posts are about a week behind my actual build and I have since ordered up lots more parts and I'm completely over budget...but I have lots of nice shiny new parts! :P

Offline Boulevard_beck

  • Full Member
  • *
  • Posts: 97
Re: A Noob's Build of a '78 CB750k
« Reply #7 on: May 02, 2012, 10:41:41 am »
So there's a little bit of rust in the gas tank...stop me if you've heard this one before. Actually don't stop me just yet, because this one has an ending that I bet you can't predict...

A bit of rust in the tank...doesn't seem too bad, but it can't be good.


I did loads of research into what I should do. And the conclusion I came to is to use the POR-15 motorcycle kit. It seems easy enough for me to do, and seems to get the best results. I whipped out that good old MasterCard and ordered up one kit right away! It looks so simple in the YouTube videos...how hard can it be? Total cost, $71.40.

Pretty good price for a a rusty gas tank solution.


After procrastinating for a few days (that's code for "too scared to play with chemicals") a perfect afternoon came up. The wife and daughter were away all afternoon and the sun was out, so I got started. As I removed the gas tank, it looks like I'll need to replace that rubber thing that holds it down - it's old falling apart.

The tank..awaiting it's sentencing.


The carbs have gas in them, right? So I'll just turn these screws and that should drain the gas out of them. How much gas can really be in these little float bowls? Well, my garage smelled like gas for a week after I dumped what seemed like a gallon of fuel on the ground. Anyway...live and learn, I guess. I'm doing a lot more learning than I am living with this bike, it seems.

I drained the fuel into a jerry can, removed the petcock and flushed it out with water a few times. The petcock is in great shape, which is good news for me because there aren't any screws to rebuild it - just rivets.

I filled up the tank with the first step (the gunk cleaner...forget the name) and let it sit for about 30 minutes. Pro Tip: make sure you tape off the petcock before pouring in the chemical otherwise it spills all down your driveway and all over your pants when you panic and try to run the tank out of the garage before it spills everywhere. Feels like burning...no, kidding, it actually just felt slimy and didn't really bother my hands after I washed them and started over again.

The gunk cleaner worked pretty well. It was pretty nasty when I poured it out, at least - very dark and chunky. And the duct tape worked ok, but not really that good. There was some leaking here and there, but nothing too bad. Mainly just due to my poor taping job. Next up, the metal prep stuff.

Gas tank sitting with the chemicals in it.


I rinsed out the tank, poured in the metal prep and let it sit for 20 minutes on each side...total time of about 1.5 hours. Then, I poured it all out and rinsed it half a dozen times to make sure everything came out. It's pretty dark inside that gas tank, but I was determined to get a good look at this tank before I poured in the final coating.

Playing with the angles of the sun and the contours of the tank, I got a great look at everything in the tank. It looked not too bad, except for one little thing: the plastic filter screen attached to the petcock hole. Why is there a fuel filter screen inside the tank?!?

At least it looks like the chemical didn't really do anything bad to it. But I can't figure out how to remove it aside from brute force. So...a decision had to be made. Remove that filter screen and apply the POR-15 coating to the tank and try to re-install that filter thing later.........or, dry out the tank and call it a day without applying the most important part of the process.

Drying out the tank after my failed attempt to use the POR-15 stuff.


Well...at least the tank got a good cleaning. There's still rust in the tank, but I'm just sorta hoping that after the nice cleaning, it
just won't be a big issue. It shouldn't be too bad...there's the little plastic filter screen in the tank and I have a fuel filter, so no rust should be making its way to the carbs, I would think. Ignorance is bliss, isn't it!

What do you guys think? Am I screwed and just delaying the inevitable? Did I make things worse by stopping the POR-15 process before the most important step? Has anyone else ever tried the POR-15 stuff, but stopped half way through?
« Last Edit: May 02, 2012, 10:44:23 am by Boulevard_beck »

Offline cmonSTART

  • Hot Shot
  • ***
  • Posts: 285
Re: A Noob's Build of a '78 CB750k
« Reply #8 on: May 02, 2012, 12:16:08 pm »
If it's just bare metal in there, there is a risk of surface rust forming very quickly.  If you're not going to use the coating I would recommend sloshing some diesel or kerosene around in the tank to prevent the rust from forming. 
1981 GL1100 Interstate
1978 CB750F Project

Offline Boulevard_beck

  • Full Member
  • *
  • Posts: 97
Re: A Noob's Build of a '78 CB750k
« Reply #9 on: May 02, 2012, 07:47:43 pm »
I received a few boxes of parts, and let's be serious here: there's nothing quite like receiving packages in the mail. It's better than Christmas when I hear the FedEx guy knock on the door.

Today is the day where I finally see how the bike sounds now that I got the carbs rebuilt and the gas tank can hold fuel (hopefully). Let me brief when I tell you that those old intake boots that link the carb to the engine are hard as friggen rocks! With all of my strength, I tried as best I could to get them back on, but I don't think it was quite good enough.

Trying to use a strap to help put the carb back on.


After 20 minutes of turning the engine over, realizing that the fuel is turned off, turning over again, kick starting repeatedly, triple checking the kill switch, I gave up. The bike doesn't want to start. It was trying to start, but there was this loud-ish vacuum sound coming from the intake boots, so I did what I seem to do best - fired up the credit card and ordered some new ones. To be fair, the old intake boots are like rocks, and many people on the forum seem to recommend getting new ones and their bikes suddenly sound great and fire right up. Wish me luck.

BikeBandit
 Airbox Boots $39.80
 Intake Boots $93.32
 Foot Pegs $14.32
Total = $194.75

Now it's time to get serious...where's my credit card? I need some professional advice about what I'm doing, so I ordered up a copy of Hondaman's book at 20% off for a total of $89.53. I also start thinking that maybe my starting issues might be related to the points?? I read that Hondaman makes some transistorized ignition thing, and that just sounds fancy enough to convince me to pick it up along with his blade-style fuse replacer for a total of $136.50. I think I might end up re-wiring this whole bike by the time I finished.

Here's hoping that a kid can learn something.


Well, if the bike won't run right now, I might as well clean more parts.
« Last Edit: May 02, 2012, 07:49:54 pm by Boulevard_beck »

Offline Boulevard_beck

  • Full Member
  • *
  • Posts: 97
Re: A Noob's Build of a '78 CB750k
« Reply #10 on: May 05, 2012, 10:15:42 am »
At this point, I've made a pretty good list of things I want to replace on the bike, so as usual, I order them up.

VintageCB750
Wire Harness (24-4006)
Clymer CB750 Service Manual - Honda CB750 SOHC (61-1160)
Spark Plug Gapping Tool (35-0136)
Cable Luber - Pressure Type (35-0108)
Spoke Wrench Set (35-0109)
Shock Ring Wrench (35-5033) 
9 pc. Feeler Gauge Set (35-1766) 
Exhaust Headpipe Gaskets - (Pk/4) (17-3812)
Cable Adjuster (08-0067)
Die Cast mount Crankcase Breather (15-0680) 
Band Clamp 45-49mm. (15-0685)
Wire Hose Clamps (20-4014)
Brake Lever (08-0082)
Side Stand Rubber (02-6537)
Front Fuel Tank Holder Rubber (02-6534)
Graduated Cylinder (35-2211)
Chrome Universal adjustable 3 Hole Custom style Headlight Bracket
Total = $256.57

Besides doing what I do best - online shopping - I actually got around to doing some real work! I replaced the rear sprocket, the front sprocket and the chain. I got a new 630 style chain because it was a replacement of the OEM, but I guess a lot of people convert to 530 style which is the smaller chain. I think the massive 630 chain looks cool, except that people report that it breaks the chain guard quite often...which it has done to mine years ago by the looks of it. Why is it that people tend to convert to the 530 style? Is it the reduction in weight?

The legacy of the 630 style chain - broken sprocket covers.


Rear sprocket has a few teeth worn down, so it's time for a replacement.


Do I need that rear sprocket cover plate thing? I'm ditching it.


I also got around to installing some new cables. The clutch cable was pretty easy to install, the choke cable was a breeze. But the throttle cables were really tough. Installing the throttle cables is done either by using brute force and lots of swearing, or by using the simple little trick....and, I don't know the trick, if there is one!

Since I had the rear wheel off, I replaced the brakes while I was at it. I also replaced the front brakes which wasn't too tough to do. Funny little brake pads though...more like brake pucks, rather than traditional pads.

Replacing the rear brakes. Also cleaned up 30 years of gunk in the hub.


I installed the new clubman bars and it turns out that there's not a lot of room for the throttle, controls and brake cylinder. It just barely fits, but it looks like I'll need to re-route the brake line and throttle cables to allow for the new, lower location of the handlebar.

Routing cables all over the place.


It's like a maze game trying to figure out how best to route the cables.


The throttle is also pretty sticky. There's no real smooth action with the new clubman bar. I suspect that the issue is around the black coating not allowing the throttle handle to turn smoothly, but I'm not really sure. My current throttle handle is pretty nasty and dirty and scuffed up, so I might end up getting a new one of those, too.

Maybe the throttle actuator (??) on the carb needs to be lubed better.


Things are starting to take shape...very exciting times.

Offline Boulevard_beck

  • Full Member
  • *
  • Posts: 97
Re: A Noob's Build of a '78 CB750k
« Reply #11 on: May 06, 2012, 08:33:41 pm »
Not much of an update here...more of a confession, I suppose - I ordered some more parts for the bike. I'm sure that I'm going to order this stuff eventually, so I might as well order it up now rather than later. That way, when I'm ready to install it, i don't need to wait a couple weeks for it to come in, I can work on it right away. I can't wait to see how many Air Miles I get out of building this bike!

CycleX
Oil Pressure Gauge, the $59 one.
Rear Shocks: cycle exchange, not the lowering ones.
steering bearings from cycle exchange.
Front progressive Shocks and boots and seals from cycle exchange.
Bolt set from here: http://goo.gl/lQv7r
Total = $410.61

DimeCity
Speedometer - speedo and tach with indicators
Wires - OEM wire http://goo.gl/I3oyi
Pipes 4-2 MAC exhaust and tan color wrap.
License plate mount.
turn signal art deco type.
Total = $994.28

VintageCB750
Band Clamp 39-43mm. (15-0684)  = US$48.00
Throttle Sleeve (02-2430)  = US$15.00
Throttle Cable - Pull (51-2590)  = US$15.00
Throttle Cable - Push (51-2591)  = US$15.00
Clutch Lever Dust Cover (08-0058)  = US$6.00
Front Fuel Tank Holder Rubber (02-6534)  = US$4.50
Tachometer Cable (51-2401)  = US$12.00
Speedometer Cable (51-2305)  = US$12.00
Total = $149.33

Parts, parts, parts.


Now that my budget has run through, I can get back to doing some real work on the bike! I've put a restriction on all online shopping for the next few weeks/months since I have now spent more on parts than I have on purchasing the actual bike. I managed to buy the incorrect clutch and throttle cables and TWO license plate holders. No more online purchases!

Once I'm done turning this bike into a cool little racer, I should be able to recover some of my costs by selling some of the OEM parts that I took off the bike, I suppose. I won't get my hopes too high here, though :P

Pretending to ride the bike that won't yet start up.

Offline Boulevard_beck

  • Full Member
  • *
  • Posts: 97
Re: A Noob's Build of a '78 CB750k
« Reply #12 on: May 08, 2012, 11:53:43 am »
Last weekend I got to spend a lot of time working on the bike and catching up with podcasts. I suppose most people listen to music while working away, but I love catching up on podcasts. Here's a few of my favorites:

No Agenda - lots of interesting political discusses and media dissection
Wheel Nerds - motorcycle guys with lots of interesting discussions
This American Life - really, really unique and interesting stories about people and life
DH Unplugged - financial market discussions
Rebel FM - video games
Daddy on Board - what's new and interesting for fathers
Stop Podcasting Yourself - Vancouver comedians and really, really funny.
Laser Time - sometimes video games, sometimes weird 80's stuff...quirky, but great.

So, last weekend I got to listen to all of that while I installed new shocks in the rear. I had a hell of a time with the rubber grommets...they didn't quite fit nicely, so I had to "work" them on bit by bit. I sure love the look of the black on black shocks, though. Anyone have any idea if that plastic insert between the coils can be removed and how?

Nothing a little WD40 won't take care of.


The final product - shiny new black shocks.


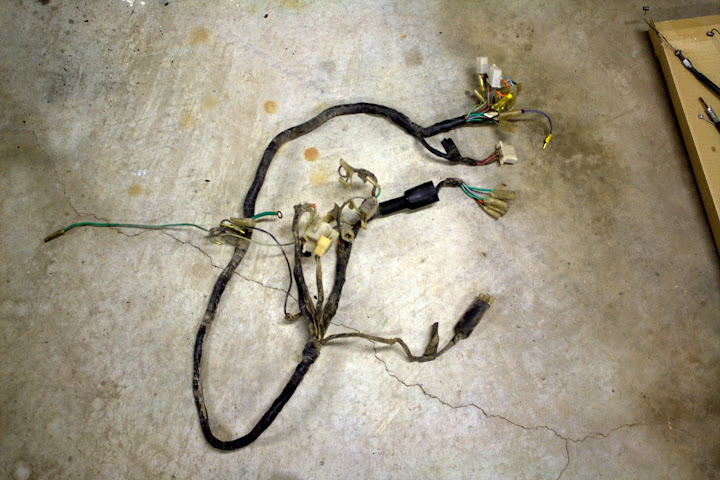
Next up was a complete replacement of the wiring harness. I love playing around with electrical stuff, so this was pretty fun. I took pics of every single connection just to be sure and cleaned every wire, too. It took a good couple of hours to replace the entire thing...I did the front half first, then worked on the back half. It's actually a lot easier than I thought...you're just matching up similar colored wires over and over again. Plus, half of the connections are those little plastic clips and they only connect to the other similar shaped plastic clip. Easy stuff. Let's hope it starts when I'm ready for that in a couple weeks.

It makes sense to hide the front wiring for everything in the headlight, but still...geez...


Wires heading to the coils.


Old wire clips are always a challenge to take apart.


I'm glad I took pictures of everything...made the re-assembly much easier, including this flasher unit.


Wires, wires, everywhere. These are the brake switch and the points/condensers.


Now, that's one good looking battery box. I cleaned it up a lot before re-installing.


The rear part of the wiring harness installed and cleaned up.


Anyone need an old used, but much loved, wiring harness?


I also installed new progressive springs in the front forks after reading all about how to do in the forum. It was actually a LOT easier than I thought. I took off the fork from the frame, unscrewed the top of the fork, poured out the old oil and took out the old spring. Then I pried off the dust seal with my fingers and used some pliers to take out the little clip easily. The seal was pretty tough to get out. I wrapped a big screw driver in some rags and just worked it all around the sides to eventually free it...took about 5 minutes of work on each one. I also let them soak in boiling water for 5 minutes, but I don't really think it helped. Reinstalling that top screw was a bugger, but basically I just called on the strength of the gods as I compressed the spring and screwed it back on....leaving welts in my hand, though.

Installed brand new springs which didn't require any special tools.


The auto store didn't have any fancy fork oil, so I just used 10W30.


I replaced the steering bearings with those AllBalls ones that everyone talks about. I remember reading in Hondaman's book to unscrew the top bolt and then go find all the bearings that fall. Determined not to have this happen to me, I unscrewed the top bolt sooooo carefully...and then the bottom of the triple tree falls out and I go hunting for bearings. Thanks Hondaman, thanks.

This thing sure makes a loud CLANG when you drop it...not that I dropped it...twice.


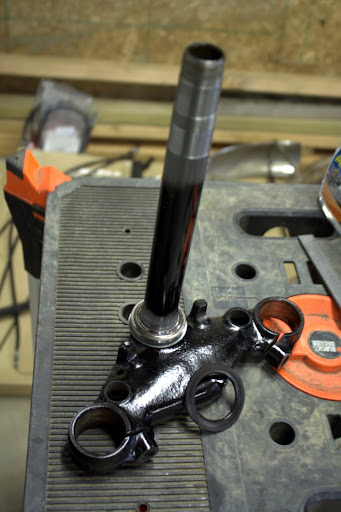
Getting the races out of the steering neck (is that what it's called??) was pretty easy. I stuck a screw driver down there and just hammered it out with ease. The hardest part was getting the race off of the triple tree bar thing....if you've done this, you know what I mean. The way I did it was to spray WD-40 in it and then hammer down on a screw driver over and over and over for about 20 minutes. I hammered down on a prybar for the part that I couldn't get the screwdriver to hit. In all of this, I forgot to get pics...sorry.

It didn't look like the old bearings were too bad, but they felt very "chunky" when turning.


After looking at some other CB750s that have those gator boots on the shocks, I realized that I still need to use the dust caps. So, I had to take the front end apart again to reinstall those. Sounds like a noob move, but I swear that it looked ok without the dust caps having the gator boots installed. Lucky that I caught that.

I forgot to put the dust seals back on.


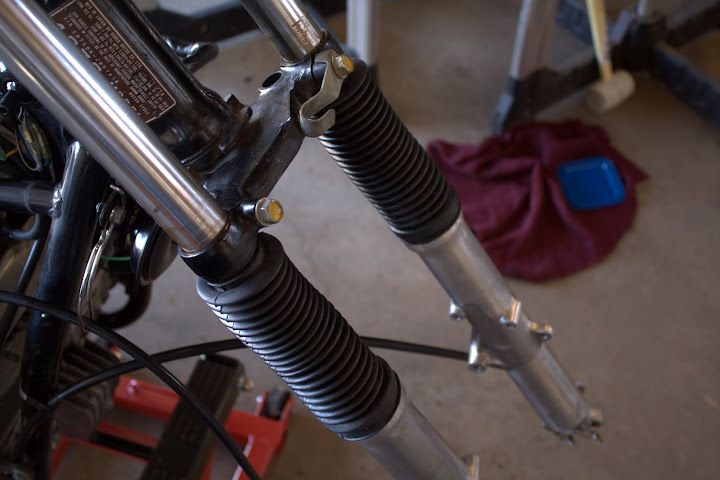
And this is the latest mockup before I start painting some parts.


So, now it sits...still disassembled, but for good reason. I picked up some metal paint and I'm going to paint some of the parts black. No point in putting the bike back together until I do that first. Maybe this coming weekend.

All of these past posts were done from memory weeks after the fact, so for now on I'll try to be a bit more timely with the updates. They might not come as quickly, but that's cause I work slow.....I  online shop fast, but I work slow.
« Last Edit: May 08, 2012, 11:59:30 am by Boulevard_beck »

Offline Boulevard_beck

  • Full Member
  • *
  • Posts: 97
Re: A Noob's Build of a '78 CB750k
« Reply #13 on: May 09, 2012, 02:36:49 pm »
I've been stock piling new parts in wait for the next time that I get to spend an afternoon working on my bike. Some days it gets tough...+20C outside and I need to make a decision: ride my M50, or work on my CB750. I need to get this Honda finished up soon, because it's killing me to not be able to ride it!

Parts laid out and boxes of new parts waiting to be installed.


A nice surprise was to receive Hondaman's little blade fuse converter in the mail the other day. It took zero skill and was a total bolt-on part, but it looks great and it gave me something to do in the evening with a beer in the garage after my daughter went to sleep.

The build quality of this part looks to be top-notch and the price was fair.


My old fuse holder had a broken connection and was pretty gunked up.


The new fuse holder fits in nicely with the cleaned up electronics and new wiring harness.


I plan to have some time this weekend clean up various parts of the bike to be painted. Hopefully the weather holds and I get a nice day to lay down a half decent rattle can paint job - this coming from someone who has yet to ever spraypaint something. Can't be too hard, right? Point and shoot in light layers?

Offline cookindaddy

  • I sure love this bike!
  • Expert
  • ****
  • Posts: 1,153
Re: A Noob's Build of a '78 CB750k
« Reply #14 on: May 09, 2012, 03:39:05 pm »
Just found your thread so I'm subscribing.

I finished my rebuild last year of the same bike. Man, it is fun to ride. I love mine. I am not a cafe fan but I am sure that you like the ride feel for yourself. For moderate distance riding, I like to be upright a bit more but that's just me. Another way of saying that mine is originally configured.

I'm an electrical guy too so I was admiring your wiring stuff. You seem to be moderately organized too which is good.

Best wishes on the project!

George


« Last Edit: May 09, 2012, 03:43:51 pm by cookindaddy »
George with a black 78 CB750K (in Lion's Head, Ontario, Canada)

Offline Boulevard_beck

  • Full Member
  • *
  • Posts: 97
Re: A Noob's Build of a '78 CB750k
« Reply #15 on: May 09, 2012, 04:50:42 pm »
Thanks George. I don't plan on taking this bike too far outside of town - I have another bike that I use for long distances with luggage and all that. I might get a little tank bag for this bike just so I can shoot out to the lake or a beach for the day, though. I imagine the clubman bars are just killer on the wrists after a while.

And I'm pretty comfortable with wiring. I'm not expert, but I can figure things out pretty well. I'll be relocating the starter and kill switch soon, so that will be fun. I built my own arcade machine a few years back, so I'm sure this will go ok.


Thanks for the comments.

Offline cookindaddy

  • I sure love this bike!
  • Expert
  • ****
  • Posts: 1,153
Re: A Noob's Build of a '78 CB750k
« Reply #16 on: May 09, 2012, 05:18:10 pm »
Good for you. Your arcade machine looks at least as complicated as the back of the 750K8 headlight bucket, so you should be in good shape  :)
George with a black 78 CB750K (in Lion's Head, Ontario, Canada)

Offline Boulevard_beck

  • Full Member
  • *
  • Posts: 97
Re: A Noob's Build of a '78 CB750k
« Reply #17 on: May 10, 2012, 01:51:56 pm »
Luck held out and I got a great weekend to go for a nice long bike ride around the city on my Suzuki, and some wrench time on my Honda. My dad came over with a shaking issue he was having on his Suzuki S83 and I think we fixed it by simply adding some air in his tires. They were down to 15psi, so I think that was probably contributing to a lot of the issue. His tires might be a bit out of alignment, too....but, that's for another thread. On to the Honda!!

Now, I don't know much about painting motorcycle parts, but I have a basic understanding of how it's done - sand, prime, paint. Let's see how this turns out.

I have a few bits for my drill that I picked up a couple months back that I figure can do the job on the sanding part. I popped them on and got to work grinding away all (well, most) of the old paint and grime that time had taken a toll on. It sure took a while getting into all of the little grooves, but I did an ok job of getting it ready, I think.

Here's what I used to "sand" down the parts that i painted...like $5 at Home Depot.


The top tripple tree after about 15 minutes of removing paint.


The speedo and tach mount came out nicely because it's just a flat piece of metal.


I wasn't sure how to handle the forks, so I just skuffed them up a bit here and there.


I forget what kind of paint I was using, but it wasn't anything special. I got it at Low's and it's meant for any kind of metal that doesn't heat up all that much. I think it did an ok job, but I can definitely tell that it's not a super high quality product - I could chip it away with a screw driver pretty easily if I wanted to. This might end up being a temporary paint job until I get around to having someone professionally paint the tank, side covers, ect, ect. Maybe this summer, maybe next summer.

I gave everything a coat of primer and let it sit for a half hour. Then I put on the first coat of black paint and let the parts dry for another half hour. And finally, I applied a second coat of black and let them dry for 24 hours before I touched them again.

Priming the parts before I painted them.


Forks hanging to dry. And note that I can actually fabricate something - hooks made from coat hangers! :P


A few other parts that I painted black, too.


In between coats of paint, I spent a little time installing the Hondaman transistorized Ignition module. This is one slick little piece of hardware! At first, it seemed to be pretty complicated...just a box with a dozen wires hanging out of it and a wiring diagram on a piece of paper...good luck to me. But, it wasn't too bad at all.

It turns out that everything is plug and play with the connections already made and you just match up the colors. The blue and yellow coming from the ignition module connected to the blue and yellow going to the points (located right beside the brake sensor at the rear right of the engine). The orange and purple connected to the blue and yellow heading up to the coil (Orange -> Yellow, Purple -> Blue). The green ground wire ran down to the points just like the existing blue and yellow wires do and grounds out on one of the condenser bolts. And finally, the black wire ran along the wiring harness up to the coils and connects in-line with one of the two existing black wires up there. I mounted the module in place of the tool box beside the battery, since I don't have the tool kit. Done and done in about 20 minutes.

I should really re-gasket the points cover. This is how the PO gave it to me.


Wires ready to be hooked up.


The ignition module mounted with some Velcro beside the battery. The wires are a little more cleaned up than in this pic.


I do have one question, though. I used Vaseline on my wire connections to prevent any corrosion. Someone told me to do this because I don't have any dielectric grease. Is this ok? Will Vaseline work to keep out some moisture and still allow the connections to work properly, or do I now need to spend a few hours cleaning every connection on the bike?

I have some time booked this weekend to put a lot of the bike back together. I need to get the painted parts installed, the handle bars back on with all of the controls, the new speedo and tach installed and everything wired back up. With a crap ton of luck, it might even start up! Jeez, I hope this bike starts up. My hopes are low, but my excitement is high. Look for a post next week with the results ;)
« Last Edit: May 10, 2012, 01:56:24 pm by Boulevard_beck »

Offline Tripps

  • Perpetual Beginner
  • Hot Shot
  • ***
  • Posts: 267
  • 1978 CB750K
Re: A Noob's Build of a '78 CB750k
« Reply #18 on: May 10, 2012, 07:31:21 pm »
Nice thread, I have a 78 myself.
The greatest obstacle to discovery is not ignorance, it is the illusion of knowledge- Daniel J Boorstin

Offline Boulevard_beck

  • Full Member
  • *
  • Posts: 97
Re: A Noob's Build of a '78 CB750k
« Reply #19 on: May 13, 2012, 09:04:39 pm »
I got a lot of work done on the bike this weekend. I'm still waiting on a few more parts to arrive in the mail before I can take the bike out for a ride, but the weekend ended in some success with it firing up...after a lot of carb cleaner helping to start the fire.

I decided to remove the crankcase breather and install a nice looking filter. It seems that the crankcase breather assembly under the battery box is not really needed except to do two things - provide some airflow out of the crankcase and catch/remove some of the oil vapor that builds up and drip it onto the road. So, the filter I installed will at least do one of those things. I'll have to monitor it for oil buildup and I might end up going back to stock if it gets nasty after a couple months.

There's just something about installing brand new parts.


I mounted the crankcase breather to the rear brake switch.


Next up was re-installing all of my front end after painting the forks. The paint job is a little cheap, but I really do like the way it looks. I hope it stands up to the road, though. I "lowered" the front end by just installing the forks lower. Is this ok? How low can I go? It appears that I'm quite low because my fork gators are pretty squished up. I'll give it a ride and see if I'm bottoming out or anything like that. I might have to raise them a bit.

Do these gators seem a little squished?


My stock gauge mounting plate looks great now that I've painted it black. It installed nice and easy and really looks sharp. That being said, I actually can't use it anyway, haha. My new speedo and tach came with special mounting plates that I need to use instead. I painted up the new mounting plates and installed them easily.

The stock gauge plate.


New speedo and tach installed.


I have one set of turn signals, so I installed them in the rear. the front ones should arrive in the mail in the next week or so. The wires were just a little bit too short, so I hooked up a little extra wire and everything looks pretty tide now. I ordered a bunch of extra OEM wire a few weeks back, so I can keep everything all colour coded to OEM for the future. One thing I've noticed is that after I hooked everything up, the turn signals will just stay solidly lit up when I press the turn signal switch. I suspect that this might be because I only have the rear hooked up and nothing is hooked up in the front. Any ideas?

Rear wiring.


My new signal lights.


The view from the back.


At the same time, the wiring setup behind the head light is sooo simple, and sooo overly complicated. There's about a dozen green (ground) connections and a dozen black (switched power) connections. If I were to clean up the wiring in the headlight, I would probably look for some type of thing that brings all green and all black connections into one single connector thing mounted into the headlight. Some type of "connection center" or something maybe. I don't know...just thinking out loud, I suppose. It just seems weird to have so many green and black connections.

Wires...everywhere.


My new MAC 4-2 exhaust installed very easily. Everything bolted up nicely and fit really well. There's not much to describe here, I just bolted on the new system. I did get the little metal inserts backwards the first time, so I then reversed them and now there's a 1/2 inch gap between the engine and the exhaust headers. From what I've read on the forum, this is normal, though. The new exhaust looks pretty sharp...very shiny. I'm more a fan of black stuff on bikes, though - chrome has never really done it for me. I plan on putting some tan coloured wrap on these pipes in the near future anyway. Is there anything I should do to "treat" the pipes before I do that? I suppose they'll be more or less ruined once i wrap them anyway.

New pipes installed.


I love the 4 into 2 look.


And one final thing I did was install an oil pressure gauge onto the side of the engine. Pro Tip - put the bike on the side stand, not the center stand, otherwise you'll get a lot of oil pouring out when you remove the bolt. I also used some of that thin white stuff that you wrap around the threads. I'm not sure if this was needed, but I think it is just because of the pressures and the oil could leak past the threads without it. Sharp looking little thing!

Runs at about 65 on a warm idle.


After all of that work this weekend, I tried to start it up. No luck. In fact, no luck after using the starter and kick starting it for about 20 minutes. Once the battery finally died, I gave up Saturday night.

Sunday, however, I came with some backup - carb cleaner. I took off the airbox and put on some cheapo air pods so I could quickly take them off and put them back on again while I tried to figure out what's up. I went through the step-by-step troubleshooting guide - checked fuel lines, checked float bowls, checked spark. Everything was good. I even learned something: when you turn off the ignition, the spark plugs get sent one last spark (to clear out the combustion chamber, I guess). Want to know how I found that out? By holding on to the sparkplug and wire while I turned the key off. Geez, that is one powerful spark.

After unloading a good amount of carb cleaner into the carbs, it would fire up for a few seconds, but then die. I did this half a dozen times with the choke, without the choke, with the choke half way. After about 20 minutes, it was warmed up enough that I guess is just decided that it would startup and idle on it's own. This bike is possessed, I swear. It's like I have no idea how to operate this thing...which is partially true, to be honest, haha. Assisted or not, the bike started up which is a great moral booster for me! I still have a lot of work to do before I can ride it on the streets, but it's nice to hear it come to life in the garage none the less.

Obligatory end of weekend shot.
« Last Edit: May 13, 2012, 09:11:28 pm by Boulevard_beck »

Offline Boulevard_beck

  • Full Member
  • *
  • Posts: 97
A Noob's Build of a '78 CB750k
« Reply #20 on: May 17, 2012, 09:20:18 pm »
No real big update this week, mainly due to a flu I picked up. However, I have made a little bit of progress on relocating my starter button and kill switch. Nothing is wired up just yet, but I should be able to do some more work on it this weekend.

Offline Boulevard_beck

  • Full Member
  • *
  • Posts: 97
Re: A Noob's Build of a '78 CB750k
« Reply #21 on: May 24, 2012, 12:06:10 pm »
I ordered some more parts to complete my build and most of my time has been just waiting for them to arrive, but I did get to do some fun little things here and there to really personalize the bike with my own style. First up, here’s the parts that I ordered:
 
Slingshot-Cycles.com
Brake line hose
Total = $51.99
 
Bike Bandit
Brake bleeder
Tubes for 19" and 17" tires
Fuel lines 25' each of 1/4" and 1/8"
Banjo bolt and washer for brake line
Total = $122.28
 
Dime City Cycles
Throttle assy without kill switch and starter button
DCC shirt
Arrow Deco turn signals
Cats eye taillight
Avon RoadRider tire 130/80-17
Avon RoadRider tire 100/90-19
Total = $420.60
 
If anyone is ordering from Dime City and doesn’t know, there’s a coupon code in the latest issue of Café Racer magazine. On checkout, enter the code CRMAG and get 10% off! If you’ve been waiting to make that big order of yours, the time is now.
 
Over the past week I did receive some parts in the mail. I installed some nice clean looking blue fuel lines to my carb. They were a little, tiny bit too small, but I think they’ll work. It was a tight fit, but nothing a little bit of spit and pliers didn’t take care of.


I also received my order from Slingshot-Cycles.com for a nice new brake line. My old one was pretty cracked and was a bit long for my clubman bars, so it was getting close to kinking with how I had to route it down to the brake. However, this new brake line is just wonderful. Very good quality and it fit like a charm. He offered stock length and a length of brake line specifically for clubman bars, which was perfect for my requirements.


Given that I installed a new brake line, I needed to completely bleed the brakes, too. At least I think I needed to, and that’s what I ended up doing. I hooked up the brake bleeder that I ordered from Bike Bandit which is a one-way valve to pump out the old fluid without letting any air/fluid back up the line. This was the first time I’ve ever done this before and it was a bit intimidating at first, but once I got into it, it’s not that big of a deal. As usual, I made some mistakes, though…


Apparently, the instructions said not to pump out all of the old fluid to the point where you’re pumping air through the line. But, I had to replace the whole brake line, so I figured that I needed to do this. Off I went, pumping everything out. Once all of the fluid was out, I replaced the brake line with my brand new one and hooked everything back up. I filled up the reservoir with new DOT3 fluid and started pumping the new fluid down the line. The issue is that once there is air in the line, it’s extremely difficult to get it out. I must have pumped for close to 30 minutes before giving up and running to the forums for help.


To my great joy, I found someone who had the same issue and suggested a really funny sounding solution. Basically, you just pump as much as you can through the system until you’re sure that there are just tiny bubbles left that is causing your brake to be “squishy” when you engage the brake. Once you’re at that point, you put the bleeder away and put everything back to normal, clean up the workplace and then do the trick. The trick is: squeeze the brake lever all the way, zip-tie it closed and then just leave it like that over night. The tiny bubble will then just find their way to the top of the brake line and everything will magically be all better by the morning.
 
I did exactly that, and to my shagrin, it friggen worked. Pulling the brake lever now gives that perfectly reliable feeling of forceful feedback and immediately locks the front brake with no squishy feeling in the lines. Never did I think such a simple trick would work given my track record of bungling things up, haha.


Still waiting for my order from Dime City to come in…it consistently takes about 2 weeks to arrive given the crappy Canadian customer process, which also charges me a good $50 extra to receive it. Once that comes in, I’ll be able to make my bike rideable. I cannot wait!
« Last Edit: May 24, 2012, 12:09:03 pm by Boulevard_beck »

Offline Boulevard_beck

  • Full Member
  • *
  • Posts: 97
Re: A Noob's Build of a '78 CB750k
« Reply #22 on: May 25, 2012, 12:20:00 pm »
Still waiting on parts from Dime City, mainly a new throttle assembly which will remove the starter and kill switch from the throttle. The reason I’m removing those switches from the throttle is because there just isn’t a lot of room on the handlebars to hold the brake, the switches, the throttle, the grips and the mirror. It’s just too cluttered. Given that, I need to relocate those two switches, and that’s what I worked on while I wait for packages to arrive in the mail.
 
I’ve looked around for creative buttons that people have used for their starter and kill switch and really didn’t find anything all that compelling to copy. Except for one guy, who used an arcade “Player 1” button. I think this is just such a great idea and I’ve got to copy it. I also just happen to have built my own arcade machine a few years back, so I have a bunch of extra buttons sitting around that I can repurpose for my bike.


I really, really looked around for interesting kill switch ideas, but didn’t find anything that really worked for me. So, I just used a simple switch from radio shack that I found in one of my tool boxes which keeps the “low profile” look of the arcade button.
 
In my mad ordering spree a few months back, I ended up ordering 2 license place brackets. As it turns out, I can reuse one of the extras and fabricate a switch mounting bracket out of it for the starter and kill switch. Reduce, reuse, recycle, right! I drew out the basic design based on the mounting location (along with the ignition) and began to fabricate.


Using a metal drill bit, I drilled out some holes for the buttons and got to filling out the basic shape for each of them. This was grueling to do with a simple hand filer. I’m guessing that I spent about 90 minutes filing this thing down to allow the arcade button and switch to fit in nicely.


Once that was complete, I used a cutoff blade attached to my drill and carefully cut away the metal parts that I didn’t need from the bracket. I then filed down the sides to be smooth…which took another 30 minutes. Then I scuffed up the surface with some sand paper and gave it a nice coat of black paint to match everything else.
 
While that cured overnight, I got to work on the electrical stuff. I have loads of Honda OEM wire from a past order from Dime City, so I was able to match up wire colours and build my own little wiring harness for these two components. I think it turned out pretty good and the heat shrink wrap should give it some weather protection and not make it look too amateurish. I think I’m going to need to buy some cable wrap to clean it up a bit more, though. I'm not completely sold on my mounting bracket that I made, so this might need to be re-fashioned in the future, too. All in good time...


Lastly, I made one final order to VintageCB750 to get some tools to help install my new tires which are one the way. Plus, the MAC exhaust that I have installed is causing my center stand to hit the chain, so I need a center stand stop to fix that. I also couldn’t help ordering one of those steering dampers – even if it ends up being just for looks. I was able to order a mounting brace to attach it to the forks, but I think I’m going to need to fabricate something to attach it to the frame of the bike. I guess I’ll start looking around to see what solutions other people have come up with.
 
VintageCB750
3 x Tire Lever - Fusil Type (35-0079)  = US$25.50
1 x Valve Stem Cap (01-0171)  = US$0.99
1 x Wheel Rim Strip - 19" x 1" (35-2016)  = US$1.25
1 x Wheel Rim Strip - 16" x 1" (35-2013)  = US$1.25
1 x Gear Change Lever with Rubber (19-0070)  = US$9.00
1 x Hydraulic Steering Damper (28-4008)  = US$74.95
1 x Alloy Bracket (28-4001)  = US$32.00
1 x Coupler Set (12-0639)  = US$4.00
1 x Metric Terminal (12-0120)  = US$2.00
1 x Metric Terminal (12-0121)  = US$2.00
1 x Center Stand Stop (07-0211)  = US$4.00
1 x Center Stand Stop (07-0210)  = US$4.00
1 x Center Stand Stop Rubber (07-4623)  = US$4.00
1 x Center Stand Stop Rubber (99-5004)  = US$3.00
Total = $176.34

I asked the dealership that I bought my Suzuki M50 from years back if they would mount and balance my tires for me, but they told me that they don’t do any work on anything that wasn’t purchased at their shop. I even asked “so, if I’m stranded on the side of the road and I have a spare tire with me, you won’t help me out??” Their answer was a clear “NO”. Suffice to say that after purchasing a brand new bike from them in 2005 for $8000 and after spending thousands on equipment and gear and parts and services from them for my Suzuki bike, I will no longer be giving Argyll Motorsports in Edmonton any of my business. I can see why they won’t do work on anything that wasn’t purchased at their shop, but this just doesn’t meet my requirements for a motorcycle shop, so I’ll be taking all of my future business elsewhere.

Offline lucky

  • Really Old Timer ...
  • *******
  • Posts: 6,717
Re: A Noob's Build of a '78 CB750k
« Reply #23 on: May 26, 2012, 10:34:34 pm »
Argyll Motorsports in Edmonton wants to control everything like Bill Gates.
they could care less about their community.

It will come back to bite them.
I bet the employees will not stick around either.

Offline mrrch

  • Hot Shot
  • ***
  • Posts: 652
Re: A Noob's Build of a '78 CB750k
« Reply #24 on: May 27, 2012, 06:13:37 am »
Is that seat & pad from Lengendary Motorcycles?
my build

1977 CB750K WITH 1976 CB750F ENGINE