Author Topic: Cam chain adjust spins round and round + glitter in the oil.... help? CB550 PICS  (Read 43069 times)

0 Members and 1 Guest are viewing this topic.

Offline Frostyboy

  • Retired: Never was an
  • Expert
  • ****
  • Posts: 1,227
  • Circa 1951
Re: Cam chain adjust spins round and round + glitter in the oil.... help?
« Reply #25 on: August 13, 2012, 06:57:14 AM »
Any words of wisdom on that base gasket? I'm thinking liquid wrench.

I've not had mine down that far I'm sorry. I don't know what the clearance is like around the bottom of the head studs, maybe the studs have grabbed onto the barrel.
I've read here before that a mix of acetone & atf works well. Maybe pour a quantity down around the studs & let it soak a while may help to ease it off?

http://forums.sohc4.net/index.php?topic=20131.0
« Last Edit: August 13, 2012, 07:11:43 AM by Frostyboy »
Last year I joined a support group for procrastinators.
We haven't met yet.
[CB550F1]

Offline DustyRags

  • I'm not skilled, I'm just a
  • Hot Shot
  • ***
  • Posts: 720
  • Just try it and see what happens
Re: Cam chain adjust spins round and round + glitter in the oil.... help?
« Reply #26 on: August 13, 2012, 09:21:31 AM »
Oh, awesome! Exactly what I was looking for! Thanks for the link, and I'll check into the studs. We'll be giving it another bang tonight.
1976 CB550K- sold
2005 Kawasaki Vulcan 500- sold
2000 CB750 Nighthawk - sold
1975 XL350 - crashed
2004 Suzuki Vstrom 650 - sold

Offline DustyRags

  • I'm not skilled, I'm just a
  • Hot Shot
  • ***
  • Posts: 720
  • Just try it and see what happens
Re: Cam chain adjust spins round and round + glitter in the oil.... help?
« Reply #27 on: August 13, 2012, 11:16:30 PM »
OK, we got the damn things off! Here's how it all went down...

First, more tools. Liquid wrench, acetone, a scraper and some spare razor blades. Yes, I know by now that's not the right scraper- the guys at the automotive store were FC about this stuff, so I grabbed that because hey, it's cheap and I need one anyhow.
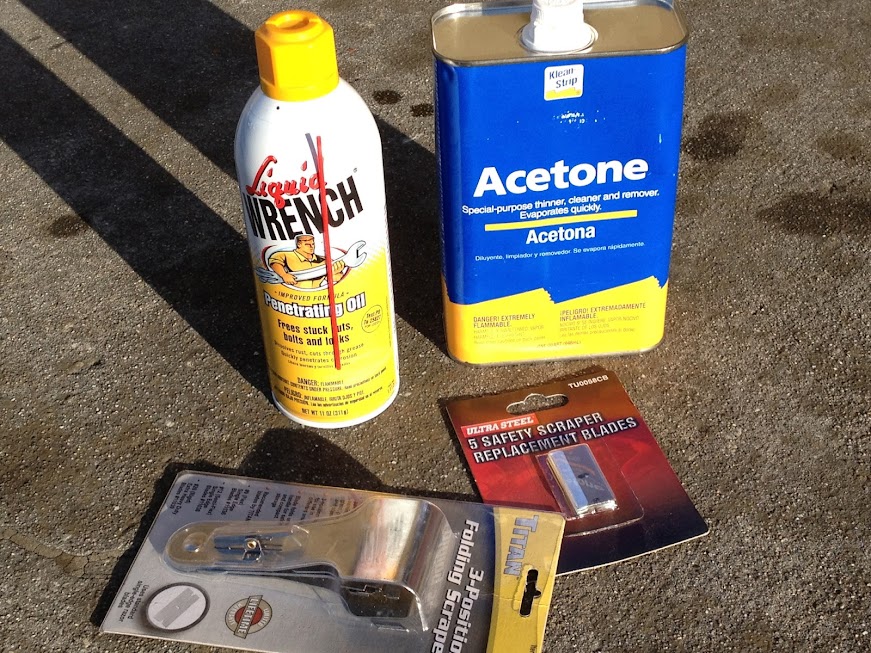


We got some acetone smeared on the cylinder head and the worst of the gasket lifted off (80% came off in a couple of big chunks), and then sprayed some liquid wrench and acetone all around the base gasket. Back to the head for a few minutes of scraping, and then there was a "clunk!" and my brother was jumping up and down shaking his hand. Turns out he'd braced a piece of hardwood under the cam chain tensioner adjuster screw nubbin thing at the back of the cylinders, stuffed the end of a large crescent wrench under it as a lever and popped it off easy peasy. And barked his knuckles in the process.


There it is! The top is pretty well smooth, although it's got this orange varnish on it. Not sure how to get it off. Think I'll hit it with brake cleaner. By the time I'm done here I'll be broke and have a whole new collection of toxic and flammable chemicals!


The base gasket split in half, but seems to be coming off OK. Sleeves are clean.


There's the head and the cylinders, upside down. The underside of the head has some varnish, and a few spots where the gasket is cemented on super hard. We put some (very small) gouges in the surface, but nothing that goes all the way through from the outside to the inside that could provide a channel. It seriously feels like the baked-on gasket is harder than the aluminum. I'll hit that with break cleaner and a putty knife later this week. How clean do these things have to be? Is a bit of varnish OK as long as it's silky smooth, or do I want bare metal? Can I glue some fine sandpaper to a mirror and lap the whole surface flat?


Lots of varnish. >_<


Horrible picture (it was dark by now, and the garage is badly lit), but you can see that the base cylinder has much less of the orangey/yellowy/brownish varnish stuff, and a lot more just plain old charred paper. This is actually coming off OK, although it's not as smooth where it does lift off.


And there's the chain guide. It's baaaaaad. Glad we went down this far. There are some channels worn into the side of the the cam chain slot down the middle of the cylinder block as well. We'll check out the sides of the chain for wear, and see if it's stretched at all.


We'll also drop the oil pan and clear the oil strainer. I imagine all that rubber and most of the aluminum shavings are down there, which is why we didn't see more in the oil.

So, two questions:

If we run the oil out of it, can we put the (week-old, 6 mile) oil back in? I can't think of a reason not to save myself the thirty five bucks or whatever.

Any good recommendations for plugging up the gaping maw of a whole in the top of the engine block as we scrap all the old gunk off the top of it? Trying to minimize the crud going into the engine, as well as any chemicals (brake cleaner) we'll be using to loosen it.

Thanks for all the help, folks, this is an exciting project. I'm learning a ton, and look forward to riding the thing when it's done.
« Last Edit: August 13, 2012, 11:21:14 PM by DustyRags »
1976 CB550K- sold
2005 Kawasaki Vulcan 500- sold
2000 CB750 Nighthawk - sold
1975 XL350 - crashed
2004 Suzuki Vstrom 650 - sold

Offline Frostyboy

  • Retired: Never was an
  • Expert
  • ****
  • Posts: 1,227
  • Circa 1951
Re: Cam chain adjust spins round and round + glitter in the oil.... help?
« Reply #28 on: August 14, 2012, 12:49:41 AM »
Good news that you finally got that thing apart. Just go easy with that acetone. It will dissolve rubber, so don't go applying it around your valve stem seals or inlet manifold o rings thinking that it's just a degreaser.
Put it away until you need to remove rubber glue from under old floor tiles.  ;)

[Edit] Does the fact that you're showing the front chain guide in your pics now mean that you were trying to remove the barrel with it still in place?
As you can see, the bottom pin is in the crankcase. the blade has to be out before the barrel will come off. Have a good look in there to be sure it's okay.
Have you downloaded the manual yet?


As for reusing the oil, personally I wouldn't, but if you must, at least run it through an old nylon stocking or something. Anyone got some pantyhose they don't want?  ;)
« Last Edit: August 14, 2012, 04:55:09 AM by Frostyboy »
Last year I joined a support group for procrastinators.
We haven't met yet.
[CB550F1]

Offline Hush

  • Finally they realise that I am an
  • Really Old Timer ...
  • *******
  • Posts: 6,761
  • "Lady, I've heard it all before"!
Re: Cam chain adjust spins round and round + glitter in the oil.... help?
« Reply #29 on: August 14, 2012, 03:53:11 AM »
Brave brave man, I take my hat off to you as such a newbie tackling a major job like this only weeks into bike ownership.
One of the really neat things is that now you will understand what makes your bike tick and if you have a roadside failure in the future you will have a fairly good idea of what has gone wrong.
I love knowing my bikes from the inside out, you learn to trust them more. ;)
I think the thing I most like about motorcycling is the speed at which my brain must process information at to avoid the numb skulls who are eating pies, playing the ukulele, applying make-up etc in the comfort of their airconditioned armchairs as they make random attempts to kill me!!!!!!!

Offline DustyRags

  • I'm not skilled, I'm just a
  • Hot Shot
  • ***
  • Posts: 720
  • Just try it and see what happens
Re: Cam chain adjust spins round and round + glitter in the oil.... help?
« Reply #30 on: August 14, 2012, 07:14:20 AM »
Oh hell, didn't realize there was rubber in the valve stems. Wouldn't that melt in the heat? This is... not good. I was really hoping to avoid rebuilding the head. It's mostly mineral spirits in there- any way to tell without popping the springs? I don't have a spring compressor, and was really, really hoping to avoid rebuilding the head.  Would it be foolish to just ride it and see what happens? >:(

And yeah, we weren't sure how the guide clicked in. It was obviously sandwiched between the head and the pistons, but the diagram doesn't show where those pins click in, so we figured it might have an L-shaped bottom hole since all the manuals and stuff just say "lift, turn 90 degrees and remove" or something. So we went in and checked it out.

Hush- thanks! Brave, and apparently stupid (see: acetone). I got into bikes to learn two things: how to ride and how to wrench. Might as well start with the wrenching :)
« Last Edit: August 14, 2012, 07:17:01 AM by DustyRags »
1976 CB550K- sold
2005 Kawasaki Vulcan 500- sold
2000 CB750 Nighthawk - sold
1975 XL350 - crashed
2004 Suzuki Vstrom 650 - sold

Offline dave500

  • Really Old Timer ...
  • *******
  • Posts: 17,046
  • WHAT?no gravy?
Re: Cam chain adjust spins round and round + glitter in the oil.... help?
« Reply #31 on: August 14, 2012, 01:24:46 PM »
youve gone this far now you should at least decarbonize the head,which means removing the valves,check the guide wear and replace the seals aswell.

Offline TwoTired

  • Really Old Timer ...
  • *******
  • Posts: 21,805
Re: Cam chain adjust spins round and round + glitter in the oil.... help?
« Reply #32 on: August 14, 2012, 01:57:21 PM »
The cam follower next to the tach drive appears to have uneven wear across the flat.  This usually caused by the steel rocker shafts wearing the aluminum cover surfaces, elongating the holes.

At the very least, take measures to stop the shafts from spinning in the cover.  Even better, get a 77-78 cylinder cover that has a factory pinning mechanism to keep the shafts from spinning.

Cheers,
Lloyd... (SOHC4 #11 Original Mail List)
72 500, 74 550, 75 550K, 75 550F, 76 550F, 77 550F X2, 78 550K, 77 750F X2, 78 750F, 79CX500, 85 700SC, GL1100

Those that learn from history are doomed to repeat it by those that don't learn from history.

Offline DustyRags

  • I'm not skilled, I'm just a
  • Hot Shot
  • ***
  • Posts: 720
  • Just try it and see what happens
Re: Cam chain adjust spins round and round + glitter in the oil.... help?
« Reply #33 on: August 14, 2012, 02:07:52 PM »
Dave- *sigh* Yeah, you're probably right. That's the problem with these things- once you do one thing, you might as well do the next until you've done a total rebuild. :P I'll keep it in mind- no promises, though. The compression is great and very even (148-152 all the way across, tested it four times, averages to about 150), so I'm not huge worried about the valves at this point. Except for that damn acetone...

TwoTired- that may be an artifact of the photo, but I'll look into it- good catch. Can you give me a pointer as to what sort of measures you're talking about? This is my first foray into motorcycle mechanics, and first time ever I'm into pistons at all. Total newbie.

Thanks for all the help everyone, without these forums I would never have attempted this at all. With the forums, I'm fairly confident I'll have a rockin' bike by the time I'm done. :)
1976 CB550K- sold
2005 Kawasaki Vulcan 500- sold
2000 CB750 Nighthawk - sold
1975 XL350 - crashed
2004 Suzuki Vstrom 650 - sold

Offline TwoTired

  • Really Old Timer ...
  • *******
  • Posts: 21,805
The real fix is to pin the rocker shafts to keep them from turning.
Another method, which seems" good but has no long term reliability proof, it to simply add oring between the end plugs and the shafts.  Reportedly, this provides enough extra resistance that the rockers pivot on the shafts rather than with the shafts, which stops the wear on the soft aluminum.  I did this to a bike with a brand new cover (based on recommendations).  But, I didn't have the bike long enough afterward to measure it's success.  (Hey, it didn't blow up!)  I prefer to upgrade the cover to 77-78 standards, which means replacement.  Eventually, the rocker shaft bearing surface elongation, causes both cam and rocker contact face destruction.  But, they will still run a good while before a cylinder issue becomes apparent.  It's a durability thing.

Cheers,

Lloyd... (SOHC4 #11 Original Mail List)
72 500, 74 550, 75 550K, 75 550F, 76 550F, 77 550F X2, 78 550K, 77 750F X2, 78 750F, 79CX500, 85 700SC, GL1100

Those that learn from history are doomed to repeat it by those that don't learn from history.

Offline Fritz

  • Hot Shot
  • ***
  • Posts: 521
Re: Cam chain adjust spins round and round + glitter in the oil.... help?
« Reply #35 on: August 14, 2012, 02:30:36 PM »
Dave- *sigh* Yeah, you're probably right. That's the problem with these things- once you do one thing, you might as well do the next until you've done a total rebuild. :P I'll keep it in mind- no promises, though. The compression is great and very even (148-152 all the way across, tested it four times, averages to about 150), so I'm not huge worried about the valves at this point. Except for that damn acetone...

Dave is right: Since you have the head off, it's time to clean it and change the valve stem seals, since they probably are hard as rock. It's not hard to get the valves out. You can build your own spring compressor: http://forums.sohc4.net/index.php?topic=44801.msg536641#msg536641 Instead of the drill press just use a c-clamp.
Or you could take a different approach that TwoTired proposed a while back:
http://forums.sohc4.net/index.php?topic=78618.0

And: Be careful when you put the head cover back on: Back off the valve tappet adjusters and take care that they do not bend the valve stems when you tighten the screws.

Cheers
Carsten
1976 CB550F

Offline DustyRags

  • I'm not skilled, I'm just a
  • Hot Shot
  • ***
  • Posts: 720
  • Just try it and see what happens
TwoTired, I think I get what you're saying- I'll need to poke at the head and figure it out, I don't have it memorized well enough to visualize what you're getting at. I'll make sure it's all up to snuff.

Fritz, thanks for the info on the compressor, I'll look into that. It sounds like I may have already wrecked my valve seals with some thoughtless acetone. I'll do it. Patience is not a virtue I possess, I'm afraid, although I have enough OCD to override that as necessary. It's a good compromise, my failings keep each other in check.

Updating the original To Do list from 8/12:

-Compression check. DONE! 150 all around
-Crack head cover. DONE!
-Crack head gasket. Start list of things I'll need. DONE and STARTED
-Crack base gasket. DONE
-Make a list of everything I need. STARTED (adding "valve seals")
-Cover and store while the parts come in.

New items:
-Drain oil.
-Drop and clean oil pan and strainer.
-Clean, lap and re-seal valves

Next weekend or some evenings between now and then At some point in the hopefully not-too-far future:

-Put it all back together.
-Get riding!


OK, still in the realm of possible, and no doubt. I'm really glad I'm finding these things as I go along, rather than knowing what a job it would be ahead of time. I never would have started it!
1976 CB550K- sold
2005 Kawasaki Vulcan 500- sold
2000 CB750 Nighthawk - sold
1975 XL350 - crashed
2004 Suzuki Vstrom 650 - sold

Offline Fritz

  • Hot Shot
  • ***
  • Posts: 521
Quote
Updating the original To Do list from 8/12:
...

You forgot:
- read the CB500/550 workshop service manual
- read the service manual again
- buy a torque wrench

Without the torque wrench you will end up repairing threads in the cylinder head. All the values are in the service manual :)

Also you might want to read the Honda Common Service manual. There's a lot of general information about doing things right:
http://forums.sohc4.net/index.php?topic=17788.0

Cheers

1976 CB550F

Offline DustyRags

  • I'm not skilled, I'm just a
  • Hot Shot
  • ***
  • Posts: 720
  • Just try it and see what happens
Oh, yeah! I have the Honda factory manual, and a Clymer manual, and all you good folks. I don't personally own a torque wrench, but I'm doing all this work in my brother's garage, and he has one. He also has a crusty old biker neighbor with every tool imaginable who's all about two young bucks going heads-down in the cylinders :)
1976 CB550K- sold
2005 Kawasaki Vulcan 500- sold
2000 CB750 Nighthawk - sold
1975 XL350 - crashed
2004 Suzuki Vstrom 650 - sold

Offline DustyRags

  • I'm not skilled, I'm just a
  • Hot Shot
  • ***
  • Posts: 720
  • Just try it and see what happens
Made some phone calls today, and sourced a gasket kit (Vesrah), pucks and misc. parts like screws, bolts, etc. Anybody here dealt with Charlie's Place in San Francisco? Sounds like they'll be able to hook me up with just about anything I need. Ordered the gasket kit through Hayasa Motorbikes in Oakland (gotta support the local guy, and he's been great with advice), and picking up the rest at Charlie's.

I also got some Aircraft stripper, and applied that to the crusty old gasket surfaces. It was amazing, all of a sudden the stuff the had been like plastic became more like... well, softer plastic. Now it's like scraping the teflon off a pan, and not the pan off the teflon. It also eats through nitrile gloves at the rate of a pair every five minutes, and was dissolving the 3M pad I was scrubbing with, but that's how you know it's working, right?

Next step is getting some proper solve-resistant gloves. The gaskets should come in Friday, and if I had been smart, I would have remembered to grab the various screws and stuff I need so I can pick up new ones at Charlie's on my lunch break. That may have to be on Monday. With some luck, we'll get everything cleaned this weekend, and then maybe start building next week or the following weekend.
1976 CB550K- sold
2005 Kawasaki Vulcan 500- sold
2000 CB750 Nighthawk - sold
1975 XL350 - crashed
2004 Suzuki Vstrom 650 - sold

Offline Frostyboy

  • Retired: Never was an
  • Expert
  • ****
  • Posts: 1,227
  • Circa 1951
It sounds like it's all coming together for you Dusty. Well done.
I know you've sourced a replacement tensioner, but just so you know David Silvers have new tensioners in stock at the moment. Not cheap but are from original manufacturer.
They also have replacement blade for the tensioner if your acquired one is showing any sign of wear & the front guide as well.

Tensioner: http://www.davidsilverspares.co.uk/CB550F1-SUPER-SPORT-1976/part_176173/
Tensioner blade: http://www.davidsilverspares.co.uk/CB550F1-SUPER-SPORT-1976/part_4942/
Front guide: http://www.davidsilverspares.co.uk/parts/by-part-number/partnumber_13368/
Cheers.
Last year I joined a support group for procrastinators.
We haven't met yet.
[CB550F1]

Offline DustyRags

  • I'm not skilled, I'm just a
  • Hot Shot
  • ***
  • Posts: 720
  • Just try it and see what happens
I saw those, thanks! The tensioner I have has some wear, but not much. I checked out how the chain runs over it, and it looks like the tensioner has an initial wear period where the links (the side bar thingies) run directly over the tensioner, and then the wear slows down as the weight is transferred to the rollers. It's got that initial wear, but it's not bad. I'm inclined to go with this, and in a pinch I can always pop the head cover and just change out that bit later (I think...) :P

But I'm kicking myself for not grabbing the screws and stuff I need to replace! Now I can't make a lunchtime run down to the shop in San Francisco that has them, and I don't think I'll have access to the garage tonight. That means a special trip on Saturday, or nothing 'till next week. The impatience! It kills me!

...but let's be honest, I'll be spending this weekend scrubbing parts and lapping valves anyhow. At least my gaskets should come in tomorrow! :)
1976 CB550K- sold
2005 Kawasaki Vulcan 500- sold
2000 CB750 Nighthawk - sold
1975 XL350 - crashed
2004 Suzuki Vstrom 650 - sold

Offline DustyRags

  • I'm not skilled, I'm just a
  • Hot Shot
  • ***
  • Posts: 720
  • Just try it and see what happens
More shopping! Damn, this is getting expensive!

Picked up a soft brass-bristle brush to scrub down the mating surfaces. Hopefully that'll get some of the gunk off, and shouldn't mar the aluminum. Also picked up a box of new nitrile gloves, and a pair of heavy-duty chem gloves. Hopefully those won't melt in the Aircraft paint stripper.

And my gasket kit came in! Very excited. This is most of what I need to put it all back together, aside from some random nuts and screws I can pick up at Charlie's Place in SF.

I've been thinking about paint, too. The old paint needs to go- it's damaged, and just regular rustoleum. I'm thinking I'll strip it off, do a few coats of automotive rustoleum (deals with gasoline spills much better, and generally better for this sort of thing). I'm thinking flat black with a wide, off-center stripe down the tank and rear fender (currently black). Leave the front fender chrome. I've got a viper fairing too that has the bottom chopped so it's rounded off under the headlight- I'd love to figure out how to fit that without going back to drop bars, and then probably do a matching matte black with with stripe paint job on it. Thoughts?

Gaskets!

1976 CB550K- sold
2005 Kawasaki Vulcan 500- sold
2000 CB750 Nighthawk - sold
1975 XL350 - crashed
2004 Suzuki Vstrom 650 - sold

Offline DustyRags

  • I'm not skilled, I'm just a
  • Hot Shot
  • ***
  • Posts: 720
  • Just try it and see what happens
Check out what I got clean! I hit them with a liberal amount of Aircraft paint stripper a number of times, scrubbed away with a 3M pad (correction, four of them), tried a brass-bristle brush (better), shaved bits off with a razor blade, and they were mostly clean. Then a friend of mine dropped by, and suggested lapping them with 220 grit sandpaper and a flat piece of wood (before anyone howls at me- this guy's a retired aerospace machinist and has half a century motorcycle mechanic experience; I trust him). A bit of a sandpaper and voila, the mating surfaces are CLEAN! Still need to clean the outside, though. I also sanded the sleeves while I was at it, so now all that remains is the outside, cleaning the carbon out of the heads, and doing the valves.

Question on that- since the valves sealed perfectly, do I need to lap them if I put in new seals?

I haven't gotten around to the crank case surface yet (last one! LAST ONE!), but I got the oil drained out of it and shop rags stuffed in the openings to keep debris out. My friend checked over the rockers and pistons for me and pronounced them all to be in grand shape, so I'm pretty chuffed. It's been a long day of scraping and scouring, but I made some serious progress. Next is the crank case surface, picking up some bits and pieces from the shop, finish cleaning stuff and ten build!

1976 CB550K- sold
2005 Kawasaki Vulcan 500- sold
2000 CB750 Nighthawk - sold
1975 XL350 - crashed
2004 Suzuki Vstrom 650 - sold

Offline dave500

  • Really Old Timer ...
  • *******
  • Posts: 17,046
  • WHAT?no gravy?
yep lap the valves in,itll give them a fresh seal again,the stems dont wobble in the guides?

Offline DustyRags

  • I'm not skilled, I'm just a
  • Hot Shot
  • ***
  • Posts: 720
  • Just try it and see what happens
Got it, I'll make sure to do 'em. I haven't checked the stems yet, but given how clean everything else is on this engine, I don't anticipate any problems (jinx! JINX!)

It seems to me (and correct me if I'm wrong here) that if they seal as well as they seem to, then it shouldn't take much to lap them, yes? Just enough to get a nice even ring around the middle of the curve? And I assume I pull the seals out, lap the valves, and then put the new seals back in?

My goal is to get in there some evening this week and to finish cleaning the crank case to match the bottom of the cylinders, and then get the valves pulled apart and cleaned another evening, maybe get the sump cleared as well, lap the valves on a third day, and then should be ready to start building.

Man, if I had a clue how far this would spiral out of control I never would have started, but I'm really, really glad I'm doing it. I'm learning so much about how these things work, and it's amazingly rewarding to dive into this thing. It already feels more like "my" bike than my car does... and I've hard the bike less than a month, and the car for most of a year.
1976 CB550K- sold
2005 Kawasaki Vulcan 500- sold
2000 CB750 Nighthawk - sold
1975 XL350 - crashed
2004 Suzuki Vstrom 650 - sold

Offline LesterPiglet

  • Old Timer
  • ******
  • Posts: 4,046
  • 1977 CB550F2
It's easy to form an attachment to these old bikes.
'Then' and 'than' are completely different words and have completely different meanings. Same with 'of' and 'have'. Set and sit. There, their and they're. Draw and drawer. Could care less/couldn't care less. Bought/brought FFS.


Les Ross.            Certified by a Professional

Offline DustyRags

  • I'm not skilled, I'm just a
  • Hot Shot
  • ***
  • Posts: 720
  • Just try it and see what happens
BOOYA, BITHCES!!

*ahem* 'Scuse me.

Ladies and gents, I got the last of the mating surfaces clean and sanded flat and smooth! Turns out I was being too patient with the beastly chemical stripper I was using- I shoulda hit these things about two minutes after it went on, and it woulda gone much easier. Got most of it dissolved and scrubbed off, then the last stubborn bits shaved off with a razor, and the whole thing lapped with 220 grit. Silky smooth and flat throughout. Very happy!

Next up: Get that shiny spot sanded out of the pistons, clean the outside of the crank case, cylinder block and head, refurbish the head, drop and clean the oil pan and strainer, and then start building! Tomorrow I'm hitting the Charlie's Place in SF to pick up some pucks and  screws (really really! I mean it this time!).

The only down side? My assistant/host is going out of town for a week starting Friday. I'll have a key to his garage, but I lose the extra pair of hands.

1976 CB550K- sold
2005 Kawasaki Vulcan 500- sold
2000 CB750 Nighthawk - sold
1975 XL350 - crashed
2004 Suzuki Vstrom 650 - sold

Offline dave500

  • Really Old Timer ...
  • *******
  • Posts: 17,046
  • WHAT?no gravy?
good job,its apart and your being thorough,take those pistons of to clean them,dont touch that shiny spot on the pistons unless its rough feeling, run a one mil drill bit through the oil holes and get the carbon of the crowns,clean the ring grooves,check the ring gap in the bores,you should hone and really use new rings youve gone this far,plug that oil hole where the restriction dowel goes in,any crud falling in here will block that tiny restriction dowell.

Offline DustyRags

  • I'm not skilled, I'm just a
  • Hot Shot
  • ***
  • Posts: 720
  • Just try it and see what happens
OK, just to clarify- is there a restrictor down in the oil hole, or just the one up higher? One of them got a bit of paper fuzz inside it that I still need to get out.

The pistons, other than the crowns, are totally clean. I had a machinist look the whole thing over and he pronounced it good throughout (yay!) but he also suggested getting some fine-grit sandpaper on the smooth spot so it'd drag oil up into the barrel rather than creating a hot spot. Thoughts? His opinion was that there was so little wear throughout it wouldn't make much sense to do any sort of honing, just a quick bit of cross-sanding on the cylinders and pistons so everything re-seats and oils properly.

Also (and I hate to say this) I do need to do this on the cheap where possible. I'm looking to create a bike I can learn riding on, not a concourse piece. If it survives my tyro antics for a couple of years, I'll do a full and proper rebuild in a couple of winters. :)

Thanks for the help!
1976 CB550K- sold
2005 Kawasaki Vulcan 500- sold
2000 CB750 Nighthawk - sold
1975 XL350 - crashed
2004 Suzuki Vstrom 650 - sold