Author Topic: Setting Your Points  (Read 12739 times)

0 Members and 1 Guest are viewing this topic.

Offline bjbuchanan

  • Master
  • *****
  • Posts: 2,276
Setting Your Points
« on: May 03, 2013, 01:53:43 PM »
Alright I know there have been many posts here about the subject but I think I can help clear up some issues that guys have had. I attempted to clean my advancer yesterday when all hell broke loose and nothing would work when put back together. I'm attempting to consolidate all of the tips/tricksissues /in to one source to save the headache it took me with endless searching and digging in the search bar.

 Advancer cam issues, point plate issues and utilizing the daichi points. With the jap points I had no issues, no experience with the apparently troublesome chinese ones. This elementary and pointless for some but this thread isn't for you guys. If you have some ideas to make this a good source thread lets hear it, chime in

My setup is a late 72 cb750 engine with stock advancer, japanese daichi points, not chinese along with a Hondaman ignition box setup

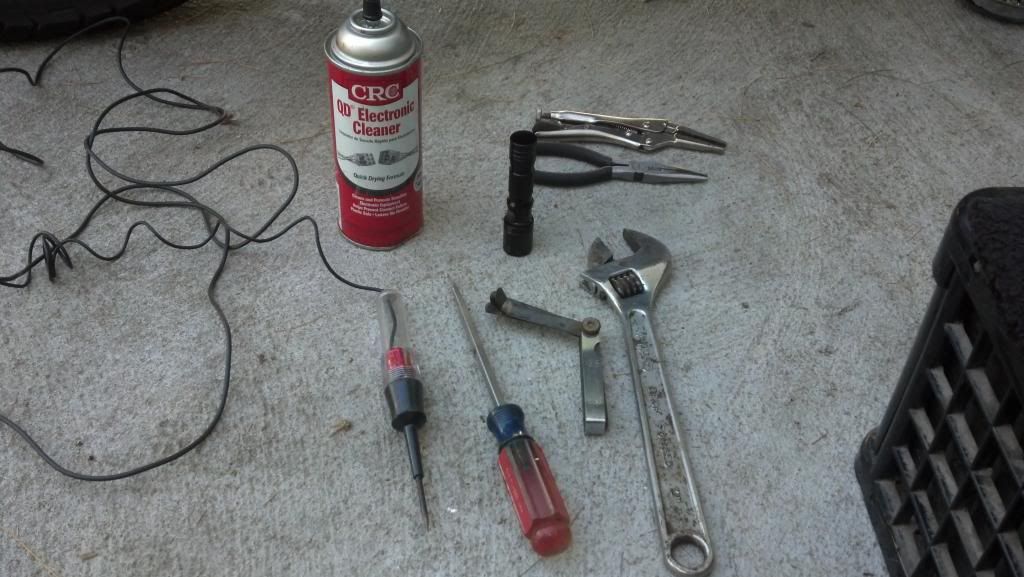
The tools I used, very low brow stuff. Use a cheap one LED test light, it lights up with very low current


Lubing up the advancer make sure when reassembling that you orient the cam mark to the mark on the plate. If not your bike will fire ~180 off the mark so no bueno. When reassembling back in place put the advancer male peg in and turn CCW so it that little bit of wiggle/tolerance is eliminated in that direction. The pic below is a circle of the cam marks
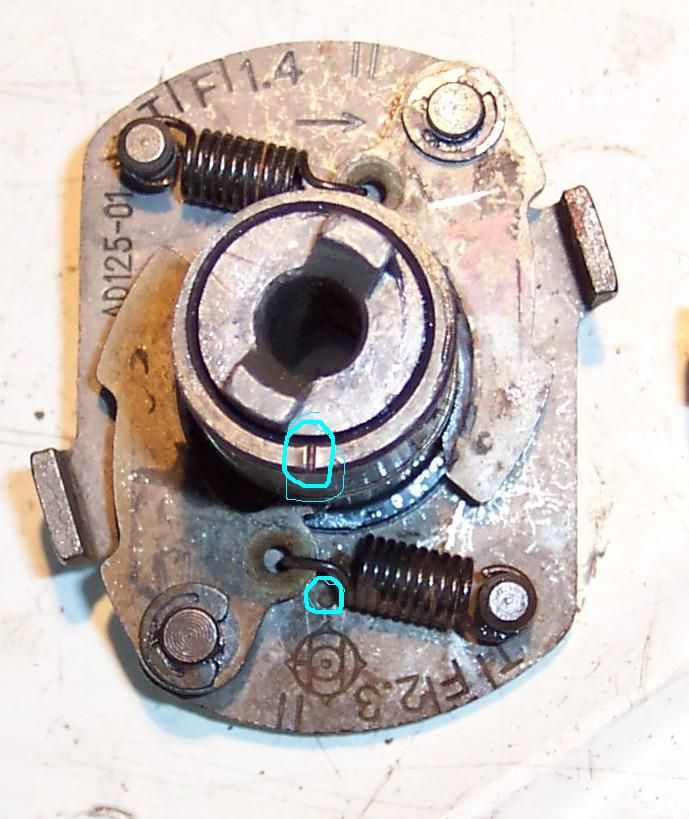


When attempting to set the 1-4 gap you want the ear of the spark advancer showing in the window. The mark past t and f, that corner mark where you would leave it for a cam chain adjustment as well. This will be your high point on the advancer cam there. Now is the start of issues with some plates. TTired originally authored this but shim up your points plate. I needed a .05 on the bottom right and this fixed my inability to nail the timing. Before this shim even a .09 points gap couldn't get me on the money.
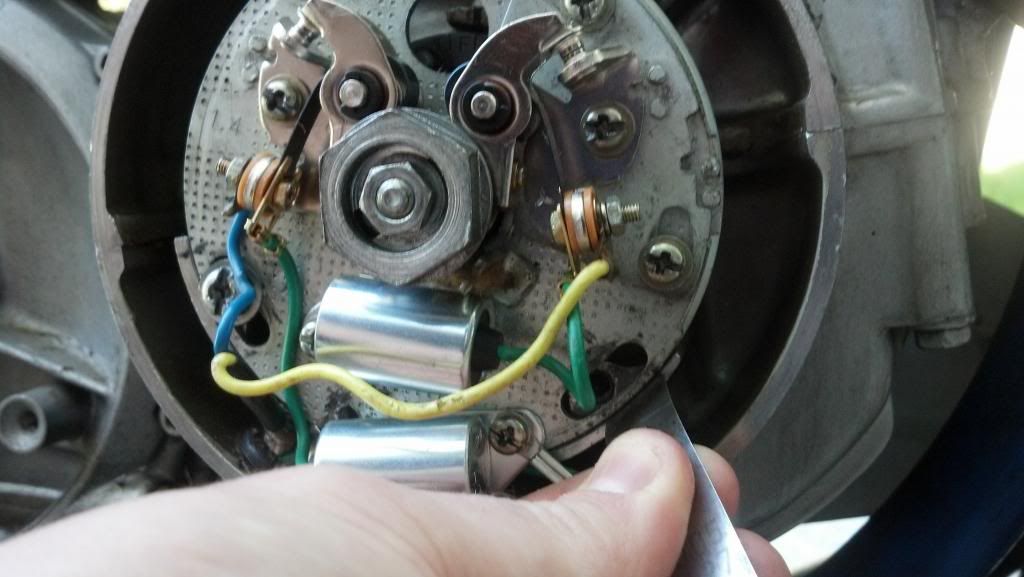


Loosen the plate, ram the shim home, tighten the adjustment screws back down. Now your plate discrepancy has been handled.

Now remember that after you set your points gaps for both 1-4 and 2-3 you gotta probably swivel the plate to bring in that dead on spot with the timing light. If you are gonna loosen the main plate, you must remember to put your shim in there til it is cinched back down. If not you just reintro'd your discrepancy. Keep using the shim to eliminate it. For those not used to setting the points remember that the light will switch on when you open the points. That is when you stop turning the big nut and see how close you are. The main idea is to see that light switch when you hit that f hash mark if not keep fiddling. The place to place the test lead is on the yellow or blue wire where it attaches to the points it is plenty sufficient.

**You may need slightly different shims, or if you are one of those lucky guys maybe you don't need any of that deal. But insert the shim with the points detached to create slack or attempt to force that shim in there. Don't eyeball it, it isn't gonna work like that. Get the biggest shim in there that will go without ruining the feeler

Hope this helps somebody like me, I know I could have used it about noon yesterday

Brian


The dirty girl-1976 cb750k, Ebay 836, Tracy bodykit
Round top carbs w/ 38 pilots, middle needle position, airscrew 7/8ths out, 122 main jet
Stock airbox w/ drop in K&N, Hooker 4-1

Don't trust me alone with a claw hammer and some pliers

Offline dave500

  • Really Old Timer ...
  • *******
  • Posts: 17,022
  • WHAT?no gravy?
Re: Setting Your Points
« Reply #1 on: May 03, 2013, 02:05:09 PM »
also if you have any worn out screw heads get new ones,it saves a lot of frustration and helps with accuracy.

Offline LesterPiglet

  • Old Timer
  • ******
  • Posts: 4,046
  • 1977 CB550F2
Re: Setting Your Points
« Reply #2 on: May 03, 2013, 02:44:04 PM »
When I have everything where it should be I scribe marks between the plates and the casing for future reference.
Handy to have this. Thanks BJ.
'Then' and 'than' are completely different words and have completely different meanings. Same with 'of' and 'have'. Set and sit. There, their and they're. Draw and drawer. Could care less/couldn't care less. Bought/brought FFS.


Les Ross.            Certified by a Professional

Offline dave500

  • Really Old Timer ...
  • *******
  • Posts: 17,022
  • WHAT?no gravy?
Re: Setting Your Points
« Reply #3 on: May 04, 2013, 01:51:05 AM »
great detailed explanation,im glad you show the index marks for the cam to body alignment bjbuchanan,,some might get this detail wrong,,thats a daichi advancer you show,the index mark is the logo,,on the "tec" ones its simply a hole and its not exactly squared up,,but if its 180 out its obvious,the cams index mark can be a dot or a scribe not always very well made,like shallow and short etc,look close.

Offline Xnavylfr

  • Expert
  • ****
  • Posts: 1,102
  • Beers, Babes and bikes since 1965
Re: Setting Your Points
« Reply #4 on: May 04, 2013, 06:50:59 AM »
You said After setting the point gaps you'll need to swivel the back plate!!
Once you move the plate around your POINTS timing will NOT be correct because by moving the back plate you have changed the position at which the points open and close on the cam lobe.It usually takes 2 or 3 times to get the gap and timing spot on because EVERY TIME you move the back plate it moves the opening position of the points!


Xnavylfr(CHUCK)

Offline bjbuchanan

  • Master
  • *****
  • Posts: 2,276
Re: Setting Your Points
« Reply #5 on: May 04, 2013, 01:15:32 PM »
You said After setting the point gaps you'll need to swivel the back plate!!
Once you move the plate around your POINTS timing will NOT be correct because by moving the back plate you have changed the position at which the points open and close on the cam lobe.It usually takes 2 or 3 times to get the gap and timing spot on because EVERY TIME you move the back plate it moves the opening position of the points!


Xnavylfr(CHUCK)
**Edited**
I didn't want to get in to that actual procedure of setting the points, that is more a routine thing you can grab from any manual out there. I wanted to highlight issues from production tolerances that can make or break what should be a simple job

Dave I ripped the picture from one of the threads I sourced. I wanted to give guys something to work with because it took me some time to dredge up that clear pic, it will ballpark you.

Thanks for the compliments and inputs
« Last Edit: May 04, 2013, 03:55:58 PM by bjbuchanan »
The dirty girl-1976 cb750k, Ebay 836, Tracy bodykit
Round top carbs w/ 38 pilots, middle needle position, airscrew 7/8ths out, 122 main jet
Stock airbox w/ drop in K&N, Hooker 4-1

Don't trust me alone with a claw hammer and some pliers

Offline Dream750

  • Hot Shot
  • ***
  • Posts: 583
Re: Setting Your Points
« Reply #6 on: May 04, 2013, 01:58:00 PM »
The 750K advancer in the OP’s first post is made by Hitachi, not Daichi.

The 12/71 Honda published K0 to K2 750 parts book confirms this and note the Hitachi corporate logo.

Click/double click diagrams for largest view:

Offline dave500

  • Really Old Timer ...
  • *******
  • Posts: 17,022
  • WHAT?no gravy?
Re: Setting Your Points
« Reply #7 on: May 04, 2013, 02:42:21 PM »
thanks for clearing that up dream.

Offline JeffSTL

  • Hot Shot
  • ***
  • Posts: 392
  • CB750 K6
Re: Setting Your Points
« Reply #8 on: May 09, 2013, 03:15:42 PM »
I guess I don't understand how you know if you need to shim the plate, what direction you would need to shim or how you would measure such a thing.

Offline bjbuchanan

  • Master
  • *****
  • Posts: 2,276
Re: Setting Your Points
« Reply #9 on: May 09, 2013, 04:32:17 PM »
Chances are you will probably need even a small shim. The thing is the measurements are just so small you can't feel it or eyeball it you gotta just insert a .002 and see if it fits

If it does, try the 3, then the 4, I made it all the way up to .005 on that bottom right corner.

 Watch the points carefully when you insert the correct shim, you will see movement, the points will spread about the same amount as that shim. Even with a too small shim you can see the difference

The direction or orientation of the shim is in my opinion related to the direction and angle the 1-4 points open. Think of the bottom right corner as the base of an angle and extend it to the two point faces. Shifting the points respective to that origin will change how open they are

The dirty girl-1976 cb750k, Ebay 836, Tracy bodykit
Round top carbs w/ 38 pilots, middle needle position, airscrew 7/8ths out, 122 main jet
Stock airbox w/ drop in K&N, Hooker 4-1

Don't trust me alone with a claw hammer and some pliers

Offline la ca fe

  • Enthusiast
  • **
  • Posts: 139
Re: Setting Your Points
« Reply #10 on: May 09, 2013, 08:47:10 PM »
Great info, thanks for the detailed description. I will give it a try in the morning. :)
1973 cb750
1977 cb750k
1975 cb750 f

Offline 750K

  • Expert
  • ****
  • Posts: 1,392
Re: Setting Your Points
« Reply #11 on: June 12, 2013, 09:16:52 AM »
Yes thanks, forgot to thank you bj a week or two ago. Shimming the plate made all the differance between hitting the F mark and not hitting it.
77 Cb750, 78 Kz1000

Offline 74750k4

  • Hot Shot
  • ***
  • Posts: 459
Re: Setting Your Points
« Reply #12 on: July 03, 2013, 10:32:19 AM »
Nice clear photos. Especially the points cam on the advancer. This could have saved me some time if I had only seen it sooner. I spent a few hours messing around with this after pulling my Dyna S off last night. PITA!
I need to try the shimming too, because the timing just did not seem to line up properly at all. A bit confusing in the shim thickness description. .05 and then, .005, I'm sure it must be one of those two :)

Offline 74750k4

  • Hot Shot
  • ***
  • Posts: 459
Re: Setting Your Points
« Reply #13 on: July 03, 2013, 01:12:49 PM »
wouldn't it be easier to wrap the edge of the points plate?

Offline TwoTired

  • Really Old Timer ...
  • *******
  • Posts: 21,805
Re: Setting Your Points
« Reply #14 on: July 03, 2013, 01:47:42 PM »
wouldn't it be easier to wrap the edge of the points plate?

No No No.  It has to be rt's way or you're a dumb ass!  Tape and bailing wire are really the classy way to repair things that behave as intended!

For those who insist on strobe timing, I've already mentioned an alternative to shims or stacking feeler gauges, and that is to make the main timing plate fit with zero tolerance in the engine bosses.  Peening or slightly flattening the area of the plate that engages the bosses, essentially makes the plate grow in diameter at the important places to where shimming, duct tape, or other post apocalypse hill billy BS repair schemes are no longer needed.
Lloyd... (SOHC4 #11 Original Mail List)
72 500, 74 550, 75 550K, 75 550F, 76 550F, 77 550F X2, 78 550K, 77 750F X2, 78 750F, 79CX500, 85 700SC, GL1100

Those that learn from history are doomed to repeat it by those that don't learn from history.

Offline 74750k4

  • Hot Shot
  • ***
  • Posts: 459
Re: Setting Your Points
« Reply #15 on: July 03, 2013, 01:57:10 PM »
Good point...  er  peen. Gotta try that over hillbilly stuff. I always keep a good supply of baling wire, tie wraps, and duct tape on had though, ya' just never know... :)

Offline 750K

  • Expert
  • ****
  • Posts: 1,392
Re: Setting Your Points
« Reply #16 on: July 03, 2013, 03:48:59 PM »
Come on now TT, if duct tape is good enough for Red Green it's good enough for me. I am Canadian after all.
77 Cb750, 78 Kz1000

Offline Kickstart

  • Expert
  • ****
  • Posts: 796
Re: Setting Your Points
« Reply #17 on: July 03, 2013, 05:51:39 PM »
Not sure if this makes me a dumb-ass or a hill billy, but I like to cut off a piece of feeler gauge (from an old feeler gauge set), bend it 90 degrees, and wedge between the post and the plate (with half of the piece of feeler gauge behind the back of the plate - holding it in place)

I think it makes it a little easier to adjust the timing with a strobe light as I can turn the plate and there's less chance of the gauge falling out. 

Is it better to adjust the timing with a strobe light or static?... I always thought it was better to adjust the timing at full advance.
- Chris
75' CB750F Orange flake (rider)
75' CB750F Blue (Project)
75' CB750F Painted black (Project)
No Reserve Racing #171 AHRMA

Offline TwoTired

  • Really Old Timer ...
  • *******
  • Posts: 21,805
Re: Setting Your Points
« Reply #18 on: July 03, 2013, 06:13:18 PM »
Is it better to adjust the timing with a strobe light or static?... I always thought it was better to adjust the timing at full advance.

I've been a techie since the late 60s.  Routinely used a strobe, as a carryover from my car hot rodding days.  So, the bike got that treatment, too, for many years.  Then I followed the shop manual lamp method, and found I can't tell that the bike runs any different on the street whether using the strobe or lamp.  Even the MPG is the same.

I suppose if I was at the track racing for timeslips, I'd look for any possible edge I might get and insist on strobe.  Still need the strobe to check the advance mechanism every 5 years, or so.  These bikes just aren't that demanding of attention, imo, as long as they get restored to near original condition. 

It's like hot rods, the more you modify and "improve" them, it seems the more attention they require to keep them at their peak.  Something about well rounded engineering, I think.  Probably won't get agreement from the many customizers here, though.
Lloyd... (SOHC4 #11 Original Mail List)
72 500, 74 550, 75 550K, 75 550F, 76 550F, 77 550F X2, 78 550K, 77 750F X2, 78 750F, 79CX500, 85 700SC, GL1100

Those that learn from history are doomed to repeat it by those that don't learn from history.

Offline bjbuchanan

  • Master
  • *****
  • Posts: 2,276
Re: Setting Your Points
« Reply #19 on: July 04, 2013, 09:59:01 AM »
Troll much?^^^

I found with pretty good repeatability that the points set at static with the shim and checked with the strobe both points are about perfect at the advancer. Needed no adjustment so there was no need for some crazy finesse or schemes to keep the shim in place

As for shim size I must have left out a zero in my write up. Not everybody's tolerance is the same could be more or less you gotta find out for yourself
The dirty girl-1976 cb750k, Ebay 836, Tracy bodykit
Round top carbs w/ 38 pilots, middle needle position, airscrew 7/8ths out, 122 main jet
Stock airbox w/ drop in K&N, Hooker 4-1

Don't trust me alone with a claw hammer and some pliers

Offline 750K

  • Expert
  • ****
  • Posts: 1,392
Re: Setting Your Points
« Reply #20 on: July 04, 2013, 10:02:12 AM »
I'm in the same boat as bj, with a shim in while static timing I was bang on with the strobe at idle and advance. So there was no need to rotate the plate after static timing was done.
77 Cb750, 78 Kz1000

Offline KRONUS0100

  • MAD MATT THE MANIAC
  • Expert
  • ****
  • Posts: 1,217
Re: Setting Your Points
« Reply #21 on: July 20, 2013, 04:48:20 AM »
just read this.  very important info here i did not realize.  i dont need to shim the plate, but i did not know about advance cam markings........even though i did try the thing 180 from where i had it.  will go out and get a "timing" light and try again this afternoon.
MATT
current bikes:  1976 CB750F, 1981 GS1100E
bikes owned:1981 GL1100I, 1990 GS500E, 1981 GS850, 1977 and 1979 GS750, 1974 CB750, 1975 CB750, and a 1982 GS750E

Offline ncstatecamp

  • Expert
  • ****
  • Posts: 799
Re: Setting Your Points
« Reply #22 on: July 20, 2013, 02:19:30 PM »
Could someone tell me why I would have to advance/retard (not sure which) my plate all the way to get it to line up? Would this be part of the shim solution?

Offline Trevor from Warragul

  • Expert
  • ****
  • Posts: 1,086
Re: Setting Your Points
« Reply #23 on: July 20, 2013, 04:06:58 PM »
Another tip - if you have the points plate off the bike, put some white paint on the 1-4, 2-3, F, T, marks, etc, then wipe the excess off with a cloth.  It makes it much easier to see the marks (especially if your eyesight aint what it used to be)

Trevor
1971 Kawasaki H1A
1972 Honda CB350F
1976 Moto Morini 3 1/2 Sport
1978 Honda CBX
1997 Suzuki Bandit 1200
1999 Ducati Monster 750

Offline bjbuchanan

  • Master
  • *****
  • Posts: 2,276
Re: Setting Your Points
« Reply #24 on: July 20, 2013, 06:17:42 PM »
Could someone tell me why I would have to advance/retard (not sure which) my plate all the way to get it to line up? Would this be part of the shim solution?

It "could" be, that was part of the point of creating the thread. I had real issues, like running out of adjustment and still not getting a good gap. Try screwing with the points plate like I said, you don't actually need feelers but they are conveniently small in size. See if with the timing plate shoved upwards you now can actually set the points
The dirty girl-1976 cb750k, Ebay 836, Tracy bodykit
Round top carbs w/ 38 pilots, middle needle position, airscrew 7/8ths out, 122 main jet
Stock airbox w/ drop in K&N, Hooker 4-1

Don't trust me alone with a claw hammer and some pliers