Author Topic: High altitude 73 CB500 daily driver ( 5/20/17 update )  (Read 33098 times)

0 Members and 3 Guests are viewing this topic.

Offline Desert Dan

  • Some might call me an
  • Enthusiast
  • **
  • Posts: 137
So I did the 100mile break in oil change and tune up the other day and everything is looking good and kosher engine wise. There was a good amount of magnetic sludge stuck to the magnets on the oil filter and magnetic drain plug indicating good ring break in, in total there was probobly 3-4 teaspoons of sludge between the oil pan and magnets. I didn't see much in the way of black rubber sludge from the break in of the new cam chain slipper and guide but I suppose it will take a little more than 100 miles for those to wear in properly. I re-tuned the carbs since I had the gas tank off just so I could get more control of the rpm using the idle adjust screw on the carb rack, I then went on a quick 20 mile jaunt. I am tickled pink by how well the bike rides after all the work Ive put in to it, the engine is so smooth the cheap Emgo mirrors I installed don't vibrate enough to make the view in the mirrors blurry until I get over 6k rpms. What are everyones thoughts on the second oil change? I was going to do it at 1500 followed by every 3k after that.
 Just for fun I took a few gratuitous driveway pictures of the bike. I don't think it looks half bad considering many of the cosmetic parts came off of wrecked bikes from the local bike yard.


This is my syncing set up for the carbs

Offline HondaMan

  • Someone took this pic of me before I became a
  • Really Old Timer ...
  • *******
  • Posts: 14,040
  • ...not my choice, I was nicknamed...
    • Getting 'em Back on the Road
What a beauty, Dan!
Looking forward to actually 'touching' it. Come on Sunday? (Shelves are on Saturday.) I'll be here after "church hours", about 2 PM or so.
See SOHC4shop@gmail.com for info about the gadgets I make for these bikes.

The demons are repulsed when a man does good. Use that.
Blood is thicker than water, but motor oil is thicker yet...so, don't mess with my SOHC4, or I might have to hurt you.
Hondaman's creed: "Bikers are family. Treat them accordingly."

Link to Hondaman Ignition: http://forums.sohc4.net/index.php?topic=67543.0

Link to My CB750 Book: https://www.lulu.com/search?adult_audience_rating=00&page=1&pageSize=10&q=my+cb750+book

Link to website: www.SOHC4shop.com

Offline SOHC4 Cafe Racer Fan

  • Speak up, Whipper-Snapper! I'm a
  • Really Old Timer ...
  • *******
  • Posts: 15,552
  • SOHC/4 Member #1235
That's a beauty, Dan. 
1975 CB550K1 "Blue" Stockish Restomod (http://forums.sohc4.net/index.php?topic=135005.0)
1975 CB550F1 frame/CB650 engine hybrid "The Hot Mess" (http://forums.sohc4.net/index.php/topic,150220.0.html)
2008 Triumph Thruxton (http://forums.sohc4.net/index.php/topic,190956.0.html)
2014 MV Agusta Brutale Dragster 800
2015 Yamaha FZ-09 (http://forums.sohc4.net/index.php/topic,186861.0.html)

"There are some things nobody needs in this world, and a bright-red, hunch-back, warp-speed 900cc cafe racer is one of them — but I want one anyway, and on some days I actually believe I need one.... Being shot out of a cannon will always be better than being squeezed out of a tube. That is why God made fast motorcycles, Bubba." Hunter S. Thompson, Song of the Sausage Creature, Cycle World, March 1995.  (http://www.latexnet.org/~csmith/sausage.html and https://magazine.cycleworld.com/article/1995/3/1/song-of-the-sausage-creature)

Sold/Emeritus
1973 CB750K2 "Bionic Mongrel" (http://forums.sohc4.net/index.php?topic=132734.0) - Sold
1977 CB750K7 "Nine Lives" Restomod (http://forums.sohc4.net/index.php?topic=50490.0) - Sold
2005 RVT1000RR RC51-SP2 "El Diablo" - Sold
2016+ Triumph Thruxton 1200 R (http://forums.sohc4.net/index.php/topic,170198.0.html) - Sold

Offline Desert Dan

  • Some might call me an
  • Enthusiast
  • **
  • Posts: 137
Thanks for all the kind words everybody, I definitely couldn't have gotten the 500 put together and running so well just in time for riding season without the help of everybody on the forums. I'd also like to Thank Mark aka Hondaman for all the help and knowledge he gave me the head he worked on came out beautifully and is working great. I'de also like to thank Andrew K who is a member of this great forum and gave me the great deal on the 550 head, cam shaft and valve cover. And Mark Im excitedly looking forward to bringing the bike down to you sunday so long as this nice weather we are having holds up.
  This morning was a gorgeous day in Colorado so I took the 500 out for a 60 mile round trip cruise to Red Rocks park and amphitheater where I took a few more beauty shots amongst the amazing rocks of the Morrison formation


Offline HondaMan

  • Someone took this pic of me before I became a
  • Really Old Timer ...
  • *******
  • Posts: 14,040
  • ...not my choice, I was nicknamed...
    • Getting 'em Back on the Road
Next you'll have to get shots at Milner Pass, top of Mt. Evans, and all along my favorite, the Million Dollar Hiway!
See SOHC4shop@gmail.com for info about the gadgets I make for these bikes.

The demons are repulsed when a man does good. Use that.
Blood is thicker than water, but motor oil is thicker yet...so, don't mess with my SOHC4, or I might have to hurt you.
Hondaman's creed: "Bikers are family. Treat them accordingly."

Link to Hondaman Ignition: http://forums.sohc4.net/index.php?topic=67543.0

Link to My CB750 Book: https://www.lulu.com/search?adult_audience_rating=00&page=1&pageSize=10&q=my+cb750+book

Link to website: www.SOHC4shop.com

Offline Desert Dan

  • Some might call me an
  • Enthusiast
  • **
  • Posts: 137
Thats hopefully the plan! I want to ride this bike all over Colorado this summer with a few multi day trips to the furthest corners of the state mixed in. Im starting out with short trips to build up confidence in my riding ability and my confidence in the bikes reliability. In my VW bus if I take it on a trip further than 100 miles one way I usually toss a to-go tool box in the back incase of breakdown, but storage space in the bike is somewhat more limited :D.   

Offline HondaMan

  • Someone took this pic of me before I became a
  • Really Old Timer ...
  • *******
  • Posts: 14,040
  • ...not my choice, I was nicknamed...
    • Getting 'em Back on the Road
Dan's done a GREAT job of bringing this poor, abused 500 back to life. It looks better in real life than in the pix, and runs fine!
Y'all ought to see it someday, it's cool!
 :D
See SOHC4shop@gmail.com for info about the gadgets I make for these bikes.

The demons are repulsed when a man does good. Use that.
Blood is thicker than water, but motor oil is thicker yet...so, don't mess with my SOHC4, or I might have to hurt you.
Hondaman's creed: "Bikers are family. Treat them accordingly."

Link to Hondaman Ignition: http://forums.sohc4.net/index.php?topic=67543.0

Link to My CB750 Book: https://www.lulu.com/search?adult_audience_rating=00&page=1&pageSize=10&q=my+cb750+book

Link to website: www.SOHC4shop.com

Offline SOHC4 Cafe Racer Fan

  • Speak up, Whipper-Snapper! I'm a
  • Really Old Timer ...
  • *******
  • Posts: 15,552
  • SOHC/4 Member #1235
Dan's done a GREAT job of bringing this poor, abused 500 back to life. It looks better in real life than in the pix, and runs fine!
Y'all ought to see it someday, it's cool!
 :D

Heck yes! That's a unique re-spray of the tank and side covers.  I like how the inset brown flows from the tank to the covers.  Very 70's colors.
1975 CB550K1 "Blue" Stockish Restomod (http://forums.sohc4.net/index.php?topic=135005.0)
1975 CB550F1 frame/CB650 engine hybrid "The Hot Mess" (http://forums.sohc4.net/index.php/topic,150220.0.html)
2008 Triumph Thruxton (http://forums.sohc4.net/index.php/topic,190956.0.html)
2014 MV Agusta Brutale Dragster 800
2015 Yamaha FZ-09 (http://forums.sohc4.net/index.php/topic,186861.0.html)

"There are some things nobody needs in this world, and a bright-red, hunch-back, warp-speed 900cc cafe racer is one of them — but I want one anyway, and on some days I actually believe I need one.... Being shot out of a cannon will always be better than being squeezed out of a tube. That is why God made fast motorcycles, Bubba." Hunter S. Thompson, Song of the Sausage Creature, Cycle World, March 1995.  (http://www.latexnet.org/~csmith/sausage.html and https://magazine.cycleworld.com/article/1995/3/1/song-of-the-sausage-creature)

Sold/Emeritus
1973 CB750K2 "Bionic Mongrel" (http://forums.sohc4.net/index.php?topic=132734.0) - Sold
1977 CB750K7 "Nine Lives" Restomod (http://forums.sohc4.net/index.php?topic=50490.0) - Sold
2005 RVT1000RR RC51-SP2 "El Diablo" - Sold
2016+ Triumph Thruxton 1200 R (http://forums.sohc4.net/index.php/topic,170198.0.html) - Sold

Offline Desert Dan

  • Some might call me an
  • Enthusiast
  • **
  • Posts: 137
I had a great time at Mark's on Sunday, I am in totall awe with the depth of knowledge he has with all things motorcycles. He has a very impressive collection of vintage Hondas and I even got the privilege of seeing his famous 750k2. Mark gave me several pointers on the cb500 which I imediately put in to use when I got home. I was really pleased to learn the proper routing of the clutch cable so that it no longer hangs out freely and even has a better and smoother pull now. Mark noted when he gave the bike a once over my spark advance springs were worn and weak and advancing the ignition timing too early, He prescribed cutting off the end hooks and bending a new end on to the spring to compensate for the wear.
Here is what the un modified spring looks like

Here is the spring after being shortened one winding.


   This method was fairly easy and straight forward as the advance kicks in around 3000+ rpm as compared to the previous 2500-rpm. The only issue I ran into in doing this process to the advancer was it through my ignition timing way out of wack. It's most likely caused by a mixture of the shortened springs, an ill fitting points base plate, and the cheap diatchi points. I got the timing set correctly first statically timing the ignition then dynamically timing it. As it sits the main points plate is maxed out in adjustment and in order to get 2/3 timing correct I had to wallow out the sliding grooves in the 2/3 base a significant amount. The ignition is timed correctly now but Im not pleased with the compromises I had to make with the points plates, I ordered a used ignition off ebay that includes the spark advancer, points plates, points, condensers, and wiring all for ten dollars. I plan on mix and matching bits and pieces between my ignition and the used one I ordered until I can get my timing set with room on the plates to adjust further if needed later on. Ill be keeping my current spark advancer as when I had my engine apart I was able to confirm the advancer's TDC mark was right in line with the engine's true TDC.

Offline HondaMan

  • Someone took this pic of me before I became a
  • Really Old Timer ...
  • *******
  • Posts: 14,040
  • ...not my choice, I was nicknamed...
    • Getting 'em Back on the Road
If it pulled the timing toward the 2-3 (which is what it sounds like) then the inside of the points cam is also worn, or the shims at the base are long-lost (they were plastic) and the whole cam wobbles a little bit. I kinda suspected this when you mentioned having to "dial-in" the advancer back when you reassembled the engine, but I knew if this spring-shortening came out "way to the right" like this, the cam issue would show up. You can make new shims from sheet brass, if the ID of the points cam isn't torn up too badly - but, judging from the other problems you inherited with this bike, I would bet it was never lubed in its life, cauusing too much ID clearance now. :(

--but, you're no slouch in the wrench room! I know you can figure this one out.
;)
See SOHC4shop@gmail.com for info about the gadgets I make for these bikes.

The demons are repulsed when a man does good. Use that.
Blood is thicker than water, but motor oil is thicker yet...so, don't mess with my SOHC4, or I might have to hurt you.
Hondaman's creed: "Bikers are family. Treat them accordingly."

Link to Hondaman Ignition: http://forums.sohc4.net/index.php?topic=67543.0

Link to My CB750 Book: https://www.lulu.com/search?adult_audience_rating=00&page=1&pageSize=10&q=my+cb750+book

Link to website: www.SOHC4shop.com

Offline Desert Dan

  • Some might call me an
  • Enthusiast
  • **
  • Posts: 137
Thanks for the vote of confidence Mark, I would bet your'e right on the mark with the cam wobble. Ill compare and contrast my current advancer to the one Ill receive from ebay. If the ebayed advancer is good shape Ill just switch that one in, if not Ill just go ahead and make those brass shims. As far as the plastic shims you mention are those on the base of the advancer where the locating knob is or are they on the pivoting arms of the advance mechanism? On my advancer there are plastic caps on the inside of the pivot arms but the end of the mechanism that mates with the crank is just bare metal.

Offline HondaMan

  • Someone took this pic of me before I became a
  • Really Old Timer ...
  • *******
  • Posts: 14,040
  • ...not my choice, I was nicknamed...
    • Getting 'em Back on the Road
The shim are (were?) located on the bottom base pin, same diameter as the cam. They always had none, or 2 or more, because as soon as one is left, it munches it right up from movement. Most are gone these days. The Twins really suffer a lot from this, as they were styrene plastic and warped from being at the top of the engine, with predictable results!
 :(
See SOHC4shop@gmail.com for info about the gadgets I make for these bikes.

The demons are repulsed when a man does good. Use that.
Blood is thicker than water, but motor oil is thicker yet...so, don't mess with my SOHC4, or I might have to hurt you.
Hondaman's creed: "Bikers are family. Treat them accordingly."

Link to Hondaman Ignition: http://forums.sohc4.net/index.php?topic=67543.0

Link to My CB750 Book: https://www.lulu.com/search?adult_audience_rating=00&page=1&pageSize=10&q=my+cb750+book

Link to website: www.SOHC4shop.com

Offline Desert Dan

  • Some might call me an
  • Enthusiast
  • **
  • Posts: 137
Hmm thats a vexing development, one of the problems of diving in to an incomplete project is you never know about the small things you're missing until some one points them out to you. When I was modifying the advance springs I carefully inspected the "peg" on the bottom of the mechanism and the hole it is inserted into on the crank for wear and there was non visible to the naked eye. There didn't appear to be any wear on the base of the mechanism either as the machining marks are still clearly visible on the base, with that said there is a certain amount of wobble to the advancer cam when the bolt and slotted nut are not installed and holding it in place. 
 
Also Mark, I read through your entire build thread you did for your 750 in 2013, after which I did some searching on E-bay and came across this
http://www.ebay.com/itm/13-NOS-CB750-Valve-Guides-Sandcast-K0-K1-12027-300-330-12035-300-300-/251922470916?hash=item3aa7bfd804&vxp=mtr
It would appear to be early K0 K1 valve guides, which if I understood your explanation of 750 valve guides correctly means they are made of your highly prized stellite. There isn't much of a description the title just reads, "13 NOS CB750 Valve Guides Sandcast K0 K1 12027-300-330 12035-300-300". So I imagine there would have to be a bit of a discussion with the seller on whether or not they are stellite guides for the 750.
« Last Edit: May 05, 2015, 10:08:39 PM by Desert Dan »

Offline Desert Dan

  • Some might call me an
  • Enthusiast
  • **
  • Posts: 137
I managed to get a few test rides in today in between rain showers to see how the shortened advance springs worked, sadly they caused a flat spot in the 0 to 3000rpm range. This creates a bit of a wall where the engine doesn't develop enough power to accelerate the bike past 3000 rpms unless I coax it along with the clutch. Though on the bright side it does seem to make the engine run smoother from 4000 to 5000 which is where I do most of my riding. I think when I get the used 550 ignition Ill try swapping a shortened spring for a stock spring so I can keep the new found smoothness while losing the low rpm flatness.
   I also got the new air box boots from Germany so as soon as the new jets arrive Ill install those. I could only find #92 jets online, I would have preferred 96's or 94's to replace the 98's Im currently running so hopefully I don't go from too rich to too lean. If I end up on the lean side Ill either drop a needle position or take the 92's to this harley shop down the road from me and see if the guy there has some micro bits to drill them out to 94's or 96.
 There's a vintage bike get together going on tomorrow in Denver that I just learned of so Im going to try and ride the 500 to it. The flat spot shouldn't be an issue as it's easily overcome with the clutch but it has been raining off and on for the past week which would be the only thing preventing me from going. If I do make it Ill see if I can get any cool shots to share on here.

Offline HondaMan

  • Someone took this pic of me before I became a
  • Really Old Timer ...
  • *******
  • Posts: 14,040
  • ...not my choice, I was nicknamed...
    • Getting 'em Back on the Road
If the carbs are still running rich, the flat spot will be "stronger" with the cut-back springs because it is too much fuel to burn. Once you get that air filter and the mix right, you may well wish to 'revisit' this spring issue, as it will make a nice difference.

I wouldn't spend too much time and effort on those jets, either, until you get the air filter right-otherwise, you'll be right back on this 'page' again after all that work, once the engine can breathe easier.
;)
See SOHC4shop@gmail.com for info about the gadgets I make for these bikes.

The demons are repulsed when a man does good. Use that.
Blood is thicker than water, but motor oil is thicker yet...so, don't mess with my SOHC4, or I might have to hurt you.
Hondaman's creed: "Bikers are family. Treat them accordingly."

Link to Hondaman Ignition: http://forums.sohc4.net/index.php?topic=67543.0

Link to My CB750 Book: https://www.lulu.com/search?adult_audience_rating=00&page=1&pageSize=10&q=my+cb750+book

Link to website: www.SOHC4shop.com

Offline Desert Dan

  • Some might call me an
  • Enthusiast
  • **
  • Posts: 137
Mark your knowledge of the intricacies of the Honda motorcycle astound me, I re-jetted the carbs with the 92's and the flat spot seems to have disappeared. I didn't get a full test ride in as it rained all day today up in the mountains but I did take the bike up and down the driveway and I see any signs of the flat spot.
   Since it rained all day I was unable to go down to Denver to check  out the vintage bike "show", but I did get the new jets in from 4into1. I spent most of the afternoon re-jetting the carbs, putting on the new air box boots, and fixing a small fuel leak. The fuel leak was caused by a pooched o-ring on the 1-4 fuel T and would drip 1-2 drops of fuel a minute. I also took Mark's expert advice and ditched the unifoam air filter and made my own. I simply bought a circular paper Fram air filter and cut it down to size to fit in the unifoam's plastic box, altogether the modification cost me six dollars and I have enough filter element left over to replace the current filter once it gets used up. Hopefully there will be an hour or two of sunlight tomorrow to go on a proper test ride and see how today's tune up worked.

Offline HondaMan

  • Someone took this pic of me before I became a
  • Really Old Timer ...
  • *******
  • Posts: 14,040
  • ...not my choice, I was nicknamed...
    • Getting 'em Back on the Road
Mark your knowledge of the intricacies of the Honda motorcycle astound me, I re-jetted the carbs with the 92's and the flat spot seems to have disappeared. I didn't get a full test ride in as it rained all day today up in the mountains but I did take the bike up and down the driveway and I see any signs of the flat spot.
   Since it rained all day I was unable to go down to Denver to check  out the vintage bike "show", but I did get the new jets in from 4into1. I spent most of the afternoon re-jetting the carbs, putting on the new air box boots, and fixing a small fuel leak. The fuel leak was caused by a pooched o-ring on the 1-4 fuel T and would drip 1-2 drops of fuel a minute. I also took Mark's expert advice and ditched the unifoam air filter and made my own. I simply bought a circular paper Fram air filter and cut it down to size to fit in the unifoam's plastic box, altogether the modification cost me six dollars and I have enough filter element left over to replace the current filter once it gets used up. Hopefully there will be an hour or two of sunlight tomorrow to go on a proper test ride and see how today's tune up worked.


Great idea for the filter!
See SOHC4shop@gmail.com for info about the gadgets I make for these bikes.

The demons are repulsed when a man does good. Use that.
Blood is thicker than water, but motor oil is thicker yet...so, don't mess with my SOHC4, or I might have to hurt you.
Hondaman's creed: "Bikers are family. Treat them accordingly."

Link to Hondaman Ignition: http://forums.sohc4.net/index.php?topic=67543.0

Link to My CB750 Book: https://www.lulu.com/search?adult_audience_rating=00&page=1&pageSize=10&q=my+cb750+book

Link to website: www.SOHC4shop.com

Offline Desert Dan

  • Some might call me an
  • Enthusiast
  • **
  • Posts: 137
Since Ive been out of school for summer I have had plenty of time to work on the 500, I did a quick 6 mile test ride in between rain showers and Im really liking the 92 jets. In just 6 miles the spark plugs started turning a lovely tan color as the carbon residue from running rich is being burnt off and the black carbon deposits on top of the pistons is burning off revealing the gold colored powder coating I had done to them.
  After the test ride I received a package containing the used 550 ignition and advance mechanism so I used the rest of the rainy day fixing my ignition timing. I tried several combinations of springs on both the 500 advance and 550 advance but the 2/3 timing was still way off so I broke down both advances and rebuilt the 500 mechanism using parts from both. The 500 advance had remnants of old fossilized grease inside of it so after a thorough cleaning I gave everything a thorough greasing. I ended up using an extra shim from the 550 advance along with a shortened spring from the 550 and a shortened spring from the 500.
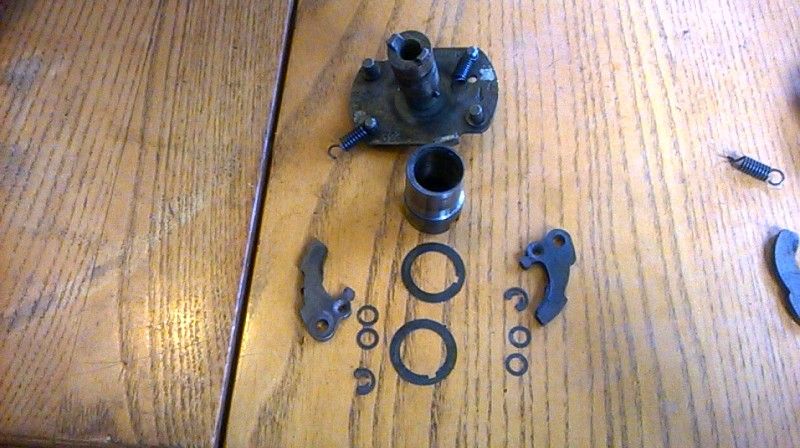
Here is the 500 advance disassembled

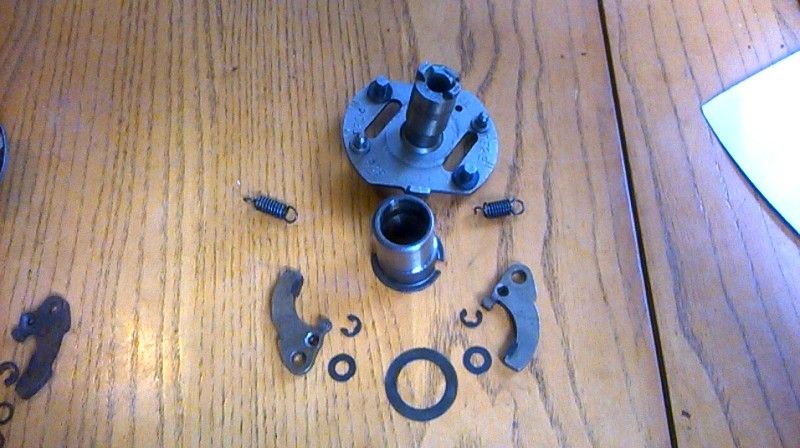
And here is the 550 advance disassembled

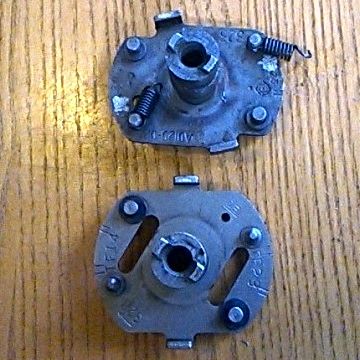
A comparison of both advance bases with the 550 on bottom

There were several differences between the 500 and 550 advance mechanisms, the 550 had larger swing arms, larger springs, a larger cam with a flared base, and it used 2 large brass shims per a swing arm. The 550 has a tab on the spindle to help locate the points cam, it also uses 3 small shims per a swing arm 1 on bottom 2 on top, and it is over all a bit smaller than the 550 mechanism.
Both mechanisms worked on the bike but I decided to use the 500 mechanism because i figure it's better to stay with the evil I know verses the evil I don't. There was what looked like a small bit of welding slag on the 500 mechanism base that I think contributed to the timing issues, it can be seen just off the spindle at the 4 o'clock position in the last picture before I filed it off. Now the timing has moved towards the 1/4 points bringing 2/3 just back in to correct timing. I believe if I added a plastic shim to the very base of the mechanism where it contacts the crank like Hondaman describes, it would bring the timing even closer to 1 and 4.

Offline riverfever

  • Master
  • *****
  • Posts: 1,769
Are you up in the Denver area Dan? Nice looking bike. I'm down closer to Colorado Springs but up high way 24 about 20 miles into the mountains and had a heck of a time getting my bike tuned for 9000' last summer.
http://forums.sohc4.net/index.php?topic=127186.0

"You wouldn't think that out here...a man could simply run clear...out of country but oh my...oh my...nothing but the light." -Ben Nichols

Offline HondaMan

  • Someone took this pic of me before I became a
  • Really Old Timer ...
  • *******
  • Posts: 14,040
  • ...not my choice, I was nicknamed...
    • Getting 'em Back on the Road
Are you up in the Denver area Dan? Nice looking bike. I'm down closer to Colorado Springs but up high way 24 about 20 miles into the mountains and had a heck of a time getting my bike tuned for 9000' last summer.

Yeah...above 7000 feet, you might wish to advance the timing a little bit, overall, or at the very least use the lowest octane you can find. On the 750, I grind the "stop ears" back a little bit (or bend them, if it is a Hitachi advancer, they are thinner metal) to let it have another 2-4 degrees top end advance. That helps "up there". When you come "down here" you can then just switch to more octane to keep it happy. Some have done this, but used little rubber O-rings on the "Stop ears" to back off the top-end timing a little when going to places like Kansas or Black Hills.
;)
See SOHC4shop@gmail.com for info about the gadgets I make for these bikes.

The demons are repulsed when a man does good. Use that.
Blood is thicker than water, but motor oil is thicker yet...so, don't mess with my SOHC4, or I might have to hurt you.
Hondaman's creed: "Bikers are family. Treat them accordingly."

Link to Hondaman Ignition: http://forums.sohc4.net/index.php?topic=67543.0

Link to My CB750 Book: https://www.lulu.com/search?adult_audience_rating=00&page=1&pageSize=10&q=my+cb750+book

Link to website: www.SOHC4shop.com

Offline riverfever

  • Master
  • *****
  • Posts: 1,769
Perhaps a silly question but, what did you use to cut that filter and, how did you ensure that everything was clean afterwards and nothing got sucked into the motor?
http://forums.sohc4.net/index.php?topic=127186.0

"You wouldn't think that out here...a man could simply run clear...out of country but oh my...oh my...nothing but the light." -Ben Nichols

Offline Desert Dan

  • Some might call me an
  • Enthusiast
  • **
  • Posts: 137
So Im still chasing my tail on these timing issues, I spent all day trying to even up 2/3 so that the plate isn't maxed out on adjustment. I left off the other day with 1/4 being properly adjusted with the plate being a bit left of center on it's range of travel while 2&3 were barely on their firing mark with it's plate being maxed out on adjustment. I made a brass shim to go underneath the advance mechanism but that didn't help in moving the timing at all, so I tried bending the ears that stop the swing arms to limit the advance to get a little more advance out of the mechanism. As it turns out this plate was not the type you can bend, I bent the ears a slight amount then when I went to test how far they advance s%#t hit the fan. I must have cracked the ears instead of bending them because the swing arms snapped the ears off right before snapping themselves off of the advance plate. The whole mechanism is now fubar'ed and whats worse when the mechanism self destructed it pooched the dowel hole on the end of the crank  >:( . Im kicking myself for making such a critical error and am currently shell shocked. I put the 550 advance back together and slapped it in there, now the timing is way off. 1/4 is now too advanced and I have to max out it's adjustment to get it near the firing mark while 2/3 is still retarded and maxed out to be near it's firing mark. I killed my budget again and ordered a used 500 advance off of Ebay and Im going to try and repair the crank's locating hole with some lead solder and clean it up a bit.

Offline HondaMan

  • Someone took this pic of me before I became a
  • Really Old Timer ...
  • *******
  • Posts: 14,040
  • ...not my choice, I was nicknamed...
    • Getting 'em Back on the Road
So Im still chasing my tail on these timing issues, I spent all day trying to even up 2/3 so that the plate isn't maxed out on adjustment. I left off the other day with 1/4 being properly adjusted with the plate being a bit left of center on it's range of travel while 2&3 were barely on their firing mark with it's plate being maxed out on adjustment. I made a brass shim to go underneath the advance mechanism but that didn't help in moving the timing at all, so I tried bending the ears that stop the swing arms to limit the advance to get a little more advance out of the mechanism. As it turns out this plate was not the type you can bend, I bent the ears a slight amount then when I went to test how far they advance s%#t hit the fan. I must have cracked the ears instead of bending them because the swing arms snapped the ears off right before snapping themselves off of the advance plate. The whole mechanism is now fubar'ed and whats worse when the mechanism self destructed it pooched the dowel hole on the end of the crank  >:( . Im kicking myself for making such a critical error and am currently shell shocked. I put the 550 advance back together and slapped it in there, now the timing is way off. 1/4 is now too advanced and I have to max out it's adjustment to get it near the firing mark while 2/3 is still retarded and maxed out to be near it's firing mark. I killed my budget again and ordered a used 500 advance off of Ebay and Im going to try and repair the crank's locating hole with some lead solder and clean it up a bit.

Ouch! And just in time for the foot of snow that is just starting. My basement just flooded, am taking a short break from pushing water around for a while...

I suspect the timing issues you're fighting are due more to the Daiichi points than the spark advancers. When you get the new one, maybe try this: set the timing to be on the "T" mark for the 1-4 side with a gap of .012", then stop the engine and slightly bend the ground arm of the points set away from the moving one for a .014" gap. Then see if you can get the 2-3 to time up a little closer.

The geometry of the Daiichi points is simply incorrect. Most of the ones I have installed are only working because the bike(s) also has my transistor Ignition aboard, which makes it insensitive to gap sizes (you can run as little as .008" or as much as .016" with this box connected).

There are more than a few of the crankshafts out there with brass bushings in those dowel holes, too...
:( 
See SOHC4shop@gmail.com for info about the gadgets I make for these bikes.

The demons are repulsed when a man does good. Use that.
Blood is thicker than water, but motor oil is thicker yet...so, don't mess with my SOHC4, or I might have to hurt you.
Hondaman's creed: "Bikers are family. Treat them accordingly."

Link to Hondaman Ignition: http://forums.sohc4.net/index.php?topic=67543.0

Link to My CB750 Book: https://www.lulu.com/search?adult_audience_rating=00&page=1&pageSize=10&q=my+cb750+book

Link to website: www.SOHC4shop.com

Offline Desert Dan

  • Some might call me an
  • Enthusiast
  • **
  • Posts: 137
So Im still chasing my tail on these timing issues, I spent all day trying to even up 2/3 so that the plate isn't maxed out on adjustment. I left off the other day with 1/4 being properly adjusted with the plate being a bit left of center on it's range of travel while 2&3 were barely on their firing mark with it's plate being maxed out on adjustment. I made a brass shim to go underneath the advance mechanism but that didn't help in moving the timing at all, so I tried bending the ears that stop the swing arms to limit the advance to get a little more advance out of the mechanism. As it turns out this plate was not the type you can bend, I bent the ears a slight amount then when I went to test how far they advance s%#t hit the fan. I must have cracked the ears instead of bending them because the swing arms snapped the ears off right before snapping themselves off of the advance plate. The whole mechanism is now fubar'ed and whats worse when the mechanism self destructed it pooched the dowel hole on the end of the crank  >:( . Im kicking myself for making such a critical error and am currently shell shocked. I put the 550 advance back together and slapped it in there, now the timing is way off. 1/4 is now too advanced and I have to max out it's adjustment to get it near the firing mark while 2/3 is still retarded and maxed out to be near it's firing mark. I killed my budget again and ordered a used 500 advance off of Ebay and Im going to try and repair the crank's locating hole with some lead solder and clean it up a bit.

Ouch! And just in time for the foot of snow that is just starting. My basement just flooded, am taking a short break from pushing water around for a while...

I suspect the timing issues you're fighting are due more to the Daiichi points than the spark advancers. When you get the new one, maybe try this: set the timing to be on the "T" mark for the 1-4 side with a gap of .012", then stop the engine and slightly bend the ground arm of the points set away from the moving one for a .014" gap. Then see if you can get the 2-3 to time up a little closer.

The geometry of the Daiichi points is simply incorrect. Most of the ones I have installed are only working because the bike(s) also has my transistor Ignition aboard, which makes it insensitive to gap sizes (you can run as little as .008" or as much as .016" with this box connected).

There are more than a few of the crankshafts out there with brass bushings in those dowel holes, too...
:(
Ill give that a try tomorrow once I get done shoveling all of this snow. The used 550 advance and ignition plate came with a 1/4 daiichi and a 2/3 of a different make, so I substituted it's 2/3 for the 2/3 daiitchi I was using as it was such a horrible fit. How would I go about getting a brass bushing put in to the end of the crank, would the whole engine have to be disassembled and taken to a machinist or would it be a process I could do myself without any special machinery?

Offline Desert Dan

  • Some might call me an
  • Enthusiast
  • **
  • Posts: 137
Ok I have had success with the timing, I spent all day monkeying with it and I have got it set correctly with extra adjustment room if need be. I started by measuring the runout of the advance mechanism spindle (points cam not installed) and I got these measurements (no shim behind advance .016in) (shim behind the advance .012in) I thought the run out was causing my timing issues so I spent a good while strategically sanding down sections of the brass shim I made until I got this measurement with the shim installed .006in. I reassembled everything and what I found was truing the mechanism made the timing worse so I removed the shim and viola timing came back to good adjustable levels. The next problem I had was the 550 advance did not have enough totall advance, so I ground down the stopper ears until I could achieve the proper full advance. Also I inspected the locating hole on the crank with a clear head and the damage is minimal to negligible as only the very outside of the hole got wallowed a bit, there is no play or wiggle when a pin is inserted in it. Now I have the timing set slightly advanced at idle with a little bit extra advance when fully advanced to help with the altitude. I also found a interesting quirk while tuning, since I am still using the stock 40 idle jets the bike runs rich at idle making it so when I idle the bike for long periods of time or several sessions of idling for a few minutes the air intake plenum behind the carbs fills up with fuel and overtime drains out the the vent tube with the foam filter on the end. I was pretty surprised when I found a small puddle of gas under the bike after it had not been run for a few hours with the fuel valve shut off.
Here is the brass shim I had made to "fix" the timing, and it's plastic template

And a few photos of my modified air filter if anyone is interested
« Last Edit: May 10, 2015, 08:59:32 PM by Desert Dan »