Author Topic: 1972 "CB525" Backyard Rescue  (Read 25856 times)

0 Members and 3 Guests are viewing this topic.

Offline wowbagger

  • Not much of an
  • Expert
  • ****
  • Posts: 853
Re: 1972 "CB525" Backyard Rescue
« Reply #50 on: January 12, 2016, 06:17:08 AM »
Taking a break from the wheels for a bit and working on cleaning the motor. After hours of scrubbing, it's ready for a soak in the sonic cleaner. Hopefully, I'll have the case halves powdered this week.


Offline calj737

  • Really Old Timer ...
  • *******
  • Posts: 21,070
  • I refuse...
Re: 1972 "CB525" Backyard Rescue
« Reply #51 on: January 12, 2016, 06:50:58 AM »
I saw that thread too. I don't believe that is the case for stock spokes or in all cases. Did you verify yours are indeed Whitworth?
'74 550 Build http://forums.sohc4.net/index.php?topic=126401.0
'73 500 Build http://forums.sohc4.net/index.php?topic=132935.0

"Of all tyrannies, a tyranny sincerely exercised for the good of it's victim may be the most oppressive. It may be better to live under robber barons than under omnipotent moral busybodies. The robber baron's cruelty may sometimes sleep, his cupidity may at some point be satiated, but those who torment us for our own good will torment us without end for they do so with the approval of their own conscience." - C.S. Lewis

Offline wowbagger

  • Not much of an
  • Expert
  • ****
  • Posts: 853
Re: 1972 "CB525" Backyard Rescue
« Reply #52 on: January 12, 2016, 06:52:28 AM »
Yeah, I used a thread pitch gauge and none of the metric or SAE matched. So, I'm assuming they are Whitworth.

Offline Godffery

  • Godffery's Garage
  • Expert
  • ****
  • Posts: 1,172
  • Wisdom brings a realization of how little we know.
    • Godffery's Garage hosted by VinMoto.org
Re: 1972 "CB525" Backyard Rescue
« Reply #53 on: January 12, 2016, 05:27:35 PM »
 Looks like your making some nice progress!

Offline wowbagger

  • Not much of an
  • Expert
  • ****
  • Posts: 853
Re: 1972 "CB525" Backyard Rescue
« Reply #54 on: January 12, 2016, 05:35:44 PM »

Looks like your making some nice progress!

Thanks! It's never as simple as it seems but I am making slow progress.

Sadly, the budget for this build doesn't support having you drill the rotor even though I know how awesome it would look.

Offline Godffery

  • Godffery's Garage
  • Expert
  • ****
  • Posts: 1,172
  • Wisdom brings a realization of how little we know.
    • Godffery's Garage hosted by VinMoto.org
Re: 1972 "CB525" Backyard Rescue
« Reply #55 on: January 13, 2016, 03:13:35 AM »
 Ha, Well I'll let it slide THIS TIME.   ; )
You know, it's not just looks with my Sweet Sweet Rotors.  They improve braking & handling by grabbing better, running cooler, with half the wight giving you less gyroscopic effect! AND there only $88 with your core exchange.
 Just saying.  :D   

 Okay, shameless self promotion over.

Offline wowbagger

  • Not much of an
  • Expert
  • ****
  • Posts: 853
Re: 1972 "CB525" Backyard Rescue
« Reply #56 on: January 13, 2016, 04:02:10 AM »
Oh, I know the benefits all too well. I have one on my other 500 and it it was a night and day improvement. 

Offline wowbagger

  • Not much of an
  • Expert
  • ****
  • Posts: 853
Re: 1972 "CB525" Backyard Rescue
« Reply #57 on: January 13, 2016, 07:52:14 AM »
Well, parts cleaning continues and I've stumbled upon yet another (albeit common) issue. The Clutch adjuster in the left side cover has cracked and is missing a significant check of the sleeve. This is almost certainly due to years of poor to no maintenance of the clutch mechanism. Amazingly, the clutch push rod is still in one piece and the ball bearing was still present and accounted for.

After spending most of my Tuesday hunting for a replacement clutch adjuster, I finally found a bike shop in Michigan that is sitting on a small hoard of brand new ones. $30 later, I have a shiny new adjuster on it's way. This of course, will promptly go into my blue CB500 and the used one from that will get moved to this bike.

For any other CB500 owners out there in need of this part, here's the details:

Honda part #: 22841-266-000 - Adjuster Clutch
Part #5 in the fiche
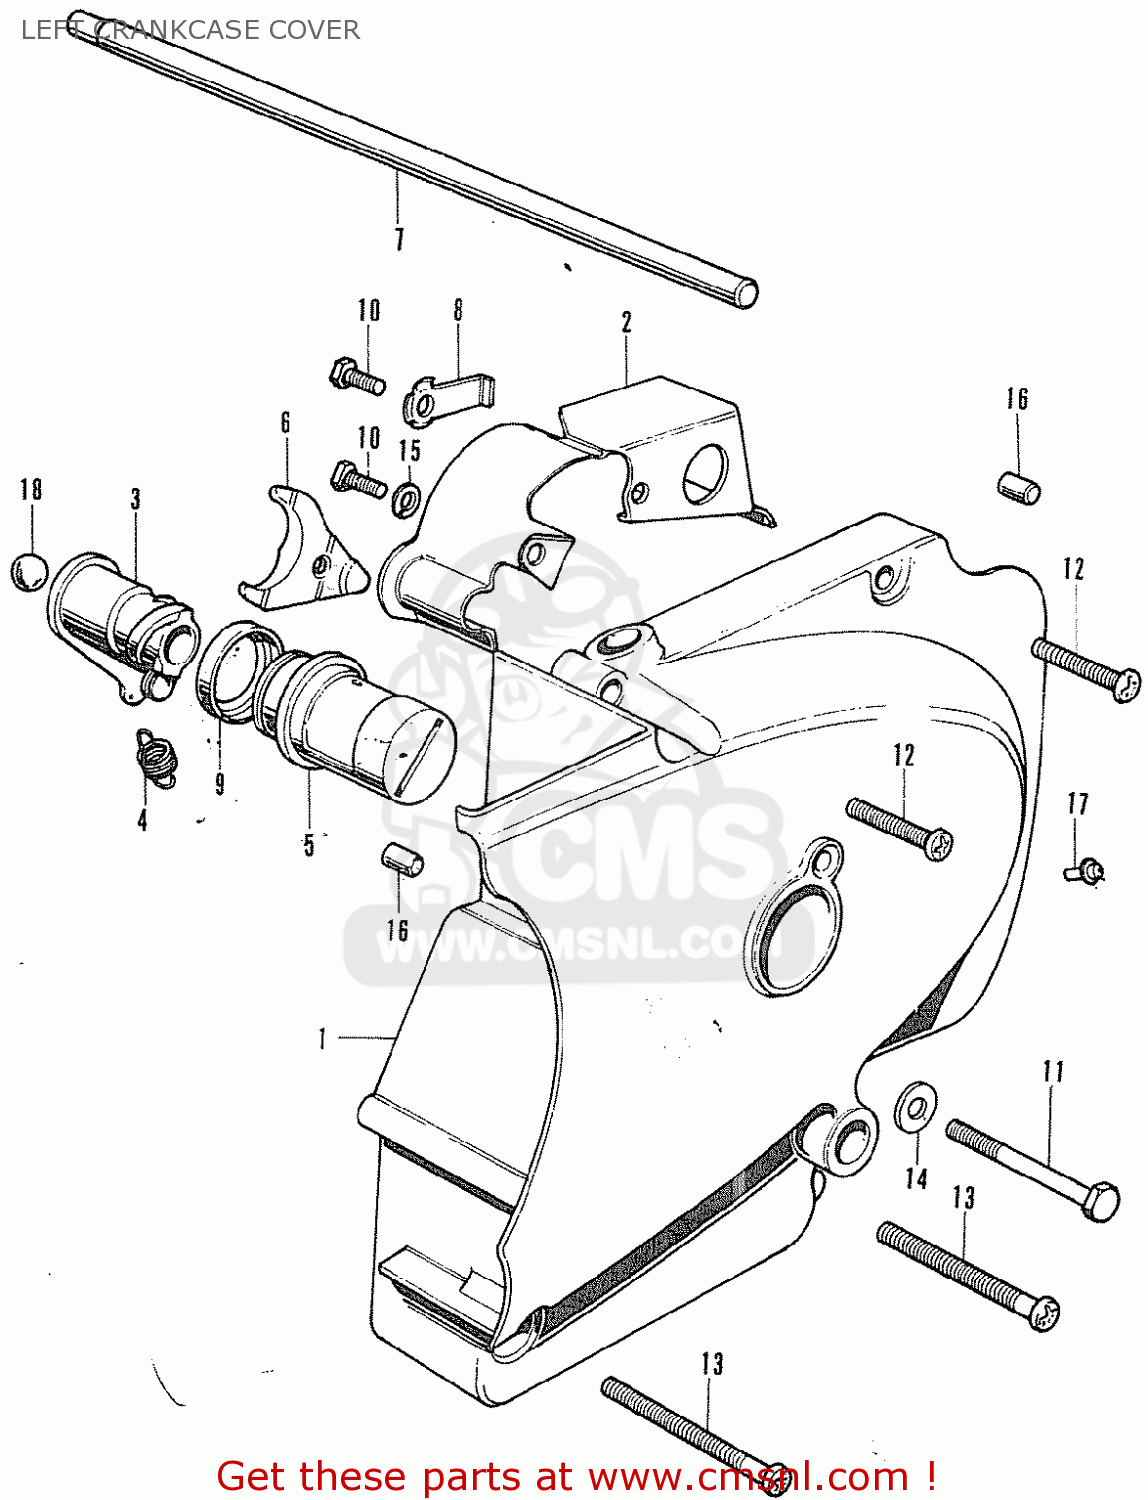

Available at College Bike Shop
1 (517) 484-6413
http://www.collegebikeshop.com/

There were 7 of these left after I ordered mine.

Offline Stev-o

  • Ain't no
  • Really Old Timer ...
  • *******
  • Posts: 34,399
  • Central Texas
Re: 1972 "CB525" Backyard Rescue
« Reply #58 on: January 14, 2016, 05:46:21 AM »
I can believe you found that part! If I had a 500, I'd be ordering one today. 
'74 "Big Bang" Honda 750K [836].....'76 Honda 550F.....K3 Park Racer!......and a Bomber!............plus plus plus.........

Offline wowbagger

  • Not much of an
  • Expert
  • ****
  • Posts: 853
Re: 1972 "CB525" Backyard Rescue
« Reply #59 on: January 14, 2016, 06:01:34 AM »
Yeah, I spent two months trying to find one for my first 500 build but only managed to get an apparently undamaged, used one.

Offline Stev-o

  • Ain't no
  • Really Old Timer ...
  • *******
  • Posts: 34,399
  • Central Texas
Re: 1972 "CB525" Backyard Rescue
« Reply #60 on: January 14, 2016, 06:40:19 AM »
but only managed to get an apparently undamaged, used one.

Same here
'74 "Big Bang" Honda 750K [836].....'76 Honda 550F.....K3 Park Racer!......and a Bomber!............plus plus plus.........

Offline wowbagger

  • Not much of an
  • Expert
  • ****
  • Posts: 853
Re: 1972 "CB525" Backyard Rescue
« Reply #61 on: January 19, 2016, 10:28:17 AM »
    I figured it was about time for me to write a "How To" on how I true spoked wheels after having completely disassembled and relaced them. Most methods I've seen are fairly imprecise and lend to the myth that wheel truing is some form of black magic. So here we go:

Tools You'll Need:

Optional But Highly Recommended "Tools"
  • Beer
  • Netflix or your preferred movie watching method
        - Note: Moosehead and Constantine may be switched for preferred beer and movie
       

Final Prep Work:
  • Mount the wheel on the stand making sure that the cones are firmly seated in the bearings. Then tighten the set screw on each cone. Ideally, the wheel should be on the stand in the same
        direction that it would be on the bike. So with the stand in front of you, the speedo drive side of the hub should be on your right. (or brake drum side if this was the rear wheel).
  • Clamp the vice grips to the axle shaft as close to the end of the shaft as possible without hitting the stand. This will ensure that only the wheel is
         moving. So that any variations in the shaft will not be picked up by the dial indicator.
         
  • Find your spoke groups.
        - A spoke group should be a set of spokes with an equal number of inside and outside spokes. The inside spokes pull on one side of the rim while
          the outside spokes pull on the other.
        - In this case, I am truing wheels off of a CB500. These are 40 spoke wheels. A set of 4 spokes will give me two inside and two outside spokes. 40
          spokes divided by 4 will give me 10 spoke groups.
        - We want to mark every other group 1 through 5. I like to start the first group immediately after the valve stem hole for easy reference
           
           
        - Now, mark the other 5 sets A through E. You should now have a wheel with all 10 groups of 4 spokes marked in the following patter:
           1-A-2-B-3-C-4-D-5-E
  • Prep the spoke tension for truing.
         - For all spokes in the 1 through 5 groups, tighten the spokes finger tight and then tighten them one full turn more.
         - For all spokes in the A through E groups, tighten the spokes finger tight and then loosen them at least one full turn. All the spokes in the
            A through E groups should rattle slightly.
         - We do this because we are going to start truing the wheel only using groups 1 through 5. We will then true A through E after the wheel is mostly
            trued. Loosening A through E will make sure that they do not interfere with truing 1 through 5
  • Now attach your dial gauge to the stand and set it to start truing the outside edge first. Make sure to preload some tension on the dial gauge
         so that it has sufficient room for the needle to move in and out. I normally set the dial gauge with the needle in the middle. Starting with the
         outside edge first will help keep the metal "Thing-A-Aa-Hoozit" from getting hung up later
       

Actually Truing The Wheel: Horizontally
  • Grab a piece of paper and label 5 columns named "1" through "5"
  • Rotate the wheel until the dial gauge is pointing at the middle of the center two spokes in group "1" and then set then zero out the dial gauge.
        (See previous photo)
  • Write a 0 in the "1" column on your paper
  • Rotate the wheel slowly until the dial gauge is pointing at the middle of the center two spokes in group "2" (skipping over group "A") and write down the reading for group two on your paper in the 2 column
  • Continue this process for groups 3,4, and 5 making sure to skip over groups B,C,D and E
  • Now we need to find the median of the wheel measurements as it currently is. Looking at my sheet, I see that only group 5 was in the positive while 2 though 4 were in the negatives. I'm calling
         group 2 my median since it is the closest to the median I can get.
         Note: The arrows on the first row are a visual reminder for me for which way the wheel is too far out of true. A left arrow indicates that section of wheel is too far left of the center line while a right
         arrow means too far right.
         
  • Now, set the dial gauge to the center of group 2 and zero out the gauge. Start a new row on your paper with a "0" in column 2
  • Remeasure groups 3,4,5 and 1 and note the measurements in the new row
  • Now were finally ready to start truing the wheel. For my wheel, I can see that groups 3 and 4 are too far left and groups 5 and 1 are too far right.
  • Starting with group 3, I tightened the two spokes on the right hand side of the rim 1/4 of a turn using the 6mm wrench. Then loosen the 2 spokes on the left hand side of the rim 1/4 of a turn.
         This now pulled that section of the rim to the right slightly. I then did the same for group 4 as it was also measuring in the negative.
  • For group 1, I tightened the two left hand spokes and loosened the two right hand spokes 1/4 turn. This moves that section of rim to the left.
  • It is best to only do 1/4 turns while truing so that you do not over tighten or loosen a section and throw the wheel further out. Also, as we are essentially treating each spoke group as a single
         spoke (with a single measurement), it is imperative that all 4 spokes in that group get tightened or loosened. If you tighten one side but do not loosen the other you will not get an accurate
         measurement.
  • I then took new measurements after making the adjustments and noted that my median had shifted again (row 4). I set my new median to group 5 and took new measurements (row 5). I then
         adjusted the spoke sets in the same manner as I explained above.
  • My median shifted yet again to group 3. I zeroed it out on group 3 and took measurements again (row 6).
  • I was finally able to maintain a steady median group with group 3. I tightened/loosened the other groups, remeasured (row 7), and repeated until I got all of the measurements as close to 0 as
         possible.
  • The guy that taught me this process always said to true the wheel within 20 thousandths of an inch. Within  .02" he claimed you could not feel the difference in normal street riding. So, I of
         course cut that in half and shoot for within .01" or 10 thousandths. My dial gauge has a couple of handy black markers that I set to +0.005 and -0.005 as a visual guide. Once I reached
         measurements within that range I called the wheel horizontally trued.
    NOTE: It is important to note that you may see groups A through E fall outside of that .01" range. At this point that is fine. We are still ignoring that those groups exist.

Actually Truing The Wheel: Vertically
  • It's time to move the dial gauge to measure the vertical runout of the wheel. This is where the metal "Thing-A-Aa-Hoozit" comes into play.
  • Unfortunately, I have no idea where I found that metal bit. It was lying around my shop from something. The important features, if you want to make one is that the center hole be large enough
         for the tip of the dial gauge to sit in without going all the way through. Also, the width of the metal piece should be narrower than the inside shoulders of your rim (where it dips down to the
         nipple heads). The toothpicks should get cut down so that they can ride on top of the rim shoulders without falling off or coming into contact with the lip of the rim.
  • Why the "Thing-A-Aa-Hoozit", you might ask. I use this because the inside of these old rims are often very pitted and uneven. The "Thing-A-Aa-Hoozit" give me a 4 point float the smooth out all
         of the variations in the rim and give me a more accurate reading. It also lets me measure from directly over the spoke heads rather than off to the side. Also, I get to name something
         "Thing-A-Aa-Hoozit"
  • Again, preload the gauge to about the middle. Position the "Thing-A-Aa-Hoozit" in the rim and set the tip of the gauge into the center hole.
       
  • Slowly rotate the wheel a full turn to make sure that your toothpicks are not going to fetch up on the rim and that your dial gauge does not move. Note the measurement on the gauge at the
         point you start. Rotate the wheel one full turn and verify that the reading is the same as before. This will ensure that the "Thing-A-Aa-Hoozit" is not throwing off the readings of the gauge
  • Start new columns labelled 1 through 5 on your paper.
  • Now set the gauge to point to the center of group 1, zero out the gauge and mark a zero in the "1" column on your paper
  • Measure groups 2,3,4, and 5 from the center point (making sure to skip groups A through E) and record the measurements
  • As with the truing process for the horizontal steps, find the median, set the gauge to that group, zero out the gauge again and remeasure.
  • I crossed out my first measurements because the dial indicator moved. I remeasured and then found my median (row 2) and then measured again (row 3)
       
  • For groups 1 and 2 the rim was too far from the hub (negative measurement). So, I tightened all 4 spokes 1/4 turn each in each group
  • For groups 3 and 4 the rim was too close the the hub (positive measurement). So, I tightened all 4 spokes 1/4 turn each in each group
  • After remeasuring, my median stayed put. So, I measured all groups again and adjusted again (row 4)
  • A few more rounds of that and I was dead on except for group 4. I had loosened these spokes to the point where they were barely finger tight. I made sure that the A through E groups were all
         still rattle-loose and not interfering. I have to assume that there is a bit of a flat spot in this old rim. Thankfully, I'm still within 0.01". So, I'll move on. I suspect that I'll be able to pull a bit of that
         flat spot out as I finish truing the wheel.

Rinse and Repeat
  • At this point, you have a wheel that is (or was) horizontally true at 5 points and vertically true at the same 5 points. You need to now switch back to the horizontal measurements and run through that whole process again. Most likely, vertically truing the wheel threw out the horizontal measurements.
  • Once the wheel is yet again horizontally true, you need to (you guessed it) double check for vertical trueness again. Follow the above steps to get groups 1 through 5 back into true.
  • Now....check for horizontal true again...and then vertical....and then horizontal...and then....well you get the idea
  • When the when measures true both horizontally without making any adjustments and then vertically without making any adjustments, you'll have a partially trued wheel.
  • Now we are ready to stop pretending that this is only a 20 spoke wheel. Go around the wheel and set all 4 spokes in groups A through E to finget tight. Now got back around and tighten the spokes in ONLY groups A through E one full turn. Do not touch any of the spokes in groups 1 through 5 or you will undo all of your hard work.
  • Start a new table on your paper with columns labelled "A-2-B-3-C-4-D-5-E-1".
  • Set your dial indicator to the center of group A for a horizontal measurement and zero it out. Now take measurements for all 10 groups.
  • As before, find your median, zero out the gauge on your median again and then remeasure all 10 groups
  • Follow the same procedure for the horizontal truing but make sure to measure and adjust all 10 spoke groups
  • Keep measuring and adjusting until all measurements are within 0.01". Then switch to measure vertically
  • Again, follow the vertical procedure, adjusting all 10 groups. Once all measurements are within 0.01", switch back to horizontal
  • Repeat the alternating adjustments until you can measure but horizontal and vertical without making adjustments and the runouts stay within 0.01"
  • CONGRATULATIONS! You have a trued wheel.......but there's on more steps

Torquing a Trued Wheel:
  • The last step is to torque each spoke so that the wheel will stay true without any of the spokes loosening and twisting the wheel.
  • Grab your trusty spoke torque wrench with a 6mm head on it
  • Put a piece of tape on the first spoke immediately after the valve stem hole. This will be your visual indicator to let you know you've tightened each spoke.
  • Tighten that first spoke that you just marked with tape ONLY 1/4 turn.
  • Now, count 3 spokes. The 3rd spoke should now be on the opposite side of the rim as the 1st one you tightened. Tighten that 3rd spoke 1/4 turn.
         
  • Now, count 3 more and tighten 1/4 turn making sure that each spoke you tighten is on the opposite side of the rim from the last one you tightened.
  • You will notice that it will take more than one rotation of the wheel before you get back to the spoke you started with. The wheel should now still be true and 1/4 turn closer to being torqued.
        Feel free to whip out your trusty dial gauge to verify but that's not necessary
  • Go around again tightening every 3rd spoke 1/4 turn starting with the 1st spoke you marked.
  • When you reach the first spoke that is torqued (you'll hear/feel the CLICK), mark it with something different than the marker for your 1st spoke
  • Continue around, tightening every 3rd spoke 1/4 turn and marking each spoke that is torqued. Do not skip spokes that are marked as torqued so that you do not throw off your pattern.
        Also, tightening other spokes may have thrown the torque off on the marked spokes.
  • Continue around and around, 1/4 turn on every 3rd spoke until all 40 spokes are marked as torqued.
  • Go around one last time and verify that all spokes are properly torqued
  • Check horizontal and vertical runout one last time with the dial gauge
  • If you are the unfortunate sound that has gotten the wheel out of true, go back to the truing steps and return the wheel. Then retorque the wheel all over again
  • You should now have a completely trued and torqued wheel! Sit back, have a beer (if you have any left) and finish your movie (or your 5th movie depending on how long this look)

Now........go back to the top and do the other wheel  ;D ;D ;D ;D ;D ;D[/list]
« Last Edit: May 13, 2016, 08:21:05 AM by wowbagger »

Offline Stev-o

  • Ain't no
  • Really Old Timer ...
  • *******
  • Posts: 34,399
  • Central Texas
Re: 1972 "CB525" Backyard Rescue
« Reply #62 on: January 19, 2016, 04:45:10 PM »
Nice write up  The Moose is Loose!
'74 "Big Bang" Honda 750K [836].....'76 Honda 550F.....K3 Park Racer!......and a Bomber!............plus plus plus.........

Offline wowbagger

  • Not much of an
  • Expert
  • ****
  • Posts: 853
Re: 1972 "CB525" Backyard Rescue
« Reply #63 on: February 01, 2016, 12:51:47 PM »
The powdering continues. After hours and hours of taping, the case halves are done. I also finished off a box of odds and ends including the redone rear spokes and the engine case bolts. I'll start reassembling the lower case just as soon as I can locate my Hondabond tube.  :(


Offline SOHC4 Cafe Racer Fan

  • Speak up, Whipper-Snapper! I'm a
  • Really Old Timer ...
  • *******
  • Posts: 15,733
  • SOHC/4 Member #1235
Re: 1972 "CB525" Backyard Rescue
« Reply #64 on: February 01, 2016, 01:00:38 PM »
Very pretty.  It's probably a trick of the light, but your cases look high-gloss black while your other parts look satin black.
1975 CB550K1 "Blue" Stockish Restomod (http://forums.sohc4.net/index.php?topic=135005.0)
1975 CB550F1 frame/CB650 engine hybrid "The Hot Mess" (http://forums.sohc4.net/index.php/topic,150220.0.html)
2008 Triumph Thruxton (http://forums.sohc4.net/index.php/topic,190956.0.html)
2014 MV Agusta Brutale Dragster 800
2015 Yamaha FZ-09 (http://forums.sohc4.net/index.php/topic,186861.0.html)

"There are some things nobody needs in this world, and a bright-red, hunch-back, warp-speed 900cc cafe racer is one of them — but I want one anyway, and on some days I actually believe I need one.... Being shot out of a cannon will always be better than being squeezed out of a tube. That is why God made fast motorcycles, Bubba." Hunter S. Thompson, Song of the Sausage Creature, Cycle World, March 1995.  (http://www.latexnet.org/~csmith/sausage.html and https://magazine.cycleworld.com/article/1995/3/1/song-of-the-sausage-creature)

Sold/Emeritus
1973 CB750K2 "Bionic Mongrel" (http://forums.sohc4.net/index.php?topic=132734.0) - Sold
1977 CB750K7 "Nine Lives" Restomod (http://forums.sohc4.net/index.php?topic=50490.0) - Sold
2005 RVT1000RR RC51-SP2 "El Diablo" - Sold
2016+ Triumph Thruxton 1200 R (http://forums.sohc4.net/index.php/topic,170198.0.html) - Sold

Offline wowbagger

  • Not much of an
  • Expert
  • ****
  • Posts: 853
Re: 1972 "CB525" Backyard Rescue
« Reply #65 on: February 01, 2016, 01:06:16 PM »
Yeah, this powder is funny stuff. When it comes out of the oven it's really glossy. It doesn't turn satin until the part is completely cooled. The case top was still warm when I took that photo.

Offline wowbagger

  • Not much of an
  • Expert
  • ****
  • Posts: 853
Re: 1972 "CB525" Backyard Rescue
« Reply #66 on: February 01, 2016, 01:07:06 PM »
Also, my camera is crap

Offline Stev-o

  • Ain't no
  • Really Old Timer ...
  • *******
  • Posts: 34,399
  • Central Texas
Re: 1972 "CB525" Backyard Rescue
« Reply #67 on: February 01, 2016, 03:07:09 PM »
Nice!  Love fresh powder.
'74 "Big Bang" Honda 750K [836].....'76 Honda 550F.....K3 Park Racer!......and a Bomber!............plus plus plus.........

Offline wowbagger

  • Not much of an
  • Expert
  • ****
  • Posts: 853
Re: 1972 "CB525" Backyard Rescue
« Reply #68 on: February 10, 2016, 07:25:11 AM »
I got some more done. Crankcase is back together and I had the idea inspired idea to just put it back into the frame without the top end. That was, by far, the easiest time I've had putting one of these engines in on my own. There is plenty of room to finish the top end assembly with it in the frame and I'll finally have a bike where the down tubes aren't scraped up where the exhaust studs hit them as I wrestled the entire engine in.


Next on the list is to finish truing the wheels and powdering the shocks to make this thing a roller again.

Offline sbeckman7

  • Glutton For Punishment And/Or
  • Hot Shot
  • ***
  • Posts: 304
  • Slow and steady
Re: 1972 "CB525" Backyard Rescue
« Reply #69 on: February 10, 2016, 05:56:00 PM »
Looking great so far man!  I know how you feel with those whoops moments with the spokes and such ;)  Like every other CB in existence, I also bought mine with cracked upper triples.  What exactly is this mystical "D-Washer" that prevents this from happening?

Spence

Offline wowbagger

  • Not much of an
  • Expert
  • ****
  • Posts: 853
Re: 1972 "CB525" Backyard Rescue
« Reply #70 on: February 10, 2016, 06:02:21 PM »
It's part #9 in this fiche:
http://www.cmsnl.com/honda-cb500-four-k0-general-export_model14652/partslist/F03.html#results

It's slightly thicker than a standard washer and has a flat side to allow the fork tube to pass by. It entire function is to keep you from over tightening then bolts.

Offline wowbagger

  • Not much of an
  • Expert
  • ****
  • Posts: 853
Re: 1972 "CB525" Backyard Rescue
« Reply #71 on: February 11, 2016, 08:44:12 AM »
I started reassembling the top bride and bars last night but noticed an error had occurred. Other than my sloppy adhesive application, the indicator jewels went and got themselves mixed up. I blame the moose that was assisting me.


After a bit of pick work and a soak in some Goo-Gone...


I got it all put back together correctly this time. I'm still working on the faceplate to clean off the extra adhesive. For the record, I do not recommend Seal-All when re-adhering the indicator jewels and dash plate.

Offline SOHC4 Cafe Racer Fan

  • Speak up, Whipper-Snapper! I'm a
  • Really Old Timer ...
  • *******
  • Posts: 15,733
  • SOHC/4 Member #1235
Re: 1972 "CB525" Backyard Rescue
« Reply #72 on: February 11, 2016, 09:09:58 AM »
That swapped order would play tricks with your head.
1975 CB550K1 "Blue" Stockish Restomod (http://forums.sohc4.net/index.php?topic=135005.0)
1975 CB550F1 frame/CB650 engine hybrid "The Hot Mess" (http://forums.sohc4.net/index.php/topic,150220.0.html)
2008 Triumph Thruxton (http://forums.sohc4.net/index.php/topic,190956.0.html)
2014 MV Agusta Brutale Dragster 800
2015 Yamaha FZ-09 (http://forums.sohc4.net/index.php/topic,186861.0.html)

"There are some things nobody needs in this world, and a bright-red, hunch-back, warp-speed 900cc cafe racer is one of them — but I want one anyway, and on some days I actually believe I need one.... Being shot out of a cannon will always be better than being squeezed out of a tube. That is why God made fast motorcycles, Bubba." Hunter S. Thompson, Song of the Sausage Creature, Cycle World, March 1995.  (http://www.latexnet.org/~csmith/sausage.html and https://magazine.cycleworld.com/article/1995/3/1/song-of-the-sausage-creature)

Sold/Emeritus
1973 CB750K2 "Bionic Mongrel" (http://forums.sohc4.net/index.php?topic=132734.0) - Sold
1977 CB750K7 "Nine Lives" Restomod (http://forums.sohc4.net/index.php?topic=50490.0) - Sold
2005 RVT1000RR RC51-SP2 "El Diablo" - Sold
2016+ Triumph Thruxton 1200 R (http://forums.sohc4.net/index.php/topic,170198.0.html) - Sold

Offline wowbagger

  • Not much of an
  • Expert
  • ****
  • Posts: 853
Re: 1972 "CB525" Backyard Rescue
« Reply #73 on: February 11, 2016, 09:15:44 AM »
Yeah, I can just imagine the confusion that a blinking green would cause while driving down the road.

Offline grcamna2

  • Not a
  • Really Old Timer ...
  • *******
  • Posts: 15,208
  • I love to restore & travel. Keep'em Going Strong !
Re: 1972 "CB525" Backyard Rescue
« Reply #74 on: February 11, 2016, 10:45:59 AM »
How did that dial ind. w/ Flexible stand from HF work for you? Does the flexible stand lock in place well once you set it up ? and was it worth the $ ?
75' CB400F/'bunch o' parts' & 81' CB125S modded to a 'CB200S'
  I love the small ones too !
Do your BEST...nobody can take that away from you.